Boot time optimization Training Practical Labs - June 4, 2019
←
→
Page content transcription
If your browser does not render page correctly, please read the page content below
Boot time optimization Training

        Practical Labs

       https://bootlin.com

           June 4, 2019
Boot time optimization Training
About this document
Updates to this document can be found on https://bootlin.com/doc/training/{}/.
This document was generated from LaTeX sources found on https://github.com/bootlin/
training-materials.
More details about our training sessions can be found on https://bootlin.com/training.
Copying this document
© 2004-2019, Bootlin, https://bootlin.com.
This document is released under the terms of the Creative Commons CC BY-SA
3.0 license . This means that you are free to download, distribute and even modify
it, under certain conditions.
Corrections, suggestions, contributions and translations are welcome!
2 © 2004-2019 Bootlin, CC BY-SA licenseBoot time optimization Training
Goals
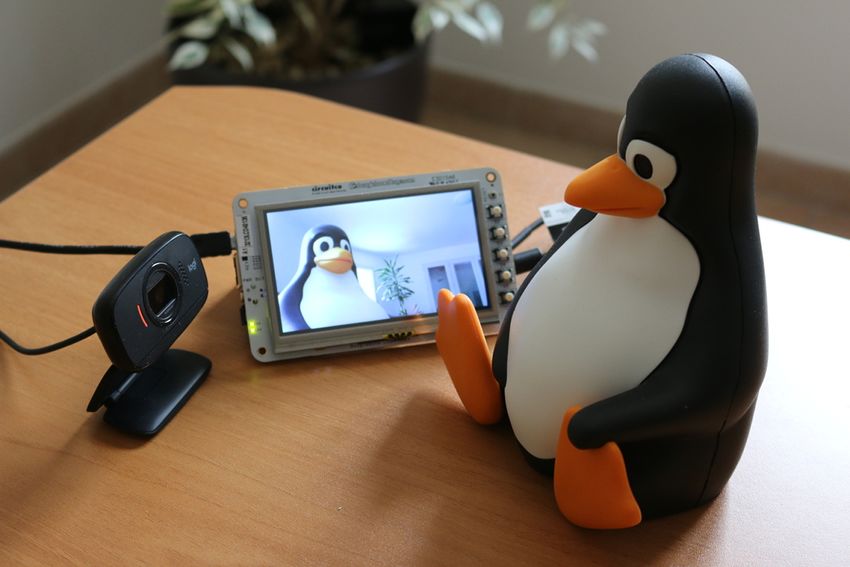
Implement a live camera system and optimize its boot time.
Here’s a description of the system that we are going to build and optimize in terms of boot time:
Hardware:
• Main board: Beagle Bone Black (Regular or Wireless), with an ARM Cortex A8 SoC
(AM335x from Texas Instruments).
• Extended by a 4 inch LCD cape
• Connected to a USB webcam
Software:
• Bootloader: U-Boot
• Operating system: Linux
• User space: ffmpeg video player
• Build system: Buildroot
• Functionality: as soon as the system has booted, display the video from the USB webcam.
© 2004-2019 Bootlin, CC BY-SA license 3Boot time optimization Training
Training setup
Download files and directories used in practical labs
Install lab data
For the different labs in this course, your instructor has prepared a set of data (kernel images,
kernel configurations, root filesystems and more). Download and extract its tarball from a
terminal:
cd
wget https://bootlin.com/doc/training/boot-time/-labs.tar.xz
tar xvf -labs.tar.xz
Lab data are now available in an -labs directory in your home directory. For each lab there is
a directory containing various data. This directory will also be used as working space for each
lab, so that the files that you produce during each lab are kept separate.
You are now ready to start the real practical labs!
Install extra packages
Feel free to install other packages you may need for your development environment. In particular,
we recommend to install your favorite text editor and configure it to your taste. The favorite
text editors of embedded Linux developers are of course Vim and Emacs, but there are also
plenty of other possibilities, such as GEdit, Qt Creator, CodeBlocks, Geany, etc.
It is worth mentioning that by default, Ubuntu comes with a very limited version of the vi
editor. So if you would like to use vi, we recommend to use the more featureful version by
installing the vim package.
More guidelines
Can be useful throughout any of the labs
• Read instructions and tips carefully. Lots of people make mistakes or waste time because
they missed an explanation or a guideline.
• Always read error messages carefully, in particular the first one which is issued. Some
people stumble on very simple errors just because they specified a wrong file path and
didn’t pay enough attention to the corresponding error message.
• Never stay stuck with a strange problem more than 5 minutes. Show your problem to
your colleagues or to the instructor.
• You should only use the root user for operations that require super-user privileges, such
as: mounting a file system, loading a kernel module, changing file ownership, configuring
the network. Most regular tasks (such as downloading, extracting sources, compiling...)
can be done as a regular user.
4 © 2004-2019 Bootlin, CC BY-SA licenseBoot time optimization Training
• If you ran commands from a root shell by mistake, your regular user may no longer be
able to handle the corresponding generated files. In this case, use the chown -R command
to give the new files back to your regular user.
Example: chown -R myuser.myuser linux/
© 2004-2019 Bootlin, CC BY-SA license 5Boot time optimization Training Downloading bootloader, kernel and Buildroot source code Save time and start fetching the source code that you will need during these labs Installing git packages We are going to access bootloader, kernel and Buildroot sources through their git repositories, which will allow us to track any changes that we make to the source code of these projects. Depending on how fast your network connection is (and how many users share it), fetching such sources is likely to take a significant amount of time. That’s why we’re starting such downloads now. So, let’s install the below packages: sudo apt install git gitk git-email Git configuration After installing git on a new machine, the first thing to do is to let git know about your name and e-mail address: git config --global user.name ’My Name’ git config --global user.email me@mydomain.net Such information will be stored in commits. It is important to configure it properly in case we need to generate and send patches. Cloning the Buildroot source tree Go to the $HOME/boot-time-labs/rootfs directory. git clone git://git.buildroot.net/buildroot or if you are behind a proxy blocking git, here’s a slower alternative: git clone https://git.buildroot.net/buildroot If the connection to the Internet turns out to be not fast enough, your instructor can give you a USB flash drive with a tar archive of a recently cloned tree: tar xf buildroot-git.tar.xz cd buildroot git checkout master git pull We will select a particular release tag later. Let’s move on to the next source repository. 6 © 2004-2019 Bootlin, CC BY-SA license
Boot time optimization Training

Cloning the U-Boot source tree
Go to the $HOME/boot-time-labs/bootloader directory.
git clone git://git.denx.de/u-boot.git
or
git clone https://git.denx.de/u-boot.git
Similarly, your instructor can give you a pre-downloaded archive if needed.

Cloning the mainline Linux tree
Go to the $HOME/boot-time-labs/kernel directory.
This represents the biggest amount of sources to download, actually more than 1 GB of data!
Again, you can use a pre-downloaded archive if that turns out to be to much for your actual
connection.
git clone git://git.kernel.org/pub/scm/linux/kernel/git/torvalds/linux.git
or
git clone https://git.kernel.org/pub/scm/linux/kernel/git/torvalds/linux.git

Accessing stable Linux releases
Stay in the Linux source directory.
Having the Linux kernel development sources is great, but when you are creating products, you
prefer to avoid working with a target that moves every day.
That’s why we need to use the stable releases of the Linux kernel.
Fortunately, with git, you won’t have to clone an entire source tree again. All you need to do is
add a reference to a remote tree, and fetch only the commits which are specific to that remote
tree.
git remote add stable git://git.kernel.org/pub/scm/linux/kernel/git/stable/linux-stable.git
git fetch stable

As this still represents many git objects to download (253 MiB when 4.19 was the latest version),
if you are using an already downloaded git tree, your instructor will probably have fetched the
stable branch ahead of time for you too. You can check by running:
git branch -a
We will choose a particular stable version in the next labs.
Now, let’s continue the lectures. This will leave time for the commands that you typed to
complete their execution (if needed).

© 2004-2019 Bootlin, CC BY-SA license                                                            7
Boot time optimization Training

Board setup
Objective: setup communication with the board and configure the
bootloader.

After this lab, you will be able to:

    • Access the board through its serial line.

    • Check the stock bootloader

    • Attach the LCD4 cape

Getting familiar with the board
Take some time to read about the board features and connectors:

    • If you have the original BeagleBone Black: http://www.elinux.org/Beagleboard:BeagleBoneBlack

    • If you have the newer BeagleBone Black Wireless: https://beagleboard.org/black-
      wireless in addition to the above URL.

Don’t hesitate to share your questions with the instructor.

Download technical documentation
We are going to download documents which we will need during our practical labs.

The main document to download is the BeagleBone Black System Reference Manual found at
https://github.com/CircuitCo/BeagleBone-Black/blob/master/BBB_SRM.pdf?raw=true.

Even if you have the BeagleBoneBlack Wireless board, this is the ultimate reference about the
board, in particular for the pinout and possible configurations of the P8 and P9 headers, and
more generally for most devices which are the same in both boards. You don’t have to start
reading this document now but you will need it during the practical labs.

Setting up serial communication with the board
The Beaglebone serial connector is exported on the 6 pins close to one of the 48 pins headers.
Using your special USB to Serial adapter provided by your instructor, connect the ground wire
(blue) to the pin closest to the power supply connector (let’s call it pin 1), and the TX (red) and
RX (green) wires to the pins 4 (board RX) and 5 (board TX)1 .

You always should make sure that you connect the TX pin of the cable to the RX pin of the board,
and vice versa, whatever the board and cables that you use.
  1 See https://www.olimex.com/Products/Components/Cables/USB-Serial-Cable/USB-Serial-Cable-F/ for details

about the USB to Serial adapter that we are using.

8                                                            © 2004-2019 Bootlin, CC BY-SA license
Boot time optimization Training Once the USB to Serial connector is plugged in, a new serial port should appear: /dev/ttyUSB0. You can also see this device appear by looking at the output of dmesg. To communicate with the board through the serial port, install a serial communication program, such as picocom: sudo apt install picocom If you run ls -l /dev/ttyUSB0, you can also see that only root and users belonging to the dialout group have read and write access to this file. Therefore, you need to add your user to the dialout group: sudo adduser $USER dialout Important: for the group change to be effective, in Ubuntu 18.04, you have to completely reboot the system 2 . A workaround is to run newgrp dialout, but it is not global. You have to run it in each terminal. Now, you can run picocom -b 115200 /dev/ttyUSB0, to start serial communication on /dev/ ttyUSB0, with a baudrate of 115200. If you wish to exit picocom, press [Ctrl][a] followed by [Ctrl][x]. There should be nothing on the serial line so far, as the board is not powered up yet. It is now time to power up your board by plugging in the mini-USB (BeagleBone Black case) or micro-USB (BeagleBone Black Wireless case) cable supplied by your instructor (with your PC or a USB power supply at the other end of the cable). See what messages you get on the serial line. You should see U-boot start on the serial line. Bootloader interaction Reset your board. Press the space bar in the picocom terminal to stop the U-boot countdown. You should then see the U-Boot prompt: => This step was just to check that the serial line was connected properly. In a later lab, we will replace the existing bootloader by a version that we compiled ourselves. 2 As explained on https://askubuntu.com/questions/1045993/after-adding-a-group-logoutlogin-is-not- enough-in-18-04/. © 2004-2019 Bootlin, CC BY-SA license 9
Boot time optimization Training

Attach the LCD cape
Switch off the board first, by pressing the POWER button until all the LEDs go off3 .
Now that we have successfully tested serial console, we are ready to attach the LCD4 cape
provided by your instructor.
Note that if you bought your own Beagle Bone Black board, you will have to gently bend the
serial headers using pliers, otherwise the serial cable won’t fit between the board and the cape.
There are two ways to connect the cape headers to the Bone Black headers, but only one actually
fits, the POWER button of the cape sliding right between the board’s RJ45 connector and power
barrel connector:

You will find the schematics of the LCD4 cape in the ~/boot-time-labs/hardware/ directory.
This will be useful to know that header pins remain free to use.

   3 That’s strongly recommended by the board maker, to avoid hardware damage that can happen if the board

is abruptly switched off.

10                                                           © 2004-2019 Bootlin, CC BY-SA license
Boot time optimization Training

Build the system
Objective: compile the root filesystem.

After this lab, you will have a ready to use root filesystem to boot your system with, including
a video player application.
We haven’t compiled the bootloader and kernel for our board yet, but since this part can take
a long time (especially compiling the cross-compiling toolchain), let’s start it now, while we are
still fetching kernel sources or going through lectures.

Setup
As specified in the Buildroot manual4 , Buildroot requires a few packages to be installed on your
machine. Let’s install them using Ubuntu’s package manager:
sudo apt install sed make binutils gcc g++ bash patch \
  gzip bzip2 perl tar cpio python unzip rsync wget libncurses-dev

Choosing a Buildroot release
Buildroot is one of the best tools for building a custom root filesystem for a dedicated embedded
system with a fixed set of features, typically like the one we’re trying to build.
Go to the /code /boot-time-labs/rootfs/buildroot/ directory.
We will use the latest revision of the 2019.02 release, which is one of Buildroot’s long term
releases:
git tag | grep 2019.02
git checkout 2019.02.2

Configuring Buildroot
To minimize external dependencies and maximize flexibility, we will ask Buildroot to generate
its own toolchain. This can be better than using external toolchains, as we have the ability to
tweak toolchain settings in a fine way if needed.
Start the Buildroot configuration utility:
make menuconfig
  • Target Options menu
        – Target Architecture: select ARM (little endian)
        – Target Architecture Variant: select cortex-A8
        – On ARM two Application Binary Interfaces are available: EABI and EABIhf. Unless
          you have backward compatibility concerns with pre-built binaries, EABIhf is more
  4 https://buildroot.org/downloads/manual/manual.html#requirement-mandatory

© 2004-2019 Bootlin, CC BY-SA license                                                           11
Boot time optimization Training
efficient, so make this choice as the Target ABI (which should already be the default
anyway).
– The other parameters can be left to their default value: ELF is the only available
Target Binary Format, VFPv3-D16 is a sane default for the Floating Point Unit, and
using the ARM instruction set is also a good default (we could use the Thumb-2 instruc-
tion set for slightly more compact code).
• As we wish to make Buildroot compile its own toolchain as as we will compile the kernel
and bootloader separately, for the moment, we can keep the default build, toolchain and
system settings.
• Target packages menu
– In Audio and video applications, select ffmpeg and add the below options:
∗ Select Build libswscale
• For the moment, all the remaining default settings are fine for us.
However, we need to do one thing to customize the root filesystem: we need to add a script that
will automatically start the ffmpeg video player.
To do so, we will use Buildroot’s Root filesystem overlay capability, which allows to drop ready-
made files into the final root filesystem archive5 .
To begin with, let’s start by creating a specific directory to store our Buildroot customizations
for our project.
mkdir board/beaglecam
And in this directory, let’s create a directory for root filesystem overlays:
mkdir board/beaglecam/rootfs-overlay
Now, let’s copy a script that we’re providing you to etc/init.d:
mkdir -p board/beaglecam/rootfs-overlay/etc/init.d/
cp ~/boot-time-labs/rootfs/data/S50playvideo board/beaglecam/rootfs-overlay/etc/init.d/
We can now run make menuconfig again and in System configuration, add board/beaglecam/
rootfs-overlay to Root filesystem overlay directories.
Running Buildroot
We are now ready to execute Buildroot:
make
Enjoy, and be patient, as building a cross-compiling toolchain takes time!
5 See https://buildroot.org/downloads/manual/manual.html#customize for details.
12 © 2004-2019 Bootlin, CC BY-SA licenseBoot time optimization Training Build the bootloader Objective: compile and install the bootloader. After this lab, you will be able to compile U-Boot for your target platform and run it from a micro SD card provided by your instructor. Setup Go to the ~/boot-time-labs/bootloader/u-boot/ directory. Let’s use the 2019.01 version: git checkout v2019.01 Compiling environment If the previous Buildroot lab is already over, we can use the toolchain it built to compile our bootloader and kernel: export PATH=/home//boot-time-labs/rootfs/buildroot/output/host/bin:$PATH export CROSS_COMPILE=arm-buildroot-linux-uclibcgnueabihf- Otherwise, let’s take a cross-compiling toolchain provided by Ubuntu: sudo apt install gcc-arm-linux-gnueabihf export CROSS_COMPILE=arm-linux-gnueabihf- You will need the same settings when you compile the kernel too, and when you recompiling U-Boot and the kernel to optimize them. Let’s make such settings permanent by adding the below lines at the end of your ~/.bashrc file: export PATH=/home//boot-time-labs/rootfs/buildroot/output/host/bin:$PATH export CROSS_COMPILE=arm-buildroot-linux-uclibcgnueabihf- Configuring U-Boot Let’s use a ready-made U-Boot configuration for the Beaglebone Black board (you can find such configuration files in the configs/ directory: make am335x_boneblack_defconfig Compiling U-Boot Just run: make or, to compile faster: make -j 8 © 2004-2019 Bootlin, CC BY-SA license 13
Boot time optimization Training

This runs 8 compiler jobs in parallel (for example if you have 4 CPU cores on your workstation...
using more jobs than cores guarantees that the CPUs and I/Os are always fully loaded, for
optimum performance.

At the end, you have MLO and u-boot.img files that we will put on a micro SD card for booting.

Prepare the SD card
Our SD card needs to be split in two partitions:

     • A first partition for the bootloader. It needs to comply with the requirements of the
       AM335x SoC so that it can find the bootloader in this partition. It should be a FAT32
       partition. We will store the bootloader (MLO and u-boot.img), the kernel image (zImage),
       the Device Tree (am335x-boneblack.dtb) and a special U-Boot script for the boot.

     • A second partition for the root filesystem. It can use whichever filesystem type you want,
       but for our system, we’ll use ext4.

First, let’s identify under what name your SD card is identified in your system: look at the
output of cat /proc/partitions and find your SD card. In general, if you use the internal SD
card reader of a laptop, it will be mmcblk0, while if you use an external USB SD card reader, it
will be sdX (i.esdb, sdc, etc.). Be careful: /dev/sda is generally the hard drive of your
machine!

If your SD card is /dev/mmcblk0, then the partitions inside the SD card are named /dev/
mmcblk0p1, /dev/mmcblk0p2, etc. If your SD card is /dev/sdc, then the partitions inside are
named /dev/sdc1, /dev/sdc2, etc.

To format your SD card, do the following steps:

     1. Unmount all partitions of your SD card (they are generally automatically mounted by
        Ubuntu)

     2. Erase the beginning of the SD card to ensure that the existing partitions are not going to
        be mistakenly detected:
        sudo dd if=/dev/zero of=/dev/mmcblk0 bs=1M count=16. Use sdc or sdb instead of mmcblk0
        if needed.

     3. Create the two partitions.

          • Start the cfdisk tool for that:
            sudo cfdisk /dev/mmcblk0.

          • Chose the dos partition table type

          • Create a first small partition (128 MB), primary, with type e (W95 FAT16) and mark
            it bootable

          • Create a second partition, also primary, with the rest of the available space, with
            type 83 (Linux).

          • Exit cfdisk

     4. Format the first partition as a FAT32 filesystem:
        sudo mkfs.vfat -F 32 -n boot /dev/mmcblk0p1. Use sdc1 or sdb1 instead of mmcblk0p1
        if needed.

14                                                      © 2004-2019 Bootlin, CC BY-SA license
Boot time optimization Training
5. Format the second partition as an ext4 filesystem:
sudo mkfs.ext4 -L rootfs -E nodiscard /dev/mmcblk0p2. Use sdc2 or sdb2 instead of
mmcblk0p2 if needed.
• -L assigns a volume name to the partition
• -E nodiscard disables bad block discarding. While this should be a useful option for
cards with bad blocks, skipping this step saves long minutes in SD cards.
Remove the SD card and insert it again, the two partitions should be mounted automatically,
in /media//boot and /media//rootfs.
Booting your new bootloader
On a board in a normal state, there should be a bootloader on the on-board MMC (eMMC)
storage, and this will prevent you from using a bootloader on an external SD card (unless you
hold the USER button while powering up your board, which is just suitable for exceptional needs).
Therefore, to override this behavior and use the external SD card, instead, let’s wipe out the
MLO file on the eMMC.
Power up or reset your board, and in the U-Boot prompt, run:
fatls mmc 1
You should see the MLO file in the list of files. Let’s remove it by issuing the below command
(erasing the first 1MiB on the eMMC):
mmc dev 1
mmc erase 0 100000
You can now see that fatls mmc 1 no longer sees any file.
If your board doesn’t boot at all, please fix it first using our instructions on https://raw.
githubusercontent.com/bootlin/training-materials/master/lab-data/common/bootloader/
beaglebone-black/README.txt.
Now, copy your newly compiled MLO and u-boot.img files to the SD card’s boot partition, and
after cleanly unmounting this partition, insert the SD card into the board and reset it.
You should now see your board booting with your own MLO and U-Boot binaries (the versions
and compiled dates are shown in the console).
© 2004-2019 Bootlin, CC BY-SA license 15Boot time optimization Training Build the kernel and boot the sys- tem Objective: configure, compile and install the kernel, install the root file system and see the full system in action! At the end of the lab, you’ll have your system completely up and running. Setup Go to the ~/boot-time-labs/kernel/linux/ directory. First, let’s get the list of branches on our stable remote tree: git branch -a As we will do our labs with the Linux 5.1 stable branch, the remote branch we are interested in is remotes/stable/linux-5.1.y. First, open the Makefile file just to check the Linux kernel version that you currently have. Now, let’s create a local branch starting from that remote branch: git checkout -b 5.1-beaglecam stable/linux-5.1.y This local branch will allow us to keep our modifications to the Linux kernel to support the LCD4 cape that we’re using. Open Makefile again and make sure you now have a 5.1.y version. Compiling environment You need the same PATH and CROSS_COMPILE environment variables as when you compiled U- Boot, plus the ARCH one that corresponds to the target architecture. So, add the below line at the end of your ~/.bashrc file: export ARCH=arm Now source this file (source ~/.bashrc) in the current terminal, or start a new terminal to get all needed variables. Adding support for the LCD4 cape To support using the LCD4 cape, all we need to do is declare and configure the devices on this cape. This is typically done by customizing the board’s Device Tree or by adding a Device Tree Overlay. So, to avoid messing with the standard DTS for our board, let’s use a such a customized device tree through a separate file: 16 © 2004-2019 Bootlin, CC BY-SA license
Boot time optimization Training

cp ~/boot-time-labs/kernel/data/am335x-boneblack-lcd4.dts arch/arm/boot/dts/
You now have to modify arch/arm/boot/dts/Makefile so that the new DTS file gets compiled
too.
There is another thing you need to do to make the Linux framebuffer work on the LCD display,
avoiding conflicts with HDMI:
Open arch/arm/boot/dts/am335x-boneblack-common.dtsi and remove:
  • The port subnode under the lcdc node.
  • The ports subnode under the tda19988 node.

Configuring the Linux kernel
First, lets pick the default kernel configuration for boards with a TI OMAP or AMxxxx SoC:
make help | grep omap
What we need is the configuration for OMAP2 and later SoCs:
make omap2plus_defconfig
Let’s run make menuconfig or make xconfig and select the below options. Use the search ca-
pability of such configuration interfaces to find the corresponding parameters (remove CONFIG_
when you search.
To enable support for the framebuffer and the PWM backlight:
  • CONFIG_PWM_TIEHRPWM=y
  • CONFIG_FB_SIMPLE=y
  • CONFIG_BACKLIGHT_PWM=y
  • CONFIG_DRM=y
  • CONFIG_DRM_TILCDC=y
  • CONFIG_DRM_TI_TFP410=y
For USB support:
  • CONFIG_USB=y
  • CONFIG_USB_MUSB_HDRC=y
  • CONFIG_USB_MUSB_DSPS=y
  • CONFIG_MUSB_PIO_ONLY=y
  • CONFIG_USB_GADGET=y
  • CONFIG_NOP_USB_XCEIV=y
  • CONFIG_AM335X_PHY_USB=y
  • CONFIG_USB_GPIO_VBUS=y
  • CONFIG_USB_GADGET_VBUS_DRAW=500
  • CONFIG_USB_CONFIGFS_F_UVC=y
For the webcam

© 2004-2019 Bootlin, CC BY-SA license                                                      17
Boot time optimization Training

     • CONFIG_MEDIA_SUPPORT=y
     • CONFIG_MEDIA_USB_SUPPORT=y
     • CONFIG_USB_VIDEO_CLASS=y
For your convenience, of if you screen up your settings in a later lab, you can also use a reference
configuration file found in boot-time-labs/kernel/data.

Compiling the kernel
To compile the device tree, just run:
make dtbs
To compile the kernel, just run:
make -j 8 zImage
Note that the default make target would have worked too, but with just zImage, we avoid
compiling many modules that are configured in the default configuration. This saves quite a lot
of time!
At the end, copy the kernel binary and DTB to the SD card’s boot partition:
cp arch/arm/boot/zImage /media/$USER/boot/
cp arch/arm/boot/dts/am335x-boneblack-lcd4.dtb /media/$USER/boot/dtb

Installing the root filesystem
We are also ready to install the root filesystem. Still with the SD card connected to your
workstation:
cd ~/boot-time-labs/rootfs
mkdir rootfs
cd rootfs
tar xf ../buildroot/output/images/rootfs.tar
sudo rsync -aH --delete ./ /media/$USER/rootfs/
sudo umount /media/$USER/rootfs
sudo umount /media/$USER/boot
Then insert the SD card in the board’s slot.

Bootloader configuration
Back to the serial console for your board, let’s define the default boot sequence, to load the
kernel and DTB from the external SD card:
setenv bootcmd 'fatload mmc 0:1 81000000 zImage; fatload mmc 0:1 82000000 dtb; bootz 81000000 - 82000000'
The last thing to do is to define the kernel command line:
setenv bootcmd 'fatload mmc 0:1 81000000 zImage; fatload mmc 0:1 82000000 dtb; bootz 81000000 - 82000000'
setenv bootargs console=ttyO0,115200n8 root=/dev/mmcblk0p2 rootwait
     • rootwait waits for the root device to be ready before attempting to mount it. You may
       have a kernel panic otherwise.
Last but not least, save your changes:

18                                                       © 2004-2019 Bootlin, CC BY-SA license
Boot time optimization Training saveenv Testing time! First, connect the USB webcam provided by your instructor, and point it to an interesting direction ;) Then, reset your board or power it on, and see it work as expected. If you don’t get what you expected, check your serial console for errors, and if you’re stuck, show your system to your instructor. © 2004-2019 Bootlin, CC BY-SA license 19
Boot time optimization Training

Measure boot time - Software so-
lution
Objective: measure boot time with software only solutions

During this lab, we will use techniques to measure boot time using only software solutions.

Timing messages on the serial console
Let’s use grabserial to time all the messages received in the serial console, from the first stage
bootloader to launching the final application.
A prerequisite is to install the python-serial package:
sudo apt install python-serial
Then download the grabserial executable from https://github.com/tbird20d/grabserial:
wget https://raw.githubusercontent.com/tbird20d/grabserial/master/grabserial
sudo mv grabserial /usr/local/bin
sudo chmod a+rx /usr/local/bin/grabserial
We are now ready to time the messages in the serial console. First, exit from Picocom ([Ctrl]
[a] [Ctrl][x]). Then, power off your board, remove its USB power supply and run:
grabserial -d /dev/ttyUSB0 -t -e 30
     • -t Displays the time when the first character of each line was received.
     • -e Specifies the end time when grabserial will exit.
Now, insert the USB power cable and see the console messages with their timing information:
[0.000001    0.000001]
[0.000235    0.000234]   U-Boot SPL 2019.01 (May 17 2019 - 05:15:21 +0200)
[0.058954    0.058719]   Trying to boot from MMC1
[0.128419    0.069465]   Loading Environment from FAT... *** Warning - bad CRC, using default environment
[0.153105    0.024686]
[0.169676    0.016571]   Loading Environment from MMC... OK
[0.523465    0.353789]
[0.523647    0.000182]
[0.523722    0.000075]   U-Boot 2019.01 (May 17 2019 - 05:15:21 +0200)
...
As you can see, the time to start U-Boot SPL can be neglected. We can the U-Boot SPL string
as a reference point for timing. This way, we don’t have to power off the board every time we
wish to make a measurement. Resetting the board will be sufficient.
So, let’s run grabserial again:
grabserial -d /dev/ttyUSB0 -m "U-Boot SPL" -t -e 30

20                                                      © 2004-2019 Bootlin, CC BY-SA license
Boot time optimization Training Timing the execution of the application Bootlin prepared a patch to ffmpeg to issue a message in its logs after decoding and displaying the first frame. Let’s instruct Buildroot to apply it! mkdir -p board/beaglecam/patches/ffmpeg/ cp ../data/0001-ffmpeg-*.patch board/beaglecam/patches/ffmpeg/ Then, tell Buildroot to look for patches in this directory, by adding board/beaglecam/patches to the BR2_GLOBAL_PATCH_DIR configuration setting (through make menuconfig or by directly editing the .config file. Then, rebuild ffmpeg: make ffmpeg-dirclean make Note that make ffmpeg-rebuild wouldn’t be sufficient to apply a newly added patch. Let’s add something else before updating the root filesystem image... Timing the launching of the application To measure the time the application takes to load and execute, it’s also very useful to time the instant when the application is started. So, let’s also modify board/beaglecam/rootfs-overlay/etc/init.d/S50playvideo to add the below line before running ffmpeg: echo "Starting ffmpeg" Now we can update the root filesystem image: make After reflashing the SD card, reset the board and check that you are getting the new message. You can now measure the time between starting ffmpeg and finishing processing the first frame. Thanks to the last message, we can now stop grabserial when it’s received, replacing the -e argument: grabserial -d /dev/ttyUSB0 -m "U-Boot SPL" -t -e 30 -q "First frame decoded" Initial measurements Now, take your calculator and fill the below table with the results from your experiments: Step Duration Description U-Boot SPL Between U-Boot SPL 2019.01 and U-Boot 2019.01 U-Boot Between U-Boot 2019.01 and Starting kernel Kernel Between Starting kernel and Run /sbin/init Init scripts Between Run /sbin/init and Starting ffmpeg Application Between Starting ffmpeg and First frame decoded Total © 2004-2019 Bootlin, CC BY-SA license 21
Boot time optimization Training

Measure boot time - Hardware so-
lution
Objective: measure boot time with hardware

During this lab, we will use a hardware technique to measure boot time, from cold boot (or
reset) to the instant when the first frame has been decoded.

Arduino setup
Take the Arduino Nano board provided by your instructor. Connect it in the middle of the
breadboard provided too, so that you can connect wires to both sides of the Arduino.
Download the 1.8.9 version of the Arduino IDE from https://www.arduino.cc/ (don’t use the
Arduino package in Ubuntu 18.04, as it has issues connecting to the serial port, even with
root privileges, while the official version works without any problem). Extract the archive in
/usr/local/.
Use the provided USB cable to connect the Arduino to your PC, and start the IDE:
/usr/local/arduino-1.8.9/arduino
Now, configure the IDE for your Arduino:
     • In Tools, Board, select Arduino Nano
     • In Tools, Processor, select ATmega328p (or ATmega328p old bootloader if you have a
       Nano clone)
     • In Tools, Port, select ttyUSB1 (or ttyUSB0 if the serial line for your Bone Black board is
       no longer connected.
Now are now ready to use your Arduino board:
     • Go to Examples, 01. Basics and select Blink. This program allows to blink the LED on
       the Nano.
     • Press the Upload butter and you should see the sketch work (that’s how the Arduino
       community call their programs).
     • You can now unplug the Arduino and plug it back. The same program will be started
       automatically. Loading a program is just necessary once.

7-segment display setup
We are going to use a 7-segment display to display time elapsed since the last time the Beagle
Bone Black board was last reset.
Take the TM1637 module provided by your instructor, and insert its pins into the breadboard
at a convenient location.

22                                                      © 2004-2019 Bootlin, CC BY-SA license
Boot time optimization Training Now, using breadboard wires, connect the GND pin of the Arduino to one of the blue rails of the breadboard, then to the GND pin of the 7-segment module. Please use blue or black wires! Similarly, connect the 5V pin of the Arduino to the red rail of the breadboard, then to the 5V pin of the module. Using red or orange wires is recommended too. Then, you can connect the Arduino D2 pin to the CLK pin of the module, and the D3 pin to the DIO pin of the module: Now, let’s test your wiring by loading the sketch in ~/boot-time-labs/arduino/test-7segment/. Upload and try to run it. Oops, a library is missing. You could have retrieved it through the IDE’s library manager (Tools, Manage Libraries), but in this case, we absolutely need its latest version. So, go to https://github.com/Seeed-Studio/Grove_4Digital_Display, download a zip file and extract this archive into ~/Arduino/libraries/. Rename Grove_4Digital_Display-master to Grove_ 4Digital_Display (removing the -master suffix added by GitHub, and you should be ready to go. Configuring Bone Black pins as GPIOs Our goal is to measure boot time with the Arduino system, in a way that is as accurate as hardware can be, and without having to rely on a slow device which is the serial console. Finding a good start signal A first possibility would be to watch the 3.3V VDD pins of the Bone Black board and start counting when they go high when the board is powered on. However, it would be cumbersome to have to power off the board each time we wish to make a measurement. A second possibility is to watch the state of the RESET signal. When this pin goes from high to low, and back to high, it means that the board starts booting. That’s a good time to start counting, and doing it after each reset is a convenient solution. Look at the Bone Black System Reference and find which pin on the P8 or P9 headers is used to expose the SYS_RESET line. © 2004-2019 Bootlin, CC BY-SA license 23
Boot time optimization Training

Finding a free pin for the stop signal

Look at the schematics for the LCD4 cape. Unfortunately, no reference manual was ever pub-
lished for this cape. However, the schematics are sufficient to find pins that are not used by the
LCD4 cape.

If you look for Bootlin in the Device Tree Source we provided, you can see in the pin definitions
sections that we selected pin 13 or the P9 headers:

// Bootlin: use idle pin as custom GPIO
0x074 (PIN_OUTPUT | MUX_MODE7) /* P9_13: uart4_txd_txd.gpio0_31 */

If you look at the Expansion Header P9 Pinout table in the Board’s Reference Manual, you will
see that MODE7 allows to get GPIO number 31 on P9’s pin 13.

Back to the pin for SYS_RESET, there is nothing to configure to get it. It’s the only line connected
to the pin.

Wiring these pins

We are going the good old wire wrapping technique as shown by the instructor to hook up to
pins we want to monitor, with a reliable connection, but without any soldering.

So, take out the LCD4 cape, find which of its header pins are connected to the Bone Black pins
we want to monitor, and then use the wire and tool provided by the instructor to connect to
these pins, because re-attaching the LCD4 cape.

On the other end of the cables, your instructor will also give you small headers that you can
plug into the breadboard holes and do some wiring wrapping on them too.

Pull up or pull down?

We need to control the state of the pins we watch when they are not driven.

For the SYS_RESET signal, we are lucky that the ATmega328p CPU pins can be configured as
pull-down, so we just need to configure them in software without having to use our own resistors.

For our custom GPIO pin, there only one choice becase we cannot use pull-up. If we used our
own resistor, we would have a 5V voltage level coming from the Arduino, and the Beagle Bone
Black is not 5V tolerant, as explicited in its manual. Therefore, pull-down is our only option.
As a consequence, as the Arduino just supports pull-down for pins, we will have to use our own
pull-down resistors.

Then which Arduino pins to connect to? As the Beagle Bone Black board has a 3.3V voltage
level, it’s best to use the Arduino’s Analog pins to measure the voltage driven by the Bone
Black with precision. We will measure a small integer value for 0V, and about 700 (out of a
1024 maximum) for 3.3V.

So, let’s use Arduino pin A0 for reset, and pin A1 for the custom GPIO, adding a 1 Kohm
pull-down resistor provided by your instructor:

24                                                       © 2004-2019 Bootlin, CC BY-SA license
Boot time optimization Training

Making ffmpeg drive the custom GPIO
Once we know how to modify ffmpeg to write to its output after processing the first frame, it’s
easy to add code that configures our custom GPIO line and drives it.
So, modify your Buildroot customizations so that you use the patch in boot-time-labs/rootfs/
data/0001-ffmpeg-first-frame-completion-log-and-gpio.patc instead of the previously used
one (look at what it does!).
Rebuild and reflash your root filesystem.

Final version of the Arduino program
We should now be able to test our full system. Loading the sketch in ~/boot-time-labs/
arduino/stopwatch/. Upload and run it.
If things don’t work as expected, you can also open the Arduino Serial Monitor (in the Tools
menu), and read the pins values that displayed there by the program.
Once the system works, is it in line with the software measurements? Is it slightly more pes-
simistic as it’s supposed to start counting time a few cycles earlier?

© 2004-2019 Bootlin, CC BY-SA license                                                       25
Boot time optimization Training

Toolchain optimization
Get the best cross-compiling toolchain for your application and sys-
tem

The goal of this lab is to find the best toolchain for your application, in terms of performance
and code size. Smaller code can be faster to load, and save time when using in an initramfs
(when the whole filesystem is loaded at once in RAM).
In this lab, we will see how to test an alternative toolchain, measuring:
     • Application execution time
     • Application and total filesystem size

Measuring application execution time
At this stage, measuring the total system boot time is not accurate enough. We need to time
the execution of the application more precisely.
Hence, we will call the ffmpeg player directly from the command line and temporarily apply a
patch that will make ffmpeg exit after processing the first frame.
To achieve this:
     • Temporarily replace the 0001-ffmpeg-log-notification-after-first-frame.patch patch
       by 0001-ffmpeg-exit-after-first-frame.patch found in ~/boot-time-labs/rootfs/data/.
     • Edit the S50playvideo script to comment out the line starting ffmpeg automatically.
Now, rebuild the root filesystem:
make ffmpeg-dirclean
make
Let’s measure the total root filesystem size and the size of the ffmpeg executable:
ls -l output/images/rootfs.tar
tar tvf output/images/rootfs.tar ./usr/bin/ffmpeg
make
Write these two numbers in the first row of the below table:
                             Total rootfs size   /usr/bin/ffmpeg size
 ARM toolchain
 Thumb2 toolchain
 Difference (percentage)
Reflash the root filesystem on the SD card and reboot your board. On the serial console, log in
and run the video player through the time command (copying and pasting the command from
these instructions or from the /etc/init.d/S50playvideo file:
time ffmpeg -f video4linux2 -video_size 544x288 -input_format mjpeg \
-i /dev/video0 -pix_fmt rgb565le -f fbdev /dev/fb0

26                                                       © 2004-2019 Bootlin, CC BY-SA license
Boot time optimization Training
Note that we removed -t 10. It’s no longer needed to stop after 10 seconds as we stop after
decoding the first frame.
Write down your first results in the below table (total1, user1 and sys1 columns):
total1 user1 sys1 total2 user2 sys2 total3 user3 sys3
ARM toolchain
Thumb2 toolchain
After the first run, the program and its shared libraries are now in the file cache. Lets run the
command two more times and write down (in the 2 and 3 columns) how fast it can run in this
ideal case.
Switching to a Thumb2 toolchain
Now, let’s modify the Buildroot toolchain, so that it generates Thumb2 code (instead of ARM)
by default.
Before we switch, let’s make a backup of the buildroot directory, in case results are disappoint-
ing and we wish to revert the changes without having to go through a full build again. In our
particular case, we will start the next lab using this backup, waiting for the new build to be
complete.
In case you didn’t know, a time and disk space efficient way to do this is by using the cp -al
command, which uses hard links instead of making new copies of each file:
cd ..
cp -al buildroot buildroot-arm
You can then check that the files correspond to the same inode:
ls -i buildroot/Makefile buildroot-arm/Makefile
Back to the buildroot directory, run make menuconfig, and in Target options, set ARM instruction
set to Thumb2.
Save the changes and run the full toolchain and root filesystem build again:
make clean
make
This is probably going to run for at least 30 minutes. In the meantime, start working on the
next lab.
When the build is over:
• Measure the new root filesystem archive and ffmpeg executable size, write it down in the
table, and compute the difference percentages vs. the ARM code.
• Update the SD card with the new filesystem, run the same time measurements, and write
down the results to compare them with the ARM ones.
So, was it a good choice to switch to Thumb2? Where there any size and performance benefits?
Don’t hesitate to show your results to your instructor.
© 2004-2019 Bootlin, CC BY-SA license 27Boot time optimization Training
Generate a Buildroot SDK
With Buildroot, it’s frequent to need to run make clean and thus make a full rebuild, typically
after configuration changes. As you’ve seen, such rebuilds are expensive with our Buildroot
configuration that builds the toolchain too.
Now that we have finalized our toolchain, let’s have Buildroot generate an SDK that we won’t
have to build from scratch every time we need a full rebuild.
make sdk
cd ~/boot-time-labs/rootfs
tar xf buildroot/output/images/arm-buildroot-linux-uclibcgnueabihf_sdk-buildroot.tar.gz
cd arm-buildroot-linux-uclibcgnueabihf_sdk-buildroot
./relocate-sdk.sh
Let’s then configure Buildroot to use this new toolchain:
cd ../buildroot/
make menuconfig
In the Toolchain menu:
• Set Toolchain type to External toolchain
• Set Toolchain to Custom toolchain
• Set Toolchain origin to Pre-installed toolchain
• Set Toolchain path to /home//boot-time-labs/rootfs/arm-buildroot-linux-uclibcgnueabihf_
sdk-buildroot
• Set External toolchain kernel headers series to 4.19.x
• Set External toolchain gcc version to 7.x
• Disable Toolchain has threads debugging support?
Now test that your settings are correct:
make clean
make
28 © 2004-2019 Bootlin, CC BY-SA licenseBoot time optimization Training
Application optimization
Optimize the size and startup time of your application
Measuring
We have already measured application startup time in the previous lab.
Remove unnecessary functionality
Compiling ffmpeg with a reduced configuration
In our system, we use a generic version of ffmpeg that was built with support for too many
codecs and options that we actually do not need in our very special case.
So, let’s try to find out what the minimum requirements for ffmpeg are.
A first thing to do is to look at the ffmpeg logs:
Input #0, video4linux2,v4l2, from '/dev/video0':
Duration: N/A, start: 8.768660, bitrate: N/A
Stream #0:0: Video: mjpeg, yuvj422p(pc, bt470bg/unknown/unknown), 544x288, 30 fps, 30 tbr, 1000k
Stream mapping:
Stream #0:0 -> #0:0 (mjpeg (native) -> rawvideo (native))
Press [q] to stop, [?] for help
[mjpeg @ 0xb6b00340] unable to decode APP fields: Invalid data found when processing input
[swscaler @ 0x8f650] deprecated pixel format used, make sure you did set range correctly
[swscaler @ 0x8f650] No accelerated colorspace conversion found from yuv422p to rgb565le.
Output #0, fbdev, to '/dev/fb0':
Metadata:
encoder : Lavf57.83.100
Stream #0:0: Video: rawvideo (RGB[16] / 0x10424752), rgb565le, 544x288, q=2-31, 75202 kb/s, 30 f
Metadata:
encoder : Lavc57.107.100 rawvideo
Here we see that ffmpeg is using:
• Input from a video4linux device, decoding an mjpeg stream.
• Encoding a rawvideo stream, written to an fbdev output device.
• A software scaler to resize the input video for our LCD screen
Let’s check ffmpeg’s configure script, and see what its options are:
cd ~/boot-time-labs/rootfs/buildroot-arm/output/build/ffmpeg-3.4.5
./configure --help
We see that configure has precisely three interesting options: --list-encoders, --list-
decoders, --list-filters, --list-outdevs and --list-indevs.
© 2004-2019 Bootlin, CC BY-SA license 29Boot time optimization Training
Run configure with each of those and recognize the features that we need to enable.
Following these findings, here’s how we are going to modify Buildroot’s configuration for ffmpeg.
This time, let’s assume that the Thumb2 build from the previous lab has completed. If that’s
the case, finish that lab (measuring and writing down size and performance), and come back
here when you are done:
cd ~/boot-time-labs/rootfs/buildroot/
make menuconfig
In Buildroot’s configuration interface:
• Set Enabled encoders to rawvideo
• Set Enabled decoders to mjpeg
• Empty the Enabled muxers, Enabled demuxers, Enabled parsers, Enabled bitstreams
and Enabled protocols settings.
• Set Enabled filters to scale
• For Enable output devices and Enable input devices, individual device selection is not
possible, so we will configure devices manually in the next field. So, empty such settings.
• Set Additional parameters for ./configure to --enable-indev=v4l2 --enable-outdev=
fbdev
Now, let’s get Buildroot to recompile ffmpeg, taking our new settings into account:
make ffmpeg-dirclean
make
You can now fill the below table, reusing data from the previous lab:
Total rootfs size /usr/bin/ffmpeg size
Initial configuration
Reduced configuration
Difference (percentage)
Do you expect to see differences in execution time, with a reduced configuration? Run the
measures with time again, and compare with what you got during the previous lab.
If the results surprise you, don’t hesitate to show them to your instructor ask for her/his opinion.
Trying to remove further features
Looking at the ffmpeg log which displays enabled configuration settings, try to find further
configuration switches which can be removed without breaking the player in our particular
system.
Inspection of the whole root filesystem
Something that can help too is to inspect the whole root filesystem, looking for files that don’t
seem necessary.
The easiest way is to do this on the workstation:
30 © 2004-2019 Bootlin, CC BY-SA licenseBoot time optimization Training sudo apt install tree cd /media/$USER/rootfs tree The tree command really makes this task easier. For the moment, don’t bother about Busybox and system files. They will be addressed later. Better focus on files and libraries related to ffmpeg. Further analysis of the application With a build system like Buildroot, it’s easy to add performance analysis and debugging utilities. Configure Buildroot to add strace to your root filesystem. You will find the corresponding configuration option in Package selection for the target and then in Debugging, profiling and benchmark. Run Buildroot and reflash your device as usual. Tracing and profiling with strace With strace’s help, you can already have a pretty good understanding of how your application spends its time. You can see all the system calls that it makes and knowing the application, you can guess in which part of the code it is at a given time. You can also spot unnecessary attempts to open files that do not exist, multiple accesses to the same file, or more generally things that the program was not supposed to do. All these correspond to opportunities to fix and optimize your application. Once the board has booted, run strace on the video player application: strace -tt -f -o strace.log ffmpeg -f video4linux2 -video_size 544x288 \ -input_format mjpeg -i /dev/video0 -pix_fmt rgb565le -f fbdev /dev/fb0 Also have strace generate a summary: strace -c -f -o strace-summary.log ffmpeg ... Take some time to read strace.log6 , and see everything that the program is doing. Don’t hesitate to lookup the ioctl codes on the Internet to have an idea about what’s going on between the player, he camera and the display. Also have a look at strace-summary.log. You will find the number of errors trying to open files that do not exist, and where most time is spent, for example. You can also count the number of memory allocations (using the mmap2 system call). Optimizing necessary functionality At this stage, there is nothing more we can really do to further optimize ffmpeg, unless we are ready to dig into the code and make changes. However, if the player was your own application, I’m sure this would help to understand how it’s actually behaving and how to improve it to make it even faster and smaller. 6 At this stage, when you have to open files directly on the board, some familiarity with the basic commands of the vi editor becomes useful. See https://bootlin.com/doc/command_memento.pdf for a basic command summary. Otherwise, you can use the more rudimentary more command. You can also copy the files to your PC, using a USB drive, for example. © 2004-2019 Bootlin, CC BY-SA license 31
Boot time optimization Training

Putting things back together
Now that we have analyzed the execution of the video player, let’s restore the normal configu-
ration for the system:
     • Remove support for strace
     • Restore the 0001-ffmpeg-log-notification-after-first-frame.patch patch, replacing
       the most recently applied patch.
     • Restoring the automatic execution of ffmpeg in /etc/init.d/S50playvideo.
As explained in the Buildroot manual7 , you need to make a full rebuild after disabling packages.
Otherwise, such packages will still be present in the filesystem image. Fortunately, full rebuilds
are now fast with Buildroot when it’s using a prebuilt toolchain:
make clean
make
Update your root filesystem and then reboot.
According to our tests, there should be an issue now: the video player is started even before the
camera is ready, as you can see in the system console.
To address this issue for the time being, let’s modify /etc/init.d/S50playvideo by adding a
loop waiting for the /dev/video0 device to appear. So, let’s add the following lines before the
call to echo "Starting ffmpeg":
if ! [ -e /dev/video0 ]
then
   echo "Waiting for /dev/video0 to be ready..."
   while ! [ -e /dev/video0 ]
   do
        sleep 0.001
   done
fi
Notes:
     • It seems you can not run an empty while loop with Busybox sh. That’s why I had to put
       a real command (not a comment) inside the loop.
     • Fortunately, the sleep command supports subsecond waiting. Did you know?
     • When we optimize the kernel, we will try to address this camera readiness issue. If we
       can’t fix it, at least we will display something on the screen to make the user wait.
Update and reboot your system through grabserial. Fill the below table with updated figures
(we don’t expect earlier parts of system bootup to be impacted... scripts may run faster after
being recompiled in Thumb2)
 Step                   Duration                                          Description
 Init scripts                             Between Run /sbin/init and Starting ffmpeg
 Application                         Between Starting ffmpeg and First frame decoded
 Total boot time

     7 https://buildroot.org/downloads/manual/manual.html#full-rebuild

32                                                             © 2004-2019 Bootlin, CC BY-SA license
Boot time optimization Training
Init script optimizations
Analyzing and optimizing init scripts
Measuring
Remember that the first step in optimization work is measuring elapsed time. We need to know
which parts of the init scripts are the biggest time consumers.
Use bootchartd on the board
Add bootchartd to your BusyBox configuration. Also add support for gzip compression in utilities
like tar (BR2_FEATURE_SEAMLESS_GZ), which is needed by bootchartd.
cd ~/boot-time-labs/rootfs/buildroot
make busybox-menuconfig
make
The above command should only take a few seconds to run.
Re-flash the root filesystem
Update your root filesystem on the SD card.
The next thing to do is to use the init argument on the kernel command line (in u-boot, this is
the bootargs environment variable) to boot using bootchart instead of using the init program
provided by Busybox.
So, boot your board but stay in the U-Boot shell, by pressing the Space key before the timer
expires.
Add init=/sbin/bootchartd to the bootargs variable:
U-Boot> setenv bootargs ${bootargs} init=/sbin/bootchartd
U-Boot> saveenv
This will make the system boot and the resulting bootlog will be located in /var/log/bootlog.
tgz. As /var/log is actually stored in RAM (through the tmpfs filesystem, copy it to the root
filesystem storage and halt your board:
cp /var/log/bootlog.gz /root/
halt
Remove the SD card and copy that file to ~/boot-time-labs/rootfs/ on your host.
Analyze bootchart data on your workstation
To compile and use bootchart on your workstation, you first need to install a few Java packages:
© 2004-2019 Bootlin, CC BY-SA license 33Boot time optimization Training sudo apt install ant openjdk-11-jdk Note that ant is a Java based build tool like make. Now, get the bootchart source code for version 0.9 from http://www.bootchart.org/8 , compile it and use bootchart to generate the boot chart: tar xf bootchart-0.9.tar.bz2 cd bootchart-0.9 ant java -jar bootchart.jar ~/boot-time-labs/rootfs/bootlog.tgz This produces the bootlog.png image which you can visualize to study and optimize your startup sequence: xdg-open bootlog.png xdg-open is a universal way of opening a file with a given MIME type with the associated application as registered in the system. According to the exact Ubuntu flavor that you are using, it will run the particular image viewer available in that particular flavor. Remove unnecessary functionality Getting Buildroot to generate less files The above graph shows several system processes running during the startup process, consuming CPU time, probably delaying the execution of our application (see the color bars showing when a task is using the CPU). In the general case, there will be services that you want to keep. At least, you could change the order according to which services are started, by changing the alphanumeric order of startup files (that’s reordering / postponing work). 8 Don’t try to get the bootchart package supplied by Ubuntu instead. While it has similar functionality, it looks like a completely unrelated piece of software. To confirm this, it has no dependency whatsoever on Java packages. 34 © 2004-2019 Bootlin, CC BY-SA license
Boot time optimization Training

Back to our case, we want to simplify our system as much as possible. In Buildroot’s configu-
ration interface, go to the System Configuration menu:
  • Disable Enable root login with password and Run a getty (login prompt) after boot.
  • Disable remount root filesystem read-write during boot
  • Disable Purge unwanted locales
Don’t forget to remove bootchartd support as well and BR2_FEATURE_SEAMLESS_GZ which we
added earlier. Also disable ifupdown scripts in Networking applications. This allows to
remove the /etc/init.d/S40network script.
Before we update the filesystem, let’s make another experiment: boot your board, interrupt the
video player, and unmount /proc and /sys manually. Then, run the video player command
again, and you’ll see that ffmpeg runs perfectly without these virtual filesystems mounted.
This means we could directly run the video player as the init process! To keep the possibility
to interact with the board through a command line shell, we’re going to run a shell after the
video player.
So, let’s remove /etc/init.d/S50playvideo from the root filesystem overlay and replace it by
the /playvideo script provided in ~/boot-time-labs/rootfs/data/.
Regenerate your root filesystem:
make clean
make
Update and reflash your SD card. Reboot the board, but before booting, stop in U-Boot to
update the init program:
setenv bootargs console=ttyO0,115200n8 root=/dev/mmcblk0p2 rootwait rw init=/playvideo
saveenv
boot
Note that the rw setting is going to be important, as it will make Linux mount the root filesystem
in read/write mode, which allows to record the access time of each file.

Detecting and eliminating unused files

If the video played ran fine as expected, you should now be in a shell in the serial console.
Type the sync command to flush the filesystem, remove the SD card and insert it on your PC
again. Go to /media/$USER/rootfs and run the below command:
find . -atime -100 -type f
This lists the regular files that were not accessed during the boot sequence we’ve just executed:
./usr/lib/os-release
./usr/share/ffmpeg/libvpx-720p50_60.ffpreset
./usr/share/ffmpeg/libvpx-360p.ffpreset
./usr/share/ffmpeg/libvpx-720p.ffpreset
./usr/share/ffmpeg/ffprobe.xsd
./usr/share/ffmpeg/libvpx-1080p.ffpreset
./usr/share/ffmpeg/libvpx-1080p50_60.ffpreset
./usr/share/udhcpc/default.script
./bin/busybox

© 2004-2019 Bootlin, CC BY-SA license                                                           35
You can also read