CII & CPAR For Alberta Health Services - USER GUIDE
←
→
Page content transcription
If your browser does not render page correctly, please read the page content below

AB

USER GUIDE

CII & CPAR
For Alberta Health Services

                              1.866.729.8889
                              www.AccuroEMR.com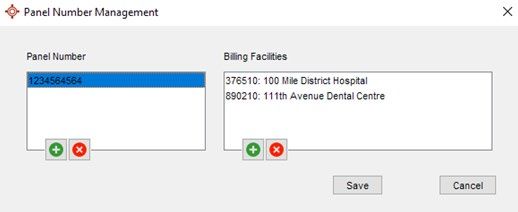
1.866.729.8889
                                                                                                                                                      www.AccuroEMR.com

TABLE OF CONTENTS
WELCOME TO COMMUNITY INFORMATION INTEGRATION & CENTRAL PATIENT
ATTACHMENT REGISTRY (CII & CPAR).................................................................................................. 3

CPAR .................................................................................................................................................................. 4
   Overview.......................................................................................................................................................................... 4
   Setup: Provider Configuration .................................................................................................................................... 4
   Setup: Patient Configuration .................................................................................................................................... 10
   Clinic Workflow ........................................................................................................................................................... 12

CII: ENCOUNTER DATA SHARING ......................................................................................................... 20
   Overview....................................................................................................................................................................... 20
   Setup: Provider Configuration ................................................................................................................................. 20
   Data Sharing, Clinic Workflow ................................................................................................................................ 26

CII: CONSULT DATA SHARING ............................................................................................................... 32
   Overview....................................................................................................................................................................... 32
   Setup – Provider Configuration ............................................................................................................................... 32
   Data Sharing, Clinic Workflow ................................................................................................................................ 35

TRAINING AND SUPPORT ........................................................................................................................ 37
   Clinic Support .............................................................................................................................................................. 37

Version: 2.1
Date of Revision: Jan 6, 2021                                                                                                                                                             2
1.866.729.8889
                                                                                            www.AccuroEMR.com

WELCOME TO COMMUNITY INFORMATION INTEGRATION &
CENTRAL PATIENT ATTACHMENT REGISTRY (CII & CPAR)
Alberta Netcare Integration
CII and CPAR is the chosen vehicle to enhance community EMRs with two-way data flow.

Community Information Integration (CII) is a system that transfers select patient information between
community Electronic Medical Records (EMRs) and other patient care team members through Alberta
Netcare.

Central Patient Attachment Registry (CPAR) is a provincial system that captures the confirmed
relationship of a primary provider (family physician, pediatrician or nurse practitioner, etc.) and their
paneled patients.

Together, CII and CPAR enable two foundational change elements in the implementation of the Patient’s
Medical Home: health system integration and improved continuity of care.

CII & CPAR:

    •   Enables sharing of important healthcare information between the patient’s primary provider and
        other providers in the patient’s circle of care.

    •   Facilitates sharing of consultation reports back to the patient’s primary provider and other
        providers.

    •   Identifies relationships between patients and their primary provider.

CII and CPAR are important technical enablers to improved patient care. CII and CPAR help clinics
identify patients whose continuity of care is sub-optimized. Knowing that a patient is paneled to another
provider creates an opportunity to confirm roles and responsibilities in care provision.

For PCNs and clinics already invested in panel management, CII and CPAR is the next step to promote a
coordinated care management approach to service delivery and achieve better patient, provider, and
system outcomes.

Healthcare providers can already access Alberta Netcare Portal to view a ‘snapshot’ of care received by a
patient. CII and CPAR aim to increase value by sharing select information from family physicians and
other community providers via Community Encounter Digests and consultation reports.

Version: 2.1
Date of Revision: Jan 6, 2021                                                                                3
1.866.729.8889
                                                                                        www.AccuroEMR.com

CPAR
Overview
The Central Patient Attachment Registry (CPAR) is a provincial system for Alberta that captures the
confirmed relationship of a primary provider and their paneled patients.

Mapping
Please see the CII & CPAR Accuro Mapping document for the details on what data is collected and where
that data originates in Accuro.

Setup: Provider Configuration
Configuration Pre-Requisites

    •   A provider must enroll to the CPAR program with Alberta Health.

    •   Accuro configuration can begin when notification of CII approval is received from Alberta Health.

    •   Configuration for CPAR is a one-time activity performed by the clinic for each primary provider.

    •   Provider configuration for CPAR must be completed by a System Administrator.
        Providers require access to:

        o    The Provider Wizard window          Accuro Start Menu >Tools > Configure Providers

        o    The Form Editor                     Accuro Start Menu > Tools > Form Editor

        o    The Form Mapper                     Accuro Start Menu > Tools > Map Forms

Version: 2.1
Date of Revision: Jan 6, 2021                                                                               4
1.866.729.8889
www.AccuroEMR.com
Step 1: Enter the Provider’s PRAC ID
Providers must have a PRAC ID recorded in Accuro to be enabled with CPAR.
To check if the Provider you are setting up has a PRAC ID, follow these steps:
1. In Accuro, select F2 for Provider Management.
2. Select the name of the Provider.
3. Open the Provider Demographics tab and review the PRAC ID. If no ID displays, enter the PRAC
ID, then click Update Provider.
Version: 2.1
Date of Revision: Jan 6, 2021 51.866.729.8889
www.AccuroEMR.com
Step 2: Enter Your CPAR Panel Number
Panel Numbers are generated by CPAR upon registration and sent by email to the clinic’s Panel
Administrator.
Enter your Panel Number from Alberta Health into Accuro:
1. Click on the Accuro Start Menu> Tools> Configure Providers.
2. Click on the Provider Demographics tab.
3. In the Panel Number field, click Manage.
4. In the Panel Number area, select the Add button to add a new panel.
5. Type in your Panel Number from Alberta Health.
6. In the Billing Facilities area, select the Add button to enter the billing facilities associated with the
Panel Number.
For Providers working in multiple locations using the same AccuroEMR, enter in each location.
7. Click the Save button.
Version: 2.1
Date of Revision: Jan 6, 2021 61.866.729.8889
www.AccuroEMR.com
Step 3: Assign Panel Numbers to Providers
Now that the Panel Number has been added into Accuro, it’s time to assign it to the Provider.
1. Click on the Accuro Start Menu> Tools > Configure Providers.
2. Select a Provider.
3. Click on the Provider Demographics tab.
4. In the Panel Number field, choose the appropriate Panel Number for the Provider.
5. Click Update Provider to save your changes.
Version: 2.1
Date of Revision: Jan 6, 2021 71.866.729.8889
www.AccuroEMR.com
Step 4: Manage your Patient Status
Only patients with a Patient Status that is categorized as Active on the CII/CPAR Panel are considered
eligible to be added to a Panel and submitted to CII/CPAR. Panel status types must be reviewed as part
of configuration.
1. Navigate to the Patients section.
2. Click on the Status History tab.
3. Click on the Edit button.
4. Enable the checkbox in the Active on CII and CPAR Panel column for every Status that should
be considered when adding the Patient to a Panel.
5. Click OK to save.
Version: 2.1
Date of Revision: Jan 6, 2021 81.866.729.8889
www.AccuroEMR.com
Step 5: Note Your Transaction IDs in the File Queue
The first time you use CII and CPAR, Alberta Health will request transaction IDs for your first few data
uploads. Your Transaction IDs are located in Accuro’s File Queue.
To access transaction IDs in the file queue, as a System Administrator:
1. In the Accuro Start Menu, search for “File Queue”
2. In the File Queue window, open the Queue drop down list and select CII/CPAR. New fields and
columns then appear next to the Queue drop down list.
3. Open the Category drop down list to display transaction IDs of that type.
4. Your Transaction ID’s display in the right-hand column labelled, ‘Transaction ID’
Version: 2.1
Date of Revision: Jan 6, 2021 91.866.729.8889
www.AccuroEMR.com
Setup: Patient Configuration
Patients must meet the following criteria to be Paneled to a Provider and sent to Alberta Netcare:
1. The patient’s Status is categorized as Active on CII & CPAR Panel.
2. The Patient has a Verification Date.
3. The patient has a Last Visit Date. This is the most recent date the patient visited the Provider, or
any other Provider within the same family practice.
Note: Accuro checks your entire visit history without date restrictions to determine the last visit.
4. The patient is linked to the Provider using the existing Office Provider field. See Linking Patients
to Providers.
Version: 2.1
Date of Revision: Jan 6, 2021 101.866.729.8889
www.AccuroEMR.com
Linking Patients to Providers
1. Click the Patients button in the Accuro Side Bar.
2. Click the Providers tab.
3. Click the Ellipses button next to the Office Provider text box.
4. Providers that exist in your clinic display in the search results. Click on a Provider’s name in the
results, then click Select.
5. Click Update Patient.
Version: 2.1
Date of Revision: Jan 6, 2021 111.866.729.8889
www.AccuroEMR.com
Clinic Workflow
As part of your successful participation in CPAR, the following workflow processes must be implemented
by your clinic – both in and out of Accuro.
Workflow A: Maintain Up-to-Date Patient Information
Your clinics must update Patient information as part of your everyday workflow to ensure that:
1. New patient’s statuses are categorized as Active on CII & CPAR Panel.
2. New patients are linked to a Provider using the existing Office Provider field.
3. All Patients have a Verification Date.
4. The Patient has a Last Visit Date recorded in Accuro.
Version: 2.1
Date of Revision: Jan 6, 2021 121.866.729.8889
www.AccuroEMR.com
Automatic Syncing
Consult report documents (letters, forms) automatically transmit and update with NetCare. When files
attached to a Patient’s virtual chart are deleted, they are also deleted from NetCare.
Deleting Items
To delete documents from a Patient’s EMR chart:
1. With a patient globally selected, open the EMR section of Accuro.
2. Open the Virtual Chart, then navigate to the Documents folder.
3. Right click a document, then select Delete Now.
4. Click Yes to confirm.
Note: Users cannot delete reviewed documents. If the Delete Now selection is greyed out, the document
must be unreviewed. Alternatively, Accuro Users can be given permission to Delete Reviewed Chart
Items.
To unreview documents:
1. Click Home then open the Documents folder.
2. Note the review date.
3. Click Review History.
4. In the Document Review History window, select your date range and Provider.
5. Click the Unreview Selected check box.
6. Click Close.
To give Users permission to Delete Reviewed Chart Items:
1. Open the Accuro Start Menu, then search for “Manage Security”
2. Open System Settings > General.
3. Scroll down to the Encounter Notes section, then activate the ‘Allow Users to Delete Reviewed
Chart Items’ check box.
4. Click Save Settings.
5. General > Allow Users to Delete Reviewed Chart Items Checkbox
Note: this is a global system setting that affects all Accuro users at your clinic.
Version: 2.1
Date of Revision: Jan 6, 2021 131.866.729.8889
www.AccuroEMR.com
Restoring Deleted Items
To restore deleted items:
1. Open the Accuro Start Menu, then search for “Manage Security”
2. Click Audit Logs.
3. Double click the Date Range filters to search for Activities between those dates.
4. Use the Activity drop down list to select the document type.
5. Right click the Activity, then click Restore.
Version: 2.1
Date of Revision: Jan 6, 2021 141.866.729.8889
www.AccuroEMR.com
Workflow B: Check for Errors in Accuro
Accuro helps determine which panels will be successfully submitted and which ones are showing as
duplicates or with missing information (things Accuro knows will be rejected by AH).
To ensure a successful submission, errors in Accuro can be identified quickly, then fixed by your Clinic in
Accuro prior to the 12th of each month.
Trainer Tip - If you are the Panel Administrator (or the person who will be checking for errors in the
CPAR Panels for your clinic), we recommend you set a recurring calendar reminder before the 12th of
each month!
Version: 2.1
Date of Revision: Jan 6, 2021 151.866.729.8889
www.AccuroEMR.com
Step 1 - Setup
Errors are displayed in the Manually Submit CII & CPAR Panels window.
To view the CII and CPAR window in Accuro, a System Administrator with access to Manage Security
must enable the permission on the user’s profile. To enable permission for AH-CII Panels:
1. Accuro Menu> Users> Manage Security.
2. Select Feature Access, then click to highlight the Role.
3. Enable ‘Manually Submit CII/CPAR Panels’
To access the CII/CPAR window once permission is enabled:
1. Navigate to the Accuro Start Menu and search: “Submit CII/CPAR Panels”
2. Choose Panel from the Panel Number field.
Version: 2.1
Date of Revision: Jan 6, 2021 161.866.729.8889
www.AccuroEMR.com
Step 2 - Window Overview & Fixing Panel Errors
Providers associated with each Panel Number are listed in Provider Details. Patients associated with each
Provider are listed in Patient Details.
Included in Submission Tab
Shows a list of patients that meet the Patient Configuration requirements. There are no action items in
this view.
Ignored in Submission Tab
Shows data points that are missing required information and were not sent to Alberta Health. The
missing information could be a Last Visit Date, Verification Date, or the Status of the patient may not be
set as Active on the CII & CPAR Panel.
Users reviewing Panel errors prior to the 12th of each month should check this tab and manually correct
any errors within the respective section(s) of Accuro using the CPAR Patient Configuration section of this
guide.
Duplicate Patient Data Tab
Shows errors related to duplicate patient information. To correct duplication errors, update your patient
records with correct information.
Trainer Tip: Learn more about Patient Merging Permissions by searching for “Merging” in the Accuro
User Guide!
Note: If you cannot locate the source of an error in the Patient Details window, see Step 5: Note Your
Transaction IDs in the File Queue.
Version: 2.1
Date of Revision: Jan 6, 2021 171.866.729.8889
www.AccuroEMR.com
Workflow C: Check for Errors in Alberta Health Portal
There may instances where Accuro does not catch every error. In these cases, the error is detected after
information is received and Quality Controlled by Alberta Health. Panel Administrators (or the person
who will be quality controlling the CPAR Panels for your clinic), are encouraged to check on their
submissions within the provided Alberta Health portal. Please check with Alberta Health for the portal
details after the 12th of each month.
Trainer Tip: If you are the Panel Administrator, we recommend you set a recurring calendar reminder
after the 12th of each month as a reminder to check these panels in the Alberta Health portal!
If Alberta Health declares a minor error, the user can fix the error in Accuro, then re-submit the correct
information with the following month’s re-submissions.
If Alberta Heath declares a major error, the user must correct the error in Accuro and then immediately
re-submit to the panel.
Re-submit Panel Manually (Major Error)
To resubmit a CPAR Panel Manually, user must have the correct permissions. To enable access to the
‘Manually Submit CII/CPAR Panels’ window, follow these steps:
1. Identify and correct the error in Accuro.
2. Navigate to the Accuro Start Menu and search, “Submit CII/CPAR Panels”
3. From the ‘Panel Number’ dropdown, select the appropriate Provider and Panel.
4. Click Submit.
Version: 2.1
Date of Revision: Jan 6, 2021 181.866.729.8889
www.AccuroEMR.com
Workflow D: Transaction IDs
You can review your clinic’s Transaction IDs in the Accuro File Queue Viewer.
To launch the File Queue Viewer:
1. In the Accuro Start Menu, search for “file queue” then select ‘View File Queue’
Alternatively, select ‘View File Queue’ from your Quick Access Icons.
2. In the File Queue Viewer window, use the ‘Queue’ drop down list to select CII/CPAR Queue.
3. Use the ‘Category’ drop down list to filter Transaction IDs by Panel, EMR, or Consult Report.
4. Your Transaction IDs display in the right-hand column of the File Queue Viewer.
Version: 2.1
Date of Revision: Jan 6, 2021 191.866.729.8889
www.AccuroEMR.com
CII: ENCOUNTER DATA SHARING
Overview
Community Information Integration (CII) is a system that transfers patient information between
Electronic Medical Records (EMRs) and other members of the patient’s care team through Alberta
Netcare.
Data is submitted to CII when an encounter with a paneled patient is recorded in Accuro, such as an
appointment. The data attached to the appointment is automatically gathered and submitted to CII.
CII Encounter Mapping
The Mapping document contains the details for what data is collected from Accuro and submitted to CII
Encounter Data Sharing.
Setup: Provider Configuration
Pre-Requisites
1. A Provider must enroll to the “CII/CPAR – Encounter Data Sharing” program with Alberta Health.
2. Once notification of CII approval is received from Alberta Health, the configuration can begin in
Accuro. Provider Configuration for CII must be completed by a System Administrator. Providers
require access to:
The Provider Wizard window: Accuro Start Menu > Tools > Configure Providers
The Form Editor: Accuro Start Menu > Tools > Form Editor
The Form Mapper: Accuro Start Menu > Tools > Map Forms
Version: 2.1
Date of Revision: Jan 6, 2021 201.866.729.8889
www.AccuroEMR.com
Step 1: Enable Encounter Data Sharing for Providers
To enable a Provider in the CII – Encounter Data Sharing program:
1. Click on the Accuro Start Menu > Tools > Configure Providers.
2. Select a Provider and click Configure.
3. Click the Next button until you get to the Affiliated Programs page.
4. Click the Add button and select ‘CPAR – Encounter Data Sharing’ from the list.
5. Click Finish to save your changes.
Note: Repeat these steps for each Provider.
Version: 2.1
Date of Revision: Jan 6, 2021 211.866.729.8889
www.AccuroEMR.com
Step 2: Map Forms for Submission
The second part of CII configuration includes mapping the existing Diagnostic Orders, Lab Orders, and
Referrals of participating Providers to a new (CII specific) Form Type.
Accuro searches the database for the CII Participating Providers and the Forms these Providers used,
that have been categorized with this Type and prepares these documents for CII Submission to Netcare.
Mapping Diagnostic Orders
Diagnostic Orders must be categorized as a Requisition Form before they can be mapped to the
appropriate CII Form Type.
1. Open the Form Editor (Accuro Start Menu > Tools > Form Editor).
2. Select an existing Form being used for Diagnostic Orders by the clinic.
3. From the Category dropdown, select “Requisition Forms”
4. Then click Save to save this Form.
Repeats steps 2 – 4 for all Diagnostic Orders used by the clinic.
Version: 2.1
Date of Revision: Jan 6, 2021 221.866.729.8889
www.AccuroEMR.com
Next, map the Diagnostic Orders to the appropriate CII Form Type:
1. Open the Accuro Form Mapper (Accuro Start Menu > Tools > Map Forms).
2. In the Type dropdown, select “Diagnostic Orders”
3. Select the forms within the ‘Available’ pane and click the button with the right pointing arrow to
move the form into the ‘Selected’ pane.
Once all the Diagnostic Orders are moved into the ‘Selected’ pane, you’re done!
Version: 2.1
Date of Revision: Jan 6, 2021 231.866.729.8889
www.AccuroEMR.com
Mapping Lab Orders
Lab Orders must first be categorized as a Requisition Form before they can be mapped to appropriate CII
Form Type:
1. Open the Form Editor (Accuro Start Menu > Tools > Form Editor)
2. Select an existing Form being used for Lab Orders by the clinic.
3. From the Category dropdown, select Requisition Forms.
4. Then click Save to save this Form.
Repeats steps 2 – 4 for all Lab Orders used by the clinic.
Next, map the Lab Orders to the appropriate CII Form Type:
1. Open the Accuro Form Mapper (Accuro Start Menu > Tools > Map Forms).
2. In the Type dropdown, select Lab Orders.
3. Select the forms within the ‘Available’ pane and click the right arrow to move the form to the
‘Selected’ pane.
Once your Lab Orders are moved into the ‘Selected’ pane, you’re done!
Version: 2.1
Date of Revision: Jan 6, 2021 241.866.729.8889
www.AccuroEMR.com
Mapping Referral Letters
The final part of CII Configuration is mapping the clinics Referral Letters. Unlike Diagnostic Forms and
Lab Orders, Referrals do not need to be categorized as Requisition Forms in the Form Editor; you will only
need to Map the Referrals to the appropriate CII Form Type.
1. Open the Accuro Form Mapper (Accuro Start Menu > Tools > Map Forms)
2. In the Type dropdown, select ‘Referrals.’
3. Select the forms within the ‘Available’ pane and click the button with the right-pointing arrow to
move the form into the ‘Selected’ pane.
Once all the Referrals are moved into the Selected Pane, you’re done!
With your Clinics Diagnostic Orders, Lab Orders, and Referrals categorized appropriately, Accuro will
constantly check to see when these forms are being used and submit the data to Netcare.
Note: Remember to repeat these steps for any new forms added to Accuro in the future.
Version: 2.1
Date of Revision: Jan 6, 2021 251.866.729.8889
www.AccuroEMR.com
Data Sharing, Clinic Workflow
As part of successful participation in CII, clinics need to adopt the following processes – both in and out
of Accuro.
Workflow: Your Patients’ Participation Rights
It is important to understand your patient’s rights in sharing/not sharing data with Alberta Netcare.
Although you have seen the benefits of this initiative, your patients may appreciate some coaching and
explanation. Providing information to your patients about their rights is an essential component of
success.
Let you patients know that they can request their CII data either be:
Shared with Alberta Netcare with the option to opt out for specific appointments if requested
(more desired), or
Be made fully exempt from being sent to Alberta Netcare
(less desired)
Shared (with option to ‘Do Not Share’ for specific appointments) – More Desired
If a patient has elected to share their data with Netcare, all CII Data will be automatically shared from
Accuro with no additional work from the clinic.
Version: 2.1
Date of Revision: Jan 6, 2021 261.866.729.8889
www.AccuroEMR.com
‘Do Not Share’ for a specific appointment
If a patient does not want the details of a specific appointment sent to CII, either the user scheduling the
appointment or the physician (during the appointment) can request not to share information about a that
appointment.
To prevent appointment information from being shared
with CII:
1. In Accuro, navigate to the Scheduler section.
2. Open the Appointment.
3. Check the “Do not share EMR or Consult data
with CII/CPAR” checkbox.
OR: Right click an appointment in the Scheduler and
select, “Do not share EMR or Consult data with
CII/CPAR”
Version: 2.1
Date of Revision: Jan 6, 2021 271.866.729.8889
www.AccuroEMR.com
Patient wants to their data to be fully exempt from submission to Alberta Netcare (less desired)
If a patient does not want their CII data to be shared with Netcare period, the Accuro user must:
1. Navigate to the Patients section and open a Patient record.
2. Click on the ‘Other’ tab.
3. Enable the “Do not share EMR or Consult data with CII/CPAR” checkbox.
Version: 2.1
Date of Revision: Jan 6, 2021 281.866.729.8889
www.AccuroEMR.com
Workflow: Encounter Sharing Rules for Submission
CII data must fall under certain criteria to be submitted to Alberta Netcare. While data submission takes
place automatically, it is important that users understand the types of appointments that are excluded if
the following criteria is missed:
Step 1: The Appointment must be considered ‘Valid’
Based on CII Criteria, Accuro determines your appointments to be ‘Valid’ if:
1. The Patient is not flagged with Do not share EMR or Consult data with CII/CPAR.
2. The Appointment is not flagged with Do not share EMR or Consult data with CII/CPAR.
3. The Patient has an Alberta ULI.
4. The Appointment's Date/Time is newer than Provider's opt-in date to the AB CII/CPAR - share
Encounter data program.
5. Appointment is not marked as No Show.
6. Appointment's Facility is neither None nor Blank.
7. Appointment is not a Group Appointment.
Step 2: The Patient must have a ‘Valid’ Chart item
Based on CII Criteria, Accuro determines a patient’s chart item(s) to be ‘Valid’ if:
1. The Chart Item is associated with a valid Appointment.
2. The Chart Item has a recorded owner:
The Chart Item's Date of Service/Alternative Date is newer than Provider's opt-in date to
the AB CII/CPAR - share Encounter data program.
3. Chart Items with no recorded owner (e.g. History of Problems, Allergy, Immunization):
Chart Item is shared with CII/CPAR if the associated Appointment's Scheduling Provider
has opted-in to the "AB CII/CPAR - share Encounter data" program.
(Continued on next page)
Version: 2.1
Date of Revision: Jan 6, 2021 291.866.729.8889
www.AccuroEMR.com
4. Chart Item is ‘Active.’ The table below lists the applicable chart item types and the
status/property values that define the chart item as “Active.”
5. The Chart Item was added within 48 hours of the appointment
Only chart items created within a 48h window after the appointment’s date/time, are considered
for CPAR submission. Chart Items with a missing Date of Service will be exempt.
Version: 2.1
Date of Revision: Jan 6, 2021 301.866.729.8889
www.AccuroEMR.com
The following diagrams show two appointments and three chart items. All chart items are missing Date
of Service and their alternative date (e.g. created date) is used when creating the association to an
appointment.
Appointment: APT1
• Appointment date/time: 2018-Sep-22,
1:30pm
• APT 1’s 48h window is between A and B
in the diagram above
Chart item: CI 1
• Created Date: Nov-18 4:28pm
• CI 1 is "orphaned" and will never be
associated with an appointment because
alternative date falls outside “APT 1” time
window (A-B).
• This will not be submitted to CII.
Appointment: APT2
• Appointment date/time: Feb-25, 11:30am
• APT 2’s 48h window is between C and D
Chart Item: CI 2
• Created Date: Feb-26 9:09am
• CI 2 is associated with APT 2 because
alternative date falls inside the 48h
window (C-D).
• This will be submitted to CII
Chart Item: CI 3
• Created Date: Feb-28 10:10am
• CI 3 is “orphaned" and will never be
associated with an appointment because
alternative date falls outside APT2’s 48h
window (D).
• This will not be submitted
Version: 2.1
Date of Revision: Jan 6, 2021 311.866.729.8889
www.AccuroEMR.com
CII: CONSULT DATA SHARING
Overview
Community Information Integration (CII) is a system that transfers patient information between
Electronic Medical Records (EMRs) and other members of the patient’s care team through Alberta
Netcare.
Data is submitted to CII when an encounter with a patient is recorded in Accuro, such as an appointment.
The data attached to the appointment is automatically gathered and submitted to CII.
CII Consult Mapping
The Mapping document contains the details for what data is collected from Accuro and submitted to CII
Consult Data Sharing.
Setup: Provider Configuration
Pre-Requisites
1. A provider must enroll to the “CII/CPAR – Consult Data Sharing” program with Alberta Health.
2. Configuration can begin in Accuro once notification of CII approval is received from Alberta
Health. Provider Configuration for CII must be completed by an Accuro System Administrator.
Providers require access to:
The Provider Wizard window Accuro Start Menu >Tools > Configure Providers
The Form Editor Accuro Start Menu > Tools > Form Editor
The Form Mapper Accuro Start Menu > Tools > Map Forms
Version: 2.1
Date of Revision: Jan 6, 2021 321.866.729.8889
www.AccuroEMR.com
Step 1: Enable Consult Data Sharing for Providers
Complete the following steps for each Provider in the CII – Consult Data Sharing program:
1. Open the Provider Wizard (Accuro Start Menu> Tools> Configure Providers).
2. Select the Provider being enabled, then click the Configure button.
3. Select Next until you get to the ‘Affiliated Programs’ page.
4. Click the Add button and select ‘CPAR – Consult Report Sharing’ from the list.
5. Click Finish to save your changes.
Version: 2.1
Date of Revision: Jan 6, 2021 331.866.729.8889
www.AccuroEMR.com
Step 2: Categorize Your Consult Letters for Data Sharing
Next, categorize your existing consultation letters with the ‘Consult Report’ Type so that Accuro
compiles those letters and automatically submits them to Netcare. Accuro periodically checks when
reports are in use, then submits the data to Netcare.
Complete these steps for any new letters and notes added to Accuro in the future.
1. Open to Template Wizard (Accuro Start Menu > Tools > Template Wizard).
2. Select an existing Consult Letter Template.
3. In the Type dropdown, choose ‘Consult Report’
4. Click Save.
Repeat steps 2-4 for all Templates you’re submitting to CII.
Note: For details about what information gets sent from Accuro to CII, see the ‘CII & CPAR Accuro
Mapping’ document.
Version: 2.1
Date of Revision: Jan 6, 2021 341.866.729.8889
www.AccuroEMR.com
Data Sharing, Clinic Workflow
Workflow: Your Patients’ Participation Rights
It is important to understand your patient’s rights in choosing to share data with Alberta Netcare.
Although you understand the benefits of the CII and CPAR initiative, your patients may appreciate an
explanation and some coaching. Providing information to your patients and their rights is an essential
part of success.
Your patients can elect to:
a) Share data to Alberta Netcare with the option to not share specific appointments or reports
(more desired), or
b) Be made fully exempt from sending data to Alberta Netcare (less desired).
Shared (with option to ‘Do Not Share’ for specific appointments or specific reports) – More Desired
If a patient elects to share their data with Alberta Netcare, all CII Data is automatically shared from
Accuro with no work from the clinic.
‘Do Not Share’ for a specific appointment
If a patient does not want the details of a specific appointment sent to CII, either the user scheduling the
appointment or the physician (during the appointment) can request that specific appointment to not be
shared. To prevent appointment information from being shared with CII:
1. In Accuro, navigate to the Scheduler section, then open an Appointment.
2. Enable the ‘Do not share EMR or Consult data with CII/CPAR’ checkbox.
OR: Right click on the appointment and select, “Do not share EMR or Consult data with CII/CPAR”
Version: 2.1
Date of Revision: Jan 6, 2021 351.866.729.8889
www.AccuroEMR.com
‘Do Not Share’ for a specific report
If a Consult Report is generated for a patient outside of a scheduled appointment, when the Provider
saves the item to the patient’s chart, they will be prompted with the “CII/ CPAR Consult Report
Metadata” window.
Here, the physician can elect to either:
a. Fill in the fields provided and select ‘Continue’ to share the data with Netcare, or
b. (if the patient requests) do not fill in the provided fields, choose to “Do not share with CII/CPAR”,
and select ‘Continue’
Note: Only the Facility field is required to submit this window, but you may want to submit as much data
as possible to CII and CPAR.
Patient wants their data to be fully exempt from being sent to Alberta Netcare (less desired)
If a patient does not want their CII Consult data to be shared with Netcare at all, the Accuro user must:
1. Navigate to the Patients section, the open a Patient record.
2. In the Other tab, enable the ‘Do not share EMR or Consult data with CII/CPAR’ checkbox.
Version: 2.1
Date of Revision: Jan 6, 2021 361.866.729.8889
www.AccuroEMR.com
TRAINING AND SUPPORT
Clinic Support
QHR Technologies can provide your clinic with support and user training. User training may be subject to
a fee.
QHR Technologies Inc. Client Services
Phone: 866.729.8889
Email: accuro@QHRTech.com
Content Disclaimer
All content in this User Guide is valid and deemed correct as of the date of publishing. The images and content are
subject to change as the product develops and evolves. To view the most current version, please refer to the Accuro
User Guide accessed from within Accuro (Accuro Start Menu > Help > Accuro User Guide).
Version: 2.1
Date of Revision: Jan 6, 2021 37You can also read