Connection Broker Advanced Capacity and Connection Management for Hybrid Clouds - | Quick Start Guide with AWS - Leostream
←
→
Page content transcription
If your browser does not render page correctly, please read the page content below

| Quick Start Guide
                              with AWS

Connection Broker
Advanced Capacity and Connection
Management for Hybrid Clouds
Version 9.0 – August 2021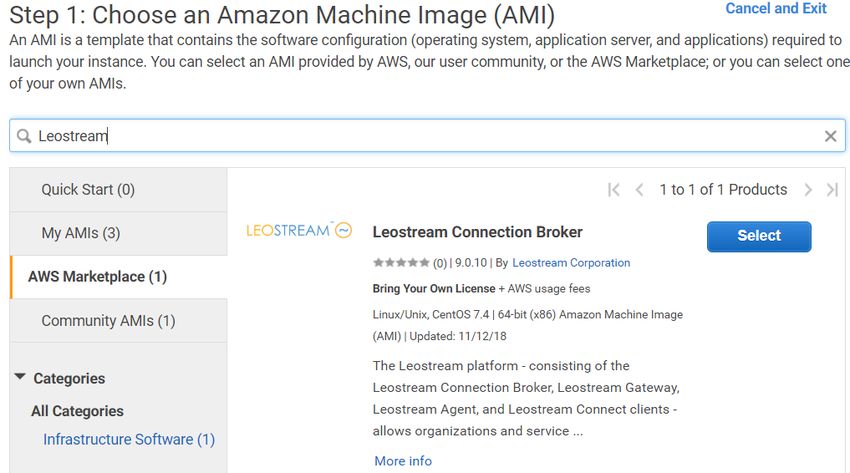
Contacting Leostream

   Leostream Corporation                                                      http://www.leostream.com
   271 Waverley Oaks Rd.                                                      Telephone: +1 781 890 2019
   Suite 204
   Waltham, MA 02452
   USA

   To submit an enhancement request, email features@leostream.com.
   To request product information or inquire about our future directions, email sales@leostream.com.
   For support, contact support@leostream.com. (See the Leostream Support Policy.)

Copyright

   © Copyright 2002-2021 by Leostream Corporation

   This software program and documentation are copyrighted by Leostream. The software described in this
   document is provided under a license agreement and may be used or copied only under the terms of this
   agreement. No part of this manual may be copied or reproduced in any form without prior written consent
   from Leostream.

Trademarks

   The following are trademarks of Leostream Corporation.
      Leostream™
      The Leostream graphical logo™

   The absence of a product name or logo from this list does not constitute a waiver of the trademark or other
   intellectual property rights concerning that product, name, or logo by Leostream.

   Amazon Web Services, the “Powered by AWS” logo, Amazon EC2, EC2, Amazon Relational Database,
   Amazon RDS, Amazon S3, Amazon Route 53, Amazon Virtual Private Cloud, Amazon VPC, AWS Marketplace,
   and AWS are trademarks of Amazon.com, Inc. or its affiliates in the United States and/or other countries.
   OpenLDAP is a trademark of The OpenLDAP Foundation. Microsoft, Active Directory and Windows are
   trademarks or registered trademarks of Microsoft Corporation in the United States and/or other countries.
   Other brand and product names are trademarks or registered trademarks of their respective holders.
   Leostream claims no right to use of these marks.

Patents

   Leostream software is protected by U.S. Patent 8,417,796.

                                                                                                             2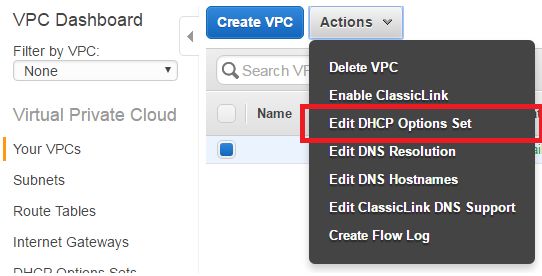
Using Leostream to Manage Amazon Web Services

Contents
CONTENTS ................................................................................................................................................ 3
CHAPTER 1: INTRODUCTION ...................................................................................................................... 4
CHAPTER 2: CONFIGURING AWS FOR USE WITH LEOSTREAM...................................................................... 6
     ARCHITECTING YOUR CLOUD INFRASTRUCTURE ......................................................................................................... 6
     DEFINING A USER FOR YOUR LEOSTREAM ENVIRONMENT ........................................................................................... 6
         Creating an Identity and Access Management User ................................................................................ 6
         Attaching Required AWS Permissions ....................................................................................................... 7
     SETTING UP SECURITY GROUPS .............................................................................................................................. 9
     CONFIGURING A VPC ........................................................................................................................................... 10
     WORKING WITH AWS DIRECTORY SERVICES............................................................................................................. 11
CHAPTER 3: INSTALLING LEOSTREAM IN AWS ............................................................................................. 13
     LAUNCHING A CONNECTION BROKER INSTANCE ........................................................................................................ 13
     LAUNCHING A LEOSTREAM GATEWAY INSTANCE ........................................................................................................ 15
     OBTAINING YOUR LEOSTREAM LICENSE ................................................................................................................... 16
CHAPTER 4: PREPARING AWS INSTANCES AND IMAGES .............................................................................. 18
CHAPTER 5: INTEGRATING WITH YOUR AWS INFRASTRUCTURE .................................................................. 19
     CONNECTING TO YOUR AMAZON DIRECTORY SERVICES .............................................................................................. 19
     CONNECTING TO YOUR AWS EC2 REGIONS ............................................................................................................. 20
CHAPTER 6: POOLING AND PROVISIONING IN AWS .................................................................................... 23
     CREATING POOLS ................................................................................................................................................. 23
     PROVISIONING NEW INSTANCES ............................................................................................................................. 23
     DISABLING PROVISIONING ..................................................................................................................................... 26
     JOINING INSTANCES TO A DOMAIN .......................................................................................................................... 27
     TAGGING AWS INSTANCES AND VOLUMES ............................................................................................................... 28
CHAPTER 7: CONNECTING USERS WITH DCV .............................................................................................. 31
     OVERVIEW OF PROTOCOL PLANS ............................................................................................................................ 31
CHAPTER 8: OFFERING DESKTOPS TO USERS .............................................................................................. 33
     POWER CONTROL PLANS ...................................................................................................................................... 33
     RELEASE PLANS ................................................................................................................................................... 34
     BUILDING USER POLICIES ...................................................................................................................................... 37
     ASSIGNING POLICIES TO USERS .............................................................................................................................. 38
     TESTING YOUR CONNECTION BROKER CONFIGURATION.............................................................................................. 41

       3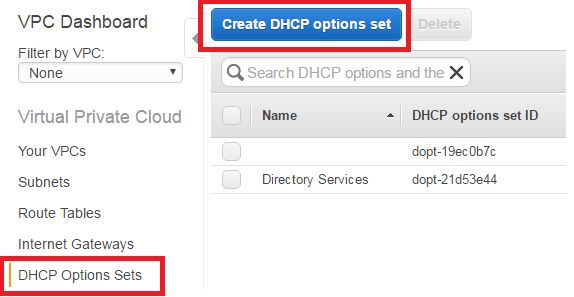
Chapter 1: Introduction

Chapter 1: Introduction
  The Leostream Connection Broker makes it possible to manage virtual workstations on Amazon Web
  Services Elastic Compute Cloud (AWS EC2). Leostream provides the tools necessary to satisfy a wide range
  of use cases and maximize the utility of desktops and applications hosted in the public cloud. With the
  combination of Leostream and AWS, you can:

     1. Provide desktops on-demand – provision virtual workspaces in minutes, preconfigured from
        customized images created in AWS

     2. Support multi-tenancy – separate departments, customers, etc., using AWS virtual private clouds, to
        provide isolated networks and manage resources independently

     3. Improve security – keep data off of the end user’s client device, to ensure that sensitive data never
        leaves the cloud; leverage multifactor authentication for secure access; use the Leostream Gateway
        to connect users to EC2 instances in a virtual private cloud

     4. Lower costs – avoid licensing fees associated with commercial VDI or DaaS stacks and pay low
        hourly usage fees in AWS.

  A virtual desktop infrastructure leveraging Leostream can utilize a range of AWS services, as described
  below, allowing you to build a complete VDI solution in the cloud. This guide focuses on AWS EC2, Amazon
  Virtual Private Cloud, and Amazon Directory Services. For more information on using Leostream with NICE
  DCV, see the Leostream Guide for Using Display Protocols.

     •   AWS EC2 (required) provides the compute for your virtual desktop infrastructure. Leostream
         launches, terminates, power controls, and connects users to instances in EC2. Simplify
         management by using a single Connection Broker to manage instances across multiple AWS
         regions, or create a cluster of Connection Brokers across various regions to support a global
         workforce.

     •   NICE DCV (optional) securely connects users to EC2 instances from any device over varying network
         conditions, with the ability to deliver graphics-intense applications and HPC workloads. NICE DCV is
         available at no extra charge when used on Amazon EC2.

     •   AWS Relational Database Service (RDS) (optional) provides the database required to build a cluster
         of Leostream Connection Brokers for high availability. The Leostream Connection Broker includes a
         built-in PostgreSQL database for small environments and proof-of-concepts. In a production
         environment, or to support a large number of users, create a cluster of Connection Brokers that use
         a common database hosted in RDS.

     •   AWS Elastic Load Balancing (optional) distributes user logins to different Connection Brokers in a
         cluster, to provide high availability and failover. Connection Brokers can be load balanced like any
         other application that uses HTTPS traffic.

     •   Amazon Virtual Private Cloud (VPC) (required) isolates EC2 instances in private networks. The

                                                                                                                4
Using Leostream to Manage Amazon Web Services
Leostream Gateway can then be used in conjunction with the Connection Broker to provide secure
access into the private network.
• Amazon Directory Services (optional) manages domain users and computers. Leostream can
authenticate users and automatically join new EC2 instances to domains managed by either AWS
Microsoft AD or Simple AD.
• Amazon Route 53 (optional) provides DNS load balancing and routes users to your Leostream login
page.
This document describes important aspects to consider when configuring your Amazon Web Services
account for use with Leostream and describes how to configure the Leostream Connection Broker to
manage capacity and user connections to compute hosted in AWS. The document assumes a basic
familiarity with AWS EC2, Amazon Virtual Private Cloud, and Amazon Directory Services concepts and use.
For an introduction to Leostream, including a description of key concepts and components, please
reference the Getting Started with Leostream Concepts guide available on the Leostream web site.
For complete details on using the Leostream Connection Broker, download the Connection Broker
Administrator’s Guide.
5Chapter 2: Configuring AWS for use with Leostream
Chapter 2: Configuring AWS for use with Leostream
This chapter discusses key requirements related to setting up your AWS account to use with Leostream.
Architecting Your Cloud Infrastructure
When architecting your VDI or DaaS deployment in AWS, Leostream recommends referencing the AWS
Well-Architected framework. This framework includes guidelines and strategies for designing a VDI
environment that satisfies the five pillars of a Well-Architected framework.
1. Security protects information and systems.
2. Reliability prevents and quickly recovers from failures.
3. Performance Efficiency uses computing resources efficiently, such as choosing the right instances
sizes for your workloads.
4. Cost Optimization focuses on understanding and controlling costs.
5. Operational Excellence includes methods for continually improving processes and procedures.
For a complete description of the Well-Architected framework and to view the guidelines, please visit
https://aws.amazon.com/architecture/well-architected/.
Defining a User for Your Leostream Environment
Leostream manages AWS using the AWS EC2 API. When using Leostream to manage instances in AWS, you
must have an Access Key ID and Secret Access Key for a user account with the required permissions for EC2.
Creating an Identity and Access Management User
Leostream requires an Identity and Access Management (IAM) user with permissions to access EC2, in
order to manage desktop instances in AWS. You can create a new user for Leostream or use an existing user
if you have the required access keys. If you have an existing user, skip to Required AWS Permissions for
Leostream. Otherwise, to create a new Leostream IAM user:
1. Go to the Identity and Access Management service in your AWS account.
2. Click on the Users link in the Details Dashboard on the left.
3. Click Create New Users.
4. In the Create User form, enter a username for your Leostream user.
5. Ensure that the Generate an access key for each user option is selected.
6Using Leostream to Manage Amazon Web Services
6. Click Create.
7. After the user is created, click the Show User Security Credentials list to display the users access
and secrete access key, for example:
8. Make note of the Access Key ID and Secret Access Key.
You cannot download the Secret Access Key after you leave this page. Ensure that you store
your Access Key ID and Secret Access Key in a secure location for future use. You need these keys to
connect Leostream to your AWS account.
9. Close the Create User form.
Attaching Required AWS Permissions
After you create your Leostream user, assign the user to a policy that gives them full access to the EC2
service. You can attach the policy directly to the user or assign the user to a Group with the policy.
You can choose to use the default AmazonEC2FullAcess policy or create a new policy for Leostream that
provides full access only to EC2. To create a new policy:
1. Go to the Identity and Access Management service in your AWS account.
2. Click on the Policies link in the Details Dashboard on the left.
3. Click Create Policy.
4. Click the Select button for the Create Your Own Policy option.
5. Enter a name in the Policy Name edit field, and an optional description.
6. In the Policy Document edit field, enter the following minimum permissions. These permissions are
required for Leostream to inventory, launch, power control, terminate, and sync Leostream tags for
instances in EC2.
{
"Version": "2012-10-17",
"Statement": [
{
"Sid": "",
"Effect": "Allow",
"Action": [
"ec2:Describe*",
7Chapter 2: Configuring AWS for use with Leostream
"ec2:DeleteTags",
"ec2:CreateTags"
],
"Resource": "*"
},
{
"Sid": "",
"Effect": "Allow",
"Action": [
"ec2:TerminateInstances",
"ec2:StopInstances",
"ec2:StartInstances",
"ec2:RebootInstances"
],
"Resource": "*"
},
{
"Sid": "",
"Effect": "Allow",
"Action": "ec2:RunInstances",
"Resource": "*"
}
]
}
The policy above provides access to all instances in all region. Use the Resource parameter to
restrict the IAM user, and therefore your Leostream Connection Broker, to certain instances, such
as to a region or to instances with a certain tag. You can use the Validate Policy button to check if
you entered the code correctly.
7. Click Create Policy.
To attach the policy to the user:
1. Log into your AWS account as a user with full access to the Identity and Access Management
service.
2. Click on the Users link in the Details Dashboard on the left.
3. Click on your Leostream user in the list of users.
4. When editing that user, in the Permissions section, click the Attach Policy button.
5. In the list of policies, select the checkbox in front of your Leostream policy or the
AmazonEC2FullAcess policy.
6. Click Attach Policy.
If you plan to set up multiple Leostream users, create a Group with the required permissions, and assign
the users to that group.
8Using Leostream to Manage Amazon Web Services
1. Log into your AWS account as a user with full access to the Identity and Access Management
service.
2. Click on the Groups link in the Details Dashboard on the left.
3. Click the Create New Group button.
4. Enter a name in the Group Name edit field.
5. Click Next Step.
6. In the list of policies, select the checkbox in front of your Leostream policy or the
AmazonEC2FullAcess policy.
7. Click Next Step.
8. Click Create Group.
You can then add your Leostream user to this group and they will have the required permissions.
Setting up Security Groups
EC2 instances block all incoming traffic, by default. To ensure that the Connection Broker and desktop
instances can communicate, you must create one or more security groups that open the required ports for
incoming traffic. You can create a single security group to use for all components in your environment or
create separate security groups for the Leostream Connection Broker and desktop instances.
Port Type Required By Purpose
22 TCP Connection Broker For SSH access to the Connection Broker
For access to the Connection Broker web interface. If
Connection Broker
80 TCP you close port 80 on your Connection Broker, you may
omit that port from the security group.
For access to the Connection Broker web interface, and
Connection Broker,
443 TCP communication with the Leostream Agents and
Leostream Gateway
Leostream Connect.
The Leostream Gateway uses this default port range to
forward display protocol traffic from the user’s client
20001-
Leostream Gateway device to an instance isolated in a private OpenStack
30000
network. You may optionally change this port range
using the Leostream Gateway CLI.
9Chapter 2: Configuring AWS for use with Leostream
Port Type Required By Purpose
Port for communications from the Connection Broker
to the Leostream Agent.
Leostream Agent on the AWS
8080* TCP * The Leostream Agent port may be changed using the
Instances
Leostream Agent Control Panel dialog. If you change
the default Leostream Agent port, ensure that you
open the associated port in the security group
For RDP access to the AWS VDI/DaaS instances
3389* TCP AWS Instances ** If you use a display protocol other than RDP, ensure
that you open any ports required by that display
protocol.
Configuring a VPC
An Amazon Virtual Private Cloud (VPC) isolates EC2 instances on a virtual network within the AWS cloud,
allowing you to secure and separate instances for different customers, use cases, etc. All VPC configuration
must be done within the AWS Management Console. After you configure your VPCs, Leostream can launch
and manage AWS instances in those VPCs.
If your VPC uses AWS Directory Services, you must create a DHCP option set that associates the
Domain name and Domain name servers to the domain name and DNS addresses of your Directory
Services. Any Leostream Connection Broker launched within the VPC uses the DNS information in the DHCP
options set to resolve hostnames within the VPC.
To find the DNS addresses used by your Directory Services, open the Directory Services console in the AWS
Management Console and click on the Directory ID for your Directory Services. The Directory name and
DNS Address fields displays the domain name and DNS addresses you should use in your DHCP options set,
for example:
To create a new DHCP option set, go to the DHCP Options Set page in the VPC service and click the Create
DHCP options set button, highlighted in the following figure.
10Using Leostream to Manage Amazon Web Services
In the Create DHCP options set form, ensure that you complete the Domain name and Domain name
servers information.
After creating the DHCP option set, you can associate it with your VPC, as follows.
1. On the Your VPCs page, select your VPC.
2. Select Edit DHCP Options Set from the Actions drop-down menu, for example:
3. In the Edit DHCP Options Set dialog, select the DHCP options set associated with your Directory
Services.
4. Click Save.
Working with AWS Directory Services
Leostream can use AWS Directory Services to authenticate users and to join new AWS instances to the
associated domain. The VPC associated with the Directory Services must have a DHCP options set that
associates the Domain name and Domain name servers to the domain name and DNS addresses of your
Directory Services, as described in Configuring a VPC. By setting the DHCP option set, AWS automatically
configures the Leostream Connection Broker instance with the appropriate network information.
In addition, in order for an AWS instance to join a Directory Services domain, the instance must point to the
DNS servers used by the Directory Services. Before creating a desktop image to use in Leostream, ensure
that you modify the instance’s network configuration, as follows.
11Chapter 2: Configuring AWS for use with Leostream
1. Get the DNS addresses used by your Directory Services, as described in Configuring a VPC.
2. Open the instance’s Internet Properties dialog for the local area connection, shown in the following
figure.
3. Select the Use the following DNS server addresses option.
4. In the Preferred DNS server and Alternate DNS server fields, enter in the primary and secondary
DNS addresses used by your Directory Services.
5. Click OK to accept and close any open dialogs.
If you do not set the DNS addresses appropriately, the instance cannot join the Directory Services domain.
12Using Leostream to Manage Amazon Web Services
Chapter 3: Installing Leostream in AWS
You can quickly and easily install the Leostream Connection Broker using Leostream’s offering in the AWS
Marketplace. To run properly, the Connection Broker requires, at least, the following resources.
• 1 vCPU
• 8.0 GB of RAM
• At least 20 GB of hard drive space
• One NIC, ideally with Internet connectivity
When installing into EC2, Leostream recommends installing the Connection Broker can on
a t2.large instance type.
You can run the Connection Broker on any virtual or physical machine with the required resources. If you
are managing a hybrid cloud and need to install the Connection Broker on a platform outside of AWS,
please consult the Leostream Installation Guide for complete instructions. The remainder of this guide
covers installing the Connection Broker in your AWS account.
Launching a Connection Broker Instance
When launching a Connection Broker instance using the Leostream AMI in the AWS Marketplace, please
adhere to the following guidelines:
1. In Step 1, navigate to the AWS Marketplace and search for Leostream. Click the Select button for the
Leostream Connection Broker AMI, shown in the following figure, then click Continue on the Leostream
Connection broker description dialog that opens.
13Chapter 3: Installing Leostream in AWS
2. In Step 2, select a t2.large instance, or larger.
3. In Step 3:
a. If you want to use the Connection Broker with an AWS Directory Services, use the Network drop-
down menu to place the Connection Broker in the same VPC as the AWS Directory Services.
The Connection Broker must be in the same VPC to communicate with the Directory
Services. Also, ensure that the VPC’s DHCP option set is configured to use the domain and DNS
servers associated with the Directory Services (see Configuring a VPC.)
b. The Connection Broker must be able to communicate with the Leostream Agents installed on
your AWS desktop instances. Therefore, place the Connection Broker in the same VPC where you
plan to host your desktops, or ensure you configure your network to support Leostream Agent
communication.
c. You must be able to access the Connection Broker Administrator Web interface to configure your
Leostream environment, but you do not need to assign a public IP address to your Connection
Broker to do so. The Leostream Gateway provides access to Connection Brokers that are isolated
in a private network. See “Forwarding Connection Broker Logins through the Gateway” in the
Leostream Gateway Guide for complete instructions.
d. Consider using a T2 Unlimited instance type to avoid CPU throttling.
4. In Step 4, allocate at least 20 GB of storage to the Connection Broker.
5. In Step 5, tag the instance using your standard tagging convention.
6. In Step 6, the Leostream AMI suggests a security group with the following rules.
These rules provide SSH, HTTP, and HTTPS access to the Connection Broker instance. If you want to
restrict the Connection Broker to only HTTPS, remove the inbound rule for port 80. To limit SSH access,
you can restrict the source to the IP address range of your clients.
7. In step 7, click Launch.
14Using Leostream to Manage Amazon Web Services
8. Select a key pair to use for the instance. You will need this key pair to SSH into the Connection Broker
instance.
After launching your Connection Broker instance, update the underling operating system and Connection
Broker version to the latest version, by running the following commands from the instance’s terminal
yum update
curl -s
https://45c8b52b37e25bfc3a5cec41ef7e6e6fcb2e3478bdaf591d:@packagecloud.i
o/install/repositories/leostream/9_0_prod/script.rpm.sh | sudo bash
sudo yum -y install leostream-broker
sudo /sbin/reboot
The Connection Broker includes a default user named leo that is used for Connection Broker operation.
This user must be in the sudoers file. The Connection Broker does not require the root user for
operation and Leostream recommends the root user not be used to apply upgrades or perform any
operations.
Launching a Leostream Gateway Instance
The Leostream Gateway installs on an instance running the latest CentOS or Red Hat Enterprise Linux
operating system. When launching an instance for the Leostream Gateway, ensure you choose the
appropriate instance type based on the size of your environment.
The number of user connections that can be handled by the Leostream Gateway is determined by two key
factors, the number of available ports for forwarding display protocol traffic and the amount of CPU. Ensure
that you choose an instance type with adequate CPU, particularly if you are connecting users to their
desktops with a high-performance protocol such as Mechdyne TGX.
The Leostream Gateway must have network access to your AWS instances and must be reachable by the
end user’s client. Typically, that means locating the Leostream Gateway in the same VPC as your instances
and then assigning an Elastic IP address to the gateway instance.
After building and updating your base operating system, run the following command to install your
Leostream Gateway.
curl http://downloads.leostream.com/gateway.sh | bash
If you need to use the Leostream Gateway to access your Connection Broker login page, SSH into the
Leostream Gateway instance as a user with sudo privileges and execute the following command:
leostream-gateway --broker
15Chapter 3: Installing Leostream in AWS
Obtaining Your Leostream License
After installing your Connection Broker, you must obtain your Leostream license key. Your Connection
Broker license is derived from the serial number you received from Leostream Sales. If you did not receive
your Connection Broker 9.0 serial number, please contact sales@leostream.com.
You can generate the license key from the Connection Broker Administrator web interface if your
Connection Broker has internet access, as follows.
1. Enter https:// in your Web browser’s URL edit field, depending on if
you can access your Connection Broker or if you are using the Leostream Gateway to forward
traffic. The Connection Broker Sign In page opens.
2. Sign into the Connection Broker Web interface using the following default credentials:
• User name: admin
• Password: leo
3. Click Sign In. The Leostream license page opens.
4. If your Connection Broker has internet access, click the link to go to
https://license.leostream.com.
The installation code for your Connection Broker is automatically populated. If your Connection
Broker does not have internet access, note the Installation code to the right of the form and
navigate to the Leostream license server from a device with internet access.
5. In the Leostream license key generator, enter the Serial number you received from Leostream. If
you do not have a Leostream Serial number, contact sales@leostream.com.
6. If the Installation code is not automatically populated, enter the Installation code listed on your
Connection Broker.
7. In the Email address form, enter your email address.
8. Click Generate a license.
9. If you navigated to the Leostream license generator from your Connection Broker, click Apply to the
broker to copy the new license key into your Connection Broker. Otherwise, copy the key into a text
file.
10. Back on your Connection Broker Leostream License form, enter the license key you obtained from
the Leostream license generator. Ensure that you include the BEGIN and END lines.
11. Click on the License Agreement link to view the end user license agreement. Select the I have read
and accept the License Agreement option if you agree to the terms of the Leostream end user
license agreement.
16Using Leostream to Manage Amazon Web Services
12. Click Save. The Welcome page opens, giving you the option to check for any Connection Broker
updates.
17Chapter 4: Preparing AWS Instances and Images
Chapter 4: Preparing AWS Instances and Images
Leostream can manage connections to existing Windows and Linux AWS instances, and can provision new
AWS instances from existing AWS images, or AMIs. All instances manage by Leostream should have an
installed Leostream Agent that can communicate with the Connection Broker. The Leostream Agents are
available on the Leostream Product Downloads page. The Leostream Installation Guide contains complete
instructions for installing the Leostream Agent.
During installation, you can specify the address of the Connection Broker that manages the instance. If the
Connection Broker and instance are in the same VPC, you can point the Leostream Agent at the Connection
Broker’s private IP address. Otherwise, to ensure proper communication between the Connection Broker
and Leostream Agents, use the Connection Broker public or elastic IP.
After the Leostream Agent is installed, you can use the Test button on the Leostream Agent Control Panel
dialog to ensure that the Leostream Agent can contact the Connection Broker. To test if the Connection
Broker can contact the Leostream Agent, go to the > Resources > Desktops page in the Connection Broker
Administrator Web interface and click the Status link associated with the instance’s record in the
Connection Broker. Communication must work in both directions to use all Leostream functionality.
If you plan to use Leostream to provision new instances in AWS, and to have Leostream join the new
instances to your Directory Services domain, please adhere to the following guidelines.
• The instance used to create the image must not be joined to the domain. Leostream only joins
instances to a domain if they are currently part of a Workgroup.
• The instance must have an installed Leostream Agent that is registered with your Connection
Broker. If the Leostream Agent cannot communicate with the Connection Broker, new instances will
not be joined to the domain.
After you create an image from an instance following the previous guidelines, you can configure Leostream
pools that automatically provision new capacity in AWS (see Chapter 6: Pooling and Provisioning in AWS.)
18Using Leostream to Manage Amazon Web Services
Chapter 5: Integrating with Your AWS Infrastructure
In the Setup section of the Connection Broker Administrator Web interface, you integrate Leostream with
the other components of your hosted desktop environment, such as your Amazon Directory Services and
your AWS regions.
The Setup section is also used to integrate your Connection Broker with the Leostream Gateway. Note that
this Quick Start guide does not cover using the Leostream Gateway. For more information on configuring
your Connection Broker to work with the Leostream Gateway, see the Leostream Gateway Guide.
The Leostream Gateway may be required if your desktop instances are located in a VPC and not given
publicly accessible IP addresses.
Connecting to Your Amazon Directory Services
To authenticate users with Amazon Directory Services, or other Microsoft Active Directory server, you must
first register that domain with your Connection Broker, as follows.
1. Go to the > Setup > Authentication Servers menu.
2. Click the Add Authentication Server link.
3. In the Add Authentication Server form, enter a name for this server in the Connection Broker in the
Authentication Server name edit field.
4. In the Domain edit field, enter the domain name associated with this Active Directory server.
5. In the Connection Settings section, shown in the following figure, use the following procedure to
integrate with your Active Directory authentication server.
a. Select Active Directory from the Type drop-down list.
b. From the Specify address using drop-down menu, select Hostname or IP address.
19Chapter 5: Integrating Leostream with Your AWS Infrastructure
c. Enter the authentication server hostname or IP address in the Hostname or IP address edit
field.
d. Enter the port number in the Port edit field.
e. Check the Encrypt connection to authentication server using SSL (LDAPS) checkbox if you
need a secure connection to the authentication server. The port number automatically
changes to 636. Re-edit the Port edit field if you are not using port 636 for secure connections.
6. In the Search Settings section, shown in the following figure, enter the username and password for
an account that has read access to the user records. Leostream does not need full administrator
rights to your Active Directory authentication server.
7. In the User Login Search section, ensure that the Match Login name against this field edit field is
set to sAMAccountName. This is the attribute that the Connection Broker uses to locate the user in
the authentication server, based on the information the user enters when logging into Leostream.
8. Click Save.
Connecting to Your AWS EC2 Regions
In order to manage EC2 instances in AWS, you need to create an Amazon Web Services center in your
Leostream Connection Broker.
Leostream defines centers as the external systems that inform the Connection Broker about desktops
and other resources that are available for assignment to end users.
You can currently create centers for the following AWS regions:
• US East (N. Virginia)
• US East (Ohio)
• US West (N. California)
• US West (Oregon)
• Africa (Cape Town)
• Asia Pacific (Hong Kong)
• Asia Pacific (Mumbai)
• Asia Pacific (Osaka-Local)
• Asia Pacific (Seoul)
20Using Leostream to Manage Amazon Web Services
• Asia Pacific (Singapore)
• Asia Pacific (Sydney)
• Asia Pacific (Tokyo)
• Canada (Central)
• EU (Frankfurt)
• EU (Ireland)
• EU (London)
• EU (Milan)
• EU (Paris)
• EU (Stockholm)
• Middle East (Bahrain)
• South America (São Paulo)
• China (Beijing)
• China (Ningxia)
To create an AWS center:
1. Go to the > Setup > Centers page.
2. Click the Add Center link.
3. In the Add Center form, select Amazon Web Services from the Type drop-down menu. The Add
Center form updates to display the fields shown in the following figure.
21Chapter 5: Integrating Leostream with Your AWS Infrastructure
4. Enter a name for the center in the Name edit field.
5. Select the AWS region you want to manage from the Region drop-down menu. Create separate
centers for each region you want to manage in the Connection Broker.
6. Enter your AWS access key into the Access Key ID edit field. You can create an IAM user to use with
Leostream. Ensure that user has sufficient privileges to access EC2.
7. Enter the secret key associated with your access key into the Secret Access Key field.
8. Select a time from the Inventory refresh interval drop-down menu. This setting tells the
Connection Broker how often to refresh the desktops imported from this center. The refresh
interval is the length of time between when one refresh action completes and the next refresh
action begins.
If you are launching EC2 instances and creating new AMIs in the AWS Management Console, the
Connection Broker finds these new items when the next refresh interval occurs.
9. Select the Continuously apply any Auto-Tags option to have the Connection Broker create Tags in
AWS for the instances inventoried from this center. The Connection Broker creates tags in AWS for
each Leostream Tag associated with the instance. See Tagging AWS Instances and Volumes for
complete instructions.
10. Click Save to create the center.
All instances in all availability zones in the center’s AWS region appear in the > Resources > Desktops page.
The AMIs available for provisioning appear on the > Resources > Images page. See the “Working with
Desktops” section of the Connection Broker Administrator’s Guide for information on viewing, editing, and
controlling desktops from within the Connection Broker.
If you need to support a multi-region deployment, repeat the previous procedure to create a center for
each region.
22Using Leostream to Manage Amazon Web Services
Chapter 6: Pooling and Provisioning in AWS
After you create your centers and the Connection Broker inventories your desktops, you logically group the
desktops into pools. The Leostream Connection Broker defines a pool as any group of desktops. Pools can
be nested within one another, to create sub-pools. Pools and sub-pools have three distinct functions in
Leostream:
1. Organizing desktops on the > Resources > Desktops page
2. Provisioning new virtual machines in AWS EC2
3. Indicating the desktops that a user may connect to and how the Connection Broker manages the
user’s connection to those desktops
Creating Pools
When using Leostream to provision new instances in AWS, the key is to construct your pool in a way that
ensures that newly provisioned desktops become members of that pool. One method is to set the pool to
contain all instances in the AWS region associated with the center you created in the previous chapter.
If that pool definition is too broad, another easy way to ensure that new desktops become part of a pool is
to define the pool based on the instance name, which you set during provisioning, for example:
1. Go to the > Configuration > Pools page.
2. Click the Create Pool link. The Create Pool form opens.
3. Enter a name for the pool in the Name edit field.
4. In the first row of the Desktop Attribute Selection section:
a. Select Name from the Desktop attribute drop-down menu.
b. Select begins with from the Conditional drop-down menu.
c. In the Text value field, enter the name you will use for all the instances in this pool.
5. Click Save to save the pool.
For a complete description of creating pools, including how to create a pool of all desktops in an AWS
center, see the “Creating Desktop Pools” chapter in the Connection Broker Administrator’s Guide.
Provisioning New Instances
Your Leostream license determines if provisioning is enabled in your Connection Broker. If you do not
see the options described in this section, contact sales@leostream.com to update your license key.
23Chapter 6: Pooling and Provisioning in AWS
The Provisioning section of the Edit Pool page allows you to configure when and how the Connection
Broker creates new EC2 instances in your AWS account. By default, the Provisioning enabled checkbox is
selected, as shown in the following figure, and provisioning is on for all your pools.
The Connection Broker determines when to create new instances by comparing the thresholds specified in
the Provisioning Limits section to the current contents of the pool. If you edit an existing pool, the
Connection Broker displays the current contents of the pool size to the right of the Edit Pool form, for
example:
The number entered into the Start provisioning when unassigned desktops in pool drops below field
specifies a lower bound on the number of unassigned desktops in the pool, where the number of
unassigned desktops is the total number of desktops minus the number of assigned desktops.
For example, the previous figure shows one assigned desktop and 46 total desktops. Therefore, there are
45 unassigned desktops. An unassigned desktop can have a desktop status of either available or
unavailable.
The Connection Broker checks the provisioning limits, and creates new instances, at the following times
• When the pool is saved
• When a user is assigned to a desktop in this pool
• When any pool_stats or pool_history_stats job runs
The Connection Broker continues to provision new desktops whenever the lower threshold is crossed, until
the upper threshold specified in the Stop provisioning when total desktops in pool reaches field is
reached, indicated by the Total value in the pool size information.
Use the Provisioning Parameters section to configure how Leostream provisions new instances in AWS.
24Using Leostream to Manage Amazon Web Services
1. Select the AWS center to provision new machines into from the Provision in center drop-down
menu. The remainder of the form updates based on the contents of your selection. The following
figure shows an example of the Provisioning Parameters section.
2. Enter a name for the virtual machine in the Virtual Machine Name edit field. If the pool is defined
as instance names that begin with a certain string, ensure that the Virtual Machine Name field
starts with that string.
3. If the name entered in step four contains one of the {SEQUENCE} dynamic tag, enter the starting
number for the sequence in the Optional sequence number for virtual machine name edit field.
The Connection Broker starts naming virtual machines at this number and increments the number
for each machine created.
4. Select the image to use from the Deploy from image drop-down menu. This menu contains all the
AMIs available in your account in the AWS region associated with the selected center.
5. Select the instance size from the Instance type drop-down menu.
6. If you chose a T2 instance type, select the Enable T2 Unlimited option to indicate the instance is
allowed to burst beyond its baseline CPU usage.
7. Select the VPC from the Network/Subnet drop-down menu.
If you add the instance to a VPC that does not provide public IP addresses, you can use the
Leostream Gateway to connect clients that are outside of the private network. See the Leostream
Gateway Guide for more information.
25Chapter 6: Pooling and Provisioning in AWS
8. Select the security group to assign to the instance from the Security group drop-down menu.
9. In the IAM Instance Profile name edit field, optionally enter the name of an IAM instance profile to
attach to the provisioned instances. If you created your IAM role using the console, the instance
profile has the same name as your IAM role.
10. Select the Initialize newly provisioned desktops as deletable option to indicate that the
Connection Broker is allowed to delete this VM from disk. When this option selected, the Edit
Desktop page for the newly provisioned VM has the Allow this desktop to be deleted from disk
option selected, by default. Use release plans to schedule VM deletion.
For more information on using release plans to terminate AWS instances, see the example on
deleting virtual machines in the “Release Plans” section of Chapter 10 of the Connection Broker
Administrator’s Guide.
11. Select the Initialize newly provisioned desktop as unavailable option to set the desktop status to
Unavailable. The Connection Broker will not offer a desktop to users if the desktop’s status is
set to Unavailable, allowing you to perform post-provisioning actions on the desktop.
12. Click Save.
Disabling Provisioning
If you’ve set non-zero provisioning limits in your pool and need to temporarily disable provisioning, uncheck
the Provisioning enabled check box, shown in the following figure.
The Connection Broker may automatically disable provisioning in cases where provisioning is failing due to
configuration errors in your pool. If this occurs, please check and correct your provisioning parameters
before enabling provisioning. Typical errors to look for include:
• Your AWS account has reached its quota for the selected instance type
• The instance type is not available in your AWS region
If provisioning fails due to an issue with the AWS API that the Connection Broker is using, the Connection
Broker does not disable provisioning. In these cases, the Connection Broker retries the provisioning
command, until the AWS APIs become responsive.
26Using Leostream to Manage Amazon Web Services
Joining Instances to a Domain
You can use Leostream to join AWS instance to a domain, include Amazon Directory Services. When
enabled, the Connection Broker attempts to join a desktop to the domain when the Leostream Agent on
the desktop registers with the Connection Broker, for example, when a desktop is provisioned or when you
reboot the desktop.
Before configuring a pool to join desktops to a domain, you must define the Active Directory domain on
the > Setup > Authentication Servers page.
You enable domain joining for a pool:
1. Select the Join virtual machine to a domain option in the Domain Join section, shown in the
following figure.
2. Select the domain from the Domain drop-down menu.
3. Optionally, from the Organizational Unit drop-down menu, select an OU for the desktops.
4. To reset the desktops hostname when joining it to the domain, select the Set desktop hostname to
virtual machine name check box. With this option selected, the Leostream Agent attempts to set
the hostname to the value shown in the Name column on the > Resources > Desktops page.
If the pool provisions new desktops, this is the name found in the Virtual machine name edit field.
The Name field must contain a valid hostname, as follows:
• The name uses only the standard character set for Computer Name, which includes letters,
numbers, and the following symbols: ! @ # $ % ^ & ' ) ( . - _ { } ~
• Then name cannot be longer than 15 characters.
Leostream performs the domain join for any desktop in the pool that is not already joined to a domain.
Leostream does not have to provision the desktop to perform the domain join.
27Chapter 6: Pooling and Provisioning in AWS
Tagging AWS Instances and Volumes
When provisioning new instances in AWS, the Connection Broker automatically tags each instance and its
volume in the AWS Management Console with a Name tag that contains the instance name. The
Connection Broker can create and associate up to four additional AWS tags with any instances provision
into or inventoried from an Amazon Web Services center. To tag instances:
1. Select the Continuously apply any Auto-Tags option in your AWS center (see Connecting to Your
AWS EC2 Regions).
2. Create Leostream tags with auto-tag rules that match your desktop naming scheme, as described in
the remainder of this section.
When the Connection Broker provisions or discovers new instances in your AWS center and those instances
match any auto-tagging rules, Leostream automatically assigns the Leostream tag to the instance and
creates and associates an AWS tag to the instance in the AWS Management Console.
The Leostream tag group name becomes the Key name in AWS. The Leostream tag name becomes that
key’s Value in AWS. To define the tag group names and tags, go to the > Setup > Tags page, shown in the
following figure.
Click the Define Tag Groups link at the top of the page to open the Define Tag Groups form, shown in the
following figure.
28Using Leostream to Manage Amazon Web Services
In the Label for tag group edit fields, enter the string to use for the tag key in AWS. Keys in AWS can have a
maximum of 127 characters. For example, the previous figure creates a Locations tag key.
Each Leostream tag group must have a label. However, the Connection Broker does not tag the instance
in AWS if the Leostream tag group does not contain any tags or if the instance does not match any auto-
tagging rules for tags in that group.
After labelling your tag groups, create tags in each of the groups by clicking the Create Tag link on the >
Setup > Tags page. The Create Tag form opens, shown in the following figure.
The string entered in the Name edit field is the value for the tag key selected in the Tag group drop-down
menu. The tag is applied to any instance that satisfies the auto-tagging rule defined in the Auto-tag drop-
down menu.
29Chapter 6: Pooling and Provisioning in AWS
To decide if an auto-tagging rule applies to a desktop, the Connection Broker matches the value entered in
the Text to match field against the value shown in the Name column on the Connection Broker > Resources
> Desktops age. For example, in the previous figure, the tag key Location is given the value Boston for
any instance with a name that starts with bos.
30Using Leostream to Manage Amazon Web Services
Chapter 7: Connecting Users with DCV
After you define your desktops pools, create rules that control how the Connection Broker manages the
user’s connection to the desktops in those pools, including how long the user retains access to a particular
desktop and how they connect to it.
The Leostream Connection Broker defines a pool-based plan as a set of rules that determine
how the Connection Broker manages the connection to a desktop in a pool. This step describes
three types of pool-based plans. 1) Protocol, 2) Power Control, and 3) Release. The Connection
Broker also provides location-based plans for setting registry keys and attaching network
printers to the remote desktop. See the Connection Broker Administrator’s Guide for information
on using location-based plans.
Leostream supports a wide range of display protocols and you can mix and match display protocols, to
provide the appropriate level of performance for each user based on their tasks at hand. When connecting
users to instances in EC2, you can leverage the NICE DCV high performance display protocol to connect
users to their EC2 instances at no additional charge. Leostream supports both client-based and in-browser
NICE DCV connections, with or without the Leostream Gateway.
The remainder of this chapter focuses on how to use Leostream with NICE DCV. For information on other
display protocols, consult the Leostream Display Protocol Guide.
Overview of Protocol Plans
Protocol plans determine the display protocol the Connection Broker uses to connect a user to their
desktop. The Connection Broker provides one default protocol plan, which is shown on the > Configuration
> Protocol Plans page, shown in the following figure.
The default Protocol Plan instructs the Connection Broker to connect to the remote desktops using
Microsoft RDP.
31Chapter 7: Connecting Users with DCV
To create a new Protocol Plan, click the Create Protocol Plan link. The Create Protocol Plan form is divided
into sections based on the type of client device used to log into Leostream, for example, Leostream
Connect or the Leostream Web client.
Your Connection Broker license determines which display protocols your Connection Broker
can use. If the display protocol you want to use is not shown on the Create Protocol Plan, please
contact sales@leostream.com to obtain an updated license key.
In each section, indicate which protocol the Connection Broker should use to connect users to their
desktops by selecting 1 from that protocol’s Priority drop-down menu. Then, use the Configuration file and
Command line parameters to determine how that connection is launched. For example, for RDP, the
Configuration file is a list of RDP-file parameters that determine if, for example, the connection is launched
in full screen.
See the Leostream Guide for Working with Display Protocols for more information on
defining command line parameters and configuration files for each supported display protocol.
For a complete description of protocol plans, see “Building Pool-Based Plans” in the Connection Broker
Administrator’s Guide.
32Using Leostream to Manage Amazon Web Services
Chapter 8: Offering Desktops to Users
Power Control Plans
Power control and release plans allow you to take actions on the user’s remote session based on different
events, such as:
• When the user disconnects from their desktop
• When the user logs out of their desktop
• When the desktop is released to its pool
• When the user’s session has been idle for a specified length of time
The remote desktop must have an installed and running Leostream Agent to allow the
Connection Broker to distinguish between user logout and disconnect and to perform actions
based on idle time.
Power control plans define the power control action to take on a desktop. Available power control plans are
shown on the > Configuration > Power Control Plans page, shown in the following figure.
New Connection Broker installations contain one default power control plan, called Default. You can create
as many additional power control plans as needed for your deployment. To build a new power control plan:
1. Click the Create Power Control Plan link on the > Configuration > Power Control Plans page. The
Create Power Control Plan form, shown in the following figure, opens.
33Chapter 8: Offering Desktops to Users
Enter a descriptive name. You’ll refer to
this name when assigning the plan to a
pool.
Select the amount of time to wait before
changing the desktop’s power state. A wait
time of zero tells the Connection Broker to
immediately execute the selected power
control action.
Select the power control action to take
after the wait time elapses. For the
Connection Broker to take actions based
on disconnect or idle-time events, you
must install the Leostream Agent on that
desktop.
2. Enter a unique name for the plan in the Plan name edit field.
3. For each of the remaining sections:
a. From the Wait drop-down menu, select the time to wait before applying the power action.
b. From the then drop-down menu, select the power control action to apply. Selecting Do not
change power state renders the setting in the Wait drop-down menu irrelevant, as no
action is ever taken.
4. Click Save to store the changes or Cancel to return to the > Configuration > Power Control Plans
page without creating the plan.
Release Plans
Release plans determine how long a desktop remains assigned to a user. When the assignment is broken,
the Connection Broker releases the desktop back to its pool, making it available for other users. Available
release plans are shown on the > Configuration > Release Plans page, shown in the following figure.
When a desktop is assigned to a user, the Connection Broker always offers that desktop to that
user, regardless of where the user logs in, and to no other users. Desktops can be policy-assigned
or hard-assigned. For a description of hard-assigned desktops, see the Connection Broker
Administrator’s Guide.
34Using Leostream to Manage Amazon Web Services
New Connection Broker installations contain one default release plan. The default release plan is designed
to keep the user assigned to their desktop until they log out. When the user logs out, the Connection
Broker releases the desktop back to its pool. You can create as many additional release plans as needed for
your deployment.
For example, to build a release plan that schedules a logout one hour after the user disconnects from their
desktop:
1. Click the Create Release Plan link on the > Configuration > Release Plans page. The Create Release
Plan form, shown in the following figure, opens. The figure describes additional use cases you can
model using Release Plans.
35Chapter 8: Offering Desktops to Users
Enter a descriptive name. Refer to this
name when assigning this plan to pools.
To model a persistent desktop, ensure
that the desktop is not released when the
user disconnects or logs out.
If a Leostream Agent is not installed on
the remote desktop, the Connection
Broker cannot distinguish when the user
disconnects or logs out of their desktop. If
the user logs in using Leostream Connect,
the client sends a Connection Close event,
and you can determine if the Disconnect
or Log out portion of the release plan
should be executed.
You can perform actions on the desktop
after the user’s session is idle for the
selected elapsed time. In addition, you
can monitor the desktop’s CPU levels to
ensure that any processes the user is
running come to completion before you
forcefully log them out.
You can release a desktop back to its pool
after a specified elapsed time since the
desktop was initially assigned to the user.
After the desktop is released, if the user
remains logged in, the Connection Broker
considers them to be rogue.
To avoid rogue users, forcefully log out
the user when the desktop is released to
its pool.
Select this option to have the Connection
Broker completely delete the VM from
disk as soon as the desktop is released to
its pool. The Connection Broker deletes
the VM only if the “Edit Desktop” page for
that VM selects the “Allow this desktop to
be deleted from disk” option.
2. Enter a unique name for the plan in the Plan name edit field.
3. To build the Release Plan for our example, in the When User Disconnects from Desktop section,
select after 1 hour from the Forced Logout drop-down menu.
4. Click Save.
When using this release plan, the Connection Broker forcefully logs the user out an hour after they
disconnect from their desktop. The logout event then triggers the When User Logs Out of Desktop section
of the release plan, which releases the desktop back to its pool and removes the user’s assignment to the
desktop.
For more details on creating and using release plans, see the “Release Plans” section in Chapter 10 of the
Connection Broker Administrator’s Guide.
36You can also read