Cubeholter WS - Cubeholter Web User manual - CARDIOLINE
←
→
Page content transcription
If your browser does not render page correctly, please read the page content below
Cubeholter WS - Cubeholter Web

                User manual

                                 Rev. 07 – 10.01.2020
1936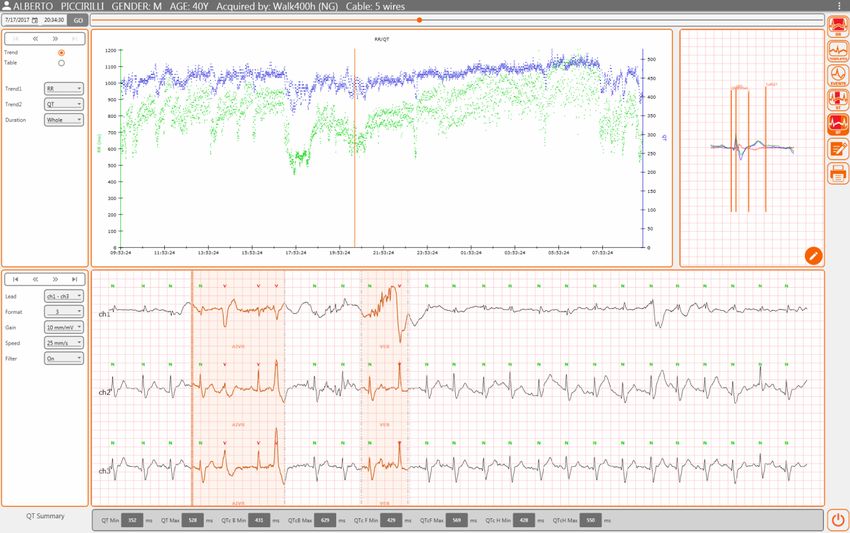
Cubeholter WS - Cubeholter Web

All rights reserved © Cardioline S.p.A.
CARDIOLINE® is a registered trademark of Cardioline S.p.A.
This publication may not be reproduced, in whole or in part, in any form or manner, without prior written authorisation
from:

       Cardioline Spa
       Via Linz, 151
       38121 Trento
       Italy
Cubeholter WS - Cubeholter Web

Contents

1.     GENERAL INFORMATION .........................................................................................................................1
     1.1.     Minimum Requirements for the computer ......................................................................................1
     1.2.     Licensing terms ................................................................................................................................1
     1.3.     Other important information ...........................................................................................................2
2.     SAFETY INFORMATION .............................................................................................................................3
3.     SYMBOLS AND LABEL ...............................................................................................................................6
     3.1.     Explanation of the symbols ..............................................................................................................6
     3.2.     Device label ......................................................................................................................................6
4.     INTRODUCTION ........................................................................................................................................7
     4.1.     Purpose of the manual .....................................................................................................................7
     4.2.     Recipients.........................................................................................................................................7
     4.3.     Intended use ....................................................................................................................................7
     4.4.     Description of the device .................................................................................................................8
       4.4.1.        Cubeholter WS .........................................................................................................................8
       4.4.2.        Cubeholter Web .......................................................................................................................8
       4.4.3.        Device contents .......................................................................................................................9
     4.5.     General overview .............................................................................................................................9
       4.5.1.        Test Archive Window – only Cubeholter WS ............................................................................10
       4.5.2.        Test Analysis window ...............................................................................................................11
5.     PREPARATION FOR USE............................................................................................................................13
     5.1.     Installing the hardware protection key – only Cubeholter WS .........................................................13
     5.2.     Software installation ........................................................................................................................13
       5.2.1.        Installing Cubeholter WS ..........................................................................................................13
       5.2.2.        Installing Cubeholter Web .......................................................................................................14
     5.3.     Starting Cubeholter ..........................................................................................................................15
       5.3.1.        Starting Cubeholter WS............................................................................................................15
       5.3.2.        Starting Cubeholter Web .........................................................................................................16
6.     TEST ARCHIVE WINDOW – only Cubeholter WS .......................................................................................18
     6.1.     General overview .............................................................................................................................18
     6.2.     Archive .............................................................................................................................................19
       6.2.1.        Edit the patient data of a test ..................................................................................................19
       6.2.2.        Deleting a test ..........................................................................................................................20
Cubeholter WS - Cubeholter Web

     6.3.     Import a test ....................................................................................................................................21
     6.4.     Preparing a recorder ........................................................................................................................22
     6.5.     Deleting a recording.........................................................................................................................24
7.     VIEW, ANALYSE AND REPORT A TEST .......................................................................................................26
     7.1.     Analyse and report a test .................................................................................................................26
     7.2.     Creating the final report ..................................................................................................................27
     7.3.     Printing the final report ...................................................................................................................28
     7.4.     Test analysis windows ......................................................................................................................28
       7.4.1.        Rhythm section ........................................................................................................................29
       7.4.2.        RR Window...............................................................................................................................31
       7.4.3.        Template Window....................................................................................................................33
       7.4.4.        Event Window ..........................................................................................................................36
       7.4.5.        HRV window .............................................................................................................................39
       7.4.6.        ST Window ...............................................................................................................................41
       7.4.7.        QT Window ..............................................................................................................................45
8.     AUTOMATIC ANALYSIS .............................................................................................................................48
     8.1.     General information.........................................................................................................................48
     8.2.     Analysis parameters .........................................................................................................................48
     8.3.     Event classification methods............................................................................................................49
       8.3.1.        Morphology .............................................................................................................................49
       8.3.2.        Rhythm.....................................................................................................................................49
9.     DEVICE SETTINGS .....................................................................................................................................54
     9.1.     General information.........................................................................................................................54
     9.2.     Analysis configuration ......................................................................................................................54
       9.2.1.        Rhythm.....................................................................................................................................55
       9.2.2.        RR .............................................................................................................................................56
       9.2.3.        ST Analysis................................................................................................................................57
       9.2.4.        Pacemaker ...............................................................................................................................57
     9.3.     Report configuration ........................................................................................................................58
       9.3.1.        Report ......................................................................................................................................58
       9.3.2.        Report title ...............................................................................................................................59
       9.3.3.        Booked print-outs ....................................................................................................................60
       9.3.4.        Summary ..................................................................................................................................60
10. SET THE DEVICE IN ACCORDANCE WITH GDPR (General Data Protection Regulation) ............................61
     10.1.    General information.........................................................................................................................61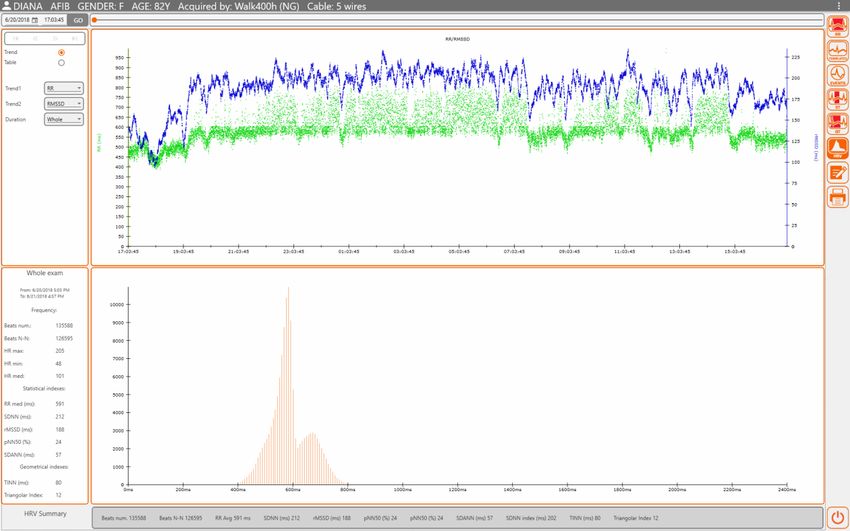
Cubeholter WS - Cubeholter Web

   10.2.      Encrypt the folder containing the database .....................................................................................61
11. UPDATING THE SOFTWARE AND OPTIONS ..............................................................................................62
   11.1.      Updating the software .....................................................................................................................62
   11.2.      Updating a hardware key .................................................................................................................62
12. MAINTENANCE AND TROUBLESHOOTING ...............................................................................................65
   12.1.      General information.........................................................................................................................65
   12.2.      Operation check ...............................................................................................................................65
   12.3.      Archive management and back up...................................................................................................65
   12.4.      Troubleshooting table ......................................................................................................................65
13. TECHNICAL SPECIFICATIONS ....................................................................................................................67
   13.1.      Filter features...................................................................................................................................67
   13.2.      Applied harmonised standards ........................................................................................................68
   13.3.      Compatible devices ..........................................................................................................................68
14. WARRANTY ..............................................................................................................................................69
Cubeholter WS - Cubeholter Web
Cubeholter WS - Cubeholter Web
                                                                                            1. GENERAL INFORMATION

1.          GENERAL INFORMATION

This manual is an integral part of the device and should always be available as support material to the clinical
practitioner or operator. Strict compliance with the information contained in this manual is an essential
prerequisite for the proper and reliable use of the device.
Have the operator read the manual thoroughly, as a great deal of the information is only described once.

1.1.        Minimum Requirements for the computer
Cubeholter can be installed on any computer that meets the following minimum requisites:

Operating System ............................ Windows 7 or higher, 32 or 64 bit
Processor......................................... Intel core i5 or higher
RAM ................................................ More than or equal to 8GB
Free space on Hard Disk .................. At least 2GB for the program plus the space for the archive
Monitor ........................................... 16:10 form factor @ 1600x1050, 22” or more (100% resizing)
                                                      16:9 form factor @ 1920x1080, 15.4” or more (resizing >= 125%)
USB.................................................. At least 1 USB port
Printer ............................................. Laser B/N or Colour
Safety Standard                                IEC 60950-1

1.2.        Licensing terms
By installing the software, the terms and conditions described as follows are accepted.
The object of this agreement is granting the licence for use of the software and the operating manual.
Cardioline S.p.A. guarantees a personal licence, non-exclusive and non-transferable, for use of the software
and the attached documents. The software and accompanying documents are protected by copyright. The
user must comply with copyright law dispositions.
All rights relative to the software are the property of Cardioline S.p.A.. The transfer of software onto another
computer by internet or data channel is not permitted.
The programs and the attached documents cannot be changed, copied, merged with other programs or
made available to third parties.
The user is deemed responsible for any damage stemming from non-compliance with the copyright, or from
violation of the conditions reported in this agreement.

1
Cubeholter WS - Cubeholter Web
                                                                              1. GENERAL INFORMATION

1.3.        Other important information
This manual was written with the utmost care. Should you find any details that do not correspond to those
contained in this manual, please inform Cardioline S.p.A., who will proceed to correct such inconsistencies as
promptly as possible.

The information contained in this manual is subject to change without notice.
All changes will be in compliance with the regulations governing the manufacturing of medical equipment.

All trademarks mentioned in this document are the property of their respective owners. Their protection is
guaranteed.
No part of this manual may be reprinted, translated or reproduced without the manufacturer's written
authorisation.

The codes relating to this manual are listed below.

 Language                     Code
 Italiano                     36519171_ITA

2
Cubeholter WS - Cubeholter Web
2. SAFETY INFORMATION
2. SAFETY INFORMATION
Cardioline S.p.A. will be held responsible for the safety, reliability and functionality of the devices only if:
1. Assembly, modification or repair operations are carried out by Cardioline S.p.A. or by one of its
Authorised Assistance Centres;
2. The device must be used in compliance with the instructions contained in the user manual.
Always contact Cardioline S.p.A. should you wish to connect any devices not mentioned in this manual.
Warnings
This manual provides important information on the proper use and safety of the device. Failure to
comply with the described operating procedure, improper use of the device, ignoring the
specifications and recommendations supplied, may cause severe physical injuries to the operators,
patients and bystanders, or may damage the device.
The device cannot be modified in any way.
Do not use the device if you suspect it is malfunctioning.
The device captures and presents the data that represents the physiological condition of the patient;
this information can be examined by specialist medical staff and will be useful in providing an
accurate diagnosis. In any event, the data cannot be used as the only means to make an accurate
diagnosis of the patient.
The operators that this device is intended for must have the required competence regarding medical
procedures and the treatment of patients. They must also be sufficiently trained in using the device.
Have the operator carefully read and understand the contents of the operator manual and the other
annexed documents before using the device for clinical applications. Inadequate knowledge or
training could pose a greater risk to the physical safety of operators, patients and bystanders, or
could damage the device.
The installation of the software, described in chap. 5, requires basic computer knowledge
(installation of software from CDs). If you do not have this basic knowledge, you are advised to
request the installation of the software by Cardioline or its authorized personnel or to request
specific training to Cardioline or its authorized personnel.
This device has been designed to be used exclusively with Cardioline recorders (walk400h,
clickholter) indicated in par. 13.3. Refer to the recorder user manual for the risks and warnings
associated with it and for the operating instructions.
This device can be installed on various kinds of computers, provided they meet the minimum
requirements indicated in par. 1.1. To ensure the electrical safety of the operator and patient during
its operation, the following precautions must be observed:
3
Cubeholter WS - Cubeholter Web
2. SAFETY INFORMATION
If the computer is battery powered, do not connect it to an external power supply (for
recharging) or other electrical equipment (e.g. to another computer via USB or to a LAN
network) when using it in the patient area.
If the computer is powered by the mains, it may not be used in the patient area. When used
in the patient area, it must be powered with an isolation transformer and shielded cables
must be used to connect it to the LAN. The power cable shielding (when present) must be
connected to an earthing system appropriate for the area where the device is used. This will
avoid electric shocks caused by different earth potentials which could exist between the
various points of an electricity distribution system, or else by failures of the external
equipment connected to the mains.
In the event that the computer that this device is installed on is connected to the Internet, it is
recommended to install an antivirus to protect it from unwanted changes. The antivirus must be
configured excluding from the check the folder containing the data, by default:
C:\Users\username\Documents\Cubeholter\data.
If you are printing PDF files, you need to set up a corresponding program so that the document is in
no way adapted or scaled. If you are using Acrobat Reader, you need to select “Actual Size” in “Page
management and size.” Otherwise you may get non-diagnostic quality print outs.
Heart rate is calculated as an average of 4 consecutive normal heartbeats.
An event is classified as a pause if the time between a heartbeat and the next is greater than
2000ms. The value can be set by the user.
Regarding ST analysis:
The ST analysis is performed on all leads. The ST is calculated over a range of 20s, within
which the average heart rate is calculated.
The operator can move point j to calculate the elevation and depression of the ST and can
choose the duration of the ST elevation/depression to be considered as a variation of the ST
segment that is significant for the detection of an ST episode.
The ST page displays the values of the ST variation every 20 s. The trend can be printed in
the PDF report. The number and type of episodes are shown on the ST page, in the strips
and in the table. Duration in the strip of the ST page. This information is provided for each
episode.
Maximum displacement and duration are indicated for each episode.
Attention
The device does not require any calibration or special instrumentation for correct use and
maintenance.
The analysis algorithm is intended for the analysis of ECG tracings acquired with Holter Cardioline
recorders (walk400h, clickholter). The algorithm provides an analysis of the tracings and a
classification of heartbeats and events. Validation by a cardiologist or a doctor is always required.
Cubeholter Web requires ECGWebApp software.
4Cubeholter WS - Cubeholter Web
2. SAFETY INFORMATION
Notes
Appropriate patient preparation is important to enable correct application of the electrodes and
patient cable, to minimise the artefacts caused by patient movement and allow proper device
operation.
If the electrodes are not properly connected to the patient, or one or more of the patient's leads are
damaged, the software will indicate these leads as a square wave.
The accuracy of the measurements taken by this device complies with the specific requirement of
standard IEC 60601-2-47.
The device is Class II in compliance with Directive 93/42/EEC.
Losing the pen drive is the same as losing the device and it cannot be replaced.
5Cubeholter WS - Cubeholter Web
3. SYMBOLS AND LABEL
3. SYMBOLS AND LABEL
3.1. Explanation of the symbols
Symbol Description
Comply with the instructions in the use manual
1936 CE marking – compliance with the European Union directives
Product code
Refer to the user instructions
Manufacturer
3.2. Device label
Cubeholter WS
Cubeholter Web
6Cubeholter WS - Cubeholter Web
4. INTRODUCTION
4. INTRODUCTION
4.1. Purpose of the manual
This manual refers to the Cubeholter (Cubeholter WS / Cubeholter Web) product.
The manual represents a guide for the execution of the following operations:
Reasonable use of the device, of the function keys and of the sequence of menus.
Preparation of the device for use (Section 5).
Test archive window, recorder preparation and recording download (Section 6).
Test display, analysis and reporting. (Section 7).
Information on automatic analysis (Section 8).
Device settings (Section 9).
Updating the device (Section 11).
Troubleshooting (Section 12).
4.2. Recipients
This manual is intended for professional healthcare operators. They are therefore presumed to have specific
knowledge of medical procedures and terminology, as required by clinical practice.
4.3. Intended use
Cubeholter is a software system to import, analyse and report holter ECG tracings.
Cubeholter is designed to import, automatically analyse, modify, review, report and archive ECG data pre-
recorded from patients who have been connected to compatible ambulatory digital recorders (Holter
recorders).
Cubeholter is indicated for use in the healthcare field: hospitals, medical clinics and offices of any size.
The device acquires, analyses, displays and reviews holter ECG data.
The device is designed to provide a data analysis to be reviewed by a doctor.
The device is intended for use by a doctor or by healthcare personnel on behalf of an authorised
doctor in clinical facilities. It is not intended as the only means for determining the diagnosis.
The holter ECG data analysis provided by the device is only significant if used together with an
additional analysis by a physician and with an assessment of all the patient's other significant data.
The device is designed to be used in adult patients and paediatric patients younger than 11 years of
age for heart rate evaluation only.
7Cubeholter WS - Cubeholter Web
4. INTRODUCTION
The device is intended to be used by a doctor trained in the use of the holter ECG.
4.4. Description of the device
Cubeholter is a software system that manages Holter ECG data, acquired by means of Walk400h and
Clickholter recorders, with sampling rates from 250 to 1000 Hz and recording duration from 1 to 7 days.
Cubeholter comes in two versions: Cubeholter WS and Cubeholter Web.
4.4.1. Cubeholter WS
Cubeholter WS creates a complete ECG Holter local work station where it is possible to prepare the Holter
recorder, download the test, analyse it, review it and store it locally.
The software consists of 5 main parts:
1) Preparing the recorder and entering patient data. By connecting the Holter recorder it is possible to
enter the patient’s data and set the recording parameters.
2) Downloading and storing recorded tests. By connecting the Holter recorder, any recorded tests and
patient data are downloaded to the computer in a local archive.
3) Test analysis and creation of specific parameters. The software performs a series of automatic
analyses on the downloaded test: recognition and removal of artefacts, heartbeat recognition, heart
rate and Atrial Fibrillation analysis, pattern generation, recognition and classification of supra-and
sub-ventricular arrhythmias, ST analysis, QT/QTc analysis, HRV analysis and pacemaker analysis.
4) Holter test display and reviewing. By using a display it is possible to view the entire ECG Holter test
and the results of the analyses referred to in the previous point, change its parameters and review it,
creating the relevant PDF report.
5) Exporting the PDF Holter report. The Holter report can be exported in PDF format.
4.4.2. Cubeholter Web
Cubeholter Web can be integrated with Cardioline ECGWebApp and WebUploader software to manage the
ECG Holter tests completely online. In fact, by integrating these two types of software you can manage
worklists, file Holter tests online in ECGWebApp in raw data format and review them on a reviewing
workstation, as described below.
Cubeholter Web maintains the complete function of the analysis software and test reviewing, but cannot
prepare the recorder or download tests (operations that can be carried out with WebUploader).
The software consists of 3 main parts:
1) Test analysis and creation of specific parameters. The software performs a series of automatic
analyses on the test previously downloaded onto the computer by ECGWebApp: recognition and
removal of artefacts, heartbeat recognition, heart rate and Atrial Fibrillation analysis, pattern
8Cubeholter WS - Cubeholter Web
4. INTRODUCTION
generation, recognition and classification of supra-and sub-ventricular arrhythmias, ST analysis,
QT/QTc analysis, HRV analysis and pacemaker analysis.
2) Holter test display and reviewing. By using a display it is possible to view the entire ECG Holter test
and the results of the analyses referred to in the previous point, change its parameters and review it,
creating the relevant PDF report.
3) Exporting the reviewed test and sending it to ECGWebApp. At the end of the reviewing process it is
possible to send the reviewed test to ECGWebApp (in Cardioline raw data format) along with the
PDF report.
NOTE: WebUploader is non-medical software provided separately.
4.4.3. Device contents
The device includes:
1. Cubeholter WS software CD or Cubeholter Web software CD;
2. Hardware protection USB pen drive (only Cubeholter WS);
3. User manual.
4.5. General overview
The program consists of two main windows:
Test archive (only Cubeholter WS), from which it is possible to:
o Display the test archive;
o Download the test from a recorder;
o Prepare a recorder;
o Delete a test from a recorder.
Test analysis, from which it is possible to:
o Prepare the final test report;
o Perform RR analysis;
o Perform template analysis;
o Perform event analysis
o Perform ST analysis;
o Perform QT analysis
o Open the final report in PDF format.
Their base structure is described below.
9Cubeholter WS - Cubeholter Web
4. INTRODUCTION
4.5.1. Test Archive Window – only Cubeholter WS
The window is structured in three main areas:
Top bar (1):
At the top, it shows the main information of the window.
Side bar (2):
On the right side, it contains the window's function buttons.
Central area (3):
the area in the centre shows the contents of the window.
1
2
3
Example of a window
10Cubeholter WS - Cubeholter Web
4. INTRODUCTION
4.5.2. Test Analysis window
The windows dedicated to the test analysis are structured in five main areas:
Top bar (1):
At the top, it shows a summary of patient data: Name, gender and age of the patient; acquisition
device; type of patient cable used.
Time bar (2):
Located under the upper bar, it is used to select an instant or to scroll through the tracings over
time.
Window selection bar (3):
Placed on the right side, it contains the buttons to open the various windows of the program.
Central area (4):
The area at the centre shows the contents of the window: the test, the tracings and the commands
to operate on them.
Lower bar (5):
Placed at the bottom, it shows a summary of the values and parameters characteristic of the
window displayed.
1
2
4 5
5
Example of an analysis window
11Cubeholter WS - Cubeholter Web
4. INTRODUCTION
Buttons available – window selection bar:
RR To open the RR analysis window
Templates To open the template window
Events To open the event window
HRV To open the HRV analysis window
ST To open the ST analysis window
QT To open the QT analysis window
Report To open the final report creation and edit window
Print To open the final report in PDF format
Exit To exit the window and return to the test archive
12Cubeholter WS - Cubeholter Web
5. PREPARATION FOR USE
5. PREPARATION FOR USE
5.1. Installing the hardware protection key – only Cubeholter WS
The test display and report functions only works if the hardware protection key, provided with the software,
is installed on the computer/server that the application is installed on.
To do this, simply insert the key into one of the USB ports of the computer/server and wait a few seconds for
auto-installation.
Once the procedure is completed the software can be installed.
NOTE: the hardware pen drive is only provided with Cubeholter WS.
NOTE: losing the pen drive is the same as losing the device and it cannot be replaced.
5.2. Software installation
5.2.1. Installing Cubeholter WS
To install the program it is required to proceed as follows:
1. Insert the CD into the CD drive of the computer;
2. double-click on the CubeholterSetup.exe file.
Installation will start automatically.
For the program to work properly, the .NET Framework 4.5.2 application must also be installed on the
computer.
During installation, the program automatically checks whether the application is already installed on the
computer and if not, if the computer is connected to the Internet, it will automatically download and install
it. If the computer is not connected to the Internet, however, installation proceeds in offline mode by using
the package in the "redist" folder.
Once installation of the .NET Framework application has been completed, the next installation of the
Cubeholter application takes place automatically (it is possible to experience a delay between the two
installations of approx. 1 minute).
If required, it is possible to manually install the .NET Framework package in the "redist" folder.
At the end of the procedure, an icon with the link to the program will be created on the desktop:
Program icon
13Cubeholter WS - Cubeholter Web
5. PREPARATION FOR USE
NOTE: this device can be installed on various kinds of computers, provided they meet the minimum
requirements indicated in par. 1.1.
NOTE: since the software is not provided with a system for users profiling and access control, in order to
ensure privacy and integrity of patient data, it’s necessary to configure the computer so that it provides for
the authentication of the user at login, by means of username and password. The database and the software
settings are different for users. In order to increase the level of protection of data at rest it’s also possible for
the system administrator to enable the encrypting functions of the operating system.
NOTE: if the computer is not connected to the network, wait a few minutes before starting the Cubeholter
software installation after the .NET Framework 4.5.2 installation is complete.
NOTE: in the event that installation stops and fails, check if an antivirus is installed and if so, disable it.
Reactivate the antivirus when installation is complete.
NOTE: in the event that the computer on which this device is installed is connected to the Internet, it is
recommended to install an antivirus to protect it from unwanted changes. The antivirus must be configured
excluding from the check the folder containing the data, by default:
C:\Users\username\Documents\Cubeholter\data.
5.2.2. Installing Cubeholter Web
To install the program it is required to proceed as follows:
1. Insert the CD into the CD drive of the computer;
2. Double-click on the CubeholterSetup.exe file.
Installation will start automatically.
For the program to work properly, the .NET Framework 4.5.2 application must also be installed on the
computer.
During installation, the program automatically checks whether the application is already installed on the
computer and if not, if the computer is connected to the Internet, it will automatically download and install
it. If the computer is not connected to the Internet, however, installation proceeds in offline mode by using
the package in the "redist" folder.
Once installation of the .NET Framework application has been completed, the next installation of the
Cubeholter application takes place automatically (a delay between the two installations of approx. 1 minute
may occur).
If required, it is possible to manually install the .NET Framework package in the "redist" folder.
NOTE: this device can be installed on various kinds of computers, provided they meet the minimum
requirements indicated in par. 1.1.
NOTE: if the computer is not connected to the network, wait a few minutes before starting the Cubeholter
software installation after the .NET Framework 4.5.2 installation is complete.
14Cubeholter WS - Cubeholter Web
5. PREPARATION FOR USE
NOTE: in the event that installation stops and fails, check whether an antivirus is installed and if so, disable it.
Enable the antivirus again when installation is complete.
NOTE: in the event that the computer on which this device is installed is connected to the Internet, it is
recommended to install an antivirus to protect it from unwanted changes. The antivirus must be configured
excluding from the check the folder containing the data, by default:
C:\Users\username\Documents\Cubeholter\data.
5.3. Starting Cubeholter
5.3.1. Starting Cubeholter WS
To launch the program, simply click on its desktop icon or in the applications list.
In order to access the Cubeholter display and reporting functions, it is also necessary to have the hardware
protection key provided inserted in a USB port of the computer before starting the application.
Program icon
Alternatively, you can select the program from the list of installed programs:
1. With Windows operating system, click on the Windows button in the application bar (see picture
below) to open the main Windows menu.
Windows button
2. In the list of applications (App) select Cubeholter.
Select Cubeholter
Once the program is started, the following window is displayed, in which the test archive is shown and from
where it is possible to access the various functions of the program. (see chap. 6).
NOTE: Without a hardware protection key, the program opens showing the Test Start-up window allowing
you to manage all functions (importing the tests, preparing the recorders, changing the user data and
deleting the tests), but it is not possible to open the tests for display and reporting.
15Cubeholter WS - Cubeholter Web
5. PREPARATION FOR USE
Cubeholter WS start-up window – Test archive
5.3.2. Starting Cubeholter Web
Cubeholter Web start – Final report creation window
16Cubeholter WS - Cubeholter Web
5. PREPARATION FOR USE
Cubeholter Web is started automatically by the Cardioline ECGWebApp software when a test has been fully
downloaded (see the ECGWebApp manual for details).
NOTE: the first time an ECG Holter type of test is downloaded from ECGWebApp, the browser automatically
asks whether you want to open it with Cubeholter. Tick the “Always use this program” box and then click on
accept.
Cubeholter opens with the windows for test viewing, analysing and reviewing, all the way to the window for
creating the final report.
17Cubeholter WS - Cubeholter Web
6. TEST ARCHIVE WINDOW – only Cubeholter WS
6. TEST ARCHIVE WINDOW – only Cubeholter WS
6.1. General overview
From the test archive window it is possible to select one of the icons on the right bar to access the various
functions of the program.
Buttons – side bar:
Archive To open the test archive and display the list of saved tests (see
par. 6.2) – icon always active
Import test To import the test saved on the recorder to the computer (see
par. 6.3) – icon active only if a recorder with stored tests is
connected
Prepare recorder To open the recorder preparation window and load patient data
and test parameters (see section 6.4) – icon active only if a
recorder without stored tests is connected
Delete recording To delete a recording from the recorder (see par. 6.5) – icon
active only if a recorder with stored tests in connected
Test Archive window
18Cubeholter WS - Cubeholter Web
6. TEST ARCHIVE WINDOW – only Cubeholter WS
6.2. Archive
The Archive window displays the list of saved tests.
For each test it is possible to select one of the available actions (display, edit, delete) by clicking on the
corresponding icon.
Actions that can be performed on the tests:
Display To open the test and access the analysis and report tool (see
par. 7)
Edit To edit the entered patient data (see par. 6.2.1)
Remove To delete the test from the archive (see par. 6.2.2)
It is also possible to view the test by double clicking on the row of the test you wish to open.
6.2.1. Edit the patient data of a test
Clicking on the Edit icon of a test opens a window where it is possible to edit the patient data associated with
that test:
Name;
Surname;
Patient ID;
Date of birth;
Gender;
Phone;
E-mail;
Reason for study;
Therapy;
Date of recording.
Buttons available:
Confirmation Confirms and saves the changes
Cancel Cancels the changes without saving them
Path Displays the path where the test is stored
19Cubeholter WS - Cubeholter Web
6. TEST ARCHIVE WINDOW – only Cubeholter WS
Patient data edit window
6.2.2. Deleting a test
Clicking on the Delete icon corresponding to a test opens a window where it is possible to confirm deleting
the test from the archive or not.
Buttons available:
Confirmation Confirms the operation and deletes the test from the archive
Cancel Cancels the operation without deleting the test from the archive
Confirmation window
20Cubeholter WS - Cubeholter Web
6. TEST ARCHIVE WINDOW – only Cubeholter WS
6.3. Import a test
To import a test saved on the recorder you must have a compatible recorder (walk400h or clickholter)
connected to the computer, and click on the Import test button, which is only activated if a recorder with
stored tests is detected. Pressing the key opens the relative window.
Test import window
From the window it is possible to check the recording start date and time and listen to any audio recorded
on the recorder during preparation.
It is then possible to check, and edit if necessary, the patient data associated with the test:
Patient ID (*);
Date of birth (*);
Surname (*);
Name (*);
Gender (*);
Phone;
E-mail;
Medical history;
Therapy.
* mandatory fields
21Cubeholter WS - Cubeholter Web
6. TEST ARCHIVE WINDOW – only Cubeholter WS
It is also possible to check, and if necessary set, the values for the pacemaker:
Pacemaker analysis (on/off);
Pacemaker type (ventricular, atrial, atrial-ventricular);
Frequency (between 40 and 100 bpm).
Lastly, it is possible to check, but not edit, the test parameters: type of cable used, sampling rate, LSB.
By ticking the "Delete after importing" box, it is possible to automatically delete the test from the recorder's
memory once the import is complete. Otherwise the test is not deleted.
By clicking on the Import button (which is activated only if all the mandatory fields indicated above have
been entered), the test is imported to the computer and, if the "Delete after importing" box is selected, it is
deleted from the recorder memory.
6.4. Preparing a recorder
To prepare a recorder, by uploading the patient data and test parameters, it is necessary to connect a
compatible recorder (walk400h or clickholter) to the computer and click on the Prepare recorder button,
which is activated only if the recorder is detected. Pressing the key opens the relative window.
Recorder preparation window
22Cubeholter WS - Cubeholter Web
6. TEST ARCHIVE WINDOW – only Cubeholter WS
From the window it is possible to set the patient data and test parameters:
Patient data:
o Patient ID (*);
o Name (*);
o Surname (*);
o Date of birth (*);
o Gender (*);
o Phone;
o E-mail;
o Working diagnosis;
o Therapy;
Pacemaker analysis:
o Pacemaker analysis: (on/off);
o Pacemaker type: ventricular, atrial, atrial-ventricular;
o Frequency: between 40 and 100 bpm;
Test parameters:
o Patient cable: 5, 7 or 10 wires;
o Recording duration: 24h, 48h or multiple days (multiday – up to 7 days maximum);
o Sampling rate: 250 Hz, 500 Hz or 1000 Hz.
* mandatory fields
By clicking the Send button (which is only enabled if all of the aforementioned compulsory fields are
completed) the data are sent to the connected recorder.
Once the data have been saved on the recorder, a new window opens in which a summary of the data is
displayed and a Reset button that allows you to edit them again.
23Cubeholter WS - Cubeholter Web
6. TEST ARCHIVE WINDOW – only Cubeholter WS
Summary window
6.5. Deleting a recording
Delete recording window
24Cubeholter WS - Cubeholter Web
6. TEST ARCHIVE WINDOW – only Cubeholter WS
By using Cubeholter it is possible to delete one or more recordings from the recorder memory. You must
have a compatible recorder (walk400h or clickholter) connected to the computer, and click on the Delete
recording button, which is only activated if a recorder with stored tests is detected. Pressing the key opens
the relative window.
The window shows a summary of the test, recording start, patient data, test parameters.
The Forward button allows you to scroll through the recordings if more than one is stored.
The Empty button deletes the displayed recording
25Cubeholter WS - Cubeholter Web
7. VIEW, ANALYSE AND REPORT A TEST
7. VIEW, ANALYSE AND REPORT A TEST
7.1. Analyse and report a test
Clicking on the View icon corresponding to a test starts the automatic test analysis program and opens the
window from which you can view, analyse and report a test.
The section that opens, coming from the archive window, is that of the report. By using the buttons on the
sidebar, it is possible to access the various sections of the program.
The open section is indicated by the button with an orange background.
Buttons available:
RR To access the RR analysis window
Templates To access the template analysis window
Events To access the event window
HRV To access the HRV window
ST To access the ST analysis window
QT To access the QT analysis window
Report To access the window from which to create the final test report
Print To open the final report in PDF format
NOTE: if the computer does not have the hardware protection key enabled, it is not possible to access the
displaying and reporting functions of the test and clicking on the Display icon the program will show an error
message.
26Cubeholter WS - Cubeholter Web
7. VIEW, ANALYSE AND REPORT A TEST
7.2. Creating the final report
Clicking on the Report button opens the reporting window, which displays a preview of the information that
will be reported in the final test report.
The window shows:
Patient data (not editable);
Reasons for study and therapy (editable by clicking on the relative fields);
Test start and duration (not editable);
Summary of recording parameters: RR, heartbeat templates, events, ST, QT, HRV (browsable) by
clicking on the relative dark grey fields);
Conclusions (editable by clicking on the relevant fields) – the field can be expanded by clicking on the
relevant icon at the bottom left;
Name of the reviewing physician and date of the report (not editable) – in the Cubeholter Web
version the field “Name of the reviewing physician” is set with the full name of the user registered in
ECGWebApp, if the user has permissions for reviewing;
Normality (editable): a check list where you can choose the value (poor test quality, normal,
abnormal, borderline normal, empty). The normality field is only available if Cubeholter is installed in
Web mode.
By clicking on the Report button at the bottom the report is generated and saved. In the event that the
"Reviewed by" field is not filled in, the report is not saved.
Report window
27Cubeholter WS - Cubeholter Web
7. VIEW, ANALYSE AND REPORT A TEST
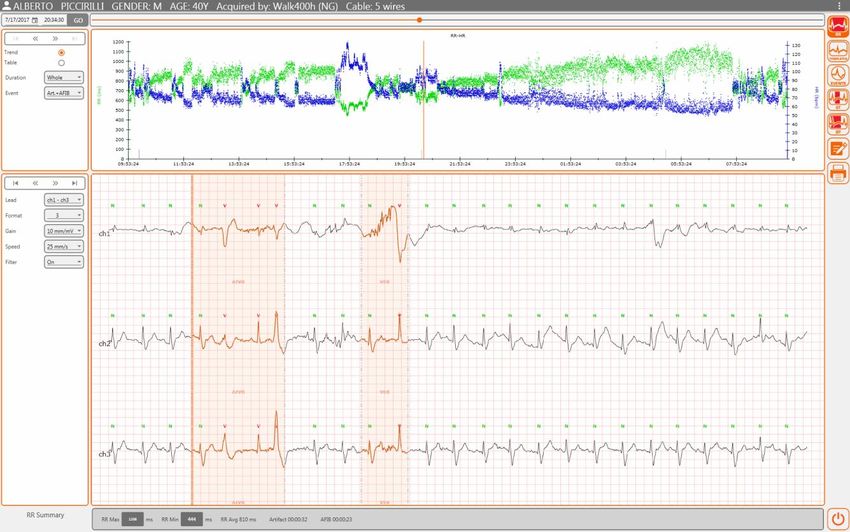
7.3. Printing the final report
Click on the Print button to open the report setup window, on which you can configure and print the final
report as described in par. 9.3.
Any changes made to the report are applied and maintained only for the current session.
7.4. Test analysis windows
1
2
Analysis window: Data section and Rhythm section
The program consists of the following test analysis windows:
RR: RR analysis
Templates: template analysis
Events: event analysis
ST: ST analysis
QT: QT analysis
28Cubeholter WS - Cubeholter Web
7. VIEW, ANALYSE AND REPORT A TEST
Each window consists of two sections:
Data Section (1): placed at the top, it displays data relative to the parameter being analysed (RR data,
templates, events and so on) and therefore changes for each window;
Rhythm Section (2): placed at the bottom, it displays the leads of the acquired test and has the same
structure in all windows. From the rhythm section it is possible to take measurements on the
tracings and insert, remove or edit a heartbeat or an event.
The following chapter describes the Rhythm section, common to all test analysis windows.
7.4.1. Rhythm section
The rhythm section shows all leads of the acquired signal, 2, 3 or 12 depending on the patient cable used for
acquisition.
By using the controls on the left panel it is possible to change:
Interval displayed: double arrow to scroll slowly, triangle to scroll quickly, scroll with the mouse
wheel to scroll at will;
Displayed leads: active in the compacted display, where it is possible to select which channel/lead to
display and with 12 leads acquired according to the selected format, where it is possible to choose
which set of leads to display, for example if the format is 3 you can choose between I-III, aVR-aVF,
V1-V3, V4-V6)..
Tracing format: 1 (compacted display –in the RR Window only), 3, 12;
Amplitude: 1, 5, 10, 20, 40 mm/mV;
Speed: 5, 10, 25, 50, 100 mm/s;
Filter: enable/disable the display filter
Each heartbeat is marked and classified with a letter and a colour indicating the type of heartbeat:
N green: normal heartbeat;
O grey: unknown heartbeat;
V red: ventricular heartbeat;
AFIB red: atrial fibrillation - the corresponding path is drawn in red;
A: artefacts – the corresponding path is drawn in grey.
P blue: pacemaker heartbeat – the relative trace is in blue (if pacemaker analysis is enabled).
If an event is present (CPT, SVS, etc.) it is indicated and a red vertical line indicating the start time is also
indicated.
29Cubeholter WS - Cubeholter Web
7. VIEW, ANALYSE AND REPORT A TEST
Performing measurements on the tracings
It is possible to perform measurements on the tracings by left-clicking on a point of the tracings and scrolling
the mouse, while holding the button down. Two vertical lines and a red area at the centre of them will
appear, corresponding to the area being measured.
Measurements on the tracings
The values measured by the software represent the time in milliseconds between the two measured points,
the heart rate in heartbeats per minute and the vertical difference in amplitude in microvolt between two
points, for example between the isoelectric line and the peak of the R wave.
Entering a new heartbeat
To enter a new beat, select a point in the ECG tracing, where the program has not found any heartbeats,
right-click to open the drop-down menu. Select “Enter” and insert the new heartbeat (choosing between
Normal, Ventricular, Atrial).
Editing or removing a heartbeat
By left-clicking a QRS already recognised by the program, right-clicking opens a drop-down menu from which
it is possible to:
Edit the heartbeat type
Remove the heartbeat
Go to the heartbeat template
By selecting a signal section it is possible to:
Enter/edit an event (also with the E key on the keyboard), selecting more than one heartbeat and
choosing an event from the drop-down list, or typing one or more letters to automatically skip to the
corresponding entry of the drop-down list: It is also possible to define a new event, freely writing the
name of a custom event
30Cubeholter WS - Cubeholter Web
7. VIEW, ANALYSE AND REPORT A TEST
Report the presence of atrial fibrillation in an ECG section (also with the I key on the keyboard);
Remove atrial fibrillation (also with the DELETE key on the keyboard);
Edit heartbeat classification;
Cancel the last operation performed;
Make a manual print reservation, also with the P key on the keyboard.
7.4.2. RR Window
The RR window allows a fast and immediate assessment of the technical quality of the recording and the
presence or absence of systematic errors in the automatic analysis.
The RR window has two sections:
RR data (1): displays the data regarding RR/HR, atrial fibrillation and artefacts;
Rhythm (2): displays the leads of the test acquired (see par. 7.4.1).
The summary at the bottom of the window shows atrial fibrillation, artefacts, maximum HR, minimum HR
and average HR of the entire test. By clicking on the maximum and minimum HR value, the corresponding
times in the RR data section and in the rhythm section are highlighted.
1
2
RR Window
31Cubeholter WS - Cubeholter Web
7. VIEW, ANALYSE AND REPORT A TEST
By using the controls on the left panel of the Data section it is possible to change:
Data displayed: double arrow to move from one event to another, triangle (enabled only if the
duration of the interval to be displayed is different from the whole test) to move through the various
intervals of the test;
Display type: trend or table;
Duration of the interval to be analysed: complete, 12h, 6h;
Events displayed: Atrial fibrillation (AFIB), Artefacts, pacemaker-induced heartbeat pacing or all.
Browsing the traces
Use the keyboard keys and the mouse to:
Scroll the signal forwards and backwards by a single heartbeat: RIGHT and LEFT arrow key – by
pressing and holding the key for more than 3 seconds the signal scrolls automatically and
continuously (scrolling is stopped by pressing any key).
Scroll the signal forwards and backwards by one page: UP and DOWN arrow key – by pressing and
holding the key for more than 3 seconds the signal scrolls all the pages automatically (scrolling is
stopped by pressing any key).
Select / Zoom on the traces: you can select a point by clicking on the traces with the left mouse
button. The mouse wheel can then be used to zoom in on the signal. When the signal is zoomed you
can select the trace (Selection) and perform measurements (as described below) or drag the
zoomed signal (Drag), by clicking with the left mouse button and holding it while moving. It is
possible to switch from the Selection function to the Drag function and vice versa by pressing the
space bar key or by opening the menu with the right mouse button and selecting the Drag/Select
menu function. If the selection function is active, the mouse pointer is an arrow, while if the drag
function is active the mouse pointer is a hand.
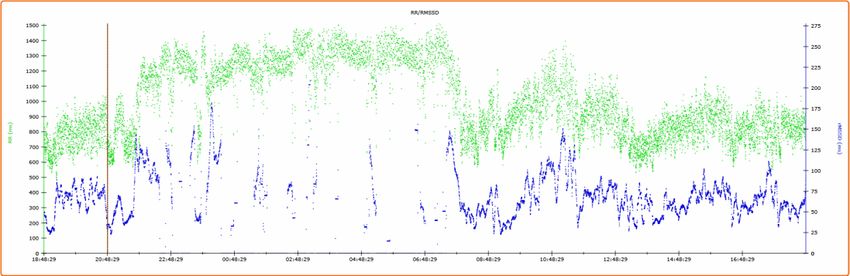
Trend display
The trend display shows the RR in green and the HR in blue point by point. Areas with atrial fibrillation and
artefacts are indicated with red vertical lines for atrial fibrillation and grey ones for artefacts.
Trend display
32Cubeholter WS - Cubeholter Web
7. VIEW, ANALYSE AND REPORT A TEST
Table display
The table display shows 24 columns, each corresponding to a portion of the analysed time interval: 15 min if
6h of data have been analysed, 30 min if 12h have been analysed, 1h if 24h have been analysed, etc.
The first three lines show RRMax, RRMin and RRAverage of each interval. By clicking on RRMax and RRMin it
is possible to display the corresponding signal in the rhythm section below.
Table display
Excluding an event
In the table display, if the signal is considered an artefact, it is possible to exclude the event and recalculate
the value by pressing the DELETE key on the keyboard. This way the 3 previous heartbeats are classified as
artefacts.
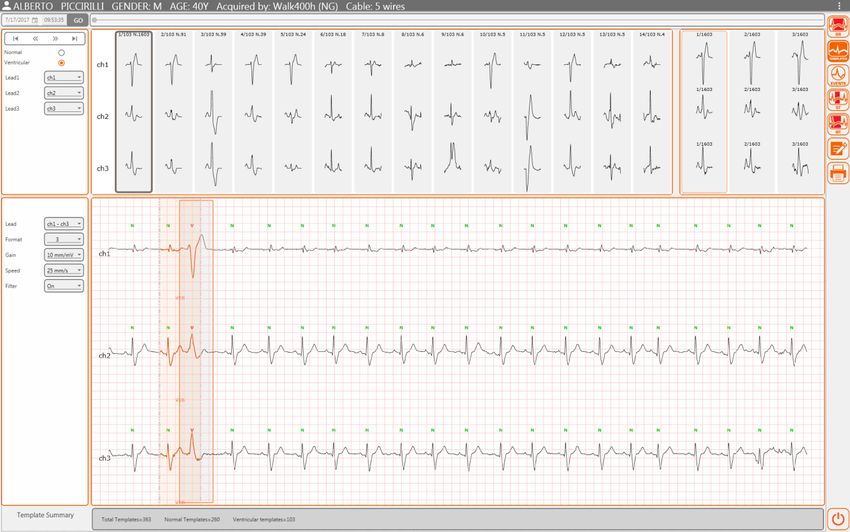
7.4.3. Template Window
The Template window allows an evaluation of the events classified according to the different morphologies
of each heartbeat class.
The Template window has two sections:
Templates (1): divided into two main parts displays templates and heartbeats related to the selected
template;
Rhythm (2): displays the leads of the test acquired (see par. 7.4.1).
The summary at the bottom of the window shows templates and their classification.
33Cubeholter WS - Cubeholter Web
7. VIEW, ANALYSE AND REPORT A TEST
1
2
Template Window
By using the controls on the left panel of the Data section it is possible to select:
Data displayed: double arrow to scroll within templates, triangle to scroll within the template
heartbeats;
Pattern types: normal, ventricular or pacemaker;
Leads to be displayed: channel 1 and/or channel 2 and/or channel 3.
The Template window shows all the templates classified by the program, for the chosen morphology,
automatically sorted according to the decreasing number of occurrences.
The list of templates is shown on the left, an example of heartbeat for each template is shown on the right.
If a template is selected from the list, all heartbeats in that template are shown on the right.
Navigation
Browsing lets you view the templates before selecting them to perform operations on them.
The data section can be browsed as follows:
DOUBLE Arrow button in the left box or the keyboard RIGHT and LEFT Arrow Keys: to scroll through
templates one at a time;
Page Up and Page Down keyboard keys: to scroll the templates page by page;
Tab keyboard key: to switch from templates to beats.
34Cubeholter WS - Cubeholter Web
7. VIEW, ANALYSE AND REPORT A TEST
The beats section can be browsed as follows:
SINGLE Arrow button in the left box;
Space bar and Backspace on the keyboard: to move forwards and backwards;
UP and DOWN arrow keys on the keyboard: To move through the beats pages.
Selection
The selection can be made both in templates and in beats as follows:
By using the left mouse button (1 click) – to cancel any previous selections;
By using the ctrl key + left mouse button (1 click) combination – to add an element to those already
selected previously or to remove it if that element had already been selected;
By using the Shift + left mouse button (1 click) combination – to select elements included between
the selected point (by using the Shift + left mouse button) and the last selection made.
The selection updates the Rhythm section.
Each time a template is selected, the second part of the section shows the heartbeats belonging to this
template. The first heartbeat of the template (in order of time) is automatically selected.
It is possible to expand the beats area and compress the template area (or vice versa) by double clicking on
the beats (or templates) area.
Beats
Templates
By selecting a template and a heartbeat, the rhythm section shows a red vertical rectangle on the selection.
It is possible to join multiple templates by selecting them and dragging them on another.
35You can also read