DR Series Time Clocks Product Manual - DR2000 Voice Control and Facial Recognition - uAttend
←
→
Page content transcription
If your browser does not render page correctly, please read the page content below

DR Series Time Clocks
Product Manual
DR2000
Voice Control and Facial Recognition
DR2500
Voice Control, Facial Recognition + Temperature Reader
CONTENTS
 01 INTRODUCTION . .  .  .  .  .  .  .  .  .  .  .  .  .  .  .  .  .  .  .  .  .  .  .  .  .  .  .  .  .  .  .  .  .  .  .  .  .  .  .  .  .  .  .  . 3
 02 YOUR UATTEND ACCOUNT. .  .  .  .  .  .  .  .  .  .  .  .  .  .  .  .  .  .  .  .  .  .  .  .  .  .  .  .  .  .  .  .  .  . 4
 03 DEPARTMENTS . . . . . . . . . . . . . . . . . . . . . . . . . . . . . . . . . . . . . . . . . . . . . 6
 04 EMPLOYEES .  .  .  .  .  .  .  .  .  .  .  .  .  .  .  .  .  .  .  .  .  .  .  .  .  .  .  .  .  .  .  .  .  .  .  .  .  .  .  .  .  .  .  .  .  .  .  . 7
 05 TEMPERATURE READER SETTINGS .  .  .  .  .  .  .  .  .  .  .  .  .  .  .  .  .  .  .  .  .  .  .  .  .  .  .  . 8
 06 TIME CLOCK ACTIVATION. .  .  .  .  .  .  .  .  .  .  .  .  .  .  .  .  .  .  .  .  .  .  .  .  .  .  .  .  .  .  .  .  .  . 10
 07 WALL MOUNT.  .  .  .  .  .  .  .  .  .  .  .  .  .  .  .  .  .  .  .  .  .  .  .  .  .  .  .  .  .  .  .  .  .  .  .  .  .  .  .  .  .  .  .  . 13
 08 FACE TEMPLATES.  .  .  .  .  .  .  .  .  .  .  .  .  .  .  .  .  .  .  .  .  .  .  .  .  .  .  .  .  .  .  .  .  .  .  .  .  .  .  .  .  . 14
 09 MENUS.  .  .  .  .  .  .  .  .  .  .  .  .  .  .  .  .  .  .  .  .  .  .  .  .  .  .  .  .  .  .  .  .  .  .  .  .  .  .  .  .  .  .  .  .  .  .  .  .  .  . 15
 10 ADD/REMOVE TEMPERATURE READER .  .  .  .  .  .  .  .  .  .  .  .  .  .  .  .  .  .  .  .  .  . 18
 11 TROUBLESHOOTING.  .  .  .  .  .  .  .  .  .  .  .  .  .  .  .  .  .  .  .  .  .  .  .  .  .  .  .  .  .  .  .  .  .  .  .  .  .  . 20
 12 LIMITED WARRANTY .  .  .  .  .  .  .  .  .  .  .  .  .  .  .  .  .  .  .  .  .  .  .  .  .  .  .  .  .  .  .  .  .  .  .  .  .  .  . 21
 13 SAFETY INFORMATION.  .  .  .  .  .  .  .  .  .  .  .  .  .  .  .  .  .  .  .  .  .  .  .  .  .  .  .  .  .  .  .  .  .  .  .  . 24

01    INTRODUCTION

Setting up your uAttend DR2000/DR2500 requires connecting your
time clock to the cloud portal.
First, we’ll set up the cloud, then the time clock.
Once you’ve completed the following six easy steps, your employees
can start punching in!

                                    1. C
                                        REATE YOUR
                                       ACCOUNT

                                    2. A
                                        DD DEPARTMENTS
                                       AND EMPLOYEES

                                    3. C
                                        HOOSE TEMPERATURE
                                       READER SETTINGS

                                    4. A
                                        CTIVATE YOUR
                                       TIME CLOCK

                                    5. M
                                        OUNT YOUR
                                       TIME CLOCK

                                    6. R
                                        EGISTER
                                       EMPLOYEE FACES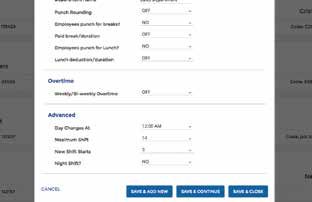
02 CREATE YOUR uATTEND ACCOUNT
efore you can set up your new uAttend Time Clock,
B
you will need to set up your uAttend Cloud Account.
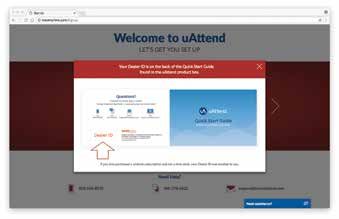
Open your web browser and visit www.TrackMyTime.com/signup
then follow the prompts.
Here are some helpful tips to make the setup as smooth
as possible.
Your Dealer ID will be found on the back of your Quick Start Guide.
If the Dealer ID is missing, please contact Customer Support.
? QUESTIONS? Call 800-518-8925 or email support@trackmytime.com
When selecting your plan size, keep in mind that your employees
are your hourly workforce.
Supervisors (not paid hourly) and administrators are not included in
this number. Your plan is month-to-month and can be changed at
any time.

Your login URL is going to become the “web address” for your
company’s uAttend Portal. For example, “The Great Cookie Co” may
become trackmytime.com/gr8cookieco

trackmytime.com/gr8cookieco

                                                                       5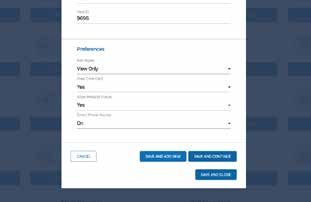
03        ADD DEPARTMENTS
          Departments are used to group employees together within
          the uAttend system. The uAttend Setup Wizard will create
          a default department, which you can modify as needed.
          You can create more departments within your account and
          choose other department settings, such as overtime and
          punch rounding rules.

    1. S
        elect the Departments tab on your Dashboard
    2. Select “+Add Department”
    3. Create a Department Code
       The Department Code is used as a reference on employee time
       cards to ensure that hours are appropriately allocated to the
       correct departments. For example, the code for “Sales” can be,
       “SLS.”

    4. E
        nter the full Department Name
       Specify additional department settings on this screen now,
       or enter that information later.
    5. Select...
       a. “Save & Add New” to add a new department.
       b. “Save & Continue” to add more rules and policies.
       c. “Save & Close” to move to the next step.

?      QUESTIONS? Call 800-518-8925 or email support@trackmytime.com
04    ADD EMPLOYEES
      The number of employees you can add to your account is
      limited by the plan size you have chosen. Add and assign
      employees to your departments in the uAttend Setup Wizard
      or simply add them later within your account.
      Change the size of your plan at any time by selecting your user
      icon in the upper right corner of your uAttend Portal, then
      selecting “My Account” from the drop down menu.

1. S
    elect the Users tab on your Dashboard
2. Select “Add User”
3. A
    ssign the user a role, then add their first and last name
	Employees are the portion of your workforce that use the time
  clock to track their time.
	Supervisors can view and edit time cards, but do not punch in
  and out of the time clock.
	Administrators have full access to the account and its settings.
  Additional administrators can be added for $6 per month, per
  administrator.
4. Select...
   a. “Save and Continue” to set up the employee’s profile.
   b. “Save and Close” to move on to the next steps.
You can add more details by going back to that user’s profile
at any time.

                                                                        7
05 CONFIGURE TEMPERATURE READER
SETTINGS
Before the time clock can scan employees’ temperatures, you
need to configure and enable the temperature reader settings.
Once enabled, the time clock will record temperatures on the
first punch-in of the day. You can apply default and individual
temperature reader settings by following the steps listed
below. The following instructions are applicable only for
devices with a temperature reader.
DEFAULT TEMPERATURE READER SETTINGS
1. Set up your default temperature reader settings by selecting
Settings > Punch Management. Then, select Edit next to
Temperature Reader Settings and fill out the following 10:17 AM PDT Wednesday, November 30, 2018 Pizza Paw - 18565 Abby Jennings
information. Dashboard Settings Departments Users Timecards Reports Status Scheduling
General Punch Management Holidays Export Communications Employee Services Job Tracking Shifts
TIME CLOCKS ADD TIMECLOCK
DEVICE ID NAME/LOCATION TIMEZONE STATUS FEATURES
DR2500-97872444 Warehouse (GMT -07:00) Pacific FEATURE UNAVAILABLE RFID EDIT [x]
LOGO IMAGE Image files must be 320 x 156 in size Logo unavailable on certain models EDIT
TEMPERATURE READER SETTINGS SETUP REQUIRED EDIT
2. Enable/Disable: The temperature reader is enabled by default.
Toggling off this setting will disable the temperature reader on
all time clocks using default settings.
3. Temperature Unit: Fahrenheit or Celsius.
4. Temperature Lockout Threshold: The time clock will lockout
employees who meet or exceed this number.
5. Temperature Reporting: Choose how employee temperatures
will be recorded in your uAttend account as either “Actual
Temperature” or “Pass/Fail.”
6. Temperature Lockout Message: This message will display on
the time clock screen if an employee is locked out of punching.
7. Apply Default Settings: Select which clocks will use default
settings.
8. Save.
9. If you have multiple time clocks on your account and would like
to apply Individual Temperature Reader Settings, proceed to the
next section.
? QUESTIONS? Call 800-518-8925 or email support@trackmytime.comINDIVIDUAL TIME CLOCK TEMERATURE READER SETTINGS
Individual temperature reader settings are optional. If you
have multiple time clocks and at least one requires different
temperature reader settings from your default selection,
proceed with the next steps.
1. From the Settings > Punch Management screen, select Edit
next to the name of the time clock you wish to apply individual 10:17 AM PDT Wednesday, November 30, 2018 Pizza Paw - 18565 Abby Jennings
settings.
Dashboard Settings Departments Users Timecards Reports Status Scheduling
General Punch Management Holidays Export Communications Employee Services Job Tracking Shifts
TIME CLOCKS ADD TIMECLOCK
DEVICE ID NAME/LOCATION TIMEZONE STATUS FEATURES
DR2500-97872444 Warehouse (GMT -07:00) Pacific FEATURE UNAVAILABLE RFID EDIT [x]
LOGO IMAGE Image files must be 320 x 156 in size Logo unavailable on certain models EDIT
TEMPERATURE READER SETTINGS
TEMPERATURE UNIT Fahrenheit (°F)
TEMPERATURE LOCKOUT THRESHOLD 100.4
EDIT
TEMPERATURE REPORTING Pass/Fail
TEMPERATURE LOCKOUT MESSAGE Please Contact Your Supervisor
APPLY DEFAULT SETTINGS 1/1 Time Clock
2. Enable/Disable: The temperature reader is enabled by default.
Toggling off this setting will disable the temperature reader on
this time clock.
3. Use Default Settings: Toggle on if you decide later that you want
this clock to use default settings.
4. Fill out the rest of the settings by following steps 3-6 in the
previous Default Temperature Reader Settings section.
5. Save.
Please note: Workwell is not advertising its products for use in the medical industry or for medical purposes.
Our products are not intended to diagnose or exclude contagions such as COVID-19, SARS, or any other medical
condition and should not be used as such. Our products are intended to serve as a first-line filter by assisting an
organization and its employees in identifying those employees who may have an elevated body temperature.
While our products may archive readings for reporting and audit purposes, it is solely the responsibility of the
organization to communicate the use of the information to its employees, to obtain any necessary consent
from its employees and to determine how the information is used. The organization should not rely solely on
our products for making such a determination. Various environmental and methodological factors can impact
thermal imaging; therefore, the readings from our products should not be relied upon as the sole determinant
of a person’s body temperature. Competent medical advice and further checks should be sought if there are
concerns regarding an employee’s health or possible illness. Workwell hereby disclaims all liability with respect
to the conditions and limitations described in this paragraph.
906 ACTIVATE YOUR TIME CLOCK
The DR series time clocks allow for easy set up with LAN
or WiFi connection.
ACTIVATION VIA LAN
1. A
ttach a LAN cable to
your clock and router,
then plug your clock into
a power outlet
a. Follow the onscreen
prompts to confirm
your network selection.
b. The clock will check for
any needed updates
once the connection is established to ensure you have the most
up-to-date version of the clock firmware.
2. Enter your uAttend
Company ID
a. This ID can be found in
the upper right corner
of your uAttend Web
Portal. If you do not
have an account, please
set one up as outlined
in Section 2 of this
manual.
3. Enter the 2-factor
Authentication Code,
emailed to your uAttend
Account administrator’s
email address
a. This helps keep your
account secure by
preventing additional
clocks from being
added to your account
without your permission.
? QUESTIONS? Call 800-518-8925 or email support@trackmytime.com4. Confirm that your
account information is
correct
5. Select a time zone based
on the location of the
clock
6. Set your Administrator
Passcode
a. This 5-digit code will be
used to access administrator-only functions. If you ever lose it,
it can be recovered by visiting your uAttend Account.
7. Clock setup is now complete!
ACTIVATION VIA WIFI
1. P
lug your clock into a
power outlet
a. Follow the onscreen
prompts to select your
WiFi Network.
b. Enter your password
onscreen.
c. The clock will check for
any needed updates
once the connection is established to ensure you have the most
up-to-date version of the clock firmware.
2. Enter your uAttend
Company ID
a. This ID can be found in
the upper right corner
of your uAttend Web
Portal. If you do not
have an account, please
set one up as outlined
in Section 2 of this
manual.
113. Enter the 2-factor
Authentication Code,
emailed to your uAttend
Account administrator’s
email address
a. This helps to keep
your account secure,
by preventing any
additional clocks from
being added to your
account without your permission.
4. Confirm that your account information is correct
5. Select a time zone based
on the location of the
clock
6. Set your Administrator
Passcode
a. This 5-digit code
will be used to access
administrator-only
functions. If you ever lose
it, it can be recovered by visiting your uAttend Account.
7. Clock setup is now complete!
? QUESTIONS? Call 800-518-8925 or email support@trackmytime.com07 WALL MOUNT
Everything you need to mount your timeclock to the wall
is included in your purchase: metal back plate, LAN cord,
power adapter, four drywall anchors, four screws, and two
small bracket screws. You will need your own Phillips-head
screwdriver.
CHOOSING A LOCATION
For best optimization of voice and facial recognition, mount your
time clock in an area that has:
• Minimal background noise to avoid interference with voice
commands.
• Ample ambient lighting (without back-lighting) for successful
facial recognition.
MOUNTING YOUR TIME CLOCK ONTO YOUR WALL
1. Select a location for your time clock near a power outlet and LAN
port (if applicable).
2. Place the provided mounting template against the wall. Drill holes
through the targets using a 1/4” (6.35mm) drill bit.
3. Insert drywall anchors into the center of the wall marks (Fig. A).
4. Align the metal back plate with the holes. Ensure that the prongs
are facing away from the wall, then secure the back plate to the
wall with the screws provided.
5. Attach the power adapter and the LAN line (if applicable).
6. Align the two slots on the back of the clock with the two prongs on
the back plate. Push down slightly to ensure the clock is securely
fastened (Fig. B).
7. Optionally screw the time clock to the metal back plate with the
included bracket screws at the bottom of the time clock (Fig. B).
Wall
side view
2 Fig. B
Wall Fig. A
side view
1
x2
1308 FACE TEMPLATES
Once an employee has registered their face on one of the
clocks, they will be able to use facial recognition authentication
on all DR clocks under your account.
REGISTRATION TIPS:
• Employees should not
wear face masks while
registering. Once registered,
employees can successfully
authenticate even when
wearing a face mask.
• Register employee faces
in a location with bright
ambient lighting. Dim
lighting, back lighting or shadows may result in failed scans.
REGISTERING FACE TEMPLATES
Before registering face templates, please ensure you have added the
employee to your online uAttend account as outlined in Section 4.
1. Tap the PIN icon in the bottom right-hand corner of the time clock
screen and enter your Administrator PIN. This is the PIN which you
chose during device setup. It can be found in your clock details at
Settings > Punch Management in your online account.
2. Select Employee in the time clock User Menu.
3. Select the employee you wish to register face templates for from
the list provided.
4. Follow the onscreen prompts to scan the employee’s face.
5. Repeat steps 1-4 for every employee who will authenticate with
facial recognition.
? QUESTIONS? Call 800-518-8925 or email support@trackmytime.com09 ADMINISTRATOR MENU OPTIONS
The Administrator menu can be accessed with the
Administrator PIN you chose during device setup. It can be
found in your clock details at Settings > Punch Management
in your online account.
Here are the different settings and tools within the Administrator
menu:
1. Employee
Displays a searchable list
of Employees by name.
a. Select an Employee
to manage or register
face templates.
2. Device
a. Software Updates
i. Tap the Software
Update option from
the Device Menu.
1. The clock will
check for available
updates. The
clock’s current
software version
will also display
on this screen.
ii. If there are updates
available, you can
select to Update
now or later.
1. After choosing
to update
the software,
the clock will
download the
update and
automatically restart to apply the update. If the update was not
successful, then the time clock will display messaging accordingly
on the screen. If this occurs, you’ll have the options to choose
Update Later or Please Try Again on the following screen.
15b. Time
i. Time Zone – The
Time Zone the clock is
located in.
ii. Time Format –
1. 12 hour – Standard
12-hour format with
AM and PM settings.
2. 24 hr – Also known
as Military time.
c. Sound
i. Key Sounds – Turn
sounds for key presses
on or off.
ii. Volume Level – The
volume setting for all
sounds on the clock.
iii. Time Clock Voice –
Select the voice for
confirmations on
punching or disable
this entirely.
d. Display
i. Brightness Level – The
default brightness level
of the screen.
ii. Sleep Mode – How
long before the screen
dims when idle.
1. Note: tapping the
screen will restore the brightness level.
e. Change Admin Password
i. Enter the current Admin PIN to verify authorization,
then tap next.
ii. Enter the new PIN for the time clock, hide the onscreen
keyboard, and tap next.
iii. A confirmation screen should be displayed.
? QUESTIONS? Call 800-518-8925 or email support@trackmytime.comf. Device ID
The number used to
identify the clock in the
uAttend portal.
g. Upload Database
This will send your
database to Workwell
Technologies for
diagnostic purposes.
3. Network
a. Network Connection:
i. WiFi
1. Scroll the list
of available
networks to locate
your network’s
name.
2. Use the onscreen
keyboard to
enter your WiFi
password and
press Next.
3. The screen
will display a
confirmation
that the clock is
connected to your
WiFi network.
ii. LAN
1. The configuration for your LAN network will be displayed
on this screen.
4. Support
a. A screen will display showing the methods for requesting
support.
1710 ADD/REMOVE TEMPERATURE READER
Unless you’ve purchased a temperature reader to add to your
DR2000 or you are troubleshooting an issue, there should be
no need to add or remove the temperature reader from your
device. Should you need to add or remove the temperature
reader, follow the simple steps below.
ADDING THE TEMPERATURE READER
1. Disconnect your device from the power outlet.
2. Connect the temperature reader to the top of the time clock.
3. Plug the cord attached to the temperature reader into the
corresponding port on the time clock.
4. Reconnect your device to the power outlet to turn on.
REMOVING THE TEMPERATURE READER
1. Disconnect your device from the power outlet.
2. Unplug the cord attached to the temperature reader from the
time clock.
3. Disconnect the temperature reader from the top of the time clock.
4. Reconnect your device to the power outlet to turn on.
Temperature Reader
Temperature Reader
Cable Port
Please note: Workwell is not advertising its products for use in the medical industry or for medical purposes.
Our products are not intended to diagnose or exclude contagions such as COVID-19, SARS, or any other medical
condition and should not be used as such. Our products are intended to serve as a first-line filter by assisting an
organization and its employees in identifying those employees who may have an elevated body temperature.
While our products may archive readings for reporting and audit purposes, it is solely the responsibility of the
organization to communicate the use of the information to its employees, to obtain any necessary consent
from its employees and to determine how the information is used. The organization should not rely solely on
our products for making such a determination. Various environmental and methodological factors can impact
thermal imaging; therefore, the readings from our products should not be relied upon as the sole determinant
of a person’s body temperature. Competent medical advice and further checks should be sought if there are
concerns regarding an employee’s health or possible illness. Workwell hereby disclaims all liability with respect
to the conditions and limitations described in this paragraph.
? QUESTIONS? Call 800-518-8925 or email support@trackmytime.com11 TROUBLESHOOTING
See the following table for help with the error messages that
you might encounter with your DR Series Time Clock.
ERROR MESSAGE NOTES
CANNOT CONNECT If clock is not currently plugged into any
TO INTERNAL networking device or the networking
NETWORK device it is plugged into is not turned on or
functioning.
SORRY, DEALER ID TrackMyTime.com will report this error if the
NOT FOUND Dealer ID you entered is not valid. Please
contact uAttend Support for assistance.
CANNOT CONNECT If a clock is placed into a functioning
TO UATTEND SERVER network, but is not able to communicate
with the uAttend server.
CANNOT ACCESS THE If a clock is connected to the local network,
INTERNET but is unable to communicate with the
Internet.
CANNOT LOCATE If a clock is not able to properly resolve
UATTEND SERVER the hostname of the domain it is trying to
USING DNS contact because it either does not have a
valid DNS server IP address to contact or the
DNS server it is contacting cannot properly
resolve the hostname for the server.
NO RESPONSE FROM If a clock is placed into a functioning
DHCP SERVICE network, is set to use DHCP, but gets no
responses when attempting to contact a
DHCP server during the Discover process of
DHCP.
1912 ATTEND DEVICE LIMITED
u
WARRANTY
This Warranty covers all uAttend Devices and any Devices
which may now or in the future be connected to your uAttend
Account.
A. Warranty and Warranty Periods. Workwell Technologies,
Inc. (“WWTech”) warrants only to the original Purchaser
that the Device will be free from defects in material and
workmanship for the time during which (i) the original
Purchaser subscribes to the uAttend System, and (ii) until
such time the Device has been replaced (the “Warranty
Period”).
B. WWTech’s Obligation Under Warranty. WWTech’s sole
obligation under the above warranty shall be to repair or
replace Devices and parts during the Warranty Period.
WWTech does not assume responsibility for delays in
replacement or repair of products or parts. WWTech may,
at its sole discretion, replace Devices with refurbished
Devices. This warranty gives end users specific legal rights,
and particular end users may also have other rights which
may vary from jurisdiction to jurisdiction.
C. DISCLAIMER OF ALL OTHER WARRANTIES. NO OTHER
WARRANTIES, EXPRESSED OR IMPLIED, ARE GIVEN, AND
WWTech EXPRESSLY DISCLAIMS ALL OTHER WARRANTIES,
INCLUDING AND WITHOUT LIMITATION, THE IMPLIED
WARRANTIES OF MERCHANTABILITY AND FITNESS FOR A
PARTICULAR PURPOSE. Some jurisdictions do not allow
limitations on how long an implied warranty lasts, so the
above limitation may not apply to particular end users.
D. Limitations. No salesperson, representative, or agent of
WWTech is authorized to make any guaranty, warranty,
or representation that contradicts the terms contained
in this Limited Warranty. Any waiver, alteration, addition,
or modification to the warranties contained herein must
? QUESTIONS? Call 800-518-8925 or email support@trackmytime.combe in writing and signed by authorized representatives of
WWTech to be valid, binding, and enforceable. WWTech
does not assume responsibility for any specific application
to which any products or parts are applied including, but
not limited to, compatibility with other equipment. All
statements, technical information, or recommendations
relating to the products or parts are based upon
tests believed to be reliable, but do not constitute a
guaranty or warranty. WWTech SHALL NOT UNDER ANY
CIRCUMSTANCES WHATSOEVER BE LIABLE TO ANY PARTY
FOR LOSS OF PROFITS, DIMINUTION OF GOOD WILL, OR
ANY OTHER SPECIAL, CONSEQUENTIAL, OR INCIDENTAL
DAMAGES WHATSOEVER WITH RESPECT TO ANY CLAIM IN
CONNECTION WITH WWTech PRODUCTS AND/OR PARTS.
Some jurisdictions do not allow the exclusion or limitation
of incidental or consequential damages, so the above
limitation or exclusion may not apply to particular end
users.
E. What May Void the Warranty. This Limited Warranty shall
be null and void in the following circumstances:
1. Modification or repair by the end user or any non-
authorized WWTech service provider; or
2. Improper use or installation, or damage by accident
or neglect, by the end user or any third party, or
intentional damage by the end user or any third party;
or
3. Failure of the end user or any third party to exercise
caution to protect from electrostatic discharge
damage and adverse temperature, or physical abuse;
or
4. Failure by the end user to follow the Return
Appointment Process set forth below.
21F. Return Appointment Process. As a condition precedent to
the above Limited Warranty, the end user must:
1. Obtain a return material authorization (RMA) from
WWTech, which will include an RMA number that
must be prominently displayed on the outside of
the shipping container. Returns without an RMA
number may be rejected by WWTech and immediately
returned to end user, freight collect.
2. Ship the items being returned to WWTech, freight
prepaid, together with a written description of the
claimed defect.
3. Pack the items being returned in the original packing
carton or equivalent. Damage in transit is end user’s
responsibility and may be cause to void the warranty
claim.
G. Transportation Costs. WWTech will pay surface freight
to return products covered by this Limited Warranty.
However, if WWTech determines in the exercise of its
reasonable but sole discretion that the product or part
returned for warranty service is not defective, or does not
otherwise qualify for warranty service, the end user shall be
liable for all costs of handling and transportation.
? QUESTIONS? Call 800-518-8925 or email support@trackmytime.com13 uATTEND SAFETY INFORMATION
IMPORTANT SAFEGUARDS FOR SAFE OPERATION & USE
SAVE THESE INSTRUCTIONS.
THIS PRODUCT IS FOR COMMERCIAL USE ONLY.
The time clock is an electrical device. In order to reduce the risk of
fatal electrical shock and fire, basic safety precautions should be
followed, including the following:
1. Read all instructions before operating.
2. This time clock must be properly installed and located in
accordance with these instructions before used.
3. Do not use outdoors.
4. Do not expose to water or any liquid.
5. Do not place objects into the time clock.
6. For best operation, plug the time clock into its own electrical outlet.
7. Do not operate the time clock with a damaged cord or plug.
8. If an extension cord is used, the marked electrical rating of the
extension cord should be at least as great as the electrical rating
of the time clock.
9. Plug the time clock into a surge protector or uninterruptible power
supply (UPS). If a surge protector is not used and there is a power
surge, your warranty may be voided.
CAUTION/WARNING DANGEROUS VOLTAGE DO NOT CONNECT
DAMAGED SUPPLY CORD
WARNING
RISK OF FIRE OR ELECTRIC SHOCK - DO NOT OPEN
WARNING: TO REDUCE THE RISK OF FIRE OR ELECTRIC SHOCK, DO NOT OPEN THE
TIME CLOCK. NO USER SERVICEABLE PARTS ARE INSIDE. REPAIRS SHOULD BE
COMPLETED BY AUTHORIZED SERVICE PERSONNEL ONLY.
23Questions?
Call 800-518-8925
Text 760-278-6623
Email support@trackmytime.com
Visit support.trackmytime.com
Designed, Developed, and Supported by Workwell Technologies, Inc.
© Workwell Technologies, Inc. All rights reserved.
2777 Loker Avenue Suite A Carlsbad CA 92010
workwelltech.com
Rev: 01/2021You can also read