Dredd Release latest Apiary - Dredd testing framework
←
→
Page content transcription
If your browser does not render page correctly, please read the page content below
Dredd
Release latest

       Apiary

     Jan 06, 2021
CONTENTS

1   Features                                                                                                                                                                                  3
    1.1 Supported API Description Formats . . . . . . . . . . . . . . . . . . . . . . . . . . . . . . . . . . .                                                                               3
    1.2 Supported Hooks Languages . . . . . . . . . . . . . . . . . . . . . . . . . . . . . . . . . . . . . . .                                                                               3
    1.3 Supported Systems . . . . . . . . . . . . . . . . . . . . . . . . . . . . . . . . . . . . . . . . . . . .                                                                             3

2   Contents                                                                                                                                                                                  5
    2.1 Installation . . . . . . . . . . . . .   .   .   .   .   .   .   .   .   .   .   .   .   .   .   .   .   .   .   .   .   .   .   .   .   .   .   .   .   .   .   .   .   .   .   .    5
    2.2 Quickstart . . . . . . . . . . . . .     .   .   .   .   .   .   .   .   .   .   .   .   .   .   .   .   .   .   .   .   .   .   .   .   .   .   .   .   .   .   .   .   .   .   .    7
    2.3 How It Works . . . . . . . . . . . .     .   .   .   .   .   .   .   .   .   .   .   .   .   .   .   .   .   .   .   .   .   .   .   .   .   .   .   .   .   .   .   .   .   .   .   10
    2.4 How-To Guides . . . . . . . . . . .      .   .   .   .   .   .   .   .   .   .   .   .   .   .   .   .   .   .   .   .   .   .   .   .   .   .   .   .   .   .   .   .   .   .   .   15
    2.5 Command-line Interface . . . . . .       .   .   .   .   .   .   .   .   .   .   .   .   .   .   .   .   .   .   .   .   .   .   .   .   .   .   .   .   .   .   .   .   .   .   .   36
    2.6 Using Dredd as a JavaScript Library      .   .   .   .   .   .   .   .   .   .   .   .   .   .   .   .   .   .   .   .   .   .   .   .   .   .   .   .   .   .   .   .   .   .   .   39
    2.7 Hooks . . . . . . . . . . . . . . . .    .   .   .   .   .   .   .   .   .   .   .   .   .   .   .   .   .   .   .   .   .   .   .   .   .   .   .   .   .   .   .   .   .   .   .   41
    2.8 Data Structures . . . . . . . . . . .    .   .   .   .   .   .   .   .   .   .   .   .   .   .   .   .   .   .   .   .   .   .   .   .   .   .   .   .   .   .   .   .   .   .   .   77
    2.9 Internals . . . . . . . . . . . . . .    .   .   .   .   .   .   .   .   .   .   .   .   .   .   .   .   .   .   .   .   .   .   .   .   .   .   .   .   .   .   .   .   .   .   .   82

3   Useful Links                                                                                                                                                                             89

4   Example Applications                                                                                                                                                                     91

Index                                                                                                                                                                                        93

                                                                                                                                                                                              i
ii
Dredd, Release latest

      Dredd is a language-agnostic command-line tool for validating API description document against
      backend implementation of the API.
Dredd reads your API description and step by step validates whether your API implementation replies with responses
as they are described in the documentation.

CONTENTS                                                                                                        1
Dredd, Release latest 2 CONTENTS
CHAPTER

                                                                                                          ONE

                                                                                               FEATURES

1.1 Supported API Description Formats

   • API Blueprint
   • OpenAPI 2 (formerly known as Swagger)
   • OpenAPI 3 (experimental, contributions welcome!)

1.2 Supported Hooks Languages

Dredd supports writing hooks — a glue code for each test setup and teardown. Following languages are supported:
   • Go
   • Node.js (JavaScript)
   • Perl
   • PHP
   • Python
   • Ruby
   • Rust
   • Didn’t find your favorite language? Add a new one!

1.3 Supported Systems

   • Linux, macOS, Windows, . . .
   • Travis CI, CircleCI, Jenkins, AppVeyor, . . .

                                                                                                                  3
Dredd, Release latest 4 Chapter 1. Features
CHAPTER

                                                                                                            TWO

                                                                                                 CONTENTS

2.1 Installation

There are several options how to run Dredd on your machine or in your Continuous Integration.

2.1.1 Docker

If you are familiar with Docker, you can get started with Dredd quickly by using the ready-made apiaryio/dredd image.
Specifics of running Dredd inside Docker are:
    • you won’t be able to use the --server option (see Docker Compose)
    • setting up non-JavaScript hooks is less straightforward (see Hooks inside Docker)
macOS, Linux
Following line runs the dredd command using the apiaryio/dredd Docker image:

$ docker run -it -v $PWD:/api -w /api apiaryio/dredd dredd

As an example of how to pass arguments, following line runs the dredd init command:

$ docker run -it -v $PWD:/api -w /api apiaryio/dredd dredd init

When testing a service running on host (e.g. localhost:8080), you need to use --network host parameter in
Docker command. If you are using Docker for Mac, you should use host.docker.internal instead of 127.0.0.1/localhost.
Windows
Following line runs the dredd command using the apiaryio/dredd Docker image:

C:\Users\Susan> docker run -it -v ${pwd}:/api -w /api apiaryio/dredd dredd

As an example of how to pass arguments, following line runs the dredd init command:

C:\Users\Susan> docker run -it -v ${pwd}:/api -w /api apiaryio/dredd dredd init

                                                                                                                   5
Dredd, Release latest
Docker Compose
Inside Docker it’s impossible for Dredd to manage child processes, so the --server and --language options
won’t work properly.
Instead, you should have separate containers for each process and run them together with Dredd using Docker Com-
pose. You can use --abort-on-container-exit and --exit-code-from with Docker Compose to manage the tear down of
all the other containers when the Dredd tests finish.
2.1.2 npm
Dredd is a command-line application written in JavaScript (to be more precise, in Node.js) and as such can be installed
using npm.
Installing Node.js and npm
macOS
• If you’re using Homebrew, run brew install node
• Otherwise download Node.js from the official website and install it using the downloaded installer
• Make sure both node --version and npm --version work in your Terminal
• Node.js needs to be at least version 8
Linux
• Install Node.js as a system package
• In case your Linux distribution calls the Node.js binary nodejs, please follow this advice to have it as node
instead
• Make sure both node --version and npm --version work in your Terminal
• Node.js needs to be at least version 8
Windows
• Download Node.js from the official website and install it using the downloaded installer
• Make sure both node --version and npm --version work in your Command Prompt
• Node.js needs to be at least version 8
Note: If your internet connection is restricted (VPN, firewall, proxy), you need to configure npm:
npm config set proxy "http://proxy.example.com:8080"
npm config set https-proxy "https://proxy.example.com:8080"
Otherwise you’ll get similar errors during Dredd installation:
npmERR! Cannot read property 'path' of null
npmERR!code ECONNRESET
npmERR!network socket hang up
Later be sure to read how to set up Dredd to correctly work with proxies.
6 Chapter 2. ContentsDredd, Release latest
Installing Dredd
Now that you have everything prepared, you can finally run npm to install Dredd:
npm install dredd --global
Note: If you get EACCES permissions errors, try one of the officially recommended solutions. In the worst case, you
can run the command again with sudo.
You can verify Dredd is correctly installed by printing its version number:
dredd --version
Now you can start using Dredd!
Adding Dredd as a dev dependency
If your API project is also an npm package, you may want to add Dredd as a dev dependency instead of installing it
globally.
• Make sure your project is an npm package with a package.json file
• In the root of the project run npm install dredd --save-dev
• Once the installation is complete, you can run Dredd from the root of the project as npx dredd
This is how Dredd is installed in the dredd-example repository, so you may want to see it for inspiration.
2.2 Quickstart
In following tutorial you can quickly learn how to test a simple HTTP API application with Dredd. The tested
application will be very simple backend written in Express.js.
2.2.1 Install Dredd
$ npm install -g dredd
If you’re not familiar with the Node.js ecosystem or you bump into any issues, follow the installation guide.
2.2.2 Document Your API
First, let’s design the API we are about to build and test. That means you will need to create an API description file,
which will document how your API should look like. Dredd supports two formats of API description documents:
• API Blueprint
• OpenAPI 2 (formerly known as Swagger)
API Blueprint
If you choose API Blueprint, create a file called api-description.apib in the root of your project and save it
with following content:
2.2. Quickstart 7Dredd, Release latest
FORMAT: 1A
# GET /
+ Response 200 (application/json; charset=utf-8)
{"message": "Hello World!"}
OpenAPI 2
If you choose OpenAPI 2, create a file called api-description.yml:
swagger: '2.0'
info:
version: '1.0'
title: Example API
license:
name: MIT
host: www.example.com
basePath: /
schemes:
- http
paths:
/:
get:
produces:
- application/json; charset=utf-8
responses:
'200':
description: ''
schema:
type: object
properties:
message:
type: string
required:
- message
2.2.3 Implement Your API
As we mentioned in the beginning, we’ll use Express.js to implement the API. Install the framework by npm:
$ npm init
$ npm install express --save
Now let’s code the thing! Create a file called app.js with following contents:
var app = require('express')();
app.get('/', function(req, res) {
res.json({message: 'Hello World!'});
})
app.listen(3000);
8 Chapter 2. ContentsDredd, Release latest 2.2.4 Test Your API At this moment, the implementation is ready to be tested. Let’s run the server as a background process and let’s test it: $ node app.js & Finally, let Dredd validate whether your freshly implemented API complies with the description you have: API Blueprint $ dredd api-description.apib http://127.0.0.1:3000 OpenAPI 2 $ dredd api-description.yml http://127.0.0.1:3000 2.2.5 Configure Dredd Dredd can be configured by many CLI options. It’s recommended to save your Dredd configuration alongside your project, so it’s easier to repeatedly execute always the same test run. Use interactive configuration wizard to create dredd.yml file in the root of your project: $ dredd init ? Location of the API description document: api-description.apib ? Command to start API backend server e.g. (bundle exec rails server) ? URL of tested API endpoint: http://127.0.0.1:3000 ? Programming language of hooks: nodejs python ruby ... ? Dredd is best served with Continuous Integration. Create CircleCI config for Dredd? ˓→Yes Now you can start test run just by typing dredd! $ dredd 2.2.6 Use Hooks Dredd’s hooks enable you to write some glue code in your favorite language to support enhanced scenarios in your API tests. Read the documentation about hooks to learn more on how to write them. Choose your language and install corresponding hooks handler library. 2.2. Quickstart 9
Dredd, Release latest

2.2.7 Advanced Examples

For more complex example applications, please refer to:
      • Express.js
      • Laravel
      • Laravel & OpenAPI 3
      • Ruby on Rails

2.3 How It Works

In a nutshell, Dredd does following:
     1. Takes your API description document,
     2. creates expectations based on requests and responses documented in the document,
     3. makes requests to tested API,
     4. checks whether API responses match the documented responses,
     5. reports the results.

2.3.1 Versioning

Dredd follows Semantic Versioning. To ensure certain stability of your Dredd installation (e.g. in CI), pin the version
accordingly. You can also use release tags:
      • npm install dredd - Installs the latest published version including experimental pre-release versions.
      • npm install dredd@stable - Skips experimental pre-release versions. Recommended for CI installa-
        tions.
If the User-Agent header isn’t overridden in the API description document, Dredd uses it for sending information
about its version number along with every HTTP request it does.

2.3.2 Execution Life Cycle

Following execution life cycle documentation should help you to understand how Dredd works internally and which
action goes after which.
     1. Load and parse API description documents
           • Report parse errors and warnings
     2. Pre-run API description check
           • Missing example values for URI template parameters
           • Required parameters present in URI
           • Report non-parseable JSON bodies
           • Report invalid URI parameters
           • Report invalid URI templates
     3. Compile HTTP transactions from API description documents

10                                                                                            Chapter 2. Contents
Dredd, Release latest
• Inherit headers
• Inherit parameters
• Expand URI templates with parameters
4. Load hooks
5. Test run
• Report test run start
• Run beforeAll hooks
• For each compiled transaction:
– Report test start
– Run beforeEach hook
– Run before hook
– Send HTTP request
– Receive HTTP response
– Run beforeEachValidation hook
– Run beforeValidation hook
– Perform validation
– Run after hook
– Run afterEach hook
– Report test end with result for in-progress reporting
• Run afterAll hooks
6. Report test run end with result statistics
2.3.3 Automatic Expectations
Dredd automatically generates expectations on HTTP responses based on examples in the API description with use of
the Gavel library. Please refer to Gavel’s rules if you want know more.
Response Headers Expectations
• All headers specified in the API description must be present in the response.
• Names of headers are validated in the case-insensitive way.
• Only values of headers significant for content negotiation are validated.
• All other headers values can differ.
When using OpenAPI 2, headers are taken from response.headers (spec). HTTP headers significant for content
negotiation are inferred according to following rules:
• produces (spec) is propagated as response’s Content-Type header.
• Response’s Content-Type header overrides any produces.
2.3. How It Works 11Dredd, Release latest
Response Body Expectations
If the HTTP response body is JSON, Dredd validates only its structure. Bodies in any other format are validated as
plain text.
To validate the structure Dredd uses JSON Schema inferred from the API description under test. The effective JSON
Schema is taken from following places (the order goes from the highest priority to the lowest):
API Blueprint
1. Schema section - provided custom JSON Schema (Draft 4, Draft 6, and Draft 7) will be used.
2. Attributes section with data structure description in MSON - API Blueprint parser automatically generates JSON
Schema from MSON.
3. Body section with sample JSON payload - Gavel, which is responsible for validation in Dredd, automatically
infers some basic expectations described below.
This order exactly follows the API Blueprint specification.
OpenAPI 2
1. response.schema (spec) - provided JSON Schema will be used.
2. response.examples (spec) with sample JSON payload - Gavel, which is responsible for validation in
Dredd, automatically infers some basic expectations described below.
Gavel’s Expectations
• All JSON keys on any level given in the sample must be present in the response’s JSON.
• Response’s JSON values must be of the same JSON primitive type.
• All JSON values can differ.
• Arrays can have additional items, type or structure of the items is not validated.
• Plain text must match perfectly.
Custom Expectations
You can make your own custom expectations in hooks. For instance, check out how to employ Chai.js assertions.
2.3.4 Making Your API Description Ready for Testing
It’s very likely that your API description document will not be testable as is. This section should help you to learn
how to solve the most common issues.
12 Chapter 2. ContentsDredd, Release latest
URI Parameters
Both API Blueprint and OpenAPI 2 allow usage of URI templates (API Blueprint fully implements RFC 6570, Ope-
nAPI 2 templates are much simpler). In order to have an API description which is testable, you need to describe all
required parameters used in URI (path or query) and provide sample values to make Dredd able to expand URI tem-
plates with given sample values. Following rules apply when Dredd interpolates variables in a templated URI, ordered
by precedence:
1. Sample value, in OpenAPI 2 available as the x-example vendor extension property (docs).
2. Value of default.
3. First value from enum.
If Dredd isn’t able to infer any value for a required parameter, it will terminate the test run and complain that the
parameter is ambiguous.
Note: The implementation of API Blueprint’s request-specific parameters is still in progress and there’s only experi-
mental support for it in Dredd as of now.
Request Headers
In OpenAPI 2 documents, HTTP headers are inferred from "in": "header" parameters (spec). HTTP headers
significant for content negotiation are inferred according to following rules:
• consumes (spec) is propagated as request’s Content-Type header.
• produces (spec) is propagated as request’s Accept header.
• If request body parameters are specified as "in": "formData", request’s Content-Type header is set
to application/x-www-form-urlencoded.
Request Body
API Blueprint
The effective request body is taken from following places (the order goes from the highest priority to the lowest):
1. Body section with sample JSON payload.
2. Attributes section with data structure description in MSON - API Blueprint parser automatically generates sam-
ple JSON payload from MSON.
This order exactly follows the API Blueprint specification.
OpenAPI 2
The effective request body is inferred from "in": "body" and "in": "formData" parameters (spec).
If body parameter has schema.example (spec), it is used as a raw JSON sample for the request body. If it’s not
present, Dredd’s OpenAPI 2 adapter generates sample values from the JSON Schema provided in the schema (spec)
property. Following rules apply when the adapter fills values of the properties, ordered by precedence:
1. Value of default.
2. First value from enum.
2.3. How It Works 13Dredd, Release latest
3. Dummy, generated value.
Empty Response Body
If there is no body example or schema specified for the response in your API description document, Dredd won’t imply
any assertions. Any server response will be considered as valid.
If you want to enforce the incoming body is empty, you can use hooks:
const hooks = require('hooks');
hooks.beforeEachValidation((transaction, done) => {
if (transaction.real.body) {
transaction.fail = 'The response body must be empty';
}
done();
});
In case of responses with 204 or 205 status codes Dredd still behaves the same way, but it warns about violating the
RFC 7231 when the responses have non-empty bodies.
2.3.5 Choosing HTTP Transactions
API Blueprint
While API Blueprint allows specifying multiple requests and responses in any combination (see specification for the
action section), Dredd currently supports just separated HTTP transaction pairs like this:
+ Request
+ Response
+ Request
+ Response
In other words, Dredd always selects just the first response for each request.
Note: Improving the support for multiple requests and responses is under development. Refer to issues #25 and #78
for details. Support for URI parameters specific to a single request within one action is also limited. Solving #227
should unblock many related problems. Also see Multiple Requests and Responses guide for workarounds.
OpenAPI 2
The OpenAPI 2 format allows to specify multiple responses for a single operation. By default Dredd tests only
responses with 2xx status codes. Responses with other codes are marked as skipped and can be activated in hooks -
see the Multiple Requests and Responses how-to guide.
In produces (spec) and consumes (spec), only JSON media types are supported. Only the first JSON media type
in produces is effective, others are skipped. Other media types are respected only when provided with explicit
examples.
Default response is ignored by Dredd unless it is the only available response. In that case, the default response is
assumed to have HTTP 200 status code.
14 Chapter 2. ContentsDredd, Release latest
2.3.6 Security
Depending on what you test and how, output of Dredd may contain sensitive data.
Mind that if you run Dredd in a CI server provided as a service (such as CircleCI, Travis CI, etc.), you are disclosing
the CLI output of Dredd to third parties.
When using Apiary Reporter and Apiary Tests, you are sending your testing data to Apiary (Dredd creators and
maintainers). See their Terms of Service and Privacy Policy. Which data exactly is being sent to Apiary?
• Complete API description under test. This means your API Blueprint or OpenAPI 2 files. The API description
is stored encrypted in Apiary.
• Complete testing results. Those can contain details of all requests made to the server under test and their
responses. Apiary stores this data unencrypted, even if the original communication between Dredd and the API
server under test happens to be over HTTPS. See Apiary Reporter Test Data for detailed description of what is
sent. You can sanitize it before it gets sent.
• Little meta data about your environment. Contents of environment variables TRAVIS, CIRCLE, CI, DRONE,
BUILD_ID, DREDD_AGENT, USER, and DREDD_HOSTNAME can be sent to Apiary. Your hostname, version
of your Dredd installation, and type, release and architecture of your OS can be sent as well. Apiary stores this
data unencrypted.
See also guidelines on how to develop Apiary Reporter.
2.3.7 Using HTTP(S) Proxy
You can tell Dredd to use HTTP(S) proxy for:
• downloading API description documents (the positional argument api-description-document or the
--path option accepts also URL)
• reporting to Apiary
Dredd respects HTTP_PROXY, HTTPS_PROXY, NO_PROXY, http_proxy, https_proxy, and no_proxy en-
vironment variables. For more information on how those work see relevant section of the underlying library’s docu-
mentation.
Dredd intentionally does not support HTTP(S) proxies for testing. Proxy can deliberately modify requests and
responses or to behave in a very different way then the server under test. Testing over a proxy is, in the first place,
testing of the proxy itself. That makes the test results irrelevant (and hard to debug).
2.4 How-To Guides
In the following guides you can find tips and best practices how to cope with some common tasks. While searching
this page for particular keywords can give you quick results, reading the whole section should help you to learn some
of the Dredd’s core concepts and usual ways how to approach problems when testing with Dredd.
2.4. How-To Guides 15Dredd, Release latest
2.4.1 Isolation of HTTP Transactions
Requests in the API description usually aren’t sorted in order to comply with logical workflow of the tested application.
To get the best results from testing with Dredd, you should ensure each resource action (API Blueprint) or operation
(OpenAPI 2) is executed in isolated context. This can be easily achieved using hooks, where you can provide your
own setup and teardown code for each HTTP transaction.
You should understand that testing with Dredd is an analogy to unit tests of your application code. In unit tests, each
unit should be testable without any dependency on other units or previous tests.
Example
Common case is to solve a situation where we want to test deleting of a resource. Obviously, to test deleting of a
resource, we first need to create one. However, the order of HTTP transactions can be pretty much random in the API
description.
To solve the situation, it’s recommended to isolate the deletion test by hooks. Providing before hook, we can ensure
the database fixture will be present every time Dredd will try to send the request to delete a category item.
API Blueprint
FORMAT: 1A
# Categories API
## Categories [/categories]
### Create a Category [POST]
+ Response 201
## Category [/category/{id}]
+ Parameters
+ id: 42 (required)
### Delete a Category [DELETE]
+ Response 204
## Category Items [/category/{id}/items]
+ Parameters
+ id: 42 (required)
## Create an Item [POST]
+ Response 201
To have an idea where we can hook our arbitrary code, we should first ask Dredd to list all available transaction names:
$ dredd api-description.apib http://127.0.0.1:3000 --names
info: Categories > Create a category
info: Category > Delete a category
info: Category Items > Create an item
Now we can create a hooks.js file. The file will contain setup and teardown of the database fixture:
hooks = require('hooks');
db = require('./lib/db');
(continues on next page)
16 Chapter 2. ContentsDredd, Release latest
(continued from previous page)
beforeAll(function() {
db.cleanUp();
});
afterEach(function(transaction) {
db.cleanUp();
});
before('Category > Delete a Category', function() {
db.createCategory({id: 42});
});
before('Category Items > Create an Item', function() {
db.createCategory({id: 42});
});
OpenAPI 2
swagger: "2.0"
info:
version: "0.0.0"
title: Categories API
license:
name: MIT
host: www.example.com
basePath: /
schemes:
- http
consumes:
- application/json
produces:
- application/json
paths:
/categories:
post:
responses:
200:
description: ""
/category/{id}:
delete:
parameters:
- name: id
in: path
required: true
type: string
enum:
- "42"
responses:
200:
description: ""
/category/{id}/items:
post:
parameters:
(continues on next page)
2.4. How-To Guides 17Dredd, Release latest
(continued from previous page)
- name: id
in: path
required: true
type: string
enum:
- "42"
responses:
200:
description: ""
To have an idea where we can hook our arbitrary code, we should first ask Dredd to list all available transaction names:
$ dredd api-description.yml http://127.0.0.1:3000 --names
info: /categories > POST > 200 > application/json
info: /category/{id} > DELETE > 200 > application/json
info: /category/{id}/items > POST > 200 > application/json
Now we can create a hooks.js file. The file will contain setup and teardown of the database fixture:
hooks = require('hooks');
db = require('./lib/db');
beforeAll(function() {
db.cleanUp();
});
afterEach(function(transaction) {
db.cleanUp();
});
before('/category/{id}', function() {
db.createCategory({id: 42});
});
before('/category/{id}/items', function() {
db.createCategory({id: 42});
});
2.4.2 Testing API Workflows
Often you want to test a sequence of steps, a scenario, rather than just one request-response pair in isolation. Since
the API description formats are quite limited in their support of documenting scenarios, Dredd probably isn’t the best
tool to provide you with this kind of testing. There are some tricks though, which can help you to work around some
of the limitations.
Note: API Blueprint prepares direct support for testing and scenarios. Interested? Check out api-blueprint#21!
To test various scenarios, you will want to write each of them into a separate API description document. To load them
during a single test run, use the --path option.
For workflows to work properly, you’ll also need to keep shared context between individual HTTP transactions. You
can use hooks in order to achieve that. See tips on how to pass data between transactions.
18 Chapter 2. ContentsDredd, Release latest
API Blueprint Example
Imagine we have a simple workflow described:
FORMAT: 1A
# My Scenario
## POST /login
+ Request (application/json)
{"username": "john", "password": "d0e"}
+ Response 200 (application/json)
{"token": "s3cr3t"}
## GET /cars
+ Response 200 (application/json)
[
{"id": "42", "color": "red"}
]
## PATCH /cars/{id}
+ Parameters
+ id: 42 (string, required)
+ Request (application/json)
{"color": "yellow"}
+ Response 200 (application/json)
{"id": 42, "color": "yellow"}
Writing Hooks
To have an idea where we can hook our arbitrary code, we should first ask Dredd to list all available transaction names:
$ dredd api-description.apib http://127.0.0.1:3000 --names
info: /login > POST
info: /cars > GET
info: /cars/{id} > PATCH
Now we can create a hooks.js file. The code of the file will use global stash variable to share data between
requests:
hooks = require('hooks');
db = require('./lib/db');
stash = {}
(continues on next page)
2.4. How-To Guides 19Dredd, Release latest
(continued from previous page)
// Stash the token we've got
after('/login > POST', function (transaction) {
stash.token = JSON.parse(transaction.real.body).token;
});
// Add the token to all HTTP transactions
beforeEach(function (transaction) {
if (stash.token) {
transaction.request.headers['X-Api-Key'] = stash.token
};
});
// Stash the car ID we've got
after('/cars > GET', function (transaction) {
stash.carId = JSON.parse(transaction.real.body).id;
});
// Replace car ID in request with the one we've stashed
before('/cars/{id} > PATCH', function (transaction) {
transaction.fullPath = transaction.fullPath.replace('42', stash.carId)
transaction.request.uri = transaction.fullPath
})
OpenAPI 2 Example
Imagine we have a simple workflow described:
swagger: "2.0"
info:
version: "0.0.0"
title: Categories API
license:
name: MIT
host: www.example.com
basePath: /
schemes:
- http
consumes:
- application/json
produces:
- application/json
paths:
/login:
post:
parameters:
- name: body
in: body
required: true
schema:
type: object
properties:
username:
type: string
password:
type: string
(continues on next page)
20 Chapter 2. ContentsDredd, Release latest
(continued from previous page)
responses:
200:
description: ""
schema:
type: object
properties:
token:
type: string
/cars:
get:
responses:
200:
description: ""
schema:
type: array
items:
type: object
properties:
id:
type: string
color:
type: string
/cars/{id}:
patch:
parameters:
- name: id
in: path
required: true
type: string
enum:
- "42"
- name: body
in: body
required: true
schema:
type: object
properties:
color:
type: string
responses:
200:
description: ""
schema:
type: object
properties:
id:
type: string
color:
type: string
2.4. How-To Guides 21Dredd, Release latest
Writing Hooks
To have an idea where we can hook our arbitrary code, we should first ask Dredd to list all available transaction names:
$ dredd api-description.yml http://127.0.0.1:3000 --names
info: /login > POST > 200 > application/json
info: /cars > GET > 200 > application/json
info: /cars/{id} > PATCH > 200 > application/json
Now we can create a hooks.js file. The code of the file will use global stash variable to share data between
requests:
hooks = require('hooks');
db = require('./lib/db');
stash = {}
// Stash the token we've got
after('/login > POST > 200 > application/json', function (transaction) {
stash.token = JSON.parse(transaction.real.body).token;
});
// Add the token to all HTTP transactions
beforeEach(function (transaction) {
if (stash.token) {
transaction.request.headers['X-Api-Key'] = stash.token
};
});
// Stash the car ID we've got
after('/cars > GET > 200 > application/json', function (transaction) {
stash.carId = JSON.parse(transaction.real.body).id;
});
// Replace car ID in request with the one we've stashed
before('/cars/{id} > PATCH > 200 > application/json', function (transaction) {
transaction.fullPath = transaction.fullPath.replace('42', stash.carId)
transaction.request.uri = transaction.fullPath
})
2.4.3 Making Dredd Validation Stricter
API Blueprint or OpenAPI 2 files are usually created primarily with documentation in mind. But what’s enough for
documentation doesn’t need to be enough for testing.
That applies to both MSON (a language powering API Blueprint’s Attributes sections) and JSON Schema (a language
powering the OpenAPI 2 format and API Blueprint’s Schema sections).
In following sections you can learn about how to deal with common scenarios.
22 Chapter 2. ContentsDredd, Release latest
Avoiding Additional Properties
If you describe a JSON body which has attributes name and size, the following payload will be considered as
correct:
{"name": "Sparta", "size": 300, "luck": false}
It’s because in both MSON and JSON Schema additional properties are not forbidden by default.
• In API Blueprint’s Attributes sections you can mark your object with fixed-type (spec), which doesn’t allow
additional properties.
• In API Blueprint’s Schema sections and in OpenAPI 2 you can use additionalProperties: false
(spec) on the objects.
Requiring Properties
If you describe a JSON body which has attributes name and size, the following payload will be considered as
correct:
{"name": "Sparta"}
It’s because properties are optional by default in both MSON and JSON Schema and you need to explicitly specify
them as required.
• In API Blueprint’s Attributes section, you can use required (spec).
• In API Blueprint’s Schema sections and in OpenAPI 2 you can use required (spec), where you list the
required properties. (Note this is true only for the Draft v4 JSON Schema, in older versions the required
functionality was done differently.)
Validating Structure of Array Items
If you describe an array of items, where each of the items should have a name property, the following payload will be
considered as correct:
[{"name": "Sparta"}, {"title": "Athens"}, "Thebes"]
That’s because in MSON, the default behavior is that you are specifying what may appear in the array.
• In API Blueprint’s Attributes sections you can mark your array with fixed-type (spec), which doesn’t allow
array items of a different structure then specified.
• In API Blueprint’s Schema sections and in OpenAPI 2 make sure to learn about how validation of arrays exactly
works.
Validating Specific Values
If you describe a JSON body which has attributes name and size, the following payload will be considered as
correct:
{"name": "Sparta", "size": 42}
If the size should be always equal to 300, you need to specify the fact in your API description.
• In API Blueprint’s Attributes sections you can mark your property with fixed (spec), which turns the sample
value into a required value. You can also use enum (spec) to provide a set of possible values.
2.4. How-To Guides 23Dredd, Release latest
• In API Blueprint’s Schema sections and in OpenAPI 2 you can use enum (spec) with one or more possible
values.
2.4.4 Integrating Dredd with Your Test Suite
Generally, if you want to add Dredd to your existing test suite, you can just save Dredd configuration in the dredd.
yml file and add call for dredd command to your task runner.
There are also some packages which make the integration a piece of cake:
• grunt-dredd
• dredd-rack
• meteor-dredd
To find more, search for dredd in your favorite language’s package index.
2.4.5 Continuous Integration
It’s a good practice to make Dredd part of your continuous integration workflow. Only that way you can ensure that
application code you’ll produce won’t break the contract you provide in your API documentation.
Dredd’s interactive configuration wizard, dredd init, can help you with setting up dredd.yml configuration file
and with modifying or generating CI configuration files for Travis CI or CircleCI.
If you prefer to add Dredd yourself or you look for inspiration on how to add Dredd to other continuous integration
services, see examples below. When testing in CI, always pin your Dredd version to a specific number and upgrade to
newer releases manually.
.circleci/config.yml Configuration File for CircleCI
version: 2
jobs:
build:
docker:
- image: circleci/node:latest
steps:
- checkout
- run: npm install dredd@x.x.x --global
- run: dredd apiary.apib http://127.0.0.1:3000
.travis.yml Configuration File for Travis CI
before_install:
- npm install dredd@x.x.x --global
before_script:
- dredd apiary.apib http://127.0.0.1:3000
24 Chapter 2. ContentsDredd, Release latest
2.4.6 Authenticated APIs
Dredd supports all common authentication schemes:
• Basic access authentication
• Digest access authentication
• OAuth (any version)
• CSRF tokens
• ...
Use user setting in your configuration file or the --user option to provide HTTP basic authentication:
--user=user:password
Most of the authentication schemes use HTTP header for carrying the authentication data. If you don’t want to add
authentication HTTP header to every request in the API description, you can instruct Dredd to do it for you by the
--header option:
--header="Authorization: Basic YmVuOnBhc3M="
2.4.7 Sending Multipart Requests
FORMAT: 1A
# Testing 'multipart/form-data' Request API
# POST /data
+ Request (multipart/form-data; boundary=CUSTOM-BOUNDARY)
+ Body
--CUSTOM-BOUNDARY
Content-Disposition: form-data; name="text"
Content-Type: text/plain
test equals to 42
--CUSTOM-BOUNDARY
Content-Disposition: form-data; name="json"
Content-Type: application/json
{"test": 42}
--CUSTOM-BOUNDARY--
+ Response 200 (application/json; charset=utf-8)
+ Body
{"test": "OK"}
swagger: '2.0'
info:
(continues on next page)
2.4. How-To Guides 25Dredd, Release latest
(continued from previous page)
title: "Testing 'multipart/form-data' Request API"
version: '1.0'
consumes:
- multipart/form-data; boundary=CUSTOM-BOUNDARY
produces:
- application/json; charset=utf-8
paths:
'/data':
post:
parameters:
- name: text
in: formData
type: string
required: true
x-example: "test equals to 42"
- name: json
in: formData
type: string
required: true
x-example: '{"test": 42}'
responses:
200:
description: 'Test OK'
examples:
application/json; charset=utf-8:
test: 'OK'
2.4.8 Sending Form Data
FORMAT: 1A
# Testing 'application/x-www-form-urlencoded' Request API
# POST /data
+ Request (application/x-www-form-urlencoded)
+ Body
test=42
+ Response 200 (application/json; charset=utf-8)
+ Body
{"test": "OK"}
swagger: '2.0'
info:
title: "Testing 'application/x-www-form-urlencoded' Request API"
version: '1.0'
consumes:
- application/x-www-form-urlencoded
produces:
(continues on next page)
26 Chapter 2. ContentsDredd, Release latest
(continued from previous page)
- application/json; charset=utf-8
paths:
'/data':
post:
parameters:
- name: test
in: formData
type: string
required: true
x-example: "42"
responses:
200:
description: 'Test OK'
examples:
application/json; charset=utf-8:
test: 'OK'
2.4.9 Working with Images and other Binary Bodies
The API description formats generally do not provide a way to describe binary content. The easiest solution is to
describe only the media type, to leave out the body, and to handle the rest using Hooks.
Binary Request Body
API Blueprint
FORMAT: 1A
# Images API
## Resource [/image.png]
### Send an Image [PUT]
+ Request (image/png)
+ Response 200 (application/json; charset=utf-8)
+ Body
{"test": "OK"}
OpenAPI 2
swagger: "2.0"
info:
version: "1.0"
title: Images API
schemes:
- http
consumes:
- image/png
(continues on next page)
2.4. How-To Guides 27Dredd, Release latest
(continued from previous page)
produces:
- application/json
paths:
/image.png:
put:
parameters:
- name: binary
in: body
required: true
schema:
type: string
format: binary
responses:
200:
description: 'Test OK'
examples:
application/json; charset=utf-8:
test: 'OK'
Hooks
In hooks, you can populate the request body with real binary data. The data must be in a form of a Base64-encoded
string.
const hooks = require('hooks');
const fs = require('fs');
const path = require('path');
hooks.beforeEach((transaction, done) => {
const buffer = fs.readFileSync(path.join(__dirname, '../image.png'));
transaction.request.body = buffer.toString('base64');
transaction.request.bodyEncoding = 'base64';
done();
});
Binary Response Body
API Blueprint
FORMAT: 1A
# Images API
## Resource [/image.png]
### Retrieve Representation [GET]
+ Response 200 (image/png)
28 Chapter 2. ContentsDredd, Release latest
OpenAPI 2
swagger: "2.0"
info:
version: "1.0"
title: Images API
schemes:
- http
produces:
- image/png
paths:
/image.png:
get:
responses:
200:
description: Representation
schema:
type: string
format: binary
examples:
"image/png": ""
Note: Do not use the explicit binary or bytes formats with response bodies, as Dredd is not able to properly work
with those (api-elements.js#269).
Hooks
In hooks, you can either assert the body:
const hooks = require('hooks');
const fs = require('fs');
const path = require('path');
hooks.beforeEachValidation((transaction, done) => {
const bytes = fs.readFileSync(path.join(__dirname, '../image.png'));
transaction.expected.body = bytes.toString('base64');
done();
});
Or you can ignore it:
const hooks = require('hooks');
hooks.beforeEachValidation((transaction, done) => {
transaction.real.body = '';
done();
});
2.4. How-To Guides 29Dredd, Release latest
2.4.10 Multiple Requests and Responses
Note: For details on this topic see also How Dredd Works With HTTP Transactions.
API Blueprint
To test multiple requests and responses within one action in Dredd, you need to cluster them into pairs:
FORMAT: 1A
# My API
## Resource [/resource/{id}]
+ Parameters
+ id: 42 (required)
### Update Resource [PATCH]
+ Request (application/json)
{"color": "yellow"}
+ Response 200 (application/json)
{"color": "yellow", "id": 1}
+ Request Edge Case (application/json)
{"weight": 1}
+ Response 400 (application/vnd.error+json)
{"message": "Validation failed"}
Dredd will detect two HTTP transaction examples and will compile following transaction names:
$ dredd api-description.apib http://127.0.0.1 --names
info: Resource > Update Resource > Example 1
info: Resource > Update Resource > Example 2
In case you need to perform particular request with different URI parameters and standard inheritance of URI param-
eters isn’t working for you, try modifying transaction before its execution in hooks.
30 Chapter 2. ContentsDredd, Release latest
OpenAPI 2
When using OpenAPI 2 format, by default Dredd tests only responses with 2xx status codes. Responses with other
codes are marked as skipped and can be activated in hooks:
var hooks = require('hooks');
hooks.before('/resource > GET > 500 > application/json', function (transaction, done)
˓→{
transaction.skip = false;
done();
});
2.4.11 Using Apiary Reporter and Apiary Tests
Command-line output of complex HTTP responses and expectations can be hard to read. To tackle the problem, you
can use Dredd to send test reports to Apiary. Apiary provides a comfortable interface for browsing complex test
reports:
$ dredd apiary.apib http://127.0.0.1 --reporter=apiary
warn: Apiary API Key or API Project Name were not provided. Configure Dredd to be
˓→able to save test reports alongside your Apiary API project: https://dredd.org/en/
˓→latest/how-to-guides/#using-apiary-reporter-and-apiary-tests
pass: DELETE /honey duration: 884ms
complete: 1 passing, 0 failing, 0 errors, 0 skipped, 1 total
complete: Tests took 1631ms
complete: See results in Apiary at: https://app.apiary.io/public/tests/run/74d20a82-
˓→55c5-49bb-aac9-a3a5a7450f06
Saving Test Reports under Your Account in Apiary
As you can see on the screenshot, the test reports are anonymous by default and will expire after some time. However,
if you provide Apiary credentials, your test reports will appear on the Tests page of your API Project. This is great
especially for introspection of test reports from Continuous Integration.
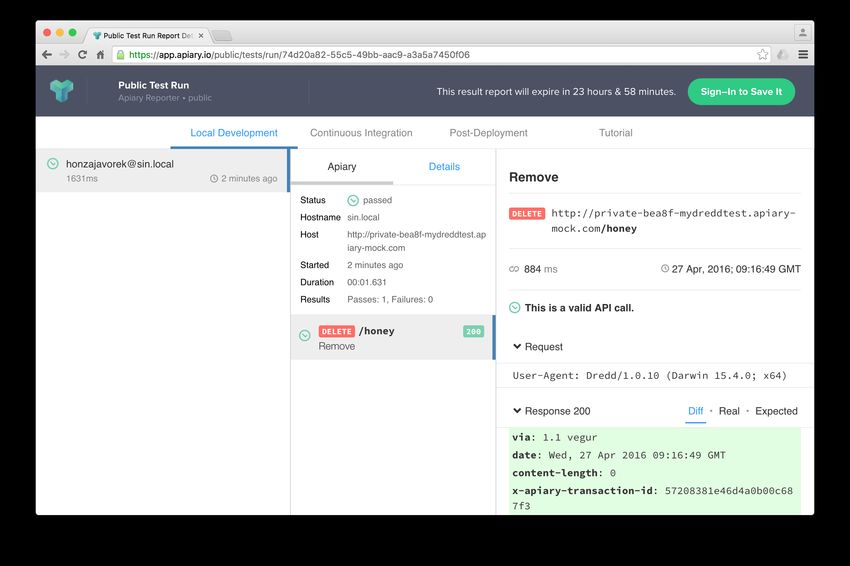
To get and setup credentials, just follow the tutorial in Apiary:
As you can see, the parameters go like this:
$ dredd -j apiaryApiKey: -j apiaryApiName:
In addition to using parameters and dredd.yml, you can also use environment variables:
• APIARY_API_KEY= - Alternative way to pass credentials to Apiary Reporter.
• APIARY_API_NAME= - Alternative way to pass credentials to Apiary Reporter.
When sending test reports to Apiary, Dredd inspects the environment where it was executed and sends some infor-
mation about it alongside test results. Those are used mainly for detection whether the environment is Continuous
Integration and also, they help you to identify individual test reports on the Tests page. You can use the following
variables to tell Dredd what to send:
• agent (string) - DREDD_AGENT or current user in the OS
• hostname (string) - DREDD_HOSTNAME or hostname of the OS
• CI (boolean) - looks for TRAVIS, CIRCLE, CI, DRONE, BUILD_ID, . . .
2.4. How-To Guides 31Dredd, Release latest
Fig. 1: Apiary Tests
32 Chapter 2. ContentsDredd, Release latest
Fig. 2: Apiary Tests Tutorial
2.4.12 Example Values for Request Parameters
While example values are natural part of the API Blueprint format, the OpenAPI 2 specification allows them only for
body request parameters (schema.example).
However, Dredd needs to know what values to use when testing described API, so it supports x-example vendor
extension property to overcome the OpenAPI 2 limitation:
...
paths:
/cars:
get:
parameters:
- name: limit
in: query
type: number
x-example: 42
The x-example property is respected for all kinds of request parameters except of body parameters, where native
schema.example should be used.
2.4. How-To Guides 33Dredd, Release latest
2.4.13 Removing Sensitive Data from Test Reports
Sometimes your API sends back sensitive information you don’t want to get disclosed in Apiary Tests or in your CI
log. In that case you can use Hooks to do sanitation. Before diving into examples below, do not forget to consider
following:
• Be sure to read section about security first.
• Only the transaction.test (docs) object will make it to reporters. You don’t have to care about sanitation
of the rest of the transaction (docs) object.
• The transaction.test.message and all the transaction.test.results.body.results.
rawData.*.message properties contain validation error messages. While they’re very useful for learning
about what’s wrong on command line, they can contain direct mentions of header names, header values, body
properties, body structure, body values, etc., thus it’s recommended their contents are completely removed to
prevent unintended leaks of sensitive information.
• Without the transaction.test.results.body.results.rawData property Apiary reporter won’t
be able to render green/red difference between payloads.
• You can use Ultimate ‘afterEach’ Guard to make sure you won’t leak any sensitive data by mistake.
• If your hooks crash, Dredd will send an error to reporters, alongside with current contents of the
transaction.test (docs) object. See the Sanitation of Test Data of Transaction With Secured Erroring
Hooks example to learn how to prevent this.
Sanitation of the Entire Request Body
• API Blueprint
• Hooks
Sanitation of the Entire Response Body
• API Blueprint
• Hooks
Sanitation of a Request Body Attribute
• API Blueprint
• Hooks
Sanitation of a Response Body Attribute
• API Blueprint
• Hooks
34 Chapter 2. ContentsDredd, Release latest Sanitation of Plain Text Response Body by Pattern Matching • API Blueprint • Hooks Sanitation of Request Headers • API Blueprint • Hooks Sanitation of Response Headers • API Blueprint • Hooks Sanitation of URI Parameters by Pattern Matching • API Blueprint • Hooks Sanitation of Any Content by Pattern Matching • API Blueprint • Hooks Sanitation of Test Data of Passing Transaction • API Blueprint • Hooks Sanitation of Test Data When Transaction Is Marked as Failed in ‘before’ Hook • API Blueprint • Hooks Sanitation of Test Data When Transaction Is Marked as Failed in ‘after’ Hook • API Blueprint • Hooks 2.4. How-To Guides 35
Dredd, Release latest

Sanitation of Test Data When Transaction Is Marked as Skipped

     • API Blueprint
     • Hooks

Ultimate ‘afterEach’ Guard Using Pattern Matching

You can use this guard to make sure you won’t leak any sensitive data by mistake.
     • API Blueprint
     • Hooks

Sanitation of Test Data of Transaction With Secured Erroring Hooks

If your hooks crash, Dredd will send an error to reporters, alongside with current contents of the transaction.
test (docs) object. If you want to prevent this, you need to add try/catch to your hooks, sanitize the test object,
and gracefully fail the transaction.
     • API Blueprint
     • Hooks

2.5 Command-line Interface

2.5.1 Usage

$ dredd '' '' [OPTIONS]

Example:

$ dredd ./apiary.md http://127.0.0.1:3000

2.5.2 Arguments

api-description-document
    URL or path to the API description document (API Blueprint, OpenAPI 2). Sample val-
    ues: ./api-blueprint.apib, ./openapi2.yml, ./openapi2.json, http://example.com/
    api-blueprint.apib
api-location
    URL, the root address of your API. Sample values: http://127.0.0.1:3000, http://api.
    example.com

36                                                                                        Chapter 2. Contents
Dredd, Release latest
2.5.3 Configuration File
If you use Dredd repeatedly within a single project, the preferred way to run it is to first persist your configuration in
a dredd.yml file. With the file in place you can then run Dredd every time simply just by:
$ dredd
Dredd offers interactive wizard to setup your dredd.yml file:
$ dredd init
See below how sample configuration file could look like. The structure is the same as of the Dredd Class configuration
object.
reporter: apiary
custom:
- "apiaryApiKey:yourSecretApiaryAPiKey"
- "apiaryApiName:apiName"
dry-run: null
hookfiles: "dreddhooks.js"
server: rails server
server-wait: 3
init: false
names: false
only: []
output: []
header: []
sorted: false
user: null
inline-errors: false
details: false
method: []
loglevel: warning
path: []
blueprint: api-description.apib
endpoint: "http://127.0.0.1:3000"
Note: Do not get confused by Dredd using a keyword blueprint also for paths to OpenAPI 2 documents. This is
for historical reasons and will be changed in the future.
2.5.4 CLI Options Reference
Remember you can always list all available arguments by dredd --help.
--color
Use –color/–no-color to enable/disable colored output Default value: true
--config
Path to dredd.yml config file. Default value: "./dredd.yml"
--custom, -j
Pass custom key-value configuration data delimited by a colon. E.g. -j ‘a:b’ Default value: []
--details, -d
Determines whether request/response details are included in passing tests. Default value: false
2.5. Command-line Interface 37Dredd, Release latest
--dry-run, -y
Do not run any real HTTP transaction, only parse API description document and compile transactions. Default
value: null
--header, -h
Extra header to include in every request. This option can be used multiple times to add multiple headers. Default
value: []
--help
Show usage information.
--hookfiles, -f
Path to hook files. Can be used multiple times, supports glob patterns. Hook files are executed in alphabetical
order. Default value: null
--hooks-worker-after-connect-wait
How long to wait between connecting to hooks handler and start of testing. [ms] Default value: 100
--hooks-worker-connect-retry
How long to wait between attempts to connect to hooks handler. [ms] Default value: 500
--hooks-worker-connect-timeout
Total hooks handler connection timeout (includes all retries). [ms] Default value: 1500
--hooks-worker-handler-host
Host of the hooks handler. Default value: "127.0.0.1"
--hooks-worker-handler-port
Port of the hooks handler. Default value: 61321
--hooks-worker-term-retry
How long to wait between attempts to terminate hooks handler. [ms] Default value: 500
--hooks-worker-term-timeout
How long to wait between trying to terminate hooks handler and killing it. [ms] Default value: 5000
--hooks-worker-timeout
How long to wait for hooks handler to start. [ms] Default value: 5000
--init, -i
Run interactive configuration. Creates dredd.yml configuration file. Default value: false
--inline-errors, -e
Determines whether failures and errors are displayed as they occur (true) or aggregated and displayed at the end
(false). Default value: false
--language, -a
Language of hookfiles. Possible options are: nodejs, ruby, python, php, perl, go, rust Default value: "nodejs"
--loglevel, -l
Application logging level. Supported levels: ‘debug’, ‘warning’, ‘error’, ‘silent’. The value ‘debug’ also dis-
plays timestamps. Default value: "warning"
--method, -m
Restrict tests to a particular HTTP method (GET, PUT, POST, DELETE, PATCH). This option can be used
multiple times to allow multiple methods. Default value: []
--names, -n
Only list names of requests (for use in a hookfile). No requests are made. Default value: false
--only, -x
Run only specified transaction name. Can be used multiple times Default value: []
38 Chapter 2. ContentsDredd, Release latest
--output, -o
Specifies output file when using additional file-based reporter. This option can be used multiple times if multiple
file-based reporters are used. Default value: []
--path, -p
Additional API description paths or URLs. Can be used multiple times with glob pattern for paths. Default
value: []
--reporter, -r
Output additional report format. This option can be used multiple times to add multiple reporters. Options:
xunit, nyan, dot, markdown, html, apiary. Default value: []
--require
When using nodejs hooks, require the given module before executing hooks Default value: null
--server, -g
Run API backend server command and kill it after Dredd execution. E.g. rails server Default value: null
--server-wait
Set delay time in seconds between running a server and test run. Default value: 3
--sorted, -s
Sorts requests in a sensible way so that objects are not modified before they are created. Order: CONNECT,
OPTIONS, POST, GET, HEAD, PUT, PATCH, LINK, UNLINK, DELETE, TRACE. Default value: false
--user, -u
Basic Auth credentials in the form username:password. Default value: null
--version
Show version number.
2.6 Using Dredd as a JavaScript Library
Dredd can be used directly from your JavaScript code. First, import and configure Dredd:
var Dredd = require('dredd');
var dredd = new Dredd(configuration);
Then you need to run the Dredd testing:
dredd.run(function (err, stats) {
// err is present if anything went wrong
// otherwise stats is an object with useful statistics
});
As you can see, dredd.run is a function receiving another function as a callback. Received arguments are err
(error if any) and stats (testing statistics) with numbers accumulated throughout the Dredd run.
2.6. Using Dredd as a JavaScript Library 39Dredd, Release latest
2.6.1 Configuration Object for Dredd Class
Let’s have a look at an example configuration first. (Please also see the CLI options to read detailed information about
the list of available options).
{
endpoint: 'http://127.0.0.1:3000/api', // your URL to API endpoint the tests will
˓→ run against
path: [], // Required Array if Strings; filepaths to API description
˓→documents, can use glob wildcards
'dry-run': false, // Boolean, do not run any real HTTP transaction
names: false, // Boolean, Print Transaction names and finish, similar to dry-run
loglevel: 'warning', // String, logging level (debug, warning, error, silent)
only: [], // Array of Strings, run only transaction that match these names
header: [], // Array of Strings, these strings are then added as headers
˓→(key:value) to every transaction
user: null, // String, Basic Auth credentials in the form username:password
hookfiles: [], // Array of Strings, filepaths to files containing hooks (can use
˓→glob wildcards)
reporter: ['dot', 'html'], // Array of possible reporters, see folder lib/reporters
output: [], // Array of Strings, filepaths to files used for output of file-
˓→based reporters
'inline-errors': false, // Boolean, If failures/errors are display immediately in
˓→Dredd run
require: null, // String, When using nodejs hooks, require the given module
˓→before executing hooks
color: true,
emitter: new EventEmitter(), // listen to test progress, your own instance of
˓→EventEmitter
apiDescriptions: ['FORMAT: 1A\n# Sample API\n']
}
Warning: The usage of nested options key is deprecated. Please list options under the root of the configuration.
Warning: The top-level server property must be replaced by endpoint. Do not confuse with the options
–server option, that provides a server running command (i.e. npm start).
configuration
configuration.endpoint
The HTTP(S) address of the API server to test against the API description(s). A valid URL is expected, e.g.
http://127.0.0.1:8000
Type string
Required yes
configuration.path
Array of paths or URLs to API description documents.
Type array
Required yes
configuration.emitter
Listen to test progress by providing your own instance of EventEmitter.
40 Chapter 2. ContentsYou can also read