Electric Bicycle Manual - E-LEGGERA - OZ E-Leggera
←
→
Page content transcription
If your browser does not render page correctly, please read the page content below

E-LEGGERA
Electric Bicycle Manual
Electric Bicycle Manual

    Catalog
1. Safety instructions and notes..........................................................2
       1.1. Safety instructions..................................................................2
       1.2. Notes .....................................................................................4
2. Basic structure and name...............................................................6
3. Unfolding method............................................................................7
4. Operation and adjustment..............................................................9
       4.1. Familiarising Display introduction......................................9
       4.2. Ride modes............................................................................9
       4.3. Introduction to speed boosting system..................................9
       4.4. Charge................................................................................10
       4.5. Quick release folding system...............................................12
       4.6. Reflection and lighting system..............................................13
       4.7. Seat position.......................................................................13
       4.8. Braking system.....................................................................14
       4.9. Chain....................................................................................16
       4.10. Inflator (option).............................................................17
5. Use and maintenance.................................................................18
       5.1. Routine inspection of electric bike before use....................18
       5.2. Attentions about the battery and charger.............................20
       5.3. Everyday use and inspection of electric bike........................21
       5.4. Bicycle inspection and care..................................................21
       5.5. Lubricating the e-bike...........................................................22
6. Riding technology.........................................................................23
7. Troubleshoot.................................................................................25
8. MAINTENANCE AND ADJUSTMENTS........................................26

1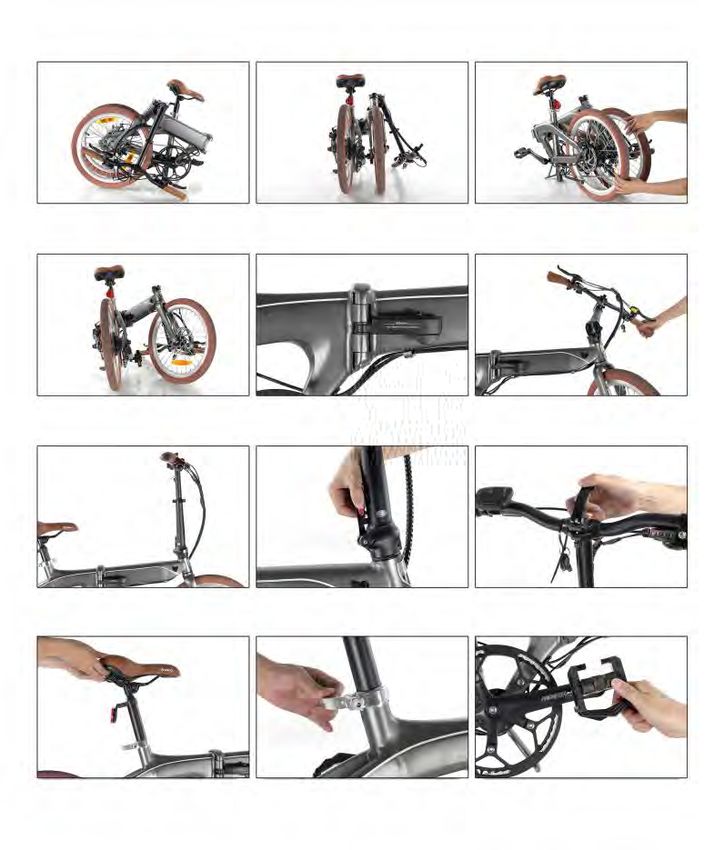
Electric Bicycle Manual
     Electrically power assisted bicycle,equipped with pedals and an
auxiliary electric motor, which can not be propelled exclusively by means
of this auxiliary electric motor.
      Compared with bicycle, Electric bicycle only add motor, controller,
charger, battery. When Riding, electric energy will help you to ride easier
and save labor.

Items in carton:
When you open the carton, please check if the following items are inside.
If not, please contact with your agent.
 ﹡     electric bicycle                             1pc
 ﹡     charger                                      1pc
 ﹡     manual                                       1pc
 ﹡     tools kit                                    1set
must be in the carton

1. Safety instructions and notes
1.1 Safety instructions
★    Do not operate this electric bike without carefully reading the manual
     and understanding the performance of the electric bike, and do not
     lend it to the persons who can manipulate the electric bike.
★    Preparations before riding: wear your helmet, gloves and other
     protective equipments before riding to protect yourself from damage
     in case of an accident.
★    We highly recommend that you observe traffic rules and regulations
     when using this electric bike. Passengers can not be carried. When
     riding in rainy, snowy or slippery conditions reduce your speed and
     keep the distance between yourself and other vehicles.

                                                                          2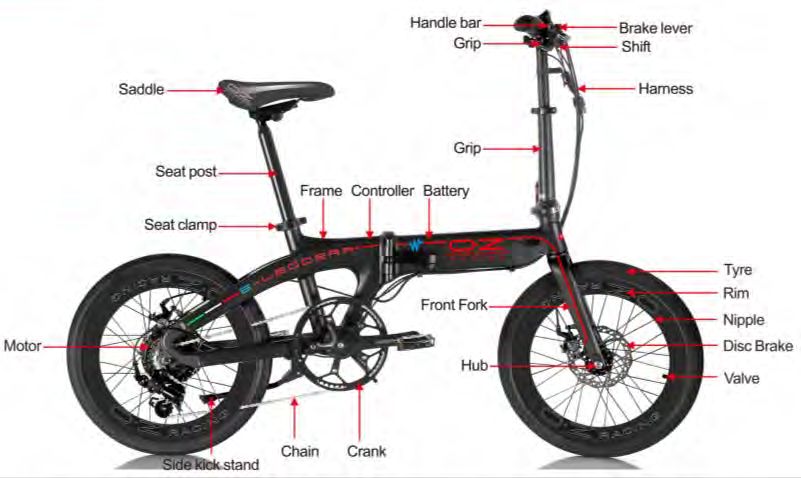
Electric Bicycle Manual
★   Cycling conditions: ambient temperature of -10 to 40C, no wind and
    flat roads; without frequently start up and brake, the general running
    distance may be 40 to 75km (according to the battery capacity).
★   Maximum load: the maximum load of the bike is (100Kg); if an
    accident happens when the load is more than 120Kg, the company
    does not undertake any responsibilities.
★   In case of frequently brake, start up, uphill, headwind running, muddy
    roads, overload and others, a large quantity of electric power of the
    storage battery will be consumed, thus affecting the continued
    mileage, so we recommend that you avoid the above factors when
    riding.
★   If the storage battery is disabled for a long time, make sure to charge
    it enough, and it need be additionally charged once if its storage is
    more than a month.
★   Make sure to pay attention: the electric bike can not wade for a long
    time because if water enters into the controller and motor wheel, it
    may cause short circuit to damage the electrical appliances!
★   Prohibit unauthorized demolition or alteration, and the company is not
    responsible for all losses resulting.
★   The scrapped battery can not be discarded randomly, so as to avoid
    environmental pollution.

3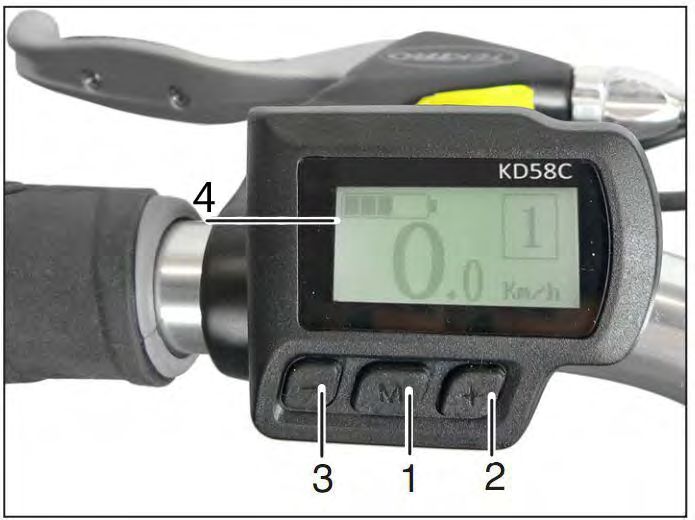
Electric Bicycle Manual
1.2 Notes
    The electric bike is designed based on the original bike in
    combination with the market demand and is a means of transport
    with special functions and uses. At the time of purchase, please
    select and buy a model suitable for your need, and the drivers must
    have skilled riding technique before riding on the road. In order to
    your correct use and security, please pay attention to the following
    matters:
    In the process of use, pay attention to check the fastening status of
    the motor and rear fork, and if a loose phenomenon is found, it
    should be tightened timely.
    When starting the power supply or meeting a steep slope, use the
    Pedal to assist as far as possible to reduce the starting current and
    extend the battery life and continuation line mileage.
    In rainy days, please pay special attention to: when the water depth
    is more than the wheel center, it is likely for the motor to soak water,
    thus resulting in failure.
    Users must use the charger specified by manufacturer for charging
    the storage battery. When charging, put the battery and charger
    smoothly.
    It is prohibited that other items are covered on the battery box and
    charger to impede heat, where good ventilation environment should
    be maintained.
    Please keep appropriate air pressure inside the tires, so as to avoid
    increasing the resistance when riding, and easily wearing the tires
    and deforming the Rim.
    Drivers should observe the traffic regulations, and the riding speed
    should be controlled below 25km/h and the goods to be carried shall

                                                                           4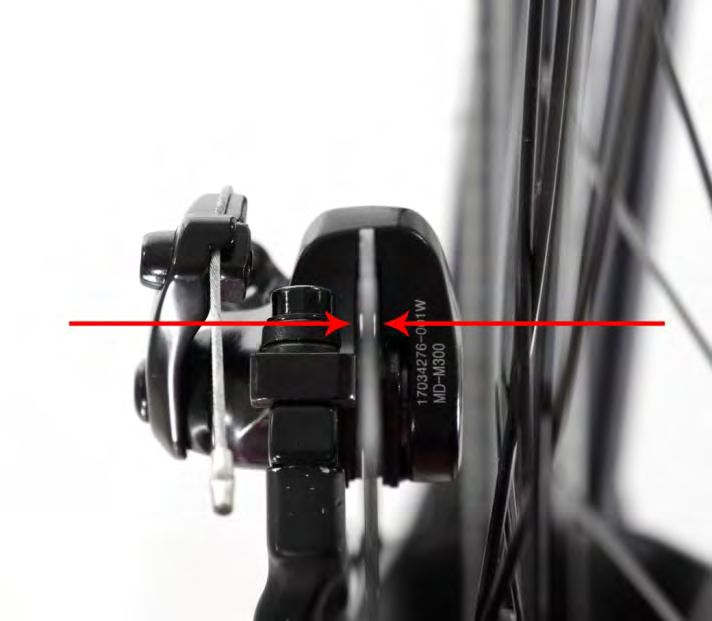
Electric Bicycle Manual
    not exceed 25Kg.
    When high-speed running or downhill hard braking, do not use the
    front brake to avoid the center of gravity from moving ahead, thus
    resulting in danger.
    Don’t modify the luggage carrier.
    Don’t pull a trailer on the luggage carrier.
    The bicycle may behave differently (particularly with regard to
    steering and braking) when the luggage carrier is loaded;
    Ensure that any luggage or child-seat fitted to the luggage carrier is
    securely fitted in accordance with the manufacturer’s instructions
    and that there are no loose straps that can get caught in any of the
    wheels;
    When luggage is attached to the luggage carrier, don’t obscured the
    reflectors and lamps;distribute luggage evenly between the two
    sides of the luggage carrier.

5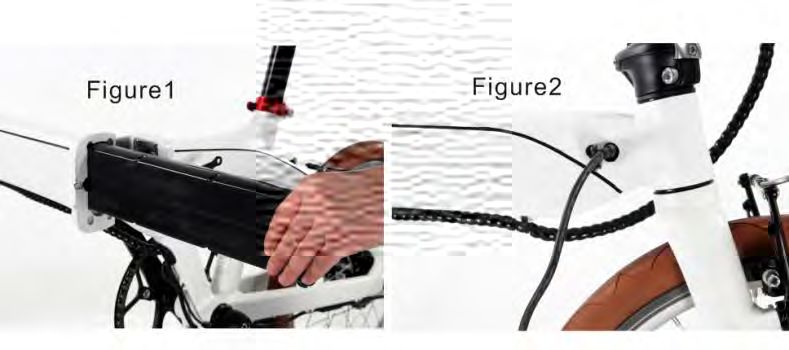
Electric Bicycle Manual

2. Basic structure and name
2.1.Folding E-bike

 1    Frame          2    Controller   3      Battery
 4    Seat clamp     5    Seat post    6      Saddle
 7    Stem           8    Grip         9      Handle bar
 10   Brake lever    11   Shift        12     Harness
 13   Disc Brakes    14   Tyre         15     Rim
 16   Nipple         17   Spoke        18     Hub
 19   Valve          20   Front Fork   21     Pedal
 22   Crank          23   Chain        24     Side kick stand
 25   Motor

                                                                6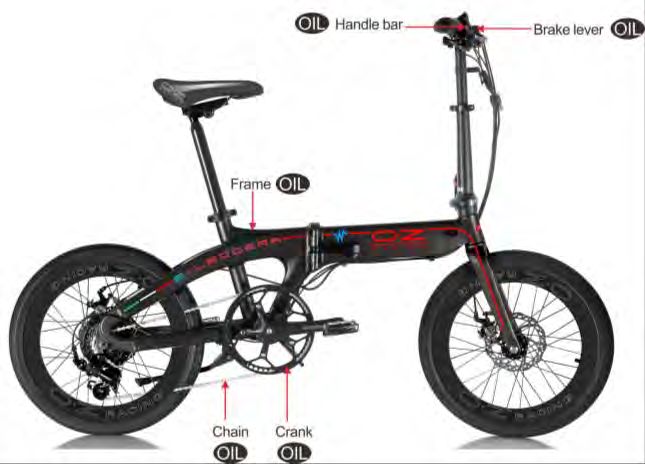
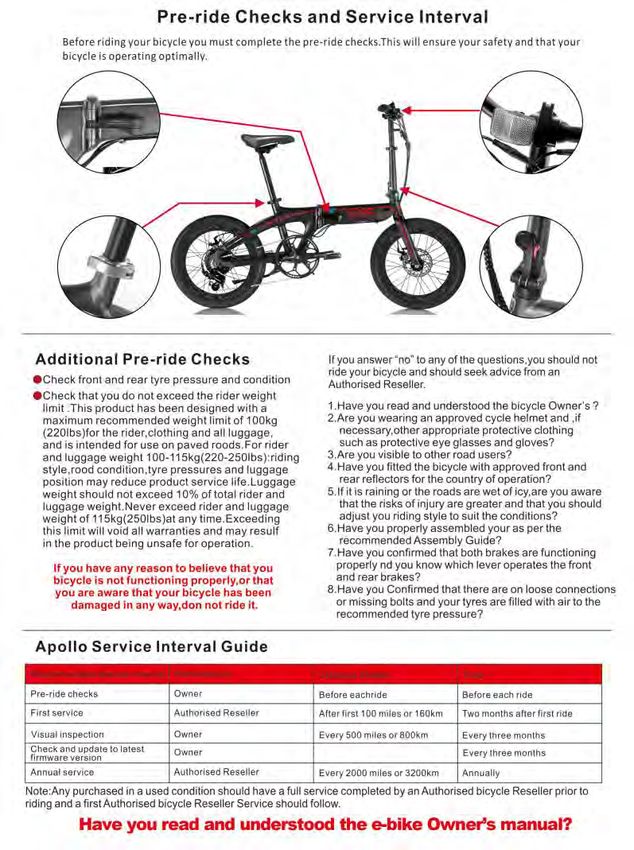
Electric Bicycle Manual

3. Unfolding method

7
Electric Bicycle Manual

                     8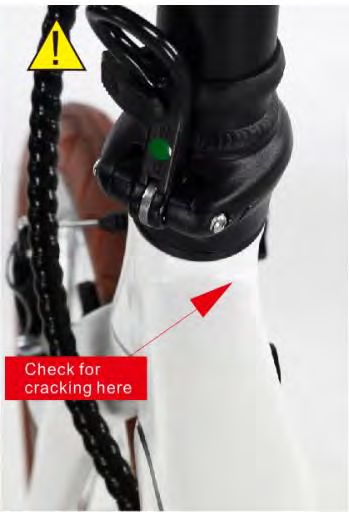
Electric Bicycle Manual

4. Operation and adjustment
4.1 Familiarising Display introduction

“3” the shift key “1”the power on key    “2” the shift key “4”the display

4.2 Ride modes
You can operate your bike in different modes to suit your personal riding
style.
Display switch on
4.3. Introduction to speed boosting system
The speed boosting system is also known as 1:1 boosting system. And the
so-called 1:1 automatic power assisting is that when you do not rotate the
speed handlebar but ride only by means of feet, the sensor with you bike
will automatically sense your riding speed and control the motor to assist
you automatically in a driving force with the same speed, so as to let your

9
Electric Bicycle Manual
ride easier and make the continuation line mileage further.
   1:1 boosting system comprises a controller, sensor and induced
cartridge.

①Controller               ②Sensor                ③Induced cartridge

4.4. Charge
As it will last a certain period of time for the ex-factory, transport and
storage of a just purchased new bike, it is likely to result in shortage of the
battery power, the battery should be first charged before it is used.
The charger configured or designated by our company must be used for
charging; otherwise it might damage the battery, and may even lead to fire
and other danger, but no warranty is provided by our company.
4.4.1. Installation and charging of battery(as shown in Figure 1 and
Figure 2)

                                                                              10
Electric Bicycle Manual 4.4.2. Charging steps and method 1. Check carefully whether the rated input voltage of the charger is consistent with the voltage of the power grid. 2. The battery can be directly put on the bike for charging. 3. Connect first the output plug of the charger with the charging jack of the battery properly, and then connect the input plug of the charger to the AC power supply. 4. At this time, the power indicator light and the charge indicator light of the charger are on, indicating that the charging has been connected. 5. After charging, should first pull out the AC power plug, and then pull out the plug connected with the battery. After the battery is fully discharged, the one-time charging time is 4 to 6 hours, and after the charge indicator light is red from green, the power capacity of the battery has been basically sufficient. A new bike had best be re-charged for (6 to 7 hours) after depth discharging since charging for the first time, and the one-week depth charging and discharging is a cycle to fully activate the active substances inside the battery. Later, it can be re-charged even if its power is not used 11
Electric Bicycle Manual
up.
Common sense of charging and use:
* The battery should be charged in a spacious environment, staying away
from high temperature, high humidity and close fire, because the battery
and the charger are electronic products, high temperature and humidity
will corrode electronic components, resulting in some harmful gases and
soot, and even a possible explosion to wound.
* The charging time should not be too long. A long charging will lead to
shortened life expectancy of the battery.
* After the battery is fully charged, the power supply should be pulled out
as soon as possible, and at the same time, the battery is taken out of the
charger.
* When the battery is not used for a long term, the battery power should be
emptied before the battery is preserved, and it is re-charged once every
month or so.
4.5. Quick release folding system
4.5.1. Quick release system of the seat
1. Move the quick release handle to
the OPEN position (OPEN sign faces
to the operator).
2. Clockwise rotate the adjusting nut,
only until it contacts with the seat
connector, and then turn a circle or
semi-circle in the opposite direction
and push the quick release handle to
the CLOSE position (as shown).
3. Push the side position of the seat head and the upper part by force; if
the seat rotates upward at the left and right or downward from up to down,

                                                                          12
Electric Bicycle Manual should first check whether the seat bunch is locked, and then check whether the quick release device is locked, and repeat the operations above if necessary. 4.6 Reflection and lighting system The reflection system includes a reflector on the rim and another one on the hand lebar. These items help to mark your own position when riding, convenient for pedestrians and other vehicles on the roads to avoid (recommendation: purchasers in accordance with local laws and standards use the reflector and lighting system). 4.7 Seat position When you sit on the seat to tread on the Pedal flatly by heel, when the Pedal is at the lowest position, legs slightly stretch, and at this time it is the most appropriate height; if the rider can tread on the Pedal only by toes or legs can not stretch slightly, fatigue and sports injury will be caused, so there is a careful need for adjustment of the height of the Seat post. The Seat post has a MAX marked line (that is, the safety line), and the 13
Electric Bicycle Manual
so-called insertion mark can not be higher than the seat connector. In
case of improper use, serious injury may be caused to the rider (as shown
in Figure 2).
4.8 Braking system
The braking system is an accessory necessary for each bike and is the
key to traffic safety; before driving, you must understand your braking
system, and do a good job in the inspection and adjustment work.
The general idea is that upon hard braking, the bike will surely stop in a
short distance, but that is wrong. Upon hard braking, when the wheels are
suddenly jammed by the brake rubber, the bike will glide horizontally, and
it not only is dangerous but the braking distance will be lengthened.
Therefore, the concept should be established is that the braking system is
only used to adjust the speed of the bike.
The braking system typically includes a Brake handle, brake (disk brake, V
brake and many other types of brakes) and brake cable.
4.8.1 Brake handle
The structure of the Brake handle is
as shown (in the left drawing), and
the left Brake handle controls the
front brake and the right Brake
handle controls the rear brake.
. The adjusting screw is used to
adjust the distance between the brake pads and the Rim.
. The effective stroke of the brake cable is about a half of the distance
between the handle of the Brake handle and the grip of the Across handle
Stems; if the brake is tight when the handle of the Brake handle is almost
approaching to the grip of the Across handle Stems, the distance between
the brake pads and the Rim is too large, it needs to be adjusted.

                                                                         14
Electric Bicycle Manual 4.8.2 Adjust the disc brake Adjustment method of the brake pads: 1 Loosen the fixed screw and see there are three holes in the permanent seat; 2 When moving the spring foot to the up hole, the elastic force increases, so that the distance between the brake pads and the Rim is increased, and vice versa it becomes small. Depending on the circumstances, the braking is adjusted accordingly. 4.8.3 Brake cable .The brake cable of the flat handle . The bifurcation situation of the internal 15
Electric Bicycle Manual
line should be avoided, so a tail sleeve had best be covered on the line
end.
. The brake cable should be regularly taken out to be oiled, to avoid too
large resistance arisen from rust.
. The brake cable in a linear way has the best function, and if it must be
bent, the turning with a small arc should be avoided as far as possible.
. The length of the brake cable is based on the principle that it will not be
stuck when the handlebar turns left or right to the limit.
Common sense of the use of braking system:
* When the distance between the brake pads and the Rim is too large, it is
adjusted by the Brake handle or the adjusting screw on the folder gate
device.
* When the lines of the brake pads are worn seriously, replace it timely in
order to maintain traffic safety.
* When not riding for a long time, please loosen the folder device to avoid
fatigue of flexibility, but pay attention to recovery of the gate device before
riding.
* When riding in rainy days, the function of any gate device will be
weakened, so please keep a longer safe braking distance and reduce the
speed.
* The surface on the brake disc, shoe block may not be oiled, so as to
avoid serious injury.
* If the brake cable is ripped, it may cause the brake cable to be broken
and this is very dangerous, please replace timely.
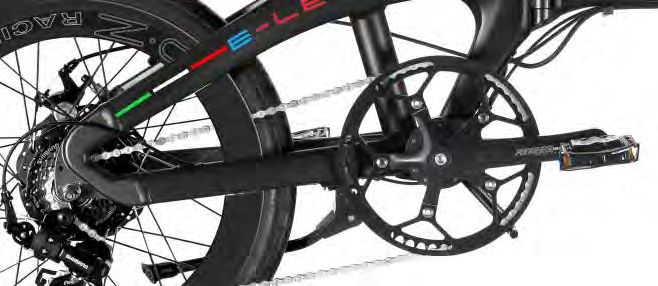
4.9 Chain
16Electric Bicycle Manual Wear the chain and elongate it to a certain extent, it will in the chain will climb to the chain wheel and jump, and at this time the chain has not meshed with the chain wheel correctly, thus affecting the cycling performance; in case of such a situation, the chain should be timely adjusted. Common sense of the use of speed control system: * If the electric bike is idle for a long time, the chain will be changed to the minimum keyboard tooth and the smallest flywheel, so as to avoid fatigue of the mechanical flexibility. * The chain, fluted disc, flywheel, should be always washed, wiped, and lubricated (oiled appropriately). 4.10 Inflator (option) A convenient inflator is hidden inside the seat post for your daily use. Take out the seat post and then the steps to use it as below: 17
Electric Bicycle Manual

1.   turn the cap from right to left
2.   pull out the inflator
3.   open the plastic cover
4.   connect with tire valve, charge the tire as normal

5. Use and maintenance
5.1. Routine inspection of electric bike before use
1 Install the battery box in the slot of the battery box, open the power
supply switch and check whether the functions of all the electrical
appliances are normal.
2 Safety inspection (see the notes to safe use in the Manual)
3 Check whether the governor switch handle rotates and is reset flexibly.
4 Check whether the braking power-off function and braking effect are in
good condition (dry braking distance 4m, wet braking distance 15m).
5 We advise against performing maintenance operations that involve
removing parts or components. If necessary, please contact your
Authorized Dealer’s Customer Service.

WARNING:
1. As with all mechanical components, the bicycle is subjected to wear and

                                                                            18
Electric Bicycle Manual high stresses. Different materials and components may react to wear or stress fatigue in different ways. If the design life of a component has been exceeded, it may suddenly fail possibly causing injuries to the rider. Any form of crack, scratches or change of coloring in highly stressed areas indicate that the life of the component has been reached and it should be replaced. 2. Danger of wheel failure due to rim Wear Replace wheel when any part of the Rim Wear Groove is not visible. 5.2 Attentions about the battery and charger 5.2.1 Battery Never short circuit the discharge or charge terminals of the battery. Never charge the battery by discharge terminals or discharge the battery by charge terminals. Keep off the battery from fire and excessive heat. Never put the battery into fire. To avoid damage to the battery, never subject it to intense physical shock or severe vibration or impact. Protect the battery from water or other moisture. Protect the discharge and charge terminals of the battery from rain or water logging. Operating temperature range when charge: 0~45℃ Operating temperature range when discharge:-20~45℃; Humidity while battery in working state:≤70% RH Keep the battery away from children. When the battery is not in use for an extended period of time, remove the battery from the load for storage. If you have any questions about this battery or its usage, please do not hesitate to contact the Customer Service Department. 19
Electric Bicycle Manual
 Never disassemble the battery without permission.
5.2.2 Charger
     Charge the battery after you buy this e-bike or the power is low.
     Make sure the charger is as least 1M away from computer, TV, fridge,
     washing machine and other electric machine while charging.
     This charge is only used in doors. Please use it on the dry and airy
     conditions, and the temperature is not more than 45°C.
     Disconnect it when there it smells un-normal while charging, and
     take it to the after sales.
     Use only the special charger supplied by our company. And don’t use
     this charger to charge the battery from other company.
     Do not use the charger in unstable or having a great lot of lampblack
     and dust, or excessively damp place.
     If the charging finished, disconnect the connection to the wall outlet,
     and then disconnect it to the battery.
     Avoid children touch it while charging.
     Never disassemble or refit the charger.
     Never put anything on the charger.
     Never put any liquid or metal into the charger.
     Never plug or unplugs the charger with wet hand
     Do not touch the charger when thunder or lighting.
     Never twiddle the charger or battery while charging.
     Avoid using the charger in direct rays.
     Keep well ventilation when the charger is operating.
     Do not disconnect the battery output while charging.
     Do not connect the charger to the wall outlet if the charger is
     disconnecting to the battery.
     Do not use the motor; neither maintain the e-bike while charging.

                                                                            20
Electric Bicycle Manual
5.3 Everyday use and inspection of electric bike
In everyday use of the electric bike, a number of mechanical, electrical
parts will be worn, screws and other fasteners are also easy to loose and
the functions of the electrical appliances would be lost. If the occurrence of
these phenomena is not noted, it is prone to failure, and it is also prone to
the risk when cycling, so drivers must be responsible for inspection and
maintenance in peacetime.
5.4 Bicycle inspection and care
5.4.1 Regular Cleaning
Remove the battery box from the e-bike before carrying out regular
cleaning.
DO NOT use water to clean the e-bike, as the electrical and
electronic systems may get wet, resulting in personal injury or
malfunction of the bicycle.
Delicately wipe any dirty painted or plastic parts with a soft, damp
cloth and a neutral cleaning solution. Carefully dry the parts with a
soft, dry cloth to finish.
Clean the battery contacts with a damp cloth.
DO NOT grease or use a greasy cloth to wipe down the electrical
connectors, brake pads, wheels, tires or plastic parts.
5.4.2 Regular maintenance (every 1/2 months)
Always carry out the following checks:
Check that the handlebar attachment and saddle post are correctly
inserted and tightened.
Check that the wheel hub mounting nuts are correctly tightened.
Check that the wheel rims are not cracked and that no spokes are
loose or broken.
Check that the tire s are not worn or cut.
21Electric Bicycle Manual
Check that the tire s are correctly inflated.
Check that the battery contacts on the frame are not dirty or oxidized.
Check that the batteries are sufficiently charged.
Check that the front and rear lights are working correctly.
Check that the front and rear brakes brake effectively.
Check that the cables are sufficiently greased, and that the brake
pads are in good condition.
Check that frame welds are in good condition and are free from
corrosion or oxidation
5.5 Lubricating the e-bike
To maintain your e-bike in proper working order, be sure to carry out
regular lubrication, as indicated in the following illustration:
Use specific transmission lubricants for the chain, free wheel and gears
every 1–2 months, or if the driveline is dry.
Grease the brake pins, front wheel hub, saddle post and pedal pins every
1–2 months, or in case of excessive friction.
Do not lubricate or grease the speed controller, brake pads or wheel rims
Parts should be lubricated
22Electric Bicycle Manual 6. Riding technology A correct cycling posture is the mother to safety: the riding posture is determined by the position of figure and shadow of the contact point (handlebar, seat, Pedal) of the rider and bicycle. However the posture is closely related to the height and size of the rider. So a single-bicycle cycling posture not only determines the efficiency of muscle contraction movement, but at the same time determines whether the bicyclist can manipulate the handlebar and brake safely. Therefore, a correct cycling position is the mother to safety. The safe cycling techniques are described one by one in the following: ◆ Adjust three points to suit your body; bicycling is just like doing the clothes, and it is necessary to measure the figure and make adjustments. The method of adjusting three points is a combination of bicycle sports mechanics, exercise physiology and safety driving three principles. 1) Adjust the position of the seat: tread the Pedal downward by heel to enable all muscle of the lower extremity joints contracts smoothly, and at the same time the principle is the legs can slightly stretch straight. 2) Front and rear position: tread the position of the Pedal to the inclined 45°, and then adjust the seat before and after, to tie in with the greatest position of the Pedal as the principle. 3) Adjust the front and rear and the height of the handlebar: for the height of the handlebar, in general, the up warping type handle is about 30 to 50mm higher than the seat, and the flat type handle is the same high as the seat. The top of the below curved type is the same height as the seat. After adjusting, pay attention to the direction of the handlebar and then lock. ◆ Sitting posture on the seat: similar to the posture on horseback, the 23
Electric Bicycle Manual
weight is scattered on the handlebar and Pedal, and all the weight must
not be placed above to prevent the pain in the hip.
◆   Skills of the Pedal: the position of the foot is one third in the front of
the length of shoes, and it is the most appropriate to fall on the middle of
the Pedal. Feet must be parallel with the centerline of the bike, and it will
diminish the efficiency of the Pedal if the feet are too open or narrow; the
speed should maintain uniform, or else the drivers may feel tired; it in
particular notes that the hook pulling action of the latter part will hook the
Pedal up.
◆   Slowdown technology: the speed change gear slows down but does
not accelerate, as is to seek for the stability of the number of revolutions of
the Pedal, so as to relieve the fatigue arising from uneven force. So, the
speed change is used for more labor-saving and comfortable, and the time
for speed change is 1: climbing, 2-3: uphill, 4-5: uneven road surface, 6:
against the wind and 7: when feeling tired. It can also be said the time is
when feeling not comfortable in the process of riding.
◆   Brake technology: as we all know the principle of hard braking is first
stopping the brake and then stopping the bike, then stopping the front
brake, but in case of an emergency, everyone will stop all together. If the
braking distance is appropriate, the bike can stop securely; if the
slowdown is too fast, people often would be thrown forward and in order to
prevent this danger, the best way is intermittent braking, and meanwhile
the hip is pushed backward. In rainy days, increase the braking distance
due in safety and reduce the running speed.

                                                                              24
Electric Bicycle Manual
7. Troubleshoot
S
/ Failure Cause Eliminating methods
N
(Ⅰ) Charge the battery
Failed speed (Ⅰ) Low battery voltage fully
change or too
1 (Ⅱ) Bad governor handle (Ⅱ) Replace the
low maximum
velocity (Ⅲ) Bad controller governor handle,
controller
(Ⅰ) Replace the
Turn on the (Ⅰ) Bad governor handle
governor handle,
power supply, (Ⅱ) Bad electric door lock
2 controller
but the motor and contact point
(Ⅱ)Re-weld the contact
does not work (Ⅲ) Bad controller
part
(Ⅰ)Tire lacks of air pressure
(Ⅱ) Inadequate charging or
Inadequate (Ⅰ)Tire is full of air
failed charger
mileage of (Ⅱ)The battery is
(Ⅲ) The battery has been
3 one-time adequate or replace
charging damaged or its life has the charger
continuation line expired
(Ⅲ)Replace the battery
(Ⅳ) Frequent braking startup,
overloading
(Ⅰ)Weld the connecting
(Ⅰ) The charger wiring is line
The charger is loose or damaged or replace
4
not charged (Ⅱ) The battery weld line falls (Ⅱ)Weld the connecting
off or is damaged line
or replace
(Ⅰ) The induced cartridge has (Ⅰ) Adjust the induced
The booster has
poor contact or is damaged cartridge or replace
5 no power
(Ⅱ) The booster wiring is bad (Ⅱ)Re-connect or
assisting
or damaged replace
25Electric Bicycle Manual
8 MAINTENANCE AND ADJUSTMENTS
8.1 Maintenance and Service Centre Location
In the event that you require maintenance and service please refer to your
nearest authorized bicycle agent.
8.2 Service interval
Recommended Service
Performed By Distance Ridden Time
Interval
Before
Pre-Ride Checklist Owner Before eachride
eachride
Authorised
2 months
Gocycle After first 100
Service after first
Specialized miles/160 kms
ride
reseller
Every 500 miles/700 Every 3
Visual Inspection Owner
kms months
Every 3
Visit Owner
months
Check and Update to Every 3
Owner
latest Firmware Version months
Authorised
Gocycle Every 2000
Service Annually
Specialized miles/3200 kms
reseller
8.3 Cleaning and Preventing Corrosion
We do not recommend that you ride your bicycle in heavy rain or store it in
damp or wet areas. Please read 2.7 Riding in Wet, Cold or Icy Conditions
for safety recommendations for riding in wet conditions.
If you do find yourself riding while it is raining, we recommend that you use
the motor when safe to do so. Using the motor will allow heat to build up in
the motor and the electronics, which will evaporate the water from these
moisture-sensitive components. Use caution when you use the motor on
wet roads, as the roads will be slippery and the motor may cause the front
wheel to spin.
Water and moisture (especially spray from roads that are salted to reduce
the formation of ice) can accelerate corrosion (rust) of the various metallic
components on the bike, and this will reduce the life of product. Leaving
water and moisture on the bike could also result in premature failure of the
electronics, battery or motor system. The warranty will not cover premature
failure as a result of corrosion through neglect.
Here are some best practice recommendations:
• If your bike has water on it, we recommend that you wipe it dry as soon as
possible with a towel or dry cloth.
26Electric Bicycle Manual
• The less you expose your bike to moisture or water, the longer it will last.
• Keep your bike inside your house, flat or garage.
• If you wish to clean the bike, we recommend that you use a damp towel
or cloth and mild liquid soap. First wipe down all areas with a damp towel,
then wipe dry with a dry towel.
• To clean the rim and tyre, remove the wheel , soak the rim and tyre in a
bucket of soapy water and then dry with a towel.
WARNING! Keep your bike clean and dry at all times, where possible.
Never spray the bike with a hose or high-pressure cleaning system. Never
use polishes, waxes or solvents to clean your bike.
8.4 Lubrication
There is no need to regularly inspect, clean and lubricate the internal
components of the chain drive system
8.5 Checking for Cracking and Fatigue Failures
As with a conventional bicycle, your bike will not last forever. It is a
mechanical item that under normal riding will be stressed, and eventually
the parts will fatigue, cracks will develop and it will become unsafe to ride.
The number of miles of riding a bicycle will endure cannot be predicted
since there are many variables that affect product life including:
• Rider weight
• Riding style
• Tyre pressure and type
• Roughness of the road
• Whether or not the bicycle has been crashed or damaged in transit
• Whether or not the bicycle has been ridden over large bumps such as
potholes or curbs
• The amount and weight of luggage carried
• The speed at which it has travelled
• Whether it has been subject to abuse or vandalism
27Electric Bicycle Manual
• Time of exposure to ultraviolet radiation from the sun
• Storage conditions, such as ambient temperature and moisture levels
Responsible, safe riding and regular maintenance, such as within the
guidelines of this manual, should afford many thousands of miles of
operation of your bike. Nevertheless, you must inspect the bike every 500
miles to see if any of the components have cracks and need replacing. To
do this, clean the bike thoroughly with a damp cloth. Wipe away all dust or
dirt. Look carefully at all the components under good lighting.
Important sites where cracking may initiate are shown in the images below.
If a crack is more than 3mm long, do not ride the bike and immediately
contact. Under normal conditions, items under warranty will be replaced.
WARNING! Failure to inspect the bike thoroughly may have serious
consequences and could result in serious bodily injury or even death.
Check for fatigue cracking around the seat
tube frame joint.
28Electric Bicycle Manual
Check the head tube junction for
fatigue cracking
Check the head tube junction for
fatigue cracking
Check under the head tube junction for
fatigue cracking
WARNING! Should you discover a fatigue crack more than 3mm long, or
should you suspect that a component may have received an impact in an
unusual way—such as if the product has been dropped—do not ride your
bicycle and immediately contact.
29Electric Bicycle Manual
8.6 Tyres
Bicycle comes fitted as standard with specialised, high-performance tyres
designed to give the best combination of low rolling resistance, light weight
and puncture resistance. To maximise performance, we do not recommend
that you use lower quality tyres than those supplied with bicycle.
We recommend that you operate bicycle with tyre pressures of 25–30 psi
on the front and 40–50 psi on the rear. This will give the best balance of
low rolling resistance and comfort. Running a relatively softer front acts as
a “cushioning effect”, reducing shock loads to the motor fork components—
specifically the clutch and gearbox.
We do not recommend that you inflate the tyres to more than 60 psi.
Inflation pressures greater than 60 psi will reduce comfort and the service
life of the product.
WARNING! Inflating the front tyre to more than 30 psi places high shock
loads into the motor drive system (motor, gearbox and clutch) whilst using
the power on acceleration or over rough roads. Just like in a car as you
would not accelerate rapidly on very rough roads, do not use motor power
when going over potholes or speed bumps or similar obstructions in the
road.
Operating the bicycle with a front tyre pressure greater than 30psi and/or
using the motor assistance on rough terrain, against these
recommendations, will invalidate the warranty.
When changing a tyre, always use plastic tyre levers. Never use a metal
tyre lever as you will damage the wheel rim.
WARNING! Bicycle tyres do not last forever. When the tread depth is
critically low and the centreline grooves in the tyre have worn down in any
part of the tyre, it may be dangerous to continue to ride on the tyre, and in
this event, we recommend that you replace the tyre.
30You can also read