FIRST YEAR B.E. WORKSHOP PRACTICE - JSS MAHAVIDYAPEETHA - DEPARTMENT OF MECHANICAL ENGINEERING - Sri Jayachamarajendra ...
←
→
Page content transcription
If your browser does not render page correctly, please read the page content below
JSS MAHAVIDYAPEETHA

FIRST YEAR B.E. WORKSHOP PRACTICE
               (Common for all Branches)

 DEPARTMENT OF MECHANICAL ENGINEERING
    JSS SCIENCE AND TECHNOLGY UNIVERSITY
  SRI JAYACHAMARAJENDRA COLLEGE OF ENGINEERING
                 MYSURU – 570006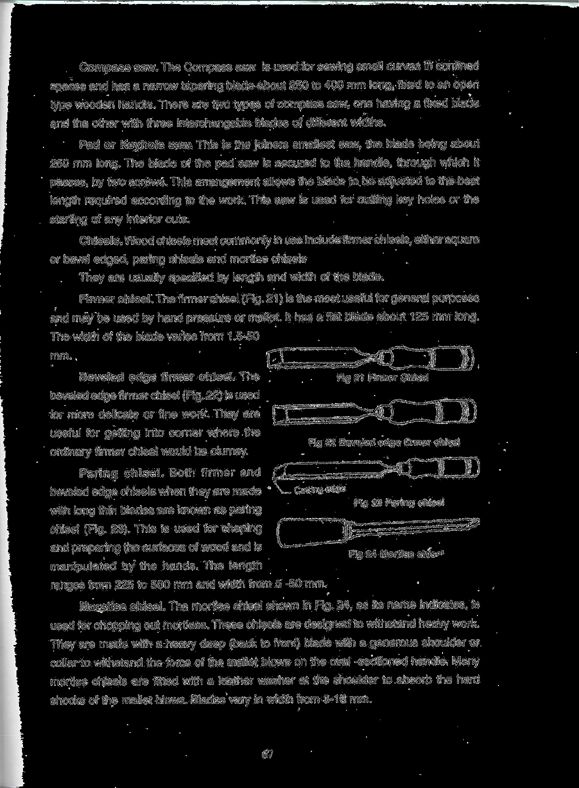
JSS MAHAVIDYAPEETHA

FIRST YEAR B.E. WORKSHOP PRACTICE
                                     (Common for all Branches)

USN:         ………………………………………………………………………......

Name:        ………………………………………………………………………......

Class:       ………………………………………………………………………..

Roll No. :   ……………………………………………………………………….

Year:        .............................................................................................................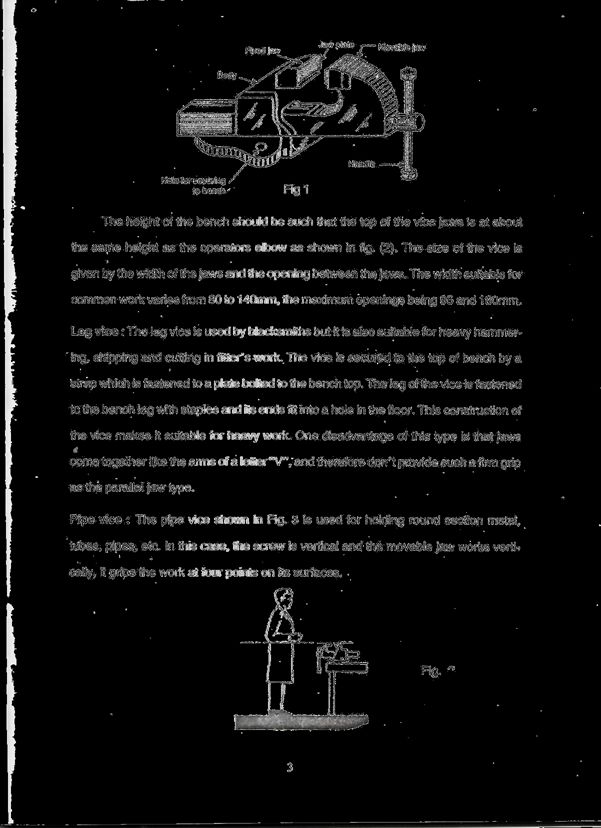
JSS MAHAVIDYAPEETHA
Sri Jayachamarajendra College of Engineering, Mysuru
Department of Mechanical Engineering
Vision of the Institution:
Be an international leader in engineering education, research and application of knowledge to
benefit society globally.
Mission of the Institution:
To synergistically develop high-quality manpower and continue to stay competitive in
tomorrow’s world.
To foster and maintain mutually beneficial partnerships with alumni, industry and government
through public services and collaborative research.
To create empowered individuals with sense of identity
Vision of the Department:
Department of mechanical engineering is committed to prepare graduates, post graduates and
research scholars by providing them the best outcome-based teaching-learning experience and
scholarship enriched with professional ethics.
Mission of the Department:
M-1: Prepare globally acceptable graduates, post graduates and research scholars for their lifelong
learning in Mechanical Engineering, Maintenance Engineering and Engineering Management.
M-2: Develop futuristic perspective in Research towards Science, Mechanical Engineering
Maintenance Engineering and Engineering Management.
M-3: Establish collaborations with Industrial and Research organizations to form strategic and
meaningful partnerships.
Program Outcomes (POs):

Engineering Graduates will be able to:

PO1:      Engineering knowledge: Apply the knowledge of mathematics, science, engineering
          fundamentals, and an engineering specialization to the solution of complex engineering
          problems.
PO2:      Problem analysis: Identify, formulate, review research literature, and analyse complex
          engineering problems reaching substantiated conclusions using first principles of
          mathematics, natural sciences, and engineering sciences.
PO3:      Design/development of solutions: Design solutions for complex engineering problems
          and design system components or processes that meet the specified needs with
          appropriate consideration for the public health and safety, and the cultural, societal, and
          environmental considerations.
PO4:      Conduct investigations of complex problems: Use research-based knowledge and
          research methods including design of experiments, analysis and interpretation of data,
          and synthesis of the information to provide valid conclusions.
PO5:      Modern tool usage: Create, select, and apply appropriate techniques, resources, and
          modern engineering and IT tools including prediction and modelling to complex
          engineering activities with an understanding of the limitations.
PO6:      The engineer and society: Apply reasoning informed by the contextual knowledge to
          assess societal, health, safety, legal and cultural issues and the consequent
          responsibilities relevant to the professional engineering practice.
PO7:      Environment and sustainability: Understand the impact of the professional
          engineering solutions in societal and environmental contexts, and demonstrate the
          knowledge of, and need for sustainable development.
PO8:      Ethics: Apply ethical principles and commit to professional ethics and responsibilities
          and norms of the engineering practice.
PO9:      Individual and team work: Function effectively as an individual, and as a member or
          leader in diverse teams, and in multidisciplinary settings.
PO10:     Communication: Communicate effectively on complex engineering activities with the
          engineering community and with society at large, such as, being able to comprehend
          and write effective reports and design documentation, make effective presentations,
          and give and receive clear instructions.
PO11:     Project management and finance: Demonstrate knowledge and understanding of the
          engineering and management principles and apply these to one’s own work, as a
          member and leader in a team, to manage projects and in multidisciplinary
          environments.
PO12:     Life-long learning: Recognize the need for, and have the preparation and ability to
          engage in independent and life-long learning in the broadest context of technological
          change.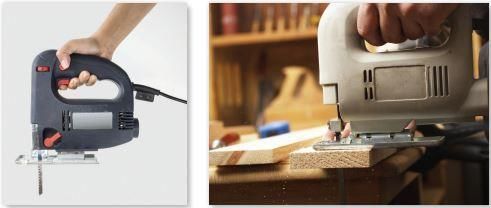
WORKSHOP PRACTICE

  Subject Code                            ME16L/ME26L           No. of Credits   0 - 0 – 1.5
  No. of Practice Hours / Week            3                     Exam Hours       --
  Total No. of Contact Hours              39                    CIE              50

Course objectives:
 1. To identify tools, work material and measuring instruments useful for fitting, welding,
     carpentry and plumbing practice.
  2. To handle tools and instruments and use them to prepare joints of specific shape and size.

                                          Course Content
Practice sessions:                                                                             06 Hrs
Identification of tools and equipments for bench work-practice, safety practice and general
guidelines.

Fitting Practice:                                                                              03 Hrs
Demonstration, usage of tools, finishing and sizing MS-flats.

Model-1                                                                                        03Hrs
Cutting and Filing.

Filing, Measurement and Finishing.                                                             03 Hrs

Welding Practice:                                                                              03 Hrs
Demonstration of tools and equipment for welding, safety practices and general
guidelines.

Model-2                                                                                        03 Hrs
Lap and Butt Joints.

Carpentry Practice:                                                                            03 Hrs
Demonstration of power tools and equipment for carpentry, safety practices and
general guidelines.

Model-3                                                                                        03 Hrs
Cutting, Plaining and Sizing.

Measurement And Finishing.                                                                     03 Hrs

Plumbing Practice:                                                                             06 Hrs
Demonstration – plumbing tools, symbols and joints.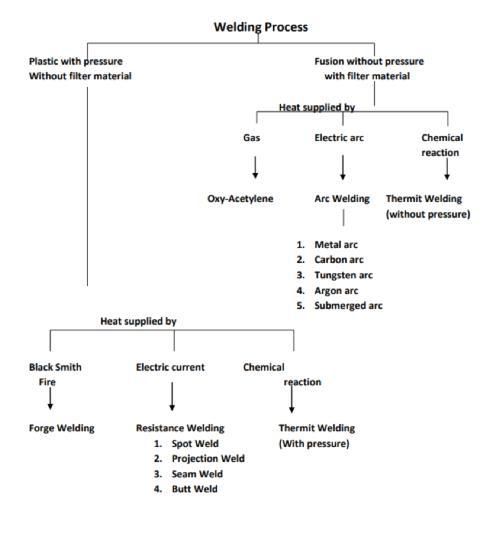
Model–4
Joining GI pipes by threading, PVC pipes by gluing and cementing.                                  03 Hrs

Text Books:
1. Elements of Mechanical Engineering - Hajra Choudhury & others, Media Promoters 2010.
2. The Elements of Workshop Technology - Vol I & II, S.K. Hajra Choudhury, A.K. Hajra
                             th
   Choudhury, Nirjhar Roy, 11 edition 2001 others, Media Promoters and Publishers,
   Mumbai.

Reference:
1. Workshop manual prepared by Department of Mechanical Engineering.

Course outcomes:
 At the end of the course students shall have the ability.

                                                                                            PO1, PO3, PSO1, PSO2,
  CO1    To select suitable tools and equipment to prepare joints using bench-work tools.   PSO3

         To produce joints using materials of specific shape and size by a suitable         PO1,PO3, PO5,    PSO1,
  CO2
         set of operations and check the accuracy of shape and dimensions using             PSO2, PSO3

                                          Course Articulation
                                               Matrix

         CO                         PO s and PSO s Mapping
  CO s    % PO1 PO2 PO3 PO4 PO5 PO6 PO7 PO8 PO9 PO10 PO11 PO12 PSO1 PSO2                                    PSO3
  CO1          3           3                                                                 3      3        3
  CO2          3           3             3                                                   3      3        3
    Total
CONTENTS
CHAPTER 1: FITTING
1.1 Introduction 1
1.2 Fitting Tools 2
1.2.1 Holding Tools 2
1.2.2 Striking Tools 4
1.2.3 Cutting Tools 6
1.2.4 Measuring, Marketing and Testing Tools 13
1.3 Filing Operations 19
1.3.1 Method of Filing 20
1.4 Marking 21
1.5 Sawing 22
1.6 Chipping 22
1.7 Materials used in fitting shop 23
1.8 Safe and correct practice in Fitting shop 24
1.9 Steps to prepare a model in fitting shop 24
CHAPTER 2: WELDING
2.1 Introduction 25
2.2 Types of welding 25
2.3 Arc welding 27
2.3.1 Principal of Arc welding 27
2.3.2 Electric Arc welding 27
2.4 Arc welding electrodes 28
2.5 Fluxes 29
2.6 Equipments used in Arc welding 29
2.7 Types of welded joints 33
2.8 Comparison between AC and DC Arc welding 35
2.9 Preparation of the work before welding 36
2.10 Advantages of welding 36
2.11 Disadvantages of welding 37
2.12 Common defects of welding 37
2.13 Safe welding practices 38
2.14 Gas welding 38
2.14.1 Oxy-acetylene welding 38
2.14.1.1 Gas Flame 39
CHAPTER 3: SHEET METAL WORK
3.1 Introduction 41
3.2 Metals used in sheet metal work 41
3.3 Hand tools 43
3.4 Sheet metal joints 47
3.5 Soldering 47
3.6 Brazing 49CHAPTER 4: CARPENTRY
4.1 Introduction 51
4.2 Advantages of Timbre 51
4.3 Structure of wood 52
4.4 Selection of Timbre 54
4.5 Seasoning of timbre 55
4.6 Methods of seasoning 55
4.7 Common Defects in Timbre 56
4.8 Classification and conversion of wood 59
4.9 Carpentry Tools 62
4.10 Cutting Tools 65
4.11 Planes 68
4.12 Boring Tools 70
CARPENTRY POWER TOOLS
5.1 Introduction 72
5.2 Jigsaw 72
5.3 Power planes 72
5.4 Circular saw 73
5.5 Router Cutters 73
5.6 Orbital Sander 74
FITTING POWER TOOLS
6.1 Introduction 75
6.2 Benefits of Portable Power Tools 75
6.3 Various types of Power tools 76
6.3.1 Impact driver 76
6.3.2 Chain Saw 76
6.3.3 Angle grinder 77
6.3.4 Drilling Machine 77
6.3.5 Nail Gun 78
6.3.6 Impact Wrench 78
6.3.7 Cut-off Machine 79
6.4 Power tools Safety 80
EXPERIMENTS
Expt.no: 01 Square Cutting 81
Expt.No: 02 V-Fitting 82
SAFETY PRECAUTIONS
VIVA QUESTIONSa part
1. Job Holding Device

  Job Holding Device
Classification of Welding

                            26
CARPENTRY POWER TOOLS
These days, power tools have largely replaced hand tools, because they allow site carpenters
and bench joiners to work with increased speed, more efficiency and greater accuracy. Power
tools are available with a variety of power sources including mains power, battery and
compressed air. Carpenters use a range of power tools to cut, shape and install timber in
building construction and fit-out. There are several categories of power tools, each designed
to carry out specific functions. They’re usually available in a range of shapes and sizes.
JIGSAW
Although jigsaws cut more slowly than circular saws, they can cut curved shapes into
materials such as timber, metal and plastic. They’re commonly found in joinery workshops
but can also be useful on site for cutting holes in, for example, kitchen worktops for sinks.
Most models now have a variable speed control so that you can select the best speed for the
job. Fast speeds are more suitable for cutting timber and slower speeds for cutting metal. The
base plate of a jigsaw can be tilted to allow bevelled cuts. The teeth of a jigsaw point upward,
so the cutting is done during the up-stroke. This can result in damage to the surface of the
timber, especially on sheet materials such as plywood. If necessary, clearance must be
allowed for the edges to be cleaned up afterwards. There are blades available with teeth
which point downwards and these are useful when cutting material such as plastic laminates.
However, you must take extreme care when using this type of blade as it can cause the saw to
‘lift’ away from the work surface. To prevent this, always maintain downward pressure on
the saw. Some models have a mechanism which produces an orbital motion in the blade. This
means that the blade moves forward on the up-cut and pulls back for the down-cut which
results in a faster (but possibly rougher) cut. A control allows the orbital motion to be
reduced to zero for clean cutting.
POWER PLANES
Electric planes are regularly used on construction sites for planing the edges of doors during
the fitting process. They can also be used to perform operations such as chamfering
(removing the corner of a piece of timber on an angle) and rebating (taking a square recess
72out of the corner of a piece of timber). Although electric planes vary from model to model,
they are all very similar in appearance and have many of the same features.
CIRCULAR SAW
No other power tool has given carpenters a greater advantage over old hand‑ powered methods than the portable circular saw (also
known as a skill saw). It’s widely used on construction sites for cutting timber and sheet materials such as plywood and chipboard.
The circular saw is used primarily for ripping and cross‑ cutting, but it can also be adjusted to perform a number of other operations
such as grooving, rebating and trenching as well as making bevelled and compound cuts.
ROUTER CUTTER OR BIT
There are many different router cutters and/or bits available. Some are used for forming
rebates and grooves for jointing and other practical purposes, and others are used for forming
decorative mouldings. All router bits are secured into the router with a collet – a sleeve with a
split in the side. When the chuck is tightened, the collet is squeezed tight and grips the shaft
of the bit. Incorrect fitting of the collet or bits can result in very serious injury to the operator.
Most router bits have a 6 mm or 12 mm shaft. A 12 mm shaft fits directly into the chuck, but
a 6 mm shaft needs a reduction sleeve.
Straight bit
Straight bits cut grooves, trenches and rebates.
They can be used to form:
•housings for shelving and stair construction
73•grooves for drawer bottoms
•rebates in doors and windows for plywood or glass.
They’re available with different ends for forming a variety of shaped grooves such as those
shown here.
Edge-forming bit
Edge-forming bits produce a shaped edge to timber or manufactured boards such as MDF.
ORBITAL SANDER
Orbital sanders (also known as finishing sanders) sand in a circular motion, and are used to
achieve a fine, smooth finish on timber surfaces. They are not suitable for ‘flushing off’ joints
or removing wood quickly. A reciprocating sander is very similar to the orbital sander but its
motion is back and forth rather than circular. The base of the sander has a soft rubber pad and
the abrasive paper is held to it by a spring clip. This paper can be bought in packs of pre-cut
pieces or cut to size from standard sized sheets or rolls. The base of the sander rotates in a
circular motion at approximately 12 000 rpm. The circular motion of the abrasive paper can
leave swirl marks on the timber surface, which may only become visible after you’ve stained
or polished the timber. If a very fine finish is required, you should carry out a final sanding
by hand in the direction of the grain.
74FITTING POWER TOOLS
A power tool is a tool that is actuated by an additional power source and mechanism other
than the solely manual labor used with hand tools.
The most common types of power tools use electric motors. Internal combustion engines and
compressed air are also commonly used. Other power sources include steam engines, direct
burning of fuels and propellants or even natural power sources like wind or moving water.
Tools directly driven by animal power are not generally considered power tools.
Power tools are used in industry, in construction, and around the house for purposes of
driving (fasteners), drilling, cutting, shaping, sanding, grinding, routing, polishing, painting,
heating and more.
Power tools are classified as either stationary or portable, where portable means hand-held.
Portable power tools have obvious advantages in mobility. Stationary power tools however
often have advantages in speed and accuracy and some stationary power tools can produce
objects that cannot be made in any other way. Stationary power tools for metalworking are
usually called machine tools.
The term machine tool is not usually applied to stationary power tools for woodworking,
although such usage is occasionally heard, and in some cases, such as drill presses and bench
grinders, exactly the same tool is used for both woodworking and metalworking
Benefits of Portable Power Tools
With the increasing number of individuals interested in performing home improvement
projects by themselves, portable power tools are also becoming more available in local
hardware stores. These gadgets, which look like miniature construction machineries for
homeowners, are very beneficial for you.
For one, they can let you save time because they can instantly hammer nails, quickly drive
screws, and rapidly cut wood and virtually other materials effortlessly. With traditional tools,
you have to do everything manually and more often than not, your project would not get
finished in just a few days. Aside from reducing project time significantly, the use of portable
power tools also allows you to finish your task with minimal energy. Thus, after doing the
job, you still have strength to do more important projects or to spend quality time with your
family.
You can also save money when using portable power tools because these gadgets can drive
screws and nails flawlessly, drill holes accurately, and cut wood and metals neatly. This
means that you reduce the occurrence of wasted materials due to inappropriate drilling or
cutting as well as doing your projects all over again because you are not satisfied with how
the nails or screws are driven.
Moreover, many portable power tools are designed to allow you to do various tasks
conveniently even in limited spaces where using traditional tools can be difficult. Among
these tasks include driving nails in tight corners.
75Various Types Power Tools
IMPACT DRIVER:
An impact driver is a tool that delivers a strong, sudden rotational and downward force. In
conjunction with toughened screwdriver bits and socket sets, they are often used by
mechanics to loosen larger screws (bolts) and nuts that are corrosively "frozen" or over-
torque. The direction can also be reversed for situations where screws have to be tightened
with torque greater than a screwdriver can reasonably provide.
CHAIN SAW:
A chainsaw (or chain saw) is a portable mechanical saw, powered by electricity, compressed
air, hydraulic power, or most commonly a two-stroke engine. It is used in activities such as
tree felling, limbing, bucking, pruning, by tree surgeons to fell trees and remove branches and
foliage, to fell snags and assist in cutting firebreaks in wild land fire suppression, and to
harvest firewood. Chainsaws with specially designed bar and chain combinations have been
developed as tools for use in chainsaw art. Specialist chainsaws are used for cutting concrete.
76ANGLE GRINDER:
An angle grinder, also known as a side grinder or disc grinder, is a handheld power tool used
for cutting, grinding and polishing.
Angle grinders can be powered by an electric motor, petrol engine or compressed air. The
motor drives a geared head at a right-angle on which is mounted an abrasive disc or a thinner
cut-off disc, either of which can be replaced when worn. Angle grinders typically have an
adjustable guard and a side-handle for two-handed operation. Certain angle grinders,
depending on their speed range, can be used as sanders, employing a sanding disc with a
backing pad or disc. The backing system is typically made of hard plastic, phenolic resin, or
medium-hard rubber depending on the amount of flexibility desired.
Angle grinders may be used both for removing excess material from a piece or simply cutting
into a piece. There are many different kinds of discs that are used for various materials and
tasks, such as cut-off discs (diamond blade), abrasive grinding discs, grinding stones, sanding
discs, wire brush wheels and polishing pads. The angle grinder has large bearings to counter
side forces generated during cutting, unlike a power drill, where the force is axial.
Angle grinders are widely used in metalworking and construction, as well as in emergency
rescues. They are commonly found in workshops, service garages and auto body repair shops.
DRILLING MACHINE:
A drill is a tool fitted with a cutting tool attachment or driving tool attachment, usually a drill
bit or driver bit, used for drilling holes in various materials or fastening various materials
together with the use of fasteners. The attachment is gripped by a chuck at one end of the drill
and rotated while pressed against the target material. The tip, and sometimes edges, of the
cutting tool does the work of cutting into the target material. This may be slicing off thin
shavings (twist drills or auger bits), grinding off small particles (oil drilling), crushing and
removing pieces of the work piece, countersinking, counter boring, or other operations.
77Drills are commonly used in woodworking, metalworking, construction and do-it-yourself
projects. Specially designed drills are also used in medicine, space missions and other
applications. Drills are available with a wide variety of performance characteristics, such as
power and capacity.
NAIL GUN:
A nail gun, nailgun or nailer is a type of tool used to drive nails into wood or some other kind
of material. It is usually driven by electromagnetism, compressed air (pneumatic), highly
flammable gases such as butane or propane, or, for powder-actuated tools, a small explosive
charge. Nail guns have in many ways replaced hammers as tools of choice among builders.
IMPACT WRENCH:
An impact wrench (also known as an impactor, air wrench, air gun, rattle gun, torque gun,
windy gun) is a socket wrench power tool designed to deliver high torque output with
minimal exertion by the user, by storing energy in a rotating mass, then delivering it suddenly
to the output shaft.
78Compressed air is the most common power source, although electric or hydraulic power is
also used, with cordless electric devices becoming increasingly popular in recent times.
Impact wrenches are widely used in many industries, such as automotive repair, heavy
equipment maintenance, product assembly (often called "pulse tools" and designed for
precise torque output), major construction projects, and any other instance where a high
torque output is needed.
CUT OFF MACHINE:
An abrasive saw, also known as a cut-off saw or metal chop saw, is a power tool which is
typically used to cut hard materials, such as metals. The cutting action is performed by an
abrasive disc, similar to a thin grinding wheel. The saw generally has a built-in vise or other
clamping arrangement, and has the cutting wheel and motor mounted on a pivoting arm
attached to a fixed base plate.
They typically use composite friction
disk blades to abrasively cut through
the steel. The disks are consumable
items as they wear throughout the
cut. The abrasive disks for these
saws are typically 14 in (360 mm) in
diameter and 7⁄64 in (2.8 mm) thick.
Larger saws use 410 mm (16 in)
diameter blades. Disks are available
for steel and stainless steel.
79Power Tool Safety Tips
1. Safety glasses: These prevent dust, debris, wood shavings, shards from fiberglass, etc from
getting into the eyes. Safety glasses are one of the most basic pieces of safety equipment that
must be used when working with power tools.
2. Protection for the ears: Power tools can generate a lot of noise, which may sound louder
in the cloistered environment of a workshop; in order to minimize damage to the ears, it is
advisable to wear earplugs.
3. Knowing the right tools for the job: It is important to know the right tools for the job in
order to avoid injury to oneself and damage to the materials. To this end, it is advisable to
thoroughly read the instruction manuals provided with the equipment and get familiar with
the recommended safety precautions.
4. Correct method of using tools: Tools should not be carried by their cords; tools that are
not in use should be disconnected; and while handling a tool connected to a power source,
fingers should be kept away from the on/off switch.
5. The right clothes: Long hair should be tied and loose clothing should be avoided. Ideally,
clothing that covers the entire body should be worn and heavy gloves should be used in order
to avoid sharp implements and splinters from hurting the hands. Masks prevent inhalation of
harmful minute particles of the material that is being worked upon. Steel-toed work boots and
hard hats can also be worn.
6. Tool inspection: Power tools should not be employed in wet environments and should
never be dipped in water; they should be checked periodically for exposed wiring, damaged
plugs, and loose plug pins. Nicked cords can be taped but if a cut appears to be deep, a cord
should be replaced. Tools that are damaged or those that sound and feel different when used
should be checked and repaired.
7. Cleanliness in the work area: This should be maintained because accumulated dust
particles in the air can ignite with a spark. Of course, flammable liquids should be kept
covered and away from the place where power tools are being used. An uncluttered work
area also makes it easy to maneuver the power tool; often distractions caused by a tangled
cord can result in an accident.
8. Care with particular tools: Miter saws and table saws should be used with a quick-release
clamp and a wood push-through, respectively. Extra care should be taken while using nail
guns and power belt sanders.
9. Keep tools in place: Power tools should be returned to their cabinets after use to prevent
them from being used by an unauthorized and incapable person.
10. Lighting: It is important to use proper lighting while working with power tools, particularly
when working in the basement and garage where lighting may not be satisfactory.
80EXPT.NO: 01
SQUARE CUTTING
AIM: To make a Square fit from the given mid steel pieces.
MATERIALS REQUIRED: mild steel flat (40*40*3mm).
TOOLS AND EQUIPMENT REQUIRED:
1.6”try square
2. 6”sriber
3. Odd leg caliper
3.12”hack saw Frame
5. 10”rough file
6. 10”smooth file
7. 10”Square file
8. Dot punch
9. Ball peen hammer
(0.5Ib).
10. Steel Rule
SEQUENCE OF OPERATIONS:
1. Filling
2. Marking
3. Punching
4. Sawing
5. Filling
6. Finishing
PROCEDURE:
1. The given mild steel flat piece is checked for given dimensions.
2. One edge of given is filled to straightness with rough and smooth files and checked
with try square.
3. An adjacent is also filled such that is square to first edge and checked with try square.
4. Wet chalk is applied on one side of the flat and dried for making.
5. Lines are marked according to given figure, using odd leg caliper and steel rule.
6. using the dot punch are made along the marked lines.
7. The excess materials removed from the remaining two edges with try square level up
to half of the marked dots.
8. Finally buts are removed by the filling on the surface of the fitted job.
PRECAUTIONS:
1. The perpendicularity of face ends edges is checked perfectly by using try square.
2. Finishing is given by using only with smooth files.
3. Marking is done without parallax error.
RESULT: The Square cutting is done successfully
81EXPT.NO: 02
V-FITTING
AIM: To make a V-Fit from the given mid steel pieces.
MATERIALS REQUIRED: Mild steel flat (40*40*3mm).
TOOLS AND EQUIPMENT REQUIRED:
1.6”try square
2. 6”sriber
3. Odd leg caliper
3.12”hack saw Frame
5.10”rough file
6.10”smooth file
7.10”triangle file
8. Knife Edge file
9. Dot punch
10. Ball peen hammer (0.5 Ib)
11. Steel Rule
SEQUENCE OF OPERATIONS:
1. Filling
2. Marking
3. Punching
4. Sawing
5. Filling
6. Finishing
PROCEDURE:
1. The given mild steel flat piece is checked for given dimensions.
2. One edge of given is filled with rough and smooth files and checked with try square for
straightness.
3. An adjacent edge is also filled such that it is square to first edge and checked with try
square.
4. Wet chalk is applied on one side of the flat and dried for marking.
5. Lines are marked according to given figure, using odd leg caliper and steel rule.
6. Using the dot punch, punches are made along the marked lines.
7. The excess materials removed from the remaining two edges with try square level up to
half of the marked dots.
8. Finally buts are removed by the filling on the surface of the fitted job.
PRECAUTIONS:
1. The perpendicularity of face ends edges is checked perfectly by using try square.
2. Finishing is given by using only with smooth files.
3. Marking is done without parallax error.
RESULT: The V-fit is done successfully.
8283
84
85
86
87
You can also read