GOLDSCREEN BOX Instruction Manual - Goldanalytix
←
→
Page content transcription
If your browser does not render page correctly, please read the page content below

GOLDSCREENBOX
  Instruction Manual
July 2020, Rev 1, 07/20
© 2020 MARAWE GmbH & Co. KG, All rights reserved. Printed in the EU.
All product names in this manual are trademarks of the respective holders.

2
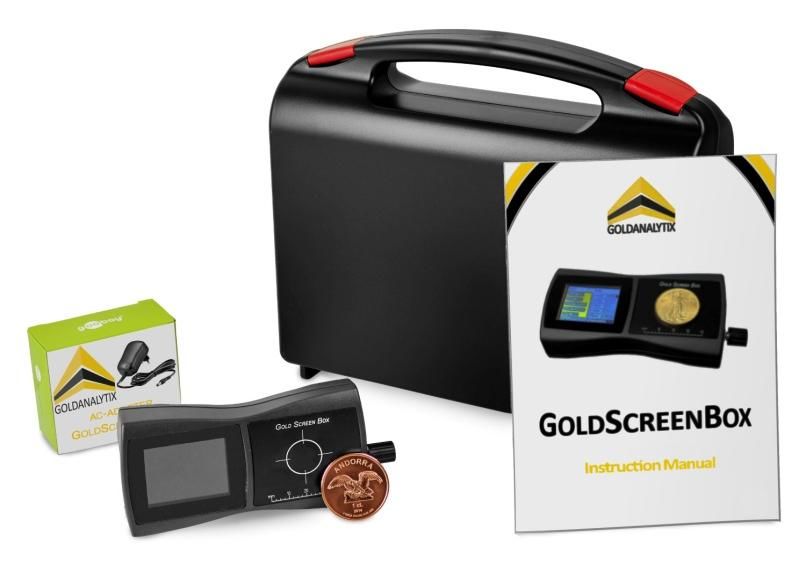
Table of Contents

1.   About Goldanalytix / Contact ....................................................................................................... 2

2.   Introduction .................................................................................................................................. 2

3.   Scope of Supply ............................................................................................................................. 3

4.   Measurement Principle................................................................................................................. 3

5.   Safety Instructions for optimal Measurement Conditions ........................................................... 4

6.   Operation and Display Elements .................................................................................................. 5

7.   Starting the Device and Performing a Measurement ................................................................... 5

8.   Evaluation and Interpretation of the Results ............................................................................... 9

9.   Important Hints for Measuring with the GoldScreenBox ........................................................... 12

10. A1. Overview of Conductance of Common Alloys of Precious Metal Bullions ........................... 15

11. A2. Overview of Conductance of Common Alloys of Jewellery Metals...................................... 16

12. More non-destructive Gold-Testing Devices by Goldanalytix .................................................... 17

                                                                                                                                                    1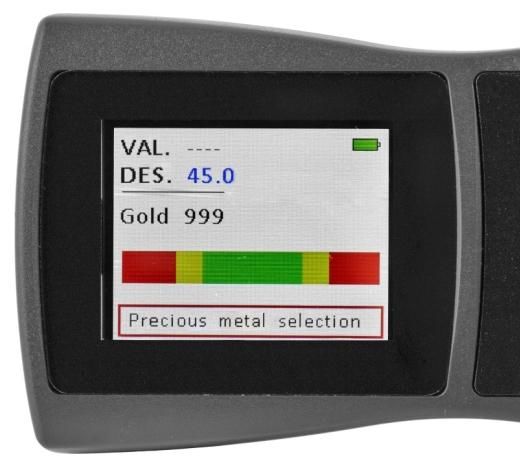
1. About Goldanalytix / Contact

Goldanalytix, established in 2010, nowadays is the leading provider of precious metal testing
methods in Germany. In our team we are working on the development of safe and reliable testing
methods for each kind of precious metal. The GoldScreenBox has been developed and is
manufactured completely in Regensburg/Germany. Thanks to the close synergy of analytics know-
how and device development, we are always up to date. Due to continuous improvements we
achieve and guarantee highest standards of quality.
Do you need support with product data, service assistance or customer service? Feel free to
contact us through one of the following channels:
                            Homepage: www.gold-analytix.com
                            E-Mail: gold-analytix@marawe.eu
                            Phone: +49 941 29020439
We are looking forward to your contact!

2. Introduction

Congratulations on your purchase of the Goldanalytix GoldScreenBox. The Goldanalytix
GoldScreenBox is an easy, fast to use and non-destructive testing device for the determination of
the electrical conductance of precious metal mouldings. This device was especially developed to
test the authenticity of precious metal coins and ingots up to ca. 50 grams.
The Goldanalytix GoldScreenBox allows for a fast and unequivocal statement within seconds.
Interpretations of the results are no longer necessary. The measuring principle of the
GoldScreenPen is based on a non-contact, inductive method that allows not only for measuring
the electrical conductance at the surface but also up to a depth of 650 µm.
Please read these operating instructions carefully prior to the first use in order to use the
GoldScreenBox properly.
Please note: The development of improved counterfeits is the goal of each forger. In order to stay
up to date on this dynamic field we recommend you to inform yourself on our website at
www.gold-analytix.com/goldscreenbox/ under “Application info”. There you can find the most
recent version of the instruction manual.

2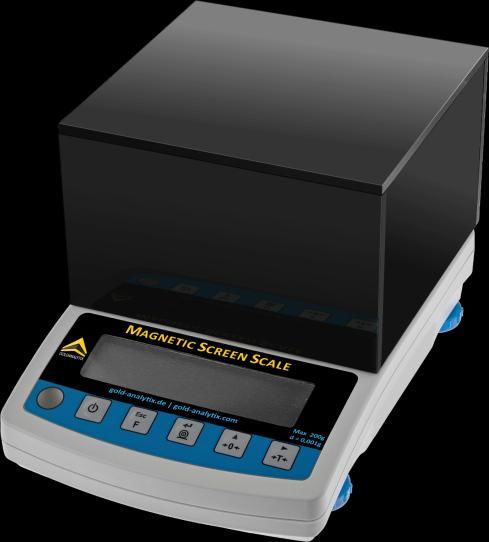
3. Scope of Supply

Your GoldScreenBox set is delivered with the following elements:

                                                                   GoldScreenBox
                                                                   Charger
                                                                   Calibration coin (Copper)
                                                                   Instruction manual
                                                                   Small suitcase

In the unlikely event that something is damaged or missing please contact Goldanalytix
immediately (for contact data see page 2).

4. Measurement Principle

The GoldScreenBox utilises the electrical conductance of metals for its measurement principle.
Every metal exhibits a characteristic conductance value, which enables the identification of
falsifications. Due to similar densities, the most used metals for falsifications like tungsten, lead or
tantalum usually differ significantly in their conductivity compared to precious metals or gold
alloys.
The patented, inductive testing method uses low-frequency, electromagnetic alternating fields,
whose penetration depth depends on the applied frequency and the electrical conductance of the
testing sample. The frequency of the GoldScreenBox was adjusted in a manner, that chemically or
galvanically plated metal layers of falsifications are totally pervaded. Nevertheless, a measurement
independent from geometry is also possible. The penetration depth depends on the conductance
of the testing sample and ranges from approximately 250 µm (silver) up to 650 µm (gold alloys;
pure gold: ca. 350 µm).
The sensor technology as well as the evaluation unit is situated inside the compact casing of the
battery-powered device allowing the use of the GoldScreenPen as a mobile device.

                                                                                                      3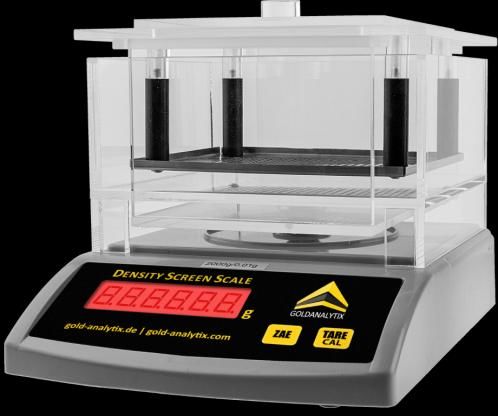
5. Safety Instructions for optimal Measurement Conditions
The highly sensitive sensor technology and the evaluation unit are stored in the housing of the
GoldScreenBox. Therefore, please be aware of the following hints while performing
measurements:
Please only use the enclosed charger. Inferior products can cause incorrect measurements
or damage the internal electronic components of the GoldScreenPen.
Do not use the testing device in the presence of explosive gases, vapours or dust or in wet
environment.
Please operate the device at room temperature and not in proximity of heat sources (e.g.
fan output of your laptop). The measured values are temperature dependant and
linearised by best fit algorithms, but the best accuracy is achieved at room temperature.
4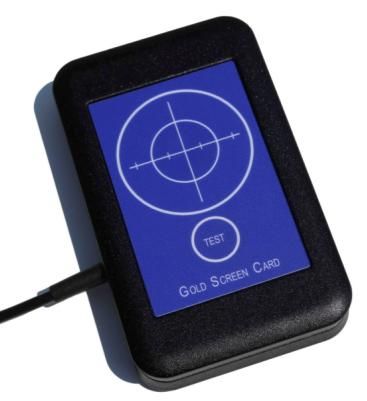
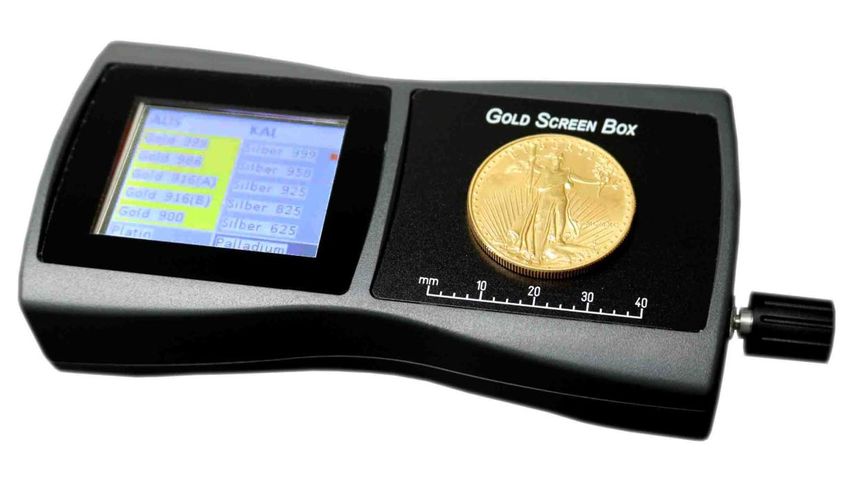
6. Operation and Display Elements

                                                                                                  ④

                         ⑤                                                                 ②
                  ⑥                                          ①                                    ③

                       Nr.        Beschreibung

                       ①          LCD Colour Screen

                       ②          Sensor Field (Ø 20 mm)

                                  Control knob to control and select the desired metal /
                       ③
                                  alloy in the menu

                       ④          Connector for charger

                       ⑤          Advice on charge level of battery

                                  Advice on measurement result (green, yellow and red
                       ⑥
                                  range) as well as display of the value

                       Table 1 – Description of the operation and display elements

7. Starting the Device and Performing a Measurement

Starting the device:
In order to switch the device on please push the control knob ③.

    Schritt              Display-Anzeige               Beschreibung

                                                       After activating the device, the start screen
                                                       will be shown. If you want to change the
                                                       default language (German), shortly push the
      1                                                control knob at this point. If you want to keep
                                                       the language used previously, just wait an
                                                       instant and you will get to the "free measure
                                                       mode" (see step 3).

                                                                                                         5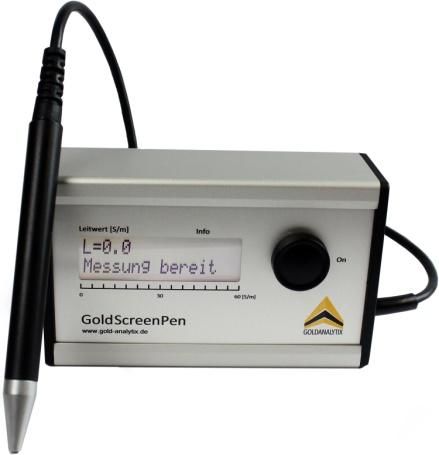
If you have decided to change the language,
        you will see the language selection menu. You
        can choose from six languages with the
    2   control knob. On demand, we also can provide
        the GoldScreenBox with other language
        packages.

        After that, the "free measure mode" will be
        shown. In this mode, the device acts like a
        pure eddy current measuring device without
        given set values. That means that you can
        establish the conductivity of the inside of any
        metal and compare this established value
        ("VAL") with those in the tables of this
        instruction manual. The shown value is the
        electrical conductivity of the object in
        megasiemens per meter [MS/m] up to the
        corresponding penetration depth (which is
        also dependent on the conductivity of the
        metal).
        Put your metallic object on the measurement
        circle ② and keep the object there for a
        moment - the conductivity will be shown as a
    3   value as well as graphically in the coloured bar
        (in the bottom part of the screen). The
        measuring bar corresponds to the scale of the
        electric conductivity of metals (0 to 65 MS/m].
        The "free measure mode" allows you to find
        out, which material you could be facing and
        measure other metals and alloys like gold,
        platinum, silver or palladium, respectively.
        This is practical, if you want to establish the
        conductivity of precious metals like rhodium,
        rhenium, ruthenium or iridium (now available
        as bullion bars or coins). In the case of
        recycling companies or auction houses it can
        be used in order to identify unknown metal
        objects.
        Push the button to get to the "precious metal
        selection".

6
In this mode you can switch off the device
    ("OFF") or select the calibration mode via
    "CAL". The latter will be explained in step 6.
    Turn the control knob to navigate to the
    desired material. The red dot will show you
    the corresponding selection – by pushing the
4   control knob you will access the "precious
    metal measuring mode" (see point 5). If you
    would like to measure a 1 ounce silver bar
    (with or without blister) with a "999"
    hallmark, for example, turn the control knob
    until the red square has arrived at "silver 999"
    and then push the knob.
    Now you will see the measuring mode for the
    corresponding precious metal - in this case
    "silver 999". Next to "DES", you will see the
    desired conductivity target. For our example,
    this is „61.0“ – as silver .999 features an
    electric conductivity of 61 MS/m at room
    temperature. Different factors like embossing
    depths / knurls / scratches / air gaps may
    cause a tiny different value than 61 (as it
    would be for a silver plate smooth as glass).
    Physically, this is absolutely normal and no
    hindrance for the measurement. For this
    reason there is a certain tolerance range
    around the set value in which the object can
    be (the green range in the measuring bar.
    Learn more about the interpretation of the
    results below).
5
    If you now put the object of at least 1 mm
    thickness (except ducats) on the device in a
    way that at least the measurement circle is
    covered, you will see the established
    conductivity as a number next to "VALUE" and
    as a black bar in the "traffic light bar". The
    position of this bar allows a statement
    whether the object is within the set range of
    the corresponding metal or not. If you now
    put a 1 ounce silver bar onto the device, the
    result for a real bar could look like shown on
    the left. If you push the control knob in the
    measurement mode, you will get back to step
    4 and to the overview of the different metals.
    You also can switch off via "OFF" or calibrate
    the device via "CAL".

                                                       7
By selecting "CAL", you will get into the
calibration mode. The GoldScreenBox is
purchased with a compatible calibration coin
made of copper. If the values differ
significantly from the expected values, it is
advisable to calibrate the device with this
coin. In order to do this, select "CAL" in step 4
and lay the calibration coin immediately on
the device. Wait a moment and you will see
"OK" on the left side at the bottom of the
screen in case of a successful calibration.
Additionally to that, you can perform a
calibration when using the device at
temperatures that differ strongly from 20 °C.
6
Please always keep in mind that all set values
in the GoldScreenBox are valid for a
temperature of 20 degrees Celsius (please see
the "important specifications" below). If you
would like to measure on a hot summer day at
30 °C, it is advisable to calibrate the device
before starting the measurements. The coins
or bars should also have a temperature of
30 °C. Please only do this in exceptional cases
- if it is absolutely impossible to perform the
measurements at room temperature. Please
be aware that the device as well as the objects
to be measured have to have the same
temperature as the surroundings.
88. Evaluation and Interpretation of the Results
The following chapter gives you hints for the interpretation of the established conductivity in the
"precious metal measure mode".
In order to test the most common bullion precious metals for their correct conductivity in the core
(up to the corresponding penetration depth!), you can use this mode for the corresponding set
values and a graphical interpretation through a “traffic-light” bar.
The value next to "DES" shows the reference conductivity (current conductivity) of the desired
metal or alloy at 20 °C in Megasiemens per metre [MS/m]. Ideally, the established value ("VAL") is
identical. However, small deviations can occur in case of bullion precious metals and are
completely normal. This can have the following reasons:
Scratches
Blisters & bars / other packages
Temperature effects (temperature of the device differs from the one of the measured
object, etc)
Striking on coins or bars
Bends and deformations
Uncommon coins or impurities with ferromagnetic material
This is why there is a green tolerance range around the set value for real precious metals. If the
value is inside the green one, you can feel confident: the conductivity of this metal is near the set
value of the desired material. PLEASE NOTE: This step is not a guarantee that your object is not
fake. The GoldScreenBox is a penetrating eddy current measuring device and no independent fake
detector, because it is possible to develop and produce an alloy with e.g. the same electric
conductivity as gold (e.g. copper with a low silver content), but in this case, the dimensions and
weight of the coins or bars won't be correct. We recommend the usage of various measuring
methods to detect falsifications.
In case of coins, we recommend the following procedure:
Step 1: Establish the weight with a precision balance – does it correspond with the set value? In
many cases, fakes are already detected here.
Step 2: Compare the dimensions (thickness and diameter) with the set values of the desired coins
with an electronic slide gauge (can be purchased at specialist shops) or stencils.
If 1 and 2 correspond exactly with the set values (easy to find on the Internet), it can only be a fake
with material of the same density – in case of gold, these are for example metals like tungsten or
uranium (the latter can be ruled out for obvious reasons) or in case of silver, e.g. mixture of lead
and tin or even molybdenum.
Step 3: Detection of lower alloys and counterfeits made of e.g. molybdenum, tantalum or
tungsten, tungsten alloys, tungsten carbide, brass, copper and so on up to a penetration depth of
9about 250 µm (in case of silver) up to 650 µm (in case of Krügerrand) with our GoldScreenBox (pure gold: ca. 350 µm). Just to be sure: There is no individual method which can give you a reliable answer to whether the tested precious metal is genuine or not. In case of anybody tells you something else this person is definitely not honest or does not know it better! The reason is tha any physical property (i.e. conductivity, density, sound, etc.) of any precious metal can be imitated relatively easy with certain materials. However, materials – especially for precious metals – which are identical in 2 or more properties are significantly more difficult or almost impossible to produce (if, as seen above, the density corresponds, there are only a few possibilities left - and those are e.g. identified by their current conductivity). The other way round is also true: In case of having the same conductivity, the density for example will be different. We know for instance about PAMP-gold bars made of a copper-steel alloy plated with a very thin layer of gold leading to an almost identical conductivity like pure gold. These counterfeits must be examined urgently with other methods or can be relatively easily be detected by their differing thickness or width. Please also have a look at our website www.gold-analytix.com in order to get further information about the correct procedure with the non-destructive tests of precious metals. Absolute certainty, especially about the exact composition can only be achieved with a destructive, total chemical analysis. Please don't be deterred by this information - the GoldScreenBox detects most of the current counterfeits of bullion metals. For example, the current frequently and very well faked ¼, ½ and 1 ounce tungsten bars and coins are easily identified. We want to point out the conscientious handling of the interpretations of the results. 10
GREEN RANGE
In the case of being in this range (i.e. the black measuring bar is in front of the green background
and the "VAL" is green), you know that up to the corresponding penetration depth, the material is
in the target range of a genuine precious metal. This normally excludes foreign metal cores (as
long as they do not have the same conductivity).
YELLOW RANGE
In case of the measuring bar being in the upper or lower yellow zone, there might be something
wrong with the object - but it don´t need to. It could also be a slightly bent coin or bar (the air gap
between the coil and objects will be bigger), there might be scratches in the object (change of the
eddy current induction), the blister/capsule or the packaging around the object might be too thick
or the coin might have impurities. There are various reasons for a result in the yellow zone which
do not automatically hint on a falsification. However, if the measured value is in the yellow zone
and if you chose the correct metal (always make sure!), you should be careful. Exact inspection
and further examination are inevitable.
A special case is the Krugerrand silver coin: Our tests have shown that even genuine coins with
.999 alloy can sometimes be in the lower green or even yellow zone (our theory is that the 1/1000
foreign metal is ferromagnetic, but this has still to be proven). It may be that some other coins
behave in a similar way - we personally know this phenomenon only for the Krugerrand silver coin.
RED RANGE
When the coin is barely in the red zone, this might be due to the same effects as in the "YELLOW
RANGE". This is however rare - measured values in the red zone and especially those who are
deeply in the red zone should tell you everything you need. The established conductivity in this
case is far away from the set value. If all circumstances have been respected (the object covers the
measuring circle completely / at least 1 mm thickness - except ducats, correct calibration, etc.), it
is most probable that you see a fake material.

                                                                                                    11
9. Important Hints for Measuring with the GoldScreenBox We recommend dropping all your mobile devices (i.e. smartphone, mobile phone or flash drive with wireless access) at least 1 m far away from the testing device due to the inductive eddy current principle of the device. The relatively high radiation density which is especially high during connection setup can lead to false measurements. The latter can be recognized by strong deviations or oscillations of the value. After restarting the device can be used without further restrictions. Wireless LAN / Wifi or Bluetooth do not influence the measurement. The objects should cover the measuring circle completely. Our measurements have shown that coins of the size of the Vreneli and also ¼ ounce coins still work very well. 1/10 coins are normally too small – however, you can help yourself with this little „trick“: For those small coins, the measurement coil also registers the surrounding air and the value is therefore lower than the material's actual set value. For any 1/10 ounce coin, you can write down an individual set value. The condition is of course that you are absolutely sure that your reference coin / ingot are genuine. Old coins / bars (“old” defined as before World War II) and especially objects of the 19th century may partly differ in their composition. That means that the gold content is right but the composition of the remaining amount of some coins deviates. In terms of .900 gold, those coins should consist of 900 parts gold and 100 parts copper. However, due to non-optimized production processes and analysis conditions those coins are contaminated with foreign metals which change the conductivity. Moreover, the gold used for procuding these coins has not been 100% pure so that further impurities got into the molten metal and finally into the alloy. For instance, gold was obtained by various raids and expeditions during those times (at ca. 1800 and later on). Therefore, please be aware: We only can offer set values of correctly procuded coins (mainly precious metal-copper alloys, sometimes nickel). Penetration depth of the GoldScreenBox: Depending on the conductivity of the material, the GoldScreenBox penetrates differently deep into the precious metals. This is in relation with the particular procedures during the induction of eddy currents. In case of highly conductive materials like silver, the penetration will not be as deep as in case of metals of the middle zone (pure gold or .986 gold) and the low conductivity zone (e.g. Krugerrand alloys at 9.7 MS/m). In case of silver, you can expect about 250 µm penetration depth, whereas in case of the Krugerrand alloy the penetration depths is up to 650 µm (0.65 mm). However, this is relatively deep, if you keep in mind that most gold- or silver-plated layers are only 10 to 60 µm thick. It depends from these numbers, up to which size the precious metal objects can be measured. Generally speaking, you can measure 1 kg silver bar with this device - there will be a conductivity value. However, in case of such big objects, it is very possible that the forgers apply much thicker precious metal layers 12
around the fake core. Then the GoldScreenBox will not give you a reliable answer. "Smaller"
objects are normally penetrated completely by the magnetic induction field - in case of bigger
ones (from 50 to 100 g, according to their geometry), forgers would have to use very little
amounts of fake material in order to not get caught. It is questionable if this is lucrative for them -
however, it is possible that from this size onwards, there are objects with a deeper core. This is
why you should always use more than one suitable testing method. In case of bigger bars, you
should definitely use ultrasound as well.
Testing objects should exhibit a thickness of at least 1 mm (an exception are the Austrian gold
ducats - see type B in the following conductivity table).
Blisters and capsules can have a thickness of up to 3 mm. Not every material shields in the same
manner. If there are metallic components in the supposed plastic package, no reliable or
convincing measurement can be guaranteed. Our test measurements with e.g. NGC packages have
shown that they are too thick because there are several millimeter air gaps between the object
and the packaging. Unfortunately, this kind of package cannot be measured. In this case you have
to either open the package or the objects cannot be measured with the GoldScreenBox.
The striking and the height of the edge (especially in case of coins) can lead to a deviation into the
"orange-red" range, even though it is not a fake. Always put all your objects with the front- and
the backside on the device.
Fine silver coins with a silver content of .9999 (Maple Leaf or Kangaroo) feature a higher
conductivity value than .999 coins. This sensitivity has an influence especially on the mentioned
deep embossings or high edges. That´s why .9999 silver coins and bars, respectively, are in the
range of 62 to 64 MS/m – these values are beyond the set value of silver, but because of the
measurement configuration, this is no reason to be worried about.
The Krugerrand silver 1 oz is an exception: Our tests have shown that the .999 silver coins result in
the lower green or sometimes even in the yellow range. That means that for this coin values of
about 58 and 59 MS/m are also an indication of a genuine material.
Please keep the temperature of the device and coins in mind - ideally, they should be about 20 °C
(+/- 2°C) - the conductivity values depend on the temperature. All set values are indicated for a
temperature of 20 degrees Celsius. So make sure that you do not hold the coins and bars in your
hand for too long before performing the measurement, as they would be too warm and the
measurement results can therefore be false.
The GoldScreenBox is a perfect device for the establishment of the conductivity values of metals
and genuine precious metals - but in the end, it is up to you who are responsible for your final
transactions. We do not assume any responsibility for any financial losses that result from the use
of the GoldScreenBox. An absolute security can only be provided by a total chemical analysis. The
GSB can "only" show you if the conductivity of the measured material is in the set value of the
desired material at room temperature. We recommend combining several methods for maximum
certainty. Please also have a look at our website www.gold-analytix.com.
An unambiguous differentiation of jewellery gold alloys is difficult with eddy current test devices.
This is not the device's fault - the correct conductivity value will always be established. However,

                                                                                                    13
the interpretation of the result is very difficult because of the closely situated current conductivity values of the gold alloys with a gold content of under .750 (i.e. 18k). These are simply laws of nature. Additionally, every manufacturer mixes different metals into the gold, which makes the interpretation more difficult. But you can use these results to compare pure red gold alloys (gold and copper) and other only 2 component alloys and to collect hints (see tables below). You can also discover jewellery fakes made of tungsten carbide, etc. – but please keep in mind that for plausible results, the measurement circle always has to be covered completely (this is why rings cannot be tested with the GSB, use the Goldanalytix GoldScreenPen for this purpose). 14
10.      A1. Overview of Conductance of Common Alloys of Precious Metal Bullions

                                                          Conductance          Fineness    Density
                        Denotation               Type
                                                            [MS/m]               [‰]       [g/cm3]
                         Gold .999                 A            45              999.9       19.25
                         Gold .986                 B           26.5              986         19.0
                  Gold .916 (A) / 22 karat         C           9.7               916        17.55
                  Gold .916 (B) / 22 karat         D           11.1              916         17.8
                         Gold .900                 E           8.9               900         17.8
                         Silver .999               F           61.0             999.9       10.50
                         Silver .958               G           52.5             958.4       10.41
                      Silver .925/.900             H            51             900–925      10.25
                         Silver .835                I          49.0              835        10.17
                         Silver .625                J           46               625         9.8
                          Platinum                 K           9.1              999.5         21
                         Palladium                 L           9.3              999.5       11.99

         Investment gold ingots (Degussa, Umicore, Heraeus, Agosi, etc.), Vienna Philharmonic, American Buffalo,
Type A   Kangaroo Nugget, Maple Leaf, Chinese Gold Panda, Mexican Libertad, Australian Lunar, German coins (100
         Mark collector coins, etc.), Britannia (as of 2012), Spain 5000 to 80000 Pesetas
         Please keep in mind: The set point is a compromise of the actual set point of the .986 alloy of objects with a
Type B   thickness >1mm (25.5 MS/m) and in common most likely appearing 1&4 Austrian Ducats and their restrike
         mints – they appear as very thin plates (0.71-0.75 mm) which is beyond our minimum requirement for the
         thickness of 1mm
         South Africa Krugerrand, UK Gold Britannia (1987/88), Canadian 100 Dollar, Turkey 100 Piaster, Australian 200
Type C   Dollar Gold Koala, Sovereigns, Chilean 5 Pesos (1895-1980), 20 Pesos (1896–1917), Peru Libra (1898-1969),
         Peru 50000 & 100000 Soles
Type D   American Gold Eagle of US Mint as of 1986, par value in US dollar, UK Gold Britannia (1989-2012)
         German Reichsmark, Austrian Krone Kaiser Franz Joseph up to 1915 and restrike mints, Greek drachma,
         Austrian Babenberger, Austrian Florin, Swiss Vreneli (10 to 100 FR, 1897-1949), Netherlands Wilhemina,
Type E   French Marianne Rooster/Napoleon/Republic, Italy Umberto I, Vittorio Emanuele II, Denmark Frederik VIII,
         Belgian Albert/Leopold II, Russian Rubel Alexander III/Nikolaus II, Russian Chervonets, Gold Liberty Head US /
         Double Eagle, Chilean Pesos (exceptions see type C), Mexican Centenario, Peru 5 to 10 Soles (1956-1979),
         Spain 10 to 100 Pesetas
         Modern bullion coins: Canadian Maple Leaf, Austrian Philharmonic, American Silver Eagle, Australian Silver
Type F   Koala /Kookaburra, UK Britannia Silver (as of 2013), Armenian Noah´s Ark, Chinese Silver Panda, Australian
         Lunar, Mexican Libertad (as of 1996)
Type G                                          UK Britannia Silver (1997-2003)
         Austrian Maria Theresia Thalers, many medals, Commemorative 10 € coins 2002-2010 and 20 € 2016-today,
Type H   Conductance valid only for .900 and .925 silver, and copper alloys & coins after 1945, coins before 1945 were
         often made from a silver nickel alloy – conductance ranges from 35 to 38 MS/m!
Type I                                       Latin Monetary Union, Franc, Lira, etc.
Type J         Commemorative DM & € coins Germany, e.g. 5 DM 1953-1979, 10 DM 1987-1997, 10 € 2011-2015
Type K                                             Maple Leaf, 999.5 bullion
Type L                                             Maple Leaf, 999.5 bullion

                             Table 2 – Common alloys of coins, medals and ingots

                                                                                                                  15
11. A2. Overview of Conductance of Common Alloys of Jewellery Metals
Conductance Conductance
Embossing Foreign Metal
[MS/m] [MS/m]
Alloys of yellow gold Copper (pure form) 58
.999/24K 45 Copper alloys 41-57
.916 11.8 Aluminum (pure form) 36.5
.750/18K 7.1 Brass (see Table 5) 13-33
.585/14K 7.3 Magnesium 23
.333/8K 7.6 Molybdenum 19
Alloys of red gold
Tungsten (pure form) ca. 18.8
(Copper-Gold)
.986 26.5 Tungsten alloys 20-28
.916/22K 9.7 Sintered Tungsten12. More non-destructive Gold-Testing Devices by Goldanalytix
GoldScreenPen
The GoldScreenPen is one of the most versatile electronic precious
metal testers. The world´s smallest probe tip enables the user to
measure of coins, ingots and jewellery (even through films and
blisters). The measured conductivity value, which is detected up to
a depth of 0.5 mm, is displayed on the digital screen.
www.gold-analytix.com/goldscreenpen-electronic-gold-tester
GoldScreenCard
The GoldScreenCard tests coins and ingots by utilising the eddy
current method. The penetration depth is up to 4 mm depending on
the metal species. The database, included in the purchased software,
features values of most common coins and can be extended by the
user with own values – the perfect solution for numismatists.
www.gold-analytix.com/goldscreencard-gsc
Density Balance
The Goldanalytix Density Balance is a great device for
testing precious metals of different sizes for their
authenticity. Most fake coins, ingots or jewellery can be
detected by using the Density Balance because of different
densities of the objects. The density of gold, for example, is
higher than the density of many counterfeit alloys.
www.gold-analytix.com/density-balance
Magnetic Balance
You can easily identify many counterfeits with the Magnetic
Balance, especially the ones made from tungsten. The strong
magnetic field of the Magnetic Balance penetrates the ingot or
coin without damaging it. Tungsten is detected up to 3 mm
beneath the gold plated surface!
www.gold-analytix.com/magnetic-scale
17Goldanalytix – a registered trademark of
MARAWE GmbH & Co. KG
Donaustaufer Str. 378, Building 64
93055 Regensburg
Amtsgericht – Registergericht – Regensburg
HRA 9148, Seat: Regensburg
Personally liable partner:
MARAWE Verwaltungs GmbH, Seat: Regensburg
Amtsgericht Regensburg HRB 14591
Managers: Dr. Jonas Mark, Dr. Peter Raster, Dr. Stefan Weiß
Phone: +49 941 29020439
Fax: +49 941 29020593
E-Mail: info@tifoo.de
www.gold-analytix.de
18You can also read