Guideline for the Safe Use of Autoclaves - UBC Zoology
←
→
Page content transcription
If your browser does not render page correctly, please read the page content below
Guideline for the Safe Use of
                    Autoclaves
              Department of Zoology and Department of Botany
                      University of British Columbia

Created: June 2020

Acknowledgements
We would like to thank the University of Regina for permission allowing us to use and modify
their manual, Autoclave Program User Guide 2016, making changes that are specific for the
Department of Zoology and the Department of Botany at the University of British Columbia.
We would also like to thank STERIS for use of their operating manuals and resources and
UBC Safety and Risk Services (SRS) for the use of various guides and manuals. Thank you to
SRS, and others at UBC, for their feedback on this manual.

Version 1, 2020                                                                            1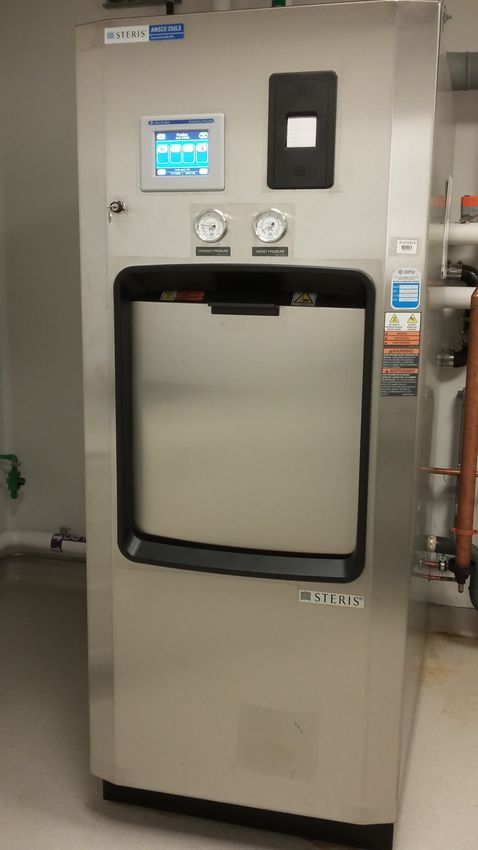
Table of Contents
Tables .............................................................................................................................. 3
USER GUIDE .................................................................................................................... 4

1. Introduction ................................................................................................................ 3
2. Background ................................................................................................................. 3
3. Types of Steam Sterilization........................................................................................ 4
4. Verification of Autoclave Efficacy for Biological Waste Decontamination ................. 5
5. Personal Protective Equipment ................................................................................. 10
6. Training ...................................................................................................................... 10
7. Potential Hazards & Safety Advisories ........................................................................ 11
8. Autoclave Spill and Incident Procedures ................................................................... 12
     a) Incidents ............................................................................................................ 12
     b) Spills .................................................................................................................. 13
              i) Spills In Autoclave……………………………………………………………..…………..…. 13
              ii) Spills Outside Autoclave………………………………………………………………...... 17
              iii) Potential Hazardous Aerosol Release………………………………….……..…….. 19
9. Material Preparation ................................................................................................. 22
10. STERIS Autoclave Standard Operating Procedures ................................................... 26
     a) Loading the Autoclave ....................................................................................... 26
     b) Cycle Section and Operation ............................................................................. 26
     c) Unloading the Autoclave ................................................................................... 30
     d) Standby and Shutdown ..................................................................................... 31
     e) Aborting cycles …………………………………………………………………………………………….. 31
11. Reference Guides….……………………………………………………………………………………………. 32

Tables
Table 1 – Interpretation Guidance Table…………………………………………………………………… 8
Table 2 – General Material Preparation for Autoclave Sterilization ............................. 22
Table 3 - Gravity Cycle Recommendations ................................................................... 27
Table 4- Liquid Cycle Recommendations ...................................................................... 27

Version 1, 2020                                                                                                                      2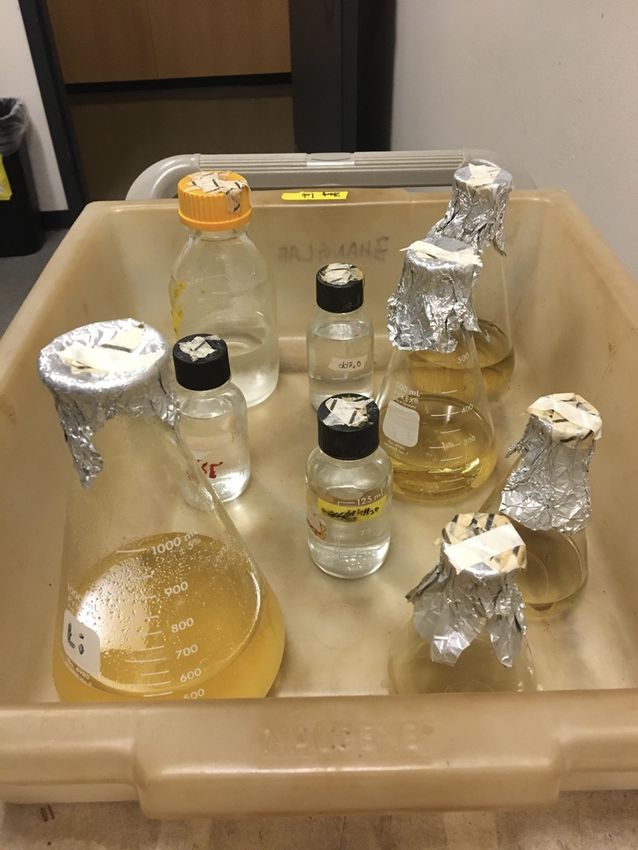
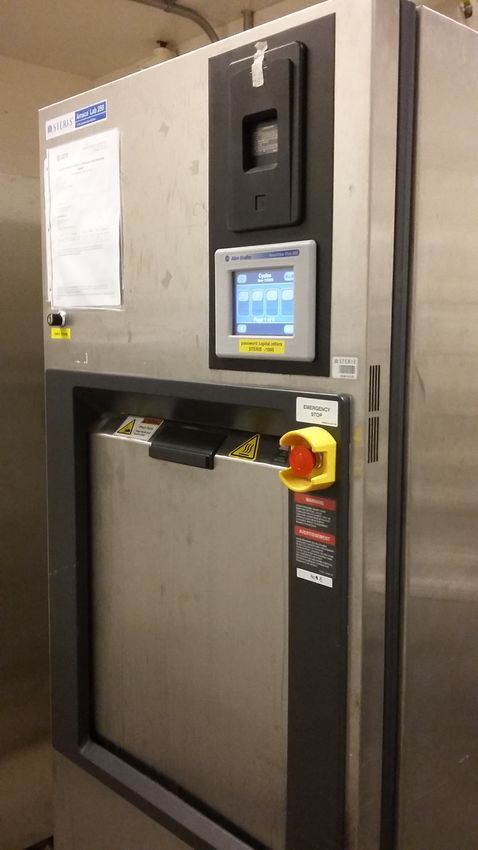
USER GUIDE
1. Introduction
Guideline For the Safe Use Of Autoclaves is intended to promote consistent and safe
use of the autoclaves in the Biological Sciences Building within the Department of
Zoology and the Department of Botany at the University of British Columbia.
This Program and corresponding standard operating procedures (SOPs) are not a
substitute for training and/or reading the appropriate manuals before use. All Principle
Investigators and Supervisors must document that training has been received by
students and staff who will be using an autoclave.
For training, please contact Joanne Denny (email denny@zoology.ubc.ca or phone:
604-822-3389). A list of authorized users will be kept by Joanne Denny and the
Department once training has been completed.

For research, there are 4 Steris Amsco Lab 250 autoclaves in the South Wing (rooms
3302-Zoology and 2302-Botany) of the Biological Sciences Building. For teaching labs,
there is 1 Steris Amsco Lab 250 (room 2014B) and 2 Steris Amsco 250LS (rooms 2014A
and 4012) autoclaves.

2. Background
An autoclave delivers heat and steam under pressure to decontaminate laboratory
media, equipment, and waste. Decontamination occurs when the contamination level
is reduced to a point where it is no longer a hazard to personnel or the environment
(by removing or inactivating infectious materials or toxins); this can be accomplished
by disinfection or sterilization.
Sterilization is the process of completely eliminating all living microorganisms,
including bacterial spores. Disinfection is the process of eliminating most forms of
living microorganisms; disinfection is much less lethal to infectious material than
sterilization.
Sterilization will only occur if the material is heated to a specific temperature for a
given period of time. There are four main parameters that affect successful steam
sterilization: steam, pressure, temperature, and time.
Steam: Steam improves heat transfer and is ideally dry and saturated. Pressure: A high

Version 1, 2020                                                                           3
pressure allows higher temperatures to be reached as required to properly
decontaminate. Temperature: The accepted temperatures for steam sterilization are
121 C
    ̊ in a gravity sterilizer for a minimum of 15 minutes at 15psig, or 132 ̊C in a
prevacuum sterilizer for a minimum of 4 minutes at 15psig. Time: Time varies
depending on type of item (solid or liquid, dense or porous, and total mass or volume),
how the item is packaged, and type of sterilization applied.

3. Types of Steam Sterilization
Gravity Sterilization: Steam is admitted at the top or side of the chamber and because
steam is lighter than air, it forces air out the bottom of the chamber through the drain
vent. As a result, air can remain trapped in upright containers or bottles and lead to
ineffective sterilization.
Prevacuum Sterilization: Is similar to gravity sterilization, except that the air is
removed from the chamber by several vacuum pulses before the saturated steam
enters the chamber. This resolves the problems of air entrapment that can occur when
air is removed by gravity displacement. It increases the speed and efficiency of
sterilization and is more effective on porous heat and moisture stable materials.

Types of Steam Sterilization Cycles
In addition, the building’s two autoclave models are equipped with various “cycles” for
appropriate material sterilization.

Gravity Sterilization Cycle: This type of sterilization cycle is suitable for sterilizing hard
goods (e.g. empty glassware and nonporous materials); but is not suitable for liquids,
or anything that will become liquid when heated.
Prevacuum Sterilization Cycle: This type of sterilization is suitable for sterilizing
wrapped goods (e.g. instrument trays and containers) with the fast exhaust option.
This type of sterilization is suitable for sterilizing liquids in heat-resistant containers
with vented closures with the slow exhaust option.
Liquid Sterilization Cycle: This type of sterilization cycle is useful for sterilizing any
liquid samples (e.g. reagents, media), wastes containing liquids, items that will become
liquid when heated (e.g. agar plates). This cycle has a slow exhaust to minimize liquid
boiling over in the autoclave.
Remember, not every item or material can be autoclaved, see Section 9 – Autoclave

Version 1, 2020                                                                                  4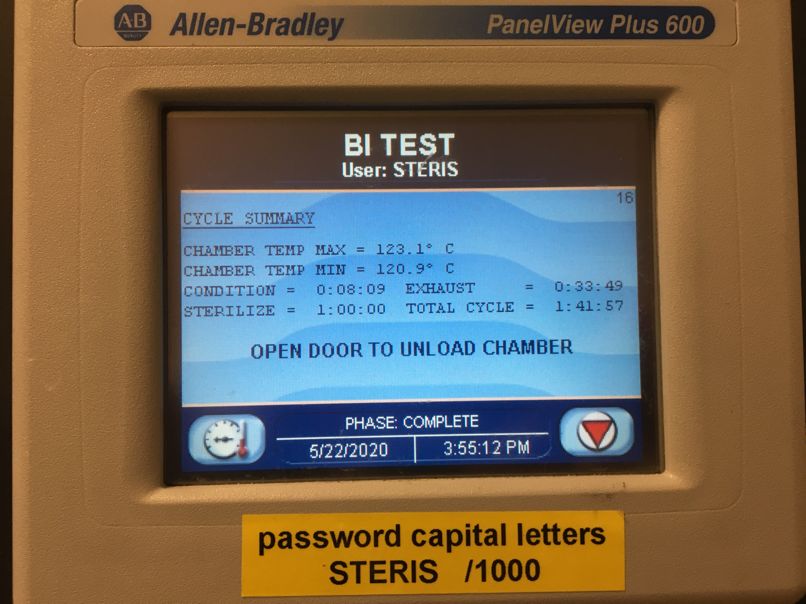
Material Preparation for more information on what is safe for autoclave sterilization.

4. Verification of Autoclave Efficacy for Biological Waste Decontamination
The effectiveness of sterilization is assessed using both chemical and biological
indicators.
Chemical Indicators: Chemical indicators, such as heat tape (aka autoclave tape) are
affixed to the outside to monitor temperature only. Chemical indicators do not
indicate if a load was successfully decontaminated, they simply confirm exposure of
the load to a given temperature.
Biological Indicators (BI): The effectiveness of steam decontamination is monitored
with a BI containing heat-resistant spores of Geobacillus stearothermophilus. If the
autoclaved waste load does not reach the correct internal temperature for the correct
length of time, the spores survive and germinate. Their metabolic by-products will
change the colour of the pH sensitive media. BIs are used to develop the processing
times for typical loads and monitor efficacy of decontamination processes.
It is mandatory to regularly verify the effectiveness of waste decontamination for
every steam autoclave using Geobacillus stearothermophilus biological indicators.

Biological indicators at UBC are available as a self-contained unit.
Self-contained units: A sealed glass ampoule with recovery media is housed in a plastic
tube along with a spore strip. After autoclaving and cooling, the glass vial is crushed,
mixing the spores with the media for incubation. Biological Indicators are supplied by
UBC Safety & Risk Services and are obtainable by emailing autoclave.report@ubc.ca.
Check expiration date and that storage is per manufacturer recommendations.

When should biological monitoring occur?

Autoclave efficacy will be validated on a regular basis. The person in charge of the
autoclaves, will send a department email when the autoclaves are set to be tested for
the following reasons:

    o Regular scheduled once per month testing.
    o After an autoclave has been repaired or moved.

Who is responsible for efficacy testing?

Version 1, 2020                                                                          5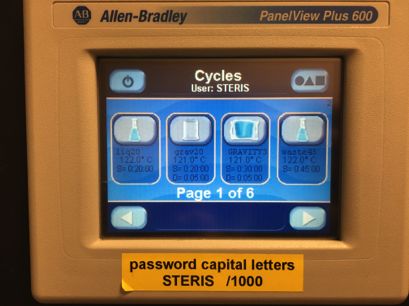
The person responsible is Joanne Denny (denny@zoology.ubc.ca room 4042 East wing
of the Biological Sciences Buildings, phone: 604-822-3389).

Efficacy Testing Bags of Waste:
A. A typical load for waste disposal is considered to be one 25” x 35” autoclave bag.
The bag should not be more than 1⁄2 full. If using a smaller bag, do not fill more than
3⁄4 full. BI tests run in Biological Sciences Building use a bag of dry soil (approximately
½ full).

NOTE: Do not compress waste as steam will be unable to penetrate and the load will
not be decontaminated.
B. Bags should be loosely tied, leaving the top open, at minimum a few inches, so
steam can penetrate the load. The bag can also be fully opened prior to being
autoclaved.
NOTE: Placing several small autoclaves bags within one large autoclave bag is
prohibited, as waste will not be decontaminated at current autoclave parameters.
C. Validation test with biological indicators (UBC Autoclave Validation Protocol LAB-
SOP-001). See Section 5 for appropriate PPE to be worn when carrying out validation
test.

                             EZTest self-contained Biological Indicator (Mesa Labs)

                  1. Obtain a representative waste load bagged in one or two autoclave-safe
                  clear bags. Note that if your representative load is mainly agar plates, it is
                  easiest to use two bags stacked vertically. The bag(s) should be placed in an
                  autoclave safe tray able to accommodate the bag(s) comfortably.

                  2. Each test will require a minimum of 2 biological indicator vials. 1 vial will
                  be the positive control and must be kept at room temperature while the

Version 1, 2020                                                                                  6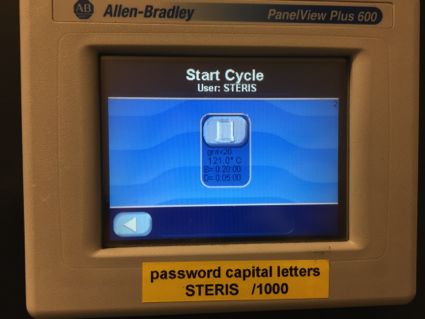
experimental vial(s) must be inserted into the center of the load. The
                  experimental indicator should be in the most difficult area for the steam to
                  penetrate and never at the bag surface.

                  3. Insertion of the experimental vial into the center of the load.

                        3.1. If your representative load is dry material in a single bag (such as
                        soil), tie a string to the vial and place the vial in the center of the
                        soil/bag. Keep the string end outside of the bag opening and leave
                        the bag open. Bag openings may be loosely gathered and pointed
                        upwards but not sealed. Using soil is the preferred method for a
                        representative load for running BI tests in the Departments of
                        Zoology and Botany.

                        3.2. If your representative load is mainly agar plates (plates neatly
                        stacked one atop the other), tie a string to the indicator for easy
                        handling after autoclaving. Place the indicator between the bags in
                        the center of the load and keep the string end outside the bag, and
                        the bag open.

                  4. Record load in the required log book, noting that it is a validation test
                  cycle.

                  5. Setup and ensure the parameters for the waste cycle are: temperature =
                  121oC, pressure =15 psi, time = 60 minutes
                  Place tray containing the bag in the center of the autoclave and run a
                  steam cycle of the parameters used for waste decontamination. For soil
                  and agar plate waste use a liquid cycle.

                  6. Check the chart reader/recorder to verify that the cycle parameters
                  were achieved. Chart recorder to be archived for review during annual
                  audits by SRS.

                  7. Remove the waste at the end of the cycle, taking care to avoid burns by
                  wearing autoclave gloves and allowing steam to vent out of the autoclave
                  before reaching in to the autoclave to remove items.

Version 1, 2020                                                                                  7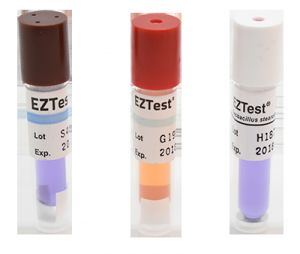
8. Remove the experimental biological indicator and allow to cool 10
                  minutes at room temperature before proceeding. Note that the indicator
                  strip on the outside of the BI will have changed color from blue to black if
                  the temperature in the autoclave reached 121oC– indicating that it was
                  exposed to the autoclave cycle. If the strip has remained blue, the
                  autoclave has not reached sterilization temperature and an investigation as
                  to why must be carried out.

                  9. Incubation of Biological Indicator.
                      • For each of the cooled experimental indicator vial and the control
                        indicator vial, squeeze the vial laterally to bring the medium into
                        contact with the spores (breaking the glass ampule inside the vial).
                        This can be done by placing the vial perpendicular to the edge of a
                        bench or table. Gently press on either end of the vial to break the
                        glass ampule. Once broken, gently agitate the vial, being careful not
                        to allow the liquid to come into contact with the lid.
                      • Place both vials at 57oC (or between 55-60oC) in the Mesa labs
                        incubator heat block (this block is designed to fit the EZTest vials) for
                        24 hours
                      • At the 24 hour mark, remove vials for interpretation.

                  10. Interpretation of Results.
                     • A color change to yellow indicates growth of the spores.
                     • No colour change (purple) means spores are inactive/dead.
                     • See Table 1 for interpretation of results and next steps.

Version 1, 2020                                                                                 8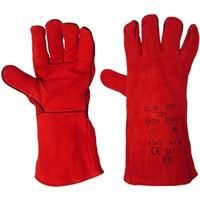
[UBC Safety and Risk Services: Autoclave Validation Protocol (LAB-SOP-001)]

                                                                               Report results to Safety and Risk
                                                                               Services

                  11. Place waste in a holding area until the results of the BI are known.

                  12. If the BI is negative (i.e. no growth) the waste can be discarded.

                  13. If the BI is positive (i.e. growth), run the load again changing the
                  parameters of the cycle to increase either the temperature or time or
                  both. Use another BI and follow all steps again. Inform users that this
                  autoclave is not available for use until it has passed a BI validation test. If it
                  fails again, contact engineer for repair. Once autoclave has been repaired,
                  repeat autoclave test. A pass must be obtained before allowing users
                  access to the autoclave.

                  14. Once you have the results from the BI test, Complete and submit the
                  online Autoclave Facility Monthly Report via the Hazardous Waste
                  Inventory System (HWIS). Note that the online report must be completed
                  even if there was no BI testing during that month (e.g. no waste generated,
                  autoclave under repairs, etc.)
                  https://cwis.rms.ubc.ca/wis/UserApp/autoclave.aspx

Version 1, 2020                                                                                                          9
15. Autoclave any positive BIs prior to discarding them.
Other requirements:
• The autoclave room must be inspected regularly to ensure the area is kept
clean and tidy (e.g. place waste bags in secondary containers) and is free of
any spills.
• The autoclave cycle recordings must be kept for a minimum of 2 years plus
the current year (for a total of 3 years). Cycle recordings are the long paper
rolls on the autoclaves that document parameters reached during a cycle.
• A log book that contains all autoclave use, including waste cycles and efficacy
testing, must be maintained and records are kept for a minimum of 3 years (2
years plus the current year).
5. Personal Protective Equipment
Often material to be loaded contains potentially infectious material or toxins, thus
standard laboratory protective equipment must be worn.
• Nitrile or latex gloves
• Safety glasses or goggles; it is advisable to wear a full face shield if a splash
hazard exists
• Laboratory coat
• Closed-toe and closed-heel shoes
In addition, since the interior of the autoclave is extremely hot,
heat resistant gloves are required for loading and unloading
autoclaved materials.
Do not wear previously used nitrile gloves inside the heat resisting gloves, since you
risk contaminating the inside of the heat resistant gloves.
6. Training
Autoclave hands on training is required prior to using an autoclave for all Faculty, Staff,
Postdocs and Students. Training will help minimize the risk of personnel being harmed
and damage to the equipment, as well as proper decontamination/sterilization of
material.
Version 1, 2020 10Currently, site-specific training is facilitated by Joanne Denny. A training session can be
requested by emailing denny@zoology.ubc.ca or by phone 604-822-3389. This training
covers general autoclave processes and procedures.
Note: This training must be complemented by additional research-specific training
provided by the Supervisor.
Other mandatory safety training requirements include the SRS Biosafety Training,
Hazardous Waste Training, and Autoclave Training (available on the UBC SRS website
https://srs.ubc.ca/training-and-general-education-courses/).
7. Potential Hazards & Safety Advisories
The autoclave operates under high pressure and temperature; therefore, there is a
significant danger of burns and scalds. See specific Autoclave Operator Manuals for a
complete listing of warnings and cautions.
• Heat burns may occur when the operator comes in contact with hot materials or
the autoclave chamber walls and doors.
• Steam burns can be caused by contact with residual steam coming out of the
autoclave or autoclaved materials upon completion of a cycle.
• Do not attempt to open the sterilizer door unless the chamber pressure gauge on
the front panel reads zero (0 psig).
• Hot fluid scalding can result from boiling liquids or spillage in the autoclave. Do
not allow hot bottles to be jostled as this can cause the bottle to break or
explode.
• When sterilizing liquids, the Liquid Cycles must only be used. Use only vented
closures; do not use screw caps if possible (if using screw caps ensure they are
very loose) or rubber stopped with crimped seals.
• Explosion can occur if flammable compounds are processed. Do not process
flammable liquids, solvents, chlorinated compounds (e.g. HCl, bleach), oils,
waxes, radioactive materials, or substances that may emit toxic fumes.
• Sterilization of >3% chloride-containing solutions (e.g. sodium hypochlorite
(bleach), HCl, and NaOH) can cause chamber corrosion and is not recommended
Version 1, 2020 11by manufacture. Please consider an alternative sterilization procedure such as
vacuum filtration. Sterilization of 1-3% saline and sodium chloride- containing
solutions may be autoclaved with secure secondary containment.
• Autoclaves require a thorough preventive maintenance program to ensure safe
and proper sterilizer operation. Load sterility may be compromised if the
biological indicator indicated a potential problem.
8. Autoclave Spill and Incident Procedures
Report all incidents and spills immediately to your Supervisor (PI) and Departmental
Administrators, Katie Pikor (Zoology zadmin@zoology.ubc.ca) and Jessica Trat (Botany
jessica.trat@botany.ubc.ca). Also report to Safety & Risk Services (SRS) using the UBC
Centralized Accident / Incident Reporting System (CAIRS) within 24 hours of
occurrence. (https://www.cairs.ubc.ca/public_page.php
a) Incidents
The most immediate concern following a spill of biologically hazardous materials or
organisms is to contain the spill and treat any exposed persons. After this occurs,
properly trained employees can begin the cleanup and decontamination process.
If hot liquids are spilled onto clothing, or clothing is soaked in steam:
1. Remove clothing and cool the injured part in cool water.
2. Seek medical attention, if necessary call 911 and/or the Occupational First Aid
Team 604-822-4444.
3. Report the incident to your PI and or Laboratory Manager immediately.
Perform clean-up procedures only if:
• The appropriate spill control material, equipment and protective clothing are
available.
• Personnel are familiar with equipment and clean-up procedures.
• More than one person is in the lab and available to participate. Work in teams.
One person cleans the spill; the other should remain outside of the
contaminated area and hand supplies to person cleaning.
• There are no ignition sources present.
Version 1, 2020 12Further information regarding chemical spills and biological spills can be found at the
UBC Safety and Risk Services website under Research Safety Resources and
Documents: https://srs.ubc.ca/health-safety/research-safety/research-safety-
resources-documents/
b) Spills : General Procedures
i. Spills in Autoclave
The autoclave must be “cleaned” and/or “disinfected” following any spill. Spills in
an autoclave may occur from a boil over or breakage of containers. No operation of
the autoclave is allowed until the spilled is cleaned up. Spill kits are located in
Rooms 2014 (Zoology), 2303 (Botany), 2374 (Botany-need a key for this room)
and the Zoology Office room 4213 (Zoology).
1) Review the SDS (formally MSDS) and PSDS, to determine the protective
equipment, spill cleanup, and disposal protocols that are necessary.
2) Wear gloves, laboratory coat, safety glasses, pants, and appropriate foot
protection (and any additional personal protective equipment indicated by the
SDS and PSDS), and contain the spill material first using the Autoclave Spill Kit.
3) Report all spills to Jessica Trat and Katie Pikor.
4) Before cleaning spills:
a. Turn off the autoclave.
b. Put a sign on autoclave indicating that is not to be used until the cleanup
is complete.
c. Wait until the autoclave and materials have cooled to room temperature,
before completing clean up:
A. Small and Large Non-Hazardous Material Spill (Spills you are comfortable
cleaning up, examples: seawater, media):
1. All persons should inform other personnel in the affected area not to enter.
2. Put up a sign indicating there is a spill and to not use the autoclave.
3. Lab PI, Lab Manager, or ‘spill buddy’ should be informed for cleanup
assistance.
4. Review the SDS, to determine the protective equipment, spill cleanup, and
disposal protocols that are necessary for all chemicals and biological materials
Version 1, 2020 13involved.
5. Wear appropriate PPE.
6. Cover the spill with paper towels to contain it, or use an appropriate spill
control material. Use Chemical Spill Kit if necessary. Create a 360o barrier
around spill. You may need to remove the shelf from the autoclave (place in
sink).
7. Do not allow any solid material to go down the chamber drain.
8. Clear away any materials like broken glass using forceps, or another
mechanical device, and place in the appropriate broken glass disposal
container (see section 8iv on glass clean up).
9. Clean the spillage area using paper towels other appropriate cleaning
materials, moving from the outside to the inside of the spill. Remove the waste
and paper towels to an appropriate container for disposal.
10. Wipe any remaining spilled material with Liqui-Jet detergent diluted 1:10 with
tap water, using a coarse spray (to avoid creating a fine mist). Rinse inside of
chamber with tap water at least 2 times to remove any remaining detergent,
and dry with a soft, lint free cloth.
11. Clean the shelf using a soft/non-abrasive cloth and Liqui-Jet detergent diluted
1:10 with tap water. Rinse with tap water and dry with a lint free cloth. Return
to autoclave.
12. Clean drain strainer by removing from drain, turn upside down under running
tap water. Use a brush to clean out any material that may be stuck inside.
13. Dispose of the waste following the protocol appropriate for the material. If
materials have mixed, follow the cleanup and disposal protocol for the most
hazardous component of the mixture. This may require re-sterilization of the
waste. DO NOT autoclave organic waste and oxidizing agents, such as bleach,
before allowing 48 hours for oxidization.
14. Contact Environmental Services Facility (ESF) at 604-822-1285 or 604-363-
4420 for information on disposal of waste.
15. Do not use the autoclave until Jessica Trat has given permission to do so.
16. Record the spill and cleanup procedures in the Autoclave Logbook
B. Small Hazardous Material Spill (less than 1L) or Biological Spill (less than 100 ml)
(Spills you are comfortable cleaning up, example: waste RG1 organism in media):
1. All persons should immediately leave the affected area and allow aerosols to
Version 1, 2020 14settle (~30 minutes).
2. Signs should be posted indicating that entry into area is forbidden. Post a sign
stating “DO NOT ENTER, HAZARDOUS MATERIAL SPILL OR BIOLOGICAL SPILL”.
Contact (name and phone #) for information.”
3. Any exposed person should seek medical assistance immediately (within 1-2
hours) from a health care professional.
4. Lab PI, Lab Manager, or ‘spill buddy’ should be informed for cleanup
assistance. Please contact Jessica Trat or Katie Pikor to inform of spill, also to
assist in contacting the appropriate people in helping with spill cleanup if
necessary.
5. Review SDS and PSDS to determine the protective equipment, spill cleanup,
and disposal protocols that are necessary for all chemical and biological
materials involved.
6. Wear appropriate PPE.
7. Cover the spill with paper towels to contain it or use an appropriate spill
control material. Create a 360o barrier around spill. Use Chemical Spill kit if
necessary. You may need to remove the shelf from the autoclave (place in
sink).
8. Do not allow any solids to go down the chamber drain.
9. Spray or pour an appropriate disinfectant, or neutralizer, (according to the
specific SDS or PSDS) moving from the outside towards the inside of the spill.
10. After the appropriate amount of time (see SDS/PSDS), clear away any
materials like broken glass using forceps, or another mechanical device, and
place in a sharps container/biohazard container. Set up a container or bag for
disposal of waste material (if still need to autoclave materials then use an
autoclave bag) (see section 8iv on glass clean up). .
11. Clean and disinfect the spillage area using paper towels and other soft non-
abrasive cleaning materials, moving from the outside to the inside of the spill.
Place waste material into disposal bag. Rinse the area/inside of the chamber
with tap water to remove traces of the disinfectant.
12. Wipe down the inside of chamber with Liqui-Jet detergent (diluted 1:10 with
tap water) using a coarse spray (to avoid creating a fine mist). Rinse with
water at least 2 times to remove any remaining detergent, and dry with a soft
lint free cloth.
13. Clean the shelf using a soft/non-abrasive cloth and Liqui-Jet detergent diluted
1:10 with tap water. Rinse with tap water and dry with a lint free cloth.
Return to autoclave.
Version 1, 2020 1514. Clean drain strainer by removing from drain, turn upside down under running
tap water. Use a brush to clean out any material that may be stuck inside.
15. Dispose of the waste following the protocol appropriate for the material. If
materials have mixed, follow the cleanup and disposal protocol for the most
hazardous component of the mixture. This may require re-sterilization of the
waste or chemical waste disposal. DO NOT autoclave organic waste and
oxidizing agents, such as bleach, before allowing 48 hours for oxidization.
16. Contact Environmental Services Facility (ESF) at 604-822-1285 or 604-363-
4420 for information on disposal of waste, including broken glass waste.
17. Do not use the autoclave until Jessica Trat has given permission to do so.
18. Record the spill and cleanup procedures in the Autoclave Logbook.
C. Large Hazardous Material Spills (larger than 1L) or Large Biological Spills (larger
than 100 ml) (example: waste RG1 organism in media):
1. All persons should immediately leave the affected area and allow aerosols to
settle (~30 minutes).
2. Signs should be posted indicating that entry into area is forbidden; post a sign
stating “DO NOT ENTER, HAZARDOUS MATERIAL SPILL OR BIOHAZARD SPILL.
Contact (name and phone #) for information.”
3. Any exposed person should seek medical assistance immediately (within 1-2
hours) from a health care professional.
4. Immediately call 911. Be prepared to give them the following information:
• Type of Chemical or Hazard
• Amount spilled
• Exact location of the spill (building and room number)
• Do not hang up until the operator releases you
• Inform the UBC Department of Health, Safety and Environment 604-822-
2029. Inform your immediate supervisor as well as Departmental
Administrator (mentioned at the start of this section).
• Try to have SDS (PSDS) on hand for emergency personal.
5. Supervised decontamination should proceed.
6. Inform PI, Lab Manager, and Jessica Trat or Katie Pikor of spill.
7. Do not use autoclave until given permission to do so.
8. Record the spill and cleanup procedures in the Autoclave Logbook.
Version 1, 2020 16ii. Spills outside Autoclave
A. Small and Large Non-Hazardous Material Spill (Spills that you are comfortable
cleaning up, examples: seawater, media):
1. All persons should inform other personnel in the affected area not to enter.
Signs should be posted indicating that there has been a spill, include contact
(name and phone #) for information.”
2. The Laboratory Supervisor, or a “Spill Buddy” should be informed for cleanup
assistance.
3. Review the SDS to determine the protective equipment, spill cleanup, and
disposal protocols that are necessary for all chemicals involved.
4. Wear appropriate PPE.
5. Cover the spill with paper towels to contain it, or use an appropriate spill
control material. Create a 360o barrier around spill. Use Chemical Spill kit if
necessary.
6. If needed, spray or pour an appropriate disinfectant over the paper towels and
the immediate surrounding area (according to the specific SDS), apply from the
outside and move inwards.
7. After the appropriate amount of time (~30 minutes), clear away any materials
like broken glass using forceps or another mechanical device and place in a
sharps container/biohazard container. Set up a container or bag for disposal
of waste material (if still need to autoclave materials then use an autoclave
bag) (see section 8iv on glass clean up). .
8. Clean and disinfect the spillage area using paper towels and other appropriate
cleaning materials, moving from the outside to the inside of the spill. Wash the
affected area with an appropriate cleaning solution (soap and water).
9. Place the waste material/paper towels into the disposal bag.
11. Dispose of the waste following the protocol appropriate for the material. If
materials have mixed, follow the cleanup and disposal protocol for the most
hazardous component of the mixture. This may require re-sterilization of the
waste or chemical waste disposal. DO NOT autoclave organic waste and
oxidizing agents, such as bleach, before allowing 48 hours for oxidization.
12. Contact Environmental Services Facility (ESF) at 604-822-1285 or 604-363-4420
for information on disposal of waste.
Version 1, 2020 17B. Small Hazardous Material Spills (less than 1 L) and/or Biological Spills (less than
100 ml) (Spills you are comfortable cleaning up, example: waste RG1 organism in
media):
1. All persons should immediately leave the affected area and allow aerosols to
settle (~30 minutes).
2. Signs should be posted indicating that entry into area is forbidden. Post a sign
stating “DO NOT ENTER, HAZARDOUS OR BIOHAZARD SPILL. Contact (name
and phone #) for information.”
3. Any exposed person should seek medical assistance immediately (within 1-2
hours) from a health care professional.
4. The Laboratory Supervisor, or a “Spill Buddy” should be informed for cleanup
assistance. Please contact Jessica Trat or Katie Pikor to inform of spill, also to
assist in contacting the appropriate people in helping with spill cleanup if
necessary.
5. Review the SDS and PSDS, to determine the protective equipment, spill
cleanup, and disposal protocols that are necessary for all chemicals and
biological materials involved.
6. Wear appropriate PPE.
7. Cover the spill with paper towels to contain it, or use an appropriate spill
control material. Create a 360o barrier around spill. Use Chemical Spill kit if
necessary.
8. Spray or pour an appropriate disinfectant/neutralizer over the paper towels
and the immediate surrounding area (according to the specific biological
PSDS). Apply the disinfectant from the outside and move inwards.
9. After the appropriate amount of time (see PSDS or ~30 minutes), clear away
any materials like broken glass using forceps or another mechanical device and
place in a sharps container/biohazard container. Set up a container or bag for
disposal of waste material (if still need to autoclave materials then use an
autoclave bag) (see section 8iv on glass clean up).
10. Clean and disinfect the spillage area using paper towels and other appropriate
cleaning materials, moving from the outside to the inside of the spill. Wash
the affected area with an appropriate cleaning solution (soap and water).
11. Place the waste material/paper towels into the disposal bag.
12. Dispose of the waste following the protocol appropriate for the material. If
materials have mixed, follow the cleanup and disposal protocol for the most
Version 1, 2020 18hazardous component of the mixture. This may require re-sterilization of the
waste or chemical waste disposal. DO NOT autoclave organic waste and
oxidizing agents, such as bleach, before allowing 48 hours for oxidization.
13. Contact Environmental Services Facility (ESF) at 604-822-1285 or 604-363-
4420 for information on disposal of waste.
C. Large Hazardous Material (larger than 1 L) and Biological Spills (larger than 100
ml) (example: RG1 organism in media):
1. All persons should immediately leave the affected area and allow aerosols to
settle (~30 minutes).
2. Signs should be posted indicating that entry into area is forbidden; post a sign
stating “DO NOT ENTER, HAZARDOUS MATERIAL OR BIOLOGICAL SPILL.
Contact (name and phone #) for information.”
3. Any exposed person should seek medical assistance immediately (within 1-2
hours) from a health care professional.
4. Immediately inform 911. Be prepared to give them the following information:
• Type of Chemical or Biological Material
• Amount spilled
• Exact location of the spill (building and room number)
• Do not hang up until the operator releases you
• Inform the UBC SRS 604-822-2029. Inform your immediate supervisor as
well as the Departmental Administrator (mentioned at the start of this
section).
• Try to have SDS (PSDS) on hand for emergency personal.
5. Supervised decontamination should proceed.
6. Inform PI, Lab Manager, and Jessica Trat or Katie Pikor of spill.
7. Do not use autoclave until given permission to do so.
8. Record the spill and cleanup procedures in the Autoclave Logbook.
iii. Potentially Hazardous Aerosol Release
1. All persons should immediately leave the affected area and no one should enter
the room for an appropriate amount of time (e.g. 30 minutes), to allow for
aerosols to be carried away and heavier particles to settle. If the laboratory does
not have a central air exhaust system, entry should be delayed (e.g. for 24 hours).
Version 1, 2020 192. Signs should be posted indicating that entry is forbidden. Post a sign stating “DO
NOT ENTER, HAZARDOUS MATERIAL OR BIOHAZARD SPILL. Contact (name and
phone #) for information.”
3. Any exposed person should seek medical assistance immediately (within 1-2
hours) from a health care professional.
4. Call 911. Be prepared to give them the following information:
• Type of Aerosol
• Approximate amount released
• Exact location of aerosol release (building and room number)
• Do not hang up until the operator releases you
• Inform the UBC Safety and Risk Service 604-822-2029. Inform your
immediate supervisor as well as Departmental Administrator (mentioned
at the start of this section).
• Try to have SDS (PSDS) on hand for emergency personal.
5. Supervised decontamination should proceed.
6. Inform PI, Lab Manager, and Jessica Trat or Katie Pikor of aerosol release.
7. Do not use autoclave until given permission to do so.
8. Record the aerosol release and cleanup procedures in the Autoclave Logbook.
iv. Exploded Glassware (uncontaminated) (For contaminated, see above
procedures for clean up of Non-Hazardous and Hazardous spills)
1. If glassware has exploded inside the autoclave chamber, turn off the autoclave
and allow it to cool down.
2. Post a sign indicating the danger and your contact information.
3. The Laboratory Supervisor, or a “Spill Buddy” should be informed for cleanup
assistance. Please contact Jessica Trat or Katie Pikor to inform of glass
explosion, also to assist in contacting the appropriate people in helping with
cleanup if necessary.
4. Wear appropriate PPE.
5. Place ‘Broken Lab Glassware’ (lined with heavy duty clear plastic bags)
container nearby to dispose of broken glass as it is removed from the autoclave.
These containers can be obtained from BioSci Shipping/Receiving Room 1015.
6. Gather appropriate materials to help with cleanup, ex: dustpan and brush,
gloves, forceps and paper towel.
7. Place broken glass into the broken glassware container carefully as to avoid
Version 1, 2020 20cutting yourself.
8. When the glass container is 3/4 full, tie the bag closed and ensure that no glass
protrudes out past the top of the container. Obtain a new broken glassware
container if needed. Bring full broken glassware containers to
Shipping/Receiving in Biosci 1015, during opening hours, for disposal.
9. Once glass has been removed, wet some paper towels with tap water and
carefully wipe down the inside of the autoclave. Dispose of the paper towels in
the broken glass container.
10. Remove the drain trap at the front of the chamber. Empty any broken glass
into the broken glass container.
11. Rinse the drain trap with tap water and place back in the autoclave drain.
12. Do not use autoclave until given permission to do so.
13. Record the spill and cleanup procedures in the Autoclave Logbook.
Always contact Safety and Risk Services (604-822-2029) prior to wearing a respirator
for the first time. You MUST be fit-tested.
Version 1, 2020 219. Material Preparation
Table 2 – General Material Preparation for Autoclave Sterilization
ITEMS THAT CANNOT BE AUTOCLAVED ITEMS THAT CAN BE AUTOCLAVED
- SEALED CONTAINERS - CONTAINERS WITH LOOSENED CAPS OR LIDS (E.G.
ALUMINUM FOIL CAP )
- OILS, WAXES - CONTAMINATED SOLID ITEMS, SUCH AS:
PETRI DISHES, EPPENDORF TIPS, PIPETTES,
GLOVES, PAPER TOWELS
- FLAMMABLE MATERIALS - ITEMS FOR STERILIZATION, SUCH AS:
GLASSWARE , MEDIA, AQUEOUS SOLUTIONS,
EQUIPMENT
- MATERIALS CONTAINING: SOLVENTS, OR - BIOHAZARD MATERIALS MUST BE LABELED
CORROSIVE CHEMICALS (I.E . PHENOL, AS SUCH AND SECURED IN CONTAINMENT
TRICHLOROACETIC ACID, ETHER, VESSELS OR AUTOCLAVE BAGS
CHLOROFORM, ETHANOL)
- MATERIALS CONTAINING: VOLATILE >3% - MATERIALS CONTAINING: 1 -3% SALINE
ACIDS AND BASES (I.E. HCl, NaOH) AND CHLORINATE COMPOUNDS (I.E . CaCl2,
NaCl, KCl, PBS)
POWERFUL OXIDIZERS (BLEACH)
- RADIOACTIVE MATERIALS - STAINLESS STEEL
- SOME BUFFERS (MOPS) MAY DEGRADE IN THE - BOROSILICATE GLASS (PYREX)
AUTOCLAVE
- LOOSE OR DRY MATERIALS WRAPPED OR BAGGED IN
STEAM-PENETRABLE PAPER OR LOOSELY COVERED WITH
ALUMINUM FOIL
- SOME PLASTICS (POLYSTYRENE (PS), POLYETHYLENE (PE), - SOME PLASTICS (POLYPROPYLENE (PP) AND
AND HIGH DENSITY POLYETHYLENE (HDPE)) CANNOT BE USED POLYCARBONATE (PC)) CAN BE USED AT SECONDARY
AS SECONDARY CONTAINER CONTAINER
1. Before preparing items for sterilization or decontamination, ensure that each
item can be autoclaved (above Table 2).
2. Review the SDS and PSDS if you are unsure of the proper safety precautions and
personal protective equipment required for the material to be autoclaved.
3. All items to be autoclaved should be placed inside a suitable primary container
(i.e. flasks, tubes, beakers, biohazard bags, or wrapping paper or muslin for
instruments), which in turn is put into a secondary container (i.e. autoclave pan).
a. The primary container should be heat resistant, thermally conductive,
Version 1, 2020 22puncture proof and waterproof. Suitable containers include:
i. Borosilicate glass (Pyrex or Kimax)
ii. Polypropylene (PP) and polycarbonate (PC) plastics
iii. Teflon (PTFE)
iv. Stainless steel
v. Polypropylene bags
b. Do not fill primary containers beyond 75% of their holding capacity.
c. All primary containers must be unsealed by loosening screw or vent caps,
Version 1, 2020 23capping open containers with aluminum foil, opening plastics bags slightly (no
less than three fingers width) prior to loading into autoclave.
d. DO NOT AUTOCLAVE SEALED CONTAINERS OR BAGS.
e. Optional: It can be useful to add 250 mL of water to the contents of bags
containing solids to create additional steam to displace any air in the bag during
the cycle.
4. Place primary container (i.e. bag or flask), into a SOLID secondary container.
a. Heat-resistant secondary containers must be large enough to contain any leaks in
the primary containers.
b. Plastic secondary containers must be (polypropylene (PP) and polycarbonate
(PC)) only.
c. Optional: If using gravity sterilization cycle, 1 -2 mL of water can be added to
each item separately. This will fill insulating air pockets that may be generated
when the glassware is placed in the pan.
d. Do not allow items to touch in pan (takes longer for items to reach required
temperatures). Avoid crowding or stacking items.
e. Do not overload secondary container; leave sufficient space between each item
for steam circulation. For large loads, if the space is greater than 6 inches
between each item, the run time can be set for the volume/weight of the
volume/heaviest item. If the space is smaller than 6 inches apart, items are
considered to be one, and must be sterilized according to the mass of the two
objects combined.
f. Place empty flasks, test tubes, or other non-porous containers on their sides with
loose cover to prevent air trapping and air pockets.
5. Liquids and dry wastes should be processed separately.
6. Materials that are to be sterilized are separated from those to be
decontaminated.
7. Temperature sensitive tape must be affixed to all bags and individual items to
indicate that the material has been autoclaved. This tape does not prove that the
item has been successfully sterilized or decontaminated; it simply indicates that
a given temperature was achieved.
Version 1, 2020 24Examples of Correct Autoclave Material Packaging
B) 75% filled primary items are spaced in appropriate
A) Pyrex flasks are filled to only plastic secondary container.
75% of their holding capacity
and placed inside appropriate
plastic secondary container,
with space between each item
to allow steam to circulate.
X P P
C) Autoclavable bags are filled to D) Appropriate plastic secondary containers
only 75% of their holding capacity are properly placed inside the autoclave
and placed inside appropriate equipment.
plastic secondary container. The
bag opening should be at least 3
finger widths to allow steam to
penetrate inside the bag.
Version 1, 2020 2510. Steris Autoclave Standard Operating Procedures
a) Loading the Autoclave
1. Check the Autoclave Logbook first, to ensure that the autoclave is functioning
properly (i.e. no problems are listed) and that the autoclave has been tested for
efficacy in the month.
2. Wear heat resistant gloves, lab coat, and closed-toe shoes. Note: autoclave door
and chamber may be hot from a previously run cycle.
3. If autoclave is in standby mode, press the screen to proceed to the main menu
screen.
4. If not already logged on, enter Username: STERIS (all CAPS) and password: 1000.
5. Press foot pedal (bottom right side of autoclave) to open door (if no foot pedal,
manually open the door by pulling it down). Stand back to allow any steam still in
the chamber to escape. Hot steam can cause burns.
6. Check the inside of the autoclave to ensure that it is clean, and that the drain
strainer is in place and not blocked. Carefully remove any debris if found and
report to Jessica Trat (Jessica.trat@botany.ubc.ca) or Joanne Denny
(denny@zoology.ubc.ca). Blockages in the strainer/drain will affect the ability of
the autoclave to reach the appropriate temperature for sterilization. If you
notice any spills inside the autoclave, do not use and contact Jessica or Joanne
immediately.
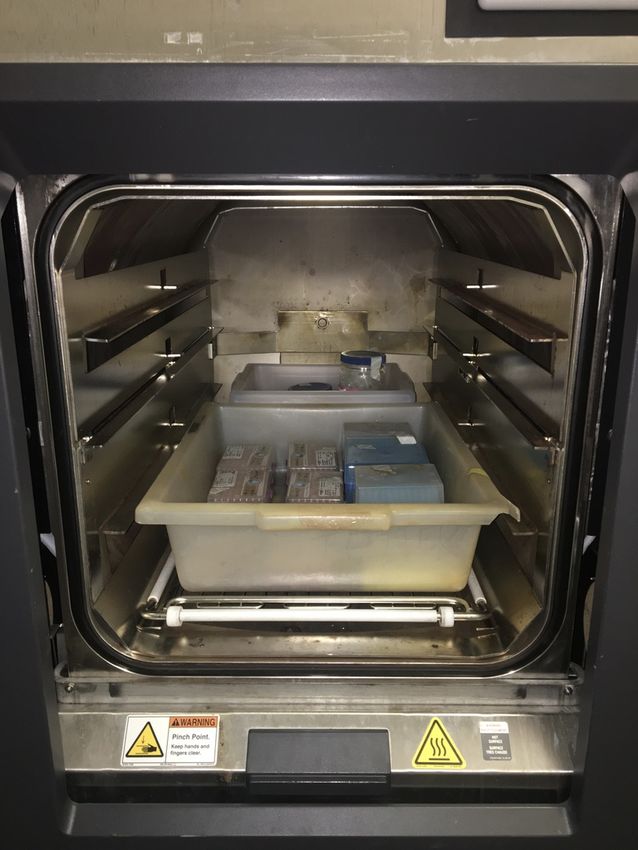
7. Place materials in autoclave, observing the following precautions:
a. Do not overload secondary containers
b. Avoid touching, crowding, or stacking items.
c. Liquid loads should be a uniform volume and container size
8. Make sure contents are completely inside chamber before closing the door.
9. Press the foot pedal to close the door (or manually close the door if no foot
pedal).
b) Cycle Section and Operation
1. Select an appropriate cycle based on the materials to be sterilized. See individual
autoclave standard operating procedures for more information. Use arrow keys
on the screen to scroll to the appropriate cycle and then press the cycle you want
to run. See below for guidelines on cycle recommendations.
Version 1, 2020 26Table 3 – Gravity Cycle Recommendations
Items Recommended Sterilize Time at Dry Times
121oC (minutes)* (Minutes)
Glassware (empty, inverted, vented) 15 0
Instruments (metal combined with suture tubing 20 0
or other porous materials (unwrapped))
Hard Goods (unwrapped) 15 0
Hard Goods (wrapped in muslin or equivalent) 30 30
Biological Waste 60 (unless exempt) 0
*Listed times include the combined time required to reach 121 C
̊ and the time required to achieve sterilization at 121 C
̊ . Cylcles
maybe longer than shown on display due to time to cool down and release pressure at the end of the cycle.
Table 4 – STERIS Liquid Cycle recommendations
Volume of Liquid in One Container (ml)* Recommended Sterilization Time at 121OC
(minutes)**
75 25
250 30
500 40
1000 45
1500 50
2000 55
>2000 55+10 min/L
*This time may vary due to viscosity of liquids and other parameters.
**Listed times include the combined time required to reach 121 C
̊ and the time required to achieve sterilization at 121 C
̊ . Cylcles
maybe longer than shown on display due to time to cool down and release pressure at the end of the cycle.
Version 1, 2020 272. Biological waste:
a. All biological waste must be autoclaved for a minimum of 60 minutes at 15 PSI
using a liquid cycle before disposal, regardless of the volume/mass being
sterilized (UBC Hazardous Waste Manual 2014). The Botany department has
an exemption list for some RG1 (non-hazardous) Biologicals Waste that has
been approved by SRS:
1. transgenic Arabidopsis thaliana plants;
2. transgenic Helianthus annuus plants;
3. Physcomitrella patens moss plants;
4. Chlamydomonas reinhardii algae (plants);
5. Nicotiana benthamiana plants;
6. non-pathogenic, non-hazardous Agrobacterium tumefaciens (microbe);
7. non-pathogenic, non-hazardous Escherichia coli bacterial strains (microbe); and
8. Saccharomyces cerevisiae (microbe).
b. Please contact Jessica Trat or Joanne Denny for this Department of Botany
Standard Operating Procedures (SOP)
3. Soil, vermiculite:
a. Anything particulate (soil, vermiculite, etc.) must be run in a liquid cycle only;
the rapid exhaust of a gravity cycle could cause the particulate to “coat” the
inside of the autoclave chamber. A pre-vacuum cycle should be used, where
available.
4. Liquids:
a. All liquids and any media that will melt during sterilization must be processed
using a liquid cycle.
b. Liquid cycles have slower exhaust rates to minimize boiling and evaporation of
the material being autoclaved; there is no drying time associated with liquid
cycles.
5. Press “Start Cycle”. Do not leave immediately; remain in room until the autoclave
has started and the screen has transitioned to a time for the length of the cycle.
6. Record autoclave parameters in the Autoclave Logbook.
Version 1, 2020 287. If the run doesn’t start, the autoclave will set off an alarm.
a. Record the error message displayed on the screen.
b. Silence the alarm.
c. IMMEDIATELY report the alarm to Jessica Trat or Joanne Denny.
d. They will assess the situation and determine if a service call needs to be
made.
e. Record problems in Autoclave Logbook.
8. Once the cycle is complete, try to unload material promptly. Others
maybe waiting patiently for equipment. Screen below shows a complete
cycle.
9. Do not attempt to open door while autoclave is operating. If you must access the
materials in the autoclave you will have to abort the cycle by pressing the abort
button on the screen (see below for aborting cycles 10e). Only use abort if it is
an emergency. Only press the red Emergency abort button for emergencies also.
This will lock the autoclave down and a service technician will need to be called.
10. If cycle alarms at any time during the run (or aborts), please record the problem
in the Autoclave Logbook and contact Jessica Trat to report the problem.
Version 1, 2020 29c) Unloading the Autoclave
1. Wear heat resistant gloves, lab coat, shoes, and face shield. The greatest risk of
personal injury occurs during autoclave unloading.
a. High risk of burns or scalds from autoclaved materials.
b. Exposure to vapors and gases due to inadvertent autoclaving of volatile
chemicals.
2. Do not attempt to open the sterilizer door unless the chamber pressure gauge on
the front panel reads zero (0 psig). If there is no gauge, check the screen. If the
screen is on the main page of cycles then it is safe to open. If there is a run
currently in the machine, there will be a countdown timer. The door will be
locked and will not open. Do not attempt to force it open. If a run has finished,
the screen will show a cycle summary and will say at the bottom ‘open door to
unload chamber’ (see picture on previous page).
3. Stand away and to the side of the door, step on the foot pedal (bottom right if
present) to open the door (or manually open if there is no foot pedal). Stand
back from the door to avoid the escaping steam.
a. If samples are boiling or bubbling, wait until they subside before removing
them.
b. Do not agitate containers of super-heated liquids or remove caps before
unloading. Super-heated liquids can “bump” when they are removed from
the autoclave causing a spray of boiling liquid, possibly resulting in serious
burns.
4. Using heat resistant gloves, carefully transfer the autoclave trays to a cart.
5. Use the foot pedal (if present) to close the autoclave door (or manually close).
Keep the chamber door closed between cycles and when not in use.
6. Verify that the temperature-sensitive tape has changed colour. If not, new tape
needs to be applied and the material autoclaved again (ensure that the cycle is
running before leaving). If the tape does not change colour a second time, and
no alarm went off, chances are the tape is “bad’. Confirm that the autoclave
cycle temperature was reached for sufficient time by reviewing the autoclave
paper printout if one is available, or check the ‘completed cycle’ screen before
opening the door. This screen will show you the temperature achieved during
the cycle. The autoclaves in the South Wing do not have working printers. If you
are sure your cycle ran, please contact Joanne Denny (denny@zoology.ubc.ca) to
run an efficacy (BI) test. Please supply a sample of your autoclave tape.
Version 1, 2020 307. Record any problems in the Autoclave Logbook.
8. Transport items to a safe location and wait for the items to cool before storing or
disposing.
9. When disposing of autoclaved biohazard waste, it must be placed inside
designated biological waste receptacles in Biological Sciences Building
Shipping/Receiving room 1015B (East wing). It may never be placed on ground or
disposed of in your laboratory. See Department Waste Disposal Protocols for
more information. Please contact Shipping/Receiving at shiprec@botany.ubc.ca
or by phone, Tel: 604-822-5040 for opening times.
d) Standby and Shutdown
On Weekends, or weekdays after 6 pm and before 8 am, autoclaves may be in standby
mode. To use, tap the screen and enter user name and password (this information is
on the main screen). The main cycle screen will appear. Use arrows to scroll to the
cycle you would like to use.
e) Aborting cycles
Aborting a cycle should only be used in an emergency. You can abort a cycle by
pressing abort on the screen. Please note, this stops the cycle immediately, however,
you will not be able to open the door until the pressure inside the chamber reaches 0
PSI. Due to stopping during the cycle, the pressure lowers slowly and it can take a
while, often a few hours (could be longer than your original run would have taken) to
reach 0 PSI depending on what the PSI was before aborting. This is a safety feature
that cannot be bypassed. Only press the red Emergency abort button, on the outside
of the machine, for emergencies also. This will lock the autoclave down and a service
technician will need to be called. Examples of emergencies: hearing something
exploding inside the autoclave during a run, and steam or a loud hissing coming from
the steam generator underneath the autoclave chamber.
Version 1, 2020 3111. Reference Guides 2016 Autoclave Program User Guide-University of Regina www.uregina.ca BOTANYwasteSOP2019MarFINAL-UBC Department of Botany Steris-LS250 Operator Manual Steris Operation Manual for AMSCO Lab Series Sterilizers The following are from: University of British Columbia (CA), Safety and Risk Management. Available from: https://srs.ubc.ca/ UBC Biosafety Manual 4962880 UBC Biohazard Waste Treatment and Disposal Procedure 2020 UBC Biological Spill Cleanup (BIO-SWP-001) UBC Autoclave Validation Protocol (LAB-SOP-001) UBC Chemical Spill Cleanup (UBC-RMS-OHS-SWP-17-001) UBC Hazardous Waste Manual 2014 UBC Laboratory Glass Disposal Steris AMSCO 250LS (Teaching Labs) Steris AMSCO 250 (Research Labs) Version 1, 2020 32
You can also read