Harry's GPS LapTimer DRAFT | NEEDS PROOF READING AND NEW SNAPSHOTS - Documentation v1.6
←
→
Page content transcription
If your browser does not render page correctly, please read the page content below
Harry’s GPS LapTimer
Documentation v1.6

DRAFT | NEEDS PROOF READING AND NEW SNAPSHOTS

                                                Harry’s Technologies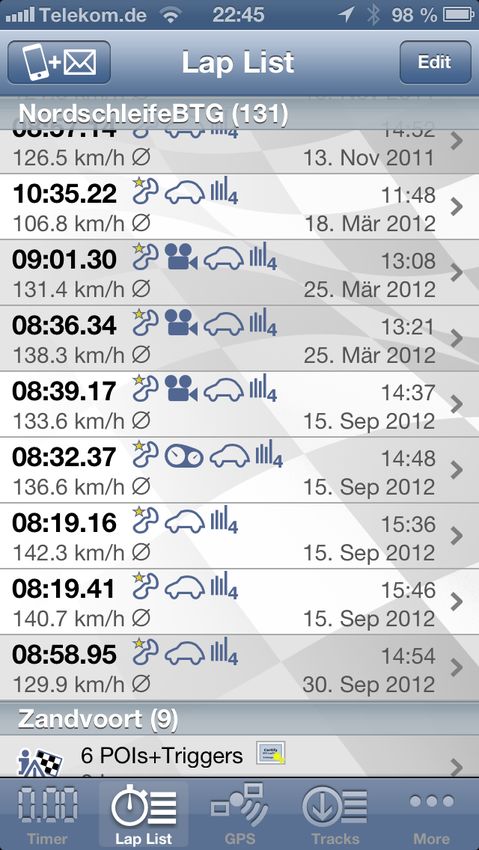
Harry’s Technologies

Scope

This paper is part of LapTimer’s documentation. It covers all available editions LapTimer comes in – both for iOS and
Android. In case functionality or wording differs, the document marks the respective sections using and Apple    or a Droid
 . For historical reasons, most snapshots are iOS pictures. However, as both apps converge over time and will show only
minor differences, pictures are not doubled in general.

For further documentation http://www.gps-laptimer.de/documentation is the first address for everything.

Harry’s GPS LapTimer Documentation                                                                                Page 1
Harry’s Technologies

Video Recording

Overview
One of the most frequently requested LapTimer features is video recording. Like many features, video recording has evolved
over time: firstly to allow users to create videos including data overlay, LapTimer version 10.4 added support to allow
recorded data to be exported to DashWare 1 and TrackVision2 desktop software. Version 11 added support for video
recording using the iPhone’s internal cam – in sync with timed laps. Version 12 was the first version that allowed recorded
data to be overlaid onto recorded video. Version 15 came with a fully reworked video recording module allowing video
recordings across single laps with various overlaying options. Version 17.0 introduced picture in picture overlays and the
ability to control multiply cams from within LapTimer (MultiCam). Besides iOS devices being remote controlled using the
dedicated MultiCam app, version 17 included experimental support for wifi connected GoPro HERO 3 cams. Version 18
introduced multi lap overlays, vehicle specific overlay gadgets, and Android   video recording and overlaying support.
Finally, version 19 added official support for both the full range of GoPro cams as well as a broad range of Sony cams and
introduced an end-to-end integration (recording to overlay) for selected models.

LapTimer video overlay has now evolved into the extremely sophisticated and powerful tool it is today. The iPhone in
particular is a very capable device for overlaying videos. Both video rendering and compression are hardware supported
placing it above of many desktop systems. Due to the tight integration with LapTimer’s knowledge of track setup and data
recordings, video overlay in LapTimer is feature rich and unique when compared to other solutions: full synchronization
between data and video without the need to adjust anything manually, augmentation of videos with track information like
points of interest, and min / max speeds achieved on straights and corners amongst others.

Video features require a device equipped with a video cam (recommended: iPhone 4S and later, or compatible Android
smartphones). The device defines the max resolution available too: SD, HD, or FullHD. Please note that video features are
not available in LapTimer’s Rookie edition. Entry level for video recording is LapTimer’s Petrolhead Edition, MultiCam features
are available in LapTimer Grand Prix edition only.

Reading this Chapter
LapTimer is designed to support “out of the box” and easy to use video recording and overlaying. Most users will never need
to dive into video timing, manual synchronization, distributed memory management and LapTimer’s more advanced settings.
This chapter is organized to give an intro into Standard Operation in the beginning, and refine topics step by step. As videos
use up a lot of space, special thought needs to be taken on this topic. Video Size and Some Thoughts on Video Recording
gives you some recommendations we found valuable when planning and performing video session. Overlaying is the ultimate
goal of video recording in LapTimer. Overlaying data generates extremely high value in terms of understanding driving tactics
making you faster. Besides this rational, LapTimer generates quite beautiful augmented footage you will find nice to keep
and share with your friends. The next section, Overlaying Options and Organization, introduces all the settings available
when overlaying data. As several of these options require background understanding in the way LapTimer organizes laps in
data recording and video, this section includes an introduction to the video timing concept and processing in LapTimer. We
recommend you fully read this section in case you need to fix broken links between data recordings, footage and when
optimizing synchronization between overlay and the raw video material. The last section we recommend you read is Maintain

1   Dashware is a product by ChaseWerks, Inc.

2   TrackVision is a trade mark of Apex Visualizations, LLC.

3   GoPro and HERO are trade marks by Woodman Labs, Inc.

Harry’s GPS LapTimer Documentation                                                                                  Page 43
Harry’s Technologies

Video Data. This section introduces video memory management on your smartphone and gives valuable hints on how to
solve issues you may run into - especially in circumstances where you recorded too much, and used up all your space.

The iOS    section Using iCloud to Have More Space Available starts the more sophisticated items. We recommend to read
this area once you have practiced regular video recording and want to get even more insights. Starting with version 17,
LapTimer includes support for iCloud enabling you to transfer footage from one device to another. As a positive side effect,
iCloud can be used to unload videos to the cloud you are not currently using. While all linking between laps and videos stays
untouched, you can make local space available using this feature. For Android         devices, SD card handling is covered in
section Maintain Video Data. One of the really exciting new video features for advanced users is the support of picture in
picture videos, which is outlined in the section, Working with Multiple Videos. While this mode is typically used when
recording with multiple cameras (MultiCam), it is a versatile feature of LapTimer’s overlaying engine: you can add any number
of videos to a lap and arrange them in any order you like. Even without handling videos individually, LapTimer has an
extremely helpful feature by adding a reference video as picture in picture video to your overlay, which is aligned by sector.
While Working with Multiple Videos is about arranging existing videos, the next section MultiCam - Controlling Multiple Video
Cams at a Time introduces a unique feature in today’s smartphone world: using MultiCam – a companion app for LapTimer
– LapTimer takes control of several satellite cams installed inside and outside of your car. Using MultiCam, LapTimer will fully
automate synchronized video recording across smartphone and external cams. In addition, an overview on LapTimer’s
integration of GoPro HERO and Sony cams is given. Like reference videos, this is a LapTimer GrandPrix feature.

Finally two special sections to finish this chapter. Fighting Device Overheating goes towards addressing the issue whilst
video recording: video recording at high resolutions burns a lot of energy. Adding this to wifi operation, a bright screen, and
the powerful LapTimer engine, generates probably one of the most demanding scenarios for an iPhone. We offer some
useful tips to help solve this problem. External Overlaying and Overlaying External Sources ends this chapter: in early
versions of LapTimer it was necessary to use 3rd party programs to overlay data recorded onto video with software like
Dashware and TrackVision. However current versions have evolved to enable you to do this directly on the smartphone using
LapTimer. Nevertheless, in case you want to use an external overlayer, this section gives you a how-to. This section is good
for the other direction too: LapTimer can be used to overlay footage recorded externally too!

Standard Mode Operation
Using LapTimer, recording videos is a simple task. In any of the Timer Views, press the Video button and mount the device
in landscape orientation. As always, LapTimer will automatically start lap timing when a trigger is passed. As long as the
Video View is active, it will record a video in addition to the timing. This allows the overlay of data recordings at a later date.
LapTimer memorizes the relationship between the video and the data recordings. This relationship can be seen later in the
Lap List. We will see more details on this important relationship later.

Harry’s GPS LapTimer Documentation                                                                                       Page 44
Harry’s Technologies

                                                          Video View

The picture above is an example of the Video View and includes overlaid data and several buttons which control the video
recording functions. LapTimer has been designed so that the driver does not need to touch the screen at all while driving.
LapTimer is fully automated and “hands free” when it is set to record and is waiting to be triggered.

Background Video Recording
Should you not want to see real-time video whilst driving, LapTimer can continue to record video in the background while it
is displaying real-time data on the screen, in the foreground. There are several modes of operation:

   • Standard Mode Operation: The Video View is active. Passing the start / finish line will start recording video
      automatically in addition to recording data. Optionally, you can start recording video manually by pressing the small
      button in the top left of the screen (There is an option in LapTimer Settings that turns on manual recording. If you set
      this setting to ON then you will see a large Record Now button instead).

   • Background Mode Operation (iOS             only): This mode is active when you press the Record Auto button displayed
      in the Video View. Even though the view through the camera is not being displayed on the screen the video engine is
      active in the background and video will be recorded when triggered by passing the start / finish line. To stop
      background video operation, just return to the Video View later and close it using the close button in the top right.

   • Mixed Mode Operation: LapTimer tries to anticipate your requirements so, for example, you start to record video
      manually and close the Video View then LapTimer will continue to record video in the background.

The current mode of operation is displayed in LapTimer Status which is at the top of each timer view. The video icon can
appear in one of three forms:

   • A grayed-out icon with a red cross means that video recording is not active.

   • A white icon signifies that recording will start when triggered either manually or automatically.

   • A white icon with a red dot means that a video recording is being made at that very moment.

Video Size and Some Thoughts on Video Recording
Today's smartphones come with impressive memory sizes... Nonetheless, recording videos in HD or even FullHD quality will
fill up any space very fast. Memory used for videos depends on the so called bit rate - the number of bits available per
second to hold the visual representation of a video. For a HD video, the typical bit rate is 10.5 Mbit/s. Add some additional
space for audio and we are at approximately 80MB/min. For FullHD videos – supported by the iPhone4S, iPad3, and later,
as well as modern Android devices – a typical bit rate is 24 Mbit/s, summing up to approximately 190MB/min. Or the other
way around: 1GB of free memory gives you 12 minutes of HD or 5 minutes of Full HD.

For Android    similar bit rates are used for raw recordings. For overlaid videos not H.264 encoding, but the less effective
MPEG4/SP encoding is used resulting in approximately double the bit rates and sizes named.

Not only because of this limitation but also factors mentioned earlier, therefore it is our recommendation that you do not
record video all of the time. You miss a lot of fun and track focus when fiddling around with video. So my suggestion is to
train the first half of a track day using standard data/time recording and then video record a trained session only. This gives
you plenty of opportunity for a great video.

Harry’s GPS LapTimer Documentation                                                                                     Page 45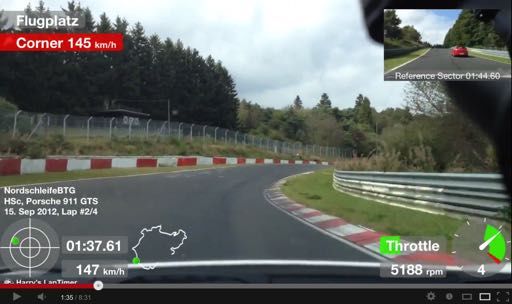
Harry’s Technologies

                              In case you video record using LapTimer, make sure you have an eye on available
                              storage (check remaining minutes in shown in Video View). Adopt video resolution
                                        selection and sections recorded to the storage you have available!

Here is an overview on video sizes available (select in LapTimer ‣ Administration ‣ Settings ‣ Video ‣ Resolution) and some
recommendation:

   • 192x144 - Low, 3G: included to cover special situations (e.g. long term recording); overlay not supported; can be used
      as picture in picture video in case the master video is SD only (see Working with Multiple Videos)

   • 480x360 - Medium, Wifi: included to allow recording of picture in picture videos applied to HD (and Full HD) master
      videos; overlay not supported

   • 640x480 - VGA: SD video, best resolution available on 3GS iPhones and very old Android devices (both are not
      supported any more); SD optimized overlay available; best choice for picture in picture videos applied to HD and
      FullHD master videos

   • 1280x720 - 720p HD: HD video, best resolution available on iPhone4 and early supported Android devices; best
      choice in terms of memory / quality balance; well suited as master video; HD optimized overlay available; requires 80
      MB/minute

   • Best Available - High: for almost all recent smartphones, this will be Full HD (1080); Full HD optimized overlay available;
      Full HD is the best quality available in LapTimer, requires considerable space (190 MB/minute) and overlay processing
      time

Overlaying
Although LapTimer shows the video including some overlays in real time (kind of a “preview”), a smartphone’s hardware is
not yet powerful enough to add this overlay to the video stream while recording. This is the reason you find a “raw” video
linked to your laps when you come back to the pits. To get a nice overlaid video, you need to add the overlay from Lap
Details. This process will combine all kinds of data recording with the raw video. For iOS   , the result is stored in your
iPhone‘s Photo Library (or LapTimer Recordings area in case access is not granted). For Android       , it is stored on the
phones external SD card (if available). They can be accessed from within LapTimer and from the other apps available on the
device (Photo library   , Gallery app    ).

                                  Overlaid Video (www.youtube.com/watch?v=bviIV7SnU7k)

Harry’s GPS LapTimer Documentation                                                                                    Page 46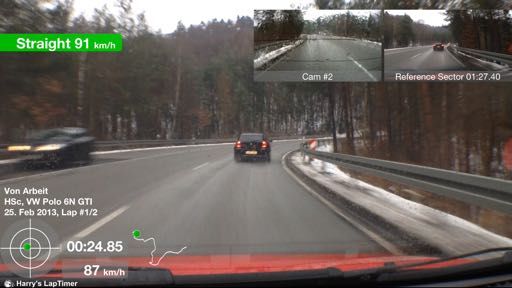
Harry’s Technologies
The example above has been recorded using an iPhone4S (and a KiwiWifi OBD II dongle). It features additions from
LapTimer v15 like intro and outro time, POI and speed inserts, as well as a reference video introduced in LapTimer v17.
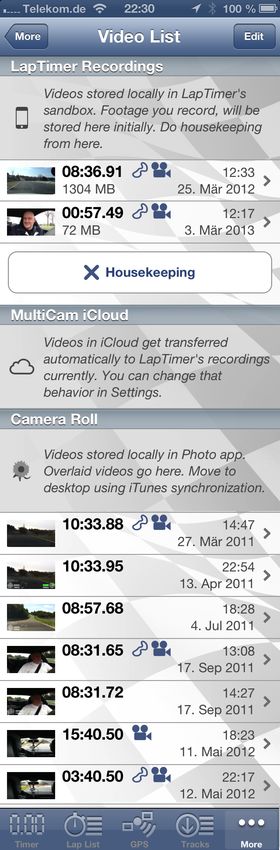
To the left, you see the Lap List,
representing all of LapTimer‘s data
recording. Laps recorded including a
video are shown with either a small
camera, or a dashboard icon. Several
of the laps recorded for the track
“Nordschleife BTG” have a video
associated with it. The lap timed at
08:32.37 shows the associated video
is already overlaid (dashboard icon), all
others have a raw video associated
requiring a later overlay.
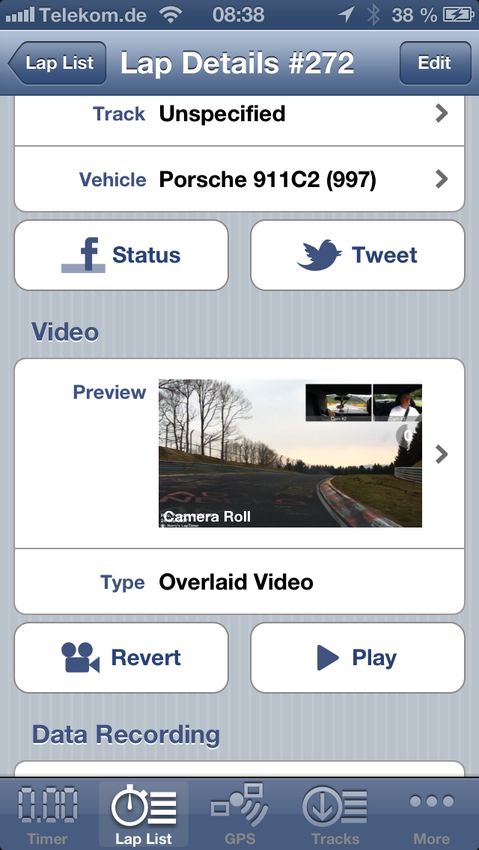
We select the lap timed 08:39.17 now (see right snapshot above). The Video section shows the raw videos associated (in
this case one master and two Picture in Picture videos – we come to this later). Buttons below this videos offer actions
applied to the videos, in this case Overlay to apply an overlay to the raw videos.
To understand the complete workflow, we create a video by pressing this Overlay button:
In a first step, the scope of the overlay is selected. By default, LapTimer will overlay the lap selected to the video. In case you
want to generate a multi lap overlay, extend the scope of laps to the left and right by tapping the left and rightmost lap you
want to be part of the result. Laps offered for overlay need to be consecutive and need to be covered by a common session
video.
Harry’s GPS LapTimer Documentation Page 47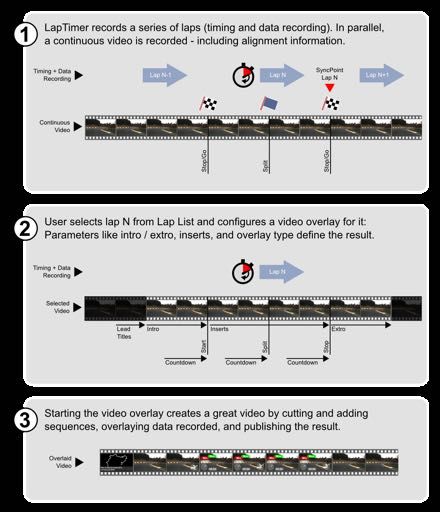
Harry’s Technologies

In a second step, you select various options for overlay creation. We will come back to this in a minute. Once you have
selected your options and press the red Overlay button, overlaying starts. The time required for the overlaying process will
depend on your hardware, the master video’s resolution, features added (picture in picture), and the the availability of
hardware accelerated encoding. It can range from half the time of the video duration up to a factor of 20.

Once the overlay is created, the overlaid video is passed to the Photo library / SD card – and associated with the lap. The
original links to the raw videos are retained - as long you do not delete the raw video, you can revert to this raw state later. At
this point you can see the buttons below the video have changed. As an overlay has been applied already, LapTimer offers
Revert and Play now.

Overlaying Options and Organization
The process behind is a bit more complicated. Looking into the diagram below, we have actually 3 steps to create a video:

       1.   Recording a video covering one or more laps recorded in parallel

       2.   Configuring the overlay and the relationship between the data recording and the video

       3.   Extracting the relevant section from the video, adding data recording, and storing the result

                                                  Lap / Video Synchronization

Harry’s GPS LapTimer Documentation                                                                                     Page 48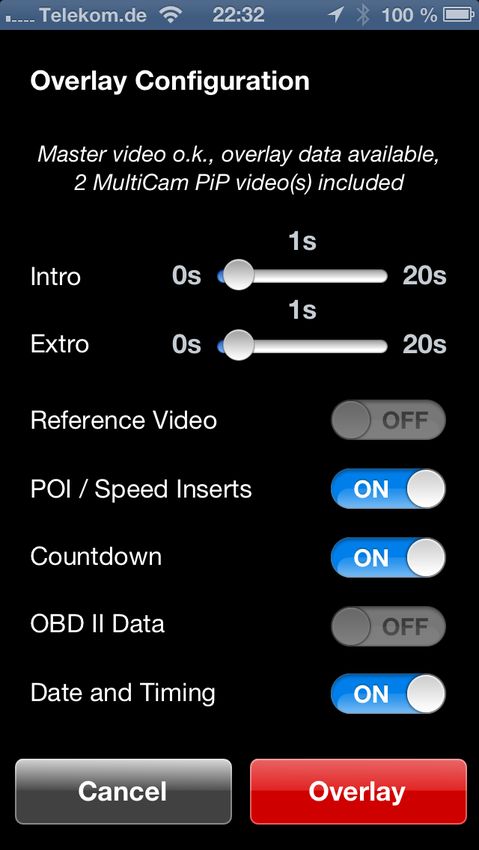
Harry’s Technologies

Some notes on the various elements of configuration:

Without Intro and Outro, the overlaid video will have the length of the lap recorded. You can expand the range shown by
adding intro and outro time. This option is only available, if footage has been recorded ahead and behind the respective lap.
The Intro and Outro sections will show some basic information on the lap, but no acceleration, time, and other data.

Reference Video will add a picture in picture video of the reference lap in case it is selected. Availability of this switch
depends on the LapTimer Edition (GrandPrix required), a reference lap set, and the availability of the video for the reference
lap. For more details on reference videos, please read Working with Multiple Videos.

The POI and Speed Inserts are generated from existing information. POI information is usually received by downloading a
track set. A minimal track set, with only one Stop/Go trigger, will have pretty poor inserts. A well prepared track set -
including a Stop/Go trigger, several splits, and an Information POI for every corner generate great videos. Please read the
Tracks chapter on track set creation and continuous improvement.

Countdown selects whether the overlaid video will show count downs ahead of splits and full laps, as well as the display of
the final split and lap times.

GPS Speed overrides the speed source used for speed displays and corner and straight speeds calculated. By default,
LapTimer will use OBD (wheel) speed if available and fall back to GPS speed otherwise. In case you have both speeds
available but want to force LapTimer to use GPS speed, check this switch.

Date and Timing is to remove or add any timing information for the overlay. Date and time include both the display of the
lap’s date and time, and lap / split times. Usually you will have this selected, but there are situations you may prefer to not
show how fast you have been and when!

In case your recordings include engine information, there is an option to customize the appearance of the engine gauges in
the bottom right of the screen (OBD II Gadget). None will remove any engine data, Standard will show one gauge (rpm,
throttle, gear) and Extended will add another gauge showing power, temperatures, and fuel level. The extended setting is
part of the LapTimer GrandPrix feature set only.

Adding Intro / Outro Footage
LapTimer has a quite sophisticated mechanism to start / stop video recording automatically on the one side, and allow
additional recording for intro and outro frames on the other:

In standard operation, LapTimer starts video recording when a Go trigger is passed. Passing a Stop/Go trigger later will stop
current lap timing and start the next one. Video recording will simply be continued in this scenario. Assuming you leave the
track after the second lap, you will have two laps recorded associating the same (long) video using two different sync points.
Passing a Stop trigger will stop video recording too in this scenario.

In manual operation, you start a recording using the small red button located in the top left of the Video View. Triggers
passed will add sync points as above. But take care: video recording needs to be stopped manually in this scenario. Even a
Stop trigger will not change the video recording status! In the example above (Nordschleife video), manual operation has
been used: we started video recording when leaving the pits, ran one lap (LapTimer started timing automatically at the
Bridge), and manually stopped video recording a few seconds after LapTimer had stopped lap timing at the finishing gate.

Harry’s GPS LapTimer Documentation                                                                                       Page 49
Harry’s Technologies

Maintaining Video Data
LapTimer features a flexible schema of places to store videos to and retrieve videos from.
Places are defined by a physical location and availability differs a lot for the Apple and
Android platforms. Nevertheless, they share some common characteristics we want to
start with:

    • Physical location: can be a directory on the smartphone, a SD card, a cloud, an
         external cam, or a repository of media; while the physical location is mostly visible
         on Android, it is usually replaced by a logic container (like Camera Roll) for iOS

    • Access from smartphone: some places allow writing videos to, some allow moving
         videos, all allow reading videos, and some allow deletion of footage

    • Access from other devices: a place can be accessible by LapTimer only, or it can be
         managed from other devices and apps in addition

    • Default location: there is always a default location for videos recorded, and a default
         location for videos generated; for Android this places are the same while for iOS
         they are usually different

Before entering a platform specific discussion of places available and how to handle them,
have a look into the Video List to the right. For both iOS       and Android    , this list is made
up from sections representing one place each. The section title is a short description
followed by some core characteristics of the place. The rest of the section is made up
from the list of videos available in this place–including some characteristics shown by
icons.

Icons shown are similar to those you will know from Lap List. The cam symbol             means
the video is a raw or original video (i.e. a video without overlay). The small dash icon
means the video is an overlaid video, a small track symbol          means the video is linked by
a lap from Lap List and either the result of an overlay, or the source for an overlay. In case
a video is not linked by any lap and the place it is sitting in allows video deletion, a red exclamation mark is displayed to
signal “this is a candidate for housekeeping”.

As videos require a lot of memory, you need to take care when using it. Videos overlaid can be removed from the mobile
device once they are copied to the desktop. Pressing the Housekeeping button will purge all videos not associated with a
lap at once. Other videos are deleted by applying the platform specific deletion gestures (Edit button + Delete for iOS         , and
long press + Trash for Android        ) line by line. Please take care with this function, a video deleted is lost and can no longer be
recovered.

iOS Video Places
LapTimer Recordings is a media directory part of the LapTimer app’s sandbox. Although this directory is considered private,
it can be accessed from your desktop using iTunes File Sharing (iTunes ‣ iPhone ‣ Apps ‣ File Sharing ‣ Apps/LapTimer ‣
Documents). The directory may be used for other resources too, so please take care you access .mov and .mp4 files only.
LapTimer Recordings is the default location for all video recordings. Videos included can be deleted and moved. The
physical location is on the local device and part of the well known storage 16GB, 32GB, 64GB, 128GB common to all iOS
devices.

Harry’s GPS LapTimer Documentation                                                                                         Page 50
Harry’s Technologies
Camera Roll is a synonym for iOS’s Photo Library. Videos stored here can be accessed both from within LapTimer and the
Photo app. While videos stored in Camera Roll can be deleted and distributed from the Photo app, it is used by LapTimer as
the default location for overlaid videos only. Once they are transferred to the library, LapTimer’s access is limited to playing
the video. In case the user does not grant LapTimer permission to access Photo Library, the default location for overlaid
videos is LapTimer Recordings.
MultiCam iCloud is shared storage accessible by all LapTimer and MultiCam apps. Use and handling of this place is
described in details in Using iCloud to Have More Space Available.
GoPro HERO4 (and other cams) is a remote place sitting on your external cam’s SD card. For some action cam models,
videos can be accessed from LapTimer’s Video List directly–e.g. to download them for overlay. Availability of a video list
depends both in the cam type, and the current cam connection status. As long as you see a spinning indicator, LapTimer
searches for a cam actively.
Android Video Places
SD Card (both emulated and real) is the most common place to store video on Android. There are usually a number of SD
card places available to store videos on. Depending on the Android version both directories considered public (like /Movies)
and considered private (like .../com.harrys.laptimer/files/Movies) will be available. For smartphones with an external SD card
slot, you will see corresponding SD card directories on top of emulated ones. Emulated SD cards are just internal storage–
with a strange name.
The default SD Card place is always the one shown in the top of Video List. It is selected by checking memory available and
selecting the one offering most. Important: the decision is made when LapTimer is started. So in case things change (SD
card attached / detached, or files moved around), you may want to restart LapTimer to make a new decision.
SD Card places can be accessed from your desktop too. There are basically two options: either you mount your smartphone
using an USB adapter, or you detach the SD card from the smartphone and plug it into a slot available on your computer.
The later is usually faster and gives you full access to all files, while the former is probably more convenient (and model
specific). When mounting your smartphone, the list of files accessible may be filtered. So if you are missing something–or
have problems locating a directory, try the other approach. The physical address on the SD card can be derived from the
directory name given in Video List’s section headers.
GoPro HERO4 (and other cams) is a remote place sitting on your external cam’s SD card. For some action cam models,
videos can be accessed from LapTimer’s Video List directly–e.g. to download them for overlay. Availability of a video list
depends both in the cam type, and the current cam connection status. As long as you see a spinning indicator, LapTimer
searches for a cam actively.
Associations between laps and videos are stored using the filename of the video for
Android, not the full path. This means LapTimer will find a video in any of the SD
Card places, even after moving it around.
Using iCloud to Have More Space Available
LapTimer v17 added support for Apple’s iCloud. iCloud both provides automatic synchronization between local copies of a
video and a remote version, as well as providing additional storage to the user. While an initial 5 GB of space is available for
free, contingents up to 50 GB are available on a paid basis.
Harry’s GPS LapTimer Documentation Page 51Harry’s Technologies
Both services provided by iCloud are used by LapTimer – but in different scenarios. While synchronization is used to transfer
footage from MultiCam devices to LapTimer devices (covered in MultiCam - Controlling Multiple Video Cams at a Time), this
section covers the use of external storage to free up (on device) space.
Using iCloud, the place a video is stored becomes virtualized. This means LapTimer can hold a link to a video and does not
need to differentiate if that video is stored locally, or remote. LapTimer utilizes this mechanism by allowing the user to decide
if a local copy of the video is kept, or if we are fine with the cloud stored version as we do not access it currently.
The following step by step descriptions cover several scenarios:
A. Storing a video in iCloud (instead of LapTimer Recordings)
B. Deciding whether a local copy of an iCloud stored video is kept or not
C. Transferring an iCloud stored video back to local storage
D. Deleting an iCloud stored video
To store a video in iCloud (A.), follow the steps below:
1. Navigate to Video List, and scroll to the LapTimer Recordings section
2. Select the video you want to be stored in iCloud
3. Scroll down to the bottom of the Video Details view
4. Press the button
5. Back in Video List, the video will be listed in the MultiCam iCloud section
To decide to have a video stored remotely only (actually the memory saving scenario), or both locally and remote (B.):
1. Navigate to Video List and scroll to the MultiCam iCloud section
2. Select the video you want to be stored remotely only (or both locally and remotely)
3. Scroll down to the bottom of the Video Details view
4. Press the button (or )
5. Back in Video List, the video will be shown as OFFLINE
To transfer a video back to our local recordings area (i. e. removing it from the cloud) (C.), follow these steps:
1. Navigate to Video List and scroll to the MultiCam iCloud section
2. Select the video you want to be stored locally only
3. Scroll down to the bottom of the Video Details view
4. Press the button
5. Back in Video List, the video will be listed in the LapTimer Recordings section
To delete a video stored in iCloud (D.) you perform the same step as for deleting any local video: just navigate to the video
and press Delete. NB: other than deleting a local copy, this will delete the remote video representation too. In addition, if
more than one LapTimer/MultiCam instances have used this video, these local videos are deleted too.
Harry’s GPS LapTimer Documentation Page 52Harry’s Technologies
All iCloud operations take place asynchronously and while being connected to a wifi
only. There is no guarantee the operation (like downloading a remote video locally)
will be performed within a certain time frame. So please be patient...
Working with Multiple Videos
Starting with LapTimer version 17, picture in picture videos are supported for video overlay. The concept is simple: instead of
linking one video to a lap, you add several videos. The user interface to accomplish this is straight forward: navigate from
Lap List to the lap’s details view first. For iOS , change to edit mode by pressing the Edit button. Now, you can add videos
using the button, you can remove videos using the button, or you can reorder the videos using the reorder controls .
For Android , press to add a video and long-press a video row to remove that item or move it up or down in the list of
videos. But what does the order mean for videos? The first video in order is always the master video - the one everything
else is overlaid to. All other videos are Picture in Picture videos, i.e. video that gets “slid” into the master video, displaying
additional perspectives. The order of picture in picture videos is the preferred order they are “slid” in.
Picture in picture videos can come from several sources including external cams (see External Overlaying and Overlaying
External Sources), videos recorded in sync using MultiCam (see next section), or reference videos:
Reference videos are a unique feature available in LapTimer Grand Prix edition. They allow a visual side by side comparison
of the lap overlaid, and the video associated to the reference lap selected (reference laps are introduced in the Racer’s View
description). In case you have selected the Best Lap as the reference lap, you will see the best lap’s video footage in your
overlaid video – making it extremely convenient to understand were you had lost or gained time.
The reference video is inserted into the master video just like other picture in picture videos are. Besides similarities there are
some differences too:
1. Selecting the reference video is done by selecting the reference lap (it certainly needs to have a video linked). So
please do not add the reference laps video manually. In many cases, you will not need to do anything, as the
reference lap is set automatically.
2. The reference video is not shown continuously, but is realigned to each sector’s start: you will see a slide in /
slide out during each sector count down. Aligning the reference video for each sector separately, gives you more
positions on track you can start comparing the videos at the same position.
3. Inclusion of a reference video can be de-selected in Overlay Options (introduced above).
The snapshot below shows a video with both an additional cam to the rear, and a reference video. The reference video
comes with a caption showing the sector time of the reference lap.
Harry’s GPS LapTimer Documentation Page 53Harry’s Technologies
Video with Rear Cam (Cam #2), and Reference Video
Picture in picture videos come at the price of additional overlaying time (+50% per
additions picture in picture video). We recommend to insert reference videos only for
analysis, not for videos showing the drive to others.
MultiCam - Controlling Multiple Cams at a Time
In the section Working with Multiple Videos we have seen how multiple videos can be combined to one rich overlaid video
using picture in picture technology. For those having used desktop software to overlay and combine their footage in the past,
this process is familiar - but not particularly convenient.
MultiCam is the technology LapTimer uses to prepare multiple video for this after the fact combination process – right from
the beginning. Besides aligning master and satellite footage with data recordings automatically, it makes controlling complex
cam scenarios very convenient too.
MultiCam satellites can be either external action cams, or iPhones running the free
companion app “MultiCam”. While the former are supported for both Android and
iOS , the later is an iOS only feature.
MultiCam Sample Scenario
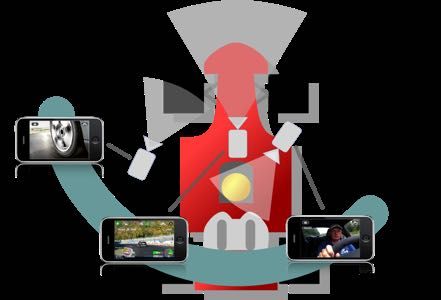
Let’s have a look into the following scenario to understand how the recording process can look like: we want to run some
timed laps using a racing car. In addition to automatic lap timing and data recording, we want to record footage showing
several perspectives including the track ahead, the driver, and some front wheel dynamics. To accomplish this, we have
three iOS devices available (for Android , please check Using External Action Cams as MultiCams below; keep reading
here as this section outlines the idea of MultiCam). The so called master device – the device LapTimer is running on – is
mounted to our windscreen and video records the track ahead. It is the device we use for data recording and lap timing too.
We have a second device mounted to the windscreen on the co-pilot’s side – pointing to the driver including the steering
wheel. Finally, we have mounted another iPhone to the pilot’s door from the outside – focusing the left front wheel.
The picture below shows our scenario:
Harry’s GPS LapTimer Documentation Page 54Harry’s Technologies
Typical MultiCam scenario
In addition to Harry’s LapTimer Grand Prix on the master device, we have started a free companion app named Harry’s
MultiCam on both satellite devices. What else do we need to do to start our session? Actually you will follow the same steps
you perform when using LapTimer stand alone: just switch to the video view and drive!
So what steps do we perform for a recording? Once you switch to the Video View in LapTimer, it will check if it finds
MultiCam devices around. This connection is done using Bluetooth, so no configuration is necessary, it is plug & play – but
without the need to plug. Once LapTimer detects any MultiCam device, it will send a command to it to switch to Video View.
It will ask it to select a video preset you can change from within LapTimer, and it will ask it to send a video live stream to
check the field of view set. So in our scenario the driver sitting in his / her seat would see the Video View showing the master
video, real time data recording using LapTimer’s overlay preview, and two picture in picture videos named Cam #2 and
Cam#3 as life previews.
Next, we leave the pits and enter the track. We perform the entry lap and approach the start / finish line the first time. Once
LapTimer detects the line has been crossed, it starts timing, data recording, starts video recording for the master video, and
video recording for the two satellites – no touch. It is just like standard operation.
While recording data, LapTimer will turn off any live video stream to allow Bluetooth
sensors to use the full bandwidth. To allow the driver to see the connection status, it
will present picture in picture placeholders for each MultiCam connected.
So let’s finish the session – we have returned to the pits and we stop the final, incomplete lap pressing the Cancel button in
LapTimer’s Video View. Again, this will stop video recording on the master, and for both satellites. In addition, it will void the
last incomplete lap like usual.
Now, we leave Video View and return to Lap List. To save energy, LapTimer will close both Satellite Video Views too. In the
event that connections are not used to MultiCam for a period of time, they will be closed for the same reason. In our
scenario, we have some need to use the open connections: we have entered Lap List in LapTimer and navigate to one of
the laps just recorded. Lap Details for this lap will show three videos: the master video marked LapTimer Recordings, and
two picture in picture videos marked with the MultiCam device’s name (e.g. Harry’s iPhone6 Recordings).
Harry’s GPS LapTimer Documentation Page 55Harry’s Technologies
Picture in picture videos shown in Lap Details may reside in any of the supported
storage areas – including a MultiCam device connected.
Preparing iOS MultiCam Devices for Recording
Every additional device integration added to LapTimer introduces potential pitfalls. This section outlines the conditions for
successful MultiCam device connections using iOS devices.
1. You need to have Harry's LapTimer Grand Prix Edition installed on your "Master" iPhone; in case you run either
the Rookie or the Petrolhead Editions, please upgrade from within LapTimer first
2. Install the free Harry's MultiCam app from AppStore to any iOS device you have available
3. Both devices - master and satellite(s) - need to have Bluetooth active: iOS ‣ Settings ‣ Bluetooth ‣ ON
4. In LapTimer, make sure you have MultiCam operation enabled: LapTimer ‣ Administration ‣ Settings ‣ MultiCam
Control ‣ Discover MultiCams ‣ ON; to save energy, the default for this setting is OFF
5. Start the MultiCam app on the satellite device (no need to change a view here)
To test the connection, switch to the Video View within LapTimer - you should see the gray little cam in the status bar turning
white; in addition, you should see communication going on between master and satellite shown by small green and blue
indicators; the MultiCam app will change to Video View automatically – you are ready to record. You will see a small life
stream view for the MultiCam device in LapTimer to check the field of view.
Transferring Video from MultiCam Devices
Although we see a preview of the picture in picture videos in Lap Details, we cannot use the footage to overlay it yet.
LapTimer requires all videos being used in an overlay to be stored locally. So before we can enjoy the multi video result, we
need to transfer the footage to the master device.
MultiCam Processing
LapTimer’s current implementation uses iCloud to transfer footage from MultiCam to LapTimer. As outlined in section Using
iCloud to Have More Space Available, this process requires a wifi connection to work (Bluetooth is too slow, and mobile data
will be too expensive) and will be performed asynchronously. The overall workflow is shown in the picture above.
Harry’s GPS LapTimer Documentation Page 56Harry’s Technologies
The standard behavior of MultiCam is to move footage stored locally to the MultiCam iCloud (MultiCam ‣ Settings ‣ Auto
Send Videos). Once the video is uploaded to the cloud, LapTimer will detect that a new video appeared in the cloud and will
transfer it to its local storage area (LapTimer ‣ Settings ‣ iCloud ‣ Auto Receive Videos). This means as long as the settings
are not changed, videos recorded in MultiCam will arrive in LapTimer for overlay – some time later...
Troubleshooting Video Transfer Through iCloud
In case MultiCam footage does not arrive in your LapTimer app, please check the following items:
1. Both the MultiCam and the LapTimer iPhones need to be logged in to iCloud (iOS ‣ Settings ‣ iCloud)
2. Make sure you have enabled iCloud and auto transfer to iCloud in MultiCam (both MultiCam ‣ Settings ‣ Use
iCloud and MultiCam ‣ Settings ‣ Auto Send Videos need to be in position ON)
3. Make sure you have enabled iCloud and auto receive videos in LapTimer (both LapTimer ‣ Administration ‣
Settings ‣ Use iCloud and LapTimer ‣ Administration ‣ Settings ‣ iCloud ‣ Auto Receive Videos need to be in
position ON)
4. Verify iCloud access works (LapTimer ‣ Analyze ‣ Video List ‣ MultiCam iCloud shows positive status)
5. Make sure both devices are connected to the Internet using a wifi connection (iCloud does not replicate while in
a cellular networks only - that’s at least the default)
In case all of the above steps are o.k., you need to wait up to an hour for iCloud to transfer the videos in background.
MultiCam Video Preset
As mentioned in our MultiCam scenario, LapTimer can be used to control the video preset not only for its own video
recordings (LapTimer ‣ Administration ‣ Settings ‣ Video ‣ Resolution), but for MultiCam too. The setting can be found in
LapTimer ‣ Administration ‣ Settings ‣ MultiCam Control ‣ MultiCam Preset. The reason we have added this setting is it
allows the user to optimize memory and energy usage, and transfer size of footage recorded. As an example, if you know
you will use the front wheel footage from our sample scenario as a picture in picture video only (i.e. not as a master video), it
makes sense to record it in single density from the beginning. There are three settings available: Picture in Picture optimized
video settings for later use as a picture in picture video, Master will set the video to allow a later use as a master video, and
None does not change the video settings selected in MultiCam itself. Use the last setting value in case you want to set an
individual video preset in MultiCam or the external cam itself.
Besides selecting the resolution, this settings defines the role of a video recorded too. So if you select Picture in Picture for
the MultiCam device, it will be added as PiP to lap associations. Otherwise it will be the master video.
Using External Action Cams as MultiCams
At the time of writing, LapTimer supports GoPro’s HERO3, 3+ and 4 cams as well as a variety of Sony cams. To check the
latest status, please visit http://www.gps-laptimer.de/Compatibility.html. Not all action cams come with the same set of
integration features, this will be detailed below. Support is the same for iOS and Android. We got reports by users the
HERO2 plus BacPac works too, but it is not a supported configuration.
Preparing External Cams for Recording
Before we go into the section on recording with an external cam, here are the steps you need to perform to connect your
smartphone:
1. Make sure you have a compatible action cam available (see above).
2. Make sure you have the latest firmware for your action cam installed.
Harry’s GPS LapTimer Documentation Page 57Harry’s Technologies
3. Make sure you have set the correct Wi-Fi mode for the action cam. Action cams often with two modes of
control: some proprietary remote controls and a Wi-Fi based app communication. Select the later.
4. Turn on Wi-Fi operation for the action cam.
5. Connect your smartphone to the action cam Wi-Fi. This step is performed in iOS / Android Wi-Fi settings.
6. In LapTimer, make sure you have MultiCam operation enabled: LapTimer ‣ Administration ‣ Settings ‣ MultiCam
Control ‣ Discover MultiCams ‣ ON.
7. Select the correct external cam type from LapTimer ‣ Administration ‣ Settings ‣ MultiCam Control ‣ External
Cam.
8. In case you use a HERO3 or 3+, please enter your GoPro Wi-Fi password in MultiCam Control ‣ HERO3/3+ Wifii
Password; this is necessary as every command sent to the HERO3 series requires this password - no good
practice from my point of view and obsolete for the HERO4.
9. While the HERO3 and 3+ can be woken up by Wi-FI (so only Wi-Fi operation needs to be turned on), the
HERO4 and Sony cams need to be turned on manually.
10. Finally, in case you want to use the action cam recorded video as the master video later, make sure you setup
resolution to one of the presets supported by LapTimer: 640x480 (SD), 1280x720 (HD), or 1920x1080 (FullHD) It
is possible to select other resolutions, but this may lead to cropped or misaligned overlays later.
To test connection, switch to the Video View within LapTimer - you should see the gray little cam in the status bar turning
white; in addition, you should see communication going on between Master and Satellite shown by small green and blue
indicators; for the HERO3/3+ the cam will beep and turn the cam on - you are ready to record. Please note that instead of
getting a live view, the action cams will be shown as model specific placeholders with blinking LEDs.
In case this does not work, please try the action cam’s manufacturer’s app available
for free on the net. They use the same mechanism. The most frequent issue seen for
the HERO3 / 3+ series is a password mismatch between action cam configuration
and LapTimer setting.
Connecting to HERO4 cams and keeping the connection can be tricky. Even if the
HERO4 signals it has WiFi on, it may be in sleep mode to safe power. To reconnect,
please turn off WiFi for the cam and turn it on again. Do not forget to join your
smartphone to the WiFi again afterwards!
Features Available by Action Cam
Actually we would like to provide the same service level for external action cams we have available for iOS devices (MultiCam
app). For some cams this level of support has been achieved since LapTimer v19, for others we miss full support by the API
provided by manufacturers and want to give advice how to substitute missing features by manual steps.
The table below shows all features desired (in order of video recording / overlaying process) and the current level of cam
support provided:
Feature HERO 3/3+ HERO 4 Sony Cams
Wake up on Wi-Fi supported turn on manually n/a
Video presets applied supported supported supported
Harry’s GPS LapTimer Documentation Page 58Harry’s Technologies
Feature HERO 3/3+ HERO 4 Sony Cams
Life Preview(*) supported not supported supported
Automatic recording supported supported supported
Automatic lap / video synch supported supported supported
Browsing videos on cam not supported(*) supported not yet supported
Automatic transfer to phone not supported(*) supported not yet supported
Automatic lap association use Re-Link supported use Re-Link
Overlaying supported supported supported
Some comments on the above items: “Life Preview” is available in our Harry’s Camper app only, it is not supported in
LapTimer yet. “Browsing videos on cam” and “Automatic transfer to phone” are not yet implemented for Sony cams but may
follow in a later version. Support for this features is disabled for HERO 3/3+ cams as we found the integration to be not
reliable. You can enable this feature in LapTimer’s Expert Settings, but we cannot support issues you run into. “Automatic lap
association” is the process to identify videos transferred from an action cam to be the ones recorded for a session of laps.
For cams not supporting this feature, LapTimer provides an easy manual step as a workaround (see below).
Transfer Footage from Action Cam to Smartphone
In case your cam supports automatic transfer to the smartphone, things are comparably easy:
• Connect the cam and the smartphone like discussed for MultiCam recording
• Switch to LapTimer ‣ Analysis ‣ Video List and scroll to the External Cam section (name depends on cam type, see
above).
• Wait until the spinner has stopped and videos appear. This process will take some time depending on the cam
processing power. Wait for the time necessary.
• Select the video you want to transfer. In case your cam supports “Automatic lap association”, you will see the list of
laps referencing this video in the bottom of Video Details.
• Press Download (button in the bottom of Video Details for iOS , image button in the top right for Android ) to start
the download from action cam to smartphone.
The download will be performed in background. You can return to Video Details and check the Location row to see the
status of download. It will be either Remote, Downloading x%, or Downloaded/Local. There are slight changes how
background downloads work for iOS and Android: for iOS, the download will take place independent whether LapTimer is
active, inactive, or not in memory at all. For Android, the app needs to run either in foreground or background. In case it is
killed from some reason, the download needs to be restarted. Needless to say, the cam needs to stay turned on and
connected until the video has arrived.
Once the video is downloaded, it is available for overlays from Lap List in case “Automatic lap association” is supported by
your action cam. In case this feature is not supported, please continue with reading Associate Video Transferred with Laps.
In case your cam does not support automatic transfer, you need to copy videos manually:
• Start by either mounting the action cam to a desktop computer (so you can access the SD card from Finder /
Explorer), or unplug the SD card from the cam and plug it into your desktop’s SD card slot (if available).
Harry’s GPS LapTimer Documentation Page 59Harry’s Technologies
• For iOS , start iTunes and connect your iPhone. Select the phone from the top and select Apps from the left list.
Scroll down and find File Sharing / Apps and select LapTimer. Now, you will see all files stored in LapTimer Recordings
on the right–just drop the video you want to overlay into this folder.
• For Android , either mount your smartphone using a USB cable, or plug the smartphone’s SD card into a second SD
card slot of your desktop. In LapTimer, check Video List for the preferred directory (see Android Video Places). The
directory shown on your desktop will slightly differ from the Android directory (different mounting points). It often helps
to compare the files contained in the directory to identify it. Now, just drop the video you want to overlay into this
directory.
After performing this steps, the video will be available in Video List in LapTimer, but it is not yet associated with laps. This
step is described in the next section:
Associate Video Transferred with Laps
Once the video has arrived in one of the video h
1. Select any lap from LapTimer ‣ Analysis ‣ Lap List you recorded the video for. As LapTimer cannot recreate the
link automatically, you will see a video placeholder stating the video cannot be found.
2. Select the video placeholder–which will bring you to a nearly empty Video Details dialog.
3. Scroll to the bottom of that view and press Re-Link for iOS , or select from the top right for Android.
4. Now, select the video from the Video List shown. Although you can repeat that step, please take care you select
the right video here.
5. Confirm all laps referencing this session video should be re-linked to the video selected. This operation will
actually re-link all laps in the same session you recorded a single session video for. This in turn means, you need
to go through this steps only once. The syncing between the external video and LapTimer laps will be preserved
and will not require you to select sync points individually!
So, you are actually done. All videos (internal, external, MultiCam) are available and can be overlaid now. In case you need
help on this item, please return to Overlaying.
Harry’s GPS LapTimer Documentation Page 60Harry’s Technologies
Fighting Device Overheating
Smartphones devices in warm / hot environments while active, run into overheating problems from time to time. As videoing
at high resolutions is the most energy intensive process you can perform on your phone, we want to give some hints how to
work around this issue:
• Reduce energy consumption as this directly relates to heat developed
• Shade your smartphone from direct sun
• Place you device in a cool place
The first point is pretty obvious. Here are combinations for energy consumptions on your device – from strong, to low
impact: video capturing, wifi operation, bright screen, mobile network operation, Bluetooth operation.
The video capturing process heats the smartphone quite a bit, just record a few minutes and touch the area around your
lens – it is getting pretty hot. Besides reducing resolution, there is not too much you can do about this as long as you want a
video recording. However, we want to repeat our recommendation made above: "… it is our recommendation that you do
not record video all of the time."
Wifi operation should be turned off while using LapTimer. The only exception is when you use one of the wifi connected
external accessories like OBD dongles etc.
Screen brightness can be reduced to approximately 80% without any impact on readability. I'm not sure how much
difference the 20% make for power consumption, but it is worth a try. In case you do not watch LapTimer while driving, you
may consider reducing brightness far below 80%.
Cellular operation is not significant as long as you do not use online access. However during normal operation, LapTimer
does send position and lap time data while actively lapping. You can turn this feature off using LapTimer's setting Online
Racing ‣ Publish by switching it to Never. Turning it off will not allow your friends to view you on track, see yellow flags, or get
your time into the Hall of Fame however.
Bluetooth operation is the least significant component. However it is good practice to treat it like wifi operation and turn it off
as long as you do not have an external Bluetooth sensor connected, or use the MultiCam feature.
Next point is direct sun. You can overheat your smartphone by placing it into direct sun very quickly. A typical beach problem
. So please try to place your phone in a shadowed position, which will help significantly.
The last point is the most powerful approach. I personally never ever ran into any overheating problem with any of my
devices–even with all features above turned on. Reason is I have my smartphone placed directly into one of my car's air fan
streams with the fan set to cool/cold.
Place your smartphone into one of your car’s air fan streams to work around
overheating.
Harry’s GPS LapTimer Documentation Page 61Harry’s Technologies
iPhone Placed into an Air Fan’s Stream
Please check this option first, in case you have the opportunity to place your iPhone e.g. like in the picture.
External Overlaying and Overlaying External Sources
In case you want to design your own dashboards for video overlays, you need to export both data recordings, and optionally
the video to a 3rd party software available elsewhere. To transfer data recordings, please use the .CSV format available from
LapTimer’s Export View. To copy videos, access depends on the place they are stored in. Please revisit Maintain Video Data
to understand how to access videos from your desktop.
The opposite scenario is supported too: LapTimer can be used to overlay externally recorded videos following these steps:
1. Record your lap using any video cam, e.g. an action cam not supported by LapTimer’s MultiCam.
2. Copy the video to one of the video places available in Video List. Revisit Maintain Video Data for the options.
3. From within LapTimer / Lap Details, associate the video with your lap (press Edit and Add Video on iOS, press
for Android).
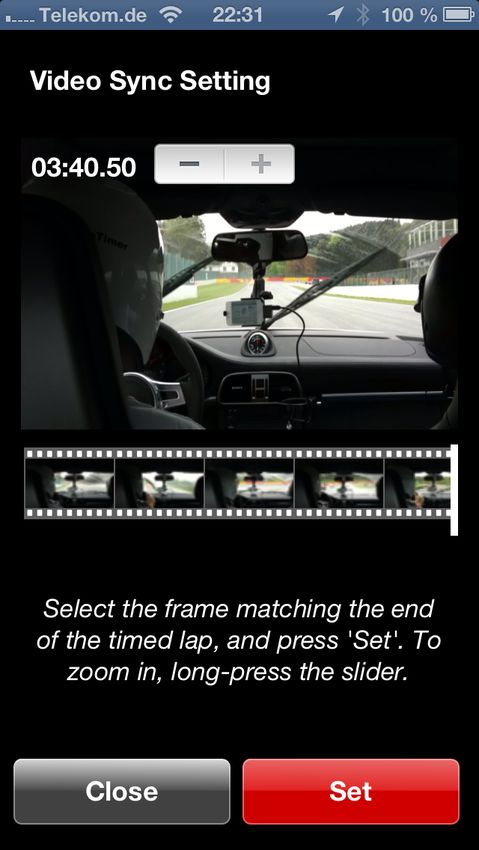
4. Select the position in the video that matches the lap's end (finish line)
5. Start the overlaying process by pressing Overlay – and enjoy the result
Quality of the output depends both on your device type, video resolutions available, the video input quality, and the video
overlay quality set in LapTimer ‣ Administration ‣ Settings ‣ Overlay Quality (Android). On Android, for videos generated, the
master video dimensions are used, while on iOS, one of these dimensions is used:
• SD: 640 x 480 (4:3)
• HD: 1280 x 720 (16:9)
• FullHD: 1920 x 1080 (16:9)
This means, for iOS, you need to take care the input video can be mapped without getting stretched or squished. In case
the processed video does not match one of the above, the resolution is selected based on height only:
• ≥ 1080 uses 1920 x 1080
• ≥ 720 uses 1280 x 720
• the rest goes to 640 x 480
Harry’s GPS LapTimer Documentation Page 62You can also read