How to Build an AirCasting Air Monitor
←
→
Page content transcription
If your browser does not render page correctly, please read the page content below

How to Build an
     AirCasting Air Monitor

Funding for the AirCasting Air Monitor was provided by the New York Hall of Science, the New York State Dept.
of Environmental Conservation Environmental Justice Community Impact Grant Program, and the National Science
Foundation (NSF ATE No 1003712). The Monitor was created at the Mechatronics Technology Center (MTC) of
the New York City College of Technology (City Tech). The electronics were designed and programmed by Dr. Iem
Heng and Raymond Yap and the casing was designed by Dr. Andy Zhang. AirCasting is a collaborative project lead
by HabitatMap in partnership with City Tech’s MTC and the New York Hall of Science.
The AirCasting Platform
AirCasting is a platform for recording, mapping, and sharing health and environmental data using your smart-
phone. Each AirCasting session lets you capture real-world measurements, annotate the data to tell your story,
and share it via the CrowdMap.

To start recording, mapping, and sharing sound level data for your neighborhood, simply download the Air-
Casting app to your Android device and press record. Don’t have an Android device? Check out the AirCasting
maps to see if someone has already contributed data for your area.

                                                      -1-
The AirCasting Air Monitor
The AirCasting Air Monitor (ACAM) is equipped with carbon monoxide (CO), nitrogen dioxide (NO2), tem-
perature, and relative humidity sensors. The ACAM connects to the AirCasting Android app over Bluetooth.
When the ACAM is connected to the AirCasting app and an AirCasting session is initiated, the app begins
receiving, mapping, graphing, and enumerating the data from the ACAM sensors.

Currently there is insufficient data available on the ACAM gas sensors to characterize or calibrate their true
performance. However, the sensors are sensitive enough and their detection limits are low enough that they are
capable of measuring relative changes in CO and NO2 concentrations within ranges that are commonly encoun-
tered in the urban environment. Reflecting the uncertain accuracy of the gas sensors, the ACAM is programmed
to report gas concetrations using a generic response indicator (RI) scale rather than a parts per million or parts
per billion unit of concentration.

The temperature and relative humidity sensors are affected by the heat generated from the operation of the
ACAM electronics. Because the gas sensors are sensitive to changes in temperature and humidity, we elected to
locate the temperature and humidity sensors in close proximity to the gas sensors. In the future, this will enable
the calibration of the gas sensors based on the temperature and humidity. However, this proximity compromises
the ability of the temperature and relative humidity sensors to accurately measure ambient air. We may add a
fan to future ACAM designs to improve the air flow around the sensors which will enable more accurate ambi-
ent air temperature and humidity readings.

 ATTN Hardware Developers
It’s simple to connect your own custom-designed sense device to the AirCasting app to display and record sen-
sor measurements. Just do the following:
   1. Download the AirCasting Arduino sketch, which controls the sensors and sends data to the app via Blue-
      tooth, https://github.com/LunarLogicPolska/AirCastingAndroidClient/blob/master/arduino/aircasting/air-
      casting_tmp36.ino
   2. Alter the Arduino sketch to communicate your sensor data
   3. Use the AirCasting app to send your data to the AirCasting servers for display on the AirCasting website.
      Want to send the data to your own servers, just specify the URL in the AirCasting app settings, “Menu” >
      “Settings” > “Backend settings”.

 AirCasting is Open Source
AirCasting is an open source project. You can access the code repositories for the AirCasting Android app and
the AirCasting web app through GitHub.

 AirCasting Luminescence
AirCasting Luminescence uses a IOIO microcontroller connected to the AirCasting app over Bluetooth to illu-
minate LEDs in response to the sensor measurements received by the AirCasting app. Download the AirCasting
Luminescent Apparel DIY guide, http://www.habitatmap.org/habitatmap_docs/MakeYourOwnAirCastingLumi-
nescentApparel.pdf, to make a fashion statement with your sensor measurements.

 Monitor Your Heart Rate with AirCasting
Connect the Zephyr HxM heart rate monitor to the AirCasting app and measure how your heart rate responds to
your activity level, location, and exposure to noise and air pollution.
                                                       -2-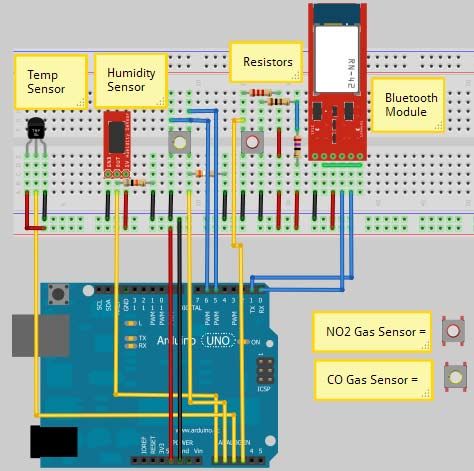
Future Development
We’re not done! Next we’ll be connecting the Dylos DC1700 and Shinyei PPD42NS laser particle counters to
the AirCasting platform. We also plan to continue making improvements to our first generation ACAM and
begin developing methods for laboratory and in-field data validation. If you have any suggestions on how to
improve the ACAM, the app, or website please send them our way.

 Thanks!
To Dr. Iem Heng and Raymond Yap for designing, programming, assembling and testing the AirCasting Air
Monitor electronics; to Dr. Andy Zhang for designing and printing the AirCasting Air Monitor casings; to Lunar
Logic Polska for coding the AirCasting app and website; and to Tim Dye of Sonoma Technology for big ideas
and constructive feedback.

 AirCasting Partners
HabitatMap is a non-profit environmental health justice organization whose goal is to raise awareness about the
impact the environment has on human health. Our online mapping and social networking platforms are designed
to maximize the impact of community voices on city planning and strengthen ties between organizations and
activists working to build greener, more sustainable cities. In addition to our online platforms, habitatmap.org &
aircasting.org, HabitatMap conducts workshops that teach grassroots groups and their members how to leverage
our online map making tools to strengthen their organizing and advocacy efforts.

City Tech’s Mechatronics Technology Center provides a multidisciplinary platform for students to master the
latest mechatronics and robotics technologies and gain experience through hands-on projects. The principle of
hands-on education gives students an opportunity to experiment and understand why science, technology, engi-
neering, and mathematics (STEM) are important in the context of solving real world problems.

The New York Hall of Science is New York City’s hands-on science and technology center. Since 1986, NYSCI
has served over seven million children, parents, and teachers. NYSCI’s mission is to convey the excitement and
understanding of science and technology to children, families, teachers, and others by galvanizing their curios-
ity and offering them creative, participatory ways to learn. NYSCI features the largest collection of hands-on
science exhibits in New York City. Visitors of all ages can explore over 450 interactive exhibits.

 Contact Us
Do you have questions, comments, or constructive feedback regarding our DIY guide? Contact Michael
Heimbinder, Executive Director, HabitatMap: info@habitatmap.org, 347.410.9499

                                                      -3-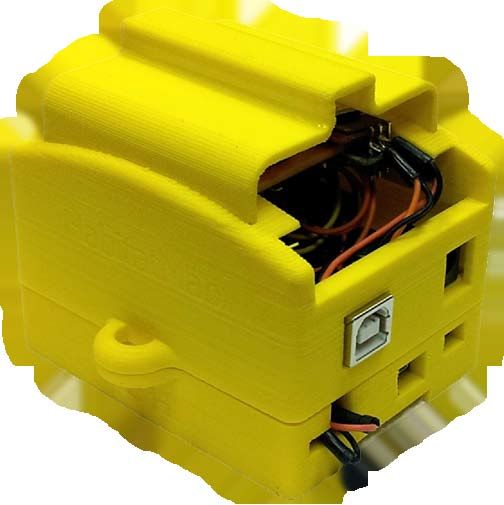
-4-
Schematic Layout of ACAM Using Visio

                                       -5-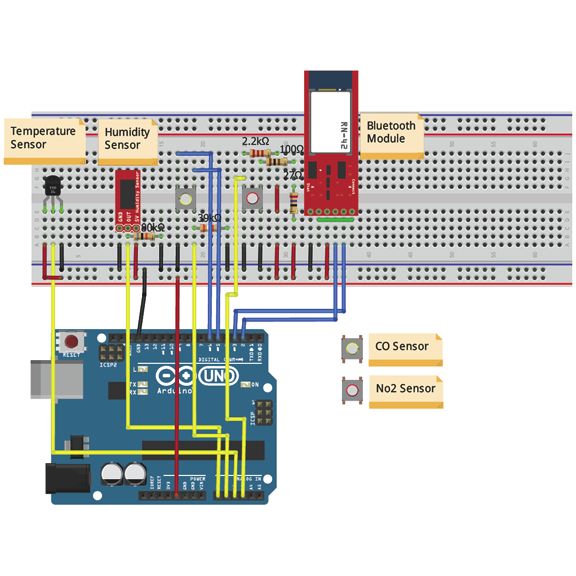
Schematic Layout of ACAM Using Fritzing

                                      -6-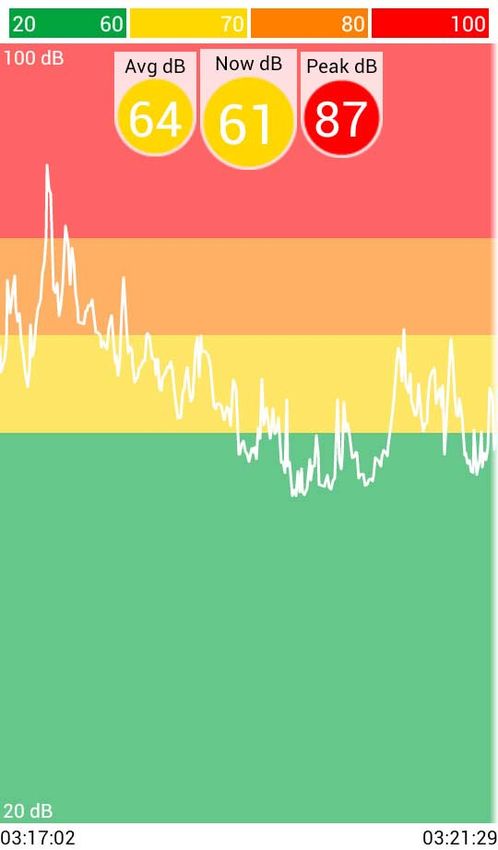
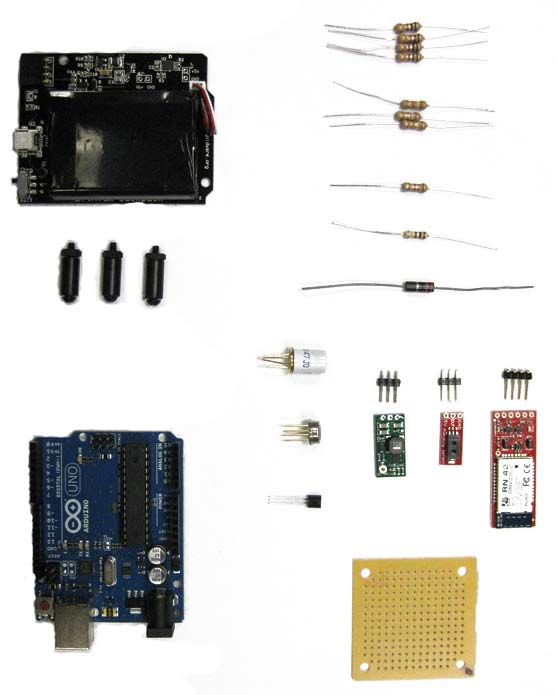
Parts & Tools
The electronic components for the AirCasting Air Monitor cost approximately $180. Vendor web links for these
components are not an endorsement of the vendor; they are provided for convenience only. In order to assemble
the Monitor you’ll need a soldering iron, solder wire, a wire cutter/stripper, and long nose pliers.

Item Name                       Vendor                 Vendor Web Link                           Price/Unit
Dual Mini Board with 213                               http://www.radioshack.com/product/
                                Radioshack                                                             $2.19
Holes                                                  index.jsp?productId=2104052
Adjustable Boost Regulator                             http://www.jayconsystems.com/prod-
                                Jaycon Systems                                                       $11.95
4-25V                                                  uct_detail.php?prod_id=291
                                                       http://www.cdiweb.com/ProductDe-
MiCS 2710 NO2 Gas Sensor        Component Distributors                                                 $5.53
                                                       tail/MICS2710/333415
                                                       http://www.liquidware.com/shop/
Hi-Cap Lithium Backpack         Liquidware                                                           $47.36
                                                       show/MBP/Lithium+Backpack
                                                       http://www.sparkfun.com/prod-
Arduino Uno R3                  Sparkfun                                                             $29.95
                                                       ucts/11021
Bluetooth Modem - Blue                                 http://www.sparkfun.com/prod-
                                Sparkfun                                                             $39.95
SMiRF Silver                                           ucts/10269
                                                       http://www.sparkfun.com/prod-
Humidity Sensor HIH-4030        Sparkfun                                                             $16.95
                                                       ucts/9569
                                                       http://www.sparkfun.com/prod-
Temperature Sensor TMP 36       Sparkfun                                                               $1.50
                                                       ucts/10988
Figaro TGS 2442 CO Gas
                                Figaro                    http://www.figarosensor.com/               $16.00
Sensor
                                                          Print your own - www.thingiverse.
AirCasting Air Monitor Casing Shapeways                   com/thing:26555. Or buy one - www.         ----
                                                          shapeways.com/shops/AirCasting
Stranded Breadboard Jumper
Wire: 4 orange - 5V, 4 blue
- ground, 1 blue & 1 green
                                           ----                            ----                      ----
- CO power cycle, 1 white &
1 yellow - BT comm, 4 yellow
- sensor signals
Solid Core Breadboard Jumper
Wire: 1 gray - insulation
1k Ohm Resistor: brown,
                                           ----                            ----                      ----
black, red (4 units)
39k Ohm Resistor: orange,
                                           ----                            ----                      ----
white, orange (3 units)
22k Ohm Resistor: red, red,
                                           ----                            ----                      ----
red
100 Ohm Resistor: brown,
                                           ----                            ----                      ----
black, brown
27 Ohm Resistor: red, purple,
                                           ----                            ----                      ----
black
10 Pin Breakaway Headers                   ----                            ----                      ----

                                                    -7-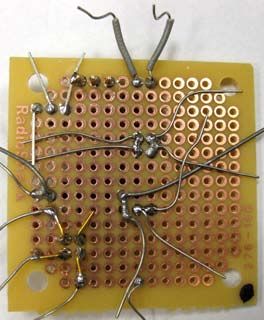
1k Ohm Resistor

     Hi-Cap Lithium Backpack

                                                            39k Ohm Resistor

                                                             22k Ohm Resistor

                                                            100 Ohm Resistor

Stranded Breadboard Jumper Wires                             27 Ohm Resistor

                                                               Straight Breakaway Headers

                                     Figaro TGS 2442

                                      MiCS 2710 NO2

                                                                  Humidity Sensor
                                                                    HIH-4030
                                   Temperature Sensor Adjustable Boost
                                       TMP 36         Regulator 4-25V      Bluetooth Modem
                                                                           Blue SMiRF Silver

                                    Solid Core
                                    Breadboard
                                   Jumper Wire

       Arduino Uno R3

                                                       Dual Mini Board with 213 Holes

                                       -8-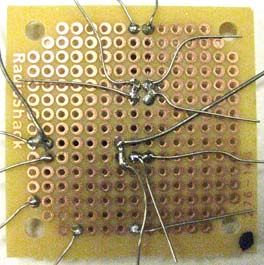
Step by Step Instructions
1 Snap the Mini Board in half. Take half the board, orient it top side up, and rotate it so the snapped side is
up. Take a permanent marker and mark the upper right hand corner with a dot to orient yourself while build-
ing up the board. Then flip the board upside down and mark the same corner on the other side of the board.

2 Place resistors on the board. Be sure to pull the
(2)
resistor wires all the way through the board until the
resistors are nearly flush with the top of the board.
Bend the resistor wires against the back of the board to
keep them in place.

3 Solder the resistors to the board. Bridge the
(3)
shown connections using solder.

4 Use pliers to break away four pins from the strip
(4)                                                          5 Use pliers to break away three pins from the strip
                                                             (5)
of straight break away headers. Use a hard surface           of straight break away headers. Use a hard surface
to push the black plastic on the straight break away         to push the black plastic on the straight break away
headers to one end. Insert straight break away head-         headers to one end. Insert the straight break away
ers into BT. Solder straight break away headers to           headers into the humidity sensor and solder them in
BT. Solder together the two small plates located on          place.
the back of the BT above the letter “n”.

                                                       -9-
6 Insert the NO2 sensor into the breadboard.
(6) 7(7) Bend the bottom left leg, the top left leg, and
Make sure the reference tab (the copper piece of the bottom right leg of the NO2 sensor as shown
metal protruding from the packaging) is facing up. and solder the legs to the resistors. Solder the legs
on the right side of the NO2 sensor together (note
that this last step is not shown here.)
8 Insert the humidity and temperature sensors. Solder the humidity sensor to the breadboard. Bend the
(8)
right leg of the temperature sensor up and solder it to the left leg of the humidity sensor. Then bend the
center leg of the temperature sensor up and bend the left leg down.
- 10 -9 Note: To prevent the wires from shorting when
(9) 10 Insert and solder the Bluetooth modem to
they overlap you’ll need to insulate them. To insu- the breadboard.
late the wires, strip the plastic insulation from the
solid core breadboard jumper wires, then measure
and cut to fit.
Insulate the two resistor wires at the top of the
board and wrap the ends around the left and center
legs of the humidity sensor, left to left and right to
center, then solder in place.
- 11 -11 Insert the CO sensor into the breadboard. Make 12 Bend the legs of the CO sensor as shown and
sure the reference tab (the copper piece of metal solder the bottom right leg to the resistor. Insulate
protruding from the packaging) is facing down. the resistor wire at the bottom left side of the board,
then connect and solder the resistor wire to the top
right leg of the CO sensor.
13 Solder the left leg of the temperature sensor to 14 To make the board easier to work with, remove
the resistor on the left side of the board. some of the resistor wires sticking up from the
board. Using a gentle circular motion, wiggle the
eight resistor wires in the center of the board until
they break loose.
- 12 -15 Use the mini pliers to create a hook at the end 16 Hook and solder a yellow jumper cable to the
of a blue jumper cable and hook and solder the middle leg of the temperature sensor.
bottom left leg of the CO sensor. Next, hook and
solder a green jumper cable to the top left leg of
the CO sensor.
17 Wiggle the wires protruding from the humidity
sensor until they break away
- 13 -18 Hook and solder a yellow jumper cable to the 19 Hook and solder a yellow jumper cable to the
center leg of the humidity sensor. bottom right leg of the CO sensor
20 Hook and solder a yellow jumper cable to the 21 Take one of the blue jumper cables from the
bottom left leg of the NO2 sensor. Hook and sol- bottom right leg of the NO2 sensor and hook and
der two blue jumper cables to the bottom right leg solder the opposite end to the left leg of the hu-
of the NO2 sensor. midity sensor. Next, hook and solder three orange
jumper cables to the remaining wire protruding
from the bridged connection between the resistor
and the left leg of the temperature sensor.
- 14 -22 Take one of the orange jumper cables and hook 24 Hook and solder two black jumper cables to
and solder it to the right leg of the humidity sensor. the center leg of the boost regulator. Hook and
Take the second orange jumper cable and hook and solder an orange jumper cable to the left and right
solder it to the left leg of the BT. legs of the voltage booster.
25 Screw the Lithium Backpack to the Arduino.
Following the schematic layout, plug the jumper
cables into the Arduino microcontroller pins as
listed below.
•Pin AO: Humidity
•Pin A1: CO Sensor
23 Hook and solder a blue jumper cable to the •Pin A2: Temp Sensor
center-left leg of the BT. Hook and solder a white •Pin A3: NO2 Sensor
jumper cable to the center-right leg of the BT. •5V Pin: Power Sensors + Bluetooth
Hook and solder a yellow jumper cable to the right •GND Pin: Common Ground
leg of the BT. •GND Pin: Common Ground
•Pin 2: Rx pin for Bluetooth
•Pin 3: Tx Pin for Bluetooth
•Pin 5: Power cycle for CO Sensor
•Pin 6: Power cycle for CO Sensor
- 15 -26 Plug one of the black jumper cables running from
the center leg of the boost regulator into the Ardui-
no’s power GND pin. Plug the second black jumper
cable running from the center leg of the boost regu-
lator into the Lithium Backpack’s GND pin. Plug
the orange jumper cable running from Vin leg of the
boost regulator into the 5V pin of the Lithium Back-
pack. Plug the orange jumper cable running from the
VOUT pin of the boost regulator into the Arduino’s
VIN pin.
27 Print out the casing (www.thingiverse.com/
thing:26555) or buy it from Shapeways (www.
shapeways.com/shops/AirCasting). Slot the bread-
board into the casing cover then insert the Lithium
Backpack and Arduino into the base. Finally, slot
the sensor cover into place. Note that the slots for
the breadboard and sensor cover may need to be
filed for a better fit.
28 Now that your Monitor is fully assembled,
you can connect it to the AirCasting app and
begin mapping and graphing your sensor
measurements. First, download and install the
Arduino software on your computer, www.ar-
duino.cc/hu/Main/Software. Then connect your
Arduino to your computer using a USB a to b
cable and run the Arduino software, opening up
a new Sketch.
29 Next, copy the AirCasting Arduino INO file
from GitHub - https://github.com/LunarLog-
icPolska/AirCastingAndroidClient/blob/master/
arduino/aircasting/aircasting_tmp36.ino - paste it
into your Sketch and upload it to your Arduino.
Once the upload is complete, disconnect the Ar-
duino from the USB cable.
- 16 -30 Next, turn on your Monitor by flipping the 32 AirCasting provides four ways to view your
power switch on the Lithium Backpack. Note that sensor data: the Route Map, the CrowdMap, the
you may need to charge the Lithium Backpack Graph and the Sensors Dashboard. Toggle between
prior to powering up. You’ll know the battery is the views by tapping the triangular buttons located
fully charged when the orange charging indica- on the left and right sides of the screen. If you don’t
tor on the Lithium Backpack turns off. Once the see any buttons, tap the screen once to make them
Monitor is on, you should observe a blinking red appear; tap the screen again to make them disap-
light on the Bluetooth modem. pear.
Toggle to the Route Map or CrowdMap. Make
31 Now you’re ready to connect your Monitor to sure your GPS is on and your location on the map
the AirCasting app over your Android phone’s
is accurate. Without a GPS fix you will not be able
Bluetooth connection. First, open the Play Store
to record data. Press the bullseye button to refresh
app and search for, download, and launch the Air-
your location and center the map. Once you have
Casting app. Then, press the menu button on your
confirmed that your location is accurate, press the
phone, select “Settings”, select “External devices”,
record button to begin recording data. If you don’t
select “pair with new devices”, “search for devic-
see the record button, tap the screen once and it will
es”, select your Monitor name and MAC address
appear.
(e.g. R42-C22C 00:06:66:46:C2:2C), enter the
pairing code “1234”, return to the AirCasting app,
Hint: To adjust the relationship between sensor
select your monitor from the “External devices”
measurements and display colors, tap the “Heat
dialog, and when prompted to connect press “Yes”.
Legend” (the colored bar at the top of the screen).
To toggle between sensor streams tap the “Avg”
Once the AirCasting app is connected to the Moni-
“Now” “Peak” circles at the top of the screen.
tor the blinking red light on the Bluetooth modem
will be replaced by a solid green light and the Air-
Casting Sensors Dashboard will appear and begin 33 When you’re done recording your AirCasting
enumerating the data streams from the sensors. session press the stop button. If you don’t see the
stop button tap the screen once and it will appear.
You only need to pair and connect the Monitor Enter a title, tags, and description and press “Save
to the AirCasting app once. After that, the Moni- session”. You will then be prompted to contribute
tor should automatically connect to the AirCast- your session to the CrowdMap. Sessions added
ing app when it’s launched. If the Monitor does to the CrowdMap are publicly accessible via the
not automatically connect after 60 seconds, select website, www.aircasting.org
“Settings”, select “External devices”, and connect
again.
- 17 -The Sensors Dashboard
displays the measurements
from all your sensor streams
simultaneously. Tap the re-
cord buttons next to each
sensor stream to toggle re-
cording off/on. Tap the eye
icon to select that sensor
stream for viewing on the
Route Map, CrowdMap and
Graph.
The Route Map displays
your current position as a
colored dot with a white
outline; dots without an
outline are past readings. A
dot’s color corresponds to
the reading’s intensity at a
location. Refer to the “Heat
Legend ” (the colored bar
at the top of the screen) to
identify the intensity range
for a reading. For example,
Sensors Dashboard a yellow dot corresponds to Route Map
a sound level reading be-
tween 61 and 70 decibels.
The CrowdMap displays
AirCasting data from all
contributors. Each square’s
color corresponds to the
average intensity of all the
readings recorded in that
area. Refer to the “Heat Leg-
end ” to identify the inten-
sity range for a square. For
example, an orange square
corresponds to an average
sound level between 71 and
80 decibels. If no colors are
displayed, there is no data in
that area.
The Graph displays your
readings over time. Zoom
in and out for more or less
detail. Swipe to pan through
the data.
CrowdMap Graph
- 18 -You can also read