How to use the L-Tune tool - L-Tune manual
←
→
Page content transcription
If your browser does not render page correctly, please read the page content below
L-Tune manual

How to use the L-Tune tool
Log-in

L-Tune manual

             What’s new on L-Tune 3.22
Choice of Luminaire type:
       Choice of the luminaire type used extended: Mithra is added. To be expanded
       with Stela soon.
Basic insulation class question
       Class I or II selectable.

Dimming options lay-out changed
       Drop down box instead of radio buttons.
       Module selection with dimming options

Driver optimization:
       Extra 100 W (700 mA max.) driver added with driver code E.
Demos:
       The demos have been renewed to show the new options available. Class I and
       II, optional or compulsory Surge Protection Device (SPD).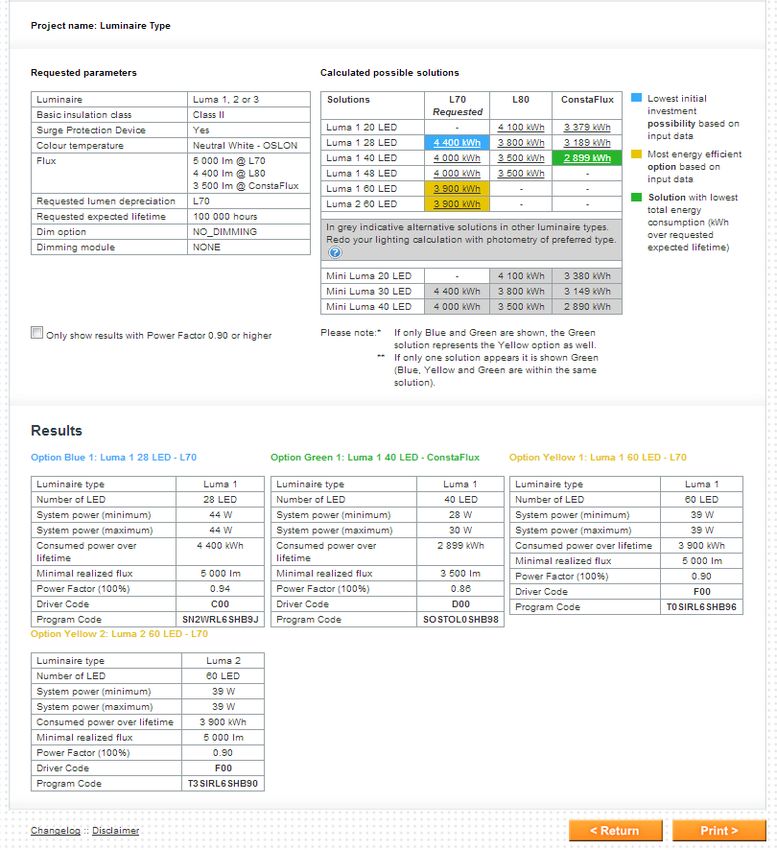
L-Tune manual
What’s what on L-Tune and where
Index
1. L-Tune input screen
2. Disclaimer pop up window
3. Changelog pop up window
4. Manual pop up to open this document
5. Project name
6. Luminaire type
7. Basic Insulation Class question
8. LED colour temperature
9. Input from lighting calculation programs
10. LMF examples pop up window
11. L-value or CONSTAFLUX & Lifetime
12. Dimming interface selection
13. Demo Indal: LUMA, 28 500 lm, L96 @ 80 000 hrs, Class I
14. Demo PF filter: Kegel/2000 series, 4000 lm, L70 @ 85 000 hrs, Class II
15. Demo Luminaire type: 5 000 lm, L70 @ 100 000 hrs, Class II
16. Log-out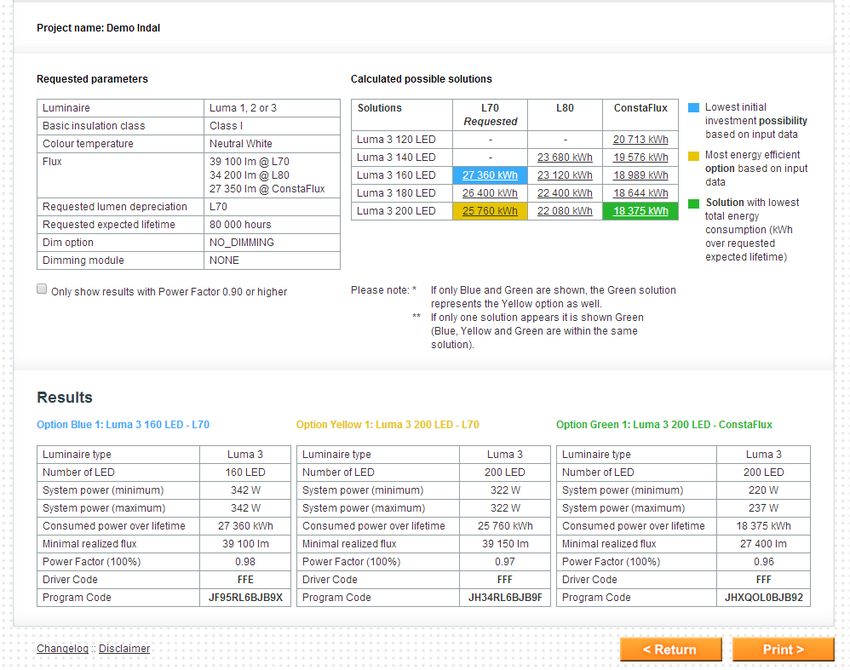
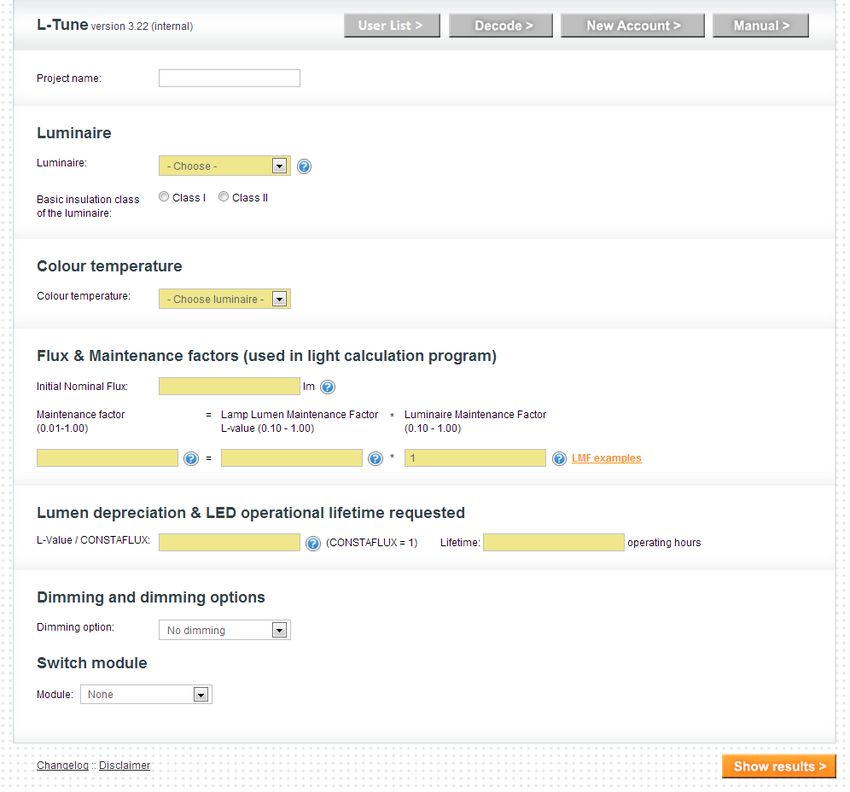
1. Input screen
2. Disclaimer
3. Changelog
4.          This manual in pdf-format

Open the manual in a new window
5. Project name

Enter a reference for
your current project.
(Optional)
6.       Luminaire type

New:
Mithra (Stela range will follow soon).

Choose the type of luminaire used in lighting calculation,
i.e. Luma 1, 2 or 3.
L-Tune output shows all solutions based on this selection.
In addition L-Tune also presents alternative solutions, if
any, in other luminaire types. However only as an
indication as the photometrical characteristics of the
different luminaire types differ.
7.     Basic Insulation Class

 New:
 Choice of Basic insulation class of the
 luminaire.
8.   LED colour temperature

      Warm White available for all
      luminaire types
9. Lighting calculations
DIALux
Lamp luminous flux and
project maintenance factor
use separate windows
IndalWin
Lighting Reality MSV NOTE:
Even with CONSTAFLUX enabled (LLMF = 1) the overall
Maintenance Factor, MF < 1.
This because the Luminaire Maintenance Factor, LMF < 1.9.1. DIALux input NOTE: Even with CONSTAFLUX enabled (LLMF = 1) the overall Maintenance Factor, MF < 1. This because the Luminaire Maintenance Factor, LMF < 1.
9.2.         IndalWin input

          NOTE:
          Even with CONSTAFLUX enabled (LLMF = 1) the overall
          Maintenance Factor, MF < 1.
          This because the Luminaire Maintenance Factor, LMF < 1.

L-Tune LLMF is a combination of
these two: Lamp Survival Factor &
Lamp Lumen Maintenance Factor.
9.3 Lighting Reality input NOTE: Even with CONSTAFLUX enabled (LLMF = 1) the overall Maintenance Factor, MF < 1. This because the Luminaire Maintenance Factor, LMF < 1.
10        LMF examples
 .

                      LMF examples button. Pops
                      up this window with LMF
                      examples from different
                      European sources.

NOTE:
Even with CONSTAFLUX enabled (LLMF = 1) the overall Maintenance
Factor, MF < 1.
This because the Luminaire Maintenance Factor, LMF < 1.

Therefor a LMF value < 1 must be used to acquire a realistic amount
of lumen for your solution
11. L-value & Lifetime request
L-value (LLMF) between 0.10 and 1.00. Defines the maximum
accepted lamp lumen depreciation over the total expected life of
the light source.
For instance L70 means that you define the expected life of the LED
at which it produces 70% of the initial nominal lumens (so you
accept 30% lumen depreciation).
For CONSTAFLUX enter 1 (= “no” lumen depreciation).
Default value is the LLMF value given in the LLMF field above.
NOTE: Despite the choice of CONSTAFLUX, one always
should use a luminaire maintenance factor, LMF < 1
due to pollution of the luminaire
Minimum required lifetime,
f.i. 20 years is approximate 80.000
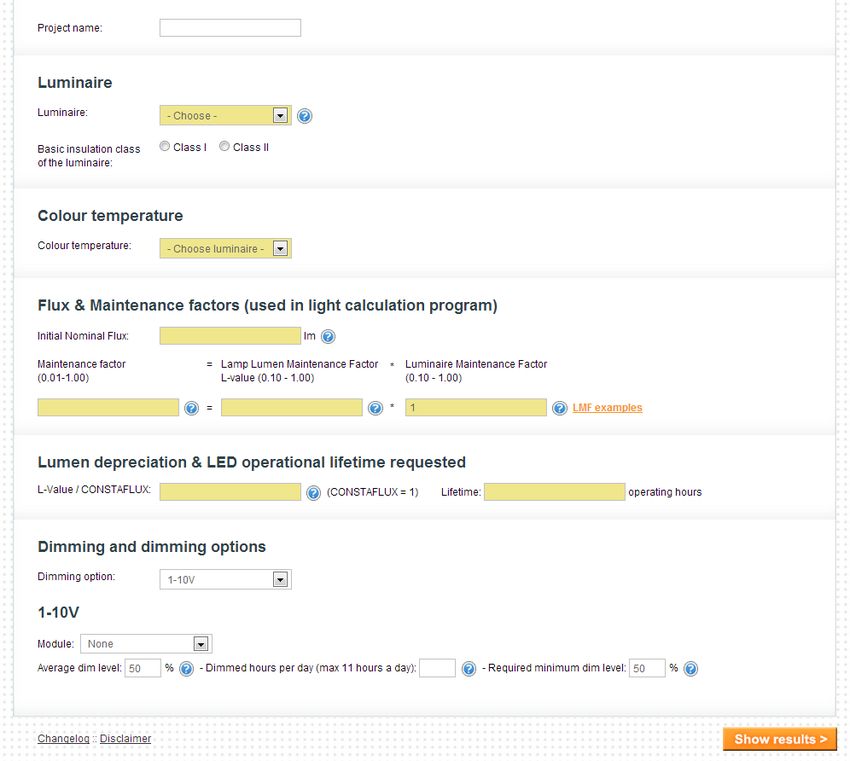
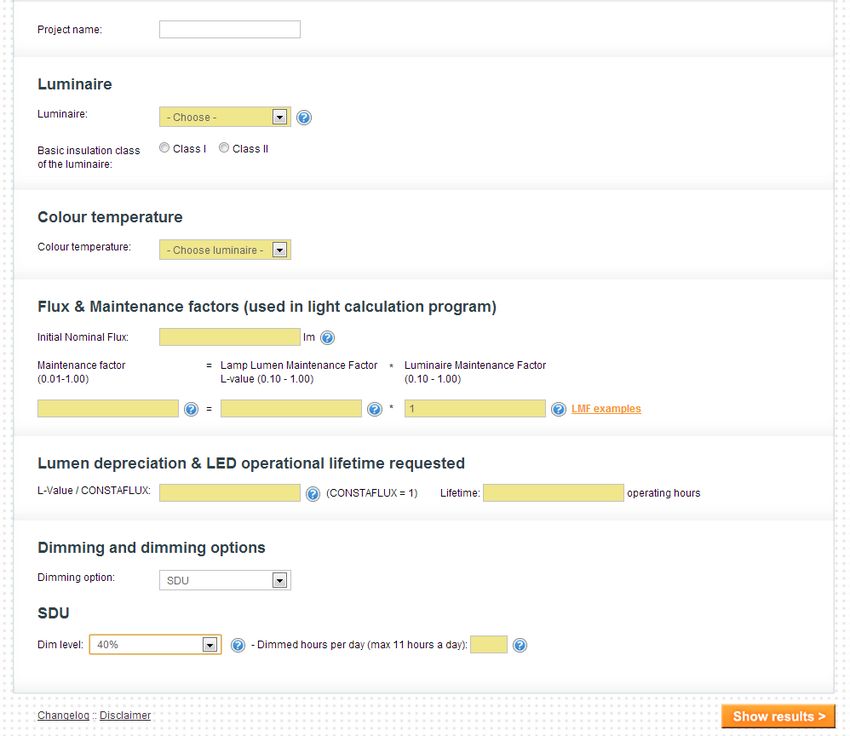
hrs (@4100 hrs/year).12. Dimming options
Depending on the chosen Dimming option, extra
input about dimming hours, levels and choice of
secondary switch/control modules are shown.
NOTE: All calculations for savings due to dimming
are based on 4100 hrs per year12.1. No dimming
No dimming;
no extra energy savings and/or
extended lifetime.
Photocells can switch the luminaire if there is no
separate power grid for public lighting.12.2. SDU
SDU: Set the required dim level
(Between 10% and 90%, in steps of
5% ). The luminaire will switch to this
level when the 2nd power line (phase)
is being switched.
Amount of hours of dimmed operation, max 11 hrs a day
(based on 4100 hrs per year).
NOTE: If the amount of hours is set to high, unrealistic
power consumption and lifetime expectation will
result!!12.3. 1 – 10 V
1 – 10 V; Average dim level, amount of hours in dimmed
operation, required minimum dim level and if signal comes from
a secondary device this has to be entered to complete this dim
scenario.
Choose whether a secondary module is
required to control the 1-10 V line of the
luminaires driver(s).
Choose if the 1-10 V signal
enters the luminaire through/with the
mains cable.12.3. 1 – 10 V
The software calculates if the required
minimum dim level can be achieved. In certain
versions the required value is not possible, due
to driver constraints. In the result table these
cases will be marked "!". In the results the
possible minimum dim level will be showed.
The value programmed is always 10% for
maximum future flexibility.
The average dim level is used together with the amount of hours, Amount of hours of dimmed operation, max.
for the power consumption and lifetime calculations. 11 hrs a day (based on 4100 hrs per year).
If only one dim level is use this dim level as the average dim level.
NOTE 1: If the amount of hours is set to high,
NOTE: unrealistic power consumption and lifetime
If the average dim level is set too low, unrealistic power expectation will result!
consumption and lifetime expectation will result!!
(if only one dim level is used than this is the average dim NOTE 2: If one just want to enable 1- 10V, fill in
level) 0 hrs of dimming (worst case)12.4. DALI
DALI; Average dim level, amount of hours in dimmed operation,
required minimum dim level and if signal comes from a
secondary device this has to be entered to complete this dim
scenario.
Choose whether a secondary module is
required to control the DALI line of the
luminaires driver(s).
Choose if the DALI signal enters
the luminaire through/with the mains
cable.12.4. DALI
The software calculates if the required
minimum dim level can be achieved. In certain
versions the required value is not possible, due
to driver constraints. In the result table these
cases will be marked "!". In the results the
possible minimum dim level will be showed.
The average dim level is used together with the amount of hours, Amount of hours of dimmed operation, max.
for the power consumption and lifetime calculations. 11 hrs a day (based on 4100 hrs per year).
If only one dim level is use this dim level as the average dim level.
NOTE 1:If the amount of hours is set to high,
NOTE: unrealistic power consumption and lifetime
If the average dim level is set too low, unrealistic power expectation will result!
consumption and lifetime expectation will result!!
(if only one dim level is used than this is the average dim NOTE 2: If one just want to enable DALI, fill in
level) 0 hrs of dimming (worst case)12.5. AmpDim
AmpDim; The required AmpDim profile, the average dim The average dim level is used together
level and the amount of hours needs to be entered to with the amount of hours, for the power
complete this dim scenario. consumption and lifetime calculations.
NOTE:
If the average dim level is set too low,
unrealistic power consumption and
lifetime expectation will result!!
Amount of hours of dimmed operation,
Select the required, pre-defined AmpDim profile. See show
max 11 hrs a day (based on 4100 hrs per
profiles for the predefined profiles
year).
NOTE: If a preferred profile is not stated here or in
NOTE: If the amount of hours is set to
the show profiles, please contact your local
high, unrealistic power consumption and
sales office.
lifetime expectation will result!!
See next page for:
Show profiles12.5. AmpDim profiles Use the AmpDim Stop Percent value as Average dim level in case of usage as switching device. This would normally be the case.
12.6.           Integrated Dynadimmer

Integrated Dynadimmer; first select the preferred regime and
secondly the location of the luminaire to complete this dim
scenario.

                                                               Choose whether a secondary module is
                                                               required to control the luminaire.
                                                               Choose  if the luminaire is
                                                               connected to a separate public lighting
                                                               grid.
12.6. Integrated Dynadimmer
Select the preferred, pre- Select the location for the luminaire.
defined regime. Note: not all regimes are available in all locations!
Contact your local sales office if your preferred
choose is not available for your location.
See next page for:
Show regimes12.6. Dynadim regimes
Regimes
Open the Regimes PDF in a new window:13. Demo Indal; Input
The LLMF used in the lighting calculation will be
transferred to the requested LLMF box. This can be
overwritten by a new requested L-value.
When the requested L-value is less than L80, e.g.
L76. The results will show the L76, L80 and
CONSTAFLUX solutions (3 columns).
However if the requested L-value is L80 or higher,
the results will only show the requested L-value and
CONSTAFLUX solutions (2 columns).
Press “Show results” button after
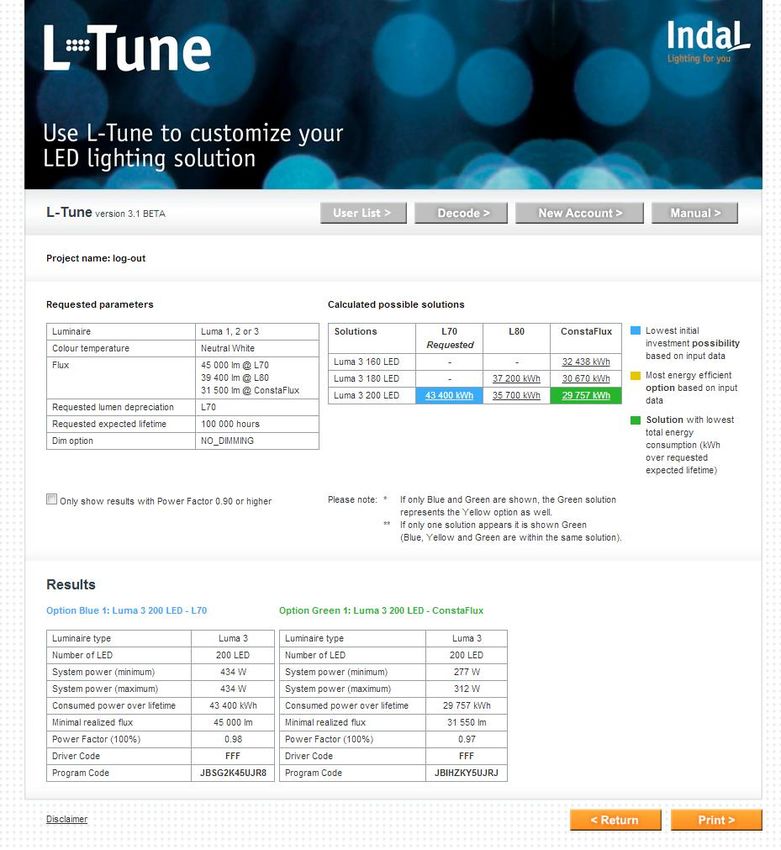
entering all preferences.13.1. Demo Indal; Results
Summary of requested
parameters.
All calculated
possible solutions: in
this example L70 is
requested. Solutions
for L70, L80 and
CONSTAFLUX are
Click any solution to see the relevant given.
information about this solution.
The three high
lighted solutions
NEW Driver code E presented with their
relevant information.
Remark:
Turn on print
background (colours
& images) in your
browser, to see the
high lighted cells in
colour when
printing.13.2. Demo Indal; Result pop up
To get your Luma the
Click any solution to see the way you want it,
relevant information about this copy/paste the
solution. Program and Driver
Code on your order.
Summary of NEW
requested Driver Code E:
parameters optimization for highest
efficiency and Power
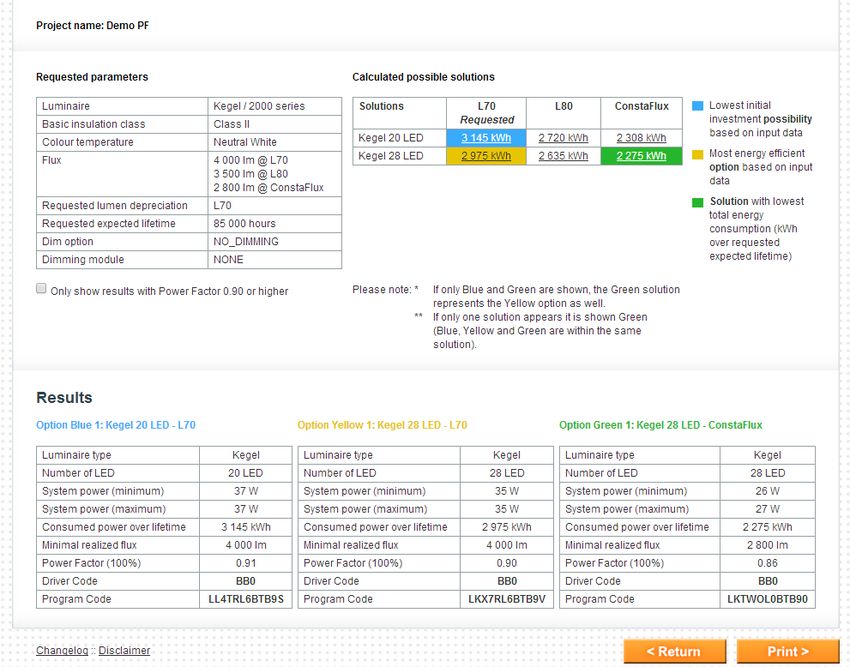
Factor.14. Demo PF filter; Input
Class II.
Press “Show results” button after
entering all preferences.
The next two pages show the
difference between all solutions
and the solutions with a PF 0.90
or higher.14.1. Demo PF filter; Results
The tick box not
checked:
All calculated
possible solutions
are shown.
Affects only the table above.
The table below with option
blue and green remains the
same.
NEW
Driver Code: optimization for a lowest system
power (best efficiency) and Power Factor. The Power Factor
is given in a non-
dimming status of
the luminaire (@
full operating
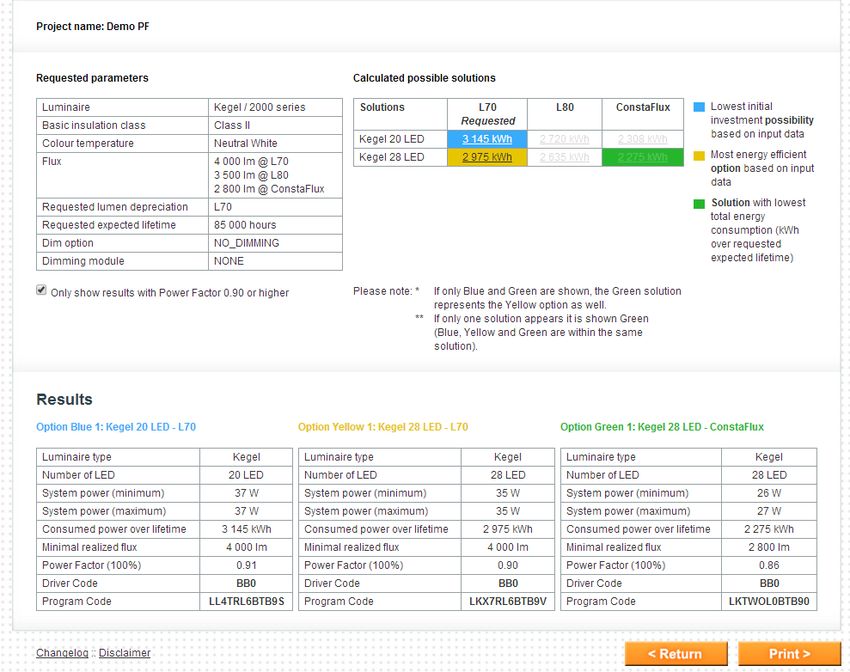
power).14.2. Demo PF filter; Filter on
The tick box checked:
Only results with a Power
Factor of 0.90 or higher are Green option has a PF < 0,90
shown. The others are shown and therefore shown in grey
in grey, but still selectable. (dimmed)
The Power Factor is given
in a non-dimming status of
the luminaire (@ full
operating power).15. Demo Luminaire type
Press “Show results” button after
entering all preferences.
The next page show the other
luminaire type(s) possible.15.1. Demo Luminaire type
In the input screen you have selected the
luminaire type that you used in your light
technical calculation.
All possible L-Tune solutions are based on this
selection. The blue, yellow and green
indicators are only given for these solutions.
In addition L-Tune also presents alternative
solutions (if any) in other luminaire types
(presented in grey), however only with an
indication of consumed power over life, as the
photometrical characteristics of the different
luminaire types differ.
In grey indicative alternative solutions in
other luminaire types.
Redo your lighting calculation with
photometry of preferred type, in order to
redefine the required luminous flux. This
redefined flux can be used again as input for
L-Tune to find exact solutions for your
project.16. Log-out Click the L-Tune logo to log-out of L-Tune and return to the log-in screen.
Log-in
You can also read