IdeaCentre AIO 3
User Guide
←
→
Page content transcription
If your browser does not render page correctly, please read the page content below

IdeaCentre AIO 3 User Guide

Read this first

Before using this documentation and the product it supports, ensure that you read and understand the
following:
• Safety and Warranty Guide
• Generic Safety and Compliance Notices
• Setup Guide

First Edition (July 2021)

© Copyright Lenovo 2021.
LIMITED AND RESTRICTED RIGHTS NOTICE: If data or software is delivered pursuant to a General Services
Administration “GSA” contract, use, reproduction, or disclosure is subject to restrictions set forth in Contract No. GS-
35F-05925.
Contents

About this documentation . . . . . . . . iii                                       Connect to a Bluetooth-enabled device (for selected
                                                                                   models) . . . . . . . . . . . . . . . . 12
Chapter 1. Meet your computer . . . . . 1                                          Use the optical drive (for selected models) . . 12
Overview . . . . . . .        .   .   .   .   .   .   .   .   .   .   .    1   Purchase accessories . . . . . . . . . . . . 13
Rear . . . . . . . . .        .   .   .   .   .   .   .   .   .   .   .    2
Rear . . . . . . . . .        .   .   .   .   .   .   .   .   .   .   .    3   Chapter 4. CRU replacement . . . . . 15
Features and specifications   .   .   .   .   .   .   .   .   .   .   .    4   CRU list . . . . . . . . . . . . .      .   .   .   .   .   15
USB specifications . . .      .   .   .   .   .   .   .   .   .   .   .    4   Remove or replace a CRU . . . . . .     .   .   .   .   .   15
Operating environment . .     .   .   .   .   .   .   .   .   .   .   .    6      Power cord and ac power adapter .    .   .   .   .   .   15
                                                                                  Computer stand . . . . . . . .       .   .   .   .   .   16
Chapter 2. Get started with your                                                  Storage drive . . . . . . . . .      .   .   .   .   .   17
computer . . . . . . . . . . . . . . . . . 7
Adjust the computer stand (for selected models)               .   .   .    7   Chapter 5. Help and support . . . . . 21
Work with Windows . . . . . . . . . . .                       .   .   .    7   Frequently asked questions . . . . .    .   .   .   .   .   21
    Windows help information . . . . . . .                    .   .   .    8   Self-help resources . . . . . . . .     .   .   .   .   .   21
Use the touch screen (for selected models) . .                .   .   .    8   Call Lenovo . . . . . . . . . . .       .   .   .   .   .   23
Connect an external display . . . . . . . .                   .   .   .    9        Before you contact Lenovo . . .    .   .   .   .   .   23
                                                                                    Lenovo Customer Support Center .   .   .   .   .   .   23
Chapter 3. Explore your computer . . 11                                        Purchase additional services. . . . .   .   .   .   .   .   24
Lenovo Vantage. . . . . . . . . . . . . . .                               11
Set the power plan . . . . . . . . . . . . .                              11   Appendix A. Notices and
Transfer data . . . . . . . . . . . . . . . .                             12   trademarks . . . . . . . . . . . . . . . 25

© Copyright Lenovo 2021                                                                                                                     i
ii IdeaCentre AIO 3 User Guide
About this documentation
• This guide applies to the Lenovo product models listed below. Illustrations in this guide may look slightly
  different from your product model.

    Model name                                         Machine types (MT)

    IdeaCentre AIO 3 22ADA6                            F0G6
    IdeaCentre AIO 3 22ITL6                            F0G5
    IdeaCentre AIO 3 24ADA6                            F0FX
    IdeaCentre AIO 3 24ALC6                            F0G1
    IdeaCentre AIO 3 24ITL6                            F0G0
    IdeaCentre AIO 3 27ALC6                            F0FY
    IdeaCentre AIO 3 27ITL6                            F0FW

• For further compliance information, refer to the Generic Safety and Compliance Notices at https://
  pcsupport.lenovo.com/docs/generic_notices.
• Depending on the model, some optional accessories, features, and software programs might not be
  available on your computer.
• Depending on the version of the operating systems and programs, some user interface instructions might
  not be applicable to your computer.
• Documentation content is subject to change without notice. Lenovo makes constant improvements to the
  documentation of your computer, including this User Guide. To get the latest documentation, go to https://
  pcsupport.lenovo.com.
• Microsoft® makes periodic feature changes to the Windows® operating system through Windows Update.
  As a result, some information in this documentation might become outdated. Refer to Microsoft resources
  for the latest information.

© Copyright Lenovo 2021                                                                                         iii
iv IdeaCentre AIO 3 User Guide
Chapter 1. Meet your computer

Overview

    1. Air vents                        2. Camera
    3. Multi-touch screen*              4. Combo audio jack

    5. Storage drive door*

Related topics
•     “USB specifications” on page 4.

* For selected models

© Copyright Lenovo 2021                                       1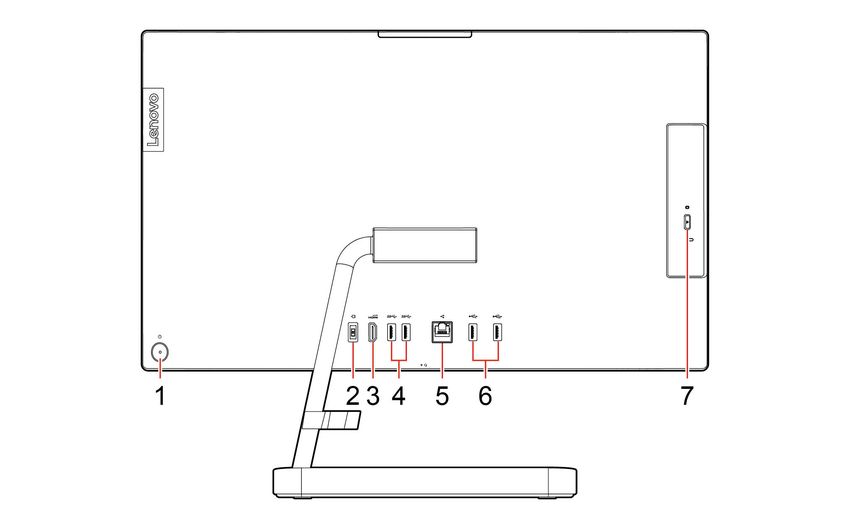
Rear
IdeaCentre AIO 3 22ADA6, IdeaCentre AIO 3 24ADA6, IdeaCentre AIO 3 24ALC6, and IdeaCentre AIO 3
27ALC6

    1. Power button/Power button indicator                2. Power connector
    3. HDMITM out connector                               4. USB 3.1 Gen 1 connectors
    5. Ethernet connector                                 6. USB 2.0 connectors
    7. Optical drive eject button

Related topics
•     “Use the optical drive (for selected models)” on page 12.
•     “Connect an external display” on page 9.
•     “USB specifications” on page 4.

Power indicator
Show the system status of your computer.
• Blinking for three times: The computer is initially connected to power.
• On: The computer is on.
• Off: The computer is off or in hibernation mode.
• Blinking rapidly: The computer is entering sleep or hibernation mode.
• Blinking slowly: The computer is in sleep mode.

2      IdeaCentre AIO 3 User Guide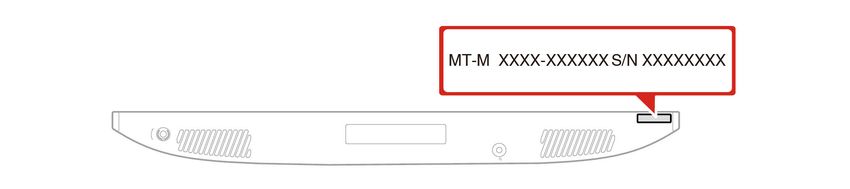
Rear
IdeaCentre AIO 3 22ITL6, IdeaCentre AIO 3 24ITL6, and IdeaCentre AIO 3 27ITL6

    1. Power button/Power button indicator                2. Power connector
    3. HDMI out connector                                 4. USB 3.1 Gen 2 connectors
    5. Ethernet connector                                 6. USB 2.0 connectors
    7. Optical drive eject button

Related topics
•     “Use the optical drive (for selected models)” on page 12.
•     “Connect an external display” on page 9.
•     “USB specifications” on page 4.

Power indicator
Show the system status of your computer.
• Blinking for three times: The computer is initially connected to power.
• On: The computer is on.
• Off: The computer is off or in hibernation mode.
• Blinking rapidly: The computer is entering sleep or hibernation mode.
• Blinking slowly: The computer is in sleep mode.

                                                                                  Chapter 1. Meet your computer   3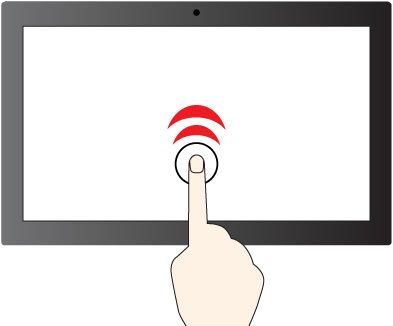
Features and specifications
For detailed specifications of your computer, go to https://psref.lenovo.com.

                                  To view the hardware information of your computer, type device manager in the
 Hardware
                                  Windows search box and then press Enter.

                                  • IdeaCentre AIO 3 22ADA6/IdeaCentre AIO 3 24ADA6: 65-watt automatic
                                    voltage-sensing power supply
 Power supply                     • IdeaCentre AIO 3 22ITL6/IdeaCentre AIO 3 24ALC6/IdeaCentre AIO 3 27ALC6:
                                    90-watt automatic voltage-sensing power supply
                                  • IdeaCentre AIO 3 24ITL6/IdeaCentre AIO 3 27ITL6: 90-watt/120-watt automatic
                                    voltage-sensing power supply

                                  • Mainland China: 220 V±22 V, 50 Hz±1 Hz
 Adaptability for power supply    • Adaptive voltage positioning: 90 V to 264 V, 50/60 Hz
                                  • With voltage selection switch: 90 V to 264 V, 50 Hz±1 Hz

                                  To view the microprocessor information of your computer, type system
 Microprocessor
                                  information in the Windows search box and then press Enter.

 Memory                           Double data rate 4 (DDR4) Small outline dual in-line memory module (SODIMM)

                                  • 2.5-inch form factor, 7-mm (0.28-inch) height hard disk drive
                                  • M.2 solid-state drive

 Storage device                   To view the storage drive capacity of your computer, type disk management in the
                                  Windows search box and then press Enter.

                                  Note: The storage drive capacity indicated by the system is less than the nominal
                                  capacity.

                                  • Memory slots
                                  • M.2 solid-state drive slot
 Expansion                        • Optical drive
                                  • Storage drive bay
                                  • PCI Express slots

                                  • Bluetooth*
 Network features                 • Ethernet LAN
                                  • Wireless LAN

* For selected models

USB specifications
Note: Depending on the model, some USB connectors might not be available on your computer.

4   IdeaCentre AIO 3 User Guide
Connector name Description
Connect USB-compatible devices, such as a USB
keyboard, USB mouse, USB storage device, or USB
printer.
• USB 2.0 connector
• USB 3.2 connector Gen 1
• USB 3.2 connector Gen 2
• Charge USB-C® compatible devices with the output
voltage and current of 5 V and 3 A.
• Connect to an external display:
– USB-C to VGA: 1900 x 1200 pixels, 60 Hz
– USB-C to DP: 3840 x 2160 pixels, 60 Hz
• Connect to USB-C accessories to help expand your
• USB-C (3.2 Gen 1) connector computer functionality. To purchase USB-C
• USB-C (3.2 Gen 2) connector accessories, go to https://www.lenovo.com/accessories.
• Thunderbolt 3 connector (USB-C)
• Thunderbolt 4 connector (USB-C)
Statement on USB transfer rate
Depending on many factors such as the processing capability of the host and peripheral devices, file
attributes, and other factors related to system configuration and operating environments, the actual transfer
rate using the various USB connectors on this device will vary and will be slower than the data rate listed
below for each corresponding device.
USB device Data rate (Gbit/s)
3.2 Gen 1 / 3.1 Gen 1 5
3.2 Gen 2 / 3.1 Gen 2 10
3.2 Gen 2 × 2 20
Thunderbolt 3 (USB-C) 40
Thunderbolt 4 (USB-C) 40
Chapter 1. Meet your computer 5Operating environment
Temperature
• Operating: From 5°C (41°F) to 35°C (95°F)
• Storage or transportation:
– For common desktop computers: From -40°C (-40°F) to 60°C (140°F)
– For all-in-one desktop computers: From -20°C (-4°F) to 60°C (140°F)
Relative humidity
• Operating: 20%-80% (non-condensing)
• Storage: 10%–90% (non-condensing)
Altitude
• Operating: -15.2 m (-50 ft) to 3048 m (10,000 ft)
• Storage: -15.2 m (-50 ft) to 12192m (40,000 ft)
6 IdeaCentre AIO 3 User GuideChapter 2. Get started with your computer
Adjust the computer stand (for selected models)
For full-function monitor stand
Work with Windows
The following table contains Windows frequently used settings. You can learn the basics and start working
with Windows right away.
To configure settings, type the corresponding keywords in the Windows search box and select the best
match. Follow the on-screen instructions to customize settings.
Table 1. Basic settings
Functions Descriptions Search by
keywords
Control Panel View or change Windows settings, including hardware and software setup Control Panel
and configuration.
Connect to Wi-Fi For models with a wireless LAN module, you can connect your computer to Wi-Fi
networks a Wi-Fi® network. Click the network icon in the Windows notification area,
and then select a network for connection.
Note: The wireless LAN module on your computer may support different
standards. For some countries or regions, use of 802.11ax may be disabled
according to local regulations.
Connect to wired For models with an Ethernet (RJ-45) connector, you can use an Ethernet —
networks cable to connect your computer to a wired network.
Airplane mode Airplane mode is a convenient setting to turn all wireless communications of Airplane mode
your computer on and off. You may need to turn it on when boarding an
airplane.
Night light mode Night light is a switch in Windows that you can turn on and off. When it is Night light
turned on, your screen shows warmer colors and the amount of emitted
blue light is reduced. Enabling night light reduces the chances of developing
eye fatigue or eye strain.
Note: For more guidance on reducing eye fatigue or eye strain, go to
https://www.lenovo.com/us/en/compliance/visual-fatigue.
© Copyright Lenovo 2021 7Table 1. Basic settings (continued)
Functions Descriptions Search by
keywords
Adjust color If night light mode is turned on, you can adjust the color temperature of the Night light
temperature screen.
Note: Selected Lenovo computers are low blue light certified. These
computers are tested with night light turned on and color temperature set to
the default value of 48.
Windows Microsoft periodically releases feature and security updates to the Windows Windows Updates
Updates operating system. Updates that are applicable to your Windows version are
downloaded automatically when your computer is connected to the
Internet. When updates are downloaded, you are prompted to restart the
computer to install these updates. You can also manually check if there are
available updates for the installed version of Windows.
Attention: Only use Windows Update to download and install updates.
Updates downloaded from other sources may include security risks.
Windows help information
If the on-screen instructions cannot solve your problem, refer to the following to get the online Windows help
information.
• Type Get Help or Tips in the Windows search box and then press Enter. When the app opens, type the
problem description and select the matched result.
• Visit Microsoft support Web site: https://support.microsoft.com. Enter what you are looking for in the
search box and get search results.
Use the touch screen (for selected models)
Note: Some gestures might not be applicable when you use certain apps.
Tap once to single click Tap twice quickly to double-click
Tap and hold to right-click Slide to scroll through items
8 IdeaCentre AIO 3 User GuideZoom in Zoom out
Swipe from the left to view all open windows Swipe from the right to open the action center
Swipe downwards shortly to show title bar Drag
Swipe downwards to close the current app
Maintenance tips
• Turn off the computer before cleaning the touch screen.
• Use a dry, soft, and lint-free cloth or a piece of absorbent cotton to remove fingerprints or dust from the
touch screen. Do not apply solvents to the cloth.
• The touch screen is a glass panel covered with a plastic film. Do not apply pressure or place any metallic
object on the screen, which might damage the touch panel or cause it to malfunction.
• Do not use fingernails, gloved fingers, or inanimate objects for input on the screen.
• Regularly calibrate the accuracy of the finger input to avoid a discrepancy.
Connect an external display
Connect a projector or a monitor to your computer to give presentations or expand your workspace.
Connect a wireless display
Ensure that both your computer and the wireless display support Miracast®.
Press the Windows and K Keys, and then select a wireless display to connect.
Chapter 2. Get started with your computer 9Change display settings To change display settings, type display settings in the Windows search box and then press Enter. 10 IdeaCentre AIO 3 User Guide
Chapter 3. Explore your computer

Lenovo Vantage

The preinstalled Lenovo Vantage is a customized one-stop solution to help you maintain your computer with
automated updates and fixes, configure hardware settings, and get personalized support.

Access Lenovo Vantage
Type Lenovo Vantage in the search box and then press Enter.

To download the latest version of Lenovo Vantage, go to Microsoft Store and search by the app name.

Key features
Lenovo Vantage enables you to:
• Know the device status easily and customize device settings.
• Download and install UEFI BIOS, firmware and driver updates to keep your computer up-to-date.
• Monitor your computer health, and secure your computer against outside threats.
• Scan your computer hardware and diagnose hardware problems.
• Look up warranty status (online).
• Access User Guide and helpful articles.

Notes:
• The available features vary depending on the computer model.
• Lenovo Vantage makes periodic updates of the features to keep improving your experience with your
  computer. The description of features might be different from that on your actual user interface.

Set the power plan
For ENERGY STAR® compliant computers, the following power plan takes effect when your computers have
been idle for a specified duration:
• turn off the display: After 10 minutes
• put the computer to sleep: After 25 minutes

To awaken the computer from Sleep mode, press any key on your keyboard.

To change or customize a power plan:
 1. Type power plan in the Windows search box and then press Enter.
 2. Customize a power plan of your preference.

© Copyright Lenovo 2021                                                                                11
Transfer data
Quickly share your files using the built-in Bluetooth technology among devices with the same features. You
also can install a disc or media card to transfer data.

Connect to a Bluetooth-enabled device (for selected models)
You can connect all types of Bluetooth-enabled devices to your computer, such as a keyboard, a mouse, a
smartphone, or speakers. To ensure that the connection is successful, place the devices 10 meters (33 feet),
at most, from the computer.

 1. Click the action center icon in the Windows notification area. Enable the Bluetooth feature.
 2. Click the bluetooth options to add a bluetooth device, and then follow the on-screen instructions.

Use the optical drive (for selected models)
If your computer has an optical drive, read the following information.

Know the type of your optical drive
To view the type of the optical driver, type device manager in the Windows search box and then press Enter.

Install or remove a disc
 1. With the computer on, press the eject button on the optical drive. The tray slides out of the drive.
 2. Insert a disc into the tray or remove a disc from the tray, and then push the tray back into the drive.

Note: If the tray does not slide out of the drive when you press the eject button, turn off the computer. Then,
insert a straightened paper clip into the emergency-eject hole adjacent to the eject button. Use the
emergency eject only in an emergency.

Record a disc
 1. Insert a recordable disc into the optical drive that supports recording.
 2. Do one of the following:
     • Open Windows Media Player.

12   IdeaCentre AIO 3 User Guide
• Double-click the ISO file.
3. Follow the on-screen instructions.
Purchase accessories
Lenovo has a number of hardware accessories and upgrades to help expand the capabilities of your
computer. Options include memory modules, storage devices, network cards, power adapters, keyboards,
mice, and more.
To shop at Lenovo, go to https://pcsupport.lenovo.com/warrantyupgrade.
Chapter 3. Explore your computer 1314 IdeaCentre AIO 3 User Guide
Chapter 4. CRU replacement
Customer Replaceable Units (CRUs) are parts that can be upgraded or replaced by the customer. Lenovo
computers contain the following types of CRUs:
• Self-service CRUs: Refer to parts that can be installed or replaced easily by customer themselves or by
  trained service technicians at an additional cost.
• Optional-service CRUs: Refer to parts that can be installed or replaced by customers with a greater skill
  level. Trained service technicians can also provide service to install or replace the parts under the type of
  warranty designated for the customer’s machine.

If you intend on installing the CRU, Lenovo will ship the CRU to you. CRU information and replacement
instructions are shipped with your product and are available from Lenovo at any time upon request. You
might be required to return the defective part that is replaced by the CRU. When return is required: (1) return
instructions, a prepaid shipping label, and a container will be included with the replacement CRU; and (2) you
might be charged for the replacement CRU if Lenovo does not receive the defective CRU within thirty (30)
days of your receipt of the replacement CRU. For full details, see the Lenovo Limited Warranty
documentation at:
https://www.lenovo.com/warranty/llw_02

CRU list
The following is the CRU list of your computer.

Self-service CRUs
• Keyboard
• Mouse
• Power adapter
• Power cord
• Storage drive
• Storage drive door

Note: Replacement of any parts not listed above, including the built-in rechargeable battery, must be done
by a Lenovo-authorized repair facility or technician. Go to https://support.lenovo.com/partnerlocation for more
information.

Remove or replace a CRU
This section provides instructions on how to remove or replace a CRU.

Power cord and ac power adapter

Prerequisite
Before you start, read Generic Safety and Compliance Notices, and print the following instructions.

Note: Do not remove the power cord when the computer is connected to ac power. Otherwise, there might
be a risk of short circuits.

© Copyright Lenovo 2021                                                                                      15
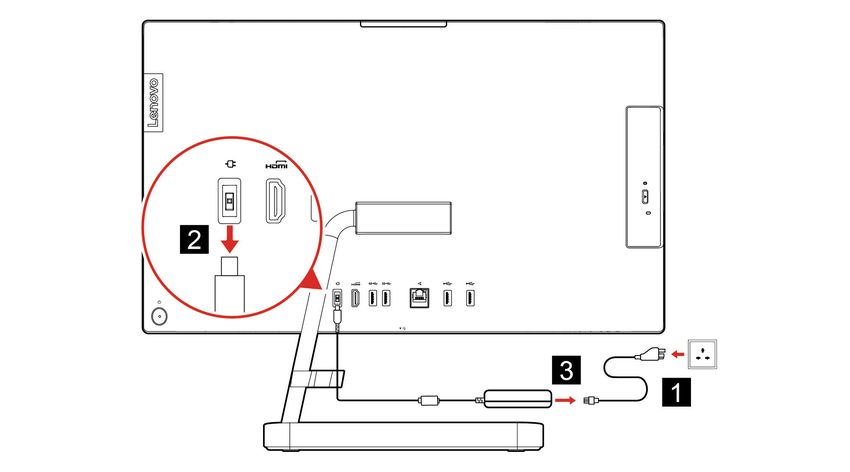
Replacement procedure
1. Turn off the computer and remove all connected devices and cables.
2. Remove the ac power adapter from the computer, and then remove the power cord from the power
adapter.
Figure 1. IdeaCentre AIO 3 22ADA6, IdeaCentre AIO 3 24ADA6, IdeaCentre AIO 3 24ALC6, and IdeaCentre AIO 3
27ALC6
Figure 2. IdeaCentre AIO 3 22ITL6, IdeaCentre AIO 3 24ITL6, and IdeaCentre AIO 3 27ITL6
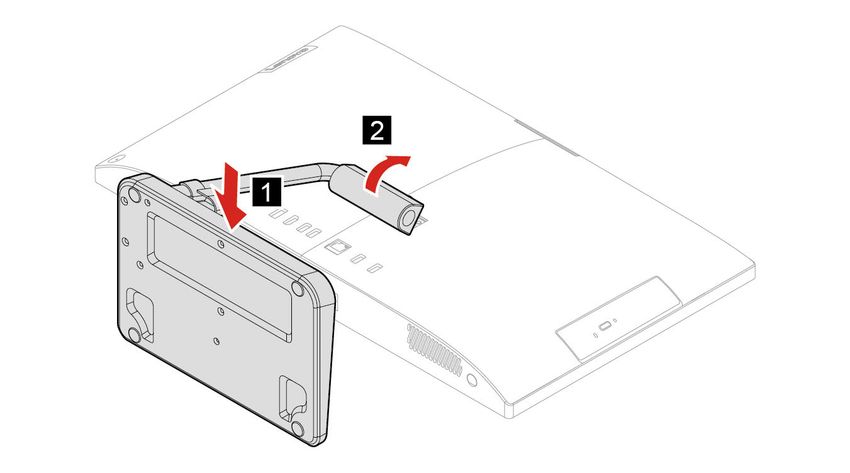
Computer stand
Prerequisite
Before you start, read Generic Safety and Compliance Notices, and print the following instructions.
Note: Do not remove the power cord when the computer is connected to ac power. Otherwise, there might
be a risk of short circuits.
Replacement procedure
1. Turn off the computer and remove all connected devices and cables.
16 IdeaCentre AIO 3 User Guide2. Remove the computer stand from the computer.
3. Install the computer stand to the computer.
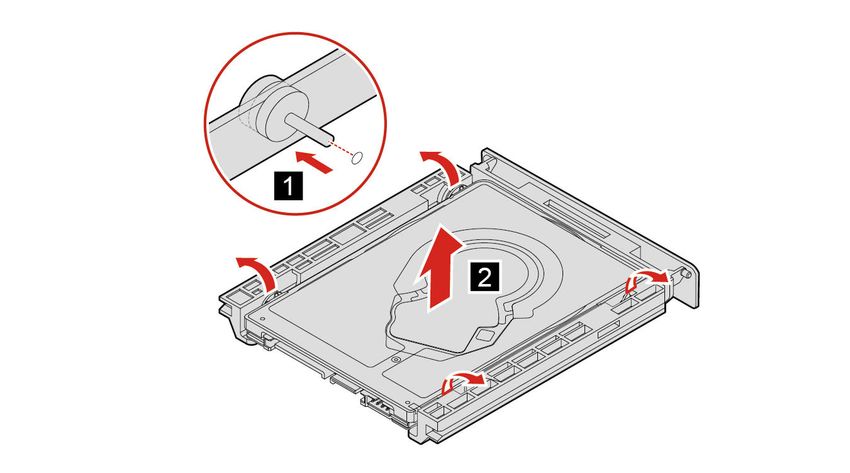
Storage drive
Prerequisite
Before you start, read Generic Safety and Compliance Notices, and print the following instructions.
Attention: The internal storage drive is sensitive. Inappropriate handling might cause damage and
permanent loss of data. When handling the internal storage drive, observe the following guidelines:
• Replace the internal storage drive only for upgrade or repair. The internal storage drive is not designed for
frequent changes or replacement.
• Before replacing the internal storage drive, make a backup copy of all the data that you want to keep.
• Do not touch the contact edge of the internal storage drive. Otherwise, the internal storage drive might get
damaged.
• Do not apply pressure to the internal storage drive.
• Do not make the internal storage drive subject to physical shocks or vibration. Put the internal storage
drive on a soft material, such as cloth, to absorb physical shocks.
Chapter 4. CRU replacement 17Removal steps 1. Remove the computer stand. See “Computer stand” on page 16. 2. Open the storage drive door. 3. Pull the storage drive out of the slot. 4. Remove the storage drive from the storage drive bracket. 18 IdeaCentre AIO 3 User Guide
Chapter 4. CRU replacement 19
5. Install the storage drive to the storage drive bracket.

 6. Push the storage drive back to the slot.

 7. Close the storage drive door.

20   IdeaCentre AIO 3 User Guide
Chapter 5. Help and support

Frequently asked questions
 How do I partition my storage
                                         Refer to https://support.lenovo.com/solutions/ht503851
 drive?
 What should I do if my computer         Press and hold the power button until the computer turns off. Then restart the
 stops responding.                       computer.

                                          1. Carefully unplug the ac power adapter and turn off the computer immediately.
                                             The more quickly you stop the current from passing through the computer the
                                             more likely you will reduce damage from short circuits.

                                             Attention: Although you might lose some data or work by turning off the
                                             computer immediately, leaving the computer on might make your computer
 What should I do if I spill liquid on       unusable.
 the computer?                            2. Wait until you are certain that all the liquid is dry before turning on your
                                             computer.

                                             CAUTION:
                                             Do not try to drain out the liquid by turning over the computer. If your
                                             computer has keyboard drainage holes on the bottom, the liquid will be
                                             drained out through the holes.

 Where can I get the latest device       • Lenovo Vantage or Lenovo PC Manager
 drivers and UEFI/BIOS?                  • Lenovo Support Web site at https://support.lenovo.com

Self-help resources
Use the following self-help resources to learn more about the computer and troubleshoot problems.

 Resources                                                        How to access?
 Troubleshooting and frequently asked questions
                                                                  • https://www.lenovo.com/tips
                                                                  • https://forums.lenovo.com

 Accessibility information                                        https://www.lenovo.com/accessibility

 Reset or restore Windows
                                                                  • Use Lenovo recovery options.
                                                                       1. Go to https://support.lenovo.com/
                                                                          HowToCreateLenovoRecovery.
                                                                       2. Follow the on-screen instructions.
                                                                  • Use Windows recovery options.
                                                                       1. Go to https://pcsupport.lenovo.com.
                                                                       2. Detect your computer or manually select your
                                                                          computer model.
                                                                       3. Click Diagnostics ➙ Operating System
                                                                          Diagnostics and then follow the on-screen
                                                                          instructions.

© Copyright Lenovo 2021                                                                                                     21
Resources How to access?
Use Lenovo Vantage to:
• Configure device settings.
• Download and install UEFI BIOS, drivers and firmware
updates. Type Lenovo Vantage in the search box and then press
• Secure you computer from outside threats. Enter.
• Diagnose hardware problems.
• Check the computer warranty status.
• Access User Guide and helpful articles.
Product documentation:
• Generic Safety and Compliance Notices
• Safety and Warranty Guide Go to https://pcsupport.lenovo.com. Then, follow the on-
screen instructions to filter out the documentation you
• Setup Guide want.
• This User Guide
• Regulatory Notice
Lenovo Support Web site with the latest support
information of the following:
• Drivers and software
• Diagnostic solutions Go to https://support.lenovo.com.
• Product and service warranty
• Product and parts details
• Knowledge base and frequently asked questions
• Use Get Help or Tips.
• Use Windows Search or the Cortana® personal
Windows help information assistant.
• Go to Microsoft support Web site: https://
support.microsoft.com.
22 IdeaCentre AIO 3 User GuideCall Lenovo
If you have tried to correct the problem yourself and still need help, you can call Lenovo Customer Support
Center.
Before you contact Lenovo
Prepare the following before you contact Lenovo:
1. Record the problem symptoms and details:
• What is the problem? Is it continuous or intermittent?
• Any error message or error code?
• What operating system are you using? Which version?
• Which software applications were running at the time of the problem?
• Can the problem be reproduced? If so, how?
2. Record the system information:
• Product name
• Machine type and serial number
The following illustration shows where to find the machine type and serial number of your computer.
Lenovo Customer Support Center
During the warranty period, you can call Lenovo Customer Support Center for help.
Telephone numbers
For a list of the Lenovo Support phone numbers for your country or region, go to:
https://pcsupport.lenovo.com/supportphonelist
Note: Phone numbers are subject to change without notice. If the number for your country or region is not
provided, contact your Lenovo reseller or Lenovo marketing representative.
Services available during the warranty period
• Problem determination - Trained personnel are available to assist you with determining if you have a
hardware problem and deciding what action is necessary to fix the problem.
• Lenovo hardware repair - If the problem is determined to be caused by Lenovo hardware under warranty,
trained service personnel are available to provide the applicable level of service.
• Engineering change management - Occasionally, there might be changes that are required after a product
has been sold. Lenovo or your reseller, if authorized by Lenovo, will make selected Engineering Changes
(ECs) that apply to your hardware available.
Services not covered
• Replacement or use of parts not manufactured for or by Lenovo or nonwarranted parts
• Identification of software problem sources
Chapter 5. Help and support 23• Configuration of UEFI BIOS as part of an installation or upgrade • Changes, modifications, or upgrades to device drivers • Installation and maintenance of network operating systems (NOS) • Installation and maintenance of programs For the terms and conditions of the Lenovo Limited Warranty that apply to your Lenovo hardware product, see “Warranty information” in the Safety and Warranty Guide that comes with your computer. Purchase additional services During and after the warranty period, you can purchase additional services from Lenovo at https:// www.lenovo.com/services. Service availability and service name might vary by country or region. 24 IdeaCentre AIO 3 User Guide
Appendix A. Notices and trademarks

Notices
Lenovo may not offer the products, services, or features discussed in this document in all countries. Consult
your local Lenovo representative for information on the products and services currently available in your
area. Any reference to a Lenovo product, program, or service is not intended to state or imply that only that
Lenovo product, program, or service may be used. Any functionally equivalent product, program, or service
that does not infringe any Lenovo intellectual property right may be used instead. However, it is the user's
responsibility to evaluate and verify the operation of any other product, program, or service.

Lenovo may have patents or pending patent programs covering subject matter described in this document.
The furnishing of this document does not give you any license to these patents. You can send license
inquiries, in writing, to:
   Lenovo (United States), Inc.
   8001 Development Drive
   Morrisville, NC 27560
   U.S.A.
   Attention: Lenovo Director of Licensing

LENOVO PROVIDES THIS PUBLICATION "AS IS" WITHOUT WARRANTY OF ANY KIND, EITHER EXPRESS
OR IMPLIED, INCLUDING, BUT NOT LIMITED TO, THE IMPLIED WARRANTIES OF NON-INFRINGEMENT,
MERCHANTABILITY OR FITNESS FOR A PARTICULAR PURPOSE. Some jurisdictions do not allow
disclaimer of express or implied warranties in certain transactions, therefore, this statement may not apply to
you.

Changes are made periodically to the information herein; these changes will be incorporated in new editions
of the publication. To provide better service, Lenovo reserves the right to improve and/or modify the
products and software programs described in the manuals included with your computer, and the content of
the manual, at any time without additional notice.

The software interface and function and hardware configuration described in the manuals included with your
computer might not match exactly the actual configuration of the computer that you purchase. For the
configuration of the product, refer to the related contract (if any) or product packing list, or consult the
distributor for the product sales. Lenovo may use or distribute any of the information you supply in any way it
believes appropriate without incurring any obligation to you.

The products described in this document are not intended for use in implantation or other life support
applications where malfunction may result in injury or death to persons. The information contained in this
document does not affect or change Lenovo product specifications or warranties. Nothing in this document
shall operate as an express or implied license or indemnity under the intellectual property rights of Lenovo or
third parties. All information contained in this document was obtained in specific environments and is
presented as an illustration. The result obtained in other operating environments may vary.

Lenovo may use or distribute any of the information you supply in any way it believes appropriate without
incurring any obligation to you.

Any references in this publication to non-Lenovo Web sites are provided for convenience only and do not in
any manner serve as an endorsement of those Web sites. The materials at those Web sites are not part of the
materials for this Lenovo product, and use of those Web sites is at your own risk.

© Copyright Lenovo 2021                                                                                      25
Any performance data contained herein was determined in a controlled environment. Therefore, the result
obtained in other operating environments may vary significantly. Some measurements may have been made
on development-level systems and there is no guarantee that these measurements will be the same on
generally available systems. Furthermore, some measurements may have been estimated through
extrapolation. Actual results may vary. Users of this document should verify the applicable data for their
specific environment.

This document is copyrighted by Lenovo and is not covered by any open source license, including any Linux
agreement(s) which may accompany software included with this product. Lenovo may update this document
at any time without notice.

For the latest information or any questions or comments, contact or visit the Lenovo Web site:
https://pcsupport.lenovo.com

Trademarks
LENOVO, LENOVO logo, IDEACENTRE, and IDEACENTRE logo are trademarks of Lenovo. Optane, and
Thunderbolt are trademarks of Intel Corporation or its subsidiaries in the U.S. and/or other countries.
Microsoft, Windows, and Cortana are trademarks of the Microsoft group of companies. HDMI is a trademark
of HDMI Licensing LLC in the United States and other countries. Wi-Fi, and Miracast are registered
trademarks of Wi-Fi Alliance. All other trademarks are the property of their respective owners. © 2021
Lenovo.

26   IdeaCentre AIO 3 User Guide
You can also read