F1 Flexible Array Loudspeaker System - F1 Model 812 and F1 Subwoofer Owner's Guide
←
→
Page content transcription
If your browser does not render page correctly, please read the page content below
F1 Flexible Array Loudspeaker System
                 F1 Model 812 and F1 Subwoofer

                                     Owner’s Guide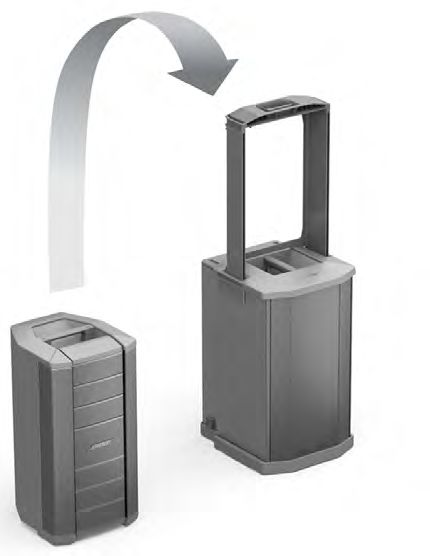
Important Safety Instructions
Please read this owner’s guide carefully and save it for 1. Read these instructions.
future reference. 2. Keep these instructions.
3. Heed all warnings.
WARNINGS: 4. Follow all instructions.
• To reduce the risk of fire or electrical shock, do not expose the product to rain or 5. Do not use this apparatus near water.
moisture.
• Do not expose this apparatus to dripping or splashing, and do not place objects filled 6. Clean only with a dry cloth.
with liquids, such as vases, on or near the apparatus. As with any electronic products, 7. Do not block any ventilation openings. Install in accordance with the manufacturer’s
use care not to spill liquids into any part of the system. Liquids can cause a failure instructions.
and/or a fire hazard. 8. Do not install near any heat sources, such as radiators, heat registers, stoves or
• Do not place any naked flame sources, such as lighted candles, on or near the other apparatus (including amplifiers) that produce heat.
apparatus.
9. Do not defeat the safety purpose of the polarized or grounding-type plug. A polarized
The lightning flash with arrowhead symbol within an equilateral triangle alerts
the user to the presence of uninsulated dangerous voltage within the system plug has two blades with one wider than the other. A grounding type plug has two
enclosure that may be of sufficient magnitude to constitute a risk of electrical blades and a third grounding prong. The wide blade or the third prong are provided
shock. for your safety. If the provided plug does not fit into your outlet, consult an electrician
The exclamation point within an equilateral triangle, as marked on the system, for replacement of the obsolete outlet.
is intended to alert the user to the presence of important operating and 10. Protect the power cord from being walked on or pinched, particularly at plugs,
maintenance instructions in this owner’s guide. convenience receptacles, and the point where they exit from the apparatus.
11. Only use attachments/accessories specified by the
This product contains magnetic material. Please contact your physician if you manufacturer.
have any questions on whether this might affect the operation of your
implantable medical device. 12. Use only with the cart, stand, tripod, bracket, or table specified by the manufacturer,
or sold with the apparatus. When a cart is used, use caution when
Contains small parts which may be a choking hazard. Not suitable for children moving the cart/apparatus combination to avoid injury from tip-over.
under age 3. 13. Unplug this apparatus during lightning storms or when unused for
long periods of time.
14. Refer all servicing to qualified service personnel. Servicing is required
CAUTIONS: when the apparatus has been damaged in any way: such as power supply cord or
• This product shall be connected to a mains socket outlet with a protective earthing plug is damaged; liquid has been spilled or objects have fallen into the apparatus;
connection. the apparatus has been exposed to rain or moisture, does not operate normally, or
• Do not make unauthorized alterations to the product; doing so may compromise has been dropped.
safety, regulatory compliance, system performance, and may void the warranty.
For Japan only:
Notes: Provide an earth connection before the main plug is connected to the mains.
• Where the mains plug or appliance coupler is used as the disconnect device, such For Finland, Norway, and Sweden:
disconnect device shall remain readily operable. • In Finnish: “Laite on liitettävä suojamaadoituskoskettimilla varustettuun pistorasiaan”
• The product must be used indoors. It is neither designed nor tested for use outdoors, • In Norwegian: “Apparatet må tilkoples jordet stikkontakt”
in recreational vehicles, or on boats. • In Svenska: “Apparaten skall anslutas till jordat uttag”
This product conforms to all applicable EU directive requirements. For China only:
The complete Declaration of Conformity can be found at
www.Bose.com/compliance. CAUTION: Only suitable for use at areas with altitude less than 2000m.
This symbol means the product must not be discarded as household
waste, and should be delivered to an appropriate collection facility for
recycling. Proper disposal and recycling helps protect natural resources, Please complete and retain for your records
human health and the environment. For more information on disposal and
recycling of this product, Contact your local municipality, disposal service, Now is a good time to record the serial numbers of your
or the shop where you bought this product. product. Serial numbers can be found on the rear panel.
NOTE: This equipment has been tested and found to comply with the limits for a You can register your product online at www.Bose.com/
Class A digital device, pursuant to part 15 of the FCC Rules. These limits are designed register or by calling 877-335-2673. Failure to do so will
to provide reasonable protection against harmful interference when the equipment is not affect your warranty rights.
operated in a commercial environment. This equipment generates, uses, and can radiate
radio frequency energy and, if not installed and used in accordance with the instruction
manual, may cause harmful interference to radio communications. Operation of this F1 Model 812 Loudspeaker_____________________________
equipment in a residential area is likely to cause harmful interference in which case the
user will be required to correct the interference at their own expense.
This Class A digital apparatus complies with Canadian ICES-003.
F1 Subwoofer_________________________________________
Changes or modifications not expressly approved by Bose Corporation could void the
user’s authority to operate this equipment.
2 - EnglishContents
Introduction
Product Description....................................................................................................................................................... 4
Features and Benefits.................................................................................................................................................... 4
Carton Contents............................................................................................................................................................. 4
F1 Model 812 Flexible Array Loudspeaker..................................................................................................................... 5
F1 Subwoofer................................................................................................................................................................. 5
Using the Flexible Array................................................................................................................................................. 6
Adjusting the array................................................................................................................................................... 6
Four coverage patterns............................................................................................................................................ 6
Applications............................................................................................................................................................. 7
Setting Up the System
Using the F1 Model 812 with the F1 Subwoofer............................................................................................................ 8
Using the F1 Model 812 on a Tripod Stand................................................................................................................... 9
Operation
F1 Model 812 Control Panel........................................................................................................................................... 10
F1 Subwoofer Control Panel.......................................................................................................................................... 11
Power On/Off Sequence................................................................................................................................................ 12
Setting EQ selector switches......................................................................................................................................... 12
Connecting Sources....................................................................................................................................................... 12
Setting Up INPUT 1 with a Microphone................................................................................................................... 12
Setting Up INPUT 1 with a Source.......................................................................................................................... 12
Setting Up INPUT 2 with a Source.......................................................................................................................... 12
Connection Scenarios.................................................................................................................................................... 13
Full band, mixing console stereo output to L/R F1 Model 812 Loudspeakers........................................................ 13
Full band with mixing console, one F1 Subwoofer and two F1 Model 812 Loudspeakers..................................... 13
Mixing console stereo output to F1 Subwoofer and left/right F1 Model 812 Loudspeakers.................................. 14
Stereo input to Left/right F1 Subwoofers and F1 Model 812 Loudspeakers.......................................................... 15
Mic to F1 Model 812 Loudspeaker INPUT 1........................................................................................................... 16
Mobile device to single F1 Model 812 Loudspeaker............................................................................................... 16
Mobile device to F1 Flexible Array Loudspeaker system........................................................................................ 17
Mobile device to F1 Model 812 Loudspeaker and F1 Subwoofer........................................................................... 17
DJ Console to two F1 Subwoofers and two F1 Model 812 Loudspeakers............................................................. 18
Care and Maintenance
Caring for Your Product.................................................................................................................................................. 19
Cleaning................................................................................................................................................................... 19
Getting Service........................................................................................................................................................ 19
Troubleshooting.............................................................................................................................................................. 19
LED Indicators................................................................................................................................................................ 20
Limited Warranty and Registration................................................................................................................................. 20
Accessories.................................................................................................................................................................... 20
Technical Information..................................................................................................................................................... 21
Physical.................................................................................................................................................................... 21
Electrical.................................................................................................................................................................. 21
Input/Output Connector Wiring Reference.............................................................................................................. 21
English - 3Introduction
Product Description
The Bose® F1 Model 812 Flexible Array Loudspeaker is the first powered portable loudspeaker that lets you control
its vertical coverage pattern. Simply push or pull the array into position to create “Straight,” “C,” “J” or “Reverse J”
coverage patterns. And once set, the system automatically changes the EQ to maintain optimum tonal balance for
each coverage pattern. So whether you’re playing at floor level, on a stage, or facing raked seats or bleachers, you can
now adapt your PA to match the room.
Engineered with an array of eight high-output mid/high drivers, a high-powered 12" woofer and a lower crossover
point, the loudspeaker delivers high SPL performance while maintaining vocal and midrange clarity that’s dramatically
better than conventional loudspeakers.
For extended bass response, the Bose F1 Subwoofer packs all the power of a larger bass box into a more compact
design that’s easier to carry and fits in a car. A mounting stand for the loudspeaker is integrated right into the body of
the subwoofer, so you always know where it is, making setup fast and easy. The stand even includes cable channels to
neatly hide the wires.
The loudspeaker and subwoofer each have 1,000 watts of power, so you can fill nearly any venue with sound.
And now getting there is easier, too. The loudspeaker and subwoofer feature light weight, high impact composite
materials and strategically placed handles for easy transport.
For the first time, the F1 Model 812 Loudspeaker allows you to focus sound where it’s needed. So no matter where
you perform, your PA has you covered.
Features and Benefits
• The flexible, eight-loudspeaker array of the F1 Model 812 allows you to select one of four coverage patterns to direct
sound to where the audience is located resulting in better overall clarity throughout the venue.
• The vertical orientation of the eight-driver loudspeaker array helps deliver wide, consistent sound coverage,
providing better clarity and tonal balance for speech, music, and instruments.
• F1 Subwoofer provides a unique built-in speaker stand for the F1 Model 812, eliminating the need for a conventional
pole mount.
• Attractive design creates a unique system with a rugged but professional look.
• The bi-amplified design includes powerful, lightweight amplifiers that provide consistent output over long durations
with extended dynamic range and lower operating temperatures.
Carton Contents
Each loudspeaker is packaged separately with the items indicated below.
F1 Model 812 Flexible Array Loudspeaker F1 Subwoofer
AC power cord* AC power cord*
Owner’s Guide Owner’s Guide
F1 Model 812 Loudspeaker F1 Subwoofer with built-in stand
*The appropriate power cord(s) for your region is included.
4 - EnglishIntroduction
F1 Model 812 Flexible Array Loudspeaker
Note: The F1 Model 812 comes with threaded M8 inserts for rigging or attaching accessory brackets.
CAUTION: Only professional installers with the knowledge of proper hardware and safe mounting techniques should
attempt to install any loudspeaker overhead.
Carry handle
Threaded M8
inserts
TOP
Flexible array Threaded Carry handle
M8 inserts
Connections and
controls panel
Front LED
FRONT REAR
F1 Subwoofer
Built-in speaker
stand
Carry handle
Speaker stand
slots
TOP
Front LED
Connections and
controls panel
Carry handle
AC input connector
and power switch
FRONT REAR
English - 5Introduction Using the Flexible Array You can shape the coverage pattern by moving the position of the top and bottom array. The array position is held in place by magnets that trigger internal sensors that adjust EQ according to array shape. Adjusting the array Pushing the array in Pulling the array out Four coverage patterns Straight pattern J pattern Pull top and bottom array out Pull top array out, push bottom array in. Reverse-J pattern C pattern Push top array in, pull bottom array out. Push top and bottom array in. 6 - English
Introduction
Applications
Straight pattern
Use the straight pattern when the
audience is standing and their
heads are approximately at the
same height as the loudspeaker.
Reverse-J pattern
The reverse-J pattern is good
for an audience in raked seating
that starts at loudspeaker height
and extends above the top of the
loudspeaker.
J pattern
The J pattern works well when
the loudspeaker is up on a raised
stage and the audience is seated
below on the floor.
C pattern
Use the C pattern for raked
seating in an auditorium when the
first row is on the floor with the
loudspeaker.
English - 7Setting Up the System
Using the F1 Model 812 with the F1 Subwoofer
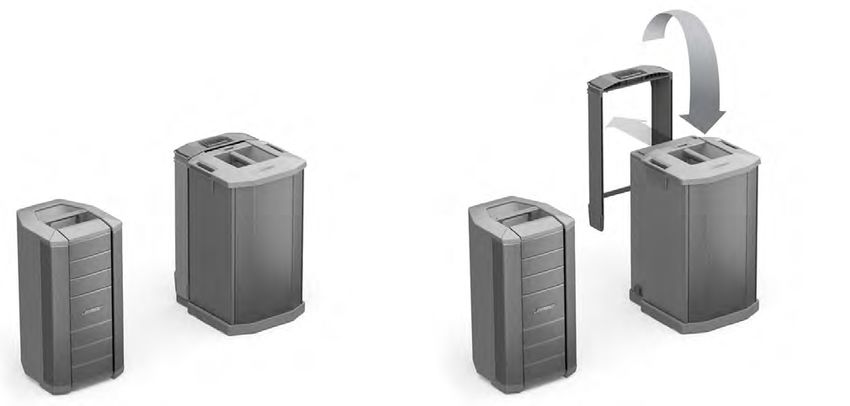
The built-in loudspeaker stand is stored in the rear of the subwoofer. Setting up the F1 Model 812 Loudspeaker with
the F1 Subwoofer is easy:
1. Remove the built-in speaker stand from the back of the F1 Subwoofer and insert it into the stand slots.
Built-in speaker
stand
Stand slots
2. Lift the F1 Model 812 Loudspeaker and place it on the stand.
8 - EnglishSetting Up the System
3. Plug in your audio cables. Feed the cables from the F1 Model 812 through the channels in the speaker stand to
help keep them organized.
Cable
channel
(both sides)
Using the F1 Model 812 on a Tripod Stand
The bottom of the F1 Model 812 Loudspeaker includes pole cup for mounting the loudspeaker on a tripod speaker
stand. The pole cup fits a standard 35 mm post.
WARNING: Do not use the F1 Model 812 Loudspeaker with a tripod stand that is unstable. The loudspeaker is only
designed for use on a 35 mm pole, and the tripod stand must be capable of supporting a loudspeaker with a minimum
weight of 44.5 lb (20.2 Kg) lbs and an overall size of 26.1" H x 13.1" W x 14.6" D (665 mm H x 334 mm W x 373 mm D)
inches (mm). Using a tripod stand that is not designed to support the size and mass of the F1 Model 812
Loudspeaker may lead to an unstable and hazardous condition that could result in injury.
Pole cup fits a standard
35 mm tripod stand
English - 9Operation
F1 Model 812 Control Panel
Note: For a complete list of LED indications and behaviors, see “LED Indicators” on page 20.
POWER: AC AC power
power on/off input
SIGNAL/CLIP: Displays the input signal status SIGNAL/CLIP: Displays the input signal
in color. status in color.
• Green = signal present. • Green = signal present.
• Red = signal clipping, input signal too high • Red = signal clipping, input signal too high.
VOLUME: Adjusts channel volume. VOLUME: Adjusts channel volume.
RCA connectors: Analog stereo input for
SIGNAL INPUT: Selector switch sets input audio sources such as DJ controllers and
sensitivity for input type. Combo connector other line-level sources. Left and right are
accepts XLR mic connector or ¼" phone summed, producing a mono audio output
plug (TRS balanced or TS unbalanced and mono signal to LINE OUTPUT (XLR).
cables).
• Left (White)
• MIC selects sensitivity for microphone
inputs (dynamic or self-powered mics • Right (Red)
only) – use only when a mic is connected ¼" phone connector: Provides analog
directly to the input. input for guitars and other instruments.
• LINE selects sensitivity for line-level in- Accepts TRS balanced or TS unbalanced
puts, for example, from a mixing console cables.
or DJ controller.
POWER/FAULT:
• Blue = power on.
• Red = fault condition.
LIMIT:
• Amber = system limiting (protection mode).
FRONT LED:
• POWER enables front LED to indicate power status.
• LIMIT engages a limiting display on the front LED.
• OFF turns off the front LED.
EQ: (See “Power On/Off Sequence” on page 12.)
• FULL RANGE allows the loudspeaker to function without high-pass filtering.
• WITH SUB engages a high-pass filter (100 Hz) when using the loudspeaker with the F1
subwoofer. Recommended when using with F1 Subwoofer.
LINE OUTPUT:
• Balanced XLR line output provides a mix of input 1 and 2, post input volume control. Can
be used to daisy chain speakers together.
10 - EnglishOperation
F1 Subwoofer Control Panel
Note: For a complete list of LED indications and behaviors, see “LED Indicators” on page 20.
FRONT LED selector switch:
• POWER enables LED to indicate power
status.
• LIMIT enables LED to indicate limiting.
• OFF turns off LED.
POWER/FAULT: indicates power/fault
LINE OUTPUT 1 & 2: status
Individual outputs that provide
balanced line output signals • Blue = power on.
(pre-volume control) that can be • Red = fault condition.
sent to powered loudspeakers
or a
dditional s ubwoofers. LIMIT: Amber = system limiting.
Note: When the LINE OUTPUT SIGNAL/CLIP: Displays the input signal
EQ selector switch is set to status in color.
THRU, the LINE OUTPUT signal • Green = signal present.
will be full range. • Red = signal clipping - input signal too
LINE INPUT 1 & 2: high.
Combination XLR – ¼" phone VOLUME – Adjusts subwoofer volume.
connector inputs that accept Middle detent position is 0dB – nominal
line level signals. position when the F1 Model 812 and F1
Subwoofer are connected to a mixing
console. Use 0dB position for a line-level
POLARITY: signal input.
• NORM is used when when the LINE OUTPUT EQ: (See “Power On/Off
F1 Model 812 loudspeaker is Sequence” on page 12.)
mounted on the supplied stand. • THRU passes input signal to the output
• REV may be used to better align with no filtering. Recommended when
the bass when the subwoofer is using with F1 Model 812.
located further away from the F1 • HPF passes input through a high-pass
Model 812 loudspeaker. (100 Hz) filter. Affects LINE OUTPUT
signals only.
AC input connector. POWER on/off switch.
English - 11Operation
Power On/Off Sequence
When turning the system on, turn on input sources and mixing consoles first and then turn on the F1 Model 812
Loudspeaker and the F1 Subwoofer. When turning the system off, turn off the F1 Model 812 and F1 Subwoofer first
followed by input sources and mixing consoles.
Setting EQ selector switches
Recommended settings for the EQ selector switches on the F1 Model 812 Loudspeaker and the F1 Subwoofer are
describe in the following table.
F1 Model 812 F1 Subwoofer
System Setup EQ Switch LINE OUTPUT EQ Switch
F1 Model 812 Loudspeaker used without F1 Subwoofer FULL RANGE Not applicable
Signal input to F1 Subwoofer, F1 Subwoofer output to F1 Model 812 Loudspeaker WITH SUB THRU
Signal input to F1 Model 812 Loudspeaker, F1 Model 812 output to F1 Subwoofer FULL RANGE No affect
or WITH SUB*
*Provides more bass extension.
Connecting Sources
Before plugging in a sound source, turn the VOLUME control of the channel fully counter-clockwise.
The two independent inputs provide a combination of input connectors that can accomodate microphone and
line-level sources.
Note: Only dynamic or self-powered microphones can be used for INPUT 1.
Setting Up INPUT 1 with a Microphone
1. Turn the INPUT 1 VOLUME fully counter-clockwise.
2. Set the SIGNAL INPUT switch to MIC. 0 dB (detent)
3. Plug the mic cable into the INPUT 1 connector.
4. Adjust the VOLUME to your desired level.
Setting Up INPUT 1 with a Source
1. Turn the INPUT 1 VOLUME fully counter-clockwise.
2. Set the SIGNAL INPUT switch to LINE LEVEL.
3. Plug the source cable into the INPUT 1 connector.
4. Adjust the VOLUME to your desired level.
Setting Up INPUT 2 with a Source
1. Turn the INPUT 2 VOLUME fully counter-clockwise.
2. Plug the source cable into an INPUT 2 connector. 0 dB (detent)
3. Adjust the VOLUME to your desired level.
12 - EnglishOperation
Connection Scenarios
Full band, mixing console stereo output to L/R F1 Model 812 Loudspeakers
L
Set F1 Model 812
EQ to FULL RANGE.
R
F1 Model 812
If using INPUT 1, set
F1 Model 812 SIGNAL
INPUT to LINE LEVEL.
F1 Model 812
Full band with mixing console, one F1 Subwoofer and two F1 Model 812 Loudspeakers
Set LINE
OUTPUT EQ
to THRU
(full range).
L
R
F1 Subwoofer F1 Model 812
Set F1
Model 812
EQ to WITH
SUB.
F1 Model 812
English - 13Operation
Mixing console stereo output to F1 Subwoofer and left/right F1 Model 812 Loudspeakers
Note: The recommend EQ settings are provided under the heading, “Power On/Off Sequence” on page 12. How-
ever, for maximum bass response, set the EQ selector switch on both F1 Model 812 Loudspeakers to FULL
RANGE and set the EQ selector switch on the F1 Subwoofer to THRU.
F1 Subwoofer
L
R
If using INPUT 1,
set F1 Model 812 F1 Model 812 Set F1 Model 812
SIGNAL INPUT to EQ to WITH SUB.
LINE LEVEL.
Set LINE
OUTPUT EQ
to THRU
(full range).
F1 Model 812
14 - EnglishOperation
Full band with mixing console stereo output to two F1 Subwoofers and two F1 Model 812 Loudspeakers
Set LINE
OUTPUT EQ
to THRU
(full range).
L
Set F1 Model
812 EQ to
WITH SUB.
R
F1 Subwoofer F1 Model 812
Set LINE
OUTPUT EQ Set F1 Model
to THRU 812 EQ to
(full range). WITH SUB.
F1 Subwoofer F1 Model 812
Stereo input to Left/right F1 Subwoofers and F1 Model 812 Loudspeakers
L
If using INPUT 1,
set F1 Model 812 F1 Model 812 Set F1 Model 812
SIGNAL INPUT to EQ to WITH SUB.
LINE LEVEL.
F1 Subwoofer
Set LINE
OUTPUT EQ
to THRU
(full range).
R
F1 Subwoofer F1 Model 812
English - 15Operation
Mic to F1 Model 812 Loudspeaker INPUT 1
Set F1 Model 812 Set F1 Model 812
SIGNAL INPUT to EQ to FULL RANGE.
MIC.
Mobile device to single F1 Model 812 Loudspeaker
Set F1 Model 812 EQ
to FULL RANGE.
Mobile device headphone
output to F1 Model 812
INPUT 2 RCA connectors.
16 - EnglishOperation
Mobile device to F1 Flexible Array Loudspeaker system
Set F1 Model 812
EQ to WITH SUB.
Mobile device headphone
output to F1 system.
Mobile device to F1 Model 812 Loudspeaker and F1 Subwoofer
F1 Model 812
F1 Subwoofer
Set F1
Model 812
EQ to FULL
RANGE.
Mobile device headphone
output to F1 Model 812
INPUT 2 RCA connectors.
English - 17Operation
DJ Console to two F1 Subwoofers and two F1 Model 812 Loudspeakers
F1 Subwoofer F1 Model 812
Set LINE Set F1
OUTPUT EQ Model
to THRU 812 EQ to
(full range). WITH SUB.
F1 Subwoofer F1 Model 812
18 - EnglishCare and Maintenance
Caring for Your Product
Cleaning
• Clean the product enclosures using only a soft, dry cloth.
• Do not use any solvents, chemicals, or cleaning solutions containing alcohol, ammonia, or abrasives.
• Do not use any sprays near the product or allow liquids to spill into any openings.
• If necessary, you may carefully vacuum the grille of the loudspeaker array.
Getting Service
For additional help in solving problems, contact the Bose Professional Sound Division at (877) 335-2673 or visit our
support area online at www.Bose.com/livesound.
Troubleshooting
If you experience problems while using this product, try the following solutions. The recommended troubleshooting
tools include a spare AC power cord and extra XLR and 1/4” phone plug cables.
Problem What to do
Loudspeaker is plugged in, • Make sure the power cord is fully engaged into both the F1 Model 812 Loudspeaker and the AC
power switch is on, but power outlet.
LED is off. • Make sure you have power at the AC outlet. Try operating a lamp or other equipment from the
same AC outlet.
• Try a different power cord.
Power LED is on (green),but • Make sure the VOLUME control is turned up.
no sound. • Make sure volume control is turned up on your instrument.
• Make sure your instrument or audio source is plugged into the appropriate input connector.
• If the F1 Model 812 Loudspeaker is receiving input from the F1 Subwoofer, make sure the
subwoofer is turned on.
Instrument or audio source • Lower the volume of the connected audio source.
sounds distorted. • If you are connected to an external mixing console, make sure input gain to the mixing console
input channel is not clipping.
• Reduce the output of the mixing console.
Microphone is encountering • Reduce the input gain on the mixing console.
feedback. • Try positioning the microphone so it nearly touches your lips.
• Try a different microphone.
• Use the tone controls on the mixing console to reduce the offending frequencies.
• Increase the distance from the loudspeaker to the microphone.
• If using a vocal effects processor, make sure it is not contributing to the feedback.
Poor Bass Response • If using the F1 Model 812 Loudspeaker without the F1 Subwoofer, make sure the EQ switch is
set to FULL RANGE.
• If using the F1 Model 812 Loudspeaker with the F1 Subwoofer, check to see if the POLARITY
switch is in NORMAL mode. If there is a fair amount distance between the F1 Subwoofer and
the F1 Model 812 Loudspeaker, setting the POLARITY switch to REV may improve bass.
• If using two F1 Subwoofers, make sure that the POLARITY switch is in the same position on
each subwoofer.
English - 19Care and Maintenance
Problem What to do
Excessive Noise or System • When connecting a microphone to the F1 Model 812 Loudspeaker, make sure the INPUT 1,
Hum SIGNAL INPUT switch is set to MIC.
• Check to make sure that all system connections are secure. Lines that are not completely
connected could create noise.
• If using a mixing console, external source or receiving input from the F1 Subwoofer, make sure
the INPUT 1 SIGNAL INPUT switch on the F1 Model 812 Loudspeaker is set to LINE.
• For best results, use balanced (XLR) connections on the system inputs.
• Keep all signal-carrying cables away from AC power cords.
• Light dimmers can cause hum in loudspeaker systems. To avoid this, plug the system into a
circuit that is not controlling lights or dimmer packs.
• Plug the audio system components into power outlets that share a common ground.
• Check cables at mixing console inputs by muting channels. If the hum goes away, replace the
cable at that mixing console channel.
LED Indicators
The following table describes LED behavior on both the F1 Model 812 Loudspeaker and F1 Subwoofer.
Type Location Color Behavior Indication Required Action
Front LED (Power) Front Grille Blue Steady state Loudspeaker is on None
Blue Pulsing Limiter is active, amplifier Reduce volume or
protection engaged source input level
SIGNAL/CLIP INPUT 1/2 Green (nominal) Flicker/Steady state Input signal present Adjust to desired level
Red Flicker/Steady state Input signal too high Reduce volume or
source input level
POWER/FAULT Rear panel Blue Steady state Loudspeaker is on None
Red Steady state Amplifier thermal shutdown Turn loudspeaker off
active
LIMIT Rear panel Amber Pulsing/Steady state Limiter is active, amplifier Reduce volume or
protection engaged source input level
Limited Warranty and Registration
Your product is covered by a limited warranty. Visit pro.Bose.com for warranty details.
Register your products online at www.Bose.com/register or call (877) 335-2673. Failure to do so will not affect your
warranty rights.
Accessories
A variety of wall/ceiling brackets, carry bags and covers are available for these products. Contact Bose to place an
order. See the contact information inside the rear cover of this guide.
20 - EnglishCare and Maintenance
Technical Information
Physical
Dimensions Weight
F1 Model 812 Loudspeaker 26.1" H x 13.1" W x 14.6" D (665 mm H x 334 mm W x 373 mm D) 44.5 lb (20.18 Kg)
F1 Subwoofer 27.0" H x 16.1" W x 17.6" D (688 mm H x 410 mm W x 449 mm D) 55.0 lb (24.95 Kg)
F1 system stack 73.5" H x 16.1" W x 17.6" D (1868 mm H x 410 mm W x 449 mm D) 99.5 lb (45.13 Kg)
Electrical
AC power rating Peak inrush current
F1 Model 812 Loudspeaker 100–240V 2.3–1.2A 50/60Hz 120 V RMS: 6.3A RMS
23 V RMS: 4.6A RMS
F1 Subwoofer 100–240V 2.3–1.2A 50/60Hz 120 V RMS: 6.3A RMS
23 V RMS: 4.6A RMS
Input/Output Connector Wiring Reference
TRS balanced TS unbalanced
XLR balanced XLR unbalanced
1 – Shield (ground) 1 – Shield (ground)
3 – Minus (–) 3 – Minus (–)
2 – Plus (+) 2 – Plus (+)
English - 21Additional Resources
Visit us on the web at pro.Bose.com. Hong Kong
Bose Limited
Americas Suites 2101-2105, Tower One, Times Square
(USA, Canada, Mexico, Central America, South America) 1 Matheson Street, Causeway Bay, Hong Kong
Bose Corporation 852 2123 9000
The Mountain
Framingham, MA 01701 USA India
Corporate Center: 508-879-7330 Bose Corporation India Private Limited
Americas Professional Systems, Salcon Aurum, 3rd Floor
Technical Support: 800-994-2673 Plot No. 4, Jasola District Centre
New Delhi – 110025, India
Australia 91 11 43080200
Bose Pty Limited
Unit 3/2 Holker Street Italy
Newington NSW Australia Bose SpA
61 2 8737 9999 Centro Leoni A – Via G. Spadolini
5 20122 Milano, Italy
Belgium 39-02-36704500
Bose N.V. / S.A
Limesweg 2, 03700 Japan
Tongeren, Belgium Bose Kabushiki Kaisha
012-390800 Sumitomo Fudosan Shibuya Garden Tower 5F
16-17, Nanpeidai-cho
China Shibuya-Ku, Tokyo, 150-0036, Japan
Bose Electronics (Shanghai) Co Ltd TEL 81-3-5489-0955
25F, L’Avenue www.bose.co.jp
99 Xianxia Road
Shanghai, P.R.C. 200051 China The Netherlands
86 21 6010 3800 Bose BV
Nijverheidstraat 8 1135 GE
France Edam, Nederland
Bose S.A.S 0299-390139
12 rue de Temara
78100 St. Germain en Laye, France United Kingdom
01-30-61-63-63 Bose Ltd
1 Ambley Green, Gillingham Business Park
Germany KENT ME8 0NJ
Bose GmbH Gillingham, England
Max-Planck Strasse 36D 61381 0870-741-4500
Friedrichsdorf, Deutschland
06172-7104-0 See website for other countries
English - 23©2015 Bose Corporation, The Mountain, Framingham, MA 01701-9168 USA AM740644 Rev. 00
You can also read