Ingest Data using Kafka to Cloudera Operational Database ReadyFlow - Date published: 2021-04-06 Date modified: 2021-12-21
←
→
Page content transcription
If your browser does not render page correctly, please read the page content below
Cloudera DataFlow

Ingest Data using Kafka to Cloudera
Operational Database ReadyFlow
Date published: 2021-04-06
Date modified: 2021-12-21

https://docs.cloudera.com/
Legal Notice
©   Cloudera Inc. 2021. All rights reserved.
The documentation is and contains Cloudera proprietary information protected by copyright and other intellectual property
rights. No license under copyright or any other intellectual property right is granted herein.
Copyright information for Cloudera software may be found within the documentation accompanying each component in a
particular release.
Cloudera software includes software from various open source or other third party projects, and may be released under the
Apache Software License 2.0 (“ASLv2”), the Affero General Public License version 3 (AGPLv3), or other license terms.
Other software included may be released under the terms of alternative open source licenses. Please review the license and
notice files accompanying the software for additional licensing information.
Please visit the Cloudera software product page for more information on Cloudera software. For more information on
Cloudera support services, please visit either the Support or Sales page. Feel free to contact us directly to discuss your
specific needs.
Cloudera reserves the right to change any products at any time, and without notice. Cloudera assumes no responsibility nor
liability arising from the use of products, except as expressly agreed to in writing by Cloudera.
Cloudera, Cloudera Altus, HUE, Impala, Cloudera Impala, and other Cloudera marks are registered or unregistered
trademarks in the United States and other countries. All other trademarks are the property of their respective owners.
Disclaimer: EXCEPT AS EXPRESSLY PROVIDED IN A WRITTEN AGREEMENT WITH CLOUDERA,
CLOUDERA DOES NOT MAKE NOR GIVE ANY REPRESENTATION, WARRANTY, NOR COVENANT OF
ANY KIND, WHETHER EXPRESS OR IMPLIED, IN CONNECTION WITH CLOUDERA TECHNOLOGY OR
RELATED SUPPORT PROVIDED IN CONNECTION THEREWITH. CLOUDERA DOES NOT WARRANT THAT
CLOUDERA PRODUCTS NOR SOFTWARE WILL OPERATE UNINTERRUPTED NOR THAT IT WILL BE
FREE FROM DEFECTS NOR ERRORS, THAT IT WILL PROTECT YOUR DATA FROM LOSS, CORRUPTION
NOR UNAVAILABILITY, NOR THAT IT WILL MEET ALL OF CUSTOMER’S BUSINESS REQUIREMENTS.
WITHOUT LIMITING THE FOREGOING, AND TO THE MAXIMUM EXTENT PERMITTED BY APPLICABLE
LAW, CLOUDERA EXPRESSLY DISCLAIMS ANY AND ALL IMPLIED WARRANTIES, INCLUDING, BUT NOT
LIMITED TO IMPLIED WARRANTIES OF MERCHANTABILITY, QUALITY, NON-INFRINGEMENT, TITLE, AND
FITNESS FOR A PARTICULAR PURPOSE AND ANY REPRESENTATION, WARRANTY, OR COVENANT BASED
ON COURSE OF DEALING OR USAGE IN TRADE.
Cloudera DataFlow | Contents | iii

Contents

  Understand the use case...........................................................................................4

  Ingesting data using Kafka to COD ReadyFlow................................................... 4
         Meeting the prerequisites..................................................................................................................................... 4
         Adding a ReadyFlow to the Catalog....................................................................................................................8
         Deploying the Kafka to COD ReadyFlow...........................................................................................................9
         Verifying Kafka to COD ingest operation.........................................................................................................12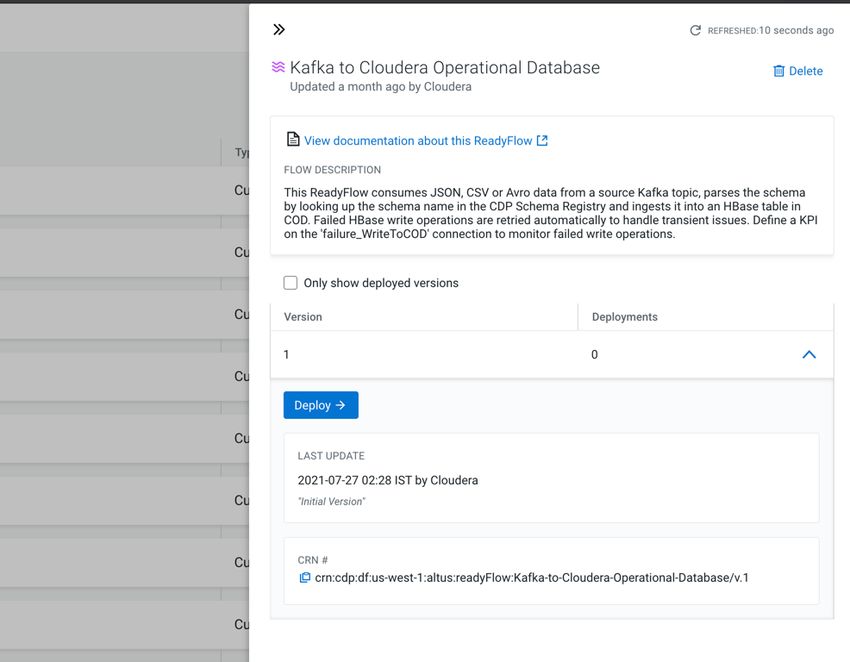
Cloudera DataFlow                                                                                                    Understand the use case

       Understand the use case
             You can use an Apache NiFi data flow to ingest data into Cloudera Operational Database (COD) through Cloudera
             DataFlow. Learn how to use NiFi to move data from a range of locations to COD in CDP Public Cloud.
             Today’s scalable web applications for use cases like hotel or flight bookings as well as mobile banking applications
             are relying on an equally scalable database which can serve data at a very low latency. COD in Cloudera DataFlow
             is powered by Apache HBase and provides application developers with everything they need to build scalable
             applications on top of it.
             You can use Apache NiFi data flows into Apache HBase in a CDP Public Cloud Operational Database cluster to
             make sure that the applications you build on top always have access to the latest data.
             In this topic, you view an example of ingesting data from a source Kafka topic to an HBase table in COD. There is
             a ReadyFlow in Cloudera DataFlow that ingests data from a Kafka topic to an HBase table in COD. This document
             describes how to use that ReadyFlow.

       Ingesting data using Kafka to COD ReadyFlow
             To develop the workflow to ingest data to an HBase table in Cloudera Operational Database (COD), you need to meet
             the prerequisites, add the ReadyFlow to the Catalog, deploy the ReadyFlow in Cloudera Dataflow, and verify the
             ingest operation.

       Meeting the prerequisites
             Learn how to collect the information you need to deploy the Kafka to Cloudera Operational Database (COD)
             ReadyFlow, and meet other prerequisites.
             Use the following checklist to ensure that you meet all the requirements before you start building your data flow:

             For your data ingest source
             •   You have created a Streams Messaging cluster in CDP Public Cloud to host your Schema Registry.
                 For information on how to create a Streams Messaging cluster, see Creating your First Streams Messaging Cluster
                 in CDP Public Cloud.
             •   You have created at least one Kafka topic.
                 1.   Navigate to Management Console > Environments and select your environment.
                 2.   Select your Streams Messaging cluster.
                 3.   Click on the Streams Messaging Manager icon.
                 4.   Navigate to the Topics page.
                 5.   Click Add New and provide the following information:
                      •   Topic name
                      •   Number of partitions
                      •   Level of availability
                      •   Cleanup policy
                              Tip:
                           SMM has automatically set Kafka topic configuration parameters. To manually adjust them, click
                           Advanced.
                 6. Click Save.

                                                                    4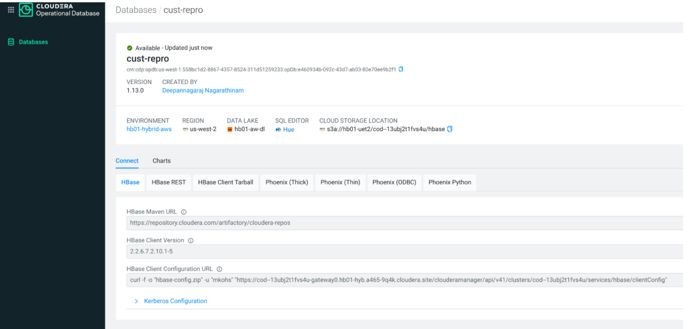
Cloudera DataFlow                                                                           Ingesting data using Kafka to COD ReadyFlow

             •   You have created a schema for your data and have uploaded it to the Schema Registry in the Streams Messaging
                 cluster.
                 For information on how to create a new schema, see Creating a new schema. For example:

                    {
                          "type":"record",
                          "name":"SensorReading",
                          "namespace":"com.cloudera.example",
                          "doc":"This is a sample sensor reading",
                          "fields":[
                             {
                                "name":"sensor_id",
                                "doc":"Sensor identification number.",
                                "type":"int"
                             },
                             {
                                "name":"sensor_ts",
                                "doc":"Timestamp of the collected readings.",
                                "type":"long"
                             },
                             {
                                "name":"sensor_0",
                                "doc":"Reading #0.",
                                "type":"int"
                             },
                             {
                                "name":"sensor_1",
                                "doc":"Reading #1.",
                                "type":"int"
                             },
                             {
                                "name":"sensor_2",
                                "doc":"Reading #2.",
                                "type":"int"
                             },
                             {
                                "name":"sensor_3",
                                "doc":"Reading #3.",
                                "type":"int"
                             }
                          ]
                    }
             •   You have the Schema Registry Host Name.
                 1. From Management Console, go to Data Hub Clusters and select the Streams Messaging cluster you are
                    using.
                 2. Navigate to the Hardware tab to locate the Master Node FQDN. Schema Registry is always running on the
                    Master node, so copy the Master node FQDN.
             •   You have the Kafka broker end points.
                 1.     From Management Console, click Data Hub Clusters.
                 2.     Select the Streams Messaging cluster from which you want to ingest data.
                 3.     Click the Hardware tab.
                 4.     Note the Kafka Broker FQDNs for each node in your cluster.
                 5.     Construct your Kafka Broker Endpoints by using the FQDN and Port number 9093 separated by a colon.
                        Separate endpoints by a comma. For example:

                         broker1.fqdn:9093,broker2.fqdn:9093,broker3.fqdn:9093

                                                                     5
Cloudera DataFlow Ingesting data using Kafka to COD ReadyFlow
• You have the Kafka Consumer Group ID.
This ID is defined by the user. Pick an ID and then create a Ranger policy for it. Use the ID when deploying the
flow in DataFlow.
• You have assigned the CDP Workload User policies to access the consumer group ID and topic.
1. Navigate to Management Console > Environments, and select the environment where you have created your
cluster.
2. Select Ranger. You are redirected to the Ranger Service Manager page.
3. Select your Streams Messaging cluster under the Kafka folder.
4. Create a policy to enable your Workload User to access the Kafka source topic.
5. On the Create Policy page, give the policy a name, select topic from the drop-down list, add the user, and
assign the Consume permission.
6. Create another policy to give your Workload User access to the consumer group ID.
7. On the Create Policy page, give the policy a name, select consumergroup from the drop-down list, add the
user, and assign the Consume permission.
• You have assigned the CDP Workload User read-access to the schema.
1. Navigate to Management Console > Environments, and select the environment where you have created your
cluster.
2. Select Ranger. You are redirected to the Ranger Service Manager page.
3. Select your Streams Messaging cluster under the Schema Registry folder.
4. Click Add New Policy.
5. On the Create Policy page, give the policy a name, specify the schema details, add the user, and assign the
Read permission.
For DataFlow
• You have enabled DataFlow for an environment.
For information on how to enable DataFlow for an environment, see Enabling DataFlow for an Environment.
• You have created a Machine User to use as the CDP Workload User.
• You have given the CDP Workload User the EnvironmentUser role.
1. From Management Console, go to the environment for which DataFlow is enabled.
2. From the Actions drop down, click Manage Access.
3. Identify the user you want to use as a Workload User.
Note:
The CDP Workload User can be a machine user or your own user name. It is best practice to create a
dedicated Machine user for this.
4. Give that user EnvironmentUser role.
• You have synchronized your user to the CDP Public Cloud environment that you enabled for DataFlow.
For information on how to synchronize your user to FreeIPA, see Performing User Sync.
6Cloudera DataFlow Ingesting data using Kafka to COD ReadyFlow
• You have granted your CDP user the DFCatalogAdmin and DFFlowAdmin roles to enable your user to add the
ReadyFlow to the Catalog and deploy the flow definition.
1. Give a user permission to add the ReadyFlow to the Catalog.
a. From Cloudera Management Console, click User Management.
b. Enter the name of the user or group you wish to authorize in the Search field.
c. Select the user or group from the list that displays.
d. Click Roles > Update Roles.
e. From Update Roles, select DFCatalogAdmin and click Update.
Note: If the ReadyFlow is already in the Catalog, then you can give your user just the
DFCatalogViewer role.
2. Give your user or group permission to deploy flow definitions.
a. From Cloudera Management Console, click Environments to display the Environment List page.
b. Select the environment to which you want your user or group to deploy flow definitions.
c. Click Actions > Manage Access to display the Environment Access page.
d. Enter the name of your user or group you wish to authorize in the Search field.
e. Select your user or group and click Update Roles.
f. Select DFFlowAdmin from the list of roles.
g. Click Update Roles.
For your data ingest target
• Ensure that the HBase table you are ingesting data to exists. If not, create one.
1. From CDP Experience UI, click Operational Database from the left navigation pane.
2. Click Create Database.
3. Select the environment for which DataFlow is enabled.
4. Enter a name for your database, and click Create Database.
5. Go to the newly created database from the Databases page.
6. Go to Hue UI by clicking Hue SQL Editor.
7. Click the HBase icon to go to HBase home.
8. Click New Table.
The Create New Table dialog appears.
9. Enter table name and column family name, and click Submit.
A blank table is created.
10. Go to the newly created table and click New Row.
The Insert New Row dialog appears.
11. Click Add Field, and then specify row key, column name, and cell value.
Note: The cloumn name should follow the format: family: column_name, where,
family is the column family name.
12. Click Submit.
• Obtain the table name, column family name, and row identifier of the HBase table in COD.
1. From CDP Experience UI, click Operational Database from the left navigation pane.
2. Select the database where your HBase table exists.
3. Go to Hue UI by clicking Hue SQL Editor.
4. Click the HBase icon to go to HBase home.
5. Click the HBase table in COD.
6. After the table appears, obtain the table name, column family name, and row identifier.
7Cloudera DataFlow Ingesting data using Kafka to COD ReadyFlow
• You have set Ranger policies for HBase table.
1. From the Cloudera Management Console, click Environments.
2. Use the search field to find and select the CDP environment for which DataFlow is enabled.
3. Go to the Ranger UI by clicking Ranger.
4. Select your database from the HBase folder.
5. Click Add New Policy.
6. Enter policy name, HBase table name, HBase column-family name, and HBase column value.
7. In Allow Conditions section, enter the name of the Machine User, you created in CDP, prefixed with srv_.
8. Click Add Permissions, and assign Read and Write permissions to the user.
9. Click Add.
• Obtain the hbase-site.xml file.
To get the hbase-site.xml file from CDP Data Hub:
1. From the Cloudera Management Console, click Environments.
2. Use the search field to find and select the CDP environment for which DataFlow is enabled.
3. Go to Data Hubs.
4. Select the Operational Database cluster.
5. Go to Cloudera Manager by clicking CM-UI.
6. Click Clusters from the left-navigation pane, and click hbase.
7. Click Actions > Download Client Configuration to download the client configuration zip file.
8. Unzip the zip file to obtain the hbase-site.xml file.
To get the hbase-site.xml file from CDP Experience:
1. From CDP Experience UI, click Operational Database from the left navigation pane.
2. Select the database where your HBase table exists.
3. Go to HBase Client Tarball tab.
4. Copy the HBase Client Configuration URL.
5. Use the URL as a command to download the client configuration zip file.
6. Unzip the zip file to obtain the hbase-site.xml file.
Adding a ReadyFlow to the Catalog
ReadyFlows are out of box flow definitions, designed to make getting started with Cloudera DataFlow quick and
easy. To use Kafka to Cloudera Operational Database (COD), just add the ReadyFlow to the Catalog.
Procedure
1. Log into Cloudera DataFlow.
8Cloudera DataFlow Ingesting data using Kafka to COD ReadyFlow
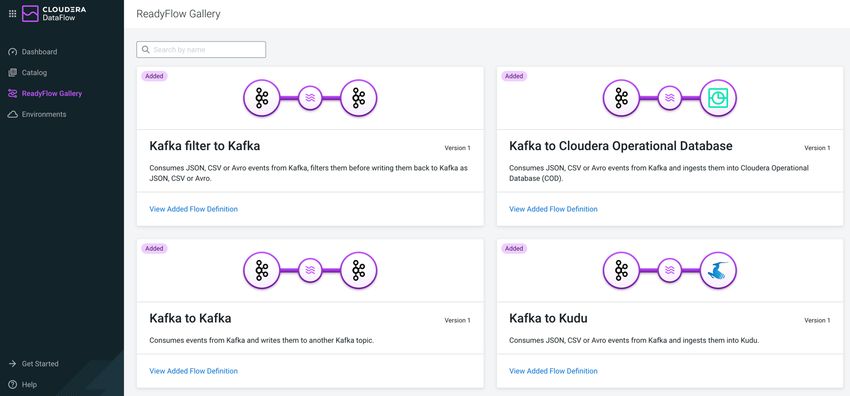
2. Click ReadyFlow Gallery from the left navigation pane.
The ReadyFlow Gallery page opens showing all ReadyFlows available.
3. Find the Kafka to Cloudera Operational Database ReadyFlow and click Add To Catalog.
If the ReadyFlow is already part of the Catalog, you can see the Added badge in the top left corner.
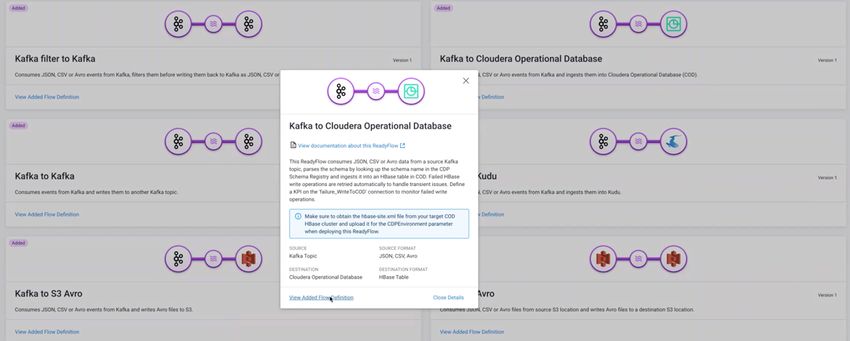
Note: If you want to see more information about the ReadyFlow before adding it to the Catalog, you can
click the ReadyFlow tile to open a pop-up window that provides you with a description of the ReadyFlow,
information about source, destination, supported data formats, and a link to the product documentation.
4. Click Add to confirm adding the ReadyFlow to the Cloudera DataFlow Catalog.
Results
The Kafka to Cloudera Operational Database ReadyFlow is added to the Catalog and is ready for deployment.
Deploying the Kafka to COD ReadyFlow
After you add the ReadyFlow to the Catalog, the next step is to deploy this flow definition.
9Cloudera DataFlow Ingesting data using Kafka to COD ReadyFlow
Procedure
1. Find the Kafka to Cloudera Operational Database (COD) ReadyFlow in the ReadyFlow Gallery and click View
Added Flow Definition to open the flow definition in the Catalog.
Alternatively, you can click Catalog in the left navigation pane, find the Kafka to Cloudera Operational Database
ReadyFlow in the list of flow definitions available to deploy, and click the row to display the flow definition
details.
The Deployment wizard launches.
2. Click on a row representing a flow definition version to display flow definition version details and the Deploy
button.
10Cloudera DataFlow Ingesting data using Kafka to COD ReadyFlow
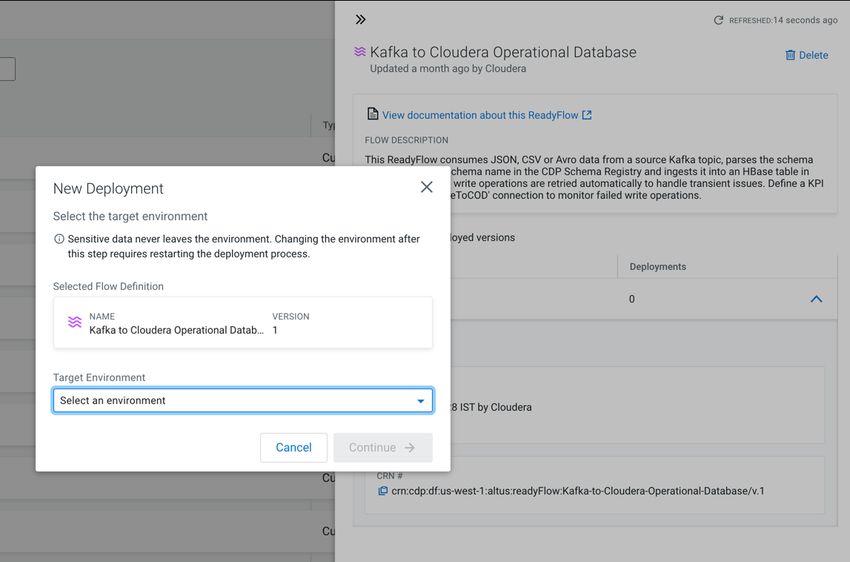
3. Click Deploy.
The New Deployment wizard appears.
4. Select the environment where COD is running, and click Continue.
The deployment starts and the Overview page appears.
5. In the Overview page, give your flow deployment a unique name and pick the NiFi Runtime Version for your
flow deployment.
Cloudera recommends that you always use a unique name and the latest available NiFi runtime version, if
possible.
6. Click Next.
The Parameters page appears.
7. Specify the following details:
• Enter the name of the Machine User, you created in CDP, prefixed with srv_, in the CDP Workload User
field, and password in the CDP Workload User Password field.
• Upload the Hbase site configuration file in the CDPEnvironment field to connect to the HBase cluster.
• Specify the COD table name, COD row identifier field name, and COD column family name from the HBase
table.
• Specify the data input format.
• Specify the Kafka broker endpoint, Kafka consumer group ID, and Kafka source topic name.
• Specify the schema name and schema registry hostname.
8. Click Next.
The Sizing & Scaling page appears.
9. Specify your Sizing & Scaling configurations.
10. Click Next.
11. In the KPIs page, you may choose to identify key performance indicators (KPIs), the metrics to track those KPIs,
and when and how to receive alerts about the KPI metrics tracking.
11Cloudera DataFlow Ingesting data using Kafka to COD ReadyFlow
12. Click Next.
The Review page appears.
13. Review the summary of the information provided and make any necessary edits by clicking Previous. When you
are finished, complete your flow deployment by clicking Deploy.
Results
Once you click Deploy, you are redirected to the Alerts tab in the detail view for the deployment where you can track
its progress.
Verifying Kafka to COD ingest operation
About this task
Navigate to Hue from your Cloudera Operational Database (COD) and verify that data is being ingested, as shown in
the following image:
12You can also read