INSTALLATION MANUAL - PEX-B PEX-A Expansion PEX - Apollo Flow
←
→
Page content transcription
If your browser does not render page correctly, please read the page content below
INSTALLATION MANUAL

              PEX-A Expansion PEX

              PEX-B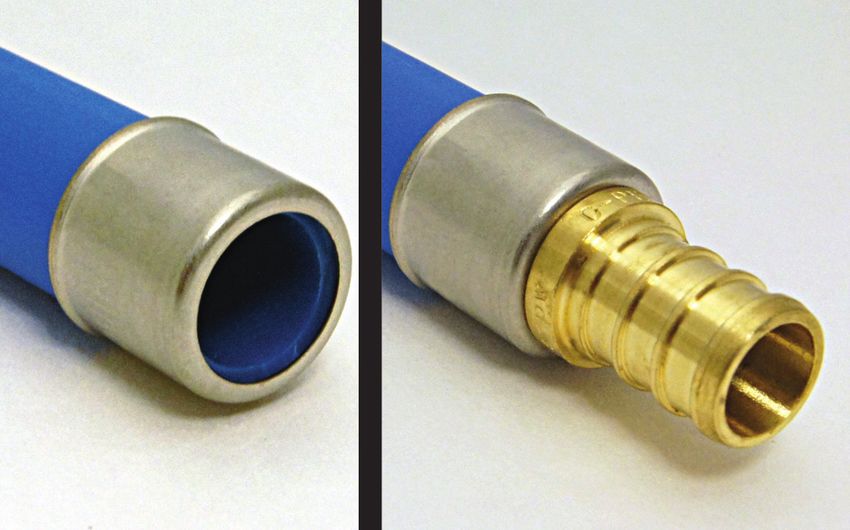
PEX

INSTALLATION MANUAL

What Is PEX?
Cross-linked polyethylene (PEX) is a high-temperature, flexible, polymer pipe. Cross-linking technology was first developed in Europe and
has since come into use around the world for a variety of applications. PEX has a 30-year history of successful use in the European market
with extensive testing for durability and material performance. It was first introduced in North America in 1984 where it was primarily used
for radiant floor heating. More recently, it has become used for domestic water distribution systems. It is approved for potable hot and cold
water supply systems in all model plumbing and mechanical codes across the United States including California and Canada.

Why Use PEX?
• Easy to Install - PEX tubing is joined with an easy to install “crimp” system; no solvent welding with messy chemicals, no chance of fire hazard possibilities due to
soldering
• Cost Effective - When installed using Manifolds fewer fittings are needed to install PEX; meaning you save money in material and time. PEX tubing also costs less
than copper pipe.
• Availability of Pipe Sizes - PEX tubing is available in a wide range of diameters.
• Energy Efficiency - PEX tubing minimizes heat transmission through the pipe wall.
• Quiet - When installed using Manifolds, PEX can be run in long lengths with smoother bends, meaning less water line noise. PEX also does not amplify sound as
readily as copper pipe.
• Water Conservation - Well designed PEX plumbing systems can reduce the wait time for hot water to reach the fixture.
• Environmentally Sound - PEX is an inert material and does not contain volatile organic compounds (VOCs).
• Installation Flexibility - PEX systems can be installed in either a conventional “trunk and branch” system or a manifold "home-run" system. PEX is also great
for adding fixtures off of your existing copper or CPVC system.
• Corrosion Resistant - Because of PEX’s smooth inner walls, minerals do not build up as fast as with copper pipe. It is also more resistant to the harmful effects
of abrasive chemicals such as chlorine.
• Freeze Resistant - While freezing conditions often cause copper and CPVC pipe to break or burst, causing thousands of dollars in water damage, PEX tubing will
expand several times its original size without damage. However, it is recommended that you follow all codes regarding water line freeze prevention.

Features:
• Tough
• Flexible
• Less expensive than other plumbing materials
• Copper tube size dimensions (CTS)
• Available in white, red, or blue

PEX-B Standards / Certifications:                                                         PEX-A Standards / Certifications:
• PEX 5006 - SDR 9		                  • Meets ASTM F876/F877                              • PEX 3006 - SDR 9		             • Meets ASTM F876/F877/F2023
• cNSFus-pw		                         • ANSI/NSF Standards 61 & 14                        • cNSFus-pw		                    • Meets ANSI/NSF 61 & 14
• cUPC			                             • CSA B137.5                                        • cUPC			                        • Meets CSA B137.5

Pressure & Temperature:
• 160 psi @ 73° F, 100 psi @ 180° F

2           www.apolloflow.com                              Customer Service: 1.888.229.2874
PEX

INSTALLATION MANUAL

What Is PEX? Why Use PEX?.............................................................................................2
Tools.................................................................................................................................4-12
Fittings..........................................................................................................................13-16
PEX Tubing...............................................................................................................17-18
Plumbing Systems...................................................................................................19-21
Manifolds...........................................................................................................................22-23

                                                     Customer Service: 1.888.229.2874              www.apolloflow.com                   3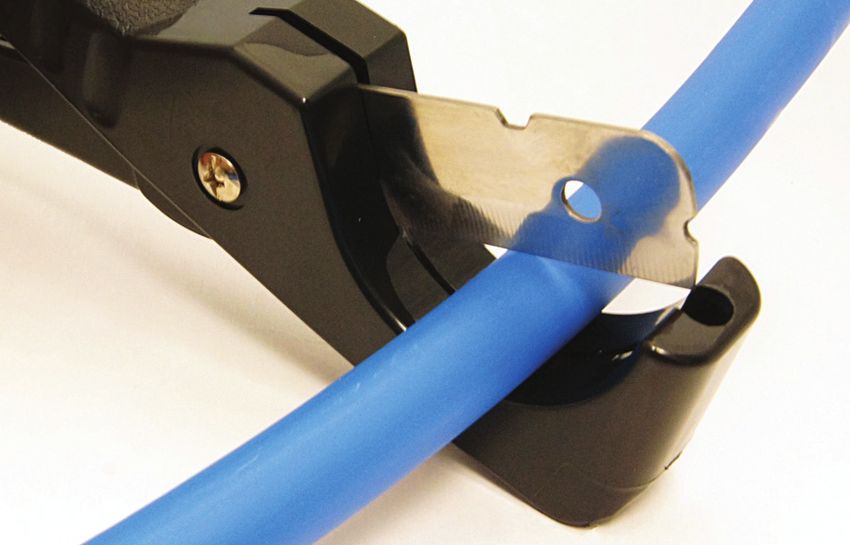
PEX CRIMP TOOL

HOW TO USE                                                                                                                              69PTKH00143 - 1/2"
                                                                                                                                        69PTKH00144 - 3/4"
Crimp Tools                                                                                                                               69PTKH00185 - 1"
                                                                                                                                   69PTKH0014C - 1/2" & 3/4"
                                                                                                                                      69PTKH0015K - 3/8"-1"

1. Cut tubing end squarely. Check for and                2. Slide crimp ring over end of tubing.                 3. Place the crimping end of tool around
   remove any burrs.                                        Insert fitting into end of tubing until it              the crimp ring and press the handles
                                                            stops. Position the crimp ring 1/8" to                  together.
                                                            1/4" from the end of the tubing and
                                                            over the ribs of the fitting.
                                                                    Apollo® PEX Crimp Rings                                Apollo® PEX PRO Crimp Rings
                                                          APXCR3810PK            3/8"         10 Pack             APXCR12LT                 1/2"         10 Pack
                                                          APXCR1210PK            1/2"         10 Pack             APXCR12LT25               1/2"         25 Pack
                                                          APXCR1225PK            1/2"         25 Pack             APXCR34LT                 3/4"         10 Pack
                                                          APXCR1250PK            1/2"         50 Pack             APXCR34LT25               3/4"         25 Pack
                                                          APXCR12100PK           1/2"        100 Pack
                                                          APXCR3410PK            3/4"         10 Pack
                                                          APXCR3425PK            3/4"         25 Pack
4. Check for proper crimp with the
   Go/ No-Go gauge.                                       APXCR34100PK           3/4"        100 Pack
                                                          APXCR15PK               1"          5 Pack
                                                          APXCR125PK              1"          25 Pack

    To remove and replace crimp heads: For 69PTKH0015K only (Heads cannot be replaced on all other Apollo® crimp tools)
                                                                                                         If you have a 69PTKH0015K that does not have spring
                                                                                                         loaded jaws, but jaws that are secured with screws, sim-
                                                                                                         ply loosen the screws located at the center of the jaws.
                                                                                                         Remove the jaws and slide the jaws you need into place.
                                                                                                         Replace the screws at the center of the jaws and tighten.
                             1                                 2                                  3
    1. With the handles. fully       2. Slide jaw out of position        3. With the side release
       open, press side release         and remove.                         spring pressed upward,
       spring upward until the                                              slide new jaw into place
       hook is above the jaw pin.                                           and release the spring.

4          www.apolloflow.com                        Customer Service: 1.888.229.2874
PEX ANGLE CRIMP TOOL

HOW TO USE                                                                                                           69PTKANG143 - 1/2"
                                                                                                                     69PTKANG144 - 3/4"
Angle Crimp Tool

                                                                                                           Moving
                                                                                                           handle

                                                                                                                 Stationary handle

1. Cut tubing end squarely. Check for and    2. Slide crimp ring over end of tubing.           3. To open the jaws: In a continuous
   remove any burrs.                            Insert fitting into end of tubing until it        motion, pull the moving handle apart,
                                                stops. Position the crimp ring 1/8" to            down, then back towards the stationary
                                                1/4" from the end of the tubing and               handle.
                                                over the ribs of the fitting.

                                                                                                         Apollo® PEX Crimp Rings
                                                                                             APXCR3810PK            3/8"           10 Pack
                                                                                             APXCR1210PK            1/2"           10 Pack
                                                                                             APXCR1225PK            1/2"           25 Pack
                                                                                             APXCR1250PK            1/2"           50 Pack
                                                                                             APXCR12100PK           1/2"           100 Pack
                                                                                             APXCR3410PK            3/4"           10 Pack
                                                                                             APXCR3425PK            3/4"           25 Pack
4. Place the crimping end of tool around     5. Check for proper crimp with the Go/ No-
                                                Go gauge. Crimped ring should slide          APXCR34100PK           3/4"           100 Pack
   the crimp ring. Push the handles
   together firmly until the jaws are           into the “Go” slot. Pressure test the        APXCR15PK               1"             5 Pack
   completely closed. Repeat step 3 to          PEX tubing and inspect before burying        APXCR125PK              1"            25 Pack
   release the tool from the crimped ring.      or normal use.
                                                                                                    Apollo® PEX PRO Crimp Rings
                                                                                             APXCR12LT              1/2"           10 Pack
                                                                                             APXCR12LT25            1/2"           25 Pack
                                                                                             APXCR34LT              3/4"           10 Pack
                                                                                             APXCR34LT25            3/4"           25 Pack

                                                Customer Service: 1.888.229.2874                www.apolloflow.com                            5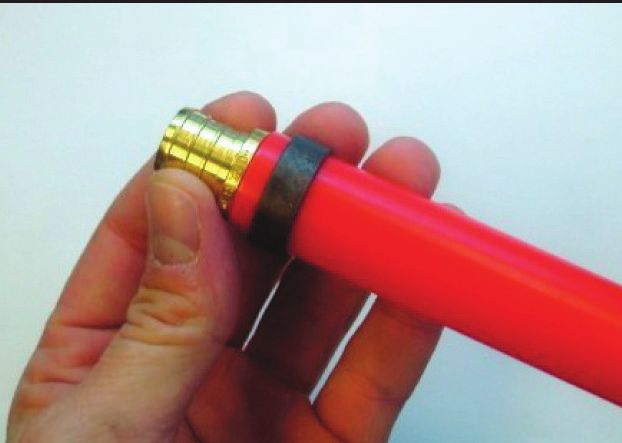
Works on PEX Rings
& RING
PEX CRIMP Cinch
REMOVALClamps
TOOL Up to 1"
Step
Step1 1 StepStep2 2
HOW TO USE
Makes Fittings
Set Dial onReusable
Tool to Desired Ring Cut PEX pipe close to fitting and
Set Dial
Cutting Sizeon Tool to Desired Ring Cutsmall
insert PEX pipe close69PTKD0009
jaw inside to fitting
fitting andand
Cutting Size insert small
Step jawforcing
1 insidecutter
fitting and
Crimp Ring Removal Tool compress handle,
compress handle, forcing cutter
emoval Tool Instructions
Operating
through
Set Dial crimp ring
through crimp ring Ring
on
Cutting Size
Tool to Desired
PEX Rings
mps Up to 1"
ngs Reusable Step 3 3 Step 4 4
1. Set dial or thumb slide on tool to desired Reposition
2. Cut PEXcutter
Step
totoother
pipe close fittingside of
and insert 3.Remove
RepositionPEX
Step
cutterRing from
to other sidePipe
of crimp
Reposition cutter to other side of ringRemove PEXhandle
Ringforcing
fromthePipe
Step 1
ring cutting size. crimpsmall
ringjaw
crimp
andinside
ring Step
compress
fitting
andcutter
compress 2
andhandle
compress
handle
and compress
Step 3
Instructions forcing the crimp ringclose
open to fitting and
handle, forcing through crimp crimp ring open.
Set Dial on Tool to Desired Ring ring.Cutthe
forcing PEXcrimp
pipe ring open
Cutting Size insert small jaw inside fitting and Reposition cutter to other side of
compress handle, forcing cutter crimp ring and compress handle
through crimp ring forcing the crimp ring open
4. Remove PEX ring from pipe. 5. Reinsert removal tool into fitting and 6. Repeat in several positions to free PEX
Step 2 Step 5 5
fully close the handles, forcing the
Step
cutting jaw into the PEX pipe.
StepStep6 6
pipe for removal.
Reinsert Removal Tool into fitting Repeat in several positions to free
Cut PEX pipeStep
close 3
to fitting and fullyReinsert
close theRemovalStep
Tool 4
into fitting
insert small jaw inside fitting and
handles, forcing the PEXRepeat
pipe forinremoval.
several positions to free
Reposition cutter to other side of cutting jaw fully close the handles, forcing the
into PEX
Remove PEXpipe.
Ring from Pipe PEX pipeStep 5
for removal.
compress handle, forcing cutter
crimp ring and compress handle cutting jaw into PEX pipe.
throughthe
crimp ringring open Reinsert Removal Tool into fitting
forcing crimp
Cinch
CinchClamp
ClampRemoval
Removal
fully close the handles, forcing the
cutting jaw into PEX pipe.
Cinch Clamp
6
Step 4
www.apolloflow.com Customer Service: 1.888.229.2874
Remove PEX Ring from Pipe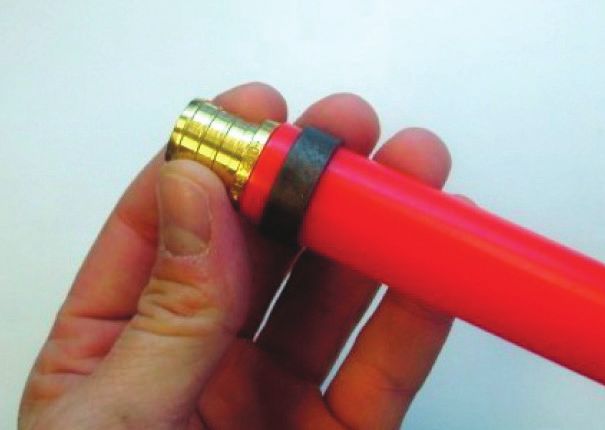
PEX GO/NO-GO GAUGE

HOW TO USE                                                                                                                                                      69PTKGONO

Go/No-Go Gauge

1. Slide the correct slot                  2. If the ring does not fit             3. If the ring slides into the                    4. If the ring slides all the
    on the gauge around                        into the slot at all, then              slot and stops in the                             way into the slot,
    the crimped ring.                          the crimp is a “No-Go”.                 “Go” range, then the                              then the crimp ring is
                                               Adjust the crimping force               crimp is good.                                    compressed too small
                                               on the tool and re-crimp                                                                  and is a “No-Go”.
                                               the ring.                                                                                 Remove the ring and
                                                                                                                                         adjust the crimping force
                                                                                                                                         on the tool.

Crimp Rings vs. Pro Crimp Rings vs. Pinch Clamps vs. Crimp Sleeves

                            Crimp Ring                                                                              Pro Crimp Ring
                            • Copper material                                                                       • Copper material with plastic top
                            • Use with brass or poly alloy fittings                                                 • Use with brass or poly alloy fittings
                            • Gauge available to check for proper                                                   • Allows for hands free fastening
                               crimp                                                                                • Secures crimp ring position on pipe
                                                                                                                    • Guarantees proper ring placement

                             Pinch Clamp                                                                            Crimp Sleeve
                             • Stainless Steel material                                                             • Stainless Steel material
                             • Use with brass or poly alloy fittings                                                • Use with brass or poly alloy fittings
                             • One tool can clamp several ring sizes                                                • One tool can clamp 1/2" or 3/4" sleeves
                             • Reduced equipment cost                                                               • Reduced equipment cost
                                                                                                                    • Secures crimp sleeve position on pipe

                                                                       Customer Service: 1.888.229.2874                       www.apolloflow.com                        7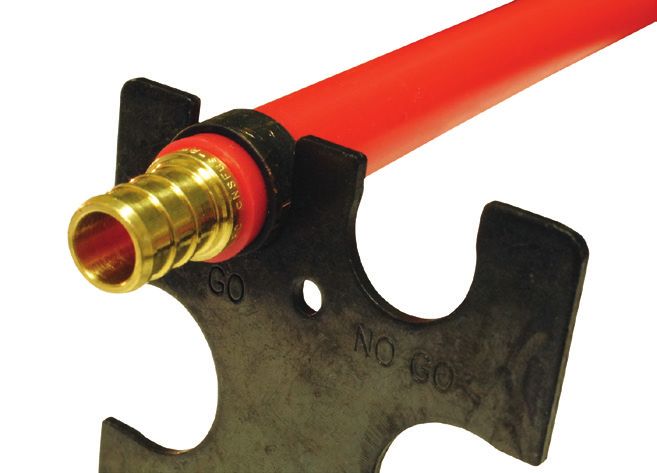
PEX CRIMP RING REMOVAL TOOL

HOW TO USE                                                                                                                            69PTKH0014SS

Stainless Steel Crimp Sleeve
Combo Tool

1. Cut PEX tubing square, leaving a clean, even   2. Slip sleeve on tube and position fitting into   3. Set tool 1/8 in. to 1/4 in. from end of tube.
   edge. Remove any burrs.                           tube.                                              Crimp sleeve with tool.

4. Use the Go/No-Go Gauge to ensure a
   leakproof joint.

Use with Stainless Steel Crimp Sleeves ONLY.                                                         Apollo® PEX Stainless Steel Crimp Sleeves
Do not use with Zurn® Qickclamp™.                                                              PXSS1210PK               1/2"              10 Pack
                                                                                               PXSS1225PK               1/2"              25 Pack
                                                                                               PXSS3410PK               3/4"              10 Pack
                                                                                               PXSS3425PK               3/4"              25 Pack

8        www.apolloflow.com                       Customer Service: 1.888.229.2874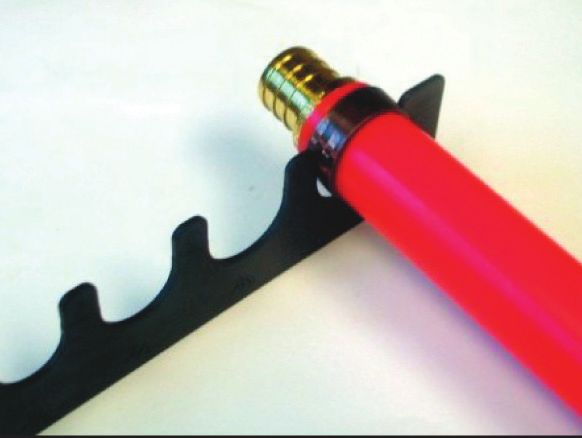
PEX QUICK PINCH CLAMP TOOL

HOW TO USE                                                                                                                            69PTKG1096

Quick Pinch Clamp Tool

1. Cut PEX tubing square, leaving a clean, even   2. Slip PEX pinch clamp over tubing and insert   3. Place PEX pinch clamp nub between tool
   edge. Remove any burrs.                           fitting. Place pinch clamp 1/8” below edge       jaws and ratchet the clamp until the PEX
                                                     of tubing.                                       Pinch Clamp Tool auto-releases. This action
                                                                                                      will assure that the PEX pinch clamp is fully
                                                                                                      engaged.

4. Pressure test the PEX tubing and inspect
   before burying or normal use. If there are
   any signs of leaks, repeat the total                                                                    Apollo® PEX Pinch Clamps
   procedure.                                                                                PXPC3810PK              3/8"               10 Pack
                                                                                             PXPC1210PK              1/2"               10 Pack
                                                                                             PXPC1225PK              1/2"               25 Pack
                                                                                             PXPC12100PK             1/2"              100 Pack
                                                                                             PXPC3410PK              3/4"               10 Pack
                                                                                             PXPC3425PK              3/4"               25 Pack
                                                                                             PXPC34100PK             3/4"              100 Pack
For use with Apollo , Watts , Murray , and Oetiker PEX cinch clamps.
                     ®        ®        ®             ®                                       PXPC15PK                 1"                5 Pack
Do not use with Zurn® Qickclamp™ PEX crimp rings.                                            PXPC110PK                1"                10 Pack

                                                         Customer Service: 1.888.229.2874                 www.apolloflow.com                      9
PEX ONE HAND PINCH CLAMP TOOL

HOW TO USE                                                                                                                                   69PTBJ0010C

One Hand Pinch Clamp Fastening Tool

                                                                                                                                            LED Light On

1. Cut PEX tubing square, leaving a clean, even    2. Slip PEX pinch clamp over tubing and insert      3. Place pinch clamp nub between tool jaws
   edge. Remove any burrs.                            fitting. Place pinch clamp 1/8" below edge          and ratchet the clamp (approximately seven
                                                      of tubing.                                          times) until the LEDlight comes on. This will
                                                                                                          assure that the pinch clamp is fully engaged.

     Release Lever

                                                                                                                Apollo® PEX Pinch Clamps
4. To release the Pinch Tool, rotate the release
   lever on the side. It is very important to                                                 PXPC3810PK                   3/8"                10 Pack
   complete the pinch process before releasing                                                PXPC1210PK                   1/2"                10 Pack
   the tool.                                                                                  PXPC1225PK                   1/2"                25 Pack
                                                                                              PXPC12100PK                  1/2"                100 Pack
                                                                                              PXPC3410PK                   3/4"                10 Pack
                                                                                              PXPC3425PK                   3/4"                25 Pack
The LED light may not turn on after more than 7 ratchets when installing some 1 in.           PXPC34100PK                  3/4"                100 Pack
pinch clamps. Don’t overclamp! Check with specification of pinch clamp manufacturer.          PXPC15PK                      1"                  5 Pack
                                                                                              PXPC110PK                     1"                 10 Pack

For use with Apollo®, Watts®, Murray®, and Oetiker® PEX pinch clamps.
                                                                                                    LED Battery (Can be purchased at any local retailer)
Do not use with Zurn® Qickclamp™. Do not use the fastening tool to remove pinch
clamps.                                                                                       CR927                  Lithium Cell (3V)            1

10        www.apolloflow.com                       Customer Service: 1.888.229.2874
PEX PINCH CLAMP REMOVAL TOOL
INSTRUCTION SHEET 69PTKPCRR
Pinch Clamp Removal Tool
1. Slide the pinch clamp nub into the removal 2. Twist the nub with the tool until the 3. Remove the tool from the clamp, then
tool slot. If the nub is too large to fit into the clamp breaks or loosens. remove the clamp from the pipe.
tool, use the clamp tool to pinch the clamp
one more time.
Tool head can be removed and used on a standard 1/2" socket wrench.
Customer Service: 1.888.229.2874 www.apolloflow.com 11EXPANSION
PEX TOOLS PEX TOOL
HOW TO USE EPXTOOLKIT, EPXTOOL
Expansion PEX Tool
1. Lightly grease the cone of 2. Attach the expansion head 3. Cut pipe squarely. 4. Place an expansion sleeve
the expansion tool. onto the expansion tool. onto the end of the pipe.
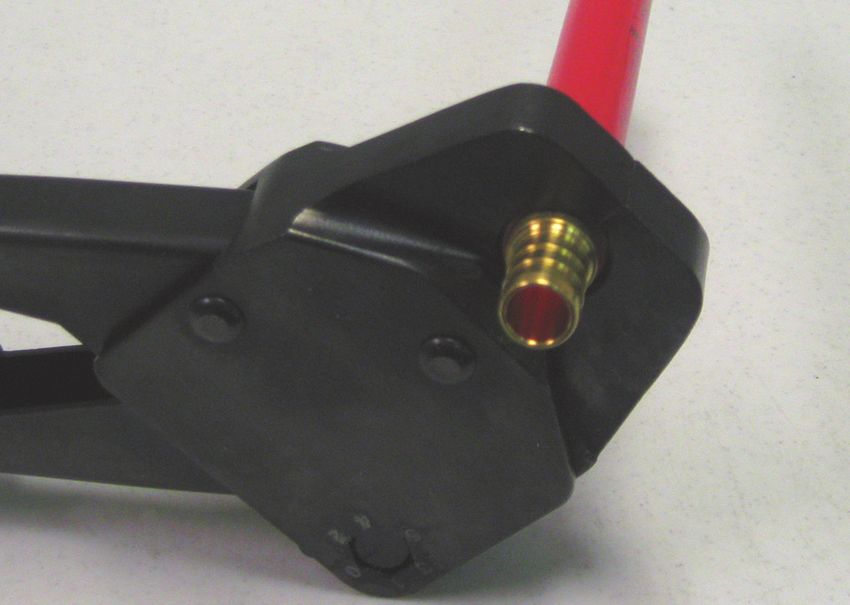
5. Open the tool handles fully 6. Expand by pressing the tool 7. Expansion is complete when 8. Immediately remove the tool
and gently insert the tool handles together. Open the pipe and sleeve are from the pipe and sleeve.
head into pipe until it stops. handles, rotate tool and against the shoulder of the Insert the fitting until its
repeat. Refer to the chart tool head. shoulder touches the sleeve
below for the recommended end. Pipe may take up to two
number of expansions per minutes to fully seal fitting.
tubing size.
Tubing Number of Apollo® Expansion PEX Sleeves
Size Expansions EPXS1225PK 1/2" 25 Pack
1/2" 3-4 EPXS3425PK 3/4" 25 Pack
3/4" 7-9 EPXS125PK 1" 10 Pack
1" 12-14
Compatible with Uponor (Wirsbo) ProPEX™.
Use with PEX-A pipe only.
12 www.apolloflow.com Customer Service: 1.888.229.2874PEX CONNECTIONS
HOW TO INSTALL
PEX connections
Crimp ring connection:
1. Fitting shoulder.
2. Pipe is cut squarely and stops at fitting shoulder.
3. Position the ring or clamp 1/8" - 1/4" from the end of the pipe, over the
two ends ribs of the fitting.
4. The ring or clamp is evenly compressed over the pipe.
5. The PEX material is uniformly compressed between the ribs, resulting
in a leak-free joint.
Pinch clamp connection:
1. Keep all components clean until ready for use. Dirt, water, or
other contaminants on mating contact surfaces of the clamp,
tubing, or fitting can result in an inferior assembly. When in 1/8"-1/4"
doubt, wipe clean before assembly.
2. Cut PEX pipe squarely and remove burrs.
3. Slide ring or clamp over end of PEX pipe and pipe over fitting to 0.08"
the fitting shoulder. Position ring 1/8"-1/4" from pipe end, over
the two ribs closest to the end of the fitting.
4. Crimp accroding to tool directions.
5. Maximum root gap in nub of clamp after crimping is 0.08”. If the
gap exceeds this limit, the tool should be recalibrated. The
existing joint should be reclamped with a new clamp.
All Apollo PEX tools are pre-calibrated from the factory to perform up to 10,000 fastens.
If you feel your tool needs calibrating to perform a correct fasten, calibration instructions will be on the instruction sheet for your tool at
www.apolloflow.com/literature.
Customer Service: 1.888.229.2874 www.apolloflow.com 13PEX FITTINGS OVERVIEW Brass PEX Fittings Apollo® PEX Brass Fittings are used for making junctions or directional changes with PEX pipe constructed potable water systems. All Apollo® PEX Brass Fittings have barb ends unless otherwise noted. All Apollo® PEX Fittings comply with the U.S. Safe Water Drinking Act (SWDA) and the 2011 U.S. Reduction of Lead in Drinking Water Act by containing equal to or less than 0.25% lead. Specifications: Use Apollo® PEX Brass Fittings with Apollo® PEX pipe and fasten to pipe using Apollo® Crimp Rings, Apollo® Pinch Clamps, or Apollo® Crimp Sleeves with Apollo® PEX Tools. Brass PEX fittings can be used with Apollo® PEX-A or PEX-B pipe. Brass Expansion PEX fittings can only be used with PEX-A pipe. Follow all instructions included with Apollo® tools, fittings, and fasteners. Approvals: • ASTM F877 and F1807 Conformance - Third Party Certified • NSF 14 and 61 • IAPMO • CSA B137.5 Poly Alloy PEX Fittings Apollo® PEX Poly Alloy Fittings are used for making junctions or directional changes with PEX pipe constructed potable water systems. Poly Alloy fittings are well-suited for hard water systems. Apollo® PEX Poly Alloy Fittings are a polysulfone/polyenylsulfone blended polymer. All Apollo® PEX Poly Alloy Fittings have barb ends unless otherwise noted. Specifications: Use Apollo® PEX Poly Alloy Fittings with Apollo® PEX pipe and fasten to pipe using Apollo® Crimp Rings or Apollo® Pinch Clamps, or Apollo® Crimp Sleeves with Apollo® PEX Tools. Poly Alloy PEX fittings can be used with Apollo® PEX-A or PEX-B pipe. Poly Alloy Expansion PEX fittings can only be used with PEX-A pipe. Follow all instructions included with Apollo® tools, fittings, and fasteners. Approvals: • ASTM F2159 Conformance - Third Party Certified • NSF-pw (Standards 14 & 61) • IAPMO • CSA B137.5 14 www.apolloflow.com Customer Service: 1.888.229.2874
EXPANSION PEX FITTINGS

OVERVIEW
Expansion PEX Fittings
Apollo® Expansion PEX Fittings (brass and poly alloy) are used for making junctions or directional changes with PEX-A pipe constructed
potable water systems.

All Apollo® Expansion PEX Fittings have barb ends unless otherwise noted.

All Apollo® Expansion PEX Fittings comply with the U.S. Safe Water Drinking Act (SWDA) and the 2011 U.S. Reduction of Lead in Drinking Water Act by containing
equal to or less than 0.25% lead.

Specifications:
Use Apollo® Expansion PEX Fittings with Apollo® PEX-A pipe and fasten to pipe using Apollo® Expansion Sleeves. Brass Expansion PEX fittings can only be used with
PEX-A pipe. Follow all instructions included with Apollo® tools, fittings, and fasteners. Compatible with Uponor (Wirsbo) ProPEX™. (ProPEX™ is a trademark of Uponor [Wirsbo].)

Approvals:
Expansion PEX Brass Fittings                                                                                                   Pressure Drop
• ASTM F877 and F1807 Conformance - Third Party Certified • NSF 14 and 61                                                PSI per Foot of PEX Tubing
• IAPMO						• CSA B137.5                                                                               gpm                 3/8"                     1/2"                    3/4"                     1"
                                                                                                          1                 0.070                    0.016
Expansion PEX Poly Alloy Fittings                                                                        1.5                0.149                    0.034

• ASTM F2159 Conformance - Third Party Certified		                     • IAPMO                           2.2                0.303                    0.069

• NSF-pw (Standards 14 & 61)				                                       • CSA B137.5                      2.5                0.385                    0.087
                                                                                                          3                 0.539                    0.122                   0.023
                PEX Brass Crimp Fittings                                                                 3.5                0.717                    0.162                   0.030
      Friction Loss - Equivalent Feet of PEX Tubing                                                       4                                          0.208                   0.039
     Size        Coupling          Elbow          Tee Run           Tee                                   5                                          0.314                   0.059
                                                                  Branch
                                                                                                          6                                          0.440                   0.082                   0.024
     3/8"             2.9             9.2            2.9             9.4                                  7                                          0.586                   0.109                   0.032
     1/2"             2.0             9.4            2.2            10.4                                  8                                                                  0.140                   0.041
     3/4"             0.6             9.4            1.9             8.9                                  9                                                                  0.174                   0.051

      1"              1.3            10.0            2.3            11.0                                 10                                                                  0.211                   0.062
                                                                                                         11                                                                  0.252                   0.074
                                                                                                         12                                                                  0.296                   0.087
              PEX Poly Alloy Crimp Fittings                                                              13                                                                  0.343                   0.101
      Friction Loss - Equivalent Feet of PEX Tubing                                                      14                                                                                          0.116
     Size        Coupling          Elbow          Tee Run           Tee                                  15                                                                                          0.148
                                                                  Branch
                                                                                                         16                                                                                          0.184
     1/2"             7.1            16.5            7.2            17.9                                 17                                                                                          0.224
     3/4"             4.8            17.4            6.6            17.7                                 18                                                                                          0.267
      1"              4.5            18.0            6.0            17.0                                             = 8 fps per size tubing
                                                                                                               NOTE: Maximum flow for each size based on 12 fps velocity. PSI x 2.307 = head loss.

                                                                  Customer Service: 1.888.229.2874                                  www.apolloflow.com                                                       15
1/2" x 1/2"1/2"023x 1/2"
FRONT
1.125"
Header
PUSH TO CONNECT FITTINGS
Push To Connect Fitting
from top
by by PE-RT, or PEX
1002-429-570
.375”
FAST • CLEAN • SIMPLE • FOREVER Use with Copper, CPVC,
ZIPPER
FOLD OVERVIEW Straight Coupling
FRONT - 6"
Brass Push To Connect Fittings 1.125" 023 x 1/2"
1/2"
1002-429-570 Header PE-RT, or PEX PE-RT,
Push To Connect Fitting
1002-429-570 or PEX
Use with Copper, CPVC, Use with Copper, CPVC,
Tectite by Apollo Push-To-Connect fittings are the fastest, cleanest and simplest way to join any combination of copper, CPVC, PE-RT and
ZIPPER
from top
PEX pipe without the use of tools, solder, open flame or glue.
by
Header
1.125"
• Removeable .375”
023 • Reusable
Simply insert the pipe to allow the high-strength stainless steel teeth to grip the pipe securely against the specially designed O-ring.
023
1.125"
Fitting removal and reuse is just as simple using a simpleWet
demount clip (sold separately). After assembly, fittings may be rotated for
1.125" Header
Push
Push To Connect • Install
To Connect
Fitting Fitting
1002-429-570 FOLD Or Dry PE-RT, or PEX
simpler installation in tight spaces.
Use with Copper, CPVC,
ZIPPER
HeaderZIPPER
from top
.25" Hanger hole:
All Tectite by Apollo fittings are approved for use in both potable water and hydronic heating piping systems.
023
.375” .375”
Header
Push To Connect Fitting
Features: FSBC12
1.125"
from top
• Removeable
• Constructed of lead free dezincification resistant (DZR) brass for superior reliability
• Push-to-connect joints require no heat, solder, solvents or tools
1 Installation • Reusable Removal
FOLD • Push-to-connect design allows for a simple and fast installation on any combination of copper, PEX, CPVC or PE-RT pipe
• Corrosion resistant for greater longevity 1 • Install Wet Or Dry
• Lifetime warranty on most fittings. Refer to Apollo Warranty on www.apolloflow.com for item specific information.
Removal tool
Cut pipe.
ZIPPER
(sold separately).
Header
1.125"
Header
1.125"
Approvals:
• Removeable
Specifications: • Removeable
• Removeable
• Maximum Working Pressure: 200• psi
Reusable • NSF 61
FSBC12
• Reusable • Reusable
• Temperature Range: 32º-250º F • Install Wet Or Dry • ASSE1061 Place tool around
• Install
• Approved Wet Or Dry
for behind-the-wall with no access and burial2
• Install Wet Or Dry • IAPMO pipe next to
ZIPPER
.25" Hanger hole:
• Ideal for potable water and hydronic heating applications • Meets UPC, IPC, and cUPC standard requirements
Removal
fitting. Press tool
1 Installation
BACK - 6"
FSBC12
Mark insertion
centered
ZIPPER
toward fitting
1
.25" Hanger hole:
.25" Hanger hole:
depth using the while pulling pipe
1 Installation Removal depth gauge from fitting. Removal tool
Push Fittings 1 FSBC12 FSBC12
centered
centered
(sold separately). Cut pipe.
Removal tool
(sold separately).
Cut pipe. (sold separately).
How to connect: HowRemoval
to disconnect:
Installation
1 1 Installation Removal
1 2 1 3 2 Place tool around Place tool around
pipe next to
Push pipe
fitting. (A)tooland
Press pipe next to
BACK - 6"
Mark insertion toward fitting fitting. Press tool
Removal tool Removal tool
BACK - 6"
depth using the twist
while(B)pulling
into fitting
pipe
Cut pipe. depth gauge Cut pipe. (sold separately). Mark insertion Max. Pressure:
(sold separately). toward fitting
until
fromfitting
fitting. edge
(sold separately). depth using the 200 psi while pulling pipe
meets depth line.
depth gauge from fitting.
(sold separately).
1. Cut pipe. 2.
3 Mark the 3. Push pipe (A) and twist Place 1. Removal
tool around tool (sold separately). Place
2. Place
tooltoolaround
around pipe
Temperature Range:
2 insertion 2 Tube
Push (B)liners
pipe into (included)
(A) and fitting until are required
fittingto joinpipe PEX tubing. next to fitting. Press
32º-250º tool
F
LEAD(B)FREE:
twist The wetted surfaces of this productnext
into fitting shall to
contain no more than 0.25% pipe next to
depth using the until edge
fitting meets
edge
lead by weighted average. insertion line. Max. Pressure:
fitting. Press tool toward fitting
fitting. Press tool while
BACK - 6"
200 psi
Mark depth gauge meets
insertion depth line.
Warning: This product Mark insertion
contains chemicals knownfitting
toward pulling
to the state of California to cause toward pipe from fitting.
fitting
depth using
(sold separately) .
the cancer and birth defects depth3or other using reproductive
the harm.
while pulling pipe
Temperature Range: while pulling pipe
Failure to follow instructions
Tube liners (included) are required to join PEX tubing.
depth
LEAD FREE: The gauge
wetted surfaces of this product shall contain no moredepth
will void the32º-250º
than 0.25% gauge from
warranty,
fitting. Push pipe
F and possibly result (A) andand from fitting.
in leaks
The use of pipe inserts for plastic pipe connections
lead by weighted average. with Apollo
water damage. Push Fittings is recommended twist (B) into fitting plumbing
in standard residential (hot and
Lifetime cold water)
Warranty
(sold
Warning:separately).
installations. Pipe inserts are included with all Apollo Push Fittings. (soldto cause
This product contains chemicals known to the state of California separately).
cancer and birth defects or other reproductive harm. 35800
Failure to follow instructions will void the warranty, and possibly result in leaks and
until fitting edge www.apolloflow.com Max. Pressure:
water damage. Lifetime Warranty meets depth line. 200 psi
The use of pipe inserts for plastic pipe connections 35800 with Apollo Push Fittings is required www.apolloflow.com in all heating installations. Pipe inserts are included
Conbraco withInc.
Industries, all Apollo Push
Fittings. Conbraco Industries, Inc. ASSE 1061 Matthews, NC USA 28105
Temperature Range:
3 3 Tube
ASSE 1061liners (included)
Matthews,are required
NC USA 28105 to join PEX tubing.
1.888.229.2874 IGC 188 1.888.229.2874
32º-250º F
Push pipe (A) and LEAD
IGC
Push 188 FREE: The wetted surfaces of this product shall contain no more than 0.25%
pipe (A) and
twist (B) into fitting
NSF-61
lead by weighted average.
twist (B)This
Made in UK
intoproduct
fitting
NSF-61 Made in UK
Warning: contains chemicals known to the stateMax.
Max. Pressure: of California to cause
Pressure:
until fitting edge until
cancerfitting
and birthedgedefects or other reproductive harm.
16 www.apolloflow.com meets depth line. Customer Service: meets
Failure todepth line.200 psiwill void the warranty, and possibly result
1.888.229.2874
follow instructions 200 psi
in leaks and
water damage. Lifetime WarrantyPEX TUBING
PEX Tubing
PEX tubing is cross-linked, high-density polyethylene. It’s available in white, red, or blue colors for easy
identification of hot and cold water lines.
Apollo PEX tubing is type PEX-B (PE-Xb, PEXb). The silane method, also called the “moisture cure” method, results
in PEX-B. In this method, cross-linking is performed in a secondary post-extrusion process, producing cross-links
between a cross-linking agent. The process is accelerated with heat and moisture. The cross-linked bonds are
formed through silanol condensation between two grafted vinyltrimethoxysilane (VTMS) units, connecting the
polyethylene chains with C-C-Si-O-Si-C-C bridges.1
PEX tubing is for use in hot and cold potable water distribution systems as well as hydronic radiant heating
systems. PEX tubing can also be used in “continuously recirculating” plumbing systems up to 140°F while
maintaining chlorine resistance.
Features:
• Tough
Fluid Capacity of
• Flexible
Apollo PEX Tubing
• Less expensive than other plumbing materials
• Copper tube size dimensions (CTS) Gallons/100' of
Nominal Size
• Available in white, red, or blue PEX Tubing
3/8" 0.53
Standards / Certifications:
• PEX 5006 - SDR 9 1/2" 0.96
• Meets ASTM F876/F877
• cNSFus-pw/rfh
3/4" 1.40
• ANSI/NSF Standards 61 & 14
• cUPC
• CSA B137.5 1" 3.10
Pressure & Temperature:
• 160 psi @ 73° F, 100 psi @ 180° F
Installation:
To cut PEX tubing, use a PEX tubing cutter and cut at a 90° angle. Clear the cut end of any burrs or debris. PEX tubing can be run through holes drilled into the center of
studs or by using straps and hangers. Bend supports can be used to make bends and angles instead of having to cut the tubing and use fittings. A variety of barb fittings
or push type fittings can be used with PEX tubing. Do not expose PEX tubing to direct sunlight.
It is recommended to insulate hot water lines with standard foam polyethylene pipe insulation to prevent heat loss.
If installing in an area that experiences harsh winters, it’s recommended to insulate both hot and cold water lines to
prevent freezing.
1
http://en.wikipedia.org/wiki/Cross-linked_polyethylene
Customer Service: 1.888.229.2874 www.apolloflow.com 17EXPANSION PEX TUBING
Expansion PEX Tubing
PEX-A tubing is cross-linked, high-density polyethylene. All Apollo® Expansion PEX is opaque in color
and is available with black, red, or blue print lines for easy identification of hot, cold, and main water lines.
Apollo® uses the high-pressure peroxide method of cross-linking which is also known as PEX-A.
Apollo® Expansion PEX pipe is produced using the high-pressure peroxide method for crosslinked polyethylene
(PEXa) in accordance with ASTM F876, F877, CSA B137.5 and PPI TR-3, and is certified to NSF 14/61 standards.
Apollo® Expansion PEX pipe also meets the requirements of ASTM F2023 for chlorine resistance. Apollo® Expansion
PEX pipe is manufactured using a quality management system which has been certified to the latest version of ISO 9001
Use of Apollo® Expansion PEX pipe in heating systems requires corrosion protection and/or isolation by using a heat exchanger or
non-ferrous components throughout the system.
Features:
• Superior flexibility allows for fewer joints, thus reducing leak points
• Expandable and allows for “full flow”
• Less coil memory than traditional PEX pipe and resists the urge to remain coiled
• Compatible with both expansion and crimp, clamp or sleeve methods of joining
• Heat-repairable if kinked during installation, thus further eliminating additional
repair connections
• Shape memory inherent in PEX-A tubing results in the shrinking of expanded pipe to
normal size, creating strong, durable, and reliable ASTM F1960 fitting connections
• Maximum cross-linking increases flexibility and resistance to cracking
• Copper tube size dimensions (CTS) Nom. Min. Wall Weight Capacity
Avg OD A
• Available in black, red, or blue print lines Article No. Size
in (mm)
Thickness B lb/ft gal/ft
• Approved for use with brass and poly alloy crimp fittings (ASTM F1960 and ASTM 1807) in in (mm) (kg/m) (l/m)
• 25 year warranty EPPBXXX12
0.625 0.070 0.06 0.0098
EPPRXXX12 1/2
(15.88) (1.78) (0.08) (0.1222)
EPPWXXX12
Standards / Certifications:
EPPBXXX34
• PEX 3006 - SDR 9 • Meets or exceeds: ASTM F876/F877/F1807/F1960/F2023/F2080/F2155 0.875 0.097 0.10 0.0189
EPPRXXX34 3/4
• cNSFus-pw • Meets ANSI/NSF 61 & 14 (22.22) (2.47) (0.15) (0.2356)
EPPWXXX34
• cUPC • Meets CSA B137.9 EPPBXXX1
1.125 0.125 0.17 0.0316
EPPRXXX1 1
(28.58) (3.18) (0.26) (0.3939)
Maximum Pressures & Temperatures: EPPWXXX1
• 160 psi @ 73.4° F (1055 kPa @ 23° C), 100 psi @ 180° F (690 kPa @82.2° C), 80 psi @ 200° F (550 kPa @ 93.3° C)
Design factor 0.50 (per ASTM F876, CSA B137.5)
Installation:
Cut PEX tubing at a 90º angle using a PEX tubing cutter. Clear the cut end of any burrs or debris. PEX tubing can be run through holes drilled into the center of studs or by using
straps and hangers. Bend supports can be used to make bends and angles instead of having to cut the tubing and use fittings. A variety of barb insert fittings or push type fittings
can be used with PEX tubing. DO NOT expose PEX tubing to direct sunlight. It is recommended to insulate hot water lines with standard foam polyethylene pipe insulation to
prevent heat loss. If installing in an area that experiences harsh winters, it’srecommended to insulate both hot and cold water lines to prevent freezing.
Compatible with Uponor (Wirsbo) ProPEX™. (ProPEX™ is a trademark of Uponor [Wirsbo].)
The maximum temperature and pressure ratings of Apollo® Expansion PEX pipe are in accordance to ASTM F876, CSA B137.5 and PPI TR-3. The designer shall determine the actual
conditions and apply the appropriate and additional design factors as required for any particular project. The temperature and pressure ratings apply to the application of Apollo®
Expansion PEX pipe for conveying heating and cooling water at the 2.0 safety factor on allowable working pressure according to ASTM and CSA. According to the Apollo® Expansion
PEX warranty, the warranty period of 25 years is for operating conditions at or below 180ºF (82.2ºC) in permitted applications when the handling, use, installation and maintenance
continually complies with all Apollo® Expansion PEX technical guidelines.
18 www.apolloflow.com Customer Service: 1.888.229.2874PEX
Do Not Use with PEX
Liquid-based leak detectors, adhesive tape, pipe dope, linseed oil, threading compound, putty, mineral oil, petroleum products, metal pipe hangers.
Leave Excess Tubing
Leave extra tubing at the beginning and end of runs to simplify connection to manifolds and end points and to make connections without straining the tubing or
connection. Immediate connection to a manifold or transition fittings and then making the run reduces the chance of cutting tubing too short.
Identify Tubing Runs
Clearly and permanently mark each run at each end to identify the fixture it supplies (hot or cold water, bathroom sink, kitchen sink, basement toilet, etc). Do not apply
adhesive labels to PEX pipe.
Thermal Expansion
Because PEX tube expands and contracts at about 1" per 100' of pipe for every 10°F change in temperature you must allow for expansion and contraction in long runs.
This can be accomplished with an offset or expansion loop.
PEX and Concrete
Tubing installed within or under concrete slabs should be continuous lengths of PEX tube. Do not install fittings beneath concrete.
Minimum Bend Radius
Do not bend tube too tightly. The minimum recommended bend radius is six times the tube size (i.e. ½" tube = 3" bend radius). When making a 90° turn, use bend
supports.
Pipe Hangers
Plastic hangers are recommended for use with Apollo PEX tubing. To prevent noise transfer, only use hangers that keep the tube off of the nailing surface. Hangers
should be used every 32" on horizontal runs and every 4' on vertical runs. Allow the tube to dip between hangers and never over tighten. To prevent stress on the crimp
joints, always support tubing before and after the fitting.
Tube Through Studs
Grommets should be used when running tubing through studs to prevent damage and reduce noise transfer. Tubing that is run within 2" of a stud
nailing surface must be protected with a metal stud guard.
Stubouts
A copper stubout may be used to exit a branch from a wall. If a stubout is used, take care not to rotate the connection when cutting the end off. Always check local codes
on the use of copper stubouts.
Trenching
If PEX tubing is placed in a trench, leave sufficient excess to allow for expansion and contraction when temperatures change in the
tubing.
PEX Tubing at Expansion Joints
Add a protective layer of insulation or place the tubing into the material underneath if installing PEX tubing under expansion joints.
Customer Service: 1.888.229.2874 www.apolloflow.com 19PEX Temperature and Sunlight Keep PEX tube away from extreme temperatures - 12" away from recessed lighting and 6" away from gas vents. Also, keep away from attics, crawl spaces, outside walls, or insulate per plumbing codes. Keep out of direct sunlight. Excessive Pressure and Temperature Apollo PEX tubing is rated up to 160 psi at 73° F or 100 psi at 180° F. Exceeding these ratings will void the warranty. Excessive Heat Soldering - Do not solder near Apollo PEX tubing. Water Heaters and Boilers - Use a minimum of 18" of metal tubing to transition between Apollo PEX tubing and the water heater/boiler. Freeze Protection Apollo PEX is resistant to freeze damage, but freeze protection is recommended that is typical to the area where installing. Fittings and connections can be damaged if the plumbing system freezes. Thawing a Frozen System Do not send electrical currents through a PEX plumbing system. Do not use an open flame to thaw a PEX plumbing system. A hot air gun may be used as long as the temperature does not exceed 300°F (149°C). Do not use a hot air gun on one spot for more than five minutes at a time. Do not heat pipe until it changes color. Damaged Pipe Do not splice PEX pipe in inaccessible locations. If a splice is necessary at a point underground, insulate the coupling and splice point to protect it from corrosion and stress. Always perform a leak and pressure test after making a splice. Bundling Lines Run hot and cold lines in separate groups to avoid transferring heat between hot and cold lines. Inspection Always inspect PEX tubing for damage and proper fastening prior to testing. Also, check all fitting and manifold connections. Repair or replace as needed. Pressure test the system with air or water at completion. Expansion Loops PEX tubing expands and contracts approximately 1" per 100' of tubing for every 10°F change in temperature. Because of this expansion and contraction, expansion loops should be installed to compensate for these changes without damage to the plumbing system. When creating an expansion loop, make sure there is adequate space for the loop to expand and contract. Do not install the loop so it’s touching studs or joists on both sides. These loops will expand when the pipe is heated and contract when the pipe cools or the building is unheated. 20 www.apolloflow.com Customer Service: 1.888.229.2874
PEX
Conventional Plumbing Method
The conventional (or trunk and branch) method has one main trunk line with smaller branch lines delivering water to various fixtures. This method uses PEX tubing with
push or barb fittings and is the fastest, easiest way to get water from meter to fixtures. However, long waits for hot water often occur.
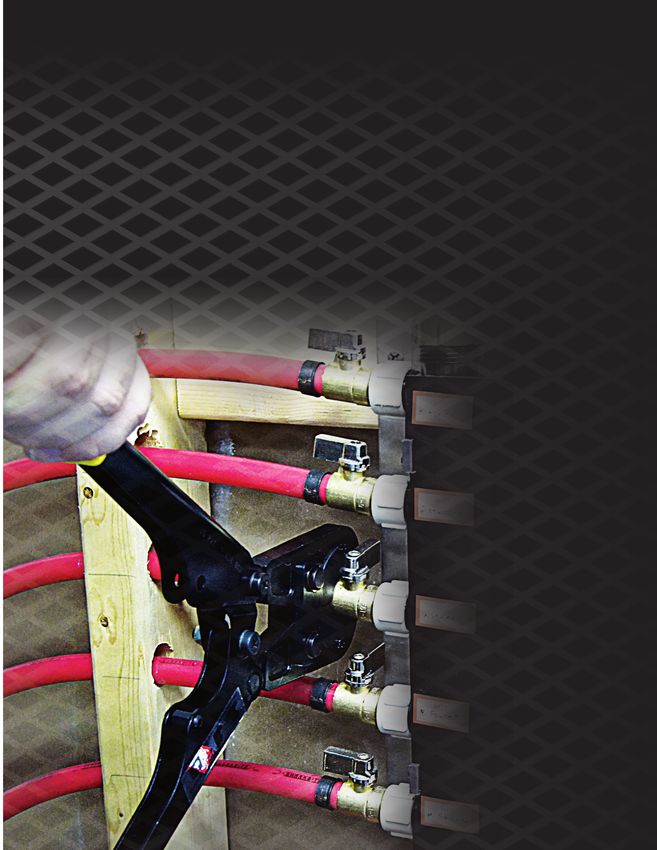
Customer Service: 1.888.229.2874 www.apolloflow.com 21PEX MANIFOLDS Manifold or Home-Run Plumbing Method The manifold or home-run plumbing method provides a distribution point to all fixtures. This method uses PEX tubing with a manifold consisting of the same number of ports as fixtures available, and push or barb fittings. Manifolds offer a variety of benefits: • Control water at one central location. • Faster delivery of hot water. • Save Time and Money - Manifolds allow you to make longer continuous runs of PEX pipe, meaning you buy fewer fittings and spend less time installing. • Fewer Possible Leaks - Longer continuous runs with fewer crimp connections means fewer chances of leaks and avoiding the possibility of thousands of dollars in water damage. • Controls Scalding - When plumbed so that each branch line feeds only one fixture, the manifold greatly reduces pressure fluctuations and temperature swings that cause scalding. • Quiet Plumbing - Longer runs of pipe using fewer fittings means smoother bends and turns which reduces line noise and “water hammer”. 22 www.apolloflow.com Customer Service: 1.888.229.2874
PEX MANIFOLDS

Manifolds
Each manifold has a galvanized back plate for easy mounting to any structure.
The cover plate, for labeling purposes, is constructed of 1/4" ABS. All manifolds
are bolted to the back plate, rather than screwed. Each manifold consists of two
inlet ports that supply the dual chambers. Typically one inlet is used for cold
water supply, and the other inlet is used for hot water supply. However, both
inlets may be used for either hot or cold water. The inlets are not temperature
specific. The water inlets connections are 3/4" PEX Barb, The outlets are 1/2"
MPT. 1/2" FPT Swivel x Barb valves are included.

Each manifold is individually boxed, and includes red and blue labels for
indicating the destination fixtures. Keep the manifold in it’s carton until ready
for installation. Protect the manifold from dust and debris until plumbing
system is fully installed.

How To Install:
1. Count the number of cold and hot water locations in the house. Be sure to include outside hose bibs and the
     refrigerator ice maker.
2. Make sure the manifold has as many ports as the house has hot and cold locations.
3. Find an accessible location near the water heater, but not closer than 18" from the water heater outlet, to place
     the manifold.
4. Attach the shut off valves.
5. Position the manifold in the desired location and nail or screw the mounting bracket to the studs. Make sure all valve
     handles have room for operation.
6. Attach 1/2" PEX pipe to the inlets and outlets and crimp or clamp securely. Close and cap all unused manifold ports.
7. Label each connection to the water location it supplies. Labels are included with each Apollo manifold.

Manifold Installation Warnings:
• Before and after installation, ensure manifold is kept in a location with limited exposure to chemicals, paint, hazardous
   materials, debris, excessive heat, direct flame, or moving objects that could cause damage.
• The manifold should be located in an area that will not be covered permanently with sheetrock, plywood, or paneling.
• Manifolds should not be installed or kept in a location exposed to freezing temperatures.
• Do not allow water to freeze in the manifold.
• Do not use pipe dope or tape to seal any fittings on the manifold.
• Care should be taken not to over or under tighten fittings.
• Distribution lines must connect to the connecting valves in a straight line perpendicular to the manifold as to avoid
   bending stress on the valves.
• Manifolds should be installed per all local and national building/plumbing codes. Where a conflict exists between
   installation instructions and local requirements, the local codes shall take precedence.
• The installer must also meet all qualifications required by the state and/or local administrative authority administering
   the provisions of the code where PEX piping is installed.
• Apollo is not responsible for leaks and property damage caused by failure to follow the installation instructions.

                                                                  Customer Service: 1.888.229.2874                          www.apolloflow.com   23
www.apolloflow.com Conbraco Industries, Inc. Matthews, NC 28105 1.888.229.2874 IM-PEX_11/30/17
You can also read