INSTRUCTION MANUAL MODEL #44347 - ENGLISH - Amazon AWS
←
→
Page content transcription
If your browser does not render page correctly, please read the page content below
INSTRUCTION MANUAL
MODEL #44347
  ENGLISH
INTRODUCTION
Thank you for purchasing the Celestron TetraView LCD Digital Unlike traditional microscopes, the Celestron TetraView LCD Digital
TM TM
Microscope with a 4.3-inch touch screen monitor. Your microscope is a Microscope uses a 5MP camera sensor in lieu of an eyepiece. You
precision optical instrument, made of the highest quality materials. It is will view specimens on the LCD screen. In addition, the sensor
designed to give you a lifetime of enjoyment with minimal maintenance. allows you to take snapshots or short videos. Plus, you can view on
most TV screens with the AV/TV cable.
Before attempting to use your microscope, please read through the
instructions to familiarize yourself with its functions and operations. The final sections of this manual provide simple care, maintenance
See the microscope diagram to locate the parts discussed in this and troubleshooting tips to ensure that your microscope provides
manual. you with years of quality performance and enjoyment.
This microscope provides high powers from 40x up to 400x, and up
to 1600x with the digital zoom. This microscope is mainly suited for
examining specimen slides of yeasts and molds, cultures, plant and
animal parts, fibers, bacteria, and more.
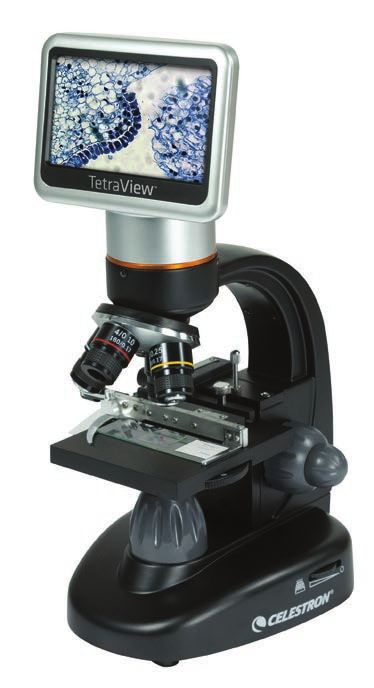
Power On/Off
LCD Module LCD Monitor
SD Card/USB/AV-TV
Cable Receptacles
Screw to adjust the tension of
the rotation Arm
Objective Nosepiece
Objective Lenses
Stage Control Knobs
Mechanical Stage
Focus Knobs
Filter Wheel
Illuminator
Base Illuminator Adjustment Switch
Fig 1
FEATURES
• Built-in Digital Camera • 20x Objective Lens • Illuminator
• 4x Objective Lens • 40x Objective Lens • 6 Position Filter Wheel/Diaphragm
• 10x Objective Lens • LCD Touch Screen Monitor • SD Card Slot
INCLUDED ACCESSORIES
• 7 Prepared Slides • AC Adapter • AV/TV Cable
• Hard Carrying Case • 8 GB SD Card • Touch Pen
• Dust Cover • USB Cable 2.0
2 | ENGLISH
SPECIFICATIONS
                                                                                                          MAGNIFICATION (POWER)
  Stage                     Mechanical Stage 3.5 in x 3.5 in (88 mm x 88 mm)
                                                                                                          Use the following table to determine the magnification
  Digital Camera            5 MP 1/2.5” CMOS; 10x Magnification in lieu of an eyepiece                    of the different objective lenses in combination with
                                                                                                          your microscope using the normal mode of the digital
  LCD Monitor               4.3 in. (109 mm) TFT LCD touch screen with 4x digital zoom —                  image on the LCD screen and using the digital zoom
                            Touch digital TFT display                                                     feature.
                            Resolution — 480 x 272 pixels                                                 Objective Lens          4x    10x       20x        40x
                                                                                                          Digital Image           40x 100x 200x 400x
  Focuser                   Dual — Coarse/Fine
                                                                                                          Maximum with 4x
  Objectives                Achromatic, glass type — 4x, 10x 20x, 40x
                                                                                                          digital zoom feature   160x 400x 800x 1600x

  Memory                    8 GB SD card (approximately 2200+ snapshots @ 5 MP)

  LCD Rotation              180° – 90° left / 90° right                                                   WORKING DISTANCE
                                                                                                          Objective Lens           4x    10x      20x        40x
  Filter Wheel              Red/Green/Blue/1 mm hole/3 mm hole/6 mm hole (default)
                                                                                                          Working
  Nosepiece                 Quad with click stop                                                          Distance (mm) - est.    35.3 7.8          1.9       0.7

  Illuminator               Built-in electric — LED 6 Volt and 6 Watt

  Condenser                 N.A. 0.65                                                                     TOUCH PEN
  AC Adapter                Input Universal 100 to 240 Volt 50/60HZ                                       You can keep the touch pen handy in the receptable behind
                                                                                                          the Power ON/OFF button.
  Batteries                 User supplied 4 AA — (optional - up to 3 hours usage)                                                            ON/OFF Button

  Weight/Dimensions         67 oz/1.9 kg 7.0” (178 mm) x 5.5 in (140 mm) x 13.0 in (330 mm)
                                                                                                                                 Touch Pen

SETTING UP YOUR MICROSCOPE
1. Carefully remove the microscope and other                                                   Take the plug style that you want to use
   parts from the carton and set them on a                                                    and center it over the AC adapter and
   table, desk, or other flat surface.                                                        rotate it until it falls into the opening.
2. Remove the plastic cover from the                                                          Rotate it clockwise until you hear a
   microscope.                                                                                click, which lets you know the plug is
                                                                                              installed correctly.
3. Plug the small cable from the AC adapter into                                   Fig 2                                                                               Fig 3A
   the socket on the back of the base                                                      C. For the Figure 3B type, pull the plug up
   (see Figure 2).                                                                            and away while holding the base of the AC
4. Insert the plug you need (see note below) into the AC adapter and                          adapter. The plug will come off. Take the plug
   then plug the adapter into the proper power source.                                        style that you want to use and align the two
  NOTE: The AC Adapter supplied with this microscope has an interchangeable plug              holes in the bottom of the plug with the two
        system that can work in the USA, UK, Europe, Australia, and many other parts of       pins in the AC adapter. Then, push the plug
        the world.                                                                            into the AC adapter all the way.
                                                                                                                                                                       Fig 3B
You can easily change plugs for your particular power requirement:                          Battery Operation — You can use your
                                                                                           microscope without AC power if you choose. This
A. You may have one of two different types of adapters. One is
                                                                                           gives you the freedom to operate the microscope
   shown in Figure 3A and another one is somewhat similar shown
                                                                                           outdoors or indoors anywhere you please. You’ll
   in Figure 3B. Each has a different means of changing plugs.
                                                                                           need 4 AA batteries (user supplied). Open the
                                                                                           battery door on the bottom of the microscope and
B. For the Figure 3A type, push down on the small button labeled
                                                                                           insert the batteries according to the battery polarity
   “PUSH” and hold it down while at the same time holding the
                                                                                           shown in the battery compartment (Figure 4). After
   prongs of the plug. Rotate it slightly counterclockwise and pull up
                                                                                           the batteries are installed, close the battery door.
   to remove it. Then release the “PUSH” button down.                                                                                                                   Fig 4
                                                                                           Battery life will typically be three hours.

                                                                                                                                                                    ENGLISH | 3
USING AN SD CARD
    The TetraView comes with a 8 GB SD card, which you can use to capture images (snapshot or video).
                  TM

    SD cards are inserted into the SD card slot in the LCD monitor (Figure 1).

   MICROSCOPE OPERATION

   Follow these instructions to turn on the LCD and adjust the               When viewing a dark colored specimen, you may need to increase
   microscope’s stage and illumination before you begin observing.           the amount of light to resolve certain features or details. This is best
   Remove the protective film from the LCD screen.                           done by increasing the brightness of the illuminator by rotating the
                                                                             brightness control dial to its highest setting.
                                                                             Experiment with adjustments to find optimum lighting settings. Each
   LCD MODULE                                                                specimen and magnification may require slightly different illumination.
   This digital microscope is different than traditional microscopes
   because it uses an LCD instead of eyepieces. With an LCD, you can         VIEWING A SPECIMEN
   view specimens on the screen by yourself or share them with others.
   To begin, turn on the LCD monitor by pushing the power button (see        Your instrument is provided with a mechanical stage with a stage
   Figure 1). You will see “Celestron Digital Microscope” on the screen.     holder clamp and directional knobs (see Figure 7).
   The touch screen functions on the LCD module are mainly used for          1. Use the clamp lever to open the clamping arm of the stage holder
   taking images (snapshots and video) and performing other functions           clamp.
   that will be discussed later in this manual.
                                                                             2. Place a specimen slide (1in x 3 in / 25.4 mm x 76.2 mm size)
                                                                                inside the holder and gently close the clamping arm against the
   ILLUMINATION                                                                 slide.

   To get the sharpest and best views, you’ll need to choose the proper      3. Use the stage movement knobs (Figure 6) to position the specimen
   illumination (lighting):                                                     over the opening in the stage. The rear stage movement knob
                                                                                moves the X axis (forward and backward), while the front stage
   1.   To turn the illuminator on, and adjust it’s brightness, rotate the      movement knob moves the Y axis (side to side). For first time
        illuminator adjustment switch located on the microscope base            microscope users, it will take some time to get used to the
        (Fig.5)                                                                 movements, but soon you will be able to center objects easily.
   2. The illuminator (Figure 1) is used mainly for specimen slides
      where the light shines up through the hole in the stage through            NOTE: A vernier scale on both axes allows the exact marking and replication of an object
      the slide.                                                                       in the field of view.
                                                                             4. Use the objective nosepiece (Figure 1) to rotate the objective
                                                                                lenses (Figure 1) until the 4x objective lens is directly over the
   ADJUSTING THE LIGHTING                                                       specimen. Always start with the lowest power objective (4x with
                                                                                this microscope), which gives you 40 power, and work your way
   Specimens of different sizes, widths, and color variations will require
                                                                                up to higher powers. At 40 power, you will have the widest field
   different levels of illumination. Normally, you adjust the brightness
                                                                                of view and the brightest image.
   by turning the switches shown in Figure 5. Another way to adjust
   brightness is by changing the EV function on the touch screen. The
   EV (exposure value) function increases or decreases the brightness
   level by using the (+) or (-) buttons on the screen.

                                              Fig 5                                                Fig 6                                                             Fig 7

4 | ENGLISH
5. Look at the LCD screen while turning the focus knob (Figures                               Diaphragm — Within the wheel are holes with three different
   1) until the specimen comes into view. You may need to adjust                              diameters, 1 mm, 3 mm, 6 mm that limit the amount of light passing
   the stage movement knobs (Figures 1& 6) slightly to center the                             through to the specimen. These holes are part of the diaphragm.
   specimen in the field of view. The larger focus knob is the coarse                         Changing the hole opening size helps you maximize the contrast,
   focus and the smaller knob is for fine (exact) focusing.                                   brightness, etc.
6. With the 4x objective lens, you can also vary the power anywhere                           The default setting is for the 6 mm hole, which should be used for
   from 40x to 160x by using the digital zoom. To use the digital                             most viewing. You can look under the stage (see Figure 9) to make
   zoom, touch the screen icons on the right side of the screen to                            sure the proper setting is actually being used.
   increase or decrease the power from 1x to 4x.
7. For higher powers, you will need to rotate the objective                                   ROTATING THE LCD SCREEN
   nosepiece to the 10x or 20x and to the 40x objective for the
                                                                                               You can rotate the viewing position of the LCD screen 180°: 90° to
   maximum power. You will have to refocus when changing the
                                                                                              the right and 90° to the left. You can view any position you choose
   power of the objective lenses. While using any of these objective
                                                                                              along the 180° rotation. This function allows you to share the view
   lenses, you also can increase power by using the digital zoom.
                                                                                              with others without actually moving the complete microscope. To
   Note that using a higher power objective lens will yield sharper
                                                                                              move the LCD screen, hold the top of the arm (see Figure 1) with
   images than a lower power objective lens and digital zoom for the
                                                                                              one hand, hold the LCD module with the other, and move it to the
   same magnification.
                                                                                              position you desire.
                                                                                              You can adjust the tension of the rotation of the monitor by
  NOTE: When changing objective lenses, lower the stage to its lowest position so you do      tightening/loosening the adjustment screws as shown in Figure 1.
        not hit anything during the rotation. At the higher powers, be careful when raising   It is best to have the tension somewhat tight so the monitor is rigid.
        the stage close to the objective lens so that the objective does not hit the slide    Turn the LCD screen on and you are now ready to use your
        specimen (or other object) and cause damage.                                          microscope for viewing. If any problems arise, check the
                                                                                              troubleshooting section.

USING FILTERS & THE DIAPHRAGM                                                                 AV/TV CABLE
Normally, most viewing or imaging can be done without colored
                                                                                              To view specimens or images on a larger format screen, connect the
filters. Before using the microscope, check to make sure no filters are
                                                                                              AV/TV cable in the receptable (see Figure 1) on one end and the
in the optical path. To bring out different levels of detail, experiment
                                                                                              other end into the socket on the monitor (if your monitor has a socket
with changing the color of the back lighting of the specimen
                                                                                              for this purpose).
especially for very bright transparent specimens. To change the
lighting color, rotate the wheel (Figure 8) to the desired color – Red
(R), Green (G), Blue (B). Each color is centered when you hear/feel
the faint click stop. You may need to refocus by adjusting the focus
knob (Figure 1) slightly for best viewing. You should experiment with
each of the colors to see what works best.

                    Wheel

                                                      Fig 8                                                       Fig 9

                                                                                                                                                              ENGLISH | 5
DIGITAL IMAGING
You can take snapshots or a short video with your microscope VIDEO MODE
using the built-in digital camera. With the SD card memory, you
do not need to use a PC or any other devices to do imaging. VIDEO MODE 12
Transferring images to your PC for saving or printing is easy and
will be discussed later in this manual.
NOTE: If you are going to take images, do not connect the USB cable to your PC
or damage could occur to the equipment. The USB cable is not used for
taking images.
SETTINGS AND INFORMATION FOR THE
DIGITAL CAMERA AND THE TOUCH SCREEN 8
The touch screen icons and their functions are quite easy to use.
Below we’ll discuss the general use of the icons. Typically, you use
your fingers with the touch screen, but you can use the included
touch pen as well. You will find the following twelve icons when in 3 4 Fig 11
the viewing/snapshot mode:
NOTE: After turning the LCD Monitor off, most settings will revert to the default settings.
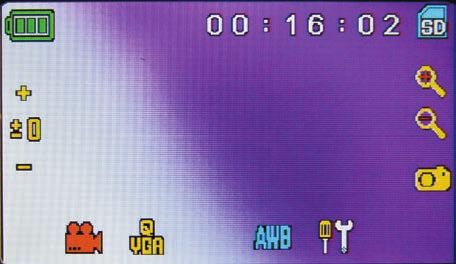
To take videos, change the “video” setting first. The icons on this
VIEWING/SNAPSHOT MODE 12 11 image (Figure 11) work the same way as in the snapshot mode with
the following exceptions:
3 Touch to go to viewing mode.
4 Set the pixel size to 640x360 (the highest resolution for videos) by
10 touching the screen. In both resolutions (high 640x360 or low - QVGA),
1 the frame specifications is 20fps.
9
8 Record Video — Touch to begin video and touch again to stop
the video.
2 8
12 Indicate recording time remaining.
SNAPSHOT OR VIDEO REVIEW
From the video mode, touch the video icon in the lower left of the
3 4 5 6 7 Fig 10 screen to go to the review mode. In this mode, you can review the
snapshots and videos you have taken. Touch the arrows and touch/
1. Increase EV function 7. Settings scroll the screen to navigate and view your videos and snapshots.
2. Decrease EV function 8. Shutter Trigger-take snapshot You can also delete them if you choose.
3. Selection mode 9-10. Digital zoom indicator + NOTE: Inserting or removing an SD card while the LCD is on may cause the LCD to shut
—
4. Pixel setting 11. SD card storage
down and/or could damage the SD card.
5. Snapshot selection 12. Snapshots remaining
6. Color special effect TRANSFERRING YOUR IMAGES
Settings Icon (7) To transfer images to a PC or Mac, you need to have a free USB
port on your computer and have an imaging program for snapshots
Time & Date — Year, month, date, and time
and/or video.
Language — Choose from Chinese (simple or traditional), English,
French, German, Italian, Japanese, Korean, Portuguese,
NOTE: Do not disconnect the USB cable while transferring images or damage may occur.
Russian, and Spanish 1. You can transfer images from the SD card to your PC by using
Beep — Beeps with each touch of the screen (can be disabled) the supplied USB cable. The small plug end of the cable plugs
Default Factory Settings — Revert to factory settings into the LCD monitor (see Figure 1) and the large plug end
of the cable plugs into your PC. When connected properly,
Format- Format the SD card you will see “MSDC” or similar on the screen. Your PC will
TV OUT - Sends a signal to an external monitor automatically recognize the new hardware. Then you will choose
a program on your PC to use for transferring images.
Pixel setting icon (4)
Lightly tap the icon to change the pixel setting from 640x360, 2. You can take the SD card out and use the SD card slot on your
1920x1080, 2048x1152, 2560x1440, 3072x1728, and PC (if available) to transfer the images as well. Either way, your
3648x2048. 3072x1728 is the sensor resolution and 3648x2048 PC will ask you to choose which program you want to transfer the
gives you higher resolution through interpolation. images to.
Snapshot selection (5) Deleting all Snapshots/Video Images – To delete all images
The default setting is single shot, but you can set for timed shots. use the memory format function, select Settings / Memory / Format
and choose SD card or Flash memory.
6 | ENGLISH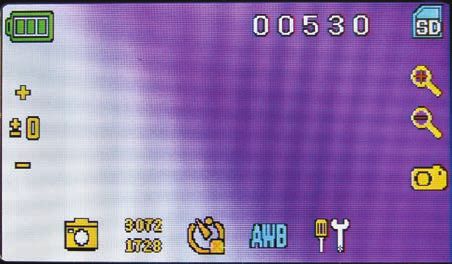
TROUBLESHOOTING
If you do not see an image on your LCD screen, here are a few             The normal position is the 6 position (6 mm hole) for most
things to check:                                                          applications.

1. Make sure the AC adapter is plugged in to an AC power source        5. Make sure the specimen slide is correctly inserted into the
   and attached to the microscope securely and correctly.                 clamp on the mechanical stage and properly centered.

2. Make sure you have the illuminators turned on with maximum          6. Make sure the SD card is inserted properly.
   brightness adjustment.                                                 If icon does not display, then remove and insert again.

3. Make sure the objective lens you have chosen is set correctly       7. If the touch screen icons are not working properly, turn the
   and it has clicked in the right position.                              microscope OFF and ON.

4. Make sure that the diaphragm (filter wheel) is set correctly at
   a click position so that the illuminated light comes up properly.

CARE, MAINTENANCE, AND WARRANTY
Your Celestron microscope is a precision optical instrument and        • Clean the outside surfaces (metal and plastic) with a moist cloth.
should be treated with care at all times. Follow these care and        • Always unplug any cords before cleaning.
maintenance suggestions and your microscope will need very little
                                                                       • Never clean optical surfaces with cloth or paper towels as they
maintenance throughout its lifetime.
                                                                         can scratch optical surfaces easily.
• When you are done using your microscope, remove any
                                                                       • To clean optical surfaces, use an air blower or camel hair brush.
  specimens left on the stage.
                                                                       • To clean fingerprints off of optical surfaces, use a lens cleaning
• Turn off the illuminator switches.
                                                                         agent and lens tissue available at most photo outlets and when
• Turn off the LCD monitor — push the on/off button until you see        cleaning do not rub in circles as this may cause sleeks or
  “Shutting Power Off.”                                                  scratches to occur.
• Unplug the power cord.                                               • Never disassemble or clean internal optical surfaces. This
• Always place the plastic bag or dust cover over the microscope         should be done by qualified technicians at the factory or other
  when not in use to help keep it clean.                                 authorized repair facilities.
• Store the microscope in a dry and clean place.                       • When handling glass specimen slides, use care as the edges
• Be very careful if using your microscope in direct sunlight to         can be sharp.
  prevent damage to the microscope or your eyes.
• When moving your microscope, carry it by the “arm” with one
  hand and not by the focuser knob, LCD monitor, etc.
  Then, put your other hand under the base for support.

                                  YOUR MICROSCOPE HAS A TWO YEAR LIMITED WARRANTY.
                             FOR MORE DETAILED INFORMATION, PLEASE VISIT CELESTRON.COM

                                                                                                                                      ENGLISH | 7
Product design and specifications are subject to change without
©2019 Celestron • All rights reserved • 12-19   prior notification.
celestron.com/pages/technical-support           This product is designed and intended for use by those 14 years of
2835 Columbia Street • Torrance, CA 90503 USA   age and older.
MICROSCOPE NUMÉRIQUE LCD

MODE D’EMPLOI
MODÈLE #44347
 FRANÇAIS

INTRODUCTION
   Merci pour l’achat du microscope numérique LCD TetraView de                    Le microscope numérique LCD TetraView de Celestron
                                                                 TM                                                                  TM

   Celestron avec un écran tactile de 4,3”. Votre microscope est un               n’utilise pas les oculaires qui sont utilisés dans les microscopes
   instrument optique de précision, fabriqué avec des matériaux de la             traditionnels. Vous verrez des spécimens ou des objets sur l’écran
   plus grande qualité afi n d’assurer sa durabilité et sa longue durée.          LCD qui sont faciles à observer et vous pouvez aussi en profi ter
   Il est conçu pour vous permettre de vivre d’agréables moments                  avec les autres. En outre, vous pouvez prendre des photos ou des
   avec un minimum d’entretien.                                                   vidéos de courte durée avec l’appareil photo numérique intégré.
                                                                                  De plus, vous avez la possibilité de l’affi cher sur la plupart des
   Avant l’utilisation de votre microscope, veuillez lire les instructions
                                                                                  écrans TV avec le câble AV/TV.
   pour vous familiariser avec les fonctions et les opérations afi n d’en
   maximiser son utilisation. Se référer au schéma de microscope                  Les dernières sections de ce manuel vous offrent des conseils de
   pour repérer les pièces mentionnées dans le présent manuel.                    soins, d’entretien et de dépannage afi n de s’assurer que votre
   Ce microscope offre des puissances élevées de 40x à 400x (jusqu’à              microscope vous fournisse des années de rendement de qualité,
   1600x avec zoom numérique). Ce microscope est principalement                   d’utilisation et de plaisir.
   adapté pour examiner des lamelles de spécimen de levures et
   de moisissures, des cultures, des plantes et parties d’animal, des
   fi bres, bactéries, etc.

                         Alimentation

                         Module LCD                                                           Moniteur LCD

                                                                                      Réceptacles de carte
                                                                                      SD/USB/câble AV-TV

                 Vis d’ajustement de
                  tension de rotation                                                                   Bras

                                                                                       Tourelle de l’objectif
                Lentilles de l’objectif

                                                                             Boutons de contrôle de platine
                   Platine Mécanique
                                                                                       Boutons de mise au point
                                                                                             Molette Filtre
                Illuminateur Inférieur

                                 Base                                                       Interrupteur de
                                                                                              l’Illuminateur

                                                                                                                                                              Fig 1

   FONCTIONNALITÉS
   • Caméra Numérique — intégré                      • Lentilles Objectif 20x                                     • Illuminateur
   • Lentilles Objectif 4x                           • Lentilles Objectif 40x                                     • Diaphragme/Molette Filtre — 6 positions
   • Lentilles Objectif 10x                          • Écran Tactile LCD                                          • Fente Carte SD

   ACCESSOIRES INCLUS
   • 7 Lamelles Préparées                            • Adaptateur CA                                            • Câble AV/TV
   • Étui Rigide                                     • Carte SD 8 Go                                            • Stylet Tactile
   • Housse de protection                            • Câble USB 2.0

10 | FRANÇAIS
SPÉCIFICATIONS TABLE DE GROSSISSEMENT
Platine Platine Mécanique 3,5” x 3,5” (88 mm x 88 mm)
Consulter le tableau suivant pour déterminer le
Caméra Numérique 5 MP 1/2.5” CMOS; Grossissement 10x à la place d’un oculaire grossissement des lentilles différentes d’objectif en
combinaison avec votre microscope en utilisant le
Moniteur LCD Écran tactile LCD TFT de 4,3 pouces (109 mm) avec zoom mode normal de l’image numérique sur l’écran LCD
numérique 4x et en utilisant la fonction de zoom numérique.
Résolution — 480 x 272 pixels Lentilles d’objectif 4x 10x 20x 40x
Tube de mise Image Numérique 40x 100x 200x 400x
au point Double — Grossier/Fin
Maximum avec
zoom numérique 160x 400x 800x 1600x
Objectives Type verre, Achromatique — 4x, 10x 20x, 40x
Mémoire 8 GB SD card (approximately 2200+ snapshots @ 5 MP)
Rotation LCD 180° – 90° gauche / 90° droite DISTANCE DE TRAVAIL
Molette de fi ltre Rouge/Vert/Bleu/Trou 1 mm/Trou 3 mm/Trou 6 mm (défaut) Lentilles d’objectif 4x 10x 20x 40x
Distance
Tourelle Quad avec position à cran de Travail (mm) - est.. 35.3 7.8 1.9 0.7
Illuminateur Électrique intégré — 6 Volts et 6 Watts
Condensateur N/D 0,65
STYLET TACTILE
Vous pouvez conserver le stylet tactile à portée de main en le
Adaptateur CA Entrée universelle 100 à 240 volts 50/60 Hz
plaçant dans le réceptacle derrière l’interrupteur d’alimentation.
Piles 4 AA non inclus — (facultatif — jusqu’à 3 heures d’utilisation) Interrupteur d’alimentation
Poids/Dimensions 67 oz/1.9 kg 7.0” (178 mm) x 5.5 in (140 mm) x 13.0 in (330 mm) Stylet Tactile
INSTALLATION DE VOTRE MICROSCOPE
1. Enlever le microscope avec précaution l’adaptateur CA et faire pivoter jusqu’à
ainsi que les autres pièces de la boîte et les ce qu’elle s’enclenche dans l’ouverture.
déposer sur une table, bureau ou surface Ensuite faire pivoter dans le sens horaire
plane. jusqu’à entendre un déclic qui vous confi
2. Enlever la housse de protection du rme que le tout est bien installé.
microscope. Fig 2 C. Pour celui de la fi gure 3B, tirez sur la Fig 3A
3. Brancher le petit câble de l’adaptateur CA prise tout en tenant la base de l’adaptateur
dans la prise à l’arrière de la base (voir Figure 2). CA et la fi che se détachera. Prenez le style
de fi che que vous souhaitez utiliser et aligner
4. Insérer la prise nécessaire (voir remarque ci-dessous) dans
les deux trous dans le bas de la fi che avec
l’adaptateur CA et ensuite brancher l’adaptateur
les deux broches de l’adaptateur CA. Ensuite,
REMARQUE : L’adaptateur CA fourni avec ce microscope possède un système de poussez la fi che dans l’adaptateur CA et
prise interchangeable qui peut fonctionner aux États-Unis, Royaume- vous avez terminé.
Uni, Europe, Australie, et dans de nombreux autres pays.
Fonctionnement avec Piles — Vous pouvez Fig 3B
Vous pouvez facilement changer les prises pour votre exigence utiliser votre microscope sans alimentation
particulière en procédant comme suit : CA, si vous le désirez. Cela vous donne la
A. Vous pouvez avoir un ou deux différents types d’adaptateurs. liberté d’utiliser le microscope à l’extérieur
Un adaptateur est affi ché à la Figure 3A et un autre quelque comme à l’intérieur où que vous le désirez. Le
peu semblable à la Figure 3B et chacun a son propre moyen de fonctionnement avec piles requiert 4 piles AA
changer les prises (non inclus). Ouvrir le compartiment de piles au
B. Pour celui de la Figure 3A, pousser sur le bouton étiqueté et le bas du microscope et insérer les piles selon les
maintenir enfoncé alors que vous maintenez les broches de la fi polarités affi chées dans le compartiment de piles
che et faites-les pivoter légèrement dans le sens antihoraire et (Figure 4). Après l’installation des piles, fermer
tirer pour l’enlever. Ensuite relâcher le bouton «PUSH». la porte du compartiment. La durée des piles est Fig 4
typiquement de trois heures.
Prendre le type de fi che que vous voulez utiliser et la centrer sur
FRANÇAIS | 11UTILISATION D’UNE CARTE SD
Le TetraView est fourni avec une carte SD de 2 Go et vous pouvez l’utiliser pour capturer des images (photo ou vidéo).
TM
Les cartes SD sont insérées dans la fente de carte SD dans le moniteur LCD (Figure 1).
FONCTIONNEMENT DU MICROSCOPE
Avant de regarder les spécimens vous devez allumer le LCD, la fonction EV de l’écran tactile. La fonction EV (valeur d’exposition)
allumer le bon illuminateur, et comprendre comment utiliser la platine augmente ou diminue le niveau de luminosité en utilisant le (+) ou (-)
mécanique et alors vous serez prêt à commencer à regarder. Enlever sur l’écran.
le fi lm protecteur de l’écran LCD.
Lorsque vous observez un spécimen de couleurs foncées, vous
LCD MODULE devrez peut-être augmenter la quantité de lumière pour déterminer
certaines caractéristiques ou certains détails. La meilleure façon
Le microscope numérique est différent des microscopes différents de le faire est d’augmenter tout simplement la luminosité de
— au lieu d’utiliser des oculaires pour regarder un spécimen dans l’illuminateur en faisant tourner la molette de réglage de la luminosité
un microscope traditionnel, le moniteur LCD remplace les oculaires jusqu’à arriver à son réglage le plus élevé.
afi n que vous puissiez regarder le spécimen à l’écran ou afi n de
partager ces images avec d’autres. Pour commencer à voir des L’éclairage optimal se réglera en expérimentant avec les ajustements
spécimens avec votre microscope, vous devez allumer le moniteur alors que chaque spécimen peut nécessiter un éclairage légèrement
LCD en appuyant sur le bouton d’alimentation (voir Figure 1) et vous différent de même que les mêmes spécimens visualisés sous
verrez «Celestron Digital Microscope» apparaitre à l’écran. C’est différentes puissances.
essentiellement tout ce que vous devez faire pour utiliser l’écran LCD
pour la visualisation des spécimens. Les fonctions de l’écran tactile AFFICHAGE D’UN SPÉCIMEN
sur le module LCD sont principalement utilisées pour prendre des
images (photos et vidéo) et le mode d’utilisation des autres fonctions Votre instrument est fourni avec une platine mécanique avec une
sera discuté plus tard dans ce manuel. pince de retenue et des boutons directionnels (voir la figure 7).
ILLUMINATION 1. Utilisez le levier de la pince pour ouvrir le bras de serrage de la
pince de retenue de la platine.
Pour obtenir les meilleurs points de vue les plus nets, l’illumination
adéquate (éclairage) doit être choisie: 2. Placer une lamelle de spécimen (1 “x 3” / 25,4 mm x 76,2 mm)
dans le support et fermer doucement le bras de serrage contre la
1. Pour allumer l’illuminateur et régler sa luminosité, tournez le lamelle.
commutateur de réglage de l’illuminateur situé sur la base du
microscope (Fig.5) 3. Utilisez les boutons de mouvement (Figure 6) de la platine pour
positionner le spécimen sur l’ouverture de la platine. Le bouton
2. L’illuminateur (Figure 1) est principalement utilisé pour des de mouvement arrière de la platine déplace l’axe X (avant et
lamelles de spécimen où la lumière brille par le trou dans la arrière) tandis que le bouton de mouvement avant de la platiner
platine à travers la lamelle. déplace l’axe Y (d’un côté à l’autre). Pour les premiers utilisateurs
de microscope, il faudra un certain temps pour s’habituer aux
RÉGLAGE DE L’ÉCLAIRAGE mouvements et en peu de temps vous serez en mesure de centrer
des objets facilement.
Les spécimens de différentes tailles, d’épaisseur et de couleurs
peuvent nécessiter différents niveaux d’éclairage. Normalement, REMARQUE : Un vernier sur les deux axes permet le marquage exact et la réplication d’un
vous réglez l’éclairage en tournant les interrupteurs tel qu’indiqué objet dans le champ de vision où l’utilisateur pourrait vouloir revenir.
aux Figure 5. Un autre moyen de régler l’éclairage est de modifier
Fig 5 Fig 6 Fig 7
12 | FRANÇAIS4. Utilisez le tourelle d’objectif (Figure 1) pour faire pivoter les ressortir différents niveaux de détail, essayer de changer la couleur
lentilles de l’objectif (Figure 1) jusqu’à ce que les lentilles de de l’éclairage arrière du spécimen, en particulier pour les très brillants
l’objectif 4x soit directement au-dessus de spécimen. Toujours spécimens transparents. Pour modifier la couleur de l’éclairage, faire
commencer par l’objectif avec la plus faible puissance (4x avec pivoter la molette (Figure 8) à la couleur désirée - Rouge (R), Vert (G),
ce microscope) qui vous donne une puissance de 40 et travailler Bleu (B). Chaque couleur est centrée lorsque vous entendez/sentez
votre chemin jusqu’à des puissances supérieures. À la puissance le faible déclic arrêter. Vous pouvez avoir besoin de refaire la mise
40 vous aurez le champ de vision le plus large et l’image la plus au point en réglant le bouton de mise au point (Figure 1) légèrement
éclatante. pour un meilleur affichage. Vous devriez expérimenter avec chacune
5. Regardez l’écran LCD tout en tournant le bouton de mise au point des couleurs pour voir les résultats.
(Figures 1 et 6) jusqu’à ce que le spécimen soit bien en vue. Diaphragme — à l’intérieur de la molette on retrouve des trous avec
Vous pouvez avoir besoin d’ajuster les boutons de mouvement trois différents diamètres, 1 mm, 3 mm, 6 mm ce qui limite la quantité
de la platine (Figure 6) légèrement au centre du spécimen dans de lumière passant à travers le spécimen. Ces trous font partie du
le champ de vision. Le bouton de mise au point large est la mise diaphragme qui vous permet de modifier la taille de l’ouverture du trou
au point grossière et le plus petit est pour la mise au point fine afin de maximiser le contraste, la luminosité, etc.
(exacte). Le réglage par défaut est le pour le trou de 6 mm qui devrait être
6. Avec les lentilles d’objectif 4x, vous pouvez également varier la utilisé pour la plupart des visualisations. Vous pouvez regarder sous
puissance entre 40x et 160x en utilisant le zoom numérique. Pour la platine (voir Figure 9) pour s’assurer que le réglage voulu est
utiliser le zoom numérique, vous touchez les icônes d’écran sur actuellement utilisé.
le côté droit de l’écran pour augmenter ou diminuer la puissance
de 1x à 4x.
7. Pour les puissances élevées, vous devrez faire tourner la tourelle ROTATION DE L’ÉCRAN LCD
de l’objectif à 10x ou 20x et à l’objectif 40x pour la puissance Vous pouvez faire pivoter l’angle de visualisation de l’écran LCD
maximale. Vous aurez à refaire la mise au point à chaque fois 180° – 90° à la droite et 90° à la gauche. Vous pouvez visualiser
que vous changez la puissance des lentilles de l’objectif. Tout toute position que vous choisissez le long de la rotation de 180°.
en utilisant n’importe laquelle de ces lentilles d’objectif, vous Cette fonction vous permet de partager l’affichage avec d’autres
pouvez également augmenter la puissance en utilisant le zoom sans réellement déplacer le microscope au complet. Pour déplacer
numérique. Remarquez que l’utilisation de lentilles d’objectif de l’écran LCD, tenir le haut du bras (voir Figure 1) avec une main et
puissance plus élevée offrira un rendement d’images plus nettes puis maintenir le module LCD avec l’autre et le déplacer à la position
par rapport à des lentilles d’objectif de puissance plus faible avec voulue.
un zoom numérique pour le même grossissement.
Vous pouvez ajuster la tension de la rotation de l’écran en serrant/
desserrant les vis de réglage tel qu’indiqué dans la Figure 1. Il
REMARQUE : Lors du changement de lentilles d’objectif, abaisser la platine à sa est préférable que la tension soit quelque peu serrée pour que
position la plus basse afi n de ne rien toucher pendant la rotation. le moniteur soit rigide. Allumer l’écran LCD et vous êtes
Également, à des puissances élevées, soyez prudent lorsque vous levez maintenant prêt à utiliser votre microscope pour visualiser et
la platine près de l’objectif afi n que l’objectif ne touche pas la lamelle en cas de problème veuillez consulter la section dépannage.
du spécimen (ou un autre objet) et causer des dommages.
CÂBLE AV/TV
UTILISATION DES FILTRES ET DU DIAPHRAGME Pour voir des spécimens ou des images sur un écran grand format,
connectez le câble AV/TV dans le réceptacle (voir Figure 1) à une
Normalement, la plupart des affichages ou imageries se font sans extrémité et l’autre extrémité dans la prise sur le moniteur (si votre
filtres colorés et avant d’utiliser le microscope s’assurer que les moniteur a une prise prévue à cet effet).
filtres ne sont pas dans le chemin optique. Toutefois, afin de faire
Wheel
Fig 8 Fig 9
FRANÇAIS | 13IMAGERIE NUMÉRIQUE
Vous pouvez prendre des photos ou une courte vidéo avec votre Sélection de photo (5)
microscope en utilisant la caméra numérique intégrée. Avec la carte Le réglage normal est une simple photo mais vous pouvez le régler
de mémoire SD, vous n’avez pas besoin d’utiliser un PC ou autre pour des photos chronométrées.
dispositif pour faire de l’imagerie. Transférer des images vers votre
PC pour les sauvegarder ou les imprimer est vraiment facile et nous MODE VIDÉO
en discuterons plus en détail plus loin dans ce manuel. MODE VIDÉO 12
REMARQUE : Si vous êtes sur le point de prendre des images, ne pas brancher le câble
USB à votre PC car des dommages pourraient survenir à l’équipement. Le
câble USB n’est pas du tout utilisé pour prendre des images.
RÉGLAGES ET INFORMATION POUR LA CAMÉRA NUMÉRIQUE
ET L’ÉCRAN TACTILE
Les icônes d’écran tactile et leurs fonctions sont généralement
facile à utiliser et intuitives en nature. Nous discuterons ci-dessous
8
de l’utilisation générale des icônes. Normalement vous utilisez vos
doigts avec l’écran tactile, mais vous pouvez également utiliser le
stylet tactile. L’écran tactile possède diverses fonctions et choix. À
partir de l’image à gauche vous trouverez les douze icônes suivants
en mode visualisation/photo 3 4 Fig 11
MODE VISUALISATION/PHOTO 12
Pour prendre des vidéos, vous devez d’abord changer le réglage
à « vidéo » [video]. Les icônes sur cette image (Figure 11)
fonctionnent de la même manière comme pour le mode de capture
instantanée à l’exception de ce qui suit:
10
1 3 Toucher pour accéder au mode visualisation
9
4 Régler la taille de pixel à 640x360 (la plus haute résolution pour les
8 vidéos) en touchant l’écran. Dans les deux résolutions (haute 640x360
2
ou basse - QVGA), les spécifications d’image sont 20 ips (fps).
8 Enregistrement de vidéo — toucher pour débuter la vidéo et toucher
encore pour l’arrêter.
12 Temps d’enregistrement restant
3 4 5 6 7 Fig 10
1. Fonction Augmentation EV 7. Réglages VISUALISATION DE PHOTO OU VIDÉO
2. Fonction Diminution EV 8. Déclencheur obturateur-capture À partir du mode Vidéo toucher l’icône vidéo dans le coin inférieur
3. Mode Sélection instantanée gauche de l’écran pour aller au mode Visualisation. Dans ce mode,
4. Réglage de Pixel 9-10. Indicateur Zoom Numérique +
—
vous pouvez visualiser les photos et vidéos. Toucher simplement les
5. Sélection de Photo flèches et toucher/défiler l’écran pour naviguer et voir vos vidéos,
11. Stockage sur Carte SD
photos et les supprimer si désiré.
6. Effets spéciaux couleur 12. Photos Restantes
REMARQUE : Insérer ou enlever une carte SD tandis que le LCD est allumé pourrait
REMARQUE : Après avoir fermé l’écran LCD, la plupart des réglages reviennent aux éteindre le LCD et/ou endommager la carte SD.
réglages par défaut.
ICÔNES DE RÉGLAGE (7) TRANSFERT DES IMAGES
Heure et Date — année, mois, et date
Langage —choisir entre le chinois (simplifié ou traditionnel), anglais, Pour transférer des images vers un ordinateur personnel ou MAC,
français, allemand, italien, japonais, portugais, russe, et l’espagnol. vous devez avoir un port USB libre sur votre ordinateur et posséder
un logiciel d’imagerie pour les captures instantanées et/ou la vidéo.
Tonalité — émet une tonalité à chaque fois que vous touchez l’écran
ou vous pouvez le désactiver.
REMARQUE : Do not disconnect the USB cable while transferring images or damage may
Réglages d’usine par défaut — retourne aux réglages d’usine.
occur.
FORMAT - Formater la carte SD 1. Vous pouvez transférer des images de la carte SD vers votre
TV OUT - Définit l’unité pour envoyer le signal à un moniteur externe PC en utilisant le câble USB inclus. La petite extrémité du
Icônes de pixel (4) câble se branche dans l’écran LCD (voir Figure1) tandis que
la grosse se branche dans votre PC. Si les branchements
Taper légèrement sur l’icône pour modifier le réglage de pixel à
sont bien effectués vous verrez apparaitre sur votre écran de
640x360, 1920x1080, 2048x1152, 2560x1440, 3072x1728,
microscope «MSDC» ou donnée similaire. Votre PC reconnaîtra
et 3648x2048. 3072x1728 est la résolution du capteur et
automatiquement le nouveau matériel. Ensuite vous n’avez qu’à
3648x2048 vous donne une meilleure résolution par interpolation.
choisir le programme de PC à utiliser pour le transfert d’images.
14 | FRANÇAIS2. Vous pouvez aussi retirer la carte SD et utiliser la fente de carte SD de
votre ordinateur (si disponible) pour transférer les images. Dans les
deux processus, votre ordinateur vous demandera de choisir dans quel
programme vous souhaitez transférer les images.
Suppression de toutes les images photos/Vidéo – Pour supprimer
toutes les images utiliser la fonction de formatage de mémoire –
Réglages / Mémoire / Format et choisir carte SD ou mémoire Flash.
DÉPANNAGE
Si aucune image n’apparaît sur votre écran LCD, voici quelques 4. S’assurer que la membrane (molette à filtre) est correctement
points à vérifier de nouveau: réglée à une position de déclic afin que la lumière monte
correctement - la position normale est la position 6 (trou de 6
1. S’assurer que l’adaptateur CA est branché dans une source
mm) pour la plupart des applications.
d’alimentation CA et fixé au microscope solidement et
correctement. 5. S’assurer que la lamelle de spécimen soit correctement insérée
dans la pince de la platine mécanique et bien centrée.
2. S’assurer d’avoir les illuminateurs allumés à la luminosité
maximale. 6. S’assurer que le carte SD est correctement insérée.
Si l’icône n’apparaît pas, alors l’enlever et l’insérer de nouveau.
3. S’assurer que les lentilles d’objectif choisies sont correctement
réglées et dans la bonne position. 7. Les icônes de l’écran tactile ne fonctionnent pas correctement.
Mise hors tension et mise sous tension.
ENTRETIEN, MAINTENANCE ET GARANTIE
Votre accessoire Celestron est un instrument optique de précision • Nettoyer les surfaces extérieures (métal et plastiques) avec un
et doit être traité avec soin, en tout temps. Suivez ces soins et chiffon humide.
suggestions d’entretien et votre microscope n’aura besoin que de • Toujours débrancher tous les cordons avant de le nettoyer.
très peu d’entretien tout au long de sa vie.
• Pour nettoyer les surfaces optiques, utilisez un séchoir à cheveux
• Lorsque vous avez terminé d’utiliser votre microscope, enlever ou un pinceau de poils de chameau.
tout spécimen de la platine.
• Soufflez la poussière des surfaces optiques avec une brosse en
• Fermer les interrupteurs des illuminateurs. poil de chameau ou un souffleur d’air.
• Éteindre le moniteur LCD — appuyer sur le bouton on/off jusqu’à • Pour nettoyer les empreintes digitales des surfaces optiques,
ce que vous voyez apparaitre «Shutting Power Off». utiliser un agent de nettoyage de lentilles et un tissu optique
• Débrancher le cordon d’alimentation. disponible dans la plupart des magasins de photo et lors du
• Toujours placer la housse de plastique ou housse de protection nettoyage ne pas frotter dans les cercles car cela pourrait
sur le microscope lorsque vous ne l’utilisez pas ou lorsqu’il est provoquer des fissures ou des rayures.
entreposé afin de le conserver propre. • Ne jamais démonter ou nettoyer les surfaces optiques internes.
• Entreposer le microscope dans un endroit propre et sec. Cela devrait être effectué par des techniciens qualifiés à l’usine
ou d’autres centres de réparation agréés.
• Faire attention si vous utilisez votre microscope en plein soleil
pour éviter d’endommager le microscope ou vos yeux. • Faire attention lors de la manipulation de lamelles de spécimen,
car les rebords peuvent être tranchants.
• Lorsque vous déplacez le microscope, le prendre par le «bras»
avec une main et non pas par le bouton de mise au point, le
moniteur LCD, etc. Ensuite, placer votre autre main sous la base
de soutien.
VOTRE MICROSCOPE A UNE GARANTIE LIMITÉE DE DEUX ANS.
VEUILLEZ CONSULTER LE SITE WEB DE CELESTRON POUR PLUS DE DÉTAILS À CELESTRON.COM
FRANÇAIS | 15La conception des produits et les spécifications sont sujettes à ©2019 Celestron • Tous droits réservés • 12-19 modification sans notification préalable. celestron.com/pages/technical-support Ce produit est conçu et destiné pour les personnes de 14 ans 2835 Columbia Street • Torrance, CA 90503 USA et plus.
DIGITALES LCD-MIKROSKOP

BEDIENUNGSANLEITUNG
MODELL #44347
  DEUTSCH
INTRODUCTION
   Vielen Dank, dass Sie sich für das Digitale LCD-Mikroskop mit einem    Das Digitale LCD-Mikroskop von Celestron TetraView verfügt nicht
                                                                                                                                        TM

   4,3-Zoll-Touchscreen-Monitor von Celestron TetraView entschieden       über Okulare, wie sie bei herkömmlichen Mikroskopen verwendet
                                                        TM

   haben. Bei ihrem Mikroskop handelt es sich um ein präzises             werden. Proben oder Objekte werden Sie auf dem LCD-Bildschirm
   optisches Instrument, das aus Materialen höchster Qualität gefertigt   angezeigt, was die Betrachtung einfach macht und die Möglichkeit
   wurde, um Haltbarkeit und Langlebigkeit zu gewährleisten. Es wurde     bietet, sich gemeinsam mit anderen daran zu erfreuen. Zusätzlich
   kreiert, um Ihnen bei minimalem Wartungsaufwand ein Leben lang         können Sie mit der integrierten Digitalkamera Schnappschüsse oder
   Freude zu bereiten.                                                    kurze Videos aufnehmen. Außerdem ist mithilfe eines AV/TV-Kabels
                                                                          eine Ansicht auf den meisten TV-Bildschirmen möglich.
   Lesen Sie diese Anleitung bitte durch, bevor Sie Ihr Mikroskop
   verwenden, um mit den Funktionen und Bedienelementen vertraut zu
                                                                          In den letzten Abschnitten dieser Anleitung finden Sie Tipps zu
   werden und ein Maximum an Freude bei der Handhabung erleben zu
                                                                          einfacher Pflege, Wartung und Fehlerbehebung, damit Ihr Mikroskop
   können. Sehen Sie sich das Schaubild zum Mikroskop an, um die in
                                                                          jahrelang einen hohen Qualitätsstandard in Sachen Leistung, Nutzen
   der Anleitung beschriebenen Bauteile zu identifizieren.
                                                                          und Freude beibehält.
   Dieses Mikroskop bietet Hochleistungen von 40-facher bis zu
   400-facher Vergrößerung (bei digitalem Zoom bis zu 1600-fach).
   Dieses Mikroskop eignet sich hauptsächlich für die Untersuchung
   von Hefen und Schimmelpilzen, Kulturen, pflanzlichen und tierischen
   Bestandteilen, Fasern, Bakterien usw.

                      Strom An/Aus

                         LCD-Modul                                                     LCD-Monitor

                                                                             SD-Karten-/USB-/AV-
                                                                                TV-Kabel-Behälter

         Schraube zur Anpassung der
                 Rotationswiderstand                                                           Arm

                                                                              Objective Nosepiece
                       Objektivlinsen

                                                                                   Tischhub-Knöpfe
                          Kreuztisch
                                                                                      Fokussierknöpfe
                                                                                      Filter-Rad
                 Untere Beleuchtung

                 Untere Beleuchtung                                                 Schalter für die
                                                                            Beleuchtungseinstellung

                                                                                                                                             Abb 1

  EIGENSCHAFTEN
  • Digitalkamera — integriert                  • 20x-Objektivlinse                                     • Ober- und Unterbeleuchtung
  • 4x-Objektivlinse                            • 40x-Objektivlinse                                     • Filter-Rad/-Membran — 6-Position
  • 10x-Objektivlinse                           • LCD-Touchscreen-Monitor                               • SD-Kartenschlitz

  MITGELIEFERTES ZUBEHÖR
  • 7 vorbereitete Objektträger                 • AC-Adapter                                            • AV/TV-Kabel
  • Schutzgehäuse                               • 8-GB-SD-Karte                                         • Touch-Pen
  • Staubschutz                                 • USB-Kabel 2.0

18 | DEUTSCH
SPEZIFIKATIONEN VERGRÖSSERUNGS-
Tisch Kreuztisch 3,5 Zoll x 3,5 Zoll (88 mm y 88 mm)
(LEISTUNGS-) TABELLE
Digitalkamera 5 MP 1/2.5” CMOS; 10-fache Vergrößerung anstelle eines Okulars Verwenden Sie die folgende Tabelle, um die
Vergrößerung von verschiedenen Objektivlinsen
LCD-Monitor 109-mm-TFT-LCD-touch screen mit 4-fachem Digitalzoom —
im normalen Modus für Digitalbilder auf dem LCD-
Digitaler Touch-TFT-Bildschirm
Bildschirm sowie unter Verwendung digitaler
Auflösung — 480 x 272 Pixel
Zoomfunktionen in Verbindung mit Ihrem Mikroskop zu
Okularauszug Dual — Grob/Fein bestimmen.
Objective Lens 4x 10x 20x 40x
Objektive Achromatisch, Glas — 4x, 10x 20x, 40x
Digital Image 40x 100x 200x 400x
Speicher 8-GB-SD-Speicherkarte (ca. 2200 + Schnappschüsse von 5MP) Maximum with 4x
digital zoom feature 160x 400x 800x 1600x
LCD-Rotation 180° – 90° links/90° rechts
Filter-Rad Rot/Grün/Blau/1-mm-Öffnung/3-mm-Öffnung/6-mm-Öffnung
(Standard) ARBEITSABSTAND
Revolver Quad mit Einrastfunktion
Objektivlinse 4x 10x 20x 40x
Beleuchtungen Elektrik — beide 6 Volt und 6 Watt LED Arbeitsabstand (mm) 35.3 7.8 1.9 0.7
Kondensor Entfällt 0.65
AC-Adapter Universaleingang 100 bis 240 Volt 50/60Hz TOUCH-PEN
Batterien Nicht im Lieferumfang enthaltene 4 AA – ca. Sie können den Touch-Pen bequem im Behälter hinter dem
-(Optional – bis zu 3 Stunden einsatzbereit) Strom-AN/AUS-Knopf aufbewahren.
Gewicht/ AN-/AUS-Knopf
Abmessungen 67 oz/1,9 kg 7,0” (178 mm) x 5,5” (140 mm) x 13,0” (330 mm)
Touch Pen
MONTAGE IHRES MIKROSKOPS
1. Heben Sie das Mikroskop und andere Teile Nehmen Sie die gewünschte Steckerart,
vorsichtig aus dem Karton und stellen Sie zentrieren Sie diese über den AC-Adapter
sie auf einem Tisch, Schreibtisch oder einer und drehen Sie den Stecker solange,
anderen flachen Oberfläche ab. bis er in die Öffnung einsinkt. Drehen
2. Entfernen Sie die Plastikabdeckung vom Sie ihn nun im Uhrzeigersinn, bis Sie
Mikroskop. ein Klicken vernehmen, das die korrekte
Abb 2 Abb 3A
Steckerinstallation anzeigt.
3. Schließen Sie das kleine AC-Adapterkabel
an die Buchse an der Fußrückseite (siehe Abbildung 2) an. C. Für den Typ aus Abbildung 3B ziehen Sie den
Stecker nach oben weg, während Sie das
4. Schließen Sie den benötigten Stecker (siehe Anmerkung unten)
AC-Adapterende festhalten, und der Stecker
an den AC-Adapter und anschließend den Adapter an eine
ist entfernt. Nehmen Sie den gewünschten
geeignete Stromversorgung an.
Steckertyp und richten Sie die zwei Löcher
ANMERKUNG: Der mit dem Mikroskop mitgelieferte AC-Adapter verfügt über ein im Steckerboden nach den zwei Stiften im
austauschbares Steckersystem, das in den USA, in GB, Europa, Australien AC-Adapter aus. Drücken Sie den Stecker
und vielen weiteren Teilen der Welt funktioniert. anschließend vollständig in den AC-Adapter Abb 3B
und der Vorgang ist abgeschlossen.
Sie können je nach spezieller Anforderung Stecker einfach wie
folgt austauschen: Batteriebedienung— Wenn gewünscht, können
Sie ihr Mikroskop ohne AC-Strom verwenden.
A. Möglicherweise haben Sie ein oder zwei verschiedene
Auf diese Weise haben Sie die Freiheit, das
Adaptertypen. Einer wird in Abbildung 3A dargestellt, ein anderer
Mikroskop beliebig im Freien oder in Innenbereichen
von ähnlicher Bauart in Abbildung 3B; beide verfügen über
einzusetzen. Der Batteriebetrieb erfordert 4 AA-
verschiedene Arten von Austausch-Steckern.
Batterien (nicht im Lieferumfang enthalten). Öffnen
B. Für den Typ aus Abbildung 3A drücken Sie den kleinen Kopf mit Sie die Batterieklappe am Mikroskopfuß und legen
dem Aufdruck “PUSH” herunter und halten ihn gedrückt, während Sie die Batterien entsprechend der im Batteriefach Abb 4
Sie gleichzeitig die Steckerzinken festhalten und den Stecker angezeigten Polarität (Abbildung 4) ein. Nachdem die
leicht gegen den Uhrzeigersinn drehen und herausziehen. Lassen Batterien eingelegt wurden, schließen Sie das Batteriefach.
Sie nun den “PUSH”-Knopf los. Die Batterielebensdauer beträgt normalerweise drei Stunden.
DEUTSCH | 19SD-KARTENVERWENDUNG
Das TetraView ist mit einer 8-GB-SD-Karte ausgestattet, die Sie für die Aufnahme von Bildern (Schnappschuss oder Video)
TM
verwenden können. Karten werden in den SD-Kartenschlitz im LCD-Monitor eingelegt (Abbildung 1).
MIKROSKOP-BETRIEB
Bevor Sie Proben betrachten können, muss das LCD sowie eine angepasst. Eine andere Möglichkeit der Helligkeitsanpassung ist die
geeignete Beleuchtung eingeschaltet sein und Sie müssen den Änderung der EV-Funktion auf dem Touchscreen. Die EV-Funktion
Umgang mit dem Kreuztisch verstanden haben; anschließend können (Belichtungswert) erhöht oder verringert die Helligkeitsstufe unter
Sie mit der Betrachtung beginnen. Entfernen Sie die Schutzfolie vom Verwendung der (+)- oder (-)-Tasten auf dem Bildschirm.
LCD-Bildschirm.
Beim Betrachten einer dunklen Probe müssen Sie möglicherweise
LCD-MODUL die Lichtmenge erhöhen, damit bestimmte Merkmale oder Details
aufgelöst werden. Am besten erreicht man dies durch erhöhte
Dieses digitale Mikroskop unterscheidet sich von herkömmlichen Helligkeit des Beleuchtungselements, indem das Helligkeits-Steuerrad
Mikroskopen — anstelle der Okulare in herkömmlichen Mikroskopen einfach vollständig bis zur höchsten Einstellung gedreht wird.
ersetzt hier der LCD-Monitor die Okulare, sodass Sie die Proben auf
dem Bildschirm selbst oder zusammen mit anderen ansehen können. Die optimale Belichtung finden Sie heraus, indem Sie mit der
Um die Probenbetrachtung zu beginnen, müssen Sie den LCD- Anpassung experimentieren, da jede Probe eine um ein wenig
Monitor anschalten, indem Sie auf den Hauptschalter (siehe Abbildung abweichende Beleuchtung erfordert und da gleiche Proben unter
1) drücken, und auf dem Bildschirm erscheint “Celestron Digital verschieden starken Auflösungsleistungen betrachtet werden können.
Microscope”. Das ist im Prinzip alles, was Sie tun müssen, um mit dem
LCD-Bildschirm Proben zu betrachten. Die Touchscreen-Funktionen BETRACHTUNG EINER PROBE
auf dem LCD-Modul dienen hauptsächlich der Aufnahme von Ihr Instrument verfügt über einen Kreuztisch mit Tisch-Halterklammer
Bildern (Schnappschüsse und Videos) und der Ausführung anderer und Justierknöpfen (siehe Abbildung 7).
Funktionen, die in dieser Anleitung später beschrieben werden.
1. Verwenden Sie den Klammerhebel, um den Klammerarm der Tisch-
BELEUCHTUNG Halterklammer zu öffnen.
2. Legen Sie einen Objektträger (Größe: 1” x 3”/25,4 mm x 76,2 mm)
To get the sharpest and best views. You’ll need to choose the proper in den Halter, und nähern Sie den Klammerarm vorsichtig an den
illumination (lighting): Objektträger an.
1. Um die Beleuchtung einzuschalten und die Helligkeit anzupassen, 3. Verwenden Sie die Tischhub-Knöpfe Abbildung 6), um die Proben
drehen Sie den Einstellschalter für die Beleuchtung an der Basis über der Tischöffnung zu positionieren. Der hintere Tischhub-Knop
des Mikroskops (Abb. 5). bewegt die X-Achse (for- und rückwärts), wohingegen der vordere
Tischhub-Knopf die Y-Achse (seitwärts) bewegt. Wenn Sie das
2. Die untere Beleuchtung (Abbildung 1) wird hauptsächlich für Mikroskop zum ersten Mal verwenden, kann es eine Zeit dauern, bis
Objektträger verwendet, bei denen Licht nach oben durch die Sie sich an die Bewegungsfunktionen gewöhnt haben, doch werden
Öffnung des Kreuztisches und durch den Objektträger fällt. Sie schnell in der Lage sein, Objekte schnell auszurichten.
LICHTANPASSUNG ANMERKUNG: Ein Nonius auf beiden Achsen ermöglicht eine genaue Kennzeichnung
und Replikation eines Objekts im Betrachtungsfeld, auf das der Betrachter
Proben unterschiedlicher Größe, Dicke und Oberflächenbeschaffenheit zurückkommen möchte.
erfordern verschiedene Beleuchtungsstufen. Generell wird die
Helligkeit über die Schalter, abgebildet in den Abbildungen 5,
Abb 5 Abb 6 Abb 7
20 | DEUTSCHYou can also read