IVRN Laboratory Manual Separation and storage of serum, plasma and PBMCs - ACH2
←
→
Page content transcription
If your browser does not render page correctly, please read the page content below
Immunovirology Research Network (IVRN)
A network of laboratories across Australia to facilitate strategic clinical
immunology and virology research in relation to Australians with HIV or HCV.

           IVRN Laboratory Manual

             Separation and storage of
                serum, plasma and
                     PBMCs

                                                                               Last Updated June 2021
TABLE OF CONTENTS
1. Record keeping and Administration ..................................................................................................3
2. Storage of serum and plasma for virological studies ........................................................................4
2.1 Materials ..........................................................................................................................................4
2.2 Method .............................................................................................................................................4
3. PBMC fractionation, cryopreservation and thawing .......................................................................5
3.1 Equipment and Materials.................................................................................................................5
3.2 Establish correct settings for your centrifuge..................................................................................6
3.3 Separation of PBMC by density gradient centrifugation .................................................................7
3.4 Cryopreservation of cells .................................................................................................................9
3.5 Notes on handling frozen ampoules ...............................................................................................10
3.6 Thawing cryopreserved cells .........................................................................................................10
3.7 Procedures that may reduce PBMC quality ..................................................................................11
4. Further reading .................................................................................................................................11
Appendix1: IVRN Blood Processing Workflow Sheet .......................................................................12
Appendix 2 Shipment of processed specimens to IVRN Central Specimen Laboratories and
invoicing ..................................................................................................................................................13
21. Record keeping and Administration
Accurately recorded details of blood samples processed for the IVRN are critical for subsequent
research studies. Please complete the IVRN Blood Processing Workflow Sheet (Appendix 1) when
specimens are processed.
Record all available specimen details (identifier [ID], 2x2 code, date of birth, study visit number or
time point, date/time collected, date/time processed, type and amount of blood received), as well as the
laboratory details (Tier One laboratory name, processor’s initials) and the study title. The subject ID
may be a clinical trial participant number.
Wherever possible, perform whole blood counts in an automated cell counter and record model of cell
counter used, the total and differential white cell counts, and the anticoagulant tube. Use of EDTA
tubes for whole blood counts is preferred, but another non-liquid anticoagulant may substitute (eg.
heparin).
Label cryovials with the following information either using a fine permanent waterproof marker (e.g.
Sharpie industrial permanent marker extra fine, or Pentel N50 bullet point), or printed labels.
Lab ID: eg. UNSW (or if in Lab QAP, Lab Z)
Study: e.g. IVRN QAP.
Subject identifier: The subject ID and the 2×2 code (e.g. John Brown = BRJO).
Date of birth: Record in the following format: _ _. _ _. _ _
dd mm y y
Specific sample type: PBMC, serum or plasma.
Anticoagulant used: For plasma samples only record the anticoagulant used in blood collection (e.g.
EDTA, LiHep).
Sample volume: Cell number for PBMCs (e.g. 5M for 5 x 10⁶ cells), or volume of serum or
plasma. (e.g. 500µl).
Date: Date of specimen collection (not processing date).
Study visit number or time point may be added if there is sufficient space on the cryovial.
See Appendix 2 for details of specimen shipping to the IVRN Central Specimen Repositories and
invoicing for specimen processing.
32. Storage of serum and plasma for virological studies
2.1 Materials
Transfer pipettes (sterile).
Cryogenic vials; high quality grade 1ml, screw cap internal thread w/o skirt (eg. Nunc Cat # 377224).
2.2 Method
1 Serum may be retrieved from any clotted specimen (e.g. SST or Z Serum Clot Activator tubes).
2 Plasma may be retrieved from any anticoagulated whole blood specimen (e.g. EDTA, lithium
heparin [LiHep], sodium heparin [NaHep], acid citrate dextran [ACD], sodium citrate tubes).
Note: Blood for viral load assessment or other quantitative test should not be taken from ACD (liquid
anticoagulants dilute the plasma by an unspecified factor). Liquid anticoagulants are acceptable for
viral isolation and culture.
3 Centrifuge at 1000g for 10 min.
4 Transfer 500µl-1000µl plasma/sera to each of the replicate ampoules (or as directed), being
careful not to aspirate any cells from the buffy layer. Plasma for viral load measurement must
be dispensed in aliquots greater than 1ml. Label tubes with the subject ID and study details as
described in section 1, and the sample type (e.g. LiHep plasma, ACD plasma, EDTA plasma, or
serum).
5 Record the number and type of vials of serum and plasma on the IVRN Blood Processing
Workflow Sheet.
6 Store aliquots in a –80 C freezer until shipment.
7 File the IVRN Blood Processing Workflow Sheet in a secure location until shipment.
43. PBMC fractionation, cryopreservation and thawing
3.1 Equipment and Materials
Item Examples
Centrifuge with graded acceleration/deceleration settings
Class II laminar flow cabinet
-80 °C freezer, and liquid or vapour phase nitrogen tank
Bench top chiller rack, or ice water bath and rack Nalgene Cat # 5116-0032
Centrifugation tubes; 50ml and 10ml
Controlled-rate freezing equipment or ‘Mr Frosty’or CoolCel. Nalgene Cat # 5100-0001
Sterile syringes; 20ml
Sterile mixing cannula Indoplas Cat # 500-11.012
Sterile disposable pipettes; 10ml Costar Cat # 4101
Sterile transfer pipettes Samco Cat # 222-20S
Cryogenic vials; high quality grade, 2ml, internal thread, w/o skirt Nunc Cat # 377267
Permanent marker; bullet point, alcohol resistant, Pentel N50, Sharpie
Sterile phosphate buffered saline, Ca++ and Mg++ free (PBS)
Cell culture medium: RPMI 1640 supplemented with HEPES,
penicillin 20 IU/ml, streptomycin 20 µg/ml, L-glutamine 2mM
• Note: glutamine in suspension is unstable, use within 14 days.
Lymphocyte separation medium Ficoll-Paque Plus or Ficoll-
• Note: different batches of Ficoll-Paque Plus give different Paque Premium (GE
lymphocyte yield efficiencies, viability results, and levels of Healthcare), or Lymphoprep
contamination with erythrocytes and granulocytes, as tested by the (Progen)
manufacturer. Request the material specification sheet for every
available lot before selection for purchase. Ficoll-Paque Premium
is manufactured to the highest GMP standard, and generally gives
slightly better lymphocyte yields and purity than Ficoll-Paque Plus
(both producst are acceptable for use in IVRN work).
Dimethyl sulphoxide (DMSO); cell culture grade Sigma Hybri-Max Cat #
• Note: buy small containers and use within 6 months of opening. D2650
Foetal calf serum; heat inactivated
• Note: best frozen in 50ml aliquots at -80 °C. It is acceptable to re-
freeze in single use sub-aliquots).
• FCS for the IVRN QAP was screened for complement-mediated
anti-human lymphocyte cytotoxicity and for the ability to support
the proliferation of PBMCs against a range of stimulants while
having low backgrounds in the presence of FCS alone. A similar
screen was performed in the ELISPOT assay.
• FCS selected by each lab for IVRN clinical trials and other non-
QAP PBMC collection should likewise provide low background
control proliferation of PBMC when tested in the LPA, or low
background IFN-g producing cells in the ELISPOT assay. At least
2 samples of FCS should be screened for selection from a suitable
supplier (eg. Thermo Trace, JRH (CSL), or other suppliers of
Australian sourced serum). A sufficient quantity of the chosen
batch of FCS should be reserved to last the duration of the FCS
shelf life (batch chosen should have an expiry date of at least 3
years).
53.2 Establish correct settings for your centrifuge
The ability to harvest sufficient PBMC
and to avoid significant losses during wash
steps depends on correct centrifuge use.
Modern centrifuges automatically convert
between RCF (g) and rotor speed (RPM)
according to the radius from the centrifuge
spindle to the bottom of the specimen tube
for each rotor. Alternatively, conversion
between RCF and RPM can be performed
manually using the nomogram shown at
the right, by simply drawing a straight line
from the rotor radius value to your known
RCF, and the resulting RPM is the value
intersected by the line. RCF can also be
calculated using the following formula:
RCF = 1.118 × 10⁻⁵ × radius (cm) × RPM2
The radius for many lab centrifuges is
18cm to the bottom of the tube, and
centrifuge speeds suggested in this manual
are based on this standard size; eg, spin
PBMC on Ficoll at 700g / 2000rpm.
The centrifuge brake setting is the other
crucial parameter that greatly influences
yield and purity. Rapid braking may cause
internal turbulence during centrifuge slow
down, causing cells to be washed off the
pellet into the supernatant. This problem is
more pronounced with wider centrifuge
tubes, or when the tube is half full. Old
centrifuges with a simple on-off brake
setting should always have the brake off.
Centrifuges with a high/low/off brake
setting range may also have to be used in
the off mode if the low brake speed is too
fast. Centrifuges with a 1 to 10 scale of
braking should be used with the brake set
on 3 or less. The brake should always be
off for the Ficoll spin.
6How to customise your centrifuge for optimal use? If your lab purchases a new centrifuge, it is
recommended that after establishing the settings, a direct comparison between old and new centrifuges
be conducted using duplicate specimens. Carefully observe the specimen after spinning to ensure the
desired result was achieved, and make adjustments where needed. Consider the following examples:
1. Have all cells been deposited as a buffy coat, or are some remaining in the plasma? If not sure,
aspirate a small specimen of plasma near the bottom and examine in a haemacytometer. If cells are
present, spin at a higher speed or for longer, and reduce brake force.
2. Is the cell pellet smaller than expected? Are there any signs of cells washed off into the supernatant?
Aspirate a small supernatant specimen, and if cells are present, consider reducing the brake or turning
the brake off. Perhaps increase centrifuge speed, or spin in a narrow tube (10 or 15 ml) instead of a
50ml tube, and ensure the tube is full so as to reduce inner turbulence during braking.
Always visually examine the supernatant before discarding so as to avoid cell losses, and be prepared
to customise your centrifuge settings in order to achieve the desired result.
3.3 Separation of PBMC by density gradient centrifugation
Sterile procedures should be used throughout this method, and all work with open specimens should be
performed inside a Class II biosafety cabinet.
1 Note: If blood for PBMC preparation is received in multiple tubes, buffy coats can be pooled
before PBMC separation. Process PBMC from different anticoagulant tubes separately. In most
situations, proceed according to option (a) below:
(a) Centrifuge whole blood at 1000g (2200rpm) for 10 minutes at room temperature. Remove
plasma to within 5mm from the buffy coat (store plasma if required at 4 × 1.5ml aliquots), then
transfer buffy coats to a 50ml centrifugation tube (approx. 15ml of buffy coat from up to 5
blood tubes from a single donor can be pooled into one 50ml tube) and dilute with 15ml PBS.
Mix well.
Note: for small blood samples (single tube), and if plasma is not required for storage, follow step 1b.
…or…
(b) To minimize cell losses from small blood samples, pour whole blood into centrifuge tube
and add residual blood washed from collection tube with PBS, and mix well.
Note: PBS is preferable to RPMI, because lack of calcium and magnesium in PBS may minimise cell
clumping and aid cell separation.
2 If separating blood in 50ml tubes, use a syringe and sterile mixing cannula to layer 15ml of
Ficoll beneath the diluted buffy coat. A fresh cannula must be used for each pooled patient
sample. Be careful not to mix the layers, by ensuring Ficoll flows out slowly, thereby
maintaining a clearly defined interface between Ficoll and blood.
Note: Diluted blood can be overlayed onto the Ficoll with a 10ml pipette, again being careful not to mix
the layers.
3 Centrifuge the tubes at 700g (1800rpm) for 20 minutes at 20°C, with the brake off.
4 Use a sterile transfer pipette to remove the lymphocyte bands from replicate tubes from each
patient sample and pool into a sterile 50ml centrifuge tube. Avoid removing any white platelet
plaque attached to the side of the centrifuge tube adjacent to the PBMC layer - these are sticky
7activated platelets, and may cause unwanted cell clumping and possible losses. Minimise the
amount of Ficoll layer harvested. Fill tube with PBS.
Note: Dilute the harvested PBMC with at least the same volume of PBS to avoid cell losses in the
following spin step.
5 Centrifuge tubes at 400g (1400rpm) for 10 minutes, with brake on lowest setting.
Note: A significant proportion of the platelets harvested with PBMC may remain suspended in the
supernatant and should be discarded. If the PBMC pellet is smaller than expected, remove a drop of
supernatant and examine in a haemocytometer to ensure all PBMC have been spun down, before
pouring off the supernatant. Also note that a significant number of cells can be lost from the pellet
because of turbulence generated in the tube during centrifuge slow down if spinning a 50ml tube that is
not full. Spin smaller volumes in 10 or 15ml tubes.
6 Discard supernatant and resuspend cell pellet in 10ml RPMI or PBS, and remove a small
sample for counting.
Note: It is advisable to leave the PBMC in RPMI with 5-10% FCS if the freezing step is delayed by more
than 1 hour, to keep the cells viable in a full nutrient medium.
7 Count cells in an automated haematology analyser if available, or use a haemocytometer.
Prepare an appropriate dilution of cells to count in a routinely calibrated automated cell counter;
eg undiluted if your counter samples only 10-20µl, or dilute if >100µl is sampled. Sensitive
multi-parameter machine,s eg Cell-Dyn models, give more reliable results than 3- or 5-cell
Sysmex cell counter models. Record total PBMC as the sum of lymphocytes and monocytes. If
the monocyte population is too small cannot be determined, record only the lymphocyte count
as the PBMC population. Do not use the white cell count because any contaminating
granulocytes present with the PBMC will be included, and will dead when thawed for
assessment and therefore reduce the recovery. If your cell counter cannot differentiate between
white blood cell sub-populations, then it is advisable to use a haemocytometer.
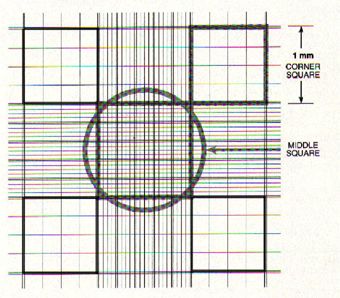
If using a haemocytometer, count at least 50-100 cells per 1mm grid for the count to be
representative. Therefore, depending on the number of PBMC harvested (look at the size of the
cell pellet), dilute 10µl of cell suspension in a suitable volume of PBS, and then dilute 1:1 in
Trypan Blue. Evenly mix then load the haemocytometer to fill the area under the cover slip.
Make sure the haemocytometer chamber depth is 0.1mm, and use the reusable cover slips
provided with the haemocytometer. Allow the
cell suspension to settle in the
haemocytometer for 30 seconds before
counting. Count the 4 large corner quadrants
(see diagram). Viable PBMCs will be clear;
non-viable PBMCs will be blue. Do not count
large cells of granulocyte appearance as being
PBMC (these do not survive
cryopreservation), so as to not over estimate
the PBMC content. Include cells that touch
either the top line or left vertical perimeter
line of any corner square. Do NOT count any
cells that touch either the bottom line or right
vertical perimeter line of any corner square.
88 Calculate total PBMC recovered:
=(lymphocytes + monocytes) cells/ml × dilution factor× sample volume (ml)
or for haemocytometer cell counts:
=(average counts/quadrant) ×104 × dilution factor (medium and Trypan Blue dilutions) ×
sample volume (ml)
3.4 Cryopreservation of cells
1 PBMCs are prepared and counted as described above.
2 Prepare an appropriate number of cryovials according to the PBMC yield (total cells ranging
from 5 - 10 ×106 PBMCs/vial). Please ensure that each aliquot of PBMC from a single patient
specimen has the same number of PBMC.
3 Ensure cryovials are labelled as described in section 1.
4 After labelling, chill cryovials in a lab top cooler rack (or ice water bath) to 4°C before use.
5 Prepare freezing medium, containing 10% DMSO & 20% FBS in RPMI. Chill to 4°C before
use. Freezing medium is best made fresh, or can be stored at 4°C for up to 1 week.
6 Centrifuge cells at 400g (1400rpm) for 10 min, discard all supernatant, and resuspend the cell
pellet directly in an appropriate amount of freezing medium to ensure a final PBMC
concentration of 5-10 x 106 cells/ ml per ampoule, and immediately dispense into the chilled
cryovials, 1ml per vial. Ensure that the quantity of cell suspension is dispensed accurately into
each vial. Cap ampoules and keep chilled until placing in the cryo device (DMSO is toxic to
cells at room temp).
7 Initiate cryopreservation using either a mechanical controlled rate freezer, or a “Mr Frosty” or
CoolCel device placed in a -80°C freezer.
Mechanical controlled rate freezing method:
1 The cryovials are placed in a rack in a controlled rate freezer held at 4°C.
2 Set an appropriate temperature gradient; e.g. reduce the temperature by -1°C/minute until -25°C
followed by a second cooling phase of -5°C/minute until -100°C is attained.
3 Cryovials should be removed and stored in nitrogen vapour or liquid as soon as the freezing run
is complete.
“Mr Frosty” freezing method:
1 Fill the Mr Frosty unit with isopropyl alcohol to the specified level, and chill to 4°C before use
(the Mr Frosty filled with alcohol should be stored at room temperature when not in use).
Replace the isopropyl alcohol after the 5th freezing cycle, because water is gradually absorbed
by the alcohol, which alters the freezing rate.
2 Place cryovials in the ‘Mr Frosty’ unit and transfer into a -80°C freezer, for a minimum of 4
hrs, or overnight, before storing in a nitrogen tank.
CoolCel freezing method:
9Keep the device at 4°C ready for use. Insert chilled ampoules and transfer device immediately
into a -80°C freezer for a minimum of 4 hours or overnight, before transferring specimens to
nitrogen.
3.5 Notes on handling frozen ampoules
It is essential that frozen PBMC are moved from the -80°C freezer to cryogenic temperatures (liquid or
vapour phase N2 tanks) within 24hrs (or over the weekend as a maximum allowed time).
Keep ampoules in dry ice when transferring frozen ampoules between the -80°C freezer to the N2 tank,
or in preparation to ship frozen cells to another lab. Never use wet ice to transfer frozen PBMC
specimens.
3.6 Thawing cryopreserved cells
Unlike freezing, when it is important that cells are cooled slowly, optimal recovery of viable cells is
obtained when cells are rapidly thawed. Medium is usually added slowly for gradual osmotic diffusion
of DMSO out of the cell to minimise cell damage, however rapid dilution may also be effective. For an
evidence-based discussion on acceptable variations to the procedure, please see Honge, et al, 2017.
1 Transfer cryovials from the nitrogen tank on dry ice.
2 Pre-label centrifuge tubes and prepare all media before thawing.
3 Thaw using a water bath or warm tap water in a beaker at 37-42°C (Note: 42°C enables rapid
thawing without overheating the contents). Electronic water baths are a notorious source of
contamination, and require regular disinfection. Ensure the cryovial lid is on tight and hold
upright in the bath with the cap out of the water to minimise possible contamination with water.
Shake vial gently while thawing until ice crystal is approximately 5mm dia.
4 Sterilise the surface of the ampoule with 70% ethanol or an alcohol wipe before opening. Pour
the contents into a sterile centrifuge tube. Rinse ampoule with approx. 1ml FBS (37°C) to wash
out remaining cell suspension, and add to the tube.
5 Add pre-warmed medium (RPMI/10% FBS; 37°C) in a drop-wise manner until approximately
5ml has been added, then fill the tube. Mix and centrifuge at 300g for 10 minutes.
6 Optional DNase I treatment for long-term frozen PBMC: If PBMC were frozen for >10
years, or if cell clumps were present when similar specimens were thawed, the best option is to
briefly enzymatically digest sticky cell-free DNA (Garcia-Pineres, et al, 2006). Otherwise
proceed to step 7.
• Prepare DNase: Stemcell Technologies (Cat# 07900)- 0.1mg/ml final conc. Dilute a 1ml
ampoule to 10ml in RPMI (or a medium that contains Ca2+/Mg2+ to activate DNase).
• Resuspend PBMC pellet in 500µl diluted DNase, and incubate 15 minutes at room
temperature.
• After incubation, add 10-15mlml RPMI/10% FBS, mix and centrifuge.
7 Discard the supernatant, and wash another time with RPMI/10% FBS.
8 Discard the supernatant and resuspend in 2-5ml medium for recovery/viability counting.
103.7 Procedures that may reduce PBMC quality
1 Separate PBMC within 8 hours of blood collection; avoid EDTA tubes unless used for
immediate PBMC separation.
2 Do not chill whole blood before fractionation; keep at ambient (22oC) lab temperature.
2 Avoid prolonged contact with Ficoll; harvest PBMCs and wash ASAP after centrifuge stops.
3 Do not leave centrifuged cells as a compressed pellet for any time longer than necessary;
resuspend cells in medium before taking a break.
4 Do not vortex cell pellets; flick the tube to loosen cell pellet or resuspend by gentle pipetting.
5 Do not leave cells in serum free medium for more than 1hr; add 5-10% FCS if processing other
specimens before batch freezing.
6 Avoid exposure to DMSO medium at ambient temperature. When freezing, resuspend cell
pellets in cold DMSO medium, dispense into cold cryovials, then place directly in cold (4°C)
“Mr Frosty” or pre-chilled controlled rate freezer.
4. Suggested reading
Bull, M., Lee, D., Stucky, J., Chiu, Y.L., Rubin, A., Horton, H., MeElrath, M.J. Defining blood
processing parameters for optimal detection of cryopreserved antigen-specific responses for HIV
vaccine trails. J Immunol Methods 2007, 322: 57-69.
Disis, M.L., dela Rosa, C., Goodell, V., Kuan, L.Y., Chang, J.C., Kuus-Reichel, K., Clay, T.M., Lyerly,
H.K., Bhatia, S., Ghanekar, S.A., Maino, V.C. and Maecker, H.T. Maximizing the retention of antigen
specific lymphocyte function after cryopreservation. J Immunol Methods 2006, 308, 13-18.
Carcia-Pineres, A.J., Hildesheim, A., Williams, M., Trivett, M., Stobel, S., Pinto, L.A. DNAse
treatment following thawing of cryopreserved PBMC is a procedure suitable for lymphocyte functional
studies. J Immunol Methods 2006, 313: 209-213.
Honge, B.L, Petersen, M.S, Olesen, R., Moller, B.K, Erikstrup, C. Optimizing recovery of frozen
human peripheral blood mononuclear cells for flow cytometry. Plos One, Nov 1 2017.
Olson WC, Smolkin ME, Farris EM, Fink RJ, Czarkowski AR, Fink JH, Chianese-Bullock KA,
Slingluff CL Jr. (2011) Shipping blood to a central laboratory in multicenter clinical trials: effect of
ambient temperature on specimen temperature, and effects of temperature on mononuclear cell yield,
viability and immunologic function. J Transl Med. 2011 Mar 8;9:26
Tree, T.I., Roep, B.O. and Peakman, M. Enhancing the sensitivity of assays to detect T cell reactivity:
the effect of cell separation and cryopreservation media. Ann N Y Acad Sci 2004, 1037, 26-32.
11Immunovirology Research Network (IVRN)
A network of laboratories across Australia to facilitate strategic clinical
immunology and virology research in relation to Australians with HIV or HCV.
Appendix1: IVRN Blood Processing Workflow Sheet
Tier One Lab ID Sample details
Processor’s Initials
Sample ID Surname Firstname
2 ´ 2 Code
1. Record sample details
N.B in 2 ´ 2 first two letters of surname then first two letters of given name dd.mm.yy Study Visit No. or
Date of Birth Timepoint
2. Study title:
Date Collected Time Collected
Date Processed Time Processed
3. Record tube type and amount of blood received
e.g. LiHep blood 9ml received, EDTA blood 4ml received Whole blood sample results
___________ blood _______ mL received 106/mL
WCC
___________ blood _______ mL received 106/mL %
neutrophils
___________ blood _______ mL received 106/mL %
lymphocytes
4. Record whole blood sample results 106/mL %
monocytes
Model of cell counter used
Serum Plasma
5. Separate serum and plasma & record number and type
e.g. 4 LiHep plasma, 3 SST serum # vials type # vials type
6. Ficoll blood and wash
Ficoll product details: __________________________________ # vials type # vials type
7. Resuspend PBMC and record PBMC result
PBMC results
8. Suspend PBMC in freezing media at concentration of 106/mL
5-10 ´ 106cells/ml and aliquot into 2ml cryovials WCC
FCS Source: Lot Number: .
:Batch Number: Expiry Date: .
9. Label ALL vials with Tier One Lab ID, Study name, 106/mL %
Subject ID, 2 ´ 2, Date of Birth, anticoagulant (e.g. LiHep neutrophils
plasma), Cell number (PBMCs) or Sample volume (serum or
plasma), Date specimen collected.
10. Record # vials and concentration PBMC/vial 106/mL %
PBMCs lymphocytes
106/mL %
Cells/vial x 106 # vials monocytes
Last Updated June 2021Appendix 2 Shipment of processed specimens to IVRN Central Specimen
Laboratories and invoicing
Below are a series of steps to follow when ready to ship specimens to the Central Specimen
Repositories (CSRs) at UNSW (Sydney) and at NRL (Melbourne).
Record Keeping
Prepare a simple list of the specimens being sent at the time of shipment, including ID number, 2x2
code, sampling time-points for each subject and total number of specimen vials, and send this list with
the shipment.
Shipping
Labs in WA, SA and Vic should ship specimens to the NRL CSR, while labs in QLD and NSW should
ship specimens to the UNSW CSR. Lab staff should contact the IVRN Project Coordinator at UNSW
when they are ready to ship specimens. In addition, please send copies of the IVRN Blood Processing
Workflow Sheets and any paperwork that arrived with the original blood samples (e.g. request forms)
with the shipment.
Invoicing
Invoice IVRN (via the Westmead Institute for Medical Research) at the time of shipment to the CSRs,
and send a copy of this invoice and a copy of the specimen list to the IVRN Project Coordinator at
UNSW.
Invoicing details are as follows:
ABN: 54 145 482 051
Westmead Institute for Medical Research
PO Box 412 WESTMEAD NSW 2145 Australia
Contact: Joanne Reidy
Phone: +612 8627 3004
Email: joanne.reidy@sydney.edu.au
13You can also read