Last updated 1/5/2021 - Endurance Learning
←
→
Page content transcription
If your browser does not render page correctly, please read the page content below

Last updated 1/5/2021
A Trainer’s Guide to Adobe Connect by Endurance Learning
How to Use This Guide
This guide is designed to provide technical tips & tricks and best practices advice for virtual training
conducted via Adobe Connect Meetings. It is suggested that you use this guide to help enhance your
understanding of the Adobe Connect Meetings platform, gain confidence in your facilitation skills, and
improve upon the learner experience.
While the tips & tricks in this guide are invaluable, they will not provide you with a complete training
experience. For access to a bank of hundreds of virtual (and in-person) training activities go to
www.soapboxify.com. Soapbox is an all-in-one presentation creation tool that allows you to enter some
basic information about your training (length, audience, objectives) and in a matter of minutes will
provide you with a complete facilitator guide, slide deck, handouts, and activity instructions. Sign up
today for a free 10-day trial to experience how Soapbox will revolutionize your training programs.
Basic Feature Overview
License Type
There are four types of Adobe Connect licenses: Adobe Connect Small Meetings, Adobe Connect
Meetings, Adobe Connect Learning, and Adobe Connect Webinar. While the function of each platform
is the same, there are small feature differences to take note of.
Feature Small Meetings Learning Webinar
Meetings
Number of Participants Up to 3 Up to 25 Up to 200 Varies
Self-Registration
Reminder Emails
Breakout Rooms
Curricula Creation & Management
Learner Tracking & Management
Recording
Branding Customization
Event Analytics
Meeting Room
Once you create a meeting room, it exists until you delete it. Each meeting room has a unique URL.
Clicking the URL will allow a person to enter the meeting. You may use the same meeting room for a
recurring meeting, or for a session conducted more than once. The host may open or close the room
between meetings. Note: If the meeting room is left open between meetings, your attendees could
enter the room to view the content.
Endurance Learning, LLC has no affiliation with Adobe.
The content of this guide is correct as of our last review of Adobe Connect
© 2021, Endurance Learning, LLC www.soapboxify.com www.endurancelearning.com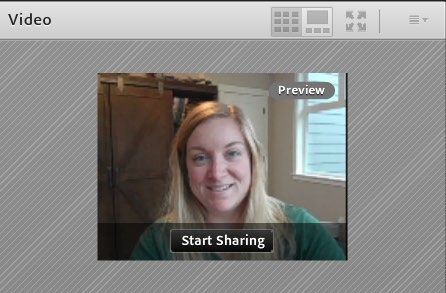
A Trainer’s Guide to Adobe Connect                                        by Endurance Learning

Pods
Adobe Connect calls the various parts of the platform’s page “pods”. With the default settings, the large
area on the left side of the screen is called the “sharing pod” which can be used to screen share,
document share, or whiteboard. On the right side of the page are the video pod, attendee pod, and chat
pod. Pods can be re-arranged into various formations, called layouts.

Layouts
On the far-right side of your screen, you will see a layouts bar. Layouts are an organized collection of
pods. Adobe Connect has three default layouts, but you can also create layouts of your own. You can
use the layouts bar to switch from one layout to another. Click the empty layout with the + icon to
design your own layout. You can change the size and placement of pods to optimize the participant
experience for the activity. Layouts can be used to help you with the flow of your meeting. You could
create one layout to start your session as a lobby, a second layout for a poll, a third layout for sharing a
demonstration, a fourth layout for use in breakout rooms, etc.

Roles
There are three roles a person involved in the session could be assigned. The person who starts the
meeting is automatically assigned as the host (though this can be passed to another person). Anyone
who joins the meeting is automatically assigned the role of participant. The host has the ability to
change each person’s assigned role at any time during the meeting.
   • Host: The person who organizes and facilitates the meeting. If you are utilizing a Producer for
       your session, the Host role is best suited to the person assuming the role of Producer.
   • Presenter: The person who assists in meeting facilitation, presenting content, and screen
       sharing. If you are utilizing a Producer for your session, the Presenter role is best suited for the
       person or persons assuming the role of Facilitator.
   • Participant: Meeting attendees. Participants can participate in polls, chat, and change their
       status.

Presenter Controls
A Presenter Only Area is available to Hosts and Presenters (not Attendees). This area can be used to
prepare content to be shared or to have private conversations. To view the Presenter Only Area, click
Meeting, then Enable Presenter Only Area.

   How to Change a Role
   •   Drag and Drop. In the attendee pod, drag and drop a Participant from one role to another.
   •   Hover. In the attendee pod, hover on a Participant name. Click Change Role. Then click the
       role you would like to assign to that Participant.

                            Endurance Learning, LLC has no affiliation with Adobe.
                   The content of this guide is correct as of our last review of Adobe Connect

© 2021, Endurance Learning, LLC          www.soapboxify.com                       www.endurancelearning.com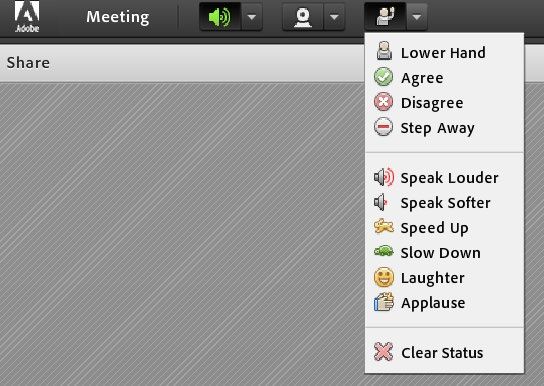
A Trainer’s Guide to Adobe Connect                                        by Endurance Learning

    Limitations
    •   Device Limitations To participate in a meeting, you must have a flash-enabled browser or the
        Adobe Connect desktop application. You may also use a mobile device or tablet to participate in
        an Adobe Connect session.
    •   Host/Co-Host/Presenter Devices Any Participant expecting to be acting in a role of Host, Co-
        Host, or Presenter should always join from a desktop computer using the Desktop Application of
        Adobe Connect. This will ensure access to all tools and overall ease of experience. (The
        exception to this is that some advanced Breakout Room controls are only accessible to a Host
        via the HTML client). Note: Screen share and polls are both tools that will be limited/restricted if
        you decide to work as Host or Presenter on a mobile device, tablet, or from a browser.

Webcam & Voice
    Overview
The most basic features of Adobe Connect Meetings are the webcam and voice features. Users are
prompted to connect their microphones and cameras upon logging into an Adobe Connect Meeting.

    Adult Learning
Adult learners need multi-sensory learning experiences. For virtual instructor led training (VILT) this
means asking your Participants to enable their cameras during training sessions. Also, adult learners
need to be involved in their learning, which includes planning learning experiences with feedback and
interaction, both of which are most effective on camera.

    Limitations
•   Microphone Rights. By default, Participants will not have the ability to talk when entering a
    meeting. You will need to enable Participant voice if you wish for Participants to be able to speak
    during your meeting.
•   Video Rights. By default, Participants will not have the ability to show their webcams when
    entering a meeting. You will need to enable Participant video if you wish to be able to see
    Participants (as the Host) or for Participants to be able to see one another during your meeting.

    How to Enable Voice/Webcam

                            Endurance Learning, LLC has no affiliation with Adobe.
                   The content of this guide is correct as of our last review of Adobe Connect

© 2021, Endurance Learning, LLC          www.soapboxify.com                       www.endurancelearning.com
A Trainer’s Guide to Adobe Connect                                       by Endurance Learning

                                                        Enable Participant voice
                                                        Open the microphone menu, click
                                                        Allow Participants to Use Microphone

                                                        Enable Participant webcam
                                                        Open the video menu, click Enable
                                                        Webcam for Participants

   How to Use Voice/Webcam
                                                        Host/Presenter/Attendee
                                                        Click the webcam (camera) button in
                                                        the top navigation bar, then click Start
                                                        My Webcam.

                           Endurance Learning, LLC has no affiliation with Adobe.
                  The content of this guide is correct as of our last review of Adobe Connect

© 2021, Endurance Learning, LLC         www.soapboxify.com                       www.endurancelearning.com
A Trainer’s Guide to Adobe Connect                                       by Endurance Learning
                                                        Alternatively, you may click Start My
                                                        Webcam in the video pod.

                                                        In the video pod, you will see a
                                                        preview of your camera. Click Start
                                                        Sharing to share your webcam with
                                                        the other Participants.

                                                        The video pod will adjust to
                                                        accommodate multiple webcams.

                                                        To stop or pause your video
                                                        Hover over your camera view and
                                                        click the Pause button.

                                                        To adjust your video view
                                                        Depending on your preferences or
                                                        session type, you may wish to adjust
                                                        how you view the video streams of the
                                                        people in your session.

                                                        In the video pod, click options (3
                                                        horizontal dots, top right corner), then
                                                        select the view that you would like.

                                                        Grid View shows all video streams,
                                                        the same size, in the video pod. This
                                                        view could be preferred when
                                                        collaborating or participating in a large
                                                        group discussion.

                                                        Film Strip View shows one video
                                                        stream larger and shows the
                                                        remaining videos smaller in a film strip
                                                        below. This view could be preferred
                                                        when listening to a specific presenter.

                           Endurance Learning, LLC has no affiliation with Adobe.
                  The content of this guide is correct as of our last review of Adobe Connect

© 2021, Endurance Learning, LLC         www.soapboxify.com                       www.endurancelearning.com
A Trainer’s Guide to Adobe Connect                                       by Endurance Learning

Mute All
The Host can mute all Participants. This is helpful to enable as people are signing into the meeting to
hide loud background noises. Furthermore, for meetings with a larger number of Participants (10+), it is
best to mute all Participants while the Presenter is speaking so that everyone can hear.

                                                        In the attendees pod, click the 3
                                                        horizontal dots for more options. Click
                                                        Mute All Attendees or Unmute All
                                                        Attendees.

                           Endurance Learning, LLC has no affiliation with Adobe.
                  The content of this guide is correct as of our last review of Adobe Connect

© 2021, Endurance Learning, LLC         www.soapboxify.com                       www.endurancelearning.com
A Trainer’s Guide to Adobe Connect by Endurance Learning
Alternatively, you may use the audio
controls in the top control panel to
Mute All Sounds or Mute Attendees.
Best Practices
Mute people upon entry. Change your settings to mute Participants upon entry prior to the
start of your session to avoid sudden loud noises or commotion.
Ask people to turn on their cameras. At the start of your session, ask your Participants to turn
on their cameras. Provide a brief explanation of why you are asking them to do so.
Allow Participants the ability to unmute themselves. It is easy to get carried away with
presenting and forget to unmute Participants at necessary points. It is also an additional factor
to try to keep track of during an already busy session. Allowing Participants the ability to unmute
themselves will take the burden off a Facilitator or Producer.
Back-Up Plan
If the webcam and/or voice are not working, try signing off Adobe Connect and back in again. If that
does not solve your problem, try a computer restart.
Screen Share and File Share
Overview
Screen sharing is another basic feature that is easy to use and can be used in a variety of ways to
enhance learning. Screen share can be used to present PowerPoint slides, show a webpage or video,
or to share a document. If you have handouts to share for use during or after your session, the share
pod is the most effective way to share the documents with Participants.
Adult Learning
Adult learners need learning experiences that appeal to all their senses, including delivery techniques
that meet the needs of audio, visual, and independent learning preferences. Using the screen share
feature is one important method through which you can engage your learners.
Endurance Learning, LLC has no affiliation with Adobe.
The content of this guide is correct as of our last review of Adobe Connect
© 2021, Endurance Learning, LLC www.soapboxify.com www.endurancelearning.comA Trainer’s Guide to Adobe Connect by Endurance Learning
Limitations
• The desktop application may be required. Depending on the version of Adobe Connect that
you are running, you may be required to download the desktop application to screen share. If
you are running Version 11 +, you will not be required to download the desktop application (you
may screen share using the Browser version).
• Mobile limitations. For Participants joining on mobile or tablet, they may be limited in their
sharing abilities. Most tablet users will be able to share documents, whiteboards, and photos.
Mobile users will only be able to share documents.
• Limitations on file type. Some Participants may say that they are unable to view something
that is being shared. Keep in mind that files that can always be shared/viewed by all Participants
include: PPT, PPTX, PDF, MP3, FLV, JPG, PNG. Convert your files prior to your session to
avoid any issues.
• Videos for mobile/tablet users. Mobile users may experience problems with not being able to
view a video being shared. This is due to video encoding, and it not due to the type of mobile
device being used by the Participant. To avoid problems, test your video on mobile/tablet prior
to your session.
How to Share
Share PowerPoint
In the share pod, click the Document
button. Click Browse My Computer to
find your file. Click Open. Your
PowerPoint file will appear in the
share pod.
Use the Next and Previous buttons to
navigate through your PowerPoint.
Click the sidebar icon to access a
section only visible to the
host/presenter where you can view
your presenter notes.
Share Document, Image, Video, etc.
In the share pod, click the Screen
button. Choose what you would like
to share:
• Desktop
• Windows
• Applications
After selecting your desired option,
click Share. A control bar will appear
in the bottom left corner that only you
Endurance Learning, LLC has no affiliation with Adobe.
The content of this guide is correct as of our last review of Adobe Connect
© 2021, Endurance Learning, LLC www.soapboxify.com www.endurancelearning.comA Trainer’s Guide to Adobe Connect by Endurance Learning
can see. You can use this control bar
to chat, manage your share, and
more.
Note: If you have never hosted an
Adobe Connect meeting before, you
may be prompted to download the
Adobe Connect desktop application
before you are able to share your
screen.
Best Practices
• Participants can use screen share in breakout rooms to display conversation questions or to
complete a task. When Participants are in a breakout room, they do not have the ability to see the
Host/Co-Hosts screen share from the main room. Instead, you will need to load any necessary
documents into the share pod prior to a breakout session (see instructions under Breakout Rooms
for more information). Be sure to clearly explain this to Participants prior to launching them into the
breakout session and ensure that they have all of the documents necessary.
• Share only the application that you want Participants to see. Adobe Connect gives you the
ability to pick the application that you want to share when you screen share. Sharing only that
application takes away possible distractions such as a desktop background photo, multiple open
applications, email or chat boxes, etc. When you click to begin screen share, you will be asked if
you would like to share your desktop, an application, or a window.
• Share the correct file type. Some Participants may experience issues sharing or viewing certain
types of files. Keep in mind that files that can be shared/viewed by all Participants regardless of
their device type include PPT, PPTX, PDF, MP3, FLV, JPG, PNG. Convert your files prior to your
session to avoid any issues.
Back-Up Plan
It is a good idea to share all of your materials with your Producer prior to the start of the session so that
they can take over screen sharing a PowerPoint or document in the event that you have technical
issues in trying to screen share. It is also a good idea to have back-up activities in mind if your planned
screen share does not work. For example, if you are planning to show a video but you cannot get the
video to play, you could instead tell a story that drives home the same point.
Endurance Learning, LLC has no affiliation with Adobe.
The content of this guide is correct as of our last review of Adobe Connect
© 2021, Endurance Learning, LLC www.soapboxify.com www.endurancelearning.comA Trainer’s Guide to Adobe Connect by Endurance Learning
Chat
Overview
Chat is another basic Adobe Connect Meetings feature that all Participants have access to. Participants
can chat with the entire meeting group, the Presenter or Host, or privately chat with individual people
within the meeting group.
Adult Learning
Chat is a great tool by which to allow adult learners to participate in their learning experience actively
and practically to learn by doing. Facilitators can ask questions for Participants to share how they can
apply their learning to their lives. Further, the chat feature allows Participants to practice and be
involved in the learning experience through feedback and evaluation.
Limitations
If for some reason you do not want participants to be able to chat, the host can disable the chat feature.
Keep in mind that it is helpful for participants to be able to privately chat message the producer with any
technical issues, so it may be useful to keep this feature enabled with most audiences.
How to Enable or Disable
With the default settings, chat is enabled for
Participants to use chat to talk to presenters,
hosts, and other Participants. If you would like
to limit the ability of Participants to be able to
chat with other people in the session, go to
chat preferences.
Endurance Learning, LLC has no affiliation with Adobe.
The content of this guide is correct as of our last review of Adobe Connect
© 2021, Endurance Learning, LLC www.soapboxify.com www.endurancelearning.comA Trainer’s Guide to Adobe Connect by Endurance Learning
Here you may disable private chat abilities for
Participants.
In chat preferences, you also have the abilty
to enable a Q&A pod where Participants can
submit questions (seperatly from the chat
pod) for Presenters to answer.
How to Chat
Use the chat pod to participate in chat.
You will see options to select if you
would like to send the message to
everyone in the meeting room, or to
chat with a certain person privately.
Endurance Learning, LLC has no affiliation with Adobe.
The content of this guide is correct as of our last review of Adobe Connect
© 2021, Endurance Learning, LLC www.soapboxify.com www.endurancelearning.comA Trainer’s Guide to Adobe Connect by Endurance Learning
In chat control, you will see various
preferences that you can adjust,
including the ability to start a chat with
a Host or Presenter, clear your chat,
email the chat history to someone,
modify the text size or color of your
font, add timestamps, etc.
Best Practices
Explain to Participants the difference between group chat and private chat. If you have
both features enabled, be sure to explain to Participants that there is a difference between the
group chat section and the private chat section. Nothing is quite as awkward as a message
going out to the group that was meant to be private.
Tell people to private chat the Producer with technical questions. Technical difficulties can
really cloud up the group chat window and take away from the purpose of your session. At the
start of your session, tell Participants to private chat the Producer with any technical problems
they may encounter during the session.
Have your Producer manage the chat room. It is best practice to have your Producer manage
your chat room instead of having the Presenter attempt to do so. When asking a question to the
group, tell Participants that you would like them to respond in the chat window. After a few
moments, ask your Producer to share aloud some of the things that Participants shared within
the chat window. This gives the Producer the ability to read responses while the Presenter is
talking. The Producer can then filter out responses that should be shared aloud to the group.
This is especially important with large groups when the number of responses coming into the
chat window will be numerous.
Back-Up Plan
If chat is not working for some reason or you are feeling overwhelmed by the amount of talk in the chat
window, you can always unmute some or all Participants and ask people to verbally respond to
questions or to elaborate on something that they shared in the chat window.
Endurance Learning, LLC has no affiliation with Adobe.
The content of this guide is correct as of our last review of Adobe Connect
© 2021, Endurance Learning, LLC www.soapboxify.com www.endurancelearning.comA Trainer’s Guide to Adobe Connect by Endurance Learning
Breakout Rooms
Overview
Breakout rooms are a way to have small group conversations or work time in a virtual environment.
Like Participants in a training room working together at a table, breakout rooms allow for the Presenter
to put Participants into individual meeting rooms with partners or small groups for as much time as they
would like. At the conclusion of the breakout room session, the Presenter or producer can bring groups
back together as a large group with the click of a button.
Adult Learning
Breakout sessions allow adult learners the opportunity to practice what they have learned (and get
feedback) and to share the relevance and applications of their learning by having small group
conversations.
Limitations
• Host controls vary across devices. Certain Host controls will be unavailable on some devices
or clients. Hosts will experience the greatest access to breakout room controls via the HTML
client. Note: It is still advised to manage breakout rooms via the desktop application. The
breakout room controls that are unavailable on the desktop application are not necessary to run
breakout rooms effectively.
• Group Size. Breakout rooms may be used in sessions with up to 200 Participants. The
maximum number of breakout rooms that can be created is 20 rooms.
• Pod Access. Participants need permission to access the various pods to collaborate during
breakout rooms. These permissions are called enhanced rights. These permissions will be
restored to their previous state at the conclusion of a breakout session (upon return to the main
room). To enable enhanced rights for Participants during breakout sessions:
o Click Breakout Room View.
o In the attendees pod, select the name of one or more Participants.
o Hover your mouse on the Participants name to Grant Access Rights. From the drop
down, select Enhance Rights.
o Select the pods that you want the Participants to control. Click Done.
• Drop In. The host can visit each breakout room to answer questions or check on progress
during a breakout session.
• You may re-use rooms. If necessary, the host can return Participants to the same breakout
rooms multiple times. The content in their breakout room pods will remain despite entering and
exiting the room multiple times.
• Layouts. Everyone goes out of full screen mode when a breakout room is started or ended.
• Group chat. If the chat pod is enabled for use in breakout rooms, the group chat is for the
people within a specific room only (you cannot chat with the entire session as a Participant from
within a breakout room). To message a Host during a breakout room, a Participant should send
Endurance Learning, LLC has no affiliation with Adobe.
The content of this guide is correct as of our last review of Adobe Connect
© 2021, Endurance Learning, LLC www.soapboxify.com www.endurancelearning.comA Trainer’s Guide to Adobe Connect by Endurance Learning
a private chat message. Chat logs in breakout rooms exist until deleted (including after a
breakout room has been closed). Note: If someone would like to save their group chat from
within a breakout room, they will need to copy and paste the chat log in order to save it.
How to Enable
If you do not see Breakout Rooms in
the attendees pod you may need to
enable it. In the attendees pod, click
the three horizontal dots for more
options. Select Breakout Room View.
Endurance Learning, LLC has no affiliation with Adobe.
The content of this guide is correct as of our last review of Adobe Connect
© 2021, Endurance Learning, LLC www.soapboxify.com www.endurancelearning.comA Trainer’s Guide to Adobe Connect by Endurance Learning
How to Set-Up
Click the plus button to add more
rooms. Drag and drop participant
names to assign them to specific
rooms. If you prefer Participants to be
sorted into rooms at random, simply
click Distribute.
When you are ready to start breakout
rooms, click Start Breakout.
If the content in each breakout room is
different (if you are using breakout
rooms as stations, for example) and
you would like to have groups rotate
through the breakout rooms as they
would physical stations around a
room, use the Rotate button to move
the Participants to the next breakout
room in your list.
When you are ready to close rooms,
click End Breakout. Note: There is not
a countdown or warning for
Participants when you end Breakout
sessions. It can seem very abrupt.
Best practice is to use the broadcast
feature to give a 2 of 5 minute warning
prior to closing breakout rooms (see
below for instructions on using the
broadcast feature).
Best Practices
Prepare Participants for what is about to happen. For Participants who have not used
breakout sessions before, the unknown can be a little scary. It is important to explain what is
about to happen and to give clear directions for what they should be accomplishing within their
breakout room.
Endurance Learning, LLC has no affiliation with Adobe.
The content of this guide is correct as of our last review of Adobe Connect
© 2021, Endurance Learning, LLC www.soapboxify.com www.endurancelearning.comA Trainer’s Guide to Adobe Connect by Endurance Learning
Unmute Participants. Oftentimes Participants will not know how to unmute themselves or will
struggle to do so. One way to alleviate this potential hazard is to unmute all Participants before
you launch them into their rooms.
Give Participants all the direction they will need. Prior to launching breakout rooms, ensure
that Participants understand the instructions of what they are to be doing in their breakout room.
Tell participants how to communicate with you if they get stuck (send the Producer a private
chat message).
Create a custom layout. You can create a custom layout for breakout rooms to set up an
exercise, project, collaboration, or group discussion. Having a custom layout created and ready
for each breakout session will help with the flow of your session. To do this, prior to Participant
arrival at the start of your session, create the necessary number of breakout rooms. Click Start
Breakouts. Move yourself from room to room and load necessary content to the share pod. This
can include instructions for the breakout room activity or any necessary handouts to be used
during the breakout time. Once all documents are loaded in the share pods, click End
Breakouts. The content that you loaded into the share pod of each breakout room will be there
ready for each group when they enter the room.
Drop in to check on progress and answer questions. Spend the breakout session time
moving yourself from room to room to check on progress or answer any questions that arise.
Keep an eye on time and your chat pod to make sure that everything is running smoothly.
Broadcast a message. Hosts can broadcast messages to all breakout rooms. This feature is
helpful to give timing updates, answer a question that all Participants have, post discussion
questions, etc. To broadcast a message:
o Click Breakout Room View.
o Choose Broadcast Message. Type your message and click Send.
o The message will show to all Participants in all rooms.
Poll a breakout room. A Host may drop in a breakout room and conduct a poll of Participants
in that breakout room using the poll pod. In this instance, the poll will show to Participants of the
that breakout room only, not the entire session.
Present work created within a breakout room. If breakout rooms were being used to
collaborate on something that you would like to present or share with the entire group, a host
can share the breakout room content with the all Participants in the main room after the
breakout sessions have been ended. To share the content from a breakout room with everyone
in the main room:
o Choose Breakout Pods from the menu in the top title bar.
o Select a breakout room name. Then select Share.
o Content will show in a new floating pod. This content is view only and cannot be edited.
Back-Up Plan
Occasionally you will find that Participants may be unable to join a breakout room due to technical
problems or their device choice. If, after troubleshooting with the Participant, you are unable to help
them to get into a breakout room, you may use the main room as a mini “breakout room” for any
Participants who were unable to access their breakout room.
Endurance Learning, LLC has no affiliation with Adobe.
The content of this guide is correct as of our last review of Adobe Connect
© 2021, Endurance Learning, LLC www.soapboxify.com www.endurancelearning.comA Trainer’s Guide to Adobe Connect by Endurance Learning
Polls
Overview
Polls can be used for gathering feedback, assessing knowledge, or taking a vote. By default, poll
results will be shown to Hosts and Presenters only. However, you may choose to broadcast poll results
to all Participants if you would like.
Adult Learning
Polls are invaluable to training sessions as they are a great method by which to gather learner
feedback. Participants can be involved in the learning process and to provide feedback and
consultation. Polls are also a way by which to give Participants control over their learning, to gather
evaluations, to check for understanding, or to allow Participants to make decisions.
Limitations
• Poll limitations for mobile users. While mobile users will be able to participate in polls, they
cannot work with polls. Mobile users will not be able to set, open, close polls, broadcast results,
or view voting details.
• Poll results save to the Adobe Connect Server. Poll results do not save in the Adobe
Connect meeting for easy access during your meeting. However, your poll results will be saved
in the Adobe Connect server. After your meeting, Click Meeting, select your session, click
Reports. If you select Questions you will see your poll question and be able to view the answer
of each Participant.
• If you accidently close a poll too early, you can reopen it. If you accidently click to close
your poll earlier than you intend, you can click the reopen button to open it again. However, the
results of Participants who have already voted will remain (unless you close out of the poll and
re-enter the Poll Pod).
• You may use the same poll more than once in a session. If you want to ask the same poll
question twice in a session, you may do so. Once your close out (hide) the poll pod, the
answers clear. You will be able to re-launch the poll a second time for fresh feedback.
Endurance Learning, LLC has no affiliation with Adobe.
The content of this guide is correct as of our last review of Adobe Connect
© 2021, Endurance Learning, LLC www.soapboxify.com www.endurancelearning.comA Trainer’s Guide to Adobe Connect by Endurance Learning
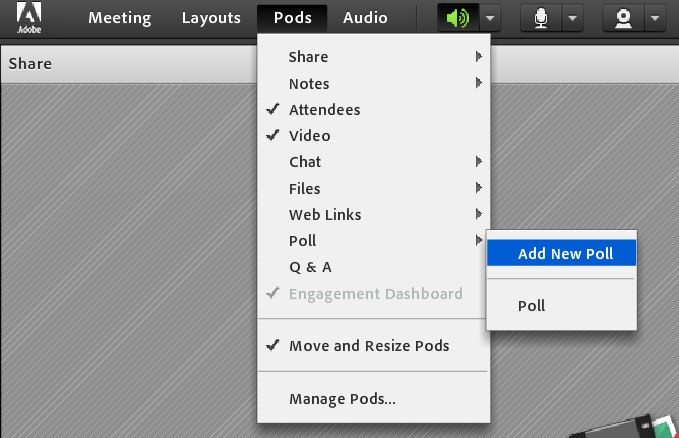
How to Set Up
From the top menu bar, click Pods,
Poll, Add New Poll.
You will be able to choose which type
of poll question you are creating
(multiple choice, multiple answers,
short answer). Enter your question
and answer options (when
applicable). Then click Open.
This is the view you will see when you
launch your poll.
Click the More button in the top right
corner for additional options such as
broadcasting results, viewing the
results in different formats, editing, or
ending polls.
Endurance Learning, LLC has no affiliation with Adobe.
The content of this guide is correct as of our last review of Adobe Connect
© 2021, Endurance Learning, LLC www.soapboxify.com www.endurancelearning.comA Trainer’s Guide to Adobe Connect by Endurance Learning
Best Practices
Set up your polls in advance. Set up each poll prior to the start of your session. Each poll that
you create will be saved in the polls pod. You can easily launch each poll at the appropriate time
during your session.
Practice launching polls prior to the start of your session. It is important to set up all your
polls prior to the start of your session and to log in and practice launching your polls. Make sure
that you have someone else logged in to validate that they are seeing the poll that you have
launched to Participants.
Work with polls on a desktop computer. Due to the limited capabilities to interact with polls
on mobile/tablet devices, Presenters/Hosts should always be conducting sessions using the
desktop application.
Back-Up Plan
If your polls do not launch as planned, you should be prepared to ask Participants to respond to your
question aloud (using voice) or via the chat feature. If you are planning to use the poll feature as an
assessment you can ask Participants to chat their responses to you using the private chat feature (so
that other Participants cannot see their responses).
Feedback Indicators
Overview
Feedback indicators include raise hand, lower hand, agree, disagree, step away, speak louder, speak
softer, speed up, slow down, laughter, and applause. Participants can click these nonverbal feedback
indicators at any point during your session and they will display to all participants in the attendee pod.
Adult Learning
Effective adult learning programs allow for participant feedback and consultation. Feedback indicators
are a simple way for Participants to be involved in their learning process.
Limitations
Mobile users will most likely only have access to raise hand, agree, and disagree. All attendees on all
devices will be able to view feedback indicators in the attendee pod. (Note: Tablet users should have
access to the full range of feedback indicators).
Endurance Learning, LLC has no affiliation with Adobe.
The content of this guide is correct as of our last review of Adobe Connect
© 2021, Endurance Learning, LLC www.soapboxify.com www.endurancelearning.comA Trainer’s Guide to Adobe Connect by Endurance Learning
How to Use
Participants may access feedback
indicators in their top navigation bar.
Click the person icon to raise a hand.
Access additional feedback indicators
by clicking the drop-down arrow to the
right of the person. Here Participants
have access to a variety of feedback
options.
In the Attendees Pod, Select Attendee
Status View to see an overview of
feedback indicators selected by each
Participant.
Best Practices
• Teach Participants how to access and use feedback indicators. Begin your session by
pointing out the feedback indicators to Participants and explaining how their work. Feedback
indicators are a great way for Participants to collaborate in the session without interrupting
the speaker.
• Teach Participants how to clear their status. An important component of using feedback
indicators is teaching Participants how to clear their status. Often, a Participant will raise
their hand with a question or for help, only to find that their question is answered in the
coming moments. By teaching Participants how to clear their status (including lowering their
hand), it will avoid a Producer wasting time checking in with that person.
• Have your Producer monitor the feedback indicators. The Producer should be keeping a
close eye on the feedback indicators. If Participants are sharing that the Presenter needs to
speak up or slow down, that is information that the Producer should be communicating to
Endurance Learning, LLC has no affiliation with Adobe.
The content of this guide is correct as of our last review of Adobe Connect
© 2021, Endurance Learning, LLC www.soapboxify.com www.endurancelearning.comA Trainer’s Guide to Adobe Connect by Endurance Learning
the Host. Additionally, a Producer can check in with someone with a raised hand via private
chat if the Host is unable to answer the question or call on the person in a timely manner.
• The Host can clear responses at any time. If responses become overwhelming or you
would like a clean slate to ask a new question, the Host can clear Participant responses at
any time.
• Feedback indicators can work like a poll. If you would like to ask a yes or no question to
participants, feedback indicators are a great way to go. They are also helpful to gauge
understanding at any point during your session by asking Participants to click thumbs up or
thumbs down to indicate if they understand the content or directions.
• They may become distracting. It can be distracting to have feedback indicators popping
up every few moments. Talk with your Producer about how you would like feedback
indicators to be managed. Additionally, it is important to know your audience and give
Participants clear guidance on using feedback indicators as necessary.
Back-Up Plan
If the feedback indicators are not working for someone, an easy back-up plan is to have Participants
chat share their answer. If your group size is small, you may also allow Participants to share answers to
a simple question verbally.
White Board Tool
Overview
The whiteboard tool is enabled by the default settings to be used by the Host to draw pictures, record
information, or share information with participants in some way. The whiteboard tool can be used as a
collaboration tool for Participants (once enabled).
Adult Learning
Annotation tools allow adult learners the opportunity to learn by doing and draw upon their past
experiences to aid in their learning. It is also a great method by which to involve Participants and give
them the ability to practice something new.
Limitations
• Limits on HTML participants. Participants, regardless of role, who join the meeting via HTML
will not be able to whiteboard.
• You must enable Participants to participate in whiteboarding. If you would like Participants
to be able to use the whiteboard, you will need to enable the functionality in whiteboard
preferences (see below).
How to Enable
Endurance Learning, LLC has no affiliation with Adobe.
The content of this guide is correct as of our last review of Adobe Connect
© 2021, Endurance Learning, LLC www.soapboxify.com www.endurancelearning.comA Trainer’s Guide to Adobe Connect by Endurance Learning
In the upper right corner of your
whiteboard pod, there is a drop down
with some additional preferences.
Here you can Print or Export your
whiteboard if you would like to keep a
copy (or send it to Participants after
the session).
Additionally, you can give Participants
the ability to draw using this drop
down.
How to Use
In the upper right corner of your
window, you will see options for
layouts. Select the Collaboration
layout to show the Whiteboard.
Endurance Learning, LLC has no affiliation with Adobe.
The content of this guide is correct as of our last review of Adobe Connect
© 2021, Endurance Learning, LLC www.soapboxify.com www.endurancelearning.comA Trainer’s Guide to Adobe Connect by Endurance Learning
Alternatively, you can access
whiteboard by selecting Pods, Share,
then Share Whiteboard in the top
navigation bar.
The whiteboard pod will be broadcast
to all Participants. To stop
broadcasting the whiteboard, click
Stop Sharing in the top right corner of
the whiteboard pod.
Features
• Selection Select a drawing, text, or picture to change its color, move it around, or delete the
item.
• Marker Draw freehand using the marker tool. Once selected, you will have the option to change
the color of the marker or the size of the marker tip.
• Delete Selected Use the selection tool to select a drawing, text, or item. Then click the trash
can to delete the item. Note: If you delete something by accident, you may use the undo button
to recover it.
• Text Use the text button to type text onto the whiteboard. Once you add text, you will be given
the option to change the color or size of the font.
• Rectangle Use the rectangle tool to add a shape to the whiteboard. Shapes include rectangle,
circle, arrow, line, check mark, arrow, star, and X.
• Undo/Redo Use these buttons at any time to undo an action or redo an action.
Best Practices
Practice. Allow Participants the ability to practice using the whiteboard features prior to use.
Demonstrate how to use each of the various features and include tips for making the whiteboard
work most effectively.
Avoid a mess. If you are asking the group to all contribute to the whiteboard, utilize the text and
shape features. Freehand drawing is often a mess and difficult to read. Participants can use the
Endurance Learning, LLC has no affiliation with Adobe.
The content of this guide is correct as of our last review of Adobe Connect
© 2021, Endurance Learning, LLC www.soapboxify.com www.endurancelearning.comA Trainer’s Guide to Adobe Connect by Endurance Learning
rectangle tool like a stamp to contribute a star on a map, point to an item in a diagram, or mark
their opinion on a chart with a dot. Consider asking Participants to utilize the color tool to identify
their contributions to the whiteboard in some way.
Be ready to delete. The Producer should be aware of the “delete selected” option and be ready
to use it during any session where you are allowing Participants to use the annotation tools.
This will enable the Producer to clear all drawings that accidentally get added to the screen at
the wrong time (which can be a big distractor to Participants).
Know your audience. It is important to consider your audience when deciding if you are going
to enable annotation tools for your session. Participants can accidentally add annotations to the
screen at the wrong time, type inappropriate things, or draw pictures that you don’t want on your
screen.
Back-Up Plan
If annotations are not working for someone or you forget to enable annotations prior to your session,
you can always ask Participants to use the chat feature as a means by which to collaborate during the
activity.
Handouts
Handouts are a useful addition to any session. Prior to a VILT session you need to consider how you
will be sharing handouts.
Sharing Before the Session via Email
You may decide that it is necessary to share your handouts prior to the start of your session. However,
it is a good idea to have handouts loaded in the share pod as a back-up plan in the event that one or
more Participants did not receive the handouts prior to the session.
Sharing During the Session via File Share
This is the most effective way to share handouts during an Adobe Connect session. You may choose to
share handouts in the main room or via an individual breakout room’s share pod (see instructions under
Breakout Rooms). Note: Mobile users will not be able to access the file pod.
Sharing After the Session via Email
If you decide that you would like to wait to share handouts until the conclusion of your session, it is a
great idea to include an evaluation in the same email.
Taking Attendance
Endurance Learning, LLC has no affiliation with Adobe.
The content of this guide is correct as of our last review of Adobe Connect
© 2021, Endurance Learning, LLC www.soapboxify.com www.endurancelearning.comA Trainer’s Guide to Adobe Connect by Endurance Learning
Attendance is automatically taken by Adobe Connect. After your session, login to the Adobe Connect
Server. Select Meetings. Select the meeting for which you are wanting to view attendance. Click
Reports, then By Attendees to view Attendance. You may download this attendance report to your
device from this page.
Other Notable Features
Notifications and Requests. Pending notifications and requests will display in
the bell icon on the menu bar. You will have the ability to act on the requests by clicking on the
bell icon. Notifications/requests may include Participant actions such as a user entry request,
asking permission to raise a hand, blocked access notifications, etc.
Notes. By default, only Hosts and Presenters can edit the notes in the notes pod.
Participants can be granted access to the notes pod to be able to edit.
Recording. If you frequently record your sessions, set a reminder to start recording
the session. Go to meeting Preferences. Under General, click Remind me to start recording the
session. Once the meeting starts, click Record Meeting to begin recording your session. At the
conclusion of the session, you will be able to save the recording to your computer if you would
like.
Producer Role
Overview
The Producer is the unseen Presenter. Their job is to take care of the administrative and technical
aspects of the session to free up the Presenter to focus on content delivery. It is important to select
your Producer carefully. A successful Producer is one who knows the platform well, who has the
technical expertise to be able to help Participants who are having problems, and someone who can
jump into the role of Presenter in the event of a technical problem.
Limitations
In order for a Producer to have the ability to run the session effectively they should claim the Host role.
Any facilitators should use the Presenter role. Additionally, to be most effective, a Producer should join
the session via the desktop version of Adobe Connect.
Endurance Learning, LLC has no affiliation with Adobe.
The content of this guide is correct as of our last review of Adobe Connect
© 2021, Endurance Learning, LLC www.soapboxify.com www.endurancelearning.comA Trainer’s Guide to Adobe Connect by Endurance Learning
Job Responsibilities
• Admit Participants. It is the job of the Producer to admit people to the session.
• Launch polls. If you are using polls in your session, you will need to launch polls at the
appropriate time.
• Answer chat questions. It is important to keep an eye on the chat box during the session
and to respond to questions or help requests, as necessary.
• Launch breakout rooms. If you are using breakout rooms during your session, it will be the
role of the Producer to set up and launch breakout rooms. You will need to sort Participants
into rooms, launch rooms, broadcast messages, and call Participants back from their
rooms.
• Be ready to assist users with breakout rooms. Be prepared to enter breakout rooms to
assist people, as necessary.
• Record your session. If you would like to have your session recorded, it should be the
responsibility of the Producer to make sure they enable the recording feature at the start of
the session.
• Assign roles. If you would like participants to have Presenter privileges at any point during
the session, or if you would like to assign enhanced privileges to a Participant, it should be
the job of the Producer to do so.
Best Practices
Practice. The most important thing for a successful session is for the Presenter and
Producer to practice together. Ensure that all features are enabled and set up and run
through the entire presentation together to ensure that each person knows their
responsibilities during the session.
Be on hand as a back-up Presenter. If a Presenter has an unstable internet connection or
has a computer crash, it is important to have the slides and lesson plan pulled up on your
own computer and ready in the event that the Producer needs to jump in as the Presenter.
Make sure that you understand the learning objectives and activities to continue the session
if your Presenter experiences technical difficulties.
Be on camera. Best practice is that the both the Presenter and Producer will be visible on
camera.
Introduce the Producer and explain their role at the start of session. It is important that
Participants are introduced to the Producer at the start of the session and told that they
should reach out to the Producer if they need help at any point during the session.
Tell Participants how to contact the Producer if they need help. The best way for
Participants to reach out to the Producer with technical problems is through a private chat
message.
Check-in with your Producer periodically during your session. It is easy to get into the
flow of presenting and forget to check-in to make sure that everything is going alright. Make
a point to check in with your Producer periodically throughout your session. You may
choose to do this verbally or through a private chat message. The Producer should use
these check-ins as an opportunity to advise the Presenter of questions that Participants
have asked (in the chat pod) or to remind the Presenter of time constraints.
Endurance Learning, LLC has no affiliation with Adobe.
The content of this guide is correct as of our last review of Adobe Connect
© 2021, Endurance Learning, LLC www.soapboxify.com www.endurancelearning.comA Trainer’s Guide to Adobe Connect by Endurance Learning
Structure
Pre-Session Activities
People will always arrive at the session early. It is a good idea to have something for Participants to do
when they arrive at your session. This gives Participants the opportunity to get comfortable with the tool
and can also be a means by which to share content. Possible activities may be playing a trivia slide
deck or doing a pre-session activity such as answering questions or playing a game.
Starting Your Session
• Begin with “housekeeping” items to set expectations and help Participants get comfortable
with the tools being used. You can use icebreaker or anchor activities as a means by which to
teach Participants how to use a tool to accomplish this seamlessly.
• Include breaks, as necessary. If your session is to exceed one hour, you may need to
consider adding a break. Add breaks to VILT sessions as often as you would to an in-person
training session. You may consider planning for “working breaks” prior to a breakout session or
activity using the annotation tools. Ask Participants to prepare for the activity prior to taking their
break. This will provide for an opportunity for people who need more assistance to get it while
not holding up the session.
Post Webinar
It is best practice to send out an evaluation after your session. This is also a good opportunity to send
out handouts or resources that were shared during your session.
Endurance Learning, LLC has no affiliation with Adobe.
The content of this guide is correct as of our last review of Adobe Connect
© 2021, Endurance Learning, LLC www.soapboxify.com www.endurancelearning.comA Trainer’s Guide to Adobe Connect by Endurance Learning
Practice
Pre-Session Checklist
Prior to starting your practice session:
▢ Send your meeting invite
● Create a custom URL if you would like.
● Select a custom template if you have one already made.
● Decide on access restraints.
● Assign permissions to guests when sending invites for ease once the
meeting begins.
▢ Enable necessary tools
● Are you using breakout rooms? If yes:
○ Create the necessary number of rooms.
○ Assign a custom layout (if necessary).
○ Load handouts into the share pod.
● Do you want Participants to be able to speak and be on camera? If yes,
you will need to enable audio and camera settings for Participants.
● Do you want Participants to be able to chat with the entire group, the
Host, and the Presenter? Enable or disable controls as you see fit.
● Do you want Participants to use the Feedback indicators? If yes, enable
them for Participant use.
▢ Set up polls
● Set up any polls for use during your session.
▢ Check your meeting settings
● Do you have your layouts set up?
● Do you have breakout rooms functioning properly?
● Are the poll settings how you would like?
● Are the correct people assigned to the correct roles?
● Are you recording this session? Set a Reminder to start the recording
(in meeting Preferences).
During your practice session:
▢ Test your microphone and camera
● Presenter: Can your Producer see and hear you?
● Producer: Can your Presenter see and hear you?
▢ Launch your slides
● Can your Producer see them?
● Can you view your slide notes?
Endurance Learning, LLC has no affiliation with Adobe.
The content of this guide is correct as of our last review of Adobe Connect
© 2021, Endurance Learning, LLC www.soapboxify.com www.endurancelearning.comA Trainer’s Guide to Adobe Connect by Endurance Learning
▢ Decide how you are sharing your handouts
● Are you sending them prior to the session, during, or after the session?
○ If you are sharing them during the session, upload any relevant
documents to the share pod (main room and breakout rooms, as
necessary).
▢ Run through your entire session
● Is the timing correct? Do you need to cut or add anything?
▢ Discuss with your Producer what their responsibilities are for each activity:
● How will you communicate with one another during the session?
● What are the back-up plans if something goes wrong?
● Where do you anticipate people struggling with the technology? How
can you be prepared to alleviate some of this stress?
▢ Have the Producer practice launching polls, running breakout sessions, and
clearing annotations and feedback indicators.
● Can you view the poll that the Producer launched?
● Are you able to access a breakout room and come back from the
breakout room?
○ Can you see a broadcast message?
○ Can you access all handouts shared via the share pod?
▢ Share the lesson plan and slides with your Producer so that they can take over
in the event of a technical disaster
Endurance Learning, LLC has no affiliation with Adobe.
The content of this guide is correct as of our last review of Adobe Connect
© 2021, Endurance Learning, LLC www.soapboxify.com www.endurancelearning.comA Trainer’s Guide to Adobe Connect by Endurance Learning
The Trainer’s Guide to Adobe Connect is brought to you by
Endurance Learning, the creators of Soapbox.
With a subscription to Soapbox you will:
Get specific instructions for how to deliver virtual training
Plan only activities that work well on the platform you are
using
Shorten your training design time by up to 75%!
Focus your sessions with fresh activities that are tied
directly to your objectives
Get a Facilitator Guide with ZERO extra work
Build virtual training sessions specifically for the tool
you're using
Visit us at www.soapboxify.com/demo to learn more.
Endurance Learning, LLC has no affiliation with Adobe.
The content of this guide is correct as of our last review of Adobe Connect
© 2021, Endurance Learning, LLC www.soapboxify.com www.endurancelearning.comYou can also read