MOD HANDBOOK Google Camera - Celso Azevedo
←
→
Page content transcription
If your browser does not render page correctly, please read the page content below

Google Camera
     MOD
  HANDBOOK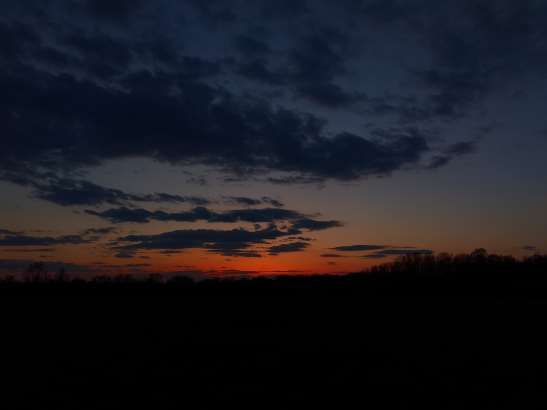
بسم هللا الرحمن الرحيم
Edition 0.1
This handbook is not to be charged upon in any circumstances.
Concept and Compilation
Greatness
Contribution
Celso Azevedo
Dennis
SixArmedPriest
John Werner
Greatness
And othersDedicated to
Everyone who has supported me from the very
beginning.With gratitude to everyone who has helped me reach till this
position in the community. I am totally grateful for your kind words,
support, critics, suggestion and everything you all have blessed me with
so far. From the very beginning, I have looked forward to make Gcam
Mods as user friendly as possible. I’ve always kept the convenience of
novice users in my mind whenever I am planning on a new feature. In
app tutorial was the very beginning of implementation of proper
guidance to use Gcam Mods easily and effectively. The moment I shared
the idea in my testing group, I received affirmative response and
support. The Gcam 8.2 Mod by Greatness has indeed much more precise
and detailed tutorials at the same time. But there are some limitations
that you are bound to face in case of putting something as vast as a
tutorial in an apk. So, I’ve decided to compile this handbook to make
Gcam understandable and easy for users. I hope it will at least help 1%
of all the users who feel clueless about the Gcam Features. This guide
should cover the basic features of almost all legit Gcam Mods like the
ones by Arnova8G2, BSG, UltraM8, Wichaya, onFire and others
alongside Greatness. I’d appreciate all your feedbacks.
- GreatnessTable of Contents Introduction 1. Introduction to Google Camera 2. Modified Google Camera (Gcam Mod) 3. History of Gcam Mods 4. Developers Involved Tutorial (Gcam 8.x specially) 5. RAM Patcher and Lib Patcher 6. XML Configurations 7. DNG Noise Model 8. Stream Configuration 9. Google Auto White Balance 10. Exposure Compensation 11. ISO/Exposure Time 12. Developer Settings 13. Sunset Mode (Greatness Exclusive) Acknowledgements Bibliography Frequently Asked Questions
Introduction to Google Camera
Google Camera, aka Gcam has evolved a lot over the last 10 years to become what it is today.
Gcam began in 2011 as a solution to fitting a decent camera experience within Google Glass. As
Glass needed to be light and wearable, Google could not approach the problem from the
hardware end. So the team at Gcam looked at applying computational photography techniques on
the software end to compensate, and even go up on hardware limitations.
Gcam’s solution came in the form of image fusion, a method which took rapid sequences of
shots and fused them together to create a single, higher quality image. Image fusion debuted in
Glass in 2013, and the success of the method prompted Gcam to bring the next iteration of image
fusion to smartphones in the form of HDR+ on the Nexus 5.
Gcam’s HDR+ mode is now available as the default mode for shooting photos on the Google
Pixel and Pixel XL.
In the future, the team at Gcam is exploring the possibilities of what they can do next. One
among the several possibilities is merging Google’s machine learning resources with
photography, allowing us to make better use of the hardware on our smartphones.
Over the years, lots of new features have been added to the Google Camera. It includes the
Portrait Mode, Nightsight Mode, Astrophotography, HDR Bracketing, Auto Nightsight and
others with each major releases.
Major Google Camera versions are usually released when Google releases a new phone (once a
year). Some of the new features can be used with the port on non-Google devices, while others
can't. Everything depends on how the feature works and your own hardware.
On Google devices, new versions usually mean new features and better (or at least equal)
quality, but it may be different for people using this port. When new updates are released, they
need to be fixed/improved/modified to work on non-Google devices and that work takes a while.
Sometimes it's better to use an older version than moving to a new, unstable version.
To learn about new features, I suggest you check sites like XDA Developers, 9to5Google, etc, as
they usually talk about what's new on each new update. New features are also mentioned when
Google presents their new devices.
Modified Google Camera (Gcam Mods)
Google Camera is the camera app used by Google on their phones (Pixel and Nexus). Compared
to other brands, pictures taken with this app are usually more detailed and have better dynamic
range, specially in hard conditions (low light, indoors, etc.).
While Google Camera (Gcam) itself can be installed on most Android phones, the features that
makes it a good app don't work on non-Google phones. For example, it takes pictures, but it
doesn't use Google's HDR+ tech which is what makes Gcam good.
This mod or port was created to unlock these features on non-Google devices. Several
developers and modders work to enable all functionality and fix bugs on other phones. Since
Google made Gcam to work only on their phones, a lot of work must be done for it to work on
other devices.
Why so many versions?
First of all, if the version you’re using works fine, there’s no need to try all new versions. If
something is broken or if you want to try new features, then yes, keep testing new versions.
In order to improve photo quality, unlock new features, fix bugs on their phones, supporting new
ones, etc., developers have to share their apks. Users are then able to test and provide feedback.
Some of these versions work, some don’t. Some are better than others, and that’s why it’s
important to be part of a community where everyone gives feedback.
I upload everything to the download page because I can’t test new versions on all phones.
Sometimes a test version is a failure for a specific phone, but works very well on other phones.
History of Google Camera Mods
Quoting Celso from celsoazevedo.com,
       “It all started with one of the worst phones I ever owned: the OnePlus 2. OxygenOS
performance wasn’t good for the first 6 months and the phone used the infamous Snapdragon
810… even in winter it felt hot. Custom ROMs improved things a lot, but the guys over at
OnePlus where too full of themselves after the OnePlus One success and the result was ROMs
with many broken features (autofocus, fingerprint, etc). After months of pain, I decided to
“downgrade” to a Nexus 5X, a phone that was slower on paper, but better in real life. It also
had the best camera I’ve ever used on a phone.
Some time later I made the decision to buy the OnePlus 3 and Google Camera was one of the
things I missed right away. OnePlus kept releasing new updates with “camera improvements”,
but no one was seeing any improvements. I couldn’t use many of the advanced apps on the Play
Store because of OnePlus’ buggy camera implementation. Since the camera was bad anyway, I
moved to custom ROMs. SultanXDA’s LineageOS builds were good because he had fixed some
camera bugs, but then Paranoid Android was released and photos looked better. It wasn’t
perfect, but it was better than the rest, so that’s what I used.
In July 2017 I spend two weeks in Portugal and took some holiday photos. Only a small number
looked good. The rest had bad dynamic range, lacked details, and low light performance was
terrible… I went back to the stock ROM, but it was more or less the same. I wasn’t happy.
When I returned, I read a post on XDA about a Google Camera with HDR+ from a guy called
“B-S-G”. I tested it and while I couldn’t use HDR+, video recording was working (or so I
though) if used with a camera related magisk module. “60FPS on custom ROMs? Let me share it
with other people!”. It turns out it didn’t worked that well, so I asked the moderators to close the
thread… but they didn’t. SynisterWolf replied:
Going to leave this thread open to see if we can spark some interest in helping you get this mod
off the ground. If you really want me to close it, please reply to this pm and say so but it looks
like you are off to a good start.
It seems that he thought this was my mod? It wasn’t, but he was right. This happened on August
18th, four days later Ivanich shared versions from B-S-G modified by him that worked on our
phone. At the same time, me and other users started testing different configurations to find what
was better for the OnePlus 3 and 3T. A month later, Arnova8G2 shared his first apk on our
thread. On September 8th, I did a quick recap of what had improved:
We went from a Google Camera app barely working to a point were almost everything works in
just a month. Not bad!
I also hosted apk files from B-S-G for the first time. This helped people a lot because B-S-G
posted everything on 4PDA. Not only most users (me included) didn’t speak Russian, but 4PDA
also requires an account to download… and they use Cyrillic captchas, making it almost impossible (but not completely) for people like me to create an account. After this, things took off quickly. The OnePlus 3 and 3T were popular devices with bad cameras, so many wanted to test this mod. On my thread you could find good versions from Ivanich and Arnova8G2. We had stable settings and you could also download apks from B-S-G. All this made that thread the place to go if you wanted to try the port… more people means more posts, more posts means more off-topic. Arnova8G2 also released his GCam5 mod, which was very popular because it worked on many phones not supported by B-S-G. Using the Google Camera port with stable settings meant better photos with better dynamic range and details. This site was also created around this time. Links to 4PDA are not allowed on XDA, Android File Host was slow, Google Drive had a bug that corrupted apk files, and I wanted to move non- 3/3T users from the thread to reduce off-topic. The wayback machine allows us to go back and see how it looked like back in November 2017. September 2017 Website 2018 was a big year for Google Camera mods. Defcomg released a fix for the 3/3t front camera which allowed advanced features like HDR and lens blur to be used and later on Arnova8G2 managed to make his versions work on some OnePlus phones without any kind of fix. Tolyan009 released his first versions compatible with the OP3/3T and other modders where working on their phones. Some introduced new controls, like miniuser123 and his denoise menu while modders like cstark supported phones from less popular brands. I even had a Russian guy (Oleg) making translations from Russian to English! In mid-2018 users started moving from the 3/3T to other phones, resulting in less testing and more issues, but Arnova8G2 and Tolyan009 where able to release good versions. Since this is only going to get worse, in December we send Arnova8G2 a 3T so he could fix problems quicker. My site also grew a lot and now hosts more than 1000 files from more than 30 modders. It hosts over 70GB of space and serves more than 200TB of data each month (this includes other Android stuff). Apk sizes went from ~20MB to over 150MB in some cases and features now include portrait mode and time lapse. My useful links page has links about more devices and the FAQ/troubleshooting page has been improved after a rant on XDA. I’ve noticed a shift from OnePlus to Xiaomi since 2017. Back then almost every visitor had a OnePlus phone, but now Xiaomi leads the top 5. I think the price increases and camera related bugs are moving people that like to tinker with their phones away from OnePlus products. For regular users, maybe image quality has improved enough for their needs. And this is how I got involved with the Google Camera port. I really enjoyed being part of that group of users that tested, reported bugs, and tried to improve Google Camera. This, and working closely with some of the devs, is why we managed to have a good port while other communities struggled a lot.”
Developers Involved
Google Camera itself has a lot of developers involved. The short mentionable list may be:
“Sam Hasinoff, Dillon Sharlet, Kiran Murthy, Julian Iseringhausen, Mike Milne, Andy Radin,
Nicholas Wilson, Navin Sarma, Gabriel Nava, Emily To, Sushil Nath, Alexander Schiffhauer,
Isaac Reynolds, Bill Strathearn, Marius Renn, Alex Hong, Jose Ricardo Lima, Bob Hung, Ying
Chen Lou, Joy Hsu, Blade Chiu, David Massoud, Jean Hsu, Ellie Yang, and Marc Levoy.”
On the contrary, the modified versions have a lot of modders/developers involved. It includes,
“Arnova8G2, BSG, cstark27, Urnyx05, Savitar, Eszdman, Zoran, Marcello, rOm10, Julian
Tsependa, overwhelmer, UltraM8, Wyroczen, MarcoChr, Wichaya, Abhi Shake, TlnNeun,
Namok, fu24,back.rider, RealJohnGalt, Tadi777, minuser, Greatness, morgenman and more .”

You can get to know about them here : Gcam Hub Dev Page
RAM Patcher and Lib Patcher
Rampatcher is a newer version of the original Libpatcher. All the image processing parameters
are stored inside c/c++ libraries in a Google Camera. While it is good by default, it's not as best
as it can be. This is where we come up with the idea of custom libs where we modify the library
for better results. While modifying a lib to perfection is a very difficult work, and a very
technical one, lib patcher does a somewhat similar work. Here, in this Gcam 8.2 Mod by
Greatness, you already have a custom lib instead of default google. We have tried our best
through lots of testing to bring out the best to preferences of our team. But over that, if you want,
you can surely tune some parameters to your own preferences. The lib patcher basically allows
you to do that. It's named Rampatcher because the libpatcher we have used, was originally coded
by renowned Gcam and Photoncamera developer Eszdman to be saved in the RAM. Below, we
are giving a short description of what the basic parameters do:
Note that OFF will use default values from our Great++ Lib for that parameter. Any other value
you set will use that as magnitude for that parameter.

Sharpness: Sharpness is a very basic photographic term.
Sharpness describes the clarity of detail in a photo, and
can be a valuable creative tool for emphasizing texture.
Proper photographic and post-processing technique can
go a long way towards improving sharpness, although
sharpness is ultimately limited by your camera
equipment, image magnification and viewing distance.

Global Denoise: The amount of overall Noise Reduction
to be added in post processing.

Chroma Denoise: The amount of overall reduction of
color noises. Too high chroma Denoise can result in
desaturation.

Luma Denoise: Among different types of noises,
luminous noise is one. Importantly, it constitutes the most
visible noises you see in a photo. Too high Luma Denoise can result in making the image look
like oil painting.
Spatial Denoise: Spatial noise is a distortion over the display area that is stable in time. It's
suggested to either leave it to default or try changing the values and learn how it affects the
image.

Dehaze: It means to remove haze from photos. It also affects the exposure in Shadows.

Luma Contrast: The difference in luma (brightness and darkness) of an image.

Chroma Contrast: The difference between colors of an image.

Saturation: The intensity of color. Higher makes the image look punchy, while lower makes the
image look flat.

Max ISO: In very basic terms, ISO is simply a camera setting that will brighten or darken a
photo. As you increase your ISO number, your photos will grow progressively brighter. Max
ISO will give you the control to limit the maximum ISO you want to allow.

Gamma Coefficient: This parameter in a Lib Patcher Basically affects the image in a fashion
similar to Contrast.
XML Configurations
[]

☢️XML Configs are saved configuration of Gcam. You can preserve or share your own
configuration over a certain Gcam Mod as XMLs.

☢️While people had problems loading XMLs, even when it was easy, with the introduction of
scooped storage in Android 11 and changed permissions in
Gcam 8.x, things have become a bit lengthy.

☢️First, you need to go to app info>permissions and then Allow
Full File Access in App Permissions. In case you can't
understand this, go watch this. (https://t.me/greatnessXMLs/14).
In this alternative method, you only need to click on the given
option and enable the toggle for All File Access.

☢️With any file manager, create GCam>Configs8 folder(might
be different if you use custom directory feature, so that option is
not recommended for novice users) in your internal storage and
Save XML inside that Folder. If it already exists, you no longer
need to.

☢️Now go back to the Gcam Viewfinder and double tap on the
blank black space outside the shutter button, it will then show a
dialog, select the XML you like and click UPDATE. The app
will restart and your XML has been applied.
DNG Noise Modeler
Noise Modelers are a new addition to the Greatness Mods
while it has been there already in some other Google Camera
Mods from past. It replaces the Pixel DNG Noise Modelers to
use system or custom ones. Note that OFF in Back or Front
Camera = System Noise Model. While if toggle is totally off, it
means you are using Google's Default. They create different
types of noise scenarios for detailed images. It is more
dynamic than Rampatcher and directly affects the RAW DNG
outputs as well as their EXIF. Noise Models have created a
great hype among the users for its enrichment in details
section. Arnova8G2 allows loading C Files in his mods Noise
Models. You can use it if you like. Some of the noise models
needs you to turn on SABRE ALLOWED in Developer
Settings.
You can find those C Files here: Morgenman’s Drive Repo
You can also make and send your own sensor noise models for
developers and modders to use here:
1. Noise Model Extractor
2. Submit Noise Models
Stream Configurations
A configured capture session for a Camera Device, used
for capturing images from the camera or reprocessing
images captured from the camera in the same session
previously. Stream Configs use capture session from
stock camera API for proper functioning of several
modes like Long Exposure, Video Stabilization, 48MP
and Slow Motion. These vary according to device.

It varies according to your usage scenario. So you can
set different streams or OP Modes for different modes.
The whole usage and output experience is highly
dependent on the stream configs if they are used.
Especially in terms of OnePlus, Xiaomi, Oppo and Asus
phone, they play a vital influence on Gcam Experience.
In case of Oneplus, the stream configs vary depending
on processors as well for example SM8150 OP Modes
work for Oneplus 7 Generation with SD855 family of
SoCs. On the other hand 8250 streams are same as
SM7250 so, Oneplus 8 and Nord series of phones share
same stream configs. Interestingly, Oneplus 9 series of
devices have the 8250 Streams supported as well as
Barcelona Op Modes. Use after proper testing and
understanding.
Google Auto White Balance (AWB)
The Auto White Balance (AWB) setting helps your camera “guess” the best option or choose the
one closest to what your eyes might see.
 Many times AWB works better when you are outdoors dealing with natural lighting, than with
more complex lighting situations. The Auto White Balance setting assesses your scene and
chooses the brightest part of your image as the white point, which unfortunately can vary from
one shot to the next. Over the years though, significant improvements have been made to AWB
systems and the results are getting better. Even with these developments, it is difficult for Auto
White Balance to correct certain kinds of lighting (e.g. artificial or combination lighting setups).
Another instance where it’s not recommended to
use AWB is when doing panoramic shots, as you
run the risk of varying light on your stitched
image.

Keep in mind that each sensor has a different
White Balance. That is why you have numerous
AWB options. Each AWB model represents a
different Sensor. These options were created
using the AWB contained in numerous devices
for their sensors. Try selecting your sensor AWB
for best results. No Selected AWB will result in
AWB OFF.
-SixArmedPriest

You can extract your Sensor AWB as well. Morgenman has a guide for Samsung Phones but it
works for others too usually. AWB EXTRACTION GUIDE.
You can submit your extracted outputs for devs and modders to use in their Gcam Mods here.
Here is the SUBMITTED AWB Sheet.
Exposure Compensation
Exposure Compensation is a tool to compensate the abundance and/or lacking of brightness or
exposure in the photo. It is implemented in the Gcam code Itself, instead of lib. This keeps the
level subtle, dynamic and tolerable at the same time.
Use them according to your needs for lowering or increasing light. Higher exposure
compensation = more lights, less noise but sometimes shadows and background are blown up.
This tool comes in handy specially when taking shots with front camera or portrait mode. Works
great in limiting exposure for an artistic look on output as well.

Back: Affects the main photo mode of back camera.

Front: Affects the main photo mode of front Camera.

Nightsight: Affects the Nightsight Mode of Both Camera.

Portrait: Affects the Portrait Mode of Both Camera.
ISO/Exposure Time Control

The ISO and Exposure Time control is a handy tool to relatively control these specific
parameters. They work like the diagram above.
It’s as complex and as simple as that.

On the other hand, the Maximum Exposure Parameter allows you to limit overall shutter speed
count. Suppose your device supports 32 Seconds Max and based on the available light, the
camera wants to expose for 32 Seconds but if you limit it to half, it will keep up with 16 Seconds
but with Higher ISO.
The Front and Back Parameters have different options and work differently.
Developer Settings
Developer Options are an addition to Gcam 8.x by Arnova8G2. Originally available only on
Google Camera 7.0 Dogfood versions, its implementation allows us a lot of controls. These
parameters are highly sensitive and do not use without knowing what you are doing.
Explanations of some of the parameters are available in this spreadsheet.

Sunset Mode

(Sunset Mode on Oppo Find X2 Pro, shot by Usyless)

Sunset Mode Brings The Shadows Down And Maintain The Highlights So That You Can Have
A Silhouette Shot Of Your Subject. The above photo is an example.
Acknowledgements
I would like to acknowledge everyone who has supported me through the times.
First, I must acknowledge Arnova8G2 for helping me come this far. He is the greatest teacher I
have ever had in terms of Gcam Modding. The whole 8.2 project of mine was solely based on
my learnings from Morka.
I then must acknowledge Urnyx05 for his help back in 2020 when I first started on the very idea
of modding Gcam and it all started with his base that I used back then.
Next comes Celso Azevedo. His hosting of my apps on his Gcam Hub despite oppositions from a
lot of people.
I must then address the very helpful friends I have had in the community like Abhi Shake,
SixArmedPriest and some others.
        The Whole Greatness Team including Dev, Flo, SixArmedPriest, oᴉɹɐW, Usyless, Enzo,
        Tony, morgenman, Dennis, savant, Timo, John, waldmeister, enerGy (nrG), mridll,
        PerciFHM, Fuzail Khan, ImRM, Saitama and Lucas;
        The Modders Test Telegram Group;
        Android Toto Company Official Facebook Group and its Admins and Moderators
        including Sarar Rahman Kabya and Nur Mohammad;
        Oneplus Users Bangladesh Facebook Group;
        Arnova Alpha Testing Telegram Group;
        Oneplus 7 and Nord Gcam Group;
And everyone else who supported and trusted me.

Bibliography
   1.   Celso Azevedo Website
   2.   XDA Developers
   3.   Cyanogen Mod
   4.   9to5 Google
   5.   Google Blog
FAQs and Troubleshooting Tips
(Collected from Celso Azevedo)
Which version should I use »
Read this page: How to use this port.
How to install GCam? »
.apk files are Android apps. After downloading the apk file (how to find a good version), you
need to install it.
Using a file manager/explorer app, click on the .apk and follow the instructions. If you need help,
see the how to install an apk file guide.
Can't install the app (App Not Installed) »
Sometimes the installation fails ("App Not Installed", "parsing error", "couldn't install", etc).
Some possible reasons and fixes:
▪ Remove other GCams first: Sometimes you need to manually remove the GCam app
that it's already installed and only after you'll be able to install the new version.
▪ Version incompatible with your Android version: Google removes support for old
Android versions quickly. Modders often are able to make the latest GCam version on
old Android versions, but that's not always the case. If you're not running the latest
Android version, maybe that's the reason why it can't be installed. Try an older version.
o Note: Sometimes old versions don't work on newer Android versions. And
sometimes package names that worked on a previous version might not work on
your current Android version (using a clone may fix the problem).
▪ Corrupted download: Maybe something went wrong when downloading the app and the
apk file is corrupted. Download it again.
If you want to keep two different versions installed, you may have to use a cloned version.
If you're using an old Android version, you may have to use an old GCam version. For example,
if GCam 7 is for Android 10 and you are on Android 8 or 9, you may have to use the previous
version (GCam 6 or 5).
App crashing just after being opened »
There are a few reasons why GCam may crash right after opening:
▪ GCam doesn't work on your hardware.▪ The version you're using was made for a different phone.
▪ You're using the wrong settings for your phone.
▪ The camera2 API is disabled on your phone.
▪ GCam version isn't compatible with the Android version you're using.
▪ AppOps, XPrivacyLua, etc, may be causing the problem.
▪ GApps are not available.
Let's go into the details of each point.
- Compatibility with your hardware:
GCam is made for Google devices, so it only works on phones with similar hardware/software.
This means that it doesn't work on most phones with Kirin, Exynos, or Mediatek SoCs, for
example.
Read the how to use page to learn about the requirements.
- Wrong version for your phone:
If you install a version that was optimised for a phone that is different than yours (eg: different
limitations, bugs, etc), GCam may crash on your phone. I recommend you read the how to find a
good version page or try one of the suggested versions.
- Wrong settings for your phone:
If GCam was working fine, but stopped working after charging a setting or loading a config file,
it's possible that some setting that doesn't work well on your device was enabled and it's causing
the crashes.
Clean the app data or reinstall GCam to start fresh, with default settings.
If this happens after updating GCam and the clean install doesn't work, then the new version may
not be compatible with your phone.
- camera2 API not available or limited:
In plain english, the camera2 API is how GCam "talks" to the camera sensors on your phone.
Old phones and many low end devices either don't support this API or are sold with it disabled.
In this case, when GCam tries to use the cameras, it can't and ends up crashing.
On some phones, it is enabled but doesn't support all features needed by GCam.
On some phones, the level required is supported, but the API itself is disabled. In may cases, this
can be enabled by editing the build.prop file (root required). If you are rooted, use an app like
BuildProp Editor, and add the following string:
persist.camera.HAL3.enabled=1Please note that:
▪ This can cause other issues (eg: breaking the stock camera app).
▪ Sometimes this string is already available. In that case, change it value "0" to "1".
- Version incompatible with your Android version:
This usually happens when you're trying to use a version made for a newer Android version.
GCam opens, expects to see some feature available on a newer Android version, and since it's
not there, it crashes.
In this case, you'll need to use an older GCam version made for your Android version.
- AppOps, XPrivacyLua, etc:
Some privacy enhancing tools/features may block access to something GCam needs. For
example, if GCam can't access the cameras, it will crash.
On XPrivacyLua, for example, the "use tracking" setting is known to cause problems on phones
that use camera hal fixes, so you may have to unlock it.
- Phones without GApps:
If you use a phone without Google Apps (GApps), most GCam versions will crash. Seehow to
use GCam without GApps.
App crashing after taking pictures »
There are many reasons for this to happen, but often it's caused by:
▪ Motion Photos: Sadly this feature causes issues on some phones. Disable it and try again
(learn more here).
▪ Incompatible features: Depending on the hardware used by your phone, processing may
fail and result in a crash:
o Sabre: Some versions have a setting to disable "sabre". It's supposed to improve
detail, but it doesn't work on non-Sony sensors. In this case, disabling it should fix
the crash.
o Use a different GCam: The GCam version you're using may not be compatible
with your phone. Try to find a better one.
If nothing fixes the crash, I recommend you ask for help on a forum, telegram group, etc, for
your phone. I have a list of forum threads and groups here.
Can't view photos/videos from inside GCam »Some GCam versions need the Google Photos app to display photos and videos inside GCam. If
the app isn't installed, GCam will return to the viewfinder.
[Note: you just have to install the app, there's no need to login (and upload your photos to
Google) or use the app.]
- GCam 7.3+:
Some versions have a setting to disable Google Photos (check GCam settings). On GCam 7.3 or
newer, this setting will use your default gallery app. Since most gallery apps don't support GCam
features (eg: motion photos) or expect the processing delay, the experience won't be as good.
If you don't want to install Google Photos, there's another Google app that can be used: Gallery
Go. This is just a simple gallery app without the upload feature. Install it, set it as default gallery
app, and the experience will be similar to having Google Photos installed. Note that you don't
have to use this gallery app. It just need to be installed.
- GCam 7.2 or older:
Versions based on GCam 7.2 or older usually have a setting to disable Google Photos. This
setting will use a built-in Gallery app, so no additional app is needed. Explore the settings menu
to find this setting*.
If it's not available, the only solution is to install the Google Photos app.
[* On old versions, the setting is under "Debugging and tools". Uncheck "camera.use_photos"
and restart the app.]
HDR modes and how to fix over exposed photos »
Google Camera supports 3 HDR modes:
▪ HDR Off: Disabled (no quality improvements)
▪ HDR ON: Auto mode (default - fast, but quality is not the best)
▪ HDR Enhanced: Forced HDR (slower, but better quality)
(Note: On old versions they're called HDR off, HDR+ Auto, and HDR+ On respectively)
Some versions also support "instantaneous HDR". It's similar to HDR On.
Use HDR Enhanced if you want the best quality possible, when comparing quality (stock vs
gcam, gcam vs gcam), and when taking pictures in hard conditions. HDR On is fast, supports
ZSL and motion photos, but quality is not always very good.
Stuck HDR processing »
This issue happens when:
▪ You use GCam 6 (or older) on Android 10 (or newer).▪ Something is limiting GCam's background processes. For the first point, it's caused by an incompatibility between GCam 6 and Android 10+. The solution is to use a newer GCam version (GCam 7+). If you're using GCam 7+, it's possible that your phone (or some tool you use) is limiting background processing. In this case, you need to allow GCam to run in the background and/or disable battery optimization for this app. Slow motion crash » Slow motion only works on some phones or Android versions. Most GCam versions based on 5.x don't support it, but some based on 6.x do. Make sure you select the correct FPS for your phone (eg: 120 instead of 240), explore the settings menu to see if such option is available. - Note about Android 7.x: Older Google Camera versions supported slow motion on many Android 7 ROMs, but some phones needed an updated media_profiles.xml file with high speed profiles. Try to find a XDA thread for your phone, maybe other users with the same phone have a solution for this problem. - Alternative apps: Some users reported that this feature was working on Nokia's camera. How to use Astrophotography » Astrophotography is a Google Camera 7+ feature. It's part of the Night Sight (aka Night Mode) feature. To use it, go into Night Sight. - Versions that allow you to enable Astro mode: Some versions have a dedicated option to force Astrophotography mode. On some versions, the option is inside the settings menu. On others, it's available on the drop down menu: In most cases the Astrophotography mode is only used if it's dark and the phone is stable. If not, Night Mode is used. - Versions without the option: If a setting isn't available, it's possible that it works like the original GCam app. To use it, open Night Sight and if the phone is steady (on a table, tripod, etc) it will automatically enable the Astrophotography mode. It won't work if the phone is moving. - Exposure times and tips: For detailed results, your phone should be stable. Using it handheld will result in blurred pictures. The exposure times depend a lot on the device. Some phones only support a few seconds while others support minutes.
How to use Motion Photos »
Motion Photos is a feature that records a small video every time you take a picture, allowing you
to see what was happening before/after you took the picture. To see the picture/video, open the
photo using Google Photos (you might have to click play/stop on the top right corner).
- Requirements:
    ▪   Google Photos app: in order to see the video, other gallery apps only display the static
        image.
    ▪   GCam app with the feature: most versions based on GCam 5.x (or newer) support this
        feature.
    ▪   Android 8 or newer: it doesn't work on Android 7 or older.
    ▪   HDR On: it doesn't work with HDR Enhanced.
- Downsides:
    ▪   Video doesn't play on other gallery apps, computers, or if you send them via an app like
        Telegram, Signal or Whatsapp.
    ▪   File sizes are bigger than usual. Keep this feature off if you don't need it.

- Crashes:
Due to code differences between Google's devices and other brands, it's not always possible to
record a full resolution video with motion photos.
Some versions allow you to set the resolution. Some phones need one with a 16:9 aspect ratio.
On other phones, it will only work with a very small resolution. Try them all if you are
experiencing crashes.
On versions without a setting, it needs to be changed by the modder. Try another version,
perhaps from a different modder and see if it works or report the problem to the developer.
If this feature is causing issues and you can't fix it, you should set it to "off".
How to use multiple cameras, what's AUX, etc »
Some GCam versions support multiple cameras (main front/rear camera, wide angle, etc).
Support also depends on the phone: it needs to properly declare the available cameras and allow
3rd party camera apps to access them.
If your phone has multiple cameras and you don't know how to use them, I recommend you find
a forum thread or group and ask for help there. They'll be able to give you info and even suggest
a fix if one is needed.
- Enable all cameras:
On some versions, you need to enable this inside the settings menu. The feature is often called
"AUX" (enable AUX, etc). Aux comes from the word auxiliary [cameras]. On some versions, it's
under the camera IDs. In most cases, ID 0 = main, ID 2 = wide (or secondary camera), ID 3 =
telephoto, and so on.
After enabling this, restart GCam.
- Switch between lenses:
Some versions display icons on the viewfinder:
On other versions, you can move between cameras by pressing the camera switch button, usually
with a normal click or a long click. See fu24's post and Arnova8G2's post where he explains how
it works on (some of) his versions.
Instantaneous HDR quality and overheating »
Some versions allow users to use instantaneous HDR or fast HDR (name differs between
versions). It's fast, but it has a few downsides:
▪ Worse dynamic range;
▪ Overheating and battery drain;
▪ Final file might be different from what you saw;
This feature works by constantly taking pictures (frames) in the background. Then when the user
takes a picture, it uses these old frames to create the final picture.
It's fast to take pictures, but it's not as good as HDR Enhanced, it demands a lot from the
hardware (hence the heat and battery drain), and because it uses old frames, your pictures may
show what was happening a few seconds before you took the picture.
What is "Lib Patcher" and "Libs" »
Lib patcher and Libs affect noise levels, detail vs smoothness, colours, add/remove brightness to
shadows, etc. Some GCam versions don't support either, some support one of them, and some
have both. Explore the settings menu of the GCam version you're using.
▪ Lib Patcher: Users need to find the best values for their hardware. Different camera
sensors need different values. Each user also has different preferences: some like more
detailed/noisy images while others like smooth pictures.▪ Libs: Libs are created by a modder and just like "lib patcher", it affects the image quality,
detail, etc. The main difference is that they are ready to use and you can't modify them.
Since this is very dependent on the hardware used by our phone and on personal preferences, it's
not possible to recommend a lib or lib patcher values that work well for everyone.
[ Note: If you're having issues loading libs, see Why can't I load libs? ]
How to use Playground / AR Stickers »
Follow the this guide.
How to load and export Google Camera settings (xml/config files) »
Some versions support import/export of .xml configuration files. Check this guide to know how
it works.
Fix for black and white pictures »
Usually this issue can be fixed by changing a setting inside the settings menu and then restarting
the app.
What's "Sabre"? »
Sabre is a merge method created by Google that improves photo quality on some modes. Some
call it "super resolution" because of the sharpness/detail improvements. It's used by Google for
Night Sight, but some GCam mods also use it for zoomed photos and HDR+ Enhanced. Works
with the RAW10 format (other RAW formats may result in black photos).
Sometimes Sabre isn't supported by all cameras sensors (eg: non-Sony sensors) and Google
Camera will crash after taking a picture. In this case, the only solution is to disable Sabre (only
available on some mods) and restart the app.
What's "Shasta"? »
Shasta or Shasta factor affects the quality of the image, especially in low light.
Higher values may help in astrophotography mode. You can also use it to control green noise in
the pictures.
What's "PseudoCT"? »
PseudoCT toggle helps to manage AWB. It may improve colour temperature. (by Nikita)
What's "Google AWB", "Pixel 3 AWB", etc ? »
The Pixel 3 AWB (Auto White Balance) was created by BSG and Savitar, and uses Pixel 3's
colour calibration info instead of the info from your phone. This is different from the Colour
Balance options available in the viewfinder.Other settings with similar names (Pixel 2 AWB, Google AWB, etc) are also included in some apps. Only some GCam mods come with this setting. Usually it only works with one of the "Pixel" models and sometimes it can result in pictures that look different from reality (e.g.: yellow street lights can become white). Since results may vary from phone to phone and also depends on personal taste, you should do your own tests to see if it's worth using this or not. How to use GCam without GApps » GCam requires Google Play Services to run, meaning that it will crash if you try to run it on a phone without GApps. To use GCam, you can't go fully "google free" (GCam itself is a Google product). microG: You can use microG, an open-source re-implementation of Google's proprietary libraries. Simply install microG's Service Core app and GCam will work. Gcam Services Provider: The other alternative is to use the Gcam Services Provider app that "simulates" what GCam needs to run. Download the apk here and visit the project's Github for more information. What's "Hot Pixel Correction"? » Reduces the number of "hot pixels" on the picture. Hot pixels are usually red or white dots in the picture. What's "Lens Shading Correction"? » Fixes vignetting (darker area around the centre of the picture). What's "Black Level"? » Using a custom "black level" value usually fixes pink or green photos on phones with this problem. Some versions allow users to use custom values for each colour channel (Crimson Red, DarkGreen, Light Green, Blue). This can be used to improve results in low light. What's "Hexagon DSP"? » Hexagon DSP is an image processor available on some SoCs (processors) and improves processing performance while using less battery. Leaving it ON usually improves speed, but doesn't work on all phones. Some apks are tagged with "NoHex" or "NoHexagon". Other apps have a "allow unknown devices" setting that enables/disables Hexagon.
What's "Buffer fix"? »
The "buffer fix" option fixes viewfinder lag on some phones affected by this problem. There's a
downside to this setting: on some phones users have to double tap the shutter button in order to
take pictures.
What's "Pixel 3 Color Transform"? »
This replaces the code cameraAPI2 SENSOR_COLOR_TRANSFORM1 and
SENSOR_COLOR_TRANSFORM2 with that of pixel 3 (works for the creation of DNG
images). Changes colours slightly.
What's "HDR+ underexposure multiplier"? »
This adjusts the under exposure (if auto exposure is enabled). Set HDR+ underexposure
multiplier to 50% and compare it with "normal" photos. Some users use it on 0%, but you need
to test and see which value is better for your phone.
What's "Default GCam CaptureSession"? »
Android 9+ only. Used for capturing images from the camera or reprocessing images captured
from the camera in the same session previously. More info on Google's developer website:
CameraCaptureSession.
What's "HDR+ parameters"? »
HDR works by merging a number of pictures. If you select "36", it means that Google Camera
will use 36 frames/photos to create the final picture. Higher values improve quality, but only
until a certain point and at a speed cost. For daily usage something between 7-12 is usually
enough.
"Autoexposure correction" and "Correction Night Sight" »
Controls the shutter speed. Long shutter speeds can be used for long exposure photos, but it
doesn't work well on all phones and users often report crashes. On the OnePlus 3, long exposure
times only work with the "Pixel 1" model and crashes with other models. Sometimes going a
step up or down can help fixing the pink tint that affects some phones.
Portrait Mode vs Lens Blur »
Some versions of this port come with these two features. Portrait Mode works better with
humans and (sometimes) animals and has better edge detection. Lens blur is older and works
with objects too, but it has worse edge detection and sometimes it blurs what shouldn't be
blurred.
What's "Recompute AWB"? »
Similar to other Auto White Balance (AWB) settings. Device compatibility limited.
To see the difference, take two pictures - one with this setting enabled and another with it
disabled - and compare the results. Depending on the GCam version you're using, you might
have to disable other AWB settings in order for it to work.
What's "Select iso priority"? »
This is a new piece of code and no one knows exactly what it does, but seems to affect the
viewfinder. Ignore it.
What's "Metering mode"? »
This changes the way Google Camera measures the light of the scene on the viewfinder. It
doesn't change the final picture, but it may affect the areas of the viewfinder that are
darker/brighter.
Some versions come with multiple settings for this option. Some might work on your phone,
while others won't do anything. It all depends on the hardware/software of your phone.
How to change your phone's fingerprint? »
1. Using Magisk Manager, install the MagiskHide Props Config module and reboot.
2. (screen recording) Using a terminal app (e.g.: Termux), type su, press "enter" on your
keyboard, and grand root access.
3. Type props > press enter > type 1 (to change fingerprints) and confirm by following the
instructions.
4. Pick the phone you want to "emulate".
5. After changing the fingerprint, choose the option to reboot.
What's video bitrate? »
The video bitrate is the number of bits per second of a video. Higher bitrates, results in bigger
files and better quality. Some slower hardware might struggle to play files with high bitrates.
Read this wikipedia page to learn more.
Some versions of the Google Camera mod allow users to change this. Usually the default setting
(or "auto) is good enough, but you can use higher values if you find video quality to be bad.

Is it possible to improve processing speed? »
Most Google Camera modes work by taking multiple photos and then merging them to create a
final photo (HDR). This takes a few seconds and during this time you'll see a "processing..."
notification. The time it takes to process depends on how fast your processor is and on the
picture taken, but it's usually between 5 and 15 seconds.
Usually there's 3 modes: HDR Off, HDR+ On (or HDR+ Auto), and HDR+ Enhanced (or HDR+
On).
HDR Enhanced is the best one in terms of quality, but it's also slower than the other two. If you
are in a hurry, you can try to use HDR+ On (the middle setting).
Some versions let you choose the number of HDR frames. Sometimes it's called HDR Quality,
HDR Frames, HDR Speed, etc. Try a lower value, restart the app, and try again.
There are some features that are more resource intensive than others. Night Sight (aka Night
Mode) is one of them and we should expect some processing time. If your camera has a big
resolution (e.g.: 48MP), it will take longer to process images (the solution for this is to select a
lower resolution).
What's "Face Warping"? »
Some apps allow you to enable/disable a feature called Face Warping correction. When enabled,
Google Camera tries to correct lens distortion when a subject's face is distorted.
What's JPG Quality, JPG Compression, etc? »
JPG, or JPEG, is a lossy image format. A file with 95% quality is bigger (more MBs) and retains
more details than a file with 85% quality. Most default camera apps use a default quality of 80-
85%. JPG quality for images you can find on most websites is usually between 60 and 85%.
It's a trade-off between quality/detail and file size: a 80% quality file can be 2MB, while a file
with 95% quality can be 6MB.
I personally use 97% quality (or 95% when I can't set 97%) for mobile photography. From my
tests, anything under 95% starts showing compression artefacts which are visible when I zoom
in. I couldn't see difference in image quality after 97%. For me 100% quality is overkill: not only
file sizes are 1 or 2 MB bigger, but I couldn't see any quality improvements.
If you value quality, use low JPG compression/high JPG quality. If you're constrained by storage
space, then reduce the JPG quality.
What's "instant_aec"? »
This is a camera2 api code from Qualcomm. There isn't much info about this, but seems to be
related to AEC 3D/artificial reality (the technology itself allows us to create 3d images/videos
from 2d images. Video about a camera that uses this tech: vimeo.com/282288552).
In practice, this setting seems to improve quality on some devices, but it's not available on all
GCam versions or on all phones. It's up to you to test and see if you can see any differences.
On versions from Arnova8G2 we usually are presented with 3 settings that allow us to
disable/enable the AEC backend:
0 - Disable
1 - Enable and set aggressive AEC algo to the backend
2 - Enable and set fast AEC algo to the backend
Why can't I load libs? »
Warning: Libs don't work anymore on versions LibLoader posted before 2019-07-01. Read why
here.
Some GCam versions support libs, but while some ship libs with the apk, others download them
from a Github repo or from one of the modders server.
When you click on "get updates", it initiates an internet connection that downloads a few
kilobytes of data (libs) and stores them locally. Since libs are added, removed, and updated often,
the list of libs available for the GCam version you're using will change over time. Google's stock
lib is included and used by default, meaning that the app will work if you don't download libs or
if in the future this feature is discontinued.
There are a few pros/cons compared to shipping libs with GCam itself:
   ▪   Pros: Smaller apk file size; Libs can be updated/added without updating the apk file;
   ▪   Cons: GCam needs internet access (only when you "update") in order to download the lib
       files; This is likely to be broken in the future as modders move on to other things;
If nothing happens ~30 seconds after clicking on "get updates", it means that the update has
failed. Make sure your phone is connected to the internet, that the app itself isn't being blocked
from accessing it, and that Github.com isn't blocked on your network.
If everything is okay on your end, try again later: sometimes Github's API limit is reached and
all requests are rate limited.
How to fix green/pink blurred photos? »
Usually this is caused by GCam using an incompatible "model" for your camera. It's a common
problem with some phone's front camera.
The solution is to change the "model" used. If one of the Pixel models is selected by default, try
the Nexus 5X or 6P model, restart and try again.
Missing or deleted photos bug »
- Portrait photos:
By default, Google Camera saves photos taken with the Portrait Mode on folders inside the main
/DCIM/Camera folder, so some GCam versions include a setting that allows you to save them on
the main shared folder. The setting name changes from dev to dev, but this is how it looks like
on some versions:
Sadly, this isn't stable and sometimes some photos are lost. The solution is to keep this setting
off or use a version that doesn't do it by default.
- Other photos:
▪ If they're displayed after a reboot: it's a system problem, Android isn't scanning the
storage quickly enough to show new files on the gallery.
▪ If photos taken with other apps also get deleted: it's not a Google Camera problem.
▪ If you have apps that modify photos/files in some way: make sure they're not deleting
them.
▪ If none of above: report the problem to the developer (usually by following the
"changelog" link next to the download link) or ask for help on a thread or group for your
phone.
What's DCI-P3? »
Some versions come with a DCI-P3 option. On phones with displays that support DCI-P3, it
should result in photos with more vibrant colours.
To learn more about this colour space, check the wikipedia page about DCI-P3.
Can GCam save photos/videos to the SD Card? »
No. Since Google phones don't support sd cards, Google Camera doesn't have a setting to save
photos and videos to external storage.
You can try a 3rd party app though. Tasker, for example, can be used to move files between
folders/storages.
How to mirror selfies? »
This setting is only available on Google Camera 7 or newer (check the settings menu). It's not
possible to enable/disable mirroring of pictures on older versions.
How to save Portrait mode photos in the main folder »
Check this page where I talk about a setting and some 3rd party apps that will allow you to save
pictures taken with GCam's Portrait Mode in the main /DCIM/Camera folder.
Differences between GCam 5, 6, 7, etc »
Major Google Camera versions are usually released when Google releases a new phone (once a
year). Some of the new features can be used with the port on non-Google devices, while others
can't. Everything depends on how the feature works and your own hardware.
On Google devices, new versions usually mean new features and better (or at least equal)
quality, but it may be different for people using this port. When new updates are released, theyneed to be fixed/improved/modified to work on non-Google devices and that work takes a while. Sometimes it's better to use an older version than moving to a new, unstable version. To learn about new features, I suggest you check sites like XDA Developers, 9to5Google, etc, as they usually talk about what's new on each new update. New features are also mentioned when Google presents their new devices. Forum threads, telegram help groups, etc » Check this page for a list of forum threads, telegram groups, and useful files/tools for this port. I suggest you find other people using the same phone as you and see which port/version/settings they're using. See if there's a GCam thread for your phone on XDA or posts on your phone's subreddit. How to save error logs » If the app is crashing and you want to send a log for the developer, check the How to save a logcat with MatLog page. How create app clones » To create clones of Google Camera apps, check my how to clone apps guide.
You can also read