The Office 365 Email Security Checklist - By Alex Fields, ITProMentor.com
←
→
Page content transcription
If your browser does not render page correctly, please read the page content below

The Office 365 Email Security Checklist
By Alex Fields, ITProMentor.com

Email is the number one attack vector that bad actors use to gain access to your data. And it is
no surprise; anyone who has ever run phishing tests against a large group of email recipients
will be shocked to learn how many people can be so easily manipulated into clicking on
something.

We can’t rely on education and testing alone—we need a comprehensive approach to email
security. Microsoft Office 365 has all of the bells and whistles imaginable for helping to mitigate
email-based attacks, but unfortunately most of them are not enabled by default (and some of
them require additional licensing). Therefore, it is up to you, the reader, to take the necessary
steps to protect your users.

My goal is to make this workbook easy to follow—like a checklist—so that you can implement a
good “baseline” level of security as you proceed through to the end.

A note about licensing
Be aware that some of the features we are going to discuss require additional subscriptions
that might not be included with your base Office 365 plan. However, I am not going to
recommend any additional products unless I truly believe that they are necessary or add
significant value (there are quite a few “security add-ons” in the Microsoft ecosystem that will
not be included in this workbook—and that is on purpose).

Impact on Secure Score
At the beginning of each section, I will include the Secure Score impact for implementing each
item. However, you will notice that some very critical actions I have included here are not even
evaluated by Secure Score, at all. Also, some actions included are not scored, or, they are
“worth” far more in Secure Score points than what I think they actually add in terms of real-
world value.

So take that tool with a grain of salt—Secure Score is as much (or more) of a sales device as it is
an assessment device. Nevertheless, if you successfully implement 100% of this workbook you
should easily bring your Secure Score to somewhere between 400 and 500 points.

                                         ITProMentor.com | The Office 365 Email Security Checklist    1
Table of Contents
The Office 365 Email Security Checklist....................................................................................................... 1
   A note about licensing.............................................................................................................................. 1
   Impact on Secure Score ............................................................................................................................ 1
Table of Contents ......................................................................................................................................... 2
☐ Connecting to Exchange Online using PowerShell ................................................................................. 4
☐ Enable Mailbox auditing ......................................................................................................................... 5
☐ Email authentication: SPF, DKIM and DMARC ....................................................................................... 6
   ☐ Sender Policy Framework ................................................................................................................... 6
   ☐ Domain Keys Identified Mail .............................................................................................................. 7
   ☐ Domain-based Message Authentication, Reporting & Conformance ............................................... 9
☐ Client authentication: moving from Basic to Modern auth................................................................. 10
   ☐ Enable Modern authentication ........................................................................................................ 11
   ☐ Eliminate Legacy Protocols and Block Basic authentication ........................................................... 11
       ☐ Option 1: Disable legacy protocols such as POP and IMAP ......................................................... 12
       ☐ Option 2: Block Basic Authentication via an Authentication Policy ............................................ 13
       ☐ Option 3: Use Conditional Access to block legacy clients (preferred) ........................................ 14
☐ Enable Multifactor authentication (MFA) ............................................................................................ 16
   ☐ Option 1. Setup MFA for users individually ..................................................................................... 16
   ☐ Option 2. Use Conditional Access to enforce MFA .......................................................................... 20
   ☐ Instructions for end users ................................................................................................................. 24
☐ Disable Mailbox forwarding to remote domains ................................................................................. 24
☐ Block sign-in for all shared mailboxes .................................................................................................. 26
☐ Tune up your Exchange Online Protection policies ............................................................................. 27
   ☐ Configure the spam filter policy ....................................................................................................... 28
   ☐ Configure the outbound spam policy ............................................................................................... 30
   ☐ Configure the malware filter policy.................................................................................................. 31
☐ Turn on Office 365 Advanced Threat Protection ................................................................................. 32
   ☐ Set Default ATP policy & Configure Safe Links ................................................................................. 33
   ☐ Configure Safe Attachments ............................................................................................................. 35
   ☐ Configure Anti-Phish policy .............................................................................................................. 36

                                                                  ITProMentor.com | The Office 365 Email Security Checklist                                     2
☐ Protect mailboxes with a Retention policy or Litigation hold ............................................................. 37
   ☐ Option #1: Create a Retention Policy ............................................................................................... 38
   ☐ Option #2: Enable Litigation hold ..................................................................................................... 40
☐ Configure Mobile device policies.......................................................................................................... 41
   ☐ Method #1: Exchange ActiveSync..................................................................................................... 41
   ☐ Method #2: Mobile Device Management in Office 365 (MDM)...................................................... 42
   ☐ Method #3: Device Management using Intune (MDM)................................................................... 45
       1.     Configure iOS enrollment certificate ......................................................................................... 46
       2.     Create Compliance policies ........................................................................................................ 47
       3.     Create Device configuration profiles ......................................................................................... 50
       4.     Create Conditional access policies ............................................................................................. 53
       5.     Enroll devices .............................................................................................................................. 54
   ☐ Method #4: Mobile Application Management (MAM).................................................................... 55
☐ Block downloads from Outlook Web on unmanaged devices ............................................................ 63
☐ Start using Office 365 Message Encryption features ........................................................................... 68
☐ Configure DLP Policy (if applicable) ...................................................................................................... 69
☐ Enable the default Alert policies .......................................................................................................... 70
☐ Enable Advanced alert policies within Cloud App Security ................................................................. 73
☐ OAuth App Notifications and Review................................................................................................... 74
Closing comments ...................................................................................................................................... 78
   What about transport rules? ................................................................................................................. 78

                                                                 ITProMentor.com | The Office 365 Email Security Checklist                                       3
☐ Connecting to Exchange Online using PowerShell
The Exchange Online PowerShell Module is going to make your life a lot easier.
To install the module, browse to your Exchange Online Admin Center, and navigate to hybrid
from the left menu. Find the second button to configure the Exchange Online PowerShell
Module (which supports MFA).

And then simply run:

Connect-EXOPSSession

                                       ITProMentor.com | The Office 365 Email Security Checklist   4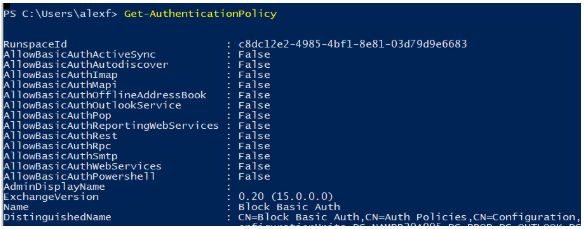
Once you are connected for the first time, it may be necessary to enable organization
customization (sometimes this has already been enabled via some other procedure, so if it
errors out just ignore):

Enable-OrganizationCustomization

☐ Enable Mailbox auditing
Secure Score impact:
- Turn on audit data recording (+15)
- Turn on mailbox auditing for all users (+10)

Auditing is crucial. If there ever is a breach, you want logging enabled in order to understand
what happened and when. Not to mention it is usually required for compliance with various
laws and regulations. Check whether the tenant is enabled for auditing at all. Most tenants
should have this enabled by default now, but even at the time of this writing, I still see
instances where it is not. View the status like this (should return a value of False if it is enabled):

Get-OrganizationConfig | FL AuditDisabled

If it says True instead of False for some reason, and you need to change the value, simply use:

Set-OrganizationConfig -AuditDisabled $false

The other piece to this is that even if auditing is enabled globally, you still need to enable audit
log search (so you can actually return data from a query against the audit logs), and on top of
that, you need to enable auditing on every mailbox individually (because it’s off by default).

To enable audit log search, run the command below. Note: it takes several hours before you
can actually search the audit log (there is no data if auditing hasn’t previously been enabled).

Set-AdminAuditLogConfig -UnifiedAuditLogIngestionEnabled $true

                                           ITProMentor.com | The Office 365 Email Security Checklist      5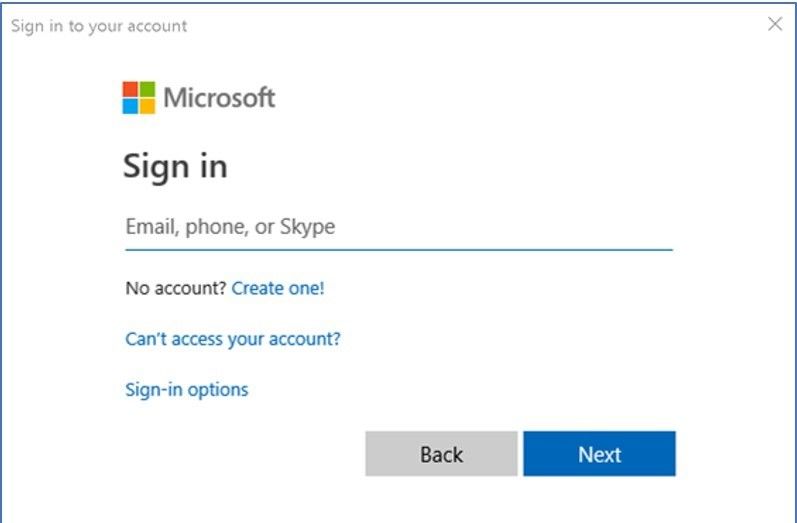
To enable auditing on all mailboxes with a log age limit of 365 days (1 year), and with audit
actions enabled (including owner actions):

Get-Mailbox -ResultSize Unlimited | Set-Mailbox -AuditEnabled $true -AuditLogAgeLimit 365 -Audit
Admin Update, MoveToDeletedItems, SoftDelete, HardDelete, SendAs, SendOnBehalf, Create, Upda
teFolderPermission -AuditDelegate Update, SoftDelete, HardDelete, SendAs, Create, UpdateFolderP
ermissions, MoveToDeletedItems, SendOnBehalf -AuditOwner UpdateFolderPermission, MailboxLo
gin, Create, SoftDelete, HardDelete, Update, MoveToDeletedItems

Please note, any new mailboxes created also will not have this enabled, so it is a good idea to
run the above command against any new mailbox (build this into your process).

☐ Email authentication: SPF, DKIM and DMARC
Secure Score impact:
- None (which is crazy)
Email authentication is a means of using DNS records to validate or prove that your email is
coming from a trusted source. Therefore, it is important that you also protect access to your
DNS hosting provider, where these changes can be made. There are three record types in total
that we need to configure.

☐ Sender Policy Framework
An SPF record is a DNS “TXT” type record. It is one of the records that Office 365 has you
provision when you first setup and configure mail flow to Office 365. Navigate in the Microsoft
365 admin center to Setup > Domains.

The function of the SPF record is to advertise to the world who is allowed to send email on
behalf of your domain. When you build this TXT record, you should try to include as many

                                         ITProMentor.com | The Office 365 Email Security Checklist   6
“legitimate” sources of email as you can. For example, for email that is hosted at Office 365,
with no other possible senders, then you only need the following:

Host name:
@

TXT value:
v=spf1 include:spf.protection.outlook.com -all

For third-party software such as Mail Chimp, Constant Contact, etc., you can usually find their
SPF information using a quick Google search, or by contacting their support. For your own on-
premises apps or scan to email devices, you may want to include an ip4 entry for your
company’s external IP addresses.

Let’s say you had a combination of Office 365 for hosted email, Constant Contact for bulk
mailing/marketing emails, and an on-premises copier/scanner internally, with your
organization’s external IP being 87.65.43.21. Then you would have this SPF to publish:

Host name:
@

TXT value:
v=spf1 include:spf.protection.outlook.com include:spf.constantcontact.com ip4:87.65.43.21 -all

☐ Domain Keys Identified Mail
DKIM is an authentication system based on an asymmetric cryptographic key pair–a private and
public key. When a message leaves Office 365, it is digitally signed with the private key. The
public key is published via a DNS CNAME record, so that recipient servers can validate the
signature. Using this with SPF is a much stronger form of authentication, since your digital
signature proves to recipient servers that individual messages really did come from the “right
place.”

By default, your “OnMicrosoft” domain already has DKIM configured and working. But if you
are bringing a “vanity” domain name such as contoso.com (most organizations are), then you
will need to setup DNS records for your domain(s), and then enable DKIM message signing in
Exchange Online.

You will need to build two CNAME records per domain for DKIM. How these records are built is
as follows:

Host name:
selector1._domainkey

                                          ITProMentor.com | The Office 365 Email Security Checklist   7
Points to:
selector1-CompanyDomainName-com._domainkey.TenantName.onmicrosoft.com

Host name:
selector2._domainkey

Points to:
selector2-CompanyDomainName-com._domainkey.TenantName.onmicrosoft.com

Note: Under “Points to,” the hyphenated version of your domain name that comes after
selector1- or selector2- should match the domain as depicted in the MX record that is given to
you by Office 365 (e.g.: contoso-com.mail.protection.outlook.com). So just make sure those
values match. Also, the tenant name (TenantName.onmicrosoft.com) can be found under
Setup > Domains in the 365 admin center.

Therefore, contoso.com looks like this:

Host name: selector1._domainkey
Points to: selector1-contoso-com._domainkey.contoso.onmicrosoft.com

Host name: selector2._domainkey
Points to: selector2-contoso-com._domainkey.contoso.onmicrosoft.com

You can use PowerShell to retrieve the “Points to” value of the CNAME record (just remember
that you have to specify the host names selector1._domainkey and selector2._domainkey as
well, for each):

Get-DkimSigningConfig  | fl *cname

Next, in the Exchange admin center, go to protection > dkim, pick the domain that you want to
enable for DKIM signing. On the right pane, click Enable. If you haven’t configured your DNS
records, this operation will fail out, so be sure to allow enough time for DNS to propagate.

                                          ITProMentor.com | The Office 365 Email Security Checklist   8
In PowerShell, this accomplished as follows (example is for contoso.com):

New-DkimSigningConfig -DomainName contoso.com -Enabled $true

NOTE: You should also have third-party senders get their DKIM information to you, so that you
can add the necessary records following their direction, and have them enable signing as well.

☐ Domain-based Message Authentication, Reporting & Conformance
DMARC is a DNS record that tells recipient servers how to treat unauthenticated messages that
come from your domain, based on policy. It can also communicate where to send reports about
mail from your domain.

By way of example, here is what DMARC could look like for contoso.com:

TXT Name: _dmarc.contoso.com
Value: "v=DMARC1; p=none; ruf=mailto:spoofalert@contoso.com; fo=1"

Walking through the logic of the text record:

   •   v=DMARC1; = This just indicates the version (1) that is being used for DMARC
   •   p=none; = The policy is set to “none” in this case, meaning that recipient servers need
       take no special action on your messages if they fail authentication (you can also choose
       to advertise quarantine or reject)
   •   ruf=mailto:; = this is where you can specify a place to send
       failure reports

                                        ITProMentor.com | The Office 365 Email Security Checklist   9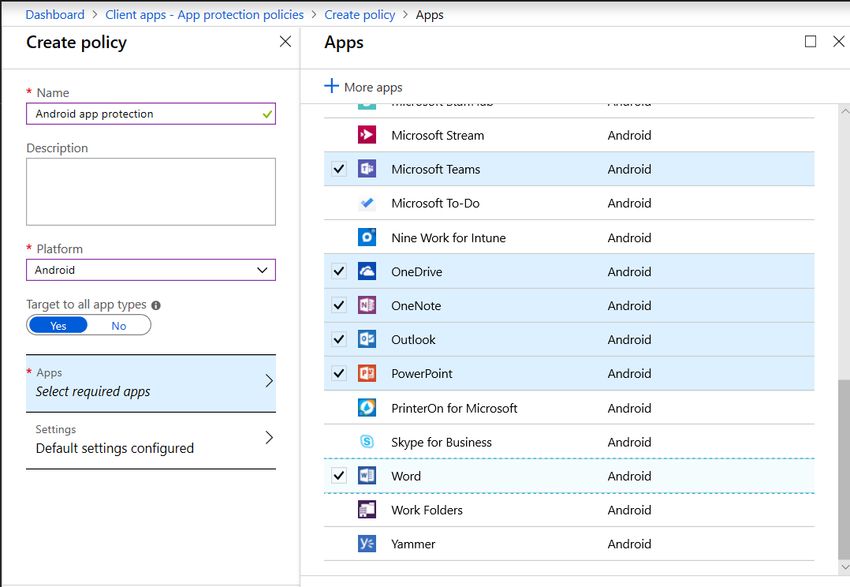
•   fo=1 = this indicates that a DMARC failure report should be produced for anything other
       than a “pass” result on either DKIM or SPF; other options are 0 (report only if both
       mechanisms fail), d (DKIM failures only), or s (SPF failures only)

When you are first rolling DMARC out, it is best to start with the policy set to p=none, because
this will allow you to start collecting data about messages that fail the DMARC, and take
necessary actions to course-correct using SPF and DKIM before moving the DMARC policy up to
a setting of quarantine, or even reject (the strongest setting).

The policy setting p=reject, for instance, tells recipient mail servers that they should reject
(delete) all messages which fail DMARC. Much better to start out with a less restrictive policy,
and monitor the results, so that you have a chance to adjust before ratcheting up.

☐ Client authentication: moving from Basic to Modern auth
Secure Score impact:
- Enable policy to block legacy authentication (+20)

Modern authentication (or OAuth) is to be distinguished from Basic (or legacy) authentication.
A Basic auth prompt looks like this from the client perspective:

While Modern auth prompts look more like this:

                                         ITProMentor.com | The Office 365 Email Security Checklist   10
Switching to Modern auth (even without implementing MFA on top of that) is a major
improvement in security. Modern authentication is not subject to the same types of attacks and
exploits that are possible with Basic auth. For example, the credentials are not stored on the
client device, and whenever something about the connection or state changes, the client is
required to reauthenticate. Additionally, we can layer true MFA on top of modern auth to make
client authentication even stronger.
Legacy clients such as Outlook 2010 are not compatible with modern auth. Even 2013 clients
aren’t compatible without making a modification to the registry. But my advice is to get off of
Office 2013, and install the newer Office 365 bits instead. Soon 2013 clients will not be able to
connect to Office 365 anyway.
☐ Enable Modern authentication
This may already be enabled for your tenant, but if not, there is no harm in running the
command anyway. We can enable modern authentication for clients connecting to Exchange
Online using a one-liner in PowerShell:
Set-OrganizationConfig -OAuth2ClientProfileEnabled $true
☐ Eliminate Legacy Protocols and Block Basic authentication
We have several ways of either limiting or completely eliminating the use of Basic auth and
legacy protocols (e.g. IMAP and POP) which do not support Modern auth:
1. Disable legacy protocols such as POP, IMAP on mailboxes individually
2. Create an Authentication policy that blocks Basic authentication
3. Use a Conditional Access policy to prevent legacy clients from connecting
ITProMentor.com | The Office 365 Email Security Checklist 11☐ Option 1: Disable legacy protocols such as POP and IMAP
This is an easy, low-risk place to start. You should try to block the use of legacy protocols (such
as POP and IMAP) wherever possible. Attacks on these protocols are launched against your
tenant daily. From the Microsoft 365 admin center, select a user account. Go to the "Mail" tab
and select the option to Manage email apps.
From here it is very easy to turn off any legacy protocols that you know are not (or should not
be) in use.
ITProMentor.com | The Office 365 Email Security Checklist 12You can accomplish the task in bulk on all mailboxes at once as follows in PowerShell:
Get-Mailbox | Set-CASMailbox -PopEnabled $false -ImapEnabled $false
Additionally, you can use Set-CASMailboxPlan organization-wide so that newly created
mailboxes will have these settings by default also.
Get-CASMailboxPlan | Set-CASMailboxPlan -ImapEnabled $false -PopEnabled $false
☐ Option 2: Block Basic Authentication via an Authentication Policy
The first option only turns down the IMAP and POP services. Basic auth is still possible on any of
the other services. SMTP, EWS, and more--PowerShell even. To completely eliminate basic
authentication in Exchange Online, we simply have to create a new authentication policy with
no additional parameters, and assign it as the default policy for the organization:
New-AuthenticationPolicy -Name "Block Basic Auth"
Set-OrganizationConfig -DefaultAuthenticationPolicy "Block Basic Auth"
NOTE: Some legacy applications or devices may be connecting to Exchange Online using basic
authentication or legacy protocols. You should try to eliminate these exceptions from your
environment; however, it is possible to create another authentication policy which would allow
basic auth using specific protocols, and then assign the policy to users individually. Example:
ITProMentor.com | The Office 365 Email Security Checklist 13New-AuthenticationPolicy "Allow Basic Auth Exceptions" -AllowBasicAuthImap -AllowBasicAuthWeb
Services
In this example, we can allow IMAP and EWS to use Basic auth, but leave it disabled for other
services. You can simply Get-AuthenticationPolicy to see all of the individual services for which
you can enable basic auth:
To apply the new “exception” policy to a specific user (such as a service account):
$ExceptionUser = “username@domain.com”
Set-User -Identity $ExceptionUser -AuthenticationPolicy "Allow Basic Auth Exceptions"
☐ Option 3: Use Conditional Access to block legacy clients (preferred)
Conditional access is the easiest way to block legacy authentication and protocols. This used to
require Azure AD Premium, but does no longer. Now Block legacy authentication is included
with all subscriptions as a “baseline” conditional access policy.
Navigate to Azure Active Directory and find Conditional access from the left menu. Select
Baseline policy: Block legacy authentication.
ITProMentor.com | The Office 365 Email Security Checklist 14Then you can simply Enable the policy, optionally selecting any users you would like to exclude
from the policy (for instance, if you had a service account that relied on legacy authentication).
You can also combine this method with an Exchange Online authentication policy (after all, you
might only need to open EWS or some other service for your exception, yet disable the rest).
ITProMentor.com | The Office 365 Email Security Checklist 15☐ Enable Multifactor authentication (MFA)
Secure Score impact:
- Require MFA for Azure AD privileged roles (+50)
- Register all users for multi-factor authentication (+20)
- Require MFA for all users (+30)
Some people think that multifactor or 2-step authentication is the silver bullet to all security
ailments. Sorry, but I have bad news for you: it is not. Most MFA implementations can be
bypassed, including Microsoft’s. Nevertheless, it is a critical security control that should be
implemented along with other controls (e.g. Conditional access). Never rely on just one
strategy.
You can enable MFA on user accounts individually with any subscription. If you have the Azure
AD Premium P1 subscription, you can instead enable Conditional access rules for MFA (meaning
that you can choose to require an MFA challenge only under certain circumstances).
☐ Option 1. Setup MFA for users individually
Go to the Office 365 Admin Center and navigate to Users > Active users. Find More > Setup
Azure multi-factor…
You can see your users listed here, but before you enable MFA for anyone in particular, check
out the service settings area.
ITProMentor.com | The Office 365 Email Security Checklist 16Here you can select various options surrounding the use of MFA. For example, allow certain
types of MFA challenge such as phone calls, SMS, mobile app notifications, or hardware tokens.
It is also where you allow or disallow users to generate app passwords (for applications that do
not support a second factor prompt–e.g. older versions of Office apps, Apple Mail, etc.).
Note: I find the mobile app notification option is usually the best user experience.
ITProMentor.com | The Office 365 Email Security Checklist 17When you have access to Azure AD Premium P1 and Conditional access, you will also see an
option to exclude trusted IPs (e.g. corporate locations). Please note, this means the external IP
addresses, not the internal IP subnets.
Back on the users tab, we can turn MFA on for users one by one, or several at a time. Simply
select one, many (or all) of the users, and choose Enable on the right.
ITProMentor.com | The Office 365 Email Security Checklist 18You also have the option to use the bulk update button at the top of this page, and provide a
CSV file which is formatted as follows:
You may also notice that when you choose one or more of the users from this area, you have an
option to Manage user settings. You get these choices:
• Require selected users to provide contact methods again
• Delete all existing app passwords generated by the selected users
• Restore multi-factor authentication on all remembered devices
ITProMentor.com | The Office 365 Email Security Checklist 19☐ Option 2. Use Conditional Access to enforce MFA
From the Azure Active Directory, find the Conditional Access blade. You will notice a policy
present in here called Baseline policy: Require MFA for admins.
You should switch this policy on (Use policy immediately). However, it is recommended to
exclude at least one emergency access or “break glass” account, but you need to treat that
account very differently than normal accounts:
• they should not be used for anything other than administrative tasks
• use a cloud-only ID with logon suffix such as “@tenant.onmicrosoft.com” rather than
your vanity domain name, or some AD-Synced account
• change the password regularly, and whenever administrative users who know this
password leave or are terminated
Here are Microsoft’s notes on emergency access accounts, for further reference. So that covers
administrative users, which is your bare minimum.
ITProMentor.com | The Office 365 Email Security Checklist 20Another baseline policy will enable MFA for end users, but only under “risky” sign-in conditions.
Select Baseline policy: End user protection. You will notice that this policy also blocks sign-in
and forces users with leaked credentials to perform a password reset (which again requires the
second factor). Bonus!
That may be good enough for some. It is recommended, however, to enforce MFA more
strictly. Simply create a new policy and call it “Require MFA for Exchange Online.” Pick All users
and Office 365 Exchange Online as the cloud app that you are targeting.
ITProMentor.com | The Office 365 Email Security Checklist 21Under Conditions > Client apps, select Browser as well as Mobile apps and desktop clients >
Modern authentication clients. “Exchange ActiveSync” clients and “Other clients” do not
support MFA.
Last go to Access Controls > Grant and choose Require Multi-factor authentication.
ITProMentor.com | The Office 365 Email Security Checklist 22Save your selection and Enable the policy.
Some additional notes about Conditional access: It is possible to exclude managed/enrolled
devices by using the Conditions > Device state blade. On the Exclude tab, select both options to
exclude managed devices.
ITProMentor.com | The Office 365 Email Security Checklist 23This option can make life easier for users on corporate owned/issued devices (because the
managed device itself is a “factor” being evaluated during authentication). It is also possible to
use Exclude tabs in other places, e.g. users/groups, locations and so forth. Use these sparingly
and try to keep your attack surface as small as possible.
☐ Instructions for end users
Communicate the MFA changes in advance to your end users. You can provide them with links
to the Microsoft support literature on this, also:
• Setup 2-Step verification for Office 365
Referring to the official support articles might be the easiest (vs. creating your own
documentation), since Microsoft changes things so often, anyway.
☐ Disable Mailbox forwarding to remote domains
Secure Score impact:
- Block client forwarding rules (+20)
When attackers get a hold of a mailbox, they will often exfiltrate data by setting up mailbox
forwarding to an outside email address that they can then monitor without needing constant
access to the source mailbox.
ITProMentor.com | The Office 365 Email Security Checklist 24There are actually several ways to deal with this problem including RBAC (limiting permissions)
and transport rules that will block / reject auto-forwarded messages, but I am going to
recommend that you implement the easiest and most effective solution. Simply disable the
auto-forwarding behavior globally—for all remote domains.
You can find this setting in the Exchange admin center also under mail flow > remote domains.
Edit the Default remote domain object (*).
Clear the selection for Allow automatic forwarding.
In PowerShell, the command is:
Set-RemoteDomain Default -AutoForwardEnabled $false
ITProMentor.com | The Office 365 Email Security Checklist 25To enable exceptions, you would create a new remote domain (to a specific place like a partner
organization) and then enable the option instead of disabling it.
If you want to see whether any existing users will be impacted by this change, you can export to
CSV the people who have either created inbox rules or configured a mailbox forwarder.
## This script collects and exports existing mailbox forwarding info;
CSV files are deposited into C:\temp\
## Find the default accepted domain name and store in a variable:
$DefaultDomainName = Get-AcceptedDomain | Where-Object Default -EQ True
## Export forwarders to CSV:
Get-Mailbox -ResultSize Unlimited -Filter {(RecipientTypeDetails -ne "DiscoveryMailbox") -and ((For
wardingSmtpAddress -ne $null) -or (ForwardingAddress -ne $null))} | Select Identity,ForwardingSmt
pAddress,ForwardingAddress | Export-Csv c:\temp\$DefaultDomainName-MailboxForwarding.csv -
append
foreach ($a in (Get-Mailbox -ResultSize Unlimited |select PrimarySMTPAddress)) {Get-InboxRule -M
ailbox $a.PrimarySMTPAddress | ?{($_.ForwardTo -ne $null) -or ($_.ForwardAsAttachmentTo -ne $n
ull) -or ($_.DeleteMessage -eq $true) -or ($_.RedirectTo -ne $null)} |select Name,Identity,ForwardT
o,ForwardAsAttachmentTo, RedirectTo, DeleteMessage | Export-Csv c:\temp\$DefaultDomainNam
e-InboxRules.csv -append }
## NOTE: After running this script, check the CSV files under C:\temp for a list of mail users who ma
y be affected by disabling the ability to auto-forward messages to external domains
☐ Block sign-in for all shared mailboxes
Secure Score impact:
- None
Shared mailboxes (including Resource mailboxes) do not require interactive login. Rather, users
who are delegated permission can access and interact with the contents of the shared mailbox.
When organizations do dumb things like allow multiple users to sign into shared mailboxes on
mobile devices, they are not working within the conceptual framework of a shared mailbox. So
effectively, those which are enabled for interactive sign-in become real user mailboxes and
need to be treated as any other user account at that point.
ITProMentor.com | The Office 365 Email Security Checklist 26Otherwise, you should be blocking sign-in on these accounts. Note that accounts which are
synced from on-premises Active Directory would need to be disabled on-premises. In the 365
admin center, select one or multiple accounts and Edit the sign-in status from the ellipses.
This action would be equivalent to the following in PowerShell (Connect-MsolService):
Set-MsolUser -UserPrincipalName username@company.com -BlockCredential $true
☐ Tune up your Exchange Online Protection policies
Secure Score impact:
- Set outbound spam notifications (+15)
The default antispam and antimalware policies… leave something to be desired, shall we say.
Basically, nothing is turned on by default. Sad. But we’re going to fix that now. In the Security &
Compliance center, navigate to Threat Management > Policy.
ITProMentor.com | The Office 365 Email Security Checklist 27If you prefer to use the graphical interface, then here is where you would find various UI-driven
policy builders, for both Exchange Online protection (anti-spam, anti-malware) as well as ATP
(anti-phishing, safe links and safe attachments).
To configure new custom baseline policies, we can do this in PowerShell. Connected to
Exchange Online via the PowerShell module, use the script blocks below. (I will also depict some
of the same settings as seen via the UI, but the script blocks will take you from zero to
configured much more quickly.)
In this first script block, you need to specify some variables that are particular to your
environment, such as the domain name(s) you need to include in protection, as well as a
mailbox that can receive alerts about suspicious emails and attachments.
## Specify your recipient domain(s) in the variable:
$RecipientDomains = "tenantname.onmicrosoft.com", "companydomain.com"
## Specify your alert mailbox:
$AlertAddress= "securityalerts@companydomain.com"
☐ Configure the spam filter policy
To configure the (inbound) spam filter policy, run the following:
$antispamparam = @{
ITProMentor.com | The Office 365 Email Security Checklist 28"name" = "Anti-spam Baseline";
'bulkspamaction' = 'quarantine';
'bulkthreshold' = '7';
'highconfidencespamaction' = 'quarantine';
'inlinesafetytipsenabled' = $true;
'markasspambulkmail' = 'on';
'increasescorewithimagelinks' = 'off'
'increasescorewithnumericips' = 'on'
'increasescorewithredirecttootherport' = 'on'
'increasescorewithbizorinfourls' = 'on';
'markasspamemptymessages' ='on';
'markasspamjavascriptinhtml' = 'on';
'markasspamframesinhtml' = 'on';
'markasspamobjecttagsinhtml' = 'on';
'markasspamembedtagsinhtml' ='on';
'markasspamformtagsinhtml' = 'on';
'markasspamwebbugsinhtml' = 'off';
'markasspamsensitivewordlist' = 'on';
'markasspamspfrecordhardfail' = 'on';
'markasspamfromaddressauthfail' = 'on';
'markasspamndrbackscatter' = 'off';
'phishspamaction' = 'quarantine';
'spamaction' = 'quarantine';
'zapenabled' = $true;
'EnableEndUserSpamNotifications' = $true;
'EndUserSpamNotificationFrequency' = 1;
'QuarantineRetentionPeriod' = 15
}
New-HostedContentFilterPolicy @antispamparam
$antispamruleparam = @{
'name' = 'Anti-spam baseline';
'hostedcontentfilterpolicy' = 'Anti-spam baseline';
'recipientdomainis' = $RecipientDomains;
'Enabled' = $true
}
New-HostedContentFilterRule @antispamruleparam
As seen via the admin center, the same policy can be reviewed.
ITProMentor.com | The Office 365 Email Security Checklist 29Note that our default configuration uses the option to Quarantine spam. You can also choose
MoveToJmf, if you prefer that the users review spam messages via their “Junk Mail Folder” in
Outlook. However, Quarantine is considered safer, because potentially malicious emails are not
so easy to access—so there is less chance of a user finding something bad within the Junk folder
and clicking on it, thinking it is legitimate.
Users can sign into https://protection.office.com to review their own quarantine at any time.
With the settings specified here, they will also receive a daily “digest” of messages that went to
quarantine during the day. They can review and release these messages as needed.
☐ Configure the outbound spam policy
To configure the outbound spam policy, run the following:
$outboundparam = @{
"identity" = 'Default';
'bccsuspiciousoutboundadditionalrecipients' = $AlertAddress;
'bccsuspiciousoutboundmail' = $true;
'notifyoutboundspam' = $true;
'NotifyOutboundSpamRecipients' = $AlertAddress
}
Set-HostedOutboundSpamFilterPolicy @outboundparam
ITProMentor.com | The Office 365 Email Security Checklist 30As seen from the UI, just scroll down further past the custom policy to find the Outbound spam
filter policy. This has been configured to alert the specified user when outbound mail is
suspected as spam.
☐ Configure the malware filter policy
$malwareparam = @{
"Name" = "Anti-malware Baseline";
'Action' = 'deletemessage';
'Enablefilefilter' = $true;
'EnableInternalSenderAdminNotifications' = $true;
'InternalSenderAdminAddress' = $AlertAddress;
'Enableinternalsendernotifications' = $true;
'ZapEnabled' = $true
}
New-MalwareFilterPolicy @malwareparam
$malwareruleparam = @{
'name' = 'Anti-malware Baseline';
'malwarefilterpolicy' = 'Anti-malware Baseline';
'recipientdomainis' = $RecipientDomains;
'Priority' = 0;
'Enabled' = $true
}
New-MalwareFilterRule @malwareruleparam
As seen from the UI, select the Anti-malware Baseline policy to review its settings.
ITProMentor.com | The Office 365 Email Security Checklist 31☐ Turn on Office 365 Advanced Threat Protection
Secure Score impact:
- Set up Office 365 ATP Safe Attachment policies (+15)
- Set up Office 365 ATP Safe Links to verify URLs (+15)
Office 365 Advanced Threat Protection (ATP) plan 1 is recommended for ALL mailbox users in
Office 365. It includes the following policies which are configurable from Security & Compliance
Center > Threat Management > Policy:
Safe Links – Hyperlinks which exist in email messages or other content in Office 365 are re-
written into a new URL which includes a Microsoft “wrapper.” The Microsoft URL acts like a
proxy, launching the links—and the links that are found within those links, and the links within
those links—before sending your own web browser on to the “real” destination. This allows
Microsoft to test out in advance if a website has “gone dark” or contains potentially bad
content, before you get there.
WARNING: it is important to realize how this timing works—the scans are taking place literally
at the time you click the link, not when the link was created or sent.
Safe Attachments – Safe attachments will essentially launch any downloadable attachment and
execute it in a virtual machine (what they call ‘detonating’), before allowing it to go on to the
end-user. This sandbox environment is looking for behaviors that are unusual or abnormal, and
which could represent malware. This is beyond virus scanning–it is looking for zero-day threats–
stuff without signatures.
ITProMentor.com | The Office 365 Email Security Checklist 32WARNING: enabling this feature will cause noticeable delays in delivery of certain
content/attachments. In some cases, I have seen some email messages delayed by up to 10
minutes.
Anti-phishing – ATP anti-phishing policies allow you to put in place some anti-impersonation
protections against specific mailboxes and domains. You can enable policy tips that would, for
example, raise a user’s attention to the fact that a domain name contains unusual characters
(e.g. a zero instead of the letter “O”), which is often exploited in certain attacks/spoof
attempts.
Furthermore, you can apply “Mailbox intelligence” which applies machine learning to the
message exchange patterns between your users and their usual contacts. This helps Microsoft
identify when a known contact sends a suspicious message, which may actually be an
impersonator standing in the shoes of that contact.
☐ Set Default ATP policy & Configure Safe Links
Before you run the PowerShell scripts to configure ATP features, be sure to define these
variables in advance:
## $AlertAddress = Who will receive notifications/redirected emails?
$AlertAddress = "securityalerts@companydomain.com"
## $RecipientDomains = Fill in the domain names that will be protected by domain impersonation:
## e.g. $RecipientDomains = "tenantname.onmicrosoft.com", "domain1.com", "domain2.com", "do
main3.com"
$RecipientDomains = "tenantname.onmicrosoft.com", "companyname.com"
## $TargetedUsersToProtect = Fill in the users who will be protected by user impersonation:
## e.g. $TargetedUsersToProtect = "Display Name 1;user1@domain.com", "Display Name 2;user2@
domain.com", "Display Name 3;user3@domain.com"
$TargetedUsersToProtect = "Alex Fields;alex@comanyname.com","Natalie Smith;natalie@company
name.com", "Jim Bryan;jim@companyname.com"
Next, configure the default ATP policy, which will enable Safe Links for client apps, and turn on
Safe Attachment scanning for SharePoint and OneDrive.
Set-AtpPolicyForO365 -EnableSafeLinksForClients $true -EnableATPForSPOTeamsODB $true -AllowC
lickThrough $false -TrackClicks $true
ITProMentor.com | The Office 365 Email Security Checklist 33Then, to configure the Safe Links policy and rule which will apply to all users:
$SafeLinksPolicyParam=@{
'Name' = "Safe Links Baseline Policy";
'AdminDisplayName' = "Safe Links Baseline Policy";
'DoNotAllowClickThrough' = $true;
'DoNotTrackUserClicks' = $false;
'EnableForInternalSender' = $true;
'ScanUrls' = $true;
'TrackClicks' = $true;
'IsEnabled' = $true
}
New-SafeLinksPolicy @SafeLinksPolicyParam
## Create the Safe Links Rule
$SafeLinksRuleParam = @{
'Name' = "Safe Links Baseline";
'SafeLinksPolicy' = "Safe Links Baseline Policy";
'RecipientDomainIs' = $RecipientDomains;
'Enabled' = $true;
'Priority' = 0
}
New-SafeLinksRule @SafeLinksRuleParam
Review the same from Threat Management > Policy > Safe Links.
ITProMentor.com | The Office 365 Email Security Checklist 34☐ Configure Safe Attachments
Now to setup Safe Attachments policy and rule:
## Create the SafeAttachments policy
## Action options = Block | Replace | Allow | DynamicDelivery
$SafeAttachmentPolicyParam=@{
'Name' = "Safe Attachments Baseline Policy";
'AdminDisplayName' = "Safe Attachments Baseline Policy";
'Action' = "Block";
'ActionOnError' = $true;
'Enable' = $true;
'Redirect' = $false;
}
New-SafeAttachmentPolicy @SafeAttachmentPolicyParam
## Create the SafeAttachments rule
$SafeAttachRuleParam=@{
'Name' = "Safe Attachments Baseline";
'SafeAttachmentPolicy' = "Safe Attachments Baseline Policy";
'RecipientDomainIs' = $RecipientDomains;
'Enabled' = $true;
'Priority' = 0
}
New-SafeAttachmentRule @SafeAttachRuleParam
Review the same from Threat Management > Policy > Safe Attachments.
ITProMentor.com | The Office 365 Email Security Checklist 35☐ Configure Anti-Phish policy
And last, configure the Anti-Phish policy and rule as follows:
## Create the Anti-Phish policy
$PhishPolicyParam=@{
'Name' = "Anti-Phish Baseline Policy";
'AdminDisplayName' = "Anti-Phish Baseline Policy";
'AuthenticationFailAction' = 'Quarantine';
'EnableAntispoofEnforcement' = $true;
'EnableAuthenticationSafetyTip' = $true;
'EnableAuthenticationSoftPassSafetyTip' = $true;
'Enabled' = $true;
'EnableMailboxIntelligence' = $true;
'EnableOrganizationDomainsProtection' = $true;
'EnableSimilarDomainsSafetyTips' = $true;
'EnableSimilarUsersSafetyTips' = $true;
'EnableTargetedDomainsProtection' = $false;
'EnableTargetedUserProtection' = $true;
'TargetedUsersToProtect' = $TargetedUsersToProtect;
'EnableUnusualCharactersSafetyTips' = $true;
'PhishThresholdLevel' = 1;
'TargetedDomainProtectionAction' = 'Quarantine';
'TargetedUserProtectionAction' = 'Quarantine';
'TreatSoftPassAsAuthenticated' = $true
}
New-AntiPhishPolicy @PhishPolicyParam
## Create the Anti-Phish rule
ITProMentor.com | The Office 365 Email Security Checklist 36$PhishRuleParam = @{
'Name' = "Anti-Phish Baseline";
'AntiPhishPolicy' = "Anti-Phish Baseline Policy";
'RecipientDomainis' = $RecipientDomains;
'Enabled' = $true;
'Priority' = 0
}
New-AntiPhishRule @PhishRuleParam
Review from Threat management > Policy > Anti-phishing.
☐ Protect mailboxes with a Retention policy or Litigation hold
Secure Score impact:
- None
You will need an Enterprise plan such as E3 or E5, or any Microsoft 365 plan, to gain access to
features like litigation hold and retention policies. But they are critical (so you should really
consider one of these plans). When you enable either litigation hold or a retention policy, it
means that email data will be preserved in the background, even if a user or attacker deletes
items from a mailbox (and they often do in an attempt to cover their tracks).
Therefore, retention policies or litigation hold can be used to protect mailbox data against
accidental or nefarious deletion activities. Even deleting entire user accounts will leave the
mailbox itself preserved, in an offline state, so that you could recover it later as needed. Use
PowerShell to see the “SoftDeletedMailbox” list.
ITProMentor.com | The Office 365 Email Security Checklist 37☐ Option #1: Create a Retention Policy
This is the preferred option since you can specify precisely how long to preserve data (consult
with your attorney if you need guidance on just how long is necessary). From Security &
Compliance center under Data governance, pick Retention. Simply choose Create. You will start
by giving it a name and proceeding.
Now, you can begin to build your new policy. Notice, for example, that while you can set up
to retain, retain and delete, or to just delete content older than a certain time frame. Be sure
you understand your own organization’s requirements before implementing your options.
By way of example only, we will build an example policy that retains content for five years from
the date it was last modified, then deletes it thereafter. Keep in mind that your own
circumstances could require a completely different policy.
ITProMentor.com | The Office 365 Email Security Checklist 38Next you can choose specific locations to which this policy applies—notice that it can be
configured against just one or across many of the services within Office 365. Select at least
Exchange email.
Finally, review the policy settings one more time before you Create this policy.
ITProMentor.com | The Office 365 Email Security Checklist 39I like this option because you don’t have to enable it for every individual mailbox, you can
simply apply a blanket policy to all Exchange email data, just like that.
☐ Option #2: Enable Litigation hold
Another option that you have with these plans to enable litigation hold. Also known as legal
hold, this feature will preserve mailbox data indefinitely (or until you remove the hold). Be sure
to incorporate enabling this feature into your mailbox provisioning process if you choose to go
this route.
In PowerShell we can accomplish the task quickly for all mailboxes as follows:
Get-Mailbox | Set-Mailbox -LitigationHoldEnabled $true
In the Exchange admin center, select any recipient mailbox to see the same option under
mailbox features:
ITProMentor.com | The Office 365 Email Security Checklist 40☐ Configure Mobile device policies
Secure Score impact:
- Activate mobile device management services (Not Scored)
- Varies depending on method selected (Office 365 vs. Intune)
We will cover briefly the various methods for enforcing policies against mobile devices
accessing Office 365.
1. Method #1: Exchange ActiveSync - Exchange Online allows you to enforce controls
against mobile devices using built-in Exchange ActiveSync policies (a.k.a. Mobile Device
Mailbox policies).
2. Method #2: Mobile Device Management in Office 365 (MDM) - Technically there is a
“free” version of MDM built-in to most Office 365 plans. However, there isn’t much
more to them than what you can already achieve with Exchange ActiveSync.
3. Method #3: Device Management using Intune (MDM) – Intune offers a full featured
MDM solution. Note that Intune also manages Windows and MacOS.
4. Method #4: Application Management using Intune (MAM) – An alternative to MDM is
MAM, where you assert controls against the applications rather than the device. This is
available with an Intune subscription.
☐ Method #1: Exchange ActiveSync
Secure Score impact:
- None (yet you can get most of the same benefits as MDM solutions)
ITProMentor.com | The Office 365 Email Security Checklist 41The real benefit of using this method to enforce mobile device policies is that you can do it
natively in Exchange Online without any additional licensing. The limitations of this solution are
that the policies do not support Conditional access, and only apply to mobile devices, whereas
Intune supports Conditional access, and you can use it to manage all platforms, including iOS,
Android, Windows and Mac.
From PowerShell, run the following script to setup a basic mobile device mailbox policy:
## Creates a baseline mobile device mailbox policy
$MobileDeviceParams= @{
'Name' = "Baseline Mobile Device Policy";
'PasswordEnabled' = $true;
'AllowSimplePassword' = $false;
'PasswordRecoveryEnabled' = $true;
'MinPasswordLength' = "4";
'MaxPasswordFailedAttempts' = "15";
'AllowExternalDeviceManagement' = $true;
'AllowNonProvisionableDevices' = $false;
'RequireDeviceEncryption' = $true;
'MaxInactivityTimeLock' = "00:05:00";
'IsDefault' = $true
}
New-MobileDeviceMailboxPolicy @MobileDeviceParams
☐ Method #2: Mobile Device Management in Office 365 (MDM)
Secure Score impact:
- Activate mobile device management services (+20)
- Several smaller actions scored between 1-5 points each, e.g. Require mobile devices to use a
password, Require mobile devices to use encryption, etc. (~25 points)
Office 365 has built-in Mobile Device Management using a “lite” implementation of Intune (but
you cannot get to an “Intune portal view” of these configurations. They are only accessible in
the 365 admin center.
The benefit to this method is that it is free with most Office 365 bundles, and it gives you
slightly more control than Exchange Active Sync policies since you can require a managed email
profile (read: Conditional access) and selective wipe (wipe only the corporate data). The
drawbacks are that it only supports a basic policy set (not as robust as Intune) and only on
mobile devices (iOS and Android).
Note: I always recommend Intune over this method for full MDM. I would recommend EAS over
this method for a “free” mobile device policy option. Nevertheless, we’ll cover it quickly.
ITProMentor.com | The Office 365 Email Security Checklist 42Access Device security policies from the Security Center or Security & Compliance center.
Use the link to View the list of managed devices. This takes you to the Device actions page in
the Microsoft 365 admin center. On this page you should first of all setup your APNS Certificate
for iOS…
Just step through the wizard to download your certificate request, go upload it at apple.com,
and then download the resulting certificate from Apple and upload it back to Office 365.
ITProMentor.com | The Office 365 Email Security Checklist 43Once you are done return to the device policies page and click Create a policy.
Just follow along in the wizard to create your policy, be sure to select the option for a managed
email profile if you want the “selective” wipe feature (wipe only corporate data).
ITProMentor.com | The Office 365 Email Security Checklist 44Once your policy is deployed to a group of users, they will need to download the Company
portal app in order to enroll their devices and become managed.
Warning: there are a lot of screens involved in getting through the enrollment process. I won’t
go through them all, just know that it can be a while.
☐ Method #3: Device Management using Intune (MDM)
Secure Score impact:
- Enable Microsoft Intune Mobile Device Management (+20)
- Compliance policies (+10 per device platform)
- Configuration profiles (+10 per device platform)
Using Intune, you can pick how you want to secure mobile devices—manage them either at the
device level, or at the application level. This section describes managing devices. Typical for
corporate owned devices.
ITProMentor.com | The Office 365 Email Security Checklist 45Although Intune is an add-on to standard Office 365 plans, it is included with Enterprise
Mobility + Security, as well as all Microsoft 365 bundles. The benefit to this product is the vast
menu of configuration options available to you, as well as the ability to visualize and manage
complaint and non-compliant devices easily in the portal.
To configure MDM, you must complete these five steps:
1. Configure iOS enrollment certificate
2. Create Device compliance policies
3. Create Device configuration profiles
4. Create Conditional Access policies
5. Enroll devices
1. Configure iOS enrollment certificate
From the Device management portal, go to Device enrollment > Apple enrollment > Apple MDM Push
certificate.
Simply follow the process laid out on this page—basically you just need to download the CSR (Certificate
Signing Request) from Microsoft, then hop over to the Apple portal, logging in with an Apple ID that is
registered to an admin account at your organization. If you need to register a corporate email account
with Apple and create a new ID, see this article from Apple.
ITProMentor.com | The Office 365 Email Security Checklist 46You can also read