MONICON XL ACTIVE STUDIO MONITOR CONTROLLER - PMONICONXL - USER S MANUAL BEDIENUNGSANLEITUNG MANUEL D UTILISATION MANUAL DE USUARIO INSTRUKCJA ...
←
→
Page content transcription
If your browser does not render page correctly, please read the page content below

USER´S MANUAL
BEDIENUNGSANLEITUNG
MANUEL D´UTILISATION
MANUAL DE USUARIO
INSTRUKCJA OBSŁUGI
MANUALE D´USO

MONICON XL
ACTIVE STUDIO MONITOR CONTROLLER
PMONICONXL
CONTENTS / INHALTSVERZEICHNIS / CONTENU / CONTENIDO /
TREŚĆ / CONTENUTO

ENGLISH                               ESPAÑOL
SAFETY INFORMATION               3    MEDIDAS DE SEGURIDAD                    36
INTRODUCTION                     5    INTRODUCCIÓN                            38
CABLING AND SETUP                5    CABLEADO Y PUESTA EN SERVICIO           38
CABLING EXAMPLE                  6    EJEMPLO DE CABLEADO                     39
INDIVIDUAL SETTINGS              11   CONFIGURACIÓN INDIVIDUAL                44
TECHNICAL SPECIFICATIONS         12   DATOS TÉCNICOS                          45
MANUFACTURER’S DECLARATIONS      13   DECLARACIONES DEL FABRICANTE            46

DEUTSCH                               POLSKI
SICHERHEITSHINWEISE              14   ŚRODKI OSTROŻNOŚCI                      47
EINFÜHRUNG                       16   WPROWADZENIE                            49
VERKABELUNG UND INBETRIEBNAHME   16   OKABLOWANIE I ROZPOCZĘCIE UŻYTKOWANIA   49
VERKABELUNGSBEISPIEL             17   PRZYKŁADOWE OKABLOWANIE                 50
INDIVIDUELLE EINSTELLUNGEN       22   USTAWIENIA INDYWIDUALNE                 55
TECHNISCHE DATEN                 23   DANE TECHNICZNE                         56
HERSTELLERERKLÄRUNGEN            24   OŚWIADCZENIA PRODUCENTA                 57

FRANCAIS                              ITALIANO
MESURES PRÉVENTIVES              25   MISURE PRECAUZIONALI                    58
INTRODUCTION                     27   INTRODUZIONE                            60
CÂBLAGE ET MISE EN SERVICE       27   CABLAGGIO E MESSA IN FUNZIONE           60
EXEMPLE DE CÂBLAGE               28   ESEMPIO DI CABLAGGIO                    61
RÉGLAGES INDIVIDUELS             33   IMPOSTAZIONI INDIVIDUALI                66
CARACTÉRISTIQUES TECHNIQUES      34   DATI TECNICI                            67
DÉCLARATIONS DU FABRICANT        35   DICHIARAZIONI DEL PRODUTTORE            68
ENGLISH
YOU‘VE MADE THE RIGHT CHOICE!

                                                                                                                     ENGLISH
We have designed this product to operate reliably over many years. Palmer® stands for this with its name
and many years of experience as a manufacturer of high-quality audio products. Please read this User‘s
Manual carefully, so that you can begin making optimum use of your Palmer® product quickly.
You can find more information about Palmer® at our Internet site www.palmer-germany.com.

SAFETY INFORMATION
1. Please read these instructions carefully.
2. Keep all information and instructions in a safe place.
3. Follow the instructions.

                                                                                                                     DEUTSCH
4. Observe all safety warnings. Never remove safety warnings or other information from the equipment.
5. Use the equipment only in the intended manner and for the intended purpose.
6. Use only sufficiently stable and compatible stands and/or mounts (for fixed installations). Make certain
that wall mounts are properly installed and secured. Make certain that the equipment is installed securely
and cannot fall down.
7. During installation, observ e the applicable safety regulations for your country.
8. Never install and operate the equipment near radiators, heat registers, ovens or other sources of heat.
Make certain that the equipment is always installed so that is cooled sufficiently and cannot overheat.
9. Never place sources of ignition, e.g., burning candles, on the equipment.

                                                                                                                     FRANCAIS
10. Ventilation slits must not be blocked.
11. Keep a minimum distance of 20 cm around and above the device.
12. Do not use this equipment in the immediate vicinity of water (does not apply to special outdoor
equipment - in this case, observe the special instructions noted below. Do not expose this equipment to
flammable materials, fluids or gases. Avoid direct sunlight!
13. Make certain that dripping or splashed water cannot enter the equipment. Do not place containers
filled with liquids, such as vases or drinking vessels, on the equipment.
14. Make certain that objects cannot fall into the device.
15. Use this equipment only with the accessories recommended and intended by the manufacturer.
16. Do not open or modify this equipment.

                                                                                                                     ESPAÑOL
17. After connecting the equipment, check all cables in order to prevent damage or accidents, e.g.,
due to tripping hazards.
18. During transport, make certain that the equipment cannot fall down and possibly cause property
damage and personal injuries.
19. If your equipment is no longer functioning properly, if fluids or objects have gotten inside the equipment
or if it has been damaged in anot her way, switch it off immediately and unplug it from the mains outlet
(if it is a powered device). This equipment may only be repaired by authorized, qualified personnel.
20. Clean the equipment using a dry cloth.
21. Comply with all applicable disposal laws in your country. During disposal of packaging, please separate
plastic and paper/cardboard.

                                                                                                                     POLSKI
22. Plastic bags must be kept out of reach of children.
23. Please note that changes or modifications not expressly approved by the party responsible for compliance
could void the user´s authority to operate the equipment.

FOR EQUIPMENT THAT CONNECTS TO THE POWER MAINS
24. CAUTION: If the power cord of the device is equipped with an earthing contact, then it must be
connected to an outlet with a protective ground. Never deactivate the protective ground of a power cord.
25. If the equipment has been exposed to strong fluctuations in temperature (for example, after transport),
do not switch it on immediately. Moisture and condensation could damage the equipment. Do not switch
                                                                                                                     ITALIANO

on the equipment until it has reached room temperature.
26. Before connecting the equipment to the power outlet, first verify that the mains voltage and frequency
match the values specified on the equipment. If the equipment has a voltage selection switch, connect
the equipment to the power outlet only if the equipment values and the mains power values match. If the
included power cord or power adapter does not fit in your wall outlet, contact your electrician.
27. Do not step on the power cord. Make certain that the power cable does not become kinked, especially
at the mains outlet and/or power adapter and the equipment connector.
28. When connecting the equipment, make certain that the power cord or power adapter is always freely
accessible. Always disconnect the equipment from the power supply if the equipment is not in use or if you
want to clean the equipment. Always unplug the power cord and power adapter from the power outlet at
the plug or adapter and not by pulling on the cord. Never touch the power cord and power adapter with
wet hands.
29. Whenever possible, avoid switching the equipment on and off in quick succession because otherwise
this can shorten the useful life of the equipment.

                                                                                                                 3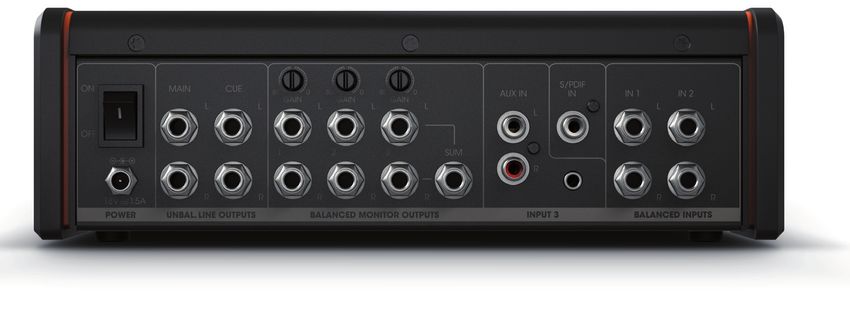
30. IMPORTANT INFORMATION: Replace fuses only with fuses of the same type and rating. If a fuse blows
           repeatedly, please contact an authorised service centre.
           31. To disconnect the equipment from the power mains completely, unplug the power cord or power
ENGLISH

           adapter from the power outlet.
           32. If your device is equipped with a Volex power connector, the mating Volex equipment connector
           must be unlocked before it can be removed. However, this also means that the equipment can slide and
           fall down if the power cable is pulled, which can lead to personal injuries and/or other damage. For this
           reason, always be careful when laying cables.
           33. Unplug the power cord and power adapter from the power outlet if there is a risk of a lightning strike or
           before extended periods of disuse.
           34. The appliance is not to be used by persons (including children) with reduced physical, sensory or mental
           capabilities, or lack of experience and knowledge.
DEUTSCH

           35. Children must be instructed not to play with the device.
           36. If the power cord of the device is damaged, do not use the device. The power cord must be replaced
           by an adequate cable or assembly from an authorized service center.

                                            CAUTION:
                                            To reduce the risk of electric shock, do not remove cover (or back). There
                                            are no user serviceable parts inside. Maintenance and repairs should be
                                            exclusively carried out by qualified service personnel.
FRANCAIS

                     The warning triangle with lightning symbol indicates dangerous uninsulated voltage inside the
                     unit, which may cause an electrical shock.

                     The warning triangle with exclamation mark indicates important operating and maintenance
                     instructions.

                      Warning! This device is designed for use below 2000 metres in altitude.
ESPAÑOL

                      Warning! This product is not intended for use in tropical climates.
POLSKI
ITALIANO

           4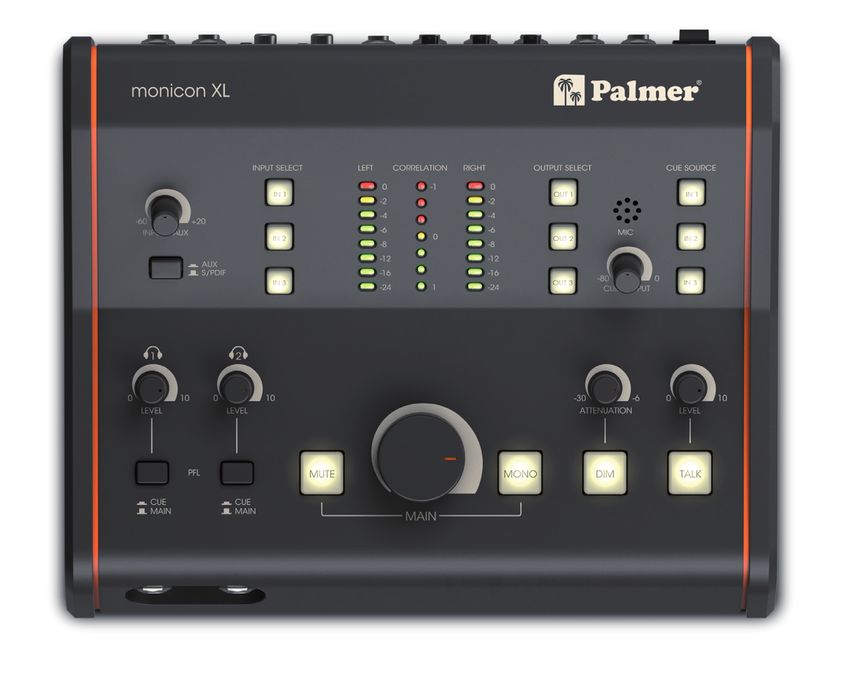
INTRODUCTION
The Palmer Monicon XL is the perfect tool for controlling multiple audio sources and studio speakers thanks

                                                                                                                     ENGLISH
to its ergonomic console layout. It features three analog stereo inputs, an S/PDIF input, and outputs for
three pairs of monitors with individual volume controls that allow for level adjustment. There is also a mono
output for a special mono speaker or subwoofer. The inputs and outputs can be conveniently controlled
using illuminated buttons. A correlation display provides visual information about the mono compatibility of
your stereo mixes. Certain functions can be adjusted and their settings saved to help you work the way you
want.

Additional features:

                                                                                                                     DEUTSCH
• Latency-free and no sound coloration, thanks to analog signal routing
• Two separately controllable headphone outputs with selector switch for main or cue signal
• Integrated talk-back microphone with illuminated button and adjustable dimming function
• Mono button, mute function, and large main volume control

Scope of delivery:
External power supply, user manual

                                                                                                                     FRANCAIS
CABLING AND SETUP
Before putting the device into operation, make sure to observe the technical data for all components, such
as the maximum output level of player devices and the maximum input level of the monitor controller and
monitors! In case of uncertainty, consult an experienced studio technician. Use high-quality and, if possible,
balanced cables for cabling. In the following, you will find information about cabling and putting the mon-
itor controller into operation with active studio monitors. The procedure can also be applied to the cabling
and setting up with a power amp and passive studio monitors.

                                                                                                                     ESPAÑOL
• Before you begin installing the cables, turn off any devices that you want to connect to the monitor con-
troller and set the volume of all devices to minimum.
• After installing the cables, turn on the connected monitors and headphone amplifiers as the last devices.
• Start playback on the desired player device and activate the appropriate input (INPUT SELECT IN 1 to IN
3). Then check the input signal using the 8-segment LEFT and RIGHT level indicators. If necessary, adjust the
display to the input signal level (for description, see point 16).
• Make sure that the controller’s MUTE, DIM, and TALK functions are not activated.
• Now activate the monitor output (OUTPUT SELECT OUT 1 to OUT 3) to which your monitors are connected

                                                                                                                     POLSKI
and turn the corresponding GAIN control above the output all the way clockwise (maximum).
• Set the MAIN volume control to the 12 o’clock position and carefully increase the volume of the monitors
to the desired monitoring volume, making sure that the monitors are equally loud. Repeat these same steps
to adjust a subwoofer’s volume to the volume of the monitors.
• Keep the levels of various player devices and pairs of monitors at the same level to avoid sudden jumps in
volume when switching signal sources and monitor outputs.
                                                                                                                     ITALIANO

                                                                                                                 5
CABLING EXAMPLE
ENGLISH
DEUTSCH

               Left Monitor                                                                           Right Monitor
FRANCAIS

                   VOLUME            HEADPHONES
ESPAÑOL

               1            21                2

                      Headphone                           Subwoofer
                         Amp
POLSKI
ITALIANO

                                                  BALANCED LINE OUTPUT   VOLUME   USB

                                                     LR

                                 CD Player             Audio Interface                  Digital Audio Workstation

           6
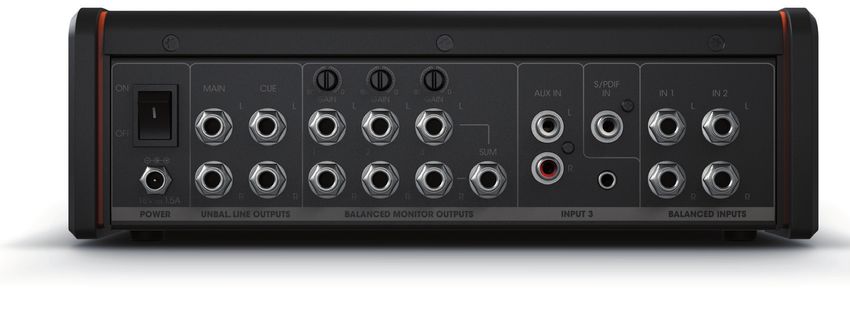
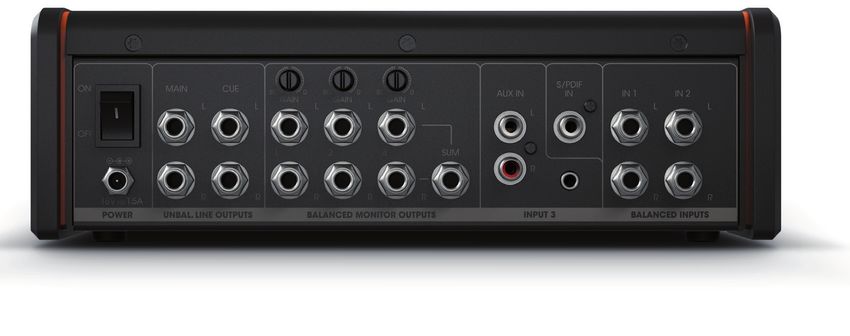
CONNECTIONS, CONTROL, AND DISPLAY ELEMENTS

                                                                                                                           ENGLISH
                                                                                                 3

                2

                                                                                                                           DEUTSCH
            1
                                                                               4

                          6                        5

1 POWER
Low-voltage socket to supply power to the device. Please use only the provided power adapter. The

                                                                                                                           FRANCAIS
strain relief fitting is located next to the socket. Use the strain relief for the power adapter’s flexible cable to
protect the device’s low-voltage socket and the power adapter’s low-voltage plug from damage and to
avoid pulling out the plug inadvertently.

2 POWER ON/OFF
On/off switch for the device power supply.

3 BALANCED INPUTS IN 1 & IN 2

                                                                                                                           ESPAÑOL
Balanced stereo line inputs with 0.25 inch jack sockets (IN 1 L+R, IN 2 L+R).

4 INPUT 3
Unbalanced stereo line input with L + R cinch sockets, one 0.14 inch stereo jack socket and one coaxial
S/PDIF input. The analog cinch inputs and 0.14 inch jack socket can be used at the same time. In this case,
the volume balance must be set on the respective player devices. The digital S/PDIF input can also be
used. The control panel on the top of the device is used for analog and digital signal source switching and
the level adjustment for IN 3 AUX.

                                                                                                                           POLSKI
5 BALANCED MONITOR OUTPUTS 1 - 2 - 3
Balanced outputs for connecting active studio monitors and power amps with passive studio monitors. All
three outputs are equipped with 0.25 inch TRS jack sockets. In addition to the two L and R sockets, Output
3 provides a mono-summed SUM output for connecting an additional monitor with mono signal or a sub-
woofer. If necessary, the output level can be configured separately for all three outputs on the correspond-
ing GAIN controller and thus adapted to the connected monitor system.
                                                                                                                           ITALIANO

6 UNBAL. LINE OUTPUTS MAIN - CUE
Unbalanced outputs with 0.25 inch jack sockets
MAIN L/R - connection available for external recording device, such as a tape recorder or a digital stereo
recorder. The signal which is selected as the input signal on the control panel for INPUT SELECT (IN 1 to IN
3) is output. The signal is tapped before the MAIN volume control. It therefore functions independently of it
and is not influenced by the MUTE, MONO, DIM, and TALK functions.
CUE L/R - connection available for an external headphone amplifier. The signal which is selected as the
signal source on the control panel for CUE SOURCE (IN 1 to IN 3) is output. Adjust the signal volume with the
CUE OUTPUT volume control on the control panel. The signal is not influenced by the MUTE, MONO and DIM
functions, while the TALK function retains its full scope of features.

                                                                                                                       7
ENGLISH

                                               7          16     17     16          10             11
                                8                                                             19
DEUTSCH

                            9

                                                                                              12
FRANCAIS

                                                   15                          14        20        18
                                                                 13

                                    21
ESPAÑOL
POLSKI

           7 INPUT SELECT IN 1 - IN 2 - IN 3
           Buttons for selecting and activating the signal sources Line input IN 1 to IN 3 on the back of the device
           (No. 3 and No. 4). The button corresponding to the active line input illuminates. You can choose between
           two modes of operation when selecting the signal source.
           Mode of operation A: All signal sources can be selected and activated at the same time (factory default).
           Before changing the setting, switch off all connected monitors and headphone amplifiers. To select the
ITALIANO

           mode of operation A “Multi mode,” switch off the monitor controller, press the IN 1 button on INPUT SELECT,
           and hold down the button until the monitor controller has been switched on again.
           Mode of operation B: A single signal source can be freely selected and activated. The previously activated
           signal source will be deactivated upon selecting another signal source. To select the mode of operation B
           “Individual mode,” switch off the monitor controller, press the IN 2 button on INPUT SELECT, and hold down
           the button until the monitor controller has been switched on again.

           8 INPUT 3 AUX
           Level control to adjust the volume of the INPUT 3 AUX line input.

           9 AUX / S/PDIF
           Switch for selecting INPUT 3’s analog or digital input source. In the switched-down position, the L/R analog
           cinch input or 0.14 inch stereo jack input is activated; when not switched down, the SPDIF IN digital coaxial
           connector is activated.

           8
10 OUTPUT SELECT OUT 1 - OUT 2 - OUT 3
Buttons for selecting OUT 1 to OUT 3 line outputs on the back of the device (No. 5). The button corre-

                                                                                                                   ENGLISH
sponding to the active line output illuminates. You can choose between three modes of operation when
selecting the line outputs.
Mode of operation A: All line outputs can be selected and activated at the same time (factory default).
Before changing the setting, switch off all connected monitors and headphone amplifiers. To select the
mode of operation A “Multi mode,” switch off the monitor controller, press the OUT 1 button on OUTPUT
SELECT, and hold down the button until the monitor
controller has been switched on again.
Mode of operation B: A single line output can be freely selected and activated. The previously activated
line output will be deactivated upon selecting another line output. To select the mode of operation B “In-

                                                                                                                   DEUTSCH
dividual mode,” switch off the monitor controller, press the OUT 2 button on OUTPUT SELECT, and hold down
the button until the monitor controller has been switched on again.
Mode of operation C: Line output OUT 3 can be switched on or off
independently of OUT 1 and OUT 2. OUT 1 and OUT 2 can be selectively activated, but not both at the
same time. The previously activated line output will be deactivated upon selecting the corresponding line
output. To select the mode of operation C “Combined mode,” switch off the monitor controller, press the
OUT 3 button on OUTPUT SELECT, and hold down the button until the monitor controller has been switched
on again.

                                                                                                                   FRANCAIS
11 CUE SOURCE IN 1 - IN 2 - IN 3
Illuminated buttons for selecting the IN 1 to IN 3 signal source for the CUE L/R line output. The button
corresponding to the active line input illuminates.

12 CUE OUTPUT
Volume control for the CUE line output (UNBAL. LINE OUTPUTS CUE).

                                                                                                                   ESPAÑOL
13 MAIN
Volume control for the balanced line outputs BALANCED MONITOR OUTPUTS 1 to 3. Keep the levels of
various signal sources at a similar level to avoid sudden jumps in volume when switching signal sources.

14 MONO
Push the MONO button in order to monitor the output signals of the line outputs BALANCED MONITOR
OUTPUTS 1 to 3 and the headphone outputs 1 and 2 (MAIN signal) in mono. It is easy to control how a mix
sounds in mono because many clubs and bars use sound systems in mono mode. It is also always advisable
to listen to a stereo mix in mono because it will allow you to better identify problems with the phasing and

                                                                                                                   POLSKI
to also rectify them.
The MONO function does not affect CUE channel’s signal.
The modes of operation for the MUTE, TALK, INPUT SELECT and OUTPUT SELECT buttons can be reset to
the factory default by switching off the monitor controller, pressing MONO, and holding it down until the
monitor controller has been switched back on again. Before changing the setting, switch off all connected
monitors and headphone amplifiers.                                                                                 ITALIANO

15 MUTE
Mute function for the output signals of the line outputs BALANCED MONITOR OUTPUTS 1 to 3 and the head-
phone outputs 1 and 2 (MAIN signal). The mute function does not affect CUE channel’s signal.
You can choose between two modes of operation for the MUTE function.
Mode of operation A (factory default): “latching” (switch): Push the MUTE button once to activate the
function and briefly again to deactivate the function. The MUTE button illuminates when the mute function
is activated.
Mode of operation B: “momentary” (button): The MUTE function is only active as long as the MUTE button
is pressed. The function automatically deactivates upon releasing the button. The MUTE button illuminates
when the MUTE function is activated.
Before changing the setting, switch off all connected monitors and headphone amplifiers.
To select the mode of operation B, switch off the monitor controller, press the MUTE button, and hold it
down until the monitor controller has been switched on again.

                                                                                                               9
16 LEFT / RIGHT
            8-segment LED level indicators for the left and right channel of the adjacent audio signal; tapping occurs
ENGLISH

            before the MAIN volume control. To improve control, the display can be adjusted to the input signal’s signal
            level in three stages.
            Example: The level indicator’s red LED 0 illuminates when the level indicator is set to +10 dBu and the input
            has a signal of +10 dBu.
            +18 dBu is the default setting. Before changing the setting, switch off all connected monitors and head-
            phone amplifiers.
            +4 dBu - If none of the connected player devices exceeds the maximum output level of +4 dBu, select the
            setting +4 dBu. Switch off the monitor controller, press the CUE SOURCE IN 1 button, and hold it down until
DEUTSCH

            the monitor controller has been switched on again.
            +10 dBu - If none of the connected player devices exceeds the maximum output level of +10 dBu, select
            the setting +10 dBu. Switch off the monitor controller, press the CUE SOURCE IN 2 button, and hold it down
            until the monitor controller has been switched on again.
            +18 dBu - If none of the connected player devices exceeds the maximum output level of +18 dBu, select
            the setting +18 dBu. Switch off the monitor controller, press the CUE SOURCE IN 3 button, and hold it down
            until the monitor controller has been switched on again.
            The monitor controller’s maximum input level is +20 dBu. If the input level goes above this level,
            it overmodulates the input and distorts the signal. If one of the connected player devices exceeds the
FRANCAIS

            maximum output level of +20 dBU, the output level of the respective player device must be restricted to a
            maximum level of +20 dBu.

            17 CORRELATION
            Check the stereo audio signal’s mono compatibility. Since many clubs and bars operate sound systems
            in mono, and since, for example, a sound production on the radio should also be played back in good
            quality on simple mono devices, the mono compatibility of the sound production is extremely important.
            For a stereo signal’s mono playback, the left and right channel are blended to form a mono signal (mono
ESPAÑOL

            sum). If a sound in the stereo mix is not played back on both channels in phase, it may be distorted or
            even completely cancelled out during mono playback. In extreme cases, the entire audio signal can be
            cancelled out altogether (silence).
            When reproducing a stereo signal in the mix, ensure that only up to three of the bottom green LEDs of the
            7-segment CORRELATION display illuminate, and that none of the top three LEDs illuminate (the more red
            LEDs illuminate, the worse the mono compatibility). The bottom green LED and middle yellow LED illuminate
            permanently, even if there is no signal.

            18 TALK LEVEL
POLSKI

            Press the TALK button to activate the integrated talk-back microphone and to easily communicate with
            musicians and voice artists using the CUE monitoring channel and the headphone outputs on the front
            of the device (respective switch in the CUE position). The volume of the talk-back microphone can be
            controlled with the LEVEL level control above the TALK button. Carefully increase the volume until the
            connected headphones are at a pleasant level and so that no feedback can happen. Upon activating
            the talk-back microphone, the CUE SOURCE IN 1 to IN 3 audio signal on the CUE channel and headphone
            outputs on the front of the device (respective switch in the CUE position) will automatically be lowered by
            a fixed amount. The audio signal on the BALANCED MONITOR OUTPUTS 1 to 3 line outputs is simultaneously
            lowered by the value set on the ATTENUATION control.
ITALIANO

            You can choose between two modes of operation for the TALK function.
            Mode of operation A (factory default): “latching” (switch): Press the TALK button once to activate the func-
            tion and then press it again briefly to deactivate the function. The TALK and DIM buttons illuminate when
            the TALK function is activated.
            Mode of operation B: “momentary” (button): The TALK function is only active as long as the TALK button
            is pressed. The function automatically deactivates upon releasing the button. The TALK and DIM buttons
            illuminate when the TALK function is activated.
            Before changing the setting, switch off all connected monitors and headphone amplifiers.
            To select the mode of operation B, switch off the monitor controller, press the TALK button, and hold it down
            until the monitor controller has been switched on again.

            19 TALK-BACK MICROPHONE
            Microphone used for communicating with musicians and voice artists via the CUE monitoring channel and
            headphone outlets on the front of the device.
           10
20 DIM ATTENUATION
ENGLISH
The DIM function allows you to lower the output signals of the BALANCED MONITOR OUTPUTS 1 to 3 line
outputs and the 1 and 2 (MAIN signal) headphone outputs by the value set on the ATTENUATION control,
without affecting the CUE signals. For example, you can have a conversation in the control room at a
low volume without disturbing an ongoing recording. Press the DIM button once to activate the function
and then press it again briefly to deactivate the function. The button illuminates when the DIM function is
activated.
21 HEADPHONE OUTPUTS 1 AND 2
DEUTSCH
Headphone outputs with 0.25 inch jack sockets. Use the CUE/MAIN switch on the desired headphone
output (switched-down position = CUE signal, not in the switched-down position = MAIN signal) to select
the signal source and adjust the volume using the corresponding LEVEL level control. To prevent damage to
equipment as well as hearing damage, turn down the volume to minimum before connecting and putting
on headphones, and then only gently raise the volume, keeping the levels of the various signal sources at a
similar level to avoid sudden jumps in volume when switching sources. The signals are each tapped before
the CUE and MAIN volume controls (PFL).
PIN ASSIGNMENT
FRANCAIS
Balanced jack Unbalanced jack Headphone jack Cinch socket
+ - GND + - / GND L R GND + - / GND
ESPAÑOL
INDIVIDUAL SETTINGS
Certain functions can be adjusted and their settings saved (see table below) to help you work the way you
want. Information about this is also printed in English on the bottom of the device.
Hold down button while switching Mode of operation for corresponding display and operating controls:
on Monicon XL
CUE SOURCE “IN 1” Adjustment of the LEFT/RIGHT level indicator: Maximum display
“0 dB” (red LED) corresponds to +4 dBu input signal level
POLSKI
CUE SOURCE “IN 2” Adjustment of the LEFT/RIGHT level indicator: Maximum display
“0 dB” (red LED) corresponds to +10 dBu input signal level
CUE SOURCE “IN 3” Adjustment of the LEFT/RIGHT level indicator: Maximum display
“0 dB” (red LED) corresponds to +18 dBu input signal level
INPUT SELECT “IN 1” Multi mode: All INPUT SELECT inputs can be activated at the same time
INPUT SELECT “IN 2” Individual mode: Only one INPUT SELECT input can be activated at
a time
ITALIANO
OUTPUT SELECT “OUT 1” Multi mode: All OUTPUT SELECT outputs can be activated at the
same time
OUTPUT SELECT “OUT 2” Individual mode: Only one OUTPUT SELECT output
can be activated at a time
OUTPUT SELECT “OUT 3” Combined mode: OUT 3 activates and deactivates independently
OUT 1 and OUT 2 can be selectively activated
“MUTE” Switching the MUTE button’s mode of operation from switch (latch-
ing) to button (momentary)
“TALK” Switching the TALK button’s mode of operation from switch (latching)
to button (momentary)
“MONO” Reset to factory default
11TECHNICAL SPECIFICATIONS
Article number: PMONICONXL
ENGLISH
Product type: Studio Equipment
Type: Monitor Controller
Number of outputs: Three controllable and balanced stereo outputs
MONITOR OUTPUTS
One unbalanced stereo CUE output
One unbalanced stereo MAIN output
Two stereo headphone outputs (PHONES)
DEUTSCH
Output connections: 0.25 inch jack (TRS)
Maximum output level: +25 dBu (balanced), +20 dBu (unbalanced)
Maximum output power of headphones output: 75 mW @ 32 ohm
Output impedance: 600 ohm
Number of inputs: Two balanced stereo inputs
One unbalanced input (cinch + 0.14 inch jack +
S/PDIF)
FRANCAIS
Input connections: IN 1 + 2: 0.25 inch jack L+R TRS
IN 3: L+R cinch, 0.14 inch stereo jack, S/PDIF coaxial
Maximum input level: +20 dBu
Input impedance: 10 kΩ (balanced), 5 kΩ (unbalanced)
S/PDIF: DA 24 bit (44.1 kHz, 48 kHz, 96 kHz)
Frequency response: 12 Hz to 90 kHz (-1 dB)
Total harmonic distortion (THD): 0.002 % (BW 20–20,000 Hz)
ESPAÑOL
Signal-to-noise ratio (SNR): 102 dB (A-weighted) @ +4 dBu
Dynamic range (DR AES17): 115 dB
CMRR: better than 55 dB
Maximum attenuation: 111 dB (Attenuator + Mute), 86 dB (Attenuator)
Talk-back microphone: Electret capacitor microphone
Control elements: On/off switch, MAIN volume control, INPUT SELECT IN
1-2-3, OUTPUT SELECT OUT 1-2-3, CUE SOURCE IN 1-2-3,
INPUT 3 volume control, INPUT 3 AUX / SPDIF, CUE OUT-
POLSKI
PUT, PHONES 1+2 LEVEL, PHONES 1+2 MAIN/CUE, MUTE,
MONO, DIM, DIM ATTENUATION, TALK, TALK LEVEL,
MONITOR OUTPUTS OUT 1-2-3 GAIN
Display elements: Illuminated button INPUT SELECT IN 1-2-3, OUTPUT
SELECT OUT 1-2-3, CUE SOURCE IN 1-2-3, MUTE, MONO,
DIM, TALK,
8-segment LED level display with peak hold, 7-seg-
ment LED correlation display
ITALIANO
Power supply: External adapter
Operating voltage: 18 V DC, 1.5 A, + indoor
Ambient temperature (running): 32°F to 104°F
Relative humidity:MANUFACTURER´S DECLARATIONS
ENGLISH
MANUFACTURER‘S WARRANTY & LIMITATIONS OF LIABILITY
You can find our current warranty conditions and limitations of liability at: https://cdn-shop.adamhall.com/
media/pdf/MANUFACTURERS-DECLARATIONS_PALMER5bb2340e52a8c.pdf To request warranty service for a
product, please contact Adam Hall GmbH, Adam-Hall-Str. 1,
61267 Neu Anspach / Email: Info@adamhall.com / +49 (0)6081 / 9419-0.
CORRECT DISPOSAL OF THIS PRODUCT
(valid in the European Union and other European countries with a differentiated waste collection
system)
This symbol on the product, or on its documents indicates that the device may not be treated as household
DEUTSCH
waste. This is to avoid environmental damage or personal injury due to uncontrolled waste disposal. Please
dispose of this product separately from other waste and have it recycled to promote sustainable economic
activity. Household users should contact either the retailer where they purchased this product, or their local
government office, for details on where and how they can recycle this item in an environmentally friendly
manner. Business users should contact their supplier and check the terms and conditions of the purchase
contract. This product should not be mixed with other commercial waste for disposal.
FRANCAIS
ESPAÑOL
POLSKI
ITALIANO
13DEUTSCH
SIE HABEN DIE RICHTIGE WAHL GETROFFEN!
ENGLISH
Dieses Gerät wurde unter hohen Qualitätsanforderungen entwickelt und gefertigt, um viele Jahre einen
reibungslosen Betrieb zu gewährleisten. Dafür steht Palmer® mit seinem Namen und der langjährigen Erfah-
rung als Hersteller hochwertiger Audioprodukte. Bitte lesen Sie diese Bedienungsanleitung sorgfältig, damit
Sie Ihr neues Produkt von Palmer® schnell optimal einsetzen können.
Mehr Informationen zu Palmer® finden Sie auf unserer Internetseite www.palmer-germany.com.
SICHERHEITSHINWEISE
1. Lesen Sie diese Anleitung bitte sorgfältig durch.
2. Bewahren Sie alle Informationen und Anleitungen an einem sicheren Ort auf.
DEUTSCH
3. Befolgen Sie die Anweisungen.
4. Beachten Sie alle Warnhinweise. Entfernen Sie keine Sicherheitshinweise oder andere Informationen
vom Gerät.
5. Verwenden Sie das Gerät nur in der vorgesehenen Art und Weise.
6. Verwenden Sie ausschließlich stabile und passende Stative bzw. Befestigungen (bei Festinstallationen).
Stellen Sie sicher, dass Wandhalterungen ordnungsgemäß installiert und gesichert sind. Stellen Sie sicher,
dass das Gerät sicher installiert ist und nicht herunterfallen kann.
7. Beachten Sie bei der Installation die für Ihr Land geltenden Sicherheitsvorschriften.
8. Installieren und betreiben Sie das Gerät nicht in der Nähe von Heizkörpern, Wärmespeichern, Öfen oder
FRANCAIS
sonstigen Wärmequellen. Sorgen Sie dafür, dass das Gerät immer so installiert ist, dass es ausreichend
gekühlt wird und nicht überhitzen kann.
9. Platzieren Sie keine Zündquellen wie z.B. brennende Kerzen auf dem Gerät.
10. Lüftungsschlitze dürfen nicht blockiert werden.
11. Halten Sie einen Mindestabstand von 20 cm seitlich und oberhalb des Geräts ein.
12. Betreiben Sie das Gerät nicht in unmittelbarer Nähe von Wasser. Bringen Sie das Gerät nicht mit brenn-
baren Materialien, Flüssigkeiten oder Gasen in Berührung. Direkte Sonneneinstrahlung vermeiden!
13. Sorgen Sie dafür, dass kein Tropf- oder Spritzwasser in das Gerät eindringen kann. Stellen Sie keine mit
Flüssigkeit gefüllten Behältnisse wie Vasen oder Trinkgefäße auf das Gerät.
14. Sorgen Sie dafür, dass keine Gegenstände in das Gerät fallen können.
ESPAÑOL
15. Betreiben Sie das Gerät nur mit dem vom Hersteller empfohlenen und vorgesehenen Zubehör.
16. Öffnen Sie das Gerät nicht und verändern Sie es nicht.
17. Überprüfen Sie nach dem Anschluss des Geräts alle Kabelwege, um Schäden oder Unfälle, z. B. durch
Stolperfallen zu vermeiden.
18. Achten Sie beim Transport darauf, dass das Gerät nicht herunterfallen und dabei möglicherweise Sach-
und Personenschäden verursachen kann.
19. Wenn Ihr Gerät nicht mehr ordnungsgemäß funktioniert, Flüssigkeiten oder Gegenstände in das
Geräteinnere gelangt sind, oder das Gerät anderweitig beschädigt wurde, schalten Sie es sofort aus und
trennen es von der Netzsteckdose (sofern es sich um ein aktives Gerät handelt). Dieses Gerät darf nur von
autorisiertem Fachpersonal repariert werden.
POLSKI
20. Verwenden Sie zur Reinigung des Geräts ein trockenes Tuch.
21. Beachten Sie alle in Ihrem Land geltenden Entsorgungsgesetze. Trennen Sie bei der Entsorgung der
Verpackung bitte Kunststoff und Papier bzw. Kartonagen voneinander.
22. Kunststoffbeutel müssen außer Reichweite von Kindern aufbewahrt werden.
23. Sämtliche vom Benutzer vorgenommenen Änderungen und Modifikationen, denen die für die Ein-
haltung der Richtlinien verantwortliche Partei nicht ausdrücklich zugestimmt hat, können zum Entzug der
Betriebserlaubnis für das Gerät führen.
BEI GERÄTEN MIT NETZANSCHLUSS
ITALIANO
24. ACHTUNG: Wenn das Netzkabel des Geräts mit einem Schutzkontakt ausgestattet ist, muss es an einer
Steckdose mit Schutzleiter angeschlossen werden. Deaktivieren Sie niemals den Schutzleiter eines Netzkabels.
25. Schalten Sie das Gerät nicht sofort ein, wenn es starken Temperaturschwankungen ausgesetzt war (bei-
spielsweise nach dem Transport). Feuchtigkeit und Kondensat könnten das Gerät beschädigen. Schalten
Sie das Gerät erst ein, wenn es Zimmertemperatur erreicht hat.
26. Bevor Sie das Gerät an die Steckdose anschließen, prüfen Sie zuerst, ob die Spannung und die Frequenz
des Stromnetzes mit den auf dem Gerät angegebenen Werten übereinstimmen. Verfügt das Gerät über
einen Spannungswahlschalter, schließen Sie das Gerät nur an die Steckdose an, wenn die Gerätewerte
mit den Werten des Stromnetzes übereinstimmen. Wenn das mitgelieferte Netzkabel bzw. der mitgelieferte
Netzadapter nicht in Ihre Netzsteckdose passt, wenden Sie sich an Ihren Elektriker.
27. Treten Sie nicht auf das Netzkabel. Sorgen Sie dafür, dass spannungsführende Kabel speziell an der Netz-
buchse bzw. am Netzadapter und der Gerätebuchse nicht geknickt werden.
1428. Achten Sie bei der Verkabelung des Geräts immer darauf, dass das Netzkabel bzw. der Netzadapter
stets frei zugänglich ist. Trennen Sie das Gerät stets von der Stromzuführung, wenn das Gerät nicht benutzt
wird, oder Sie das Gerät reinigen möchten. Ziehen Sie Netzkabel und Netzadapter immer am Stecker bzw.
ENGLISH
am Adapter und nicht am Kabel aus der Steckdose. Berühren Sie Netzkabel und Netzadapter niemals mit
nassen Händen.
29. Schalten Sie das Gerät möglichst nicht schnell hintereinander ein und aus, da sonst die Lebensdauer des
Geräts beeinträchtigt werden könnte.
30. WICHTIGER HINWEIS: Ersetzen Sie Sicherungen ausschließlich durch Sicherungen des gleichen Typs und
Wertes. Sollte eine Sicherung wiederholt auslösen, wenden Sie sich bitte an ein autorisiertes Servicezentrum.
31. Um das Gerät vollständig vom Stromnetz zu trennen, entfernen Sie das Netzkabel bzw. den Netzadapter
aus der Steckdose.
32. Wenn Ihr Gerät mit einem verriegelbaren Netzanschluss bestückt ist, muss der passende Gerätestecker
DEUTSCH
entsperrt werden, bevor er entfernt werden kann. Das bedeutet aber auch, dass das Gerät durch ein
Ziehen am Netzkabel verrutschen und herunterfallen kann, wodurch Personen verletzt werden und/oder
andere Schäden auftreten können. Verlegen Sie Ihre Kabel daher immer sorgfältig.
33. Entfernen Sie Netzkabel und Netzadapter aus der Steckdose bei Gefahr eines Blitzschlags oder wenn Sie
das Gerät länger nicht verwenden.
34. Das Gerät darf nicht von Personen (einschließlich Kindern) mit eingeschränkten körperlichen, sensori-
schen oder geistigen Fähigkeiten oder mangelnder Erfahrung und Kenntnis benutzt werden.
35. Kinder müssen angewiesen werden, nicht mit dem Gerät zu spielen.
36. Wenn das Netzkabel des Geräts beschädigt ist, darf das Gerät nicht verwendet werden. Das Netzkabel
FRANCAIS
muss durch ein adäquates Kabel oder eine spezielle Baugruppe von einem autorisierten Service-Center
ersetzt werden.
ACHTUNG
Entfernen Sie niemals die Abdeckung, da sonst das Risiko eines elek-
trischen Schlages besteht. Im Inneren des Geräts befinden sich keine Teile,
die vom Bediener repariert oder gewartet werden können.
Lassen Sie Wartung und Reparaturen ausschließlich von qualifiziertem
Servicepersonal durchführen.
ESPAÑOL
Das gleichseitige Dreieck mit Blitzsymbol warnt vor nichtisolierten, gefährlichen Spannungen im
Geräteinneren, die einen elektrischen Schlag verursachen können.
Das gleichseitige Dreieck mit Ausrufungszeichen kennzeichnet wichtige Bedienungs- und
Wartungshinweise.
POLSKI
Warnung! Dieses Gerät ist für eine Nutzung bis zu einer Höhe von maximal 2000 Metern über dem
Meeresspiegel bestimmt.
Warnung! Dieses Gerät ist nicht für den Einsatz in tropischen Klimazonen bestimmt.
ITALIANO
ACHTUNG HOHE LAUTSTÄRKEN BEI AUDIOPRODUKTEN!
Dieses Gerät ist für den professionellen Einsatz vorgesehen. Der kommerzielle Betrieb dieses Geräts unterliegt
den jeweils gültigen nationalen Vorschriften und Richtlinien zur Unfallverhütung. Als Hersteller ist Adam Hall
gesetzlich verpflichtet, Sie ausdrücklich auf mögliche Gesundheitsrisiken hinzuweisen. Gehörschäden durch
hohe Lautstärken und Dauerbelastung: Bei der Verwendung dieses Produkts können hohe Schalldruckpe-
gel (SPL) erzeugt werden, die bei Künstlern, Mitarbeitern und Zuschauern zu irreparablen Gehörschäden
führen können. Vermeiden Sie länger anhaltende Belastung durch hohe Lautstärken über 90 dB.
15EINFÜHRUNG
Mit seinem ergonomischen Konsolenlayout ist der Palmer Monicon XL das perfekte Werkzeug zum Steuern
ENGLISH
mehrerer Audioquellen und Studiolautsprecher. Es verfügt über drei analoge Stereo-Eingänge sowie einen
S/PDIF-Eingang und Ausgänge für drei Monitorpaare mit individuellen Lautstärkereglern, um die Pegelan-
passung zu ermöglichen. Zusätzlich existiert ein Mono-Ausgang für einen speziellen Mono-Lautsprecher
oder einen Subwoofer. Ein- und Ausgänge werden komfortabel über beleuchtete Taster gesteuert. Eine
Korrelationsanzeige informiert visuell über die Mono-Kompatibilität Ihrer Stereomischungen. Um Ihre be-
vorzugte Arbeitsweise zu unterstützen, können bestimmte Funktionen angepasst und deren Einstellungen
gespeichert werden.
Zusätzliche Merkmale:
DEUTSCH
• Latenzfrei und ohne Klangverfärbung durch analoge Signalführung
• 2 separat regelbare Kopfhörerausgänge mit Wahlschalter für Main- oder Cue-Signal
• Integriertes Talkback-Mikrofon mit beleuchtetem Taster und einstellbarer Dimm-Funktion
• Mono-Taster, Mute-Funktion und großer Main-Lautstärkeregler
Lieferumfang:
FRANCAIS
Externes Netzteil, Bedienungsanleitung
VERKABELUNG UND INBETRIEBNAHME
Achten Sie vor Inbetriebnahme auf die technischen Daten aller Komponenten, wie z.B. den maximalen
Ausgangspegel der Zuspielgeräte und den maximalen Eingangspegel des Monitor-Controllers und der Mo-
nitore! Nutzen Sie im Zweifelsfall die Hilfe eines erfahrenen Studiotechnikers. Verwenden Sie bei der Verka-
belung qualitativ hochwertige und wenn möglich symmetrische Kabel. Nachfolgend wird die Verkabelung
und Inbetriebnahme des Monitor-Controllers mit aktiven Studiomonitoren beschrieben, die Vorgehensweise
ESPAÑOL
kann aber auf die Verkabelung und Inbetriebnahme mit einer Endstufe und passiven Studiomonitoren
übertragen werden.
• Bevor Sie mit der Verkabelung beginnen, schalten Sie alle Geräte aus, die mit dem Monitor-Controller
verkabelt werden sollen und stellen die Lautstärke aller Geräte auf Minimum.
• Schalten Sie nach der Verkabelung die angeschlossenen Monitore und Kopfhörerverstärker als letzte
Geräte ein.
• Starten Sie die Wiedergabe des gewünschten Zuspielgeräts und aktivieren den entsprechenden Eingang
INPUT SELECT IN 1 - IN 3, überprüfen Sie dabei das Eingangssignal mit Hilfe der 8-Segment Pegelanzeigen
LEFT und RIGHT und passen ggf. die Anzeige an den Eingangssignalpegel an (Beschreibung siehe Punkt 16).
POLSKI
• Achten Sie darauf, dass die MUTE-, DIM- und TALK-Funktion des Controllers nicht aktiviert sind.
• Aktivieren Sie nun den Monitorausgang (OUTPUT SELECT OUT 1 bis OUT 3), an dem Ihre Monitore ange-
schlossen sind und bringen den entsprechenden GAIN-Regler über dem Ausgang auf Rechtsanschlag
(Maximum).
• Stellen Sie den MAIN-Lautstärkeregler auf die 12-Uhr-Position und erhöhen die Lautstärke der Monitore
vorsichtig auf die gewünschte Abhörlautstärke, achten Sie dabei darauf, dass die Monitore gleich laut sind.
Passen Sie die Lautstärke eines Subwoofers in gleicher Weise an die Lautstärke der Monitore an.
ITALIANO
• Halten Sie die Pegel verschiedener Zuspielgeräte und Monitorpaare auf dem gleichen Level, um plötzli-
che Lautstärkesprünge beim Umschalten der Signalquellen und Monitorausgänge zu vermeiden.
16VERKABELUNGSBEISPIEL
ENGLISH
DEUTSCH
Monitor L Monitor R
FRANCAIS
VOLUME HEADPHONES
ESPAÑOL
1 21 2
Headphone Subwoofer
Amp
POLSKI
ITALIANO
BALANCED LINE OUTPUT VOLUME USB
LR
CD - Player Audio - Interface Digital Audio Workstation
17ANSCHLÜSSE, BEDIEN- UND ANZEIGEELEMENTE
ENGLISH
3
2
1
DEUTSCH
4
6 5
1 POWER
Kleinspannungsbuchse für die Spannungsversorgung des Geräts. Verwenden Sie bitte ausschließlich den
FRANCAIS
mitgelieferten Netzadapter. Neben der Buchse befindet sich die Zugentlastung. Nutzen Sie die diese für
das flexible Kabel des Netzadapters, um die Kleinspannungsbuchse des Geräts und den Kleinspannungs-
stecker des Netzadapters vor Beschädigung zu schützen und ein ungewolltes Herausziehen des Steckers zu
vermeiden.
2 POWER ON / OFF
Ein- / Ausschalter für die Spannungszufuhr des Geräts.
ESPAÑOL
3 BALANCED INPUTS IN 1 - IN 2
Symmetrische Stereo Line-Eingänge mit 6,35 mm Klinkenbuchsen (IN 1 L+R, IN 2 L+R).
4 INPUT 3
Unsymmetrischer Stereo Line-Eingang mit Cinch-Buchsen L + R, einer 3,5 mm Stereo-Klinkenbuchse und
einem coaxialen S/PDIF-Eingang. Die analogen Cinch-Eingänge und die 3,5 mm Klinkenbuchse können
simultan belegt sein, das Lautstärkeverhältnis muss in diesem Fall an den jeweiligen Zuspielgeräten einge-
stellt werden, der digitale S/PDIF-Eingang kann zusätzlich belegt werden. Die Umschaltung der analogen
POLSKI
und der digitalen Signalquelle und die Pegelanpassung für IN 3 AUX erfolgen am Bedienpanel auf der
Oberseite des Geräts.
5 BALANCED MONITOR OUTPUTS 1 - 2 - 3
Symmetrische Ausgänge zum Anschließen aktiver Studiomonitore, sowie Endstufen mit passiven Studiomo-
nitoren. Alle drei Ausgänge sind mit 6,35 mm TRS-Klinkenbuchsen bestückt, Ausgang 3 bietet zusätzlich zu
den beiden Buchsen L und R einen mono-summierten Ausgang SUM zum Anschließen eines zusätzlichen
Monitors mit Mono-Signal oder eines Subwoofers. Der Ausgangspegel kann, falls notwendig, für alle drei
ITALIANO
Ausgänge separat am entsprechenden GAIN-Regler eingestellt und damit dem angeschlossenem Monitor-
system angepasst werden.
6 UNBAL. LINE OUTPUTS MAIN - CUE
Unsymmetrische Ausgänge mit 6,35 mm Klinkenbuchsen.
MAIN L/R - Anschlussmöglichkeit für ein externes Aufnahmegerät, wie eine Bandmaschine oder einen
digitalen Stereo-Recorder. Ausgegeben wird das Signal, welches am Bedienpanel bei INPUT SELECT als
Input-Signal ausgewählt ist (IN 1 - IN 3). Das Signal wird vor dem Lautstärkeregler MAIN abgegriffen, ist also
unabhängig davon und es bleibt unbeeinflusst von den Funktionen MUTE, MONO, DIM und TALK.
CUE L/R - Anschlussmöglichkeit für einen externen Kopfhörerverstärker. Ausgegeben wird das Signal,
welches am Bedienpanel bei CUE SOURCE als Signalquelle ausgewählt ist (IN 1 - IN 3). Passen Sie die Sig-
nal-Lautstärke mit Hilfe des Lautstärkereglers CUE OUTPUT am Bedienpanel an. Das Signal bleibt unbeein-
flusst von den Funktionen MUTE, MONO und DIM, die TALK-Funktion bleibt aber in vollem Umfang erhalten.
18ENGLISH
7 16 17 16 10 11
8 19
DEUTSCH
9
12
FRANCAIS
15 14 20 18
13
21
ESPAÑOL
POLSKI
7 INPUT SELECT IN 1 - IN 2 - IN 3
Taster zum Auswählen und Aktivieren der Signalquellen Line-Eingang IN 1 bis IN 3 auf der Rückseite des
Geräts (Nr. 3 und Nr. 4). Der dem aktiven Line-Eingang entsprechende Taster leuchtet. Bei der Auswahl der
Signalquellen kann zwischen zwei Arbeitsweisen ausgewählt werden.
Funktionsweise A: Alle Signalquellen können gleichzeitig angewählt und aktiviert werden (Werkseinstel-
lung). Bevor Sie die Einstellung ändern, schalten Sie alle angeschlossenen Monitore und Kopfhörerverstärker
ITALIANO
aus. Um die Arbeitsweise A „Multi mode“ auszuwählen, schalten Sie den Monitor-Controller aus, drücken
auf den Taster IN 1 bei INPUT SELECT und halten den Taster so lange gedrückt, bis Sie den Monitor-Controller
wieder eingeschaltet haben.
Funktionsweise B: Eine einzelne Signalquelle kann beliebig ausgewählt und aktiviert werden. Bei der Aus-
wahl einer anderen Signalquelle wird die zuvor aktivierte Signalquelle deaktiviert. Um die Funktionsweise B
„Individual mode“ auszuwählen, schalten Sie den Monitor-Controller aus, drücken auf den Taster IN 2 bei
INPUT SELECT und halten den Taster so lange gedrückt, bis Sie den Monitor-Controller wieder eingeschaltet
haben.
8 INPUT 3 AUX
Pegelregler zum Anpassen der Lautstärke des Line-Eingangs INPUT 3 AUX.
199 AUX / S/PDIF
Schalter zum Auswählen der analogen bzw. digitalen Eingangsquelle von INPUT 3. In der heruntergedrück-
ENGLISH
ten Position ist der analoge Cinch-Eingang L/R bzw. der 3,5mm Stereo-Klinkeneingang aktiviert, in der nicht
heruntergedrückten Position der digitale Coax-Anschluss SPDIF IN.
10 OUTPUT SELECT OUT 1 - OUT 2 - OUT 3
Taster zum Aktivieren der Line-Ausgänge OUT 1 bis OUT 3 auf der Rückseite des Geräts (Nr. 5). Der dem
aktiven Line-Ausgang entsprechende Taster leuchtet. Bei der Auswahl der Line-Ausgänge kann zwischen
drei Funktionsweisen ausgewählt werden.
Funktionsweise A: Alle Line-Ausgänge können gleichzeitig angewählt und aktiviert werden (Werkseinstel-
DEUTSCH
lung). Bevor Sie die Einstellung ändern, schalten Sie alle angeschlossenen Monitore und Kopfhörerverstärker
aus. Um die Funktionsweise A „Multi mode“ auszuwählen, schalten Sie den Monitor-Controller aus, drücken
auf den Taster OUT 1 bei OUTPUT SELECT und halten den Taster so lange gedrückt, bis Sie den Monitor-
Controller wieder eingeschaltet haben.
Funktionsweise B: Ein einzelner Line-Ausgang kann beliebig ausgewählt und aktiviert werden. Bei der
Auswahl eines anderen Line-Ausgangs wird der zuvor aktivierte Line-Ausgang deaktiviert. Um die Funktions-
weise B „Individual mode“ auszuwählen, schalten Sie den Monitor-Controller aus, drücken auf den Taster
OUT 2 bei OUTPUT SELECT und halten den Taster so lange gedrückt, bis Sie den Monitor-Controller wieder
eingeschaltet haben.
FRANCAIS
Funktionsweise C: Line-Ausgang OUT 3 kann unabhängig von OUT 1 und OUT 2 ein- oder ausgeschaltet
werden. OUT 1 und OUT 2 können wahlweise aktiviert werden, aber nicht beide gleichzeitig. Bei der
Auswahl des jeweils anderen Line-Ausgangs wird der zuvor aktivierte Line-Ausgang deaktiviert. Um die
Funktionsweise C „Combined mode“ auszuwählen, schalten Sie den Monitor-Controller aus, drücken auf
den Taster OUT 3 bei OUTPUT SELECT und halten den Taster so lange gedrückt, bis Sie den Monitor-Controller
wieder eingeschaltet haben.
11 CUE SOURCE IN 1 - IN 2 - IN 3
ESPAÑOL
Beleuchtete Taster für die Auswahl der Signalquelle IN 1 bis IN 3 für den Line-Ausgang CUE L/R. Der dem
aktiven Line-Eingang entsprechende Taster leuchtet.
12 CUE OUTPUT
Lautstärkeregler für den CUE Line-Ausgang (UNBAL. LINE OUTPUTS CUE).
13 MAIN
Lautstärkeregler für die symmetrischen Line-Ausgänge BALANCED MONITOR OUTPUTS 1 bis 3. Halten Sie die
Pegel der verschiedenen Signalquellen auf einem ähnlichen Level, um plötzliche Lautstärkesprünge beim
POLSKI
Umschalten der Signalquellen zu vermeiden.
14 MONO
Drücken Sie auf den Taster MONO, um die Ausgangssignale der Line-Ausgänge BALANCED MONITOR OUT-
PUTS 1 bis 3 und der Kopfhörerausgänge 1 und 2 (MAIN-Signal) in Mono abzuhören. Wie ein Mix in Mono
klingt, kann damit auf einfache Weise kontrolliert werden, denn in vielen Clubs und Diskotheken werden
Beschallungsanlagen im Mono-Betrieb genutzt. Es ist außerdem immer ratsam, einen Stereo-Mix auch in
ITALIANO
Mono abzuhören, weil Sie so Probleme mit der Phasenlage im Mix verwendeter Klänge besser erkennen
und damit auch beheben können.
Das Signal des CUE-Kanals wird von der MONO-Funktion nicht beeinflusst.
Die Funktionsweise der MUTE-, TALK-, INPUT SELECT und OUTPUT SELECT-Taster kann auf Werkseinstellung
zurückgestellt werden, indem Sie den Monitor-Controller ausschalten, auf MONO drücken und den Taster so
lange gedrückt halten, bis Sie den Monitor-Controller wieder eingeschaltet haben. Bevor Sie die Einstellung
ändern, schalten Sie alle angeschlossenen Monitore und Kopfhörerverstärker aus.
15 MUTE
Stummschaltefunktion für die Ausgangssignale der Line-Ausgänge BALANCED MONITOR OUTPUTS 1 bis 3
und der Kopfhörerausgänge 1 und 2 (MAIN-Signal). Das Signal des CUE-Kanals wird von der Stummschalte-
funktion nicht beeinflusst.
Bei der MUTE-Funktion kann zwischen zwei Funktionsweisen ausgewählt werden.
20Funktionsweise A (Werkseinstellung): „latching“ (Schalter): Drücken Sie einmal kurz auf den Taster MUTE, um
die Funktion zu aktivieren und noch einmal kurz, um die Funktion zu deaktivieren. Während die Stummschal-
tefunktion aktiviert ist, leuchtet der MUTE-Taster.
ENGLISH
Funktionsweise B: „momentary“ (Taster): Die MUTE-Funktion ist nur aktiv, solange der MUTE-Taster gedrückt
wird. Lässt man den Taster los, wird die Funktion automatisch deaktiviert. Während die MUTE-Funktion akti-
viert ist, leuchtet der Taster MUTE.
Bevor Sie die Einstellung ändern, schalten Sie alle angeschlossenen Monitore und Kopfhörerverstärker aus.
Um die Funktionsweise B auszuwählen, schalten Sie den Monitor-Controller aus, drücken auf MUTE und
halten den Taster so lange gedrückt, bis Sie den Monitor-Controller wieder eingeschaltet haben.
DEUTSCH
16 LEFT / RIGHT
8-Segment LED-Pegelanzeigen für den linken und rechten Kanal des anliegenden Audiosignals, der Abgriff
erfolgt vor dem Lautstärkeregler MAIN. Zur besseren Kontrolle kann die Anzeige in drei Stufen an den Signal-
pegel des Eingangssignals angepasst werden.
Beispiel: Wenn die Pegelanzeige auf den Wert +10 dBu eingestellt ist und am Eingang ein Signal mit
+10 dBu anliegt, leuchtet die rote LED 0 der Pegelanzeige.
Werksseitig ist der Wert +18 dBu eingestellt. Bevor Sie die Einstellung verändern, schalten Sie alle angeschlos-
senen Monitore und Kopfhörerverstärker aus.
FRANCAIS
+4 dBu - Wenn bei keinem der angeschlossenen Zuspielgeräte der maximale Ausgangspegel +4 dBu über-
steigt, wählen Sie die Einstellung +4 dBu. Schalten Sie den Monitor-Controller aus, drücken auf CUE SOURCE
IN 1 und halten den Taster so lange gedrückt, bis Sie den Monitor-Controller wieder eingeschaltet haben.
+10 dBu - Wenn bei keinem der angeschlossenen Zuspielgeräte der maximale Ausgangspegel +10 dBu
übersteigt, wählen Sie die Einstellung +10 dBu. Schalten Sie den Monitor-Controller aus, drücken auf CUE
SOURCE IN 2 und halten den Taster so lange gedrückt, bis Sie den Monitor-Controller wieder eingeschaltet
haben.
+18 dBu - Wenn bei keinem der angeschlossenen Zuspielgeräte der maximale Ausgangspegel +18 dBu
übersteigt, wählen Sie die Einstellung +18 dBu. Schalten Sie den Monitor-Controller aus, drücken auf CUE
ESPAÑOL
SOURCE IN 3 und halten den Taster so lange gedrückt, bis Sie den Monitor-Controller wieder eingeschaltet
haben.
Der maximale Eingangspegel des Monitor-Controllers beträgt +20 dBu, liegt der Eingangspegel darüber,
wird der Eingang übersteuert und das Signal verzerrt. Wenn bei einem der angeschlossenen Zuspielgeräte
der maximale Ausgangspegel mehr als +20 dBu beträgt, muss der Ausgangspegel des entsprechenden
Zuspielgeräts auf maximal +20 dBu begrenzt werden.
17 CORRELATION
Überprüfen der Mono-Kompatibilität eines Stereo-Audiosignals. Da in vielen Clubs und Diskotheken die Be-
POLSKI
schallungsanlagen in Mono betrieben werden und beispielsweise eine Musikproduktion im Radio auch auf
einfachen Mono-Geräten in guter Qualität wiedergegeben werden soll, ist die Mono-Kompatibilität der Mu-
sikproduktion extrem wichtig. Bei der Mono-Wiedergabe eines Stereo-Signals werden der linke und rechte
Kanal zu einem Mono-Signal zusammengemischt (Mono Summe). Falls ein Klang im Stereo-Mix auf beiden
Kanälen nicht gleichphasig wiedergegeben wird, kann das bei der Mono-Wiedergabe dazu führen, dass
er verfälscht wiedergegeben oder gar ausgelöscht wird, im Extremfall wird das komplette Audiosignal im
Ganzen ausgelöscht (Stille).
Achten Sie darauf, dass bei der Wiedergabe eines Stereo-Signals beim Mix nur maximal die 3 unteren
ITALIANO
grünen LEDs der 7-Segment Anzeige CORRELATION leuchten, aber niemals eine der oberen drei LEDs (je
mehr rote LEDs leuchten, desto schlechter die Mono-Kompatibilität). Die unterste grüne LED und die mittlere
gelbe LED leuchten permanent, auch wenn kein Signal anliegt.
18 TALK - LEVEL
Drücken Sie auf den Taster TALK, um das integrierte Talkback-Mikrofon zu aktivieren und so auf einfache
Weise mit Musikern und Sprechern über den Abhörkanal CUE und den Kopfhörerausgängen auf der Vorder-
seite des Geräts (entsprechender Schalter in Position CUE) zu kommunizieren. Die Lautstärke des Talk-
back-Mikrofons stellen Sie mit Hilfe des Pegelreglers LEVEL oberhalb des TALK-Tasters ein, erhöhen Sie dabei
die Lautstärke nur vorsichtig, bis an den angeschlossenen Kopfhörern ein angenehmer Pegel anliegt und
kein Feedback entstehen kann. Beim Aktivieren des Talkback-Mikrofons wird das am CUE-Kanal und den
Kopfhörerausgängen auf der Vorderseite des Geräts (entsprechender Schalter in Position CUE) anliegende
Audiosignal CUE SOURCE IN 1 bis IN 3 automatisch um einen festen Wert abgesenkt. Gleichzeitig wird das
an den Line-Ausgängen BALANCED MONITOR OUTPUTS 1 bis 3 anliegende Audiosignal um den am Regler
ATTENUATION eingestellten Wert abgesenkt.
21You can also read