MORSØ FORNO GAS BBQ MORSØ FORNO GAS - Piccolo R-238 - Morso
←
→
Page content transcription
If your browser does not render page correctly, please read the page content below
MORSØ FORNO GAS BBQ
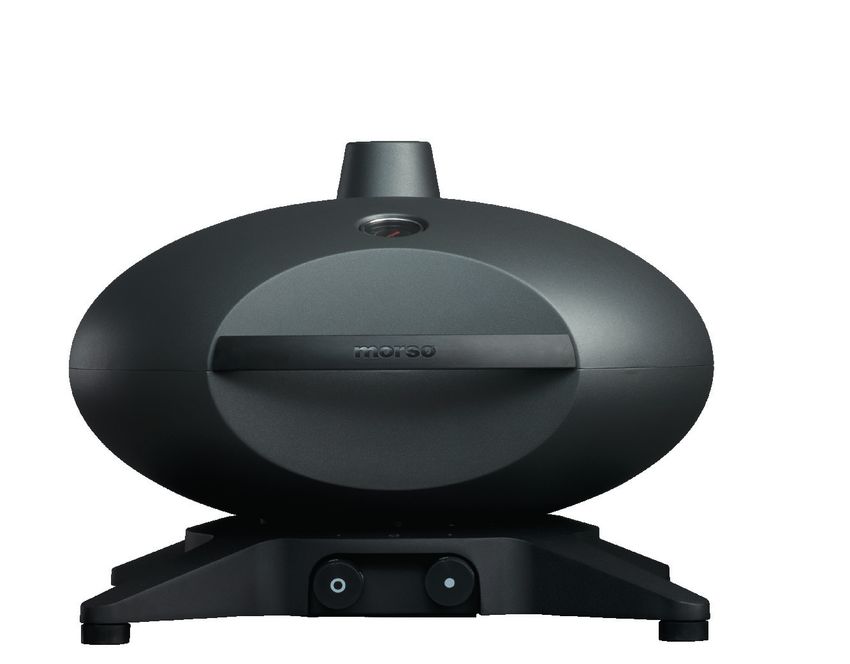
MORSØ FORNO GAS
Piccolo R-238
MORSØ FORNO GAS
Medio SQ-330
MORSØ FORNO GAS
Grande R-506
Important: Retain these instructions for future use. UK
51CS4816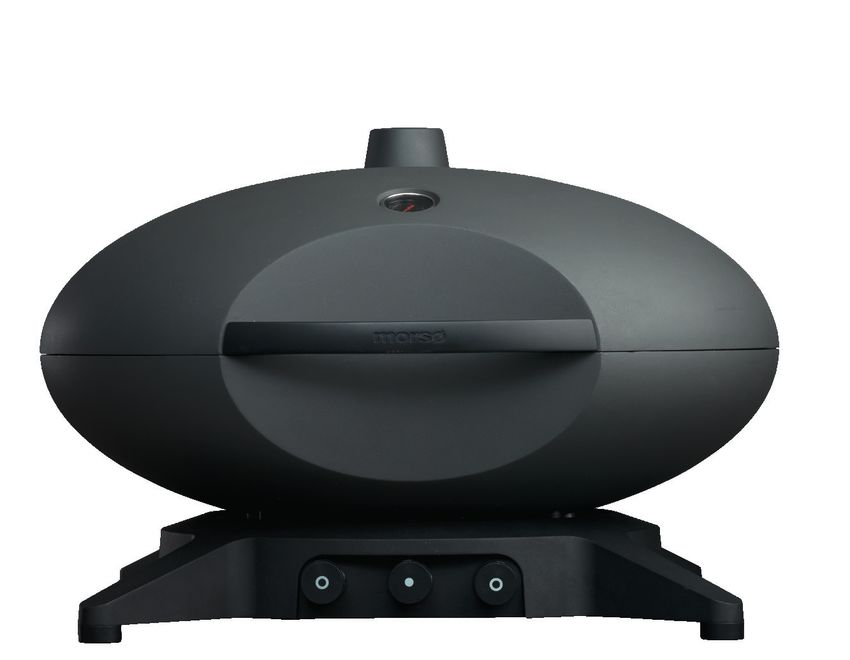
MORSØ FORNO GAS Piccolo R-238
    Morsø Forno Gas Piccolo - UK . . . . . . . . . . . . . . . . . . . . . . . . . . . . . . . . . . . . . . . . . . . . . . . . . 3

    MORSØ FORNO GAS Medio SQ-330
    Morsø Forno Gas Medio - UK                      . . . . . . . . . . . . . . . . . . . . . . . . . . . . . . . . . . . . . . . . . . . . . . .  15

    MORSØ FORNO GAS Grande R-506
    Morsø Forno Gas Grande - UK . . . . . . . . . . . . . . . . . . . . . . . . . . . . . . . . . . . . . . . . . . . . . . .  27

2
MORSØ FORNO GAS BBQ

 MORSØ FORNO GAS Piccolo                                                                  UK
 R-238
• Powerful stainless steel burner with rotary     • High dome hood – 14.5 cm – allows you to
  ignition for easy lighting                        cook roasts easily

• Satin enamel cast iron cooking surface –        • Table available as an optional extra (sold
  easy to cook on and wash up                       separately)

• Durable die cast aluminium bowl and hood        • Supplied with hose and regulator so it’s
                                                    ready to use with a POL gas cylinder
• Integrated temperature gauge for maxi-
  mum control when cooking                        • Gas certified to CE standards

                         Important: Retain these instructions for future use.

        51CS4816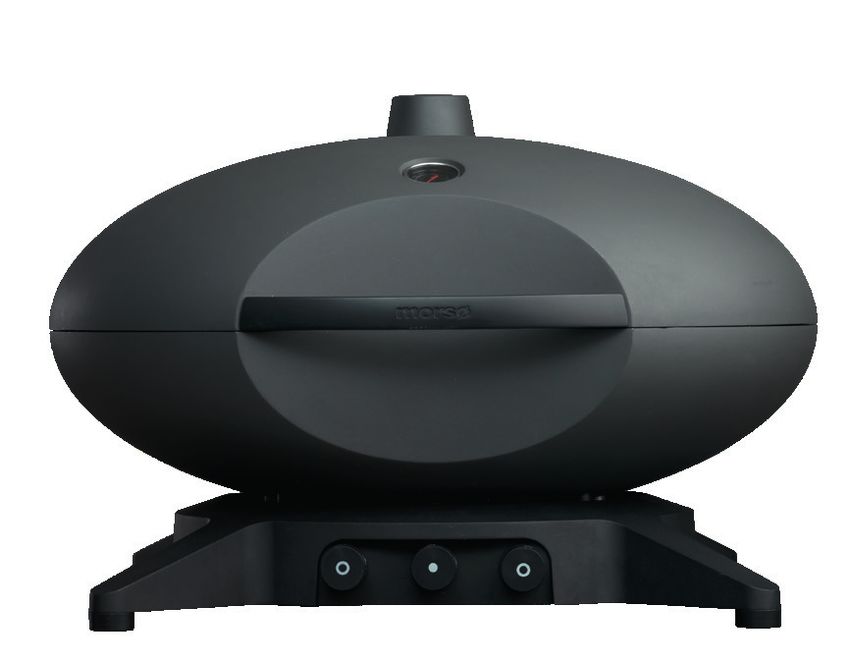
READ ME FIRST

    		 Gas leak testing
    It
    It is
       is important
          important that
                    that you
                         you leak
                             leak test
                                  test the
                                       the BBQ
                                           BBQ before
                                               before first
                                                      first use
                                                            use and
                                                                and every
                                                                    every time
                                                                          time the
                                                                               the gas cylinder is
                                                                                   gas cylinder is refilled
                                                                                                   refilled and
                                                                                                            and
    reconnected to the BBQ.

    To Complete Leak Test
    • Make sure all the control knobs are OFF.
    • In a small container, mix up a solution of water and detergent/soap.
    • Mix the solution well (about the same concentrate as washing up water).
    • Turn the cylinder ON by rotating the knob to open position.
    • Using a brush or spay bottle apply the soap solution to the gas line and each join in the gas line including:
      - the gas connection at the inlet of the BBQ
      - all gas hose connections
       - the gas connection at the gas cylinder
    • If bubbles appear, there is a gas leak.
    • If the leak is at the connection, re-tighten and re-seal.
    • If the leak is anywhere else or you cannot resolve the leak by tightening the connection DO NOT PROCEED.
    • Replace gas hose and regulator.
    • Replace hose and
      Replacement  hoseregulators can be
                        and regulators   purchased
                                       can         from from
                                           be purchased your local
                                                              your BBQ   retail retail
                                                                   local BBQ    specialist.
                                                                                       specialist.

4
2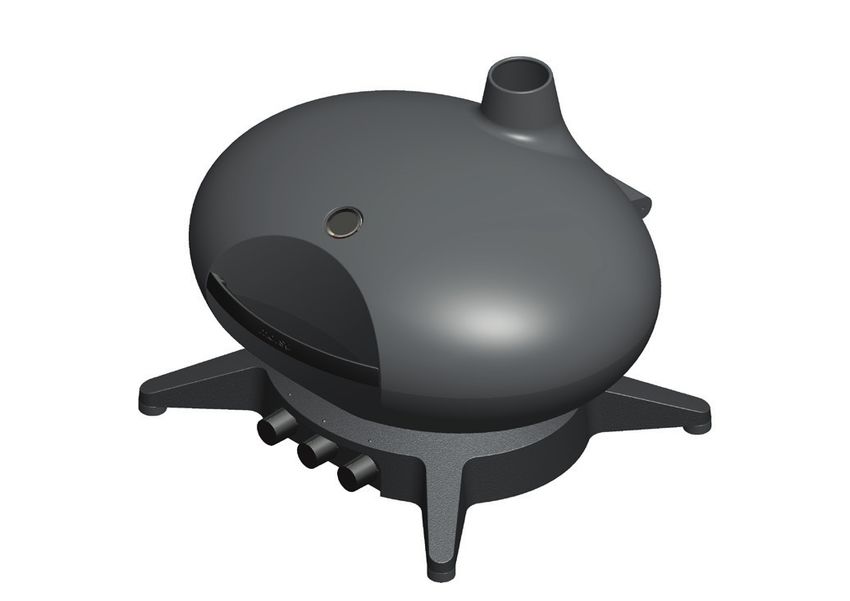
GENERAL INFORMATION

                                                            Hose & Regulator Safety
    		IMPORTANT                                             The regulator and hose assembly supplied with the
                                                            barbecue are suitable for Propane Gas or Universal
                                                            L.P.G. only.
   Read these instruction carefully prior to
   use. Familiarise yourself with the ap-                   The pressure regulator and hose assembly
                                                            supplied with the barbecue must be used. Replace-
   pliance before connecting it to it’s gas                 ment of pressure control and hose connector shall
   container. Keep these instructions for                   be carried out using Morsø genuine products only.
   future reference.                                        Contact your local dealer.
                                                            When connecting the hose and regulator assembly to
                                                            the gas cylinder, take care to avoid unnecessary twist-
    		IF YOU SMELL GAS                                      ing of the flexible hose.
                                                            After the assembly has been secured, turn on the gas
   1. Shut off gas to the barbecue at its                   and check for leaks by brushing a soap and water
                                                            solution over all connections.
       source, if possible.
                                                            If you are unable to correct the leak by tightening the
   2. Extinguish any open flame.                            connections, turn off the gas and contact the supplier
   3. Open hood.                                            immediately.
   4. If odour continues immediately call                   Always ensure the barbecue is kept away from flam-
       your gas supplier or fire department.                mable materials and the gas cylinder clear of any heat
                                                            source.
                                                            When changing over from an empty gas cylinder to a
                                                            full one make sure this procedure is carried out in a
                                                            well ventilated location, preferably outside, away from
             Replacement of pressure                        people and away from any sources of ignition; such as
             control and hose connec-                       naked flames, pilot flames, electric heaters/equipment.
             tor shall be carried out using
             Morsø genuine products only.
             Contact your local dealer.                     Gas Cylinder Use & Safety
                                                            This is a low pressure barbecue and must only be used
                                                            with the regulator supplied. Your barbecue is designed
                                                            for use with propane gas cylinders certified to the UK
                                                            market.
Gas Installation Codes                                      The gas cylinder should be filled by a reputable gas
• Barbecues must be used in accordance with the             supplier and visually inspected and re-qualified at each
  installation requirements of your gas supply authority.   filling.
• Barbecues for use with bottled gas are labelled           Always keep cylinder in an upright position. Always
  ‘propane gas’ or ‘Universal L.P.G’.                       close the cylinder valve when the barbecue is not in use.
                                                            Do not subject gas cylinder to excessive heat.

Clearances
                                                            NEVER STORE YOUR GAS CYLINDER INDOORS.
Minimum Clearances from combustible materials
                                                            If you store your barbecue indoors, ALWAYS discon-
must be: Rear - 300mm Sides - 300mm Above -
                                                            nect the gas cylinder first and store the cylinder safely
1000mm
                                                            outside.

Specifications                                              Cylinders must be stored outdoors in a well ventilated
                                                            area out of reach of children, and must not be stored
Barbecue specifications can be found on the data label      in a building, garage or any other enclosed area.
attached to the barbecue body.

                                                                                                                        5
GENERAL INFORMATION                                       • Never lean over cooking surface when lighting.
                                                              • Never alter or modify the regulator or gas supply as-
                                                                sembly.
                                                              • This barbecue must not be used indoors.
                                                              • Only use in well ventilated areas.
    FOR YOUR SAFETY                                           • Carbon monoxide hazard - Using this appliance in
    Failure to comply with these instructions could             an enclosed space may cause death. Do not use in
                                                                caravans, tents, marine craft, cars, mobile homes or
    result in a fire or explosion which could cause
                                                                similar locations.
    serious bodily injury, death or property damage.          • This appliance shall only be used in an above ground
    CAUTION: Accessible parts may be very hot.                  open-air situation with natural ventilation, without
    Keep young children away.                                   stagnant areas, where gas leakage and products of
    DO NOT modify this appliance.                               combustion are rapidly dispersed by wind and natural
                                                                convection.
    DO NOT move this barbecue during use.
                                                              • Ensure the barbecue is set up on a level and stable
    Turn off gas supply at the gas cylinder after use.          surface.
                                                              • Do not move the barbecue while in use or when hot.
    Parts sealed by the manufacturer or their agent             Remove the drip tray before moving.
    must not be manipulated by the user. This barbecue        • DO NOT use the BBQ as a hotplate. The warranty
    is only to be used and stored outdoors.                     will be voided and it violates the gas regulations, the
    • Never operate this barbecue without a regulator.          cooking grate provides the ventilation needed for the
    • Do not test for gas leaks with an open flame.             BBQ to operate safely. It is not designed to be a solid
    • If this information is not followed exactly a fire        hotplate device.
        causing death or serious injury may occur. Do not
        store a spare gas cylinder under or near this         IF THERE IS A LEAK
        barbecue. This barbecue is only to be used and
        stored outdoors.                                      • Turn the cylinder off.
    • If there is a leak on your appliance (smell of          • Ventilate the area to disperse gas.
        gas) immediately attempt to turn off the cylinder     • Check all connections.
        valve. Remove the appliance to a well ventilated      • If leak persists, keep the cylinder upright. Keep skin
        location away from any ignition source. Only            away from any gas or liquid escaping from the cylin-
        check for leaks outdoors using soapy water. DO          der.
        NOT try to detect leaks using a flame.                • Keep the cylinder at least 20 metres away from any
    • Check for leaks by brushing a soap and water              sparks or ignition sources, including electrical equip-
        solution over all connections. If you are unable to     ment, camera flashes, engines and motors.
        correct the leak by tightening the connections,       • Disperse gas by encouraging maximum ventilation and
        turn off the gas and contact customer service           spraying with a fine water spray.
        immediately.
    • Only use the hose assembly as supplied with             IF THERE IS A FIRE
        this appliance for connection to the cylinder -       • If the fire is at the barbecue, turn the gas off at the
        DO NOT USE ADAPTERS.                                    cylinder. Smother the flames with a wet cloth, fire
    • Maximum hose length - 1000mm.                             blanket or extinguish using a fire extinguisher.
    • After use turn the gas cylinder valve off, wait         • If the fire is at the cylinder, or you can not get to the
        for the flame to go out, then turn the                  valve to turn the gas off, contact the fire brigade im-
        appliance control valve off.                            mediately.
    • Avoid twisting or kinking the flexible hose.            • Using a garden hose, direct the water to the middle of
    • Do not store or use petrol or other flammable             the cylinder to keep it cool. Try not to extinguish the
        liquids in the vicinity of this or any other            flame. At least if the gas is burning, it won’t be able to
        appliance.                                              build up pressure and explode.
    • Do not store empty or full spare gas cylinders
        under or near this or any other appliance.
    • Never test for gas leaks with a lit match or open
        flame. Never light barbecue with hood closed or
        before checking to ensure the burner tubes are
        fully seated over gas valve orifices.

6
Location of your Barbecue

DO NOT use your barbecue in garages, porches, sheds,
breezeways, or other enclosed areas. Your barbecue is
to be used OUTDOORS. The barbecue is not intended
to be installed in or on recreational vehicles and/or
boats and should not be placed under any surface that
will burn. Do not obstruct the flow of combustion and
ventilation air around the barbecue housing.

Protect Children
Keep children away from barbecue during use and until
barbecue has cooled after you have finished. Do not
allow children to operate barbecue.
Always ensure that no sporting or physical activities are
carried out in close proximity to the barbecue during
use and while still hot.

Tools You Will Need
Adjustable spanner, Philips head screwdriver.

Check Barbecue for any Damage
Inspect barbecue parts as you proceed. Contact your
supplier for assistance regarding replacement of any
damaged or missing parts. Do not assemble or operate
a barbecue that appears damaged. Barbecues for use
with gas cylinders are labelled ‘Propane Gas’. Check la-
belling at the gas connection on your barbecue.

 Gas Category
 Gas and Supply         G30 Butane at 28-30 mbar             G30 Butane and                 G30 Butane and
 Pressure               G31 Propane at 37 mbar               G31 Propane at 30 mbar         G31 Propane at 50 mbar
 Country Code           BE, CH, CY, CZ, ES, FR, GB,          BE,CY, DK, EE, FR, GB, HU, IT, AT, CH, DE, SK
                        GR, IE, IT, LT, LU, LV, PT, SK, SI   LT, NL, NO, SE, SI, SK, RO, HR,
                                                             TR, BG, IS, LU, MT, FI
 Burner                 Main Burner × 1                      Main Burner × 1                Main Burner × 1
 Nominal Heat Input     3.6 kW                               3.6 kW                         3.6 kW
 Burner Injector Size   Ø0.92 mm                             Ø0.92 mm                       Ø0.82 mm
 Total Heat Input       3.6 kW(G30:262g/h;G31:257g/h)                                       Made in Taiwan

SUITABLE GAS TANKS
There are many different sizes of tank.
The figure shows the maximum tank size.
• Capacity of gas tank: Maximum 11kg
• Height of gas tank: Maximum 595 mm
• Diameter of gas tank: Maximum 304 mm

Location of gas tank
Make sure there are no kinks in the gas hose.
The gas hose may be a maximum of 1 m in length.
                                                                                                                     7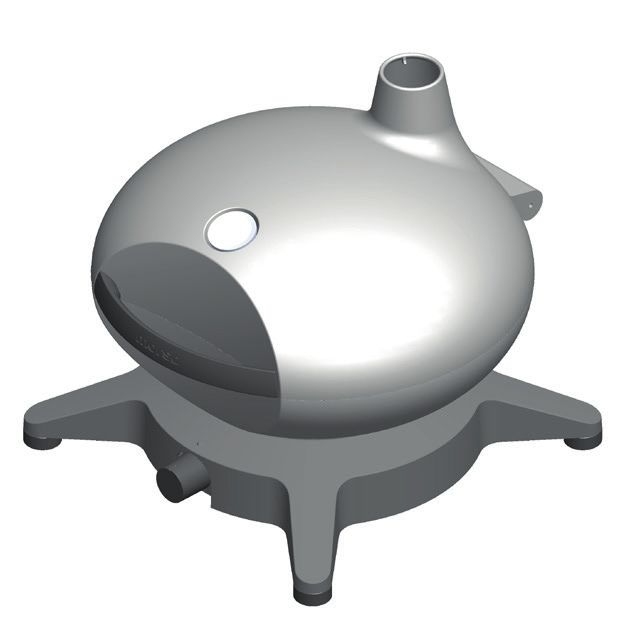
LISTE OVER DELE
                                                          LISTE OVER DELE

                                                EXPLODED
                                                EXPLODED DIAGRAM
                                                         DIAGRAM

                                        1

                                            2

                            3
                                                                                            12
                                                                                                       13

                                    4                                                                 14
                                                                                                 15
                                            5                                                               16
                             6
                      7
                                                   8
                                                                                                           17

                                        9                                                                  18

                                                 10
                                                          11
     PARTS LIST
    PARTS LIST
      Part     Description                         QTY              Part    Description                         QTY
    Part     Description                         QTY               Part     Description                          QTY
      1        Temperature Gauge                   1                11      Grease Cup                          1
    1        Temperature Gauge                   1                 11       Grease Cup                           1
      2        Lid                                 1                12      Burner                              1
    2        Lid                                 1                 12       Burner                               1
      3        Lid Handle                          1                13      Hole Cover                          1
    3 4      Lid HandleElectrode
               Ignition                          11                13
                                                                    14      Hole Cover& R-Pin
                                                                            Lid Hinge                           21
    45       Ignition
               Bowl Electrode                    11                14
                                                                    15      Lid HingeGrate
                                                                            Cooking    & R-Pin                  12
    5 6      Bowl
               Adapter                           11                15
                                                                    16      Cooking   Grate
                                                                            Heat Insulator                      41
    67       Adapter
               Valve                             11                16
                                                                    17      Heat
                                                                            FixedInsulator
                                                                                   Plate                        14
    7 8      Valve
               Base                              11                17
                                                                    18      Fixed
                                                                            PlasticPlate
                                                                                    Feet                        41
    89       Base
               Knob                              11                18       Plastic Feet                         4
    9 10     Knob
               Grease Cup Support                11
    10       Grease Cup Support                  1

    6
8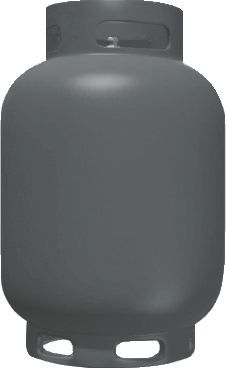
MONTAGEVEJLEDNING
                                               MONTAGEVEJLEDNING
                                               MONTAGEVEJLEDNING

ASSEMBLY
ASSEMBLY INSTRUCTIONS
ASSEMBLY INSTRUCTIONS

Remove
 Removeany
Remove  anytransit
       any  transitprotection
           transit  protectionmaterial.
                   protection material.
                                                              A
                                                              A
STEP
 STEP111
STEP
Attach
 Attach the
Attach    the lid
         the    lid handle
               lid   handle using
                    handle   using the
                            using  the fasteners
                                        fasteners as
                                                  as
shown.
shown.
 shown.

CONNECTING
 CONNECTINGTHE
CONNECTING  THEGAS
           THE GASCYLINDER
               GAS CYLINDER
                   CYLINDER

There
 Thereare
There     aretwo
          are  twodifferent
              two  different types
                   different   types of
                              types  of gas
                                         gas that
                                              that can
                                                   can
be
 beused
be   usedon
   used     onyour
            on  yourgas
                your gasbbq
                     gas   bbqdepending
                           bbq  dependingon
                                depending   on where
                                                where
you
 youlive,
you    live,that
      live,  thatbeing
            that  being either
                  being   either butane
                          either  butane or
                                 butane   or propane
                                             propane
gas.
 gas.
gas.
Both
 Bothare
Both     aresupplied
        are  suppliedin
             supplied   ingas
                       in  gascylinders.
                          gas  cylinders.
                              cylinders.

The
 Thegas
The   gascylinders
     gas  cylindersmust
         cylinders mustbe
                   must bepositioned
                        be positionedadjacant
                           positioned adjacant
to
 tothe
to  thebbq.
   the  bbq.
       bbq.

The
 Theconnection
The  connectionbetween
     connection   betweenthe
                  between   thegas
                            the gascylinder
                                gas cylinder and
                                    cylinder and
                                             and
                                                              B
                                                              B
the
 thebbq
the  bbqis
    bbq  isismade
             madewith
             made withaaaregulator
                  with    regulator
                         regulator

ItItItis
       isisimportant
             importantthat
            important  thatyou
                       that  youuse
                             you usethe
                                 use thecorrect
                                     the correctregulator
                                         correct regulator
                                                 regulator
forfor    the
            theparticular
                particulartype
                           typeof
                                ofgas
                                   gasyou
                                       you purchase.
                                           purchase.
 for the particular type of gas you purchase.

                                                                   9
                                                                   77
GARANTI
GENERAL INFORMATION
CONNECTING & DISCONNECTING IGNITION PROCEDURE
TO GAS SOURCE 1. Raise the lid of the gas grill – set the cylinder valve to
Familiarise yourself with the general information and position ON.
safety guidelines located at the front of this manual. 2. Push in the gas control button and turn it anticlock-
wise until you hear a 'click/spark' and check whether
Check the spark has lit the burner.
1. Gas cylinder is filled. A sloshing sound will be heard 3. When the burner is lit, let go of the gas control but-
when shaken. ton. You can now turn the control button from ‘MAX’
2. The burner control is in the ‘OFF’ position to ‘MIN’ depending on the required heat.
4. If the burner does not light, repeat 'step 2' two to
Connecting three times, until the burner is lit.
1. Ensure valve is in OFF position. 5. If, after several attempts, the burner still does not
light, cut off the gas supply and check whether the
2. Check for any damage to the cylinder connection.
gas supply is blocked.
3. Attach the regulator to the cylinder valve.
4. Use a soapy water solution to check the joint. If bub-
bles appear the connection will need to be retight- If re–ignition is necessary while the gas barbecue is still
ened. hot, you must wait for a minimum of 5 minutes before
commencing to re–ignite (this allows accumulated gas
fumes to clear).
Length Width Height
493 mm 436 mm 395 mm
IMPORTANT
• IMPORTANT: Before connecting and disconnecting
barbecue to gas source, make sure burner controls
are in ‘OFF’ position.
• CAUTION: When the barbecue is not in use, the gas
cylinder must be disconnected.
• Check that the seals between the appliance and the
gas cylinder are in place and in good condition be-
fore connecting the gas cylinder. 1. PUSH 2. TURN GENTLY
• Do not use this appliance if it has damaged or worn
seals.
• NOTE: If for some reason, ignitor fails to produce a
spark at the electrode, barbecue can be lit by a long IMPORTANT
barbecue match with hood open insert the match The hood must be in the open position for
into a hole on the underside of the barbecue and lighting.
turn gas control to high.
Do not smoke at any time when attempting
• Check performance of burner prior to installing bar-
becue plates.
to ignite the barbecue burners.
• Do not smoke when attempting to ignite barbecue. Do not leave the barbecue unattended
• Never use volcanic rock, heat beads or other mate- when alight.
rial.
NEVER cover the chimney, completely or
• Always use protective gloves when handling hot partially.
components.
10DATA PÅ MORSØ FORNO GAS
OPERATION
BURNER OPERATION & IGNITION SYSTEM CHECK
Problem Possible Reason Solution
Control knob is closed Turn knob to high when lighting
Burner will not ignite The ignition needle is faulty The grill is lit using a long grill match with the
lid open. Lead the match through the grilling
grid while turning the gas control to the left.
Burner has gone out Check that the gas bottle is not empty and
reignite the burner
Food is not cooking Cooking surface was not given Remove the food and give the burner time to
or is taking too long enough time to warm up before warm the cooking surface (5-10 mins)
the food was applied
There is too much food on the Cook smaller portions
cooking surface
Should you experience difficulties when lighting up your grill, the following may help:
1. Adjustment of the ’Piezo’ spark igniter: It is important to ensure that the ’Piezo’ (spark) igniter is correctly positioned
opposite the holes of the burner. The igniter may possibly have moved during transport or use. When the grill is cold,
the ’Piezo’ igniter can be carefully adjusted, using your fingers or a small pair of pincers. Make sure that the needle of
the ’Piezo’ igniter gets closer to the burner (a distance of about 1-3 mm between the tip of the needle and the burner)
and that the needle is pointed at a hole in the burner.
2. Cleaning of the burner: Food scraps, fat, or other impurities may occasionally be deposited on the burner and thus
block some of its holes. Make sure that the grill is cold, remove the grilling grid and use a soft wire brush to cleanse the
burner holes. If there are still blocked burner holes, a needle or a paper clip can be used to clear the holes. Be sure not
to push the ’Piezo’ burner during this process.
OPERATING PROCEDURE
Cooking: The control knob can be turned from ‘MAX’ to ‘MIN’ depending on the heat required.
IMPORTANT
Equipped with one burner, the Morsø Forno Gas Piccolo is thus extremely well-suited for direct grilling where
a crisp and clearly defined rind or crackling is required – for meat as for vegetables.
Pizza-baking will require an increased grilling area.
The grilling grid must not be covered by any pizza stone, cooking plate or the similar, as this will obstruct
heating circulation. Morsø Forno Medio and -Grande are, however, perfectly suited for this purpose.
MAINTENANCE:
In the course of regular use and exposure to the elements, there will always be wear and tear and patination
of outdoor products. This is quite normal and, hence, also apply to the Morsø Outdoor products. Thus, the
occurrence of scratches and the formation of corrosion will appear, but this is easily repaired by way of the
Maintenance Kit for Morsø Forno Gas and Morsø Balcone. Using the maintenance kit, you can refresh your
Morsø Forno Gas to make it appear almost new. You find an instruction video that explains the process on our
website – morsoe.com.
We always recommend the use of a Morsø cover for the protection of your grill when it is not in use. Important!
– Always make sure that your grill is completely dry and cooled off before putting on the cover.
A Morsø cover will also prevent the seepage of moisture and rainwater via the chimney and, thus, the risk of rust
on the cast-iron grate, when the grill is not in use
11TILSLUTNING AF FLASKE MED FLYDENDE PROPANGAS.
CARE & MAINTENANCE
As with all appliances, proper care and maintenance will Cleaning the Cooking Surface
keep them in top operating condition and prolong their After cooking, turn burner control to ‘OFF’ and let bar-
life. Your new gas barbecue is no exception. By follow- becue cool before attempting to clean the grill plate or
ing these cleaning procedures on a timely basis, your grate. Before first use and periodically, it is suggested
barbecue will be kept clean and working properly with that you wash the grill plate and grate in a mild soap and
minimum effort. warm water solution.
Go to morsoe.com to watch the instruction video which
Spiders and small insects occasionally spin webs or explains how, easily and efficiently, you clean and main-
make nests in the burner tubes during warehousing and tain your grilling grate.
transit.
Care of Cooking Surface
These webs can lead to a gas flow obstruction which Use and care of the cooking surface is important. Do
could result in a fire in and around the burner tubes. not use pans on the cooking surface. Do not overheat
Cleaning with a soft brush before use and at least every the cooking surface with the hood down or no food on
six months is recommended. the cooking surface.
This type of problem is known as ‘FLASH-BACK’ and Cleaning the Drip Tray
can cause serious damage to your barbecue and create To avoid fat or grease dripping from the barbecue re-
an unsafe operating condition for the user. Although move and empty the drip tray after each use. Wait until
an obstructed burner tube is not the only cause of the drip tray is cool to touch before disposing of con-
‘FLASHBACK’ it is the most common cause and fre- tents.
quent inspection and cleaning of the burner tubes is
necessary. The drip tray should be washed periodically in a mild
detergent and warm water solution.
Flash-Back
If fire occurs in and around the burner, immediately turn
off gas at its source and turn the burner control to
‘OFF’, wait until the barbecue has cooled, then clean
the burner tubes and burner ports.
IMPORTANT
• Beware of spiders and wasps. Burner tube
should be inspected and cleaned periodi-
cally.
• This appliance must only be serviced by an
authorised person.
• To avoid any flare-ups, it is recommended
that the drip tray be checked and emptied
regularly. Contents of the drip tray may
be very hot during cooking. If emptied
during extended cooking extreme cau-
tion should be taken and direct contact by
hand should be avoided at all times. Allow
to cool completely before disposing of the
contents.
12KONTROL AF GAS LÆKAGE
SAFE APPLIANCE LOCATIONS
This appliance shall only be used in an above ground open-air situation with natural ventilation, without stagnant
areas, where gas leakage and products of combustion are rapidly dispersed by wind and natural convection.
Any enclosure in which the appliance is used shall comply with the following:
An enclosure with walls on all sides, but at least one permanent opening at ground level and no overhead cover.
Within a partial enclosure that includes an overhead cover and no more than two walls.
Within a partial enclosure that includes an overhead cover and more than two walls, the following will apply:
• at least 25% of the total wall area is completely open, and
• at least 30% of the remaining wall area is open and unrestricted.
In the case of balconies, at least 20% of the total wall area shall be and remain open and
unrestricted.
DIAGRAMMATIC REPRESENTATI ONS OF OUTDOOR AREAS
The following figures are diagrammatic representations of outdoor areas. Rectangular areas have been used
in these figures – the same principles apply to any other shaped area.
1314
MORSØ FORNO GAS BBQ

MORSØ FORNO GAS Medio                                                                     UK
SQ-330
• Powerful stainless steel burner with rotary     • High dome hood – 17cms – allows you to
  ignition for easy lighting                        cook roasts easily

• Satin enamel cast iron cooking surface –        • Table available as an optional extra (sold
  easy to cook on and wash up                       separately)

• Durable die cast aluminium bowl and hood        • Supplied with hose and regulator so it’s
                                                    ready to use with a POL gas cylinder
• Integrated temperature gauge for maxi-
  mum control when cooking                        • Gas certified to CE standards

                         Important: Retain these instructions for future use.

        51CS4816
READ ME FIRST
Gas leak testing
It is important that you leak test the BBQ before first use and every time the gas cylinder is refilled and
reconnected to the BBQ.
To Complete Leak Test
• Make sure all the control knobs are OFF.
• In a small container, mix up a solution of water and detergent/soap.
• Mix the solution well (about the same concentrate as washing up water).
• Turn the cylinder ON by rotating the knob to open position.
• Using a brush or spay bottle apply the soap solution to the gas line and each join in the gas line including:
- the gas connection at the inlet of the BBQ
- all gas hose connections
- the gas connection at the gas cylinder
• If bubbles appear, there is a gas leak.
• If the leak is at the connection, re-tighten and re-seal.
• If the leak is anywhere else or you cannot resolve the leak by tightening the connection DO NOT PROCEED.
• Replace gas hose and regulator.
• Replace hose and regulators can be purchased from your local BBQ retail specialist.
16GENERAL INFORMATION
Hose & Regulator Safety
IMPORTANT The regulator and hose assembly supplied with the
barbecue are suitable for Propane Gas or Universal
L.P.G. only.
Read these instruction carefully prior to
use. Familiarise yourself with the ap- The pressure regulator and hose assembly
supplied with the barbecue must be used. Replace-
pliance before connecting it to it’s gas ment of pressure control and hose connector shall
container. Keep these instructions for be carried out using Morsø genuine products only.
future reference. Contact your local dealer.
When connecting the hose and regulator assembly to
the gas cylinder, take care to avoid unnecessary twist-
IF YOU SMELL GAS ing of the flexible hose.
After the assembly has been secured, turn on the gas
1. Shut off gas to the barbecue at its and check for leaks by brushing a soap and water
solution over all connections.
source, if possible.
If you are unable to correct the leak by tightening the
2. Extinguish any open flame. connections, turn off the gas and contact the supplier
3. Open hood. immediately.
4. If odour continues immediately call Always ensure the barbecue is kept away from flam-
your gas supplier or fire department. mable materials and the gas cylinder clear of any heat
source.
When changing over from an empty gas cylinder to a
full one make sure this procedure is carried out in a
Replacement of pressure well ventilated location, preferably outside, away from
people and away from any sources of ignition; such as
control and hose connec- naked flames, pilot flames, electric heaters/equipment.
tor shall be carried out using
Morsø genuine products only.
Contact your local dealer. Gas Cylinder Use & Safety
This is a low pressure barbecue and must only be used
with the regulator supplied. Your barbecue is designed
for use with propane gas cylinders certified to the UK
market.
Gas Installation Codes The gas cylinder should be filled by a reputable gas
• Barbecues must be used in accordance with the supplier and visually inspected and re-qualified at each
installation requirements of your gas supply authority. filling.
• Barbecues for use with bottled gas are labelled Always keep cylinder in an upright position. Always
‘propane gas’ or ‘Universal L.P.G’. close the cylinder valve when the barbecue is not in use.
Do not subject gas cylinder to excessive heat.
Clearances
NEVER STORE YOUR GAS CYLINDER INDOORS.
Minimum Clearances from combustible materials
If you store your barbecue indoors, ALWAYS discon-
must be: Rear - 300mm Sides - 300mm Above -
nect the gas cylinder first and store the cylinder safely
1000mm
outside.
Specifications Cylinders must be stored outdoors in a well ventilated
area out of reach of children, and must not be stored
Barbecue specifications can be found on the data label in a building, garage or any other enclosed area.
attached to the barbecue body.
17GENERAL INFORMATION • Never lean over cooking surface when lighting.
• Never alter or modify the regulator or gas supply as-
sembly.
• This barbecue must not be used indoors.
• Only use in well ventilated areas.
FOR YOUR SAFETY • CARBON MONOXIDE HAZARD - USING THIS AP-
Failure to comply with these instructions could PLIANCE IN AN ENCLOSED SPACE MAY CAUSE
DEATH. DO NOT USE IN CARAVANS , TENTS, MA-
result in a fire or explosion which could cause
RINE CRAFT, CARS, MOBILE HOMES OR SIMILAR
serious bodily injury, death or property damage. LOCATIONS.
CAUTION: Accessible parts may be very hot. • This appliance shall only be used in an above ground
Keep young children away. open-air situation with natural ventilation, without
DO NOT modify this appliance. stagnant areas, where gas leakage and products of
combustion are rapidly dispersed by wind and natural
DO NOT move this barbecue during use.
convection.
Turn off gas supply at the gas cylinder after use. • Ensure the barbecue is set up on a level and stable sur-
face.
Parts sealed by the manufacturer or their agent • Do not move the barbecue while in use or when hot.
must not be manipulated by the user. This barbecue Remove the drip tray before moving.
is only to be used and stored outdoors. • DO NOT use the BBQ as a hotplate. The war-
• Never operate this barbecue without a regulator. ranty will be voided and it violates the gas regu-
• Do not test for gas leaks with an open flame. lations, the cooking grate provides the ventila-
• If this information is not followed exactly a fire tion needed for the BBQ to operate safely. It
causing death or serious injury may occur. Do not is not designed to be a solid hotplate device.
store a spare gas cylinder under or near this
barbecue. This barbecue is only to be used and IF THERE IS A LEAK
stored outdoors.
• If there is a leak on your appliance (smell of • Turn the cylinder off.
gas) immediately attempt to turn off the cylinder • Ventilate the area to disperse gas.
valve. Remove the appliance to a well ventilated • Check all connections.
location away from any ignition source. Only • If leak persists, keep the cylinder upright. Keep skin
check for leaks outdoors using soapy water. DO away from any gas or liquid escaping from the cylinder.
NOT try to detect leaks using a flame. • Keep the cylinder at least 20 metres away from any
• Check for leaks by brushing a soap and water sparks or ignition sources, including electrical equip-
solution over all connections. If you are unable to ment, camera flashes, engines and motors.
correct the leak by tightening the connections, • Disperse gas by encouraging maximum ventilation and
turn off the gas and contact customer service spraying with a fine water spray.
immediately.
• Only use the hose assembly as supplied with IF THERE IS A FIRE
this appliance for connection to the cylinder - • If the fire is at the barbecue, turn the gas off at the cyl-
DO NOT USE ADAPTERS. inder. Smother the flames with a wet cloth, fire blanket
• Maximum hose length - 1000mm. or extinguish using a fire extinguisher.
• After use turn the gas cylinder valve off, wait • If the fire is at the cylinder, or you can not get to the
for the flame to go out, then turn the valve to turn the gas off, contact the fire brigade im-
appliance control valve off. mediately.
• Avoid twisting or kinking the flexible hose. • Using a garden hose, direct the water to the middle of
• Do not store or use petrol or other flammable the cylinder to keep it cool. Try not to extinguish the
liquids in the vicinity of this or any other flame. At least if the gas is burning, it won’t be able to
appliance. build up pressure and explode.
• Do not store empty or full spare gas cylinders
under or near this or any other appliance.
• Never test for gas leaks with a lit match or open
flame. Never light barbecue with hood closed or
before checking to ensure the burner tubes are
fully seated over gas valve orifices.
18Location of your Barbecue
DO NOT use your barbecue in garages, porches, sheds,
breezeways, or other enclosed areas. Your barbecue is
to be used OUTDOORS. The barbecue is not intended
to be installed in or on recreational vehicles and/or
boats and should not be placed under any surface that
will burn. Do not obstruct the flow of combustion and
ventilation air around the barbecue housing.
Protect Children
Keep children away from barbecue during use and until
barbecue has cooled after you have finished. Do not
allow children to operate barbecue.
Always ensure that no sporting or physical activities are
carried out in close proximity to the barbecue during
use and while still hot.
Tools You Will Need
Adjustable spanner, Philips head screwdriver.
Check Barbecue for any Damage
Inspect barbecue parts as you proceed. Contact your
supplier for assistance regarding replacement of any
damaged or missing parts. Do not assemble or operate
a barbecue that appears damaged. Barbecues for use
with gas cylinders are labelled ‘Propane Gas’. Check la-
belling at the gas connection on your barbecue.
Outer Burner / Inside Burner
Gas type U.L.P.G - G30 butan og G31 propan
Inj. size 0,8 mm / 0,65 mm
Nominal heat output Outer : 2.4 kw + Inner: 1,6 kw
Gas Pressure 37 mbar
SUITABLE GAS TANKS
There are many different sizes of tank.
The figure shows the maximum tank size.
• Capacity of gas tank: Maximum 11kg
• Height of gas tank: Maximum 595 mm
• Diameter of gas tank: Maximum 304 mm
Location of gas tank
Make sure there are no kinks in the gas hose.
The gas hose may be a maximum of 1 m in length.
19EXPLODED DIAGRAM PARTS LIST Part Description QTY Part Description QTY 1 Temperature Gauge 1 11 Base 1 2 Lid 1 12 Rubbet gasket 4 3 Lid Handle 1 13 Buckle 2 4 Ignition needle 2 14 Burner 1 5 Bowl 1 15 Overheating protection 1 6 Adapter 1 16 Cooking Grate 3 7 Valve 1 17 Sheet metal 1 8 Knob 2 18 Heat Insulator 3 9 Fat Cup 1 10 Fat Cup Support 1 20
ASSEMBLY INSTRUCTIONS

Remove any transit protection material.
                                                     A
STEP 1
Attach the lid handle using the fasteners as
shown.

CONNECTING THE GAS CYLINDER

There are two different types of gas that can
be used on your gas bbq depending on where
you live, that being either butane or propane
gas.
Both are supplied in gas cylinders.

The gas cylinders must be positioned adjacant
to the bbq.

The connection between the gas cylinder and          B
the bbq is made with a regulator

It is important that you use the correct regulator
for the particular type of gas you purchase.

                                                         21
GENERAL INFORMATION
CONNECTING & DISCONNECTING IGNITION PROCEDURE
TO GAS SOURCE 1. Raise the lid of the gas grill – set the cylinder valve to
Familiarise yourself with the general information and position ON.
safety guidelines located at the front of this manual. 2. Push in the gas control button and turn it anticlock-
wise until you hear a 'click/spark' and check whether
Check the spark has lit the burner.
1. Gas cylinder is filled. A sloshing sound will be heard 3. When the burner is lit, let go of the gas control but-
when shaken. ton. You can now turn the control button from ‘MAX’
2. The burner control is in the ‘OFF’ position to ‘MIN’ depending on the required heat.
4. If the burner does not light, repeat 'step 2' two to
Connecting three times, until the burner is lit.
1. Ensure valve is in OFF position. 5. If, after several attempts, the burner still does not
light, cut off the gas supply and check whether the
2. Check for any damage to the cylinder connection.
gas supply is blocked.
3. Attach the regulator to the cylinder valve.
4. Use a soapy water solution to check the joint. If bub-
bles appear the connection will need to be retight- If re–ignition is necessary while the gas barbecue is still
ened. hot, you must wait for a minimum of 5 minutes before
commencing to re–ignite (this allows accumulated gas
fumes to clear).
Length Width Height
575 mm 530 mm 421 mm
IMPORTANT
• IMPORTANT: Before connecting and disconnecting
barbecue to gas source, make sure burner controls
are in ‘OFF’ position.
• CAUTION: When the barbecue is not in use, the gas
cylinder must be disconnected.
• Check that the seals between the appliance and the
gas cylinder are in place and in good condition be-
fore connecting the gas cylinder.
• Do not use this appliance if it has damaged or worn
1. PUSH 2. TURN GENTLY
seals.
• NOTE: If for some reason, ignitor fails to produce a
spark at the electrode, barbecue can be lit by a long
barbecue match with hood open insert the match
IMPORTANT
into a hole on the underside of the barbecue and The hood must be in the open position for
turn gas control to high. lighting.
• Check performance of burner prior to installing bar- Do not smoke at any time when attempting
becue plates. to ignite the barbecue burners.
• Do not smoke when attempting to ignite barbecue.
Do not leave the barbecue unattended
• Never use volcanic rock, heat beads or other mate- when alight.
rial.
• Always use protective gloves when handling hot NEVER cover the chimney, completely or
components. partially.
22OPERATION
BURNER OPERATION & IGNITION SYSTEM CHECK
Problem Possible Reason Solution
Control knob is closed Turn knob to high when lighting
Burner will not ignite The ignition needle is faulty The grill is lit using a long grill match with the lid
open. Lead the match through the grilling grid
while turning the gas control to the left.
Burner has gone out Check that the gas bottle is not empty and
reignite the burner
Food is not cooking Cooking surface was not given Remove the food and give the burner time to
or is taking too long enough time to warm up before warm the cooking surface (5-10 mins)
the food was applied
There is too much food on the Cook smaller portions
cooking surface
Should you experience difficulties when lighting up your grill, the following may help:
1. Adjustment of the ’Piezo’ spark igniter: It is important to ensure that the ’Piezo’ (spark) igniter is correctly positioned
opposite the holes of the burner. The igniter may possibly have moved during transport or use. When the grill is cold,
the ’Piezo’ igniter can be carefully adjusted, using your fingers or a small pair of pincers. Make sure that the needle of
the ’Piezo’ igniter gets closer to the burner (a distance of about 1-3 mm between the tip of the needle and the burner)
and that the needle is pointed at a hole in the burner.
2. Cleaning of the burner: Food scraps, fat, or other impurities may occasionally be deposited on the burner and thus
block some of its holes. Make sure that the grill is cold, remove the grilling grid and use a soft wire brush to cleanse the
burner holes. If there are still blocked burner holes, a needle or a paper clip can be used to clear the holes. Be sure not
to push the ’Piezo’ burner during this process.
OPERATING PROCEDURE
Cooking: The control knob can be turned from ‘MAX’ to ‘MIN’ depending on the heat required.
IMPORTANT
MAINTENANCE:
In the course of regular use and exposure to the elements, there will always be wear and tear and patination
of outdoor products. This is quite normal and, hence, also apply to the Morsø Outdoor products. Thus, the
occurrence of scratches and the formation of corrosion will appear, but this is easily repaired by way of the
Maintenance Kit for Morsø Forno Gas and Morsø Balcone. Using the maintenance kit, you can refresh your
Morsø Forno Gas to make it appear almost new. You find an instruction video that explains the process on our
website – morsoe.com.
We always recommend the use of a Morsø cover for the protection of your grill when it is not in use. Important!
– Always make sure that your grill is completely dry and cooled off before putting on the cover.
A Morsø cover will also prevent the seepage of moisture and rainwater via the chimney and, thus, the risk of rust
on the cast-iron grate, when the grill is not in use.
23CARE & MAINTENANCE
As with all appliances, proper care and maintenance will Cleaning the Cooking Surface
keep them in top operating condition and prolong their After cooking, turn burner control to ‘OFF’ and let bar-
life. Your new gas barbecue is no exception. By follow- becue cool before attempting to clean the grill plateor
ing these cleaning procedures on a timely basis, your grate. Before first use and periodically, it is suggested
barbecue will be kept clean and working properly with that you wash the grill plate and grate in a mild soap and
minimum effort. warm water solution.
Go to morsoe.com to watch the instruction video which
Spiders and small insects occasionally spin webs or explains how, easily and efficiently, you clean and main-
make nests in the burner tubes during warehousing and tain your grilling grate.
transit.
Care of Cooking Surface
These webs can lead to a gas flow obstruction which Use and care of the cooking surface is important. Do
could result in a fire in and around the burner tubes. not use pans on the cooking surface. Do not overheat
Cleaning with a soft brush before use and at least every the cooking surface with the hood down or no food on
six months is recommended. the cooking surface.
This type of problem is known as ‘FLASH-BACK’ and Cleaning the Drip Tray
can cause serious damage to your barbecue and create To avoid fat or grease dripping from the barbecue re-
an unsafe operating condition for the user. Although move and empty the drip tray after each use. Wait until
an obstructed burner tube is not the only cause of the drip tray is cool to touch before disposing of con-
‘FLASHBACK’ it is the most common cause and fre- tents.
quent inspection and cleaning of the burner tubes is
necessary. The drip tray should be washed periodically in a mild
detergent and warm water solution.
Flash-Back
If fire occurs in and around the burner, immediately turn
off gas at its source and turn the burner control to
‘OFF’, wait until the barbecue has cooled, then clean
the burner tubes and burner ports.
IMPORTANT
• Beware of spiders and wasps. Burner tube
should be inspected and cleaned periodi-
cally.
• This appliance must only be serviced by an
authorised person.
• To avoid any flare-ups, it is recommended
that the drip tray be checked and emptied
regularly. Contents of the drip tray may
be very hot during cooking. If emptied
during extended cooking extreme cau-
tion should be taken and direct contact by
hand should be avoided at all times. Allow
to cool completely before disposing of the
contents.
24SAFE APPLIANCE LOCATIONS
This appliance shall only be used in an above ground open-air situation with natural ventilation, without stagnant
areas, where gas leakage and products of combustion are rapidly dispersed by wind and natural convection.
Any enclosure in which the appliance is used shall comply with the following:
An enclosure with walls on all sides, but at least one permanent opening at ground level and no overhead cover.
Within a partial enclosure that includes an overhead cover and no more than two walls.
Within a partial enclosure that includes an overhead cover and more than two walls, the following will apply:
• at least 25% of the total wall area is completely open, and
• at least 30% of the remaining wall area is open and unrestricted.
In the case of balconies, at least 20% of the total wall area shall be and remain open and
unrestricted.
DIAGRAMMATIC REPRESENTATI ONS OF OUTDOOR AREAS
The following figures are diagrammatic representations of outdoor areas. Rectangular areas have been used
in these figures – the same principles apply to any other shaped area.
2526
MORSØ FORNO GAS BBQ

 MORSØ FORNO GAS Grande                                                                 UK
 R-506
• Powerful stainless steel burner with rotary     • High dome hood – 19 cm – allows you to
  ignition for easy lighting                        cook roasts easily

• Satin enamel cast iron cooking surface –        • Table available as an optional extra (sold
  easy to cook on and wash up                       separately)

• Durable die cast aluminium bowl and hood        • Supplied with hose and regulator so it’s
                                                    ready to use with a POL gas cylinder
• Integrated temperature gauge for maxi-
  mum control when cooking                        • Gas certified to CE standards

                         Important: Retain these instructions for future use.

        51CS4816
READ ME FIRST
Gas leak testing
It is important that you leak test the BBQ before first use and every time the gas cylinder is refilled and
reconnected to the BBQ.
To Complete Leak Test
• Make sure all the control knobs are OFF.
• In a small container, mix up a solution of water and detergent/soap.
• Mix the solution well (about the same concentrate as washing up water).
• Turn the cylinder ON by rotating the knob to open position.
• Using a brush or spay bottle apply the soap solution to the gas line and each join in the gas line including:
- the gas connection at the inlet of the BBQ
- all gas hose connections
- the gas connection at the gas cylinder
• If bubbles appear, there is a gas leak.
• If the leak is at the connection, re-tighten and re-seal.
• If the leak is anywhere else or you cannot resolve the leak by tightening the connection DO NOT PROCEED.
• Replace gas hose and regulator.
• Replacement hose and regulators can be purchased from your local BBQ retail specialist.
28GENERAL INFORMATION
Hose & Regulator Safety
IMPORTANT The regulator and hose assembly supplied with the
barbecue are suitable for Propane Gas or Universal
L.P.G. only.
Read these instruction carefully prior to
use. Familiarise yourself with the ap- The pressure regulator and hose assembly
supplied with the barbecue must be used. Replace-
pliance before connecting it to it’s gas ment of pressure control and hose connector shall
container. Keep these instructions for be carried out using Morsø genuine products only.
future reference. Contact your local dealer.
When connecting the hose and regulator assembly to
the gas cylinder, take care to avoid unnecessary twist-
IF YOU SMELL GAS ing of the flexible hose.
After the assembly has been secured, turn on the gas
1. Shut off gas to the barbecue at its and check for leaks by brushing a soap and water
source, if possible. solution over all connections.
2. Extinguish any open flame. If you are unable to correct the leak by tightening the
3. Open hood. connections, turn off the gas and contact the supplier
immediately.
4. If odour continues immediately call
Always ensure the barbecue is kept away from flam-
your gas supplier or fire department. mable materials and the gas cylinder clear of any heat
source.
When changing over from an empty gas cylinder to a
full one make sure this procedure is carried out in a
Replacement of pressure well ventilated location, preferably outside, away from
control and hose connec- people and away from any sources of ignition; such as
tor shall be carried out using naked flames, pilot flames, electric heaters/equipment.
Morsø genuine products only.
Contact your local dealer. Gas Cylinder Use & Safety
This is a low pressure barbecue and must only be used
with the regulator supplied. Your barbecue is designed
for use with propane gas cylinders certified to the UK
Gas Installation Codes market.
• Barbecues must be used in accordance with the The gas cylinder should be filled by a reputable gas
installation requirements of your gas supply authority. supplier and visually inspected and re-qualified at each
filling.
• Barbecues for use with bottled gas are labelled
Always keep cylinder in an upright position. Always
‘propane gas’ or ‘Universal L.P.G’.
close the cylinder valve when the barbecue is not in use.
Do not subject gas cylinder to excessive heat.
Clearances
Minimum Clearances from combustible materials NEVER STORE YOUR GAS CYLINDER INDOORS.
must be: Rear - 300mm Sides - 300mm Above - If you store your barbecue indoors, ALWAYS discon-
1000mm nect the gas cylinder first and store the cylinder safely
outside.
Specifications Cylinders must be stored outdoors in a well ventilated
Barbecue specifications can be found on the data label area out of reach of children, and must not be stored
attached to the barbecue body. in a building, garage or any other enclosed area.
29GENERAL INFORMATION • Never lean over cooking surface when lighting.
• Never alter or modify the regulator or gas supply as-
sembly.
• This barbecue must not be used indoors.
• Only use in well ventilated areas.
FOR YOUR SAFETY • Carbon monoxide hazard - Using this appliance in
Failure to comply with these instructions could an enclosed space may cause death. Do not use in
caravans, tents, marine craft, cars, mobile homes or
result in a fire or explosion which could cause
similar locations.
serious bodily injury, death or property damage. • This appliance shall only be used in an above ground
CAUTION: Accessible parts may be very hot. open-air situation with natural ventilation, without
Keep young children away. stagnant areas, where gas leakage and products of
DO NOT modify this appliance. combustion are rapidly dispersed by wind and natural
convection.
DO NOT move this barbecue during use.
• Ensure the barbecue is set up on a level and stable
Turn off gas supply at the gas cylinder after use. surface.
• Do not move the barbecue while in use or when hot.
Parts sealed by the manufacturer or their agent Remove the drip tray before moving.
must not be manipulated by the user. This barbecue • DO NOT use the BBQ as a hotplate. The warranty
is only to be used and stored outdoors. will be voided and it violates the gas regulations, the
• Never operate this barbecue without a regulator. cooking grate provides the ventilation needed for the
• Do not test for gas leaks with an open flame. BBQ to operate safely. It is not designed to be a solid
• If this information is not followed exactly a fire hotplate device.
causing death or serious injury may occur. Do not
store a spare gas cylinder under or near this IF THERE IS A LEAK
barbecue. This barbecue is only to be used and
stored outdoors. • Turn the cylinder off.
• If there is a leak on your appliance (smell of • Ventilate the area to disperse gas.
gas) immediately attempt to turn off the cylinder • Check all connections.
valve. Remove the appliance to a well ventilated • If leak persists, keep the cylinder upright. Keep skin
location away from any ignition source. Only away from any gas or liquid escaping from the cylin-
check for leaks outdoors using soapy water. DO der.
NOT try to detect leaks using a flame. • Keep the cylinder at least 20 metres away from any
• Check for leaks by brushing a soap and water sparks or ignition sources, including electrical equip-
solution over all connections. If you are unable to ment, camera flashes, engines and motors.
correct the leak by tightening the connections, • Disperse gas by encouraging maximum ventilation and
turn off the gas and contact customer service spraying with a fine water spray.
immediately.
• Only use the hose assembly as supplied with IF THERE IS A FIRE
this appliance for connection to the cylinder - • If the fire is at the barbecue, turn the gas off at the
DO NOT USE ADAPTERS. cylinder. Smother the flames with a wet cloth, fire
• Maximum hose length - 1000mm. blanket or extinguish using a fire extinguisher.
• After use turn the gas cylinder valve off, wait • If the fire is at the cylinder, or you can not get to the
for the flame to go out, then turn the valve to turn the gas off, contact the fire brigade im-
appliance control valve off. mediately.
• Avoid twisting or kinking the flexible hose. • Using a garden hose, direct the water to the middle of
• Do not store or use petrol or other flammable the cylinder to keep it cool. Try not to extinguish the
liquids in the vicinity of this or any other flame. At least if the gas is burning, it won’t be able to
appliance. build up pressure and explode.
• Do not store empty or full spare gas cylinders
under or near this or any other appliance.
• Never test for gas leaks with a lit match or open
flame. Never light barbecue with hood closed or
before checking to ensure the burner tubes are
fully seated over gas valve orifices.
30Location of your Barbecue
DO NOT use your barbecue in garages, porches, sheds,
breezeways, or other enclosed areas. Your barbecue is
to be used OUTDOORS. The barbecue is not intended
to be installed in or on recreational vehicles and/or
boats and should not be placed under any surface that
will burn. Do not obstruct the flow of combustion and
ventilation air around the barbecue housing.
Protect Children
Keep children away from barbecue during use and until
barbecue has cooled after you have finished. Do not
allow children to operate barbecue.
Always ensure that no sporting or physical activities are
carried out in close proximity to the barbecue during
use and while still hot.
Tools You Will Need
Adjustable spanner, Philips head screwdriver.
Check Barbecue for any Damage
Inspect barbecue parts as you proceed. Contact your
supplier for assistance regarding replacement of any
damaged or missing parts. Do not assemble or operate
a barbecue that appears damaged. Barbecues for use
with gas cylinders are labelled ‘Propane Gas’. Check la-
belling at the gas connection on your barbecue.
Gas Category
Gas and Supply G30 Butane at 28-30 mbar G30 Butane and G30 Butane and
Pressure G31 Propane at 37 mbar G31 Propane at 30 mbar G31 Propane at 50 mbar
Country Code BE, CH, CY, CZ, ES, FR, GB, BE,CY, DK, EE, FR, GB, HU, IT, AT, CH, DE, SK
GR, IE, IT, LT, LU, LV, PT, SK, SI LT, NL, NO, SE, SI, SK, RO, HR,
TR, BG, IS, LU, MT, FI
Burner Main Burner × 3 Main Burner × 3 Main Burner × 3
Nominal Heat Input 2.8 kW × 1 / 2.3 kW × 2 2.8 kW × 1 / 2.3 kW × 2 2.8 kW × 1 / 2.3 kW × 2
Burner Injector Size Middle: Ø0.8 mm Middle: Ø0.8 mm Middle: Ø0.72 mm
Left & Right: Ø0.74 mm Left & Right: Ø0.74 mm Left & Right: Ø0.63mm
Total Heat Input 7.4 kW(G30:538g/h;G31:529g/h) Made in Taiwan
SUITABLE GAS TANKS
There are many different sizes of tank.
The figure shows the maximum tank size.
• Capacity of gas tank: Maximum 11 kg
• Height of gas tank: Maximum 595 mm
• Diameter of gas tank: Maximum 304 mm
Location of gas tank
Make sure there are no kinks in the gas hose.
The gas hose may be a maximum of 1 m in length. 31EXPLODED DIAGRAM
1
2
3
16
4
5
6 17
18
7 8
12 19
9 13
14
10
11 15
PARTS LIST
Part Description QTY Part Description QTY
1 Temperature Gauge 1 11 Valve 1
2 Lid 1 12 Grease Cup 1
3 Cooking Grate 3 13 Adapter 1
4 Lid Handle 1 14 Grease Cup Support 1
5 Bowl 1 15 Fixed Plate 1
6 Burner 3 16 Lid Hinge & R-Pin 2
7 Heat Insulator 4 17 Hole Cover 1
8 Base 1 18 Frame Bridge 2
9 Knob 3 19 Ignition Electrode 3
10 Plastic Feet 4
32ASSEMBLY INSTRUCTIONS
Remove any transit protection material.
A
STEP 1
Attach the lid handle using the fasteners as
shown.
CONNECTING THE GAS CYLINDER
There are two different types of gas that can
be used on your gas bbq depending on where
you live, that being either butane or propane
gas.
Both are supplied in gas cylinders.
The gas cylinders must be positioned adjacent
to the bbq.
The connection between the gas cylinder and B
the bbq is made with a regulator
It is important that you use the correct regulator
for the particular type of gas you purchase.
33GENERAL INFORMATION
CONNECTING & DISCONNECTING IGNITION PROCEDURE
TO GAS SOURCE 1. Raise the lid of the gas grill – set the cylinder valve to
Familiarise yourself with the general information and position ON.
safety guidelines located at the front of this manual. 2. Push in the gas control button and turn it anticlock-
wise until you hear a 'click/spark' and check whether
Check the spark has lit the burner.
1. Gas cylinder is filled. A sloshing sound will be heard 3. When the burner is lit, let go of the gas control but-
when shaken. ton. You can now turn the control button from ‘MAX’
2. The burner control is in the ‘OFF’ position to ‘MIN’ depending on the required heat.
4. If the burner does not light, repeat 'step 2' two to
Connecting three times, until the burner is lit.
1. Ensure valve is in OFF position. 5. If, after several attempts, the burner still does not
light, cut off the gas supply and check whether the
2. Check for any damage to the cylinder connection.
gas supply is blocked.
3. Attach the regulator to the cylinder valve.
4. Use a soapy water solution to check the joint. If bub-
bles appear the connection will need to be retight- If re–ignition is necessary while the gas barbecue is still
ened. hot, you must wait for a minimum of 5 minutes before
commencing to re–ignite (this allows accumulated gas
fumes to clear).
Length Width Height
726 mm 627 mm 498 mm
IMPORTANT
• IMPORTANT: Before connecting and disconnecting
barbecue to gas source, make sure burner controls
are in ‘OFF’ position.
• CAUTION: When the barbecue is not in use, the gas
cylinder must be disconnected.
• Check that the seals between the appliance and the
gas cylinder are in place and in good condition be-
fore connecting the gas cylinder.
• Do not use this appliance if it has damaged or worn 1. PUSH 2. TURN GENTLY
seals.
• NOTE: If for some reason, ignitor fails to produce a
spark at the electrode, barbecue can be lit by a long
barbecue match with hood open insert the match
IMPORTANT
into a hole on the underside of the barbecue and The hood must be in the open position for
turn gas control to high. lighting.
• Check performance of burner prior to installing bar- Do not smoke at any time when attempting
becue plates. to ignite the barbecue burners.
• Do not smoke when attempting to ignite barbecue.
Do not leave the barbecue unattended
• Never use volcanic rock, heat beads or other mate- when alight.
rial.
• Always use protective gloves when handling hot NEVER cover the chimney, completely or
components. partially.
34You can also read