MPLAB Code Configurator v3.xx User's Guide - Microchip Technology
←
→
Page content transcription
If your browser does not render page correctly, please read the page content below
MPLAB Code Configurator
                                           v3.xx User's Guide
             MPLAB® Code Configurator v3.xx User's Guide

Preface

               Important: Notice to customers:
               All documentation becomes dated, and this manual is no exception. Microchip tools and
               documentation are constantly evolving to meet customer needs, so some actual dialogs and/or
               tool descriptions may differ from those in this document. Please refer to our website
               (www.microchip.com) to obtain the latest documentation available.
               Documents are identified with a “DS” number. This number is located on the bottom of each
               page, in front of the page number. The numbering convention for the DS number is
               “DSXXXXXA”, where “XXXXX” is the document number and “A” is the revision level of the
               document.
                                                                                       ®
               For the most up-to-date information on development tools, see the MPLAB IDE online help.
               Select the Help menu, and then Topics to open a list of available online help files.

Introduction
                                                                      ®
This document describes how to install, configure and use the MPLAB Code Configurator (MCC)
software tool before starting or during the development process of an embedded software application
                   ®
designed with PIC microcontrollers.

Recommended Reading
This user's guide refers to MCC operation only. Other useful documents are listed below. The following
Microchip documents are available and recommended as supplemental reference resources:
  •    Release Notes for the MPLAB Code Configurator
  •    MPLAB X IDE User’s Guide

© 2018 Microchip Technology Inc.                                                       DS40001829C-page 1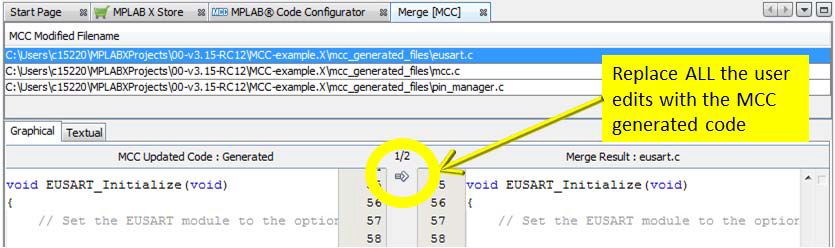
MPLAB Code Configurator v3.xx User's Guide

Table of Contents

Preface............................................................................................................................ 1

1. Introduction ...............................................................................................................3

2. Installation................................................................................................................. 4
     2.1.     Installing MPLAB Code Configurator from the Microchip Plugins Update Center........................4
     2.2.     Installing MPLAB Code Configurator from the Microchip Website............................................... 5
     2.3.     Updating MPLAB Code Configurator........................................................................................... 6
     2.4.     Older MPLAB Code Configurator Versions.................................................................................. 6

3. Operating Areas........................................................................................................ 7
     3.1.     Project Resources Area............................................................................................................... 8
     3.2.     Device Resources Area..............................................................................................................10
     3.3.     Versions Area............................................................................................................................. 11
     3.4.     Package View Area.................................................................................................................... 12
     3.5.     Table View Area......................................................................................................................... 13
     3.6.     The Composer Area................................................................................................................... 16
     3.7.     MCC Options..............................................................................................................................19

4. Generating MCC Drivers......................................................................................... 22
     4.1.     Setting Up MPLAB X IDE and Launching MCC......................................................................... 22
     4.2.     Selecting and Configurating Modules.........................................................................................23
     4.3.     Generating Code........................................................................................................................ 24

5. Generated Sources and Header Files..................................................................... 27

6. MCC Device Migration.............................................................................................29

7. Revision History.......................................................................................................30

The Microchip Web Site................................................................................................ 31

Customer Change Notification Service..........................................................................31

Customer Support......................................................................................................... 31

Microchip Devices Code Protection Feature................................................................. 31

Legal Notice...................................................................................................................32

Trademarks................................................................................................................... 32

Quality Management System Certified by DNV.............................................................33

Worldwide Sales and Service........................................................................................34

© 2018 Microchip Technology Inc.                                                                                                             DS40001829C-page 2
MPLAB Code Configurator v3.xx User'...
                                                                                                Introduction

1.   Introduction
                    ®
     The MPLAB Code Configurator (MCC) generates driver code using a Graphical User Interface (GUI).
                                                            ®
     The generated drivers control the peripherals on PIC microcontrollers. The GUI provides an easy means
                                                                                       ®
     for setting up the configuration of the peripherals. MCC is a plugin for the MPLAB X IDE.
     Additionally, the MCC is used to configure and generate libraries, which allows you to configure and
     generate code for software libraries and external components.
     The generated drivers or libraries can be used in any Microchip PIC device application program. MCC
     requires a MPLAB X IDE project to be created, or an existing project opened, before launching the MCC
     plugin. This is necessary as the MCC needs to know the device used in the project, to have access to
     device-specific information like registers, bits and configurations, and to set up the MCC GUI.
     The MCC generates source and header files based on selections made in the GUI. The generated files
     are added to the active project of MPLAB X IDE.

     © 2018 Microchip Technology Inc.                                                        DS40001829C-page 3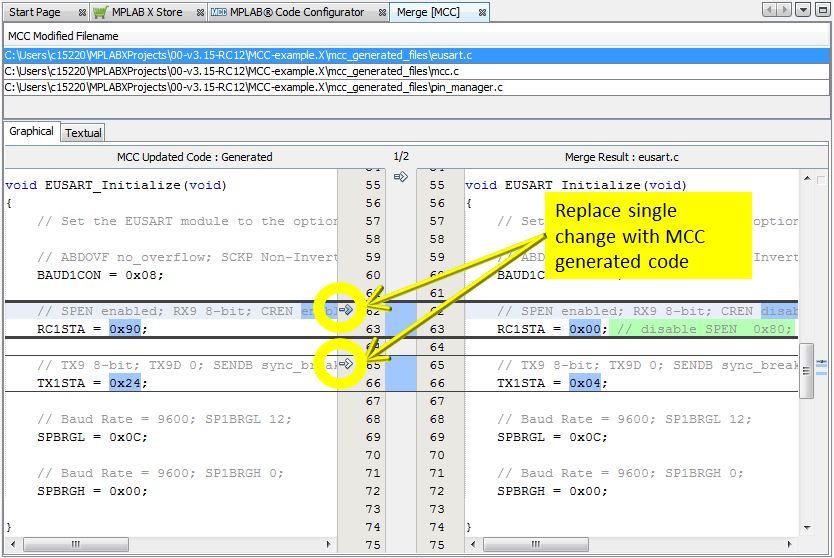
MPLAB Code Configurator v3.xx User'...
                                                                                               Installation

2.    Installation
      The MPLAB Code Configurator can be installed in two ways: via the Microchip Plugins Update Center, or
      from the Microchip website. The following chapters describe these procedures and also the MCC update
      process.

2.1   Installing MPLAB Code Configurator from the Microchip Plugins Update Center
      MCC is not installed together with the MPLAB X IDE by default, so you must download it separately and
      install it. One way to do so is via the Microchip Plugins Update Center:
        1. In the MPLAB X IDE, go to Tools -> Plugins.
        2. Go to the Available Plugins tab.
        3. Select MPLAB Code Configurator and click the Install button. See figure below.
        4. The Plugin installer opens. Click Next and check the Terms and Agreements. After this step, the
             Plugin installer begins downloading the MCC plugin.
        5. When the MCC plugin download is complete, MPLAB X IDE will ask to be restarted. Upon restart,
             the plugin is installed.
        6. You can now open MCC on a new or already existing MPLAB X IDE project. See Section 4.1
             “Setting Up MPLAB X IDE and Launching MCC.“
      Figure 2-1. Installing MPLAB Code Configurator

      © 2018 Microchip Technology Inc.                                                     DS40001829C-page 4
MPLAB Code Configurator v3.xx User'...
                                                                                                    Installation

2.2   Installing MPLAB Code Configurator from the Microchip Website
      The MCC plugin can also be downloaded from the Microchip website by typing the address
      www.microchip.com/mcc in a web browser, selecting the Current Download tab and downloading the
      Current Version .zip file. See Figure 2-2.
      Figure 2-2. Downloading MCC from the Microchip Website

      Once downloaded, extract the archive which contains the MCC plugin to a location of your preference. To
      install the plugin you downloaded, complete the following instructions:
        1. Open MPLAB X IDE.
        2. Go to Tools -> Plugins.
        3.   Select the Downloaded tab and click on the Add Plugins... button.
        4.   Navigate to the folder where you extracted the downloaded .zip file and select the MCC plugin. It
             should have a .nbm file extension.
        5.   Click on the Install button. MPLAB X IDE will ask to be restarted. Upon restart, the plugin is
             installed. See figure below.
        6.   You can now open MCC on a new or already existing MPLAB X IDE project. See Section 4.1
             “Setting Up MPLAB X IDE and Launching MCC.”
      Figure 2-3. Installing MCC from Downloaded File

      © 2018 Microchip Technology Inc.                                                         DS40001829C-page 5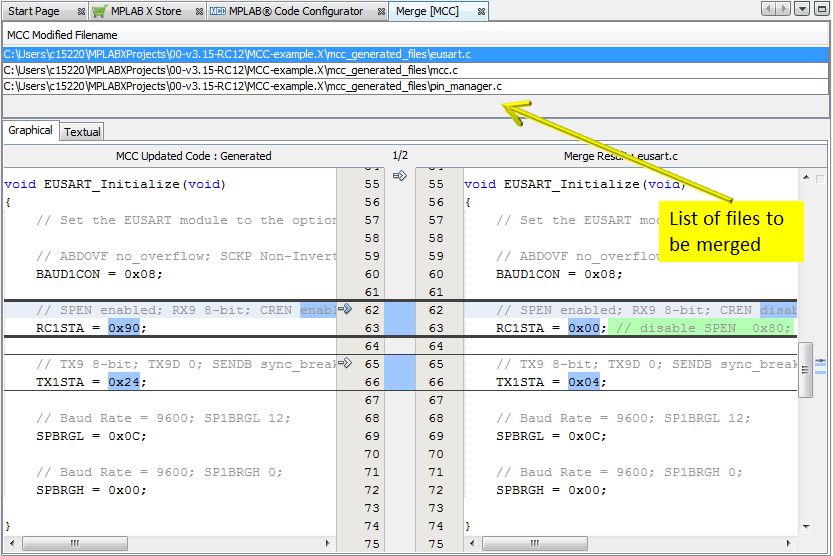
MPLAB Code Configurator v3.xx User'...
                                                                                                   Installation

2.3   Updating MPLAB Code Configurator
      When a MCC version newer than the one installed is available, the MPLAB X IDE will display a
      notification in the bottom right corner of the IDE window. By clicking on it, the plugin update wizard is
      launched. In the wizard, simply click on the Install button, which will download and install the new MCC
      plugin version. See figure below.
      Figure 2-4. Updating MPLAB Code Configurator

2.4   Older MPLAB Code Configurator Versions
      Older MCC versions are available at the same www.microchip.com/mcc address, under the Archive
      Download tab.

      © 2018 Microchip Technology Inc.                                                         DS40001829C-page 6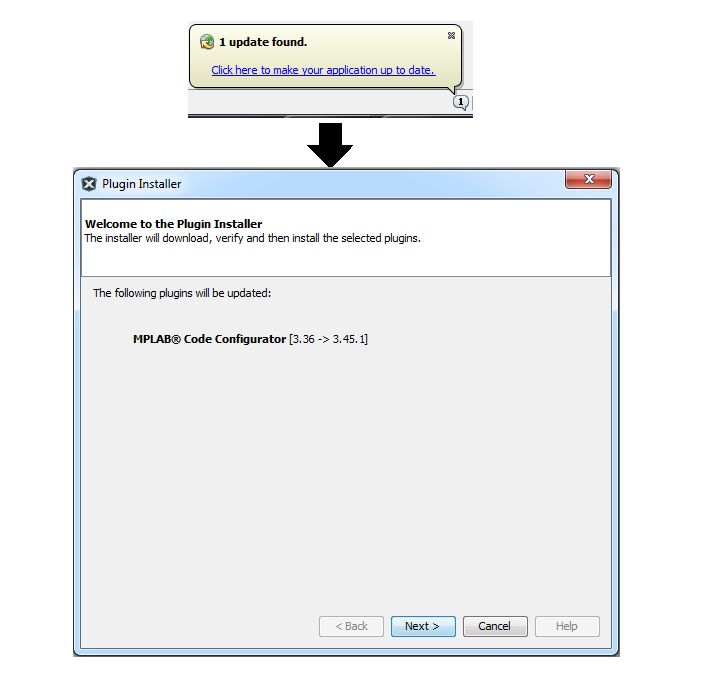
MPLAB Code Configurator v3.xx User'...
Operating Areas
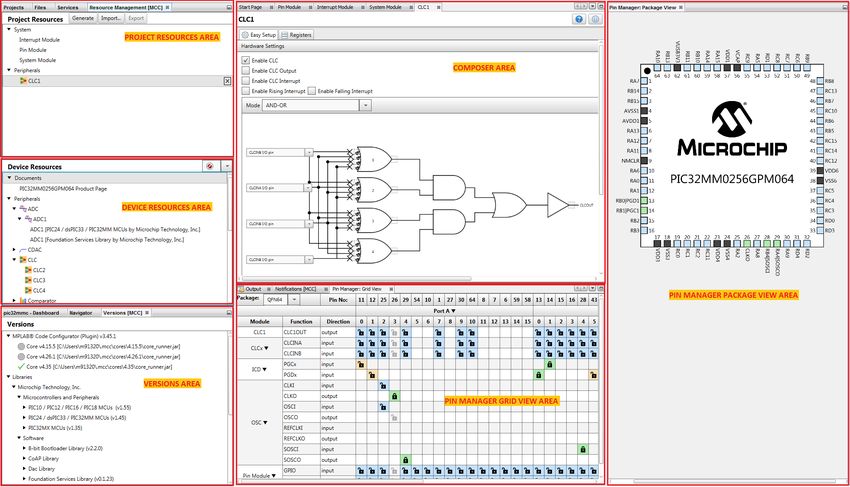
3. Operating Areas
The MCC user interface consists of six main operating areas, as shown in Figure 3-1.
1. Project Resources Area: displays the complete list of peripherals, libraries and external
components available for the selected device, based on the loaded libraries in the Versions Area.
2. Device Resources Area: displays the peripherals, libraries or external components selected for
the current project. Selection is done via the Project Resources Area. The System Module, Pin
Module and Interrupt Module are selected by default. Configuration for each of the selected
modules is done through the Composer Area. Selecting a component from this area will move the
component to the Project Resources area.
3. Versions Area: shows the complete list of MCC Cores, Peripheral Libraries and Software Libraries
which can be used with the selected device. Some of these are installed together with MCC, others
are available for download. Depending on the selected device, some core and library versions are
interchangeable.
4. Composer Area: this is the main area in which a peripheral or library driver can be configured. It
displays the possible configurations of the peripheral/library.
5. Pin Manager Grid View Area: contains three inner tabs: Notifications (errors, warnings and
general information regarding the current selections), Pin Manager - Grid View (a table version of
the Pin Module Package View) and Output (MCC Log & MPLAB X IDE Log).
6. Pin Manager Package View Area: graphic interface for pin selection and configuration.
Bidirectional operation with the Pin Manager Grid View.
Figure 3-1. MCC Operating Areas
Note: All operating areas are dockable. Each can be dragged and dropped into another position, even
out of the MPLAB X IDE main window (closing the IDE however will close all MCC windows, including the
ones moved outside the IDE).
© 2018 Microchip Technology Inc. DS40001829C-page 7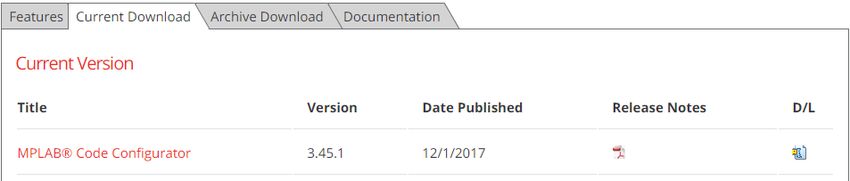
MPLAB Code Configurator v3.xx User'...
                                                                                             Operating Areas

3.1   Project Resources Area
      The Project Resources Area (Figure 3-2) displays the list of on-chip peripherals, external components
      and libraries that have been configured for the MCC project. The peripheral and libraries are added to the
      project by selecting them from the Device Resources Area. To add a peripheral or library to the Project
      Resources Area, double-click on its name in the Device Resources Area. Configuration can then be done
      via the corresponding GUI in the Composer Area.
      A module in the Project Resources window can be removed from the project by clicking the X button to
      the right of the module name in the Project Resources Area. The module will be removed from the
      MPLAB X IDE project. When a module is removed from the Project Resources, all of the unsaved
      configuration information for that module is lost.
      There are three system modules that are always available in the Project Resources Area. These modules
      cannot be removed. The modules are:
        1.   Interrupt Module: configures the interrupts for the device.
        2.   Pin Module: configures the pins for the device.
        3.   System Module: configures the system clock, Configuration bits, and other device-level functions
             for the device.
      At the top of the window, there are three buttons:
        •    Generate: once the project configuration has been completed, clicking this button will trigger the
             code generation process for that specific configuration.
        •    Import: an MCC configuration file (.mc3 extension) can be imported into the current project. If the
             selected configuration has been created for another device than the one used in the current project,
             an alert message will pop up offering the possibility of an experimental configuration migration (See
             Section 6 “MCC Device Migration”) or canceling the import process. See Figure 3-3.
        •    Export: allows the export of partial configurations. Any loaded module in the Project Resources
             except System modules can be selected for a partial configuration by right-clicking on the module
             and selecting "Mark for config export". See Figure 3-4. All modules marked for export are shown in
             bold. Clicking the Export button creates an MCC configuration consisting only of the modules
             marked for export. To remove selection use "Unmark from config export" for a specific module or
             "Unmark all for config export" for all modules/components selected for export.
      The Project Resources tree shown in Figure 3-2 can also be navigated and handled by using the
      following keys:
        1. Up and down arrow keys: for moving up and down in the tree, respectively
        2. Right arrow key: for expanding a node
        3. Left arrow key: for collapsing a node

      © 2018 Microchip Technology Inc.                                                         DS40001829C-page 8
MPLAB Code Configurator v3.xx User'...
Operating Areas
Figure 3-2. Project Resources Area
Figure 3-3. Importing a Configuration Created for a Different Device
Figure 3-4. The Context Menu of the Project Resources Area
© 2018 Microchip Technology Inc. DS40001829C-page 9MPLAB Code Configurator v3.xx User'...
Operating Areas
Besides the partial configuration export mechanism, the Context menu of the Project Resources Area
(Figure 3-4) includes several other operations on the loaded components or modules such as:
• Force Update: regenerates code for all the selected modules/components, even if there were no
modifications added to their configuration. See Section 4.3 “Generating Code”.
• Refresh [module_name] Windows: reopens the configuration window of the selected module if
that window has been closed previously. If the Context menu is invoked by right-clicking under the
Resources list, with no module/component selected, this option will be available as Refresh Module
Windows and its effect will be global - all previously closed MCC windows will be reopened.
• [module_name] Help: opens the help content for the user interface of the selected module/
component, if available.
3.2 Device Resources Area
The Device Resources Area (see figure below) lists data sheet, external components and libraries
available for the device configured in the MPLAB X IDE project. When the name of a peripheral or library
is double-clicked, it is moved from the Device Resources Area to the Project Resources Area,
simultaneously invoking the Pin Manager with all associated I/O pins.
Note: The Documents section of the Device Resources Area provides a link to the data sheet of the
selected device on www.microchip.com.
Figure 3-5. Device Resources Area
© 2018 Microchip Technology Inc. DS40001829C-page 10MPLAB Code Configurator v3.xx User'...
Operating Areas
The Device Resources tree shown in the previous figure can also be navigated and handled by using the
following keys:
1. Up and down arrow keys: for moving up and down in the tree, respectively
2. Right arrow key: for expanding a node
3. Left arrow key: for collapsing a node
Right-clicking on a module or component in this tree shows the Device Resources Context menu through
which the help content of the selected module can be invoked.
The Device Resources list can be filtered via the top combo box (see the figure below). Available filters
are: all supported and tested modules, all supported modules (including untested ones), all modules
(including unsupported ones).
Figure 3-6. Resource Filtering in Device Resources Area
3.3 Versions Area
The Versions Area provides information about the versions of each MCC Core, Peripheral Library,
Software Library or other component installed on the local machine. Over time, multiple versions of the
libraries may be available. MCC can be configured to use a specific version of a Library for the current
MCC project.
Loaded versions are displayed with a green tick, compatible but not loaded versions are displayed with a
grey circle, and available versions which are unsupported by the selected core version are displayed with
a circle backslash symbol (see Figure 3-7).
The MCC Core versions can be switched by right-clicking on an available core version and selecting
"Switch core version" from the Context menu. Library versions can be loaded by right-clicking on a
version of a component/module and selecting "Mark For Load." This action triggers the Load Selected
Library button to appear at the top of the Versions Area. By clicking the button, all library versions which
have been marked are loaded into MCC. Multiple selection is allowed; several components can be loaded
at the same time. Only one version for each module/component is allowed to be loaded at a time.
If the component is already installed on the local machine, the absolute path to the corresponding .jar
file is displayed next to the component name. If the component has not yet been installed, the "Available
for download" message is displayed instead. Selecting an uninstalled component for load and then
pressing the Load Selected Libraries button will download the corresponding .jar file from a Microchip
server and will subsequently load it in MCC, provided that the selected version is compatible with the
loaded core version.
© 2018 Microchip Technology Inc. DS40001829C-page 11MPLAB Code Configurator v3.xx User'...
Operating Areas
Figure 3-7. Versions Area
Besides the Versions Area, a core or a library can be loaded also via the MPLABX IDE menu in Tools →
Options → Plugins → MPLAB Code Configurator (see Section 3.8 “MCC Options”).
Note: All MCC libraries are published via the Microchip website: www.microchip.com/mcc.
3.4 Package View Area
The following color combinations are associated with the pins in Graphical or Table View:
1. Gray colored pin: the pin is not usable in the selected configuration and there is no enabled
module which has any functionality on that pin. There are also grayed out locks on a white
background that indicate pins that are locked out by selected system functions.
2. Blue colored pin: pins that are available to be allocated to a module.
3. Green colored pin (with a lock): the pin has been allocated and selected for a module. The name
displayed against the pin is either the name of the pin in the module’s context or a custom name
entered.
4. Green colored pin (with chain link): the pin is shared between multiple functions.
5. Yellow colored pin: a possible alternate pin for an already allocated pin function.
6. Grayed out locks on a white background: pins that are locked out by selected system functions.
The graphical Pin Manager can be zoomed in and out in order to adjust its visibility. This can be done by
scrolling the mouse wheel when the mouse is over the Package View. Zooming can also be achieved by
the “+” and “-” keys on the keyboard (useful if the mouse is not available).
© 2018 Microchip Technology Inc. DS40001829C-page 12MPLAB Code Configurator v3.xx User'...
Operating Areas
By right-clicking on a specific pin all available pin functions are listed for selection. A snapshot of the
package view configuration can be saved in PNG format by right-clicking on the package and selecting
"Export Image."
Figure 3-8. Package View Area
3.5 Table View Area
This area contains three inner tabs: Pin Manager Grid View, Output and Notifications.
3.5.1 The Pin Manager Grid View
In the Pin Manager Grid View, the device package can be selected from a drop-down list. The package
selection is in the upper left side of the Pin Manager Table View. In the figure below, the drop-down list
shows that the QFN64 package has been selected. The selected package will be displayed in the
Package View. The pin numbers in the Table View will also show the pin numbers for the selected
package.
© 2018 Microchip Technology Inc. DS40001829C-page 13MPLAB Code Configurator v3.xx User'...
Operating Areas
Figure 3-9. The Grid View Area
The three leftmost columns in the Table View indicate the module’s name, functionality name and the
direction, respectively.
The Table View allows you to:
• Expand/collapse rows and ports (Figure 3-10)
• Hide and show ports and rows (Figure 3-11 and Figure 3-12)
• Show only the pins that are configured (Isolate) (Figure 3-13)
Figure 3-10. Collapsing Ports and Rows
Figure 3-11. Hiding Ports and Rows
© 2018 Microchip Technology Inc. DS40001829C-page 14MPLAB Code Configurator v3.xx User'...
Operating Areas
Figure 3-12. Restoring Ports and Rows (Show All)
Figure 3-13. Isolating the Selected Pins
3.5.2 The MPLAB Code Configurator - Output Tab
This tab displays the MCC operation results. See figure below. The MPLAB X IDE Log is also displayed
under the Output tab when you specifically open it from the View -> IDE Log menu.
Figure 3-14. The MPLAB Code Configurator - Output Tab
3.5.3 The Notifications Tab
During the configuration process, several messages may be displayed in the Notifications tab (Figure
3-15) to help identify issues or simply in order to make sure a specific setting is configured as intended.
These are indexed in the Notifications tab by:
1. Category: identifies the notification as an alert or information that the module depends on another
module.
2. Module Name: is the name of the module that generated the notification.
3. Type: indicates the severity of the notification.
There are four types of notifications:
© 2018 Microchip Technology Inc. DS40001829C-page 15MPLAB Code Configurator v3.xx User'...
Operating Areas
• SEVERE: either the code generation or the compilation process will be faulty with the current
configuration.
• WARNING: the code will be generated according to settings made and it may compile, but it might
also fail to function as intended.
• HINT: this provides information to assist in the successful configuration of the module. The module
and the MCC can still be used. Action might be required.
• INFO: information only, no action is required.
These can be filtered out using the Type combo box. If there are any WARNING or SEVERE type
messages present in the Notifications tab when you click the Generate button, a message box displays,
giving the option of reconfiguration in order to eliminate the possible errors in the current settings. This
action can be skipped, assuming the notifications have been reviewed and taken into consideration.
Figure 3-15. The Notifications Tab
Note: The notification type may change as you change the configuration of MCC. For example,
WARNING might indicate that a module requires another module to be added to the project to operate
correctly. After the module is added, the notification type would change to INFO.
3.6 The Composer Area
When a peripheral, library or other external component is selected from the Project Resources Area, its
corresponding configuration GUI is displayed in the Composer Area. The Composer Area (Figure 3-16) is
where peripherals and libraries are configured based on the application’s requirements.
© 2018 Microchip Technology Inc. DS40001829C-page 16MPLAB Code Configurator v3.xx User'...
Operating Areas
3.6.1 The Easy Setup Tab
Figure 3-16. The Easy Setup Tab of the PIC16F1947 EUSART Module
The EUSART Easy Setup tab in the Composer Area allows configuring various EUSART parameters
related to transmission and reception operations.
3.6.2 The Registers Tab
In addition to the Easy Setup tab in the module’s Composer, MCC also provides a Registers tab (Figure
3-17). The Registers tab provides direct access for you to configure the module’s registers and settings,
providing unrestricted access to the configuration of the module.
Any module configuration done using the Easy Setup tab will be reflected in the values displayed in the
Registers tab. Likewise, changes performed in the Registers tab will be reflected in the values in the
Easy Setup tab.
© 2018 Microchip Technology Inc. DS40001829C-page 17MPLAB Code Configurator v3.xx User'...
Operating Areas
Figure 3-17. The Register View
3.6.3 The Pin Module Tab
For any pin which has been configured in the Pin Manager Table View, additional configuration of that pin
can be done using the Pin Module View in the Composer Area. To display the Pin Module View, click on
the Pin Module tab in the Project Resources Area. See Figure 3-18.
The following settings are available in this tab (depending on the selected pin): pin direction, custom
name (editable text field which will be reflected in the generated code), initial value, analog/digital
function, weak pull-ups, interrupt-on-change.
© 2018 Microchip Technology Inc. DS40001829C-page 18MPLAB Code Configurator v3.xx User'...
Operating Areas
Figure 3-18. The Pin Module Tab
3.7 MCC Options
Several aspects of the operation of the MCC can be managed by using the “Options” panel (see figure
below), which can be invoked by clicking Tools → Options → Plugins → MPLAB Code Configurator in
the menu bar of the MPLAB X IDE.
Figure 3-19. The MCC Option Panel
The MCC Options panel offers the following controls:
• File Handling
• Generated Line Endings
• Editor Behavior
© 2018 Microchip Technology Inc. DS40001829C-page 19MPLAB Code Configurator v3.xx User'...
Operating Areas
3.7.1 MCC File Handling
1. Remove unused files from the project: enabling this option tells the MCC to remove .c and .h
files for modules which were removed from the MCC configuration between the subsequent
generation procedures. This option ensures that the files which are included in the project (and thus
in the compilation) are only those which are strictly necessary. However, this will not delete the files
from the disk.
2. Delete unused files from the disk: this option gets enabled only when selecting “Remove unused
files from the project.” This performs the additional task of deleting unused files from the disk. Once
a file is deleted, it cannot be recovered.
3.7.2 MCC Line Endings
Specify the type of line endings to use in the files generated by MCC. The default is DOS ().
Unix line endings () may be specified.
3.7.3 Editor Behavior
1. Always ask before removing a module: enabling this control enables the “Are you sure?” dialog
box which appears while disabling or removing an enabled module.
2. Always ask before removing a pin: enabling this control enables the “Are you sure?” dialog box
which appears while deallocating or removing a pin from a peripheral.
3.7.4 Installing a MPLAB Code Configurator Library
The MPLAB Code Configurator provides a peripheral or software library installation feature. You can use
this feature to add MCC-compatible libraries. There are several libraries for various applications you can
choose from on the http://www.microchip.com/mcc web page. An MCC Library file should have a .jar
or a .mc3lib file extension. Once you have downloaded this file, open the MPLAB X IDE and in the
above menu go to Tools → Options → Plugins → MPLAB Code Configurator 3.x, click on the Install
Library button and select the .jar file via the Open File dialog box. The Versions window will now list
your newly added library as installed.
If there are multiple versions of a library, the newly installed one will not be the loaded one. To load a
particular version of a library, right-click on it and select “Mark for Load,” which will then highlight your
choice. If you have multiple libraries with multiple versions in each, you can highlight one from each
before loading them. See Section 3.3. “Versions Area” for more details about switching library versions.
Removing a library is done using the Remove Library button. The File selection dialogue window will
open your Library folder. Select the library you want to remove and click on the Remove button on the
File selection dialogue. You can verify that the library is no longer present on your machine anymore by
going to the Versions operating area - the library version you removed is not present on your machine
anymore. It may be present as available for download.
If you attempt to remove a library you are currently using (green tick in the Versions area), MCC will not
allow you to do so. In order to remove that library version, you need to switch to another version, go back
to the Options window and press the Remove Library button again for the library version you want to
delete.
3.7.5 Installing a MPLAB Code Configurator Core
The MPLAB Code Configurator provides a core switching feature. You can use this feature to work
simultaneously on various projects with different core versions without uninstalling or reinstalling the
plugin. In order to install a new core, you must first download the new core from the Microchip MCC web
page (http://www.microchip.com/mcc). This file should have a .mc3core file extension. Once you have
downloaded this file, open the MPLAB X IDE and in the above menu go to Tools → Options → Plugins
© 2018 Microchip Technology Inc. DS40001829C-page 20MPLAB Code Configurator v3.xx User'...
Operating Areas
→ MPLAB Code Configurator 3.x, click on the Install Core button and select the .mc3core file via the
Open File dialog box. The Versions window will now list your fresh core installation.
To switch to another core version, either double click on it, or right-click on it and select “Switch Core
Version.” The Versions window will now refresh the core selection with your choice. You can always
check the core installations by opening the Core folder, from Tools → Options → Plugins → MPLAB
Code Configurator 3.x path. Refer to Section 3.4. “Versions Area” for more details about core switching.
Removing a core version is done from the Remove Core button. The Folder selection dialogue window
will open your "Core" folder. Select the core version you want to remove and click on the Remove button
on the Folder selection dialogue. You can verify that the core version is no longer present on your
machine anymore by going to the Versions operating area - the core version you removed is not present
on your machine anymore. It may be present as available for download.
If you attempt to remove a core version you are currently using (green tick in the Versions area), MCC will
not allow you to do so. In order to remove that core version, you need to switch to another core version,
go back to the Options window and press the Remove Core button again for the core version you want to
delete.
© 2018 Microchip Technology Inc. DS40001829C-page 21MPLAB Code Configurator v3.xx User'...
Generating MCC Drivers
4. Generating MCC Drivers
Now that you have installed MCC and learned about its main operating areas, it's time to set up MCC
according to your needs and begin configuring your project. The following subsections cover basic MCC
operation and the code generation process.
4.1 Setting Up MPLAB X IDE and Launching MCC
To generate drivers using the MCC in MPLAB X IDE, follow these steps:
1. Create a new MPLAB X IDE project or open an existing project (see figure below).
2. If multiple projects are open in MPLAB X IDE, set one as the main (active) project by selecting “Set
as Main Project” in the MPLAB X IDE. For the active project, the MCC automatically includes the
generated driver files.
3. Open the MCC plugin tool. In the menu bar of the MPLAB X IDE, go to Tools → Embedded →
MPLAB Code Configurator 3.x: Open/Close. Or click on the MCC icon in the MPLAB X IDE
toolbar.
Note: For MAC users, the “Embedded” selection will be under the Preferences menu. This launches the
MCC GUI.
© 2018 Microchip Technology Inc. DS40001829C-page 22MPLAB Code Configurator v3.xx User'...
Generating MCC Drivers
Figure 4-1. Opening the MCC in MPLAB X IDE
When opening MCC for the first time on an MPLAB X project, the configuration saving dialog will be
displayed asking for a name and saving path for the MCC configuration file attached to the project. The
MCC configuration is also saved to the disk when the Generate button is pressed, or if the MPLAB X IDE
Save button is clicked. An existing MCC configuration file can be loaded by double-clicking on the
desired .mc3 file in the Important Files section of the MPLAB X IDE project.
4.2 Selecting and Configurating Modules
After opening the MCC, peripheral and library modules can be added to the project.
1. In the Project Resource Area, select the peripheral or library module which needs to be configured
by clicking the module’s name. After a peripheral or library module is selected for configuration, the
configuration GUI for that peripheral is displayed in the Composer Area.
2. Configure the peripheral as required for your application in the Composer Area.
3. Configure the pins in the Pin Manager Area depending upon the application requirements.
© 2018 Microchip Technology Inc. DS40001829C-page 23MPLAB Code Configurator v3.xx User'...
Generating MCC Drivers
4.3 Generating Code
When the MCC Generate button is pressed in the Project Resources window, the listed actions are
performed by MCC. Details of the code generation are shown in the MCC Output tab. See Section 3.6.2
“The MPLAB Code Configurator - Output Tab.”
1. The MCC configuration file is saved.
2. MCC generates code for the peripheral or library module if the module’s configuration has changed
since the last time MCC generated code for that module.
Note: You can force all modules to be generated by MCC by right-clicking in the Project Resources
window and selecting “Force Update,” before clicking on the Generate button.
If MCC attempts to regenerate a file on the disk that has been modified outside of MCC, the Merge
[MCC] window is displayed. The Merge [MCC] window allows you to select whether to keep the modified
file (default action), or to replace the modified content with the content generated by MCC.
The Merge [MCC] window is discussed in Section 4.3.2 “The Merge [MCC] Window.”
4.3.1 Saving and Loading the MCC Configuration
Saving and loading the MCC configuration is integrated into the MPLAB X IDE Save and Load functions.
The MCC configuration is saved whenever the Generate button is pressed. You can also save the MCC
configuration by clicking on the MPLAB X IDE Save tool, or selecting Save from the File menu.
The MCC configuration file is included in the MPLAB X IDE project, under the Important Files folder. The
configuration file uses the extension .mc3. Double-clicking on the MCC configuration file will cause that
MCC configuration to be loaded.
4.3.2 The Merge [MCC] Window
If any of the files generated by the MCC has been edited outside of MCC and saved to the disk, then the
Merge [MCC] window will appear in the Composer Area. The Merge [MCC] window allows you to decide
whether to keep the edits, or to replace them with the MCC newly generated code.
Note: Your edits will never be overwritten by the MCC generated code, except by explicit action in the
Merge [MCC] window.
When changes have been made both to a generated file and also in the corresponding MCC UI within the
Composer Area, the Merge [MCC] window shown in Figure 4-2 will be displayed. The Merge [MCC]
window allows you to resolve the conflicts between the newly generated file and the edits you have made
to the file.
When the newly generated MCC content has been accepted, MCC makes the changes to the file. To the
MPLAB X IDE, these changes are the same as if you typed in the new content. The normal MPLAB X
IDE edit undo can be used in the MCC Merge operation.
© 2018 Microchip Technology Inc. DS40001829C-page 24MPLAB Code Configurator v3.xx User'...
Generating MCC Drivers
Figure 4-2. Merge [MCC] Window - File List
A list of all the files that need to be merged is shown at the top of the Merge [MCC] window. You must
select each file in the list, in turn, to ensure that all of the newly generated code is incorporated into the
project.
At the top of the Merge [MCC] window, in the center margin, there is an arrow, as shown in Figure 4-3.
Clicking on the arrow will replace all of your edits in the current file with the MCC updated code that the
MCC has just generated. The numbers above the arrow indicate the current difference and the total
number of differences.
Figure 4-3. Merge [MCC] Window - Replacing All Edits with MCC Generated Code
© 2018 Microchip Technology Inc. DS40001829C-page 25MPLAB Code Configurator v3.xx User'...
Generating MCC Drivers
The individual lines of MCC Updated Code can be selected to replace the edited code. As shown in
Figure 4-4, clicking on the arrows in the right margin of the left window will copy the MCC Updated Code
to the generated driver file. Once the changes are accepted, the Merge mechanism will remove the
highlighted file and highlight the next file on the list. To insure all updates are completed, a warning will be
generated if the Merge mechanism is closed before all the changes are accepted.
Figure 4-4. Merge [MCC] Window - Replacing Single Changes with MCC Generated Code
Note:
1. Remember to merge the code for every file shown in the file list in the Merge [MCC] window.
2. Be sure to save all the changed files from the Merge process.
© 2018 Microchip Technology Inc. DS40001829C-page 26MPLAB Code Configurator v3.xx User'...
Generated Sources and Header Files
5. Generated Sources and Header Files
The generated drivers will be included in the active MPLAB X IDE project, as shown in the figure below.
Figure 5-1. Generated Source and Header Files
1. The mcc.h and mcc.c files include the definitions of Configuration bits and the
‘OSCILLATOR_initializer’ function. These definitions are based on the settings which were
made for the System module in the Composer. Also included is the ‘SYSTEM_initializer’
function which can be called in the application program to call all the other default initializers (the
ones marked in the GUI by sprocket symbol).
2. The pin_manager.h and pin_manager.c files include the Pin Manager initializer functions
based on the configurations which were made in the Pin Manager GUI.
3. The interrupt_manager.h and interrupt_manager.c files are optional files which are
generated only when peripheral interrupts are enabled and they include interrupt initializer
functions.
4. The .c and .h are module specific files and include each module’s peripheral\library configuration
functions.
5. The main.c file is generated only when the MCC detects that there is no main.c file present in
the project. If there is any previous main.c in the project regardless of its creator (you or the
© 2018 Microchip Technology Inc. DS40001829C-page 27MPLAB Code Configurator v3.xx User'...
Generated Sources and Header Files
MCC), it will not generate or overwrite the existing one. When using a main.c not generated by the
MCC, the lines ‘#include "mcc_generated_files/mcc.h";’ and
‘SYSTEM_Initializer()’ need to be added to the main.c file. The main.c file generated by
the MCC may include commented out code lines to enable interrupts. Remove the comments from
the appropriate lines if the application requires interrupts to be enabled when it starts.
The functions provided in any of these MCC generated files can be called from the user application code,
as required. The MPLAB X IDE provides auto-completion assistance of all of the MCC generated content.
While editing source code in the project, start typing in a MCC API, or MCC variable name, and press
. The MPLAB X IDE will show a list of options to complete the entry.
© 2018 Microchip Technology Inc. DS40001829C-page 28MPLAB Code Configurator v3.xx User'...
MCC Device Migration
6. MCC Device Migration
Using a MCC configuration created for one device, on a different device is called MCC device migration.
Note: MCC device migration is not supported in MCC.
It is possible that attempting to use a MCC configuration on a device other than the one for which it was
created, might appear not to fail. It is entirely the user's responsibility to determine if the MCC code
generated as the result of device migration is suitable for use in their application.
Unintended MCC device migration may occur if the selected device in the MPLAB X IDE project is
changed after MCC has been configured for that project. Copying a MCC configuration file (*.mc3) to
another MPLAB X IDE project may also cause MCC device migration or other unintended operation.
© 2018 Microchip Technology Inc. DS40001829C-page 29MPLAB Code Configurator v3.xx User'...
Revision History
7. Revision History
Revision A (January 2016)
Initial release of the document.
Revision B (May 2016)
Revise Figure 1-1; Revise Chapter 2; Revised Figure 2-5 Title; Add Figures 2-6 through 2-10; Revise
Chapter 3.
Revision C (March 2018)
Added Chapter 2 Installation; updated text in Chapter 3 Operating Areas; removed previous Figures 1-1,
2-8, 2-13, 2-16, 2-17, 2-18 and 2-19; changed or replaced various figures; added Figures 3-3, 3-4, 3-6,
added text in Chapter 3 in Project Resources Area and Versions Area; moved text to Package View Area;
added subchapter 3.5.3. The Notification Tab; subchapter 3.6.3 The Pin Module Tab; subchapter 3.7.4
Installing a MPLAB Code Configurator Library; subchapter 3.7.5 Installing a MPLAB Code Configurator
Core and different text corrections throughout the document.
© 2018 Microchip Technology Inc. DS40001829C-page 30MPLAB Code Configurator v3.xx User's Guide
The Microchip Web Site
Microchip provides online support via our web site at http://www.microchip.com/. This web site is used as
a means to make files and information easily available to customers. Accessible by using your favorite
Internet browser, the web site contains the following information:
• Product Support – Data sheets and errata, application notes and sample programs, design
resources, user’s guides and hardware support documents, latest software releases and archived
software
• General Technical Support – Frequently Asked Questions (FAQ), technical support requests,
online discussion groups, Microchip consultant program member listing
• Business of Microchip – Product selector and ordering guides, latest Microchip press releases,
listing of seminars and events, listings of Microchip sales offices, distributors and factory
representatives
Customer Change Notification Service
Microchip’s customer notification service helps keep customers current on Microchip products.
Subscribers will receive e-mail notification whenever there are changes, updates, revisions or errata
related to a specified product family or development tool of interest.
To register, access the Microchip web site at http://www.microchip.com/. Under “Support”, click on
“Customer Change Notification” and follow the registration instructions.
Customer Support
Users of Microchip products can receive assistance through several channels:
• Distributor or Representative
• Local Sales Office
• Field Application Engineer (FAE)
• Technical Support
Customers should contact their distributor, representative or Field Application Engineer (FAE) for support.
Local sales offices are also available to help customers. A listing of sales offices and locations is included
in the back of this document.
Technical support is available through the web site at: http://www.microchip.com/support
Microchip Devices Code Protection Feature
Note the following details of the code protection feature on Microchip devices:
• Microchip products meet the specification contained in their particular Microchip Data Sheet.
• Microchip believes that its family of products is one of the most secure families of its kind on the
market today, when used in the intended manner and under normal conditions.
• There are dishonest and possibly illegal methods used to breach the code protection feature. All of
these methods, to our knowledge, require using the Microchip products in a manner outside the
operating specifications contained in Microchip’s Data Sheets. Most likely, the person doing so is
engaged in theft of intellectual property.
• Microchip is willing to work with the customer who is concerned about the integrity of their code.
© 2018 Microchip Technology Inc. DS40001829C-page 31MPLAB Code Configurator v3.xx User's Guide
• Neither Microchip nor any other semiconductor manufacturer can guarantee the security of their
code. Code protection does not mean that we are guaranteeing the product as “unbreakable.”
Code protection is constantly evolving. We at Microchip are committed to continuously improving the
code protection features of our products. Attempts to break Microchip’s code protection feature may be a
violation of the Digital Millennium Copyright Act. If such acts allow unauthorized access to your software
or other copyrighted work, you may have a right to sue for relief under that Act.
Legal Notice
Information contained in this publication regarding device applications and the like is provided only for
your convenience and may be superseded by updates. It is your responsibility to ensure that your
application meets with your specifications. MICROCHIP MAKES NO REPRESENTATIONS OR
WARRANTIES OF ANY KIND WHETHER EXPRESS OR IMPLIED, WRITTEN OR ORAL, STATUTORY
OR OTHERWISE, RELATED TO THE INFORMATION, INCLUDING BUT NOT LIMITED TO ITS
CONDITION, QUALITY, PERFORMANCE, MERCHANTABILITY OR FITNESS FOR PURPOSE.
Microchip disclaims all liability arising from this information and its use. Use of Microchip devices in life
support and/or safety applications is entirely at the buyer’s risk, and the buyer agrees to defend,
indemnify and hold harmless Microchip from any and all damages, claims, suits, or expenses resulting
from such use. No licenses are conveyed, implicitly or otherwise, under any Microchip intellectual
property rights unless otherwise stated.
Trademarks
The Microchip name and logo, the Microchip logo, AnyRate, AVR, AVR logo, AVR Freaks, BeaconThings,
BitCloud, CryptoMemory, CryptoRF, dsPIC, FlashFlex, flexPWR, Heldo, JukeBlox, KeeLoq, KeeLoq logo,
Kleer, LANCheck, LINK MD, maXStylus, maXTouch, MediaLB, megaAVR, MOST, MOST logo, MPLAB,
OptoLyzer, PIC, picoPower, PICSTART, PIC32 logo, Prochip Designer, QTouch, RightTouch, SAM-BA,
SpyNIC, SST, SST Logo, SuperFlash, tinyAVR, UNI/O, and XMEGA are registered trademarks of
Microchip Technology Incorporated in the U.S.A. and other countries.
ClockWorks, The Embedded Control Solutions Company, EtherSynch, Hyper Speed Control, HyperLight
Load, IntelliMOS, mTouch, Precision Edge, and Quiet-Wire are registered trademarks of Microchip
Technology Incorporated in the U.S.A.
Adjacent Key Suppression, AKS, Analog-for-the-Digital Age, Any Capacitor, AnyIn, AnyOut, BodyCom,
chipKIT, chipKIT logo, CodeGuard, CryptoAuthentication, CryptoCompanion, CryptoController,
dsPICDEM, dsPICDEM.net, Dynamic Average Matching, DAM, ECAN, EtherGREEN, In-Circuit Serial
Programming, ICSP, Inter-Chip Connectivity, JitterBlocker, KleerNet, KleerNet logo, Mindi, MiWi,
motorBench, MPASM, MPF, MPLAB Certified logo, MPLIB, MPLINK, MultiTRAK, NetDetach, Omniscient
Code Generation, PICDEM, PICDEM.net, PICkit, PICtail, PureSilicon, QMatrix, RightTouch logo, REAL
ICE, Ripple Blocker, SAM-ICE, Serial Quad I/O, SMART-I.S., SQI, SuperSwitcher, SuperSwitcher II, Total
Endurance, TSHARC, USBCheck, VariSense, ViewSpan, WiperLock, Wireless DNA, and ZENA are
trademarks of Microchip Technology Incorporated in the U.S.A. and other countries.
SQTP is a service mark of Microchip Technology Incorporated in the U.S.A.
Silicon Storage Technology is a registered trademark of Microchip Technology Inc. in other countries.
GestIC is a registered trademark of Microchip Technology Germany II GmbH & Co. KG, a subsidiary of
Microchip Technology Inc., in other countries.
All other trademarks mentioned herein are property of their respective companies.
© 2018 Microchip Technology Inc. DS40001829C-page 32MPLAB Code Configurator v3.xx User's Guide
© 2018, Microchip Technology Incorporated, Printed in the U.S.A., All Rights Reserved.
ISBN:
Quality Management System Certified by DNV
ISO/TS 16949
Microchip received ISO/TS-16949:2009 certification for its worldwide headquarters, design and wafer
fabrication facilities in Chandler and Tempe, Arizona; Gresham, Oregon and design centers in California
® ®
and India. The Company’s quality system processes and procedures are for its PIC MCUs and dsPIC
®
DSCs, KEELOQ code hopping devices, Serial EEPROMs, microperipherals, nonvolatile memory and
analog products. In addition, Microchip’s quality system for the design and manufacture of development
systems is ISO 9001:2000 certified.
© 2018 Microchip Technology Inc. DS40001829C-page 33Worldwide Sales and Service
AMERICAS ASIA/PACIFIC ASIA/PACIFIC EUROPE
Corporate Office Australia - Sydney India - Bangalore Austria - Wels
2355 West Chandler Blvd. Tel: 61-2-9868-6733 Tel: 91-80-3090-4444 Tel: 43-7242-2244-39
Chandler, AZ 85224-6199 China - Beijing India - New Delhi Fax: 43-7242-2244-393
Tel: 480-792-7200 Tel: 86-10-8569-7000 Tel: 91-11-4160-8631 Denmark - Copenhagen
Fax: 480-792-7277 China - Chengdu India - Pune Tel: 45-4450-2828
Technical Support: Tel: 86-28-8665-5511 Tel: 91-20-4121-0141 Fax: 45-4485-2829
http://www.microchip.com/ China - Chongqing Japan - Osaka Finland - Espoo
support Tel: 86-23-8980-9588 Tel: 81-6-6152-7160 Tel: 358-9-4520-820
Web Address: China - Dongguan Japan - Tokyo France - Paris
www.microchip.com Tel: 86-769-8702-9880 Tel: 81-3-6880- 3770 Tel: 33-1-69-53-63-20
Atlanta China - Guangzhou Korea - Daegu Fax: 33-1-69-30-90-79
Duluth, GA Tel: 86-20-8755-8029 Tel: 82-53-744-4301 Germany - Garching
Tel: 678-957-9614 China - Hangzhou Korea - Seoul Tel: 49-8931-9700
Fax: 678-957-1455 Tel: 86-571-8792-8115 Tel: 82-2-554-7200 Germany - Haan
Austin, TX China - Hong Kong SAR Malaysia - Kuala Lumpur Tel: 49-2129-3766400
Tel: 512-257-3370 Tel: 852-2943-5100 Tel: 60-3-7651-7906 Germany - Heilbronn
Boston China - Nanjing Malaysia - Penang Tel: 49-7131-67-3636
Westborough, MA Tel: 86-25-8473-2460 Tel: 60-4-227-8870 Germany - Karlsruhe
Tel: 774-760-0087 China - Qingdao Philippines - Manila Tel: 49-721-625370
Fax: 774-760-0088 Tel: 86-532-8502-7355 Tel: 63-2-634-9065 Germany - Munich
Chicago China - Shanghai Singapore Tel: 49-89-627-144-0
Itasca, IL Tel: 86-21-3326-8000 Tel: 65-6334-8870 Fax: 49-89-627-144-44
Tel: 630-285-0071 China - Shenyang Taiwan - Hsin Chu Germany - Rosenheim
Fax: 630-285-0075 Tel: 86-24-2334-2829 Tel: 886-3-577-8366 Tel: 49-8031-354-560
Dallas China - Shenzhen Taiwan - Kaohsiung Israel - Ra’anana
Addison, TX Tel: 86-755-8864-2200 Tel: 886-7-213-7830 Tel: 972-9-744-7705
Tel: 972-818-7423 China - Suzhou Taiwan - Taipei Italy - Milan
Tel: 86-186-6233-1526
Fax: 972-818-2924 Tel: 886-2-2508-8600 Tel: 39-0331-742611
China - Wuhan
Detroit Thailand - Bangkok Fax: 39-0331-466781
Tel: 86-27-5980-5300
Novi, MI Tel: 66-2-694-1351 Italy - Padova
China - Xian
Tel: 248-848-4000 Vietnam - Ho Chi Minh Tel: 39-049-7625286
Tel: 86-29-8833-7252 Tel: 84-28-5448-2100
Houston, TX Netherlands - Drunen
China - Xiamen
Tel: 281-894-5983 Tel: 31-416-690399
Tel: 86-592-2388138
Indianapolis Fax: 31-416-690340
China - Zhuhai
Noblesville, IN Norway - Trondheim
Tel: 86-756-3210040
Tel: 317-773-8323 Tel: 47-7289-7561
Fax: 317-773-5453 Poland - Warsaw
Tel: 317-536-2380 Tel: 48-22-3325737
Los Angeles Romania - Bucharest
Mission Viejo, CA Tel: 40-21-407-87-50
Tel: 949-462-9523 Spain - Madrid
Fax: 949-462-9608 Tel: 34-91-708-08-90
Tel: 951-273-7800 Fax: 34-91-708-08-91
Raleigh, NC Sweden - Gothenberg
Tel: 919-844-7510 Tel: 46-31-704-60-40
New York, NY Sweden - Stockholm
Tel: 631-435-6000 Tel: 46-8-5090-4654
San Jose, CA UK - Wokingham
Tel: 408-735-9110 Tel: 44-118-921-5800
Tel: 408-436-4270 Fax: 44-118-921-5820
Canada - Toronto
Tel: 905-695-1980
Fax: 905-695-2078
© 2018 Microchip Technology Inc. DS40001829C-page 34You can also read