OPENPATH ACCESS CONTROL USER GUIDE FOR ADMINISTRATOR WEB PORTAL V3.6 - Admin Web Portal 2
←
→
Page content transcription
If your browser does not render page correctly, please read the page content below
OPENPATH ACCESS CONTROL USER GUIDE FOR ADMINISTRATOR WEB PORTAL V3.6
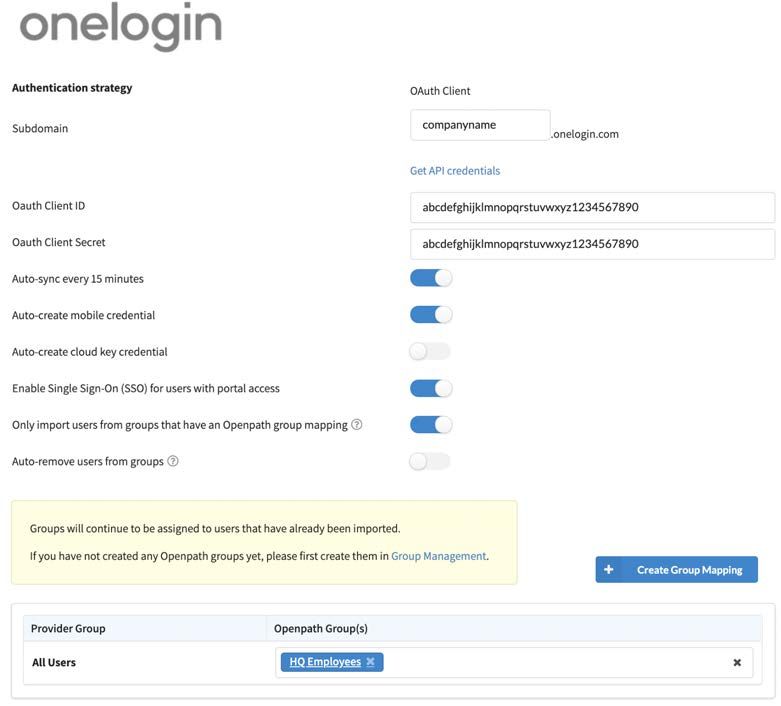
TABLE OF CONTENTS
  TABLE OF CONTENTS                                2
Openpath Admin Portal User Guide                   4
  NEW FEATURES | DECEMBER 2021                     4
  GETTING STARTED                                  4
  TERMINOLOGY                                      4
  LOGGING IN                                       5
DASHBOARDS                                         6
  ACTIVITY DASHBOARD                               6
    CAMERA SNAPSHOTS                               7
  ENTRY DASHBOARD                                  7
  HARDWARE DASHBOARD                               8
    CONTROLLER STATUS                              8
    REMOTE DIAGNOSTICS                             9
  CUSTOM DASHBOARDS                               10
USERS                                             12
  USER MANAGEMENT                                 12
    CREATE USER                                   13
    IMPORT USERS                                  14
    ISSUE CREDENTIALS                             15
    USER ACCESS                                   16
    USER SECURITY                                 17
    MANAGING USERS                                17
    GUEST ACCESS LINKS AND WEBHOOK URLS           18
  GROUP MANAGEMENT                                19
    CREATE GROUPS                                20
  ROLE MANAGEMENT                                 21
    CREATE ROLES                                 22
  USER SCHEDULES                                 23
    CREATE USER SCHEDULE                         24
    MULTIPLE SCHEDULES                           24
  CUSTOM FIELDS                                  25
SITES                                            25
  SITE MANAGEMENT                                26
    CREATE SITES                                 26
  ZONE MANAGEMENT                                26
    ZONE SHARING                                 27
    CREATE ZONE                                  27
    ANTI-PASSBACK AND OCCUPANCY MANAGEMENT       27
  ENTRY MANAGEMENT                               30
    CREATE ENTRY                                 30
    ENTRY SETTINGS                                31
  ENTRY STATE MANAGEMENT                         36
    ADD ENTRY STATE                              37
  ENTRY SCHEDULES                                39
  LOCKDOWN PLAN MANAGEMENT                        41
    CREATE LOCKDOWN PLAN                          41
    TRIGGER A LOCKDOWN PLAN                      43
HARDWARE                                         44

Version 3.6            © Openpath 2021       2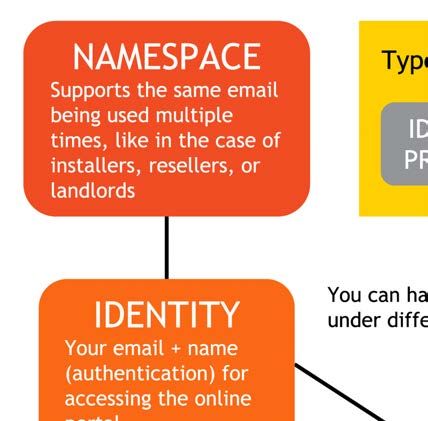
ACU MANAGEMENT 44
CREATE 44
ADD EXPANSION BOARD 46
EDIT ACU PORTS 46
READER MANAGEMENT 47
CREATE READER 47
WIRELESS LOCK MANAGEMENT 48
EDIT LOCK 49
WIRELESS LOCK GATEWAY MANAGEMENT 50
REPORTS 50
INTEGRATIONS 51
GOOGLE G SUITE 52
MICROSOFT AZURE ACTIVE DIRECTORY 53
OKTA 55
ONELOGIN 58
SINGLE SIGN-ON 60
MANUALLY SYNC 60
CAMIO 60
RHOMBUS 60
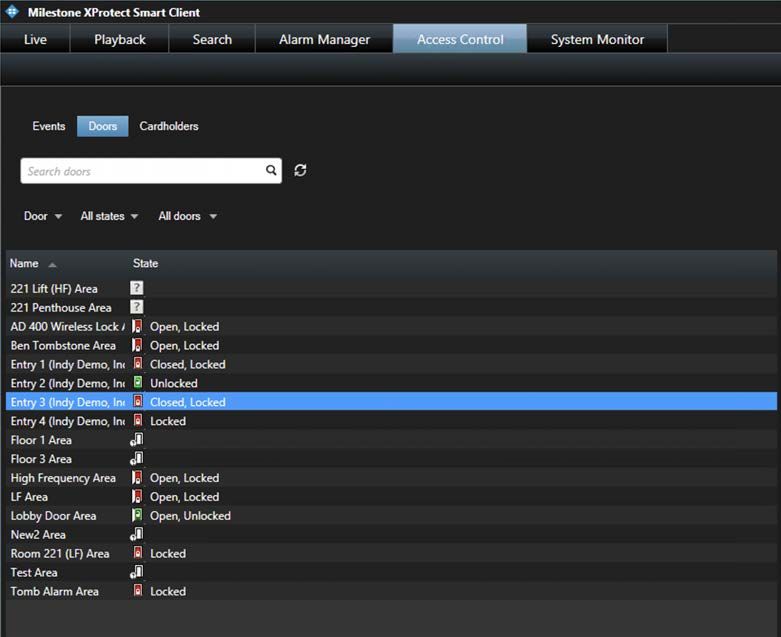
MILESTONE 61
CISCO MERAKI 64
SLACK 64
ALLEGION 64
ZAPIER 64
BUTTERFLYMX 64
WEBHOOKS 64
CONFIGURATIONS 65
RULES ENGINE 65
ALERT SETTINGS 66
MOBILE APP 68
BADGE VIEW 68
BADGE TEMPLATES 70
ADMINISTRATION 71
ACCOUNT 71
SECURITY SETTINGS 72
QUICK START 73
MY PROFILE 73
USER DATA MODEL 73
CONFIGURING OPENPATH WITH LEGACY SYSTEMS 75
REGULATORY 76
UL 294 76
CAN/ULC 60839-11-1-16 GRADE 1 76
FCC 77
IEC 62368-1 77
RF Radiation Hazard Warning 77
Industry Canada Notice and Marking 78
Version 3.6 © Openpath 2021 3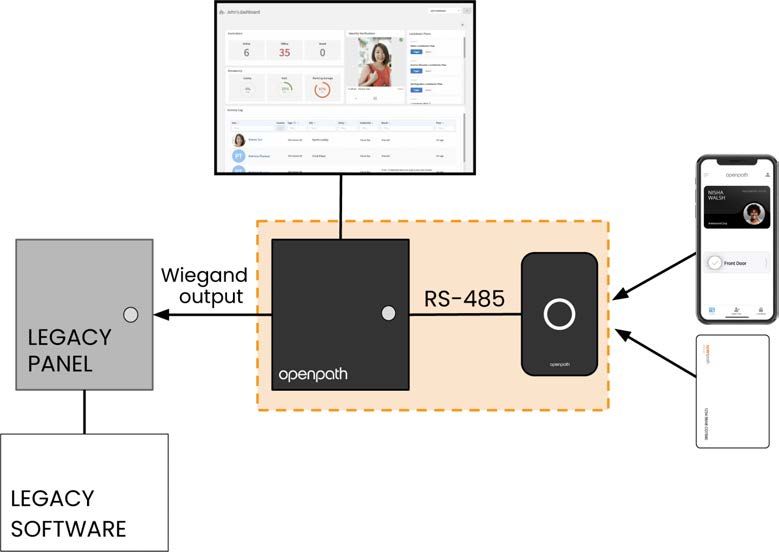
Openpath Admin Portal User Guide

 NEW FEATURES | DECEMBER 2021
       l   Openpath now supports Allegion Schlage Control™ locks. See WIRELESS LOCK
           MANAGEMENT .
       l   Now you can schedule Activity Log reports on a daily, weekly, monthly, or
           quarterly basis. See REPORTS .

GETTING STARTED
The Openpath Control Center is an online portal where Administrators can configure
the Openpath Access Control system through an Internet browser. This user guide will
explain how to get started in the Control Center, manage users and hardware, and
provide access to your entries.

Note: Some features in the Control Center are only available in certain software
packages and as add-on features. Also, depending on your role, not all of these
features may be visible to you.

TERMINOLOGY
   l   ACU: A cloud-based control panel that manages access to a secured area.
   l   Cloud Key Credential: A credential that lets users generate links to provide
       temporary access through the Openpath Mobile App or through the Control
       Center.
   l   Control Center: An online portal that lets administrators manage users, set up
       entries and permissions, and troubleshoot hardware.
   l   Credential: A key presented to a reader to gain access to an entry. Examples
       include cards, key fobs, and mobile credentials.
   l   Entry: A door, gate, turnstile, elevator floor, or other point of access. Often
       secured with a reader or wireless lock.
   l   Entry State: Determines whether an entry is locked or unlocked and defines
       what kinds of credentials and trigger methods are valid.
   l   Mobile Credential: An access method tied to a user's smartphone through the
       use of the Openpath Mobile App.
   l   Openpath Mobile App: Used for providing mobile credentials and remote
       unlock for users. The app is available for iOS and Android devices.

Version 3.6                         © Openpath 2021                                      4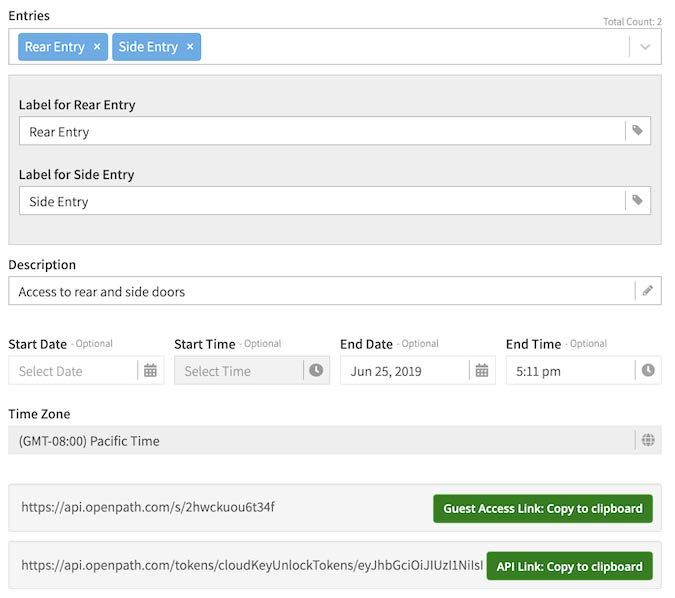
l   Remote Unlock: A feature that lets users unlock an entry via the Openpath
       Mobile App without needing to be in range of the Reader.
   l   Request to Exit: A sensor that detects when someone is exiting an entry which
       lets the Smart Hub ACU know to unlock the door.
   l   Schedule: A set of defined dates and times that can be used to restrict access
       to entries or users.
   l   Site: A physical location (usually a building) that contains zones and entries.
   l   Smart Reader: A device installed near an entry capable of reading information
       stored on key cards, fobs, and Openpath mobile credentials.
   l   Trigger Method: A combination of credential type and 1FA/2FA.
   l   User: A person defined in the Control Center with credentials.
   l   Wiegand Reader: A device installed near an entry capable of reading
       information stored on a Wiegand card and transmitting to an access control
       unit.
   l   Zone: Contains one or more entries within a site. Zones are the units of physical
       access permissions that you assign to users and groups.
   l   1FA: Single-Factor Authentication.
   l   2FA: Two-Factor Authentication.

LOGGING IN
  1. Go to https://control.openpath.com/login
  2. There are two ways to log in. If you received admin credentials through
       Openpath, use the Login tab. In order to use the Single Sign On (SSO) tab, your
       organization must have enabled the feature when setting up GOOGLE G SUITE ,
       MICROSOFT AZURE ACTIVE DIRECTORY , ONELOGIN , or OKTA .

Note: If you try logging in via SSO and get an error asking for your namespace, that is
because your organization has enabled SSO for two or more identity providers. Ask
the admin who set up the identity provider integrations for the correct namespace to
use. See also USER DATA MODEL .

Version 3.6                       © Openpath 2021                                  5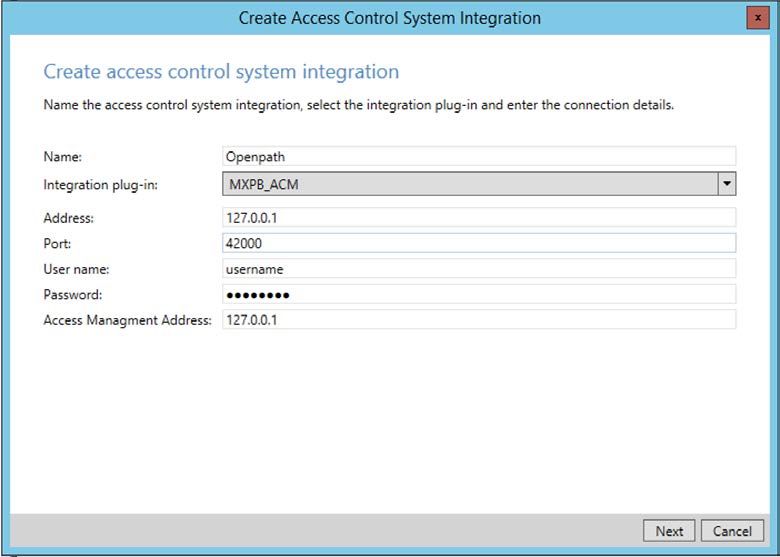
Figure 1 Login screen

DASHBOARDS
ACTIVITY DASHBOARD
Once logged in, you'll see the Activity Dashboard. This page shows a live feed of
access events from the past hour, as well as statistics about event activity and active
users. Click on the name of a user to go to their User Details.

                                Figure 2 Activity Dashboard

Version 3.6                      © Openpath 2021                                    6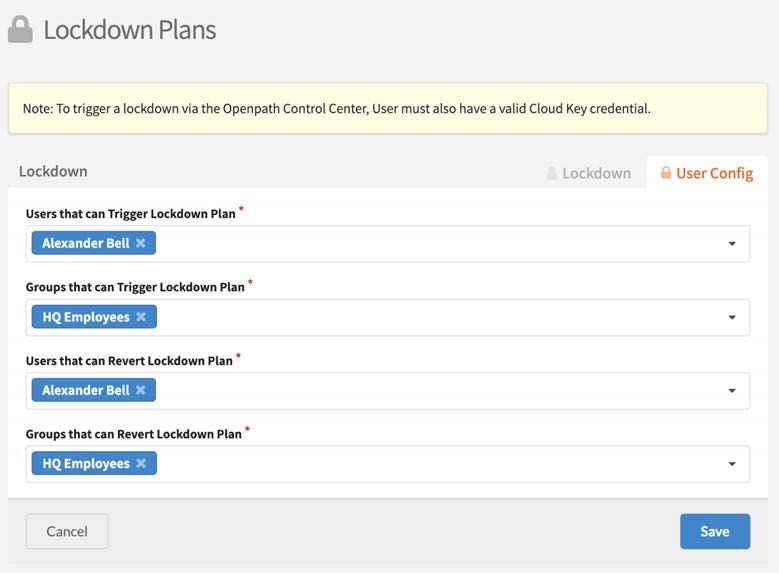
CAMERA SNAPSHOTS

If you have the Cisco Meraki integration enabled, you'll see a Camera column in the
Activity Dashboard, where you can view snapshots of entry events by hovering over
the Play icon. Click on the Play icon to view the video footage in the Meraki
dashboard. Snapshots may take up to a minute to appear in the Openpath Control
Center.

                      Figure 3 Camera snapshots in Activity Dashboard

ENTRY DASHBOARD
The Entry Dashboard shows a live status of every entry in your site.

                                 Figure 4 Entry Dashboard

Version 3.6                      © Openpath 2021                                7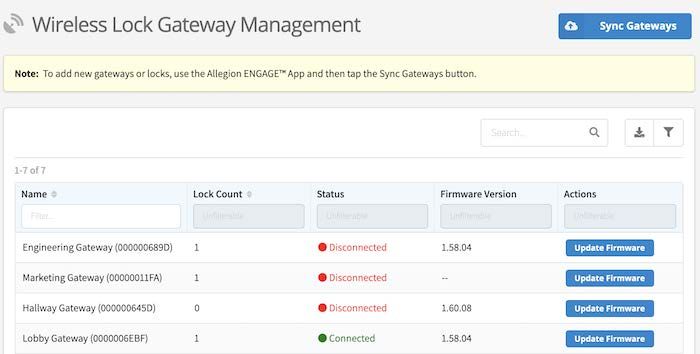
This is where you can see your organization's usage statistics as well as the current
lock state for entries. The data on the Dashboard is real time, so as soon as an entry
unlock request is made or denied or a lock state changes, the data displayed will
update immediately.

If you have a Cloud Key and remote unlock permissions (and the entry's state also
allows remote unlock requests), you can unlock entries from the Main Dashboard by
clicking the Unlock button next to the entry's name.

Note: If a door is ajar or not properly closed, the Door Ajar alarm will be prominently
displayed in the Door State column.

HARDWARE DASHBOARD
The Hardware Dashboard is where you can get a high level overview of your
organization's Controllers (ACUs) and readers.

CONTROLLER STATUS

The Hardware Dashboard indicates the online status of an ACU in the Status column:

   l   A green dot indicates the ACU is online and communicating normally
   l   A yellow dot indicates the last message received from the ACU is more than
       five minutes old
   l   A red dot indicates the ACU is offline: the last message received from the ACU is
       more than 60 minutes old OR more than 20 minutes old and the VPN is down

                               Figure 5 Hardware Dashboard

Version 3.6                      © Openpath 2021                                    8
REMOTE DIAGNOSTICS

In the Controller Status table under the Remote Diagnostics column, you can perform
the following actions:

   l   Identify: Identify a Controller to verify that the physical wiring matches the
       Control Center configuration. Clicking this will cause the Status LED on the
       Controller to flash green.
   l   Refresh: Refresh a Controller to send the latest data from the physical device to
       the Control Center.
   l   The Restart functions will restart individual software services on the Controller:
          o Restart API Server: The core application that processes authorization,

              authentication, and execution of unlock requests. Restart this service if
              you're having issues with the mobile app, such as unlock requests not
              working.
          o   Restart Cloud Communicator: The service that receives live messages
              from the cloud, including entry-related configuration changes, user
              permissions changes, and cloud-based unlock requests. Restart this
              service if changes (new credentials, new schedules) made on the Control
              Center aren't syncing with the ACUs or if you're experiencing issues with
              remote unlock requests.
          o   Restart Hardware Communicator: The service that sends and receives
              data between the ACU core and peripheral hardware. Restart this service if
            you're experiencing issues with readers or expansion boards.
   l   Mute: Muting a Controller changes its status icon to gray on the Hardware
       Dashboard. It will not affect any alerts or rules regarding the Controller, and it
       will only appear as muted on your browser.

Note: Restarting a service may interrupt the affected service for up to 60 seconds. We
recommend restarting services one at a time, waiting a few seconds after restarting
one before restarting the next.

You can also perform Remote Diagnostics actions on readers. Expand an ACU to see
its associated readers. Under the Remote Diagnostics column, you can perform the
following actions:

   l   Identify: Identify a reader to verify that the physical wiring matches the Control
       Center configuration. Clicking this will cause the following:

Version 3.6                        © Openpath 2021                                      9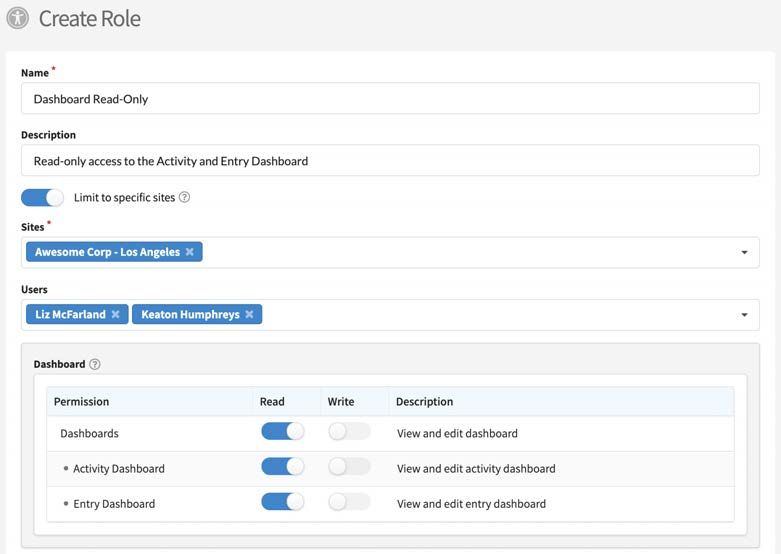
o the reader's outer ring LED will light up
          o the reader's center dot will light up green

          o the reader's buzzer will beep several times

   l   Restart: Restart a reader to force a reboot. This will interrupt services provided
       by the reader for up to 60 seconds.

CUSTOM DASHBOARDS
The Custom Dashboard feature lets you create personalized views comprised of
widgets that you can use in your org in addition to Openpath's default dashboards
(Activity, Hardware, and Entry).

To create a custom dashboard:

   1. Next to the dashboard dropdown, click the Add Dashboard button (+)

                                       Figure 6 Add Dashboard

  2. Enter a name for the dashboard, then click Save

                                 Figure 7 Name and save dashboard

  3. Click the edit icon to change settings, add widgets, make a dashboard your
       default view, or delete a dashboard

Version 3.6                        © Openpath 2021                                  10
Figure 8 Edit dashboard
a. Activity Feed Widget is a live feed of entry activity log
b. Entry Controls Widget lets you pin one or more entries to the dashboard
and lets you temporarily unlock them instantly, or keep them unlocked for
5, 10, 15, or 60 minutes
i. Note: You will need a Cloud Key credential and appropriate access
to the entry (or entries) in order to trigger unlocks
c. Lockdown Widget displays all lockdown plans in the org, with buttons to
trigger and revert plans
i. Note: You will need user permissions on the lockdown plans to trigger
and revert
d. Identity Verification Widget lets you monitor access events at a
particular entry
e. Event Feed Widget is a live feed of entry events, door ajar and door
propped open alarms, lockdown activation
f. Occupancy Widget shows you the occupancy of Areas configured using
Anti-Passback
i. Note: You will need to configure Anti-Passback and set occupancy
limits to use this widget
g. Hardware Widget displays the number of controllers and readers
configured in the system as well as their online status
h. Statistics Widget displays the total events, number of active users, and
percentage of active users from the last 12 hours
Version 3.6 © Openpath 2021 114. You can click and drag to place the widget anywhere on the dashboard, as well
as resize the widget by clicking and dragging the lower righthand corners
5. Click Save Changes when you're done customizing the dashboard
Figure 9 Custom Dashboard
The custom dashboard that you created will appear in the Dashboard dropdown.
Your dashboard will be viewable and editable to all other Super Admin users in your
org.
USERS
The Users tab lets you manage and import users, as well as create and define groups
and roles for users.
USER MANAGEMENT
The User Management screen is where you can view and manage users. You can
export user data to CSV by clicking the Export to CSV icon. Filters can be used on any
of the columns to narrow down the users shown in the view. Click the Filter Columns
icon to show or hide columns.
Version 3.6 © Openpath 2021 12Figure 10 User Management
The Identity Provider column will list the master user database from where the users
were created (within the portal, from Active Directory, G Suite, etc.). You can toggle
this column to show the namespace. For more information, see USER DATA MODEL .
CREATE USER
l To create a new user, click the Add User button (+) on the top right corner. Enter
the user's name, email address, and start/end date.
l If the user belongs to another Organization, check the box Add a user from an
existing namespace and enter the Namespace
l The External ID field can be used for employee IDs or other useful information.
l If desired, click Change Photo to upload a User photo, or take a new photo using
your device's built-in camera or webcam. This photo will appear on the Control
Center and in the user's Openpath mobile app.
l If the user is an admin and requires access to the web portal, click the Portal
Access slider and then add the Super Admin role.
Note: Only give portal access to users who require it, like an office manager or
security guard. If you want to give someone limited access to the Control Center,
create a role with GRANULAR PERMISSIONS.
Version 3.6 © Openpath 2021 13Figure 11 Create User
IMPORT USERS
In addition to creating individual users, you can also import and update users with a
CSV file. You can also import users by using a directory service integration. See
INTEGRATIONS .
To add and update users with a CSV file:
l Go to Users > Import Users (or from the User Management page, click the Import
Users button)
l Click Download Sample CSV and fill out all required fields in the format shown
o Note: If you are updating users, you can click the Export Data icon on the
User Management page to download a CSV of all users, then modify that
Version 3.6 © Openpath 2021 14file to import
l On the Import Users page, click Show Fields to view examples of acceptable
values
l Save the file as a CSV file (Excel file extensions will not work). Example:
openpath-bulk-import-users.csv
l On the Import Users page, click Select CSV File and locate the file.
l Select the Namespace:
o Select Local if you're adding new users or updating existing ones and you
don't use an IDP.
n Note: If using the Local namespace, choose whether you want to skip
existing users or update them using the How To Handle Existing Users
dropdown.
o Select Google G Suite, Microsoft Azure AD, Okta, or OneLogin if you want
to update existing users you previously synced with Openpath (new users
will not be added).
l Click Upload File.
l The Upload Status field will log all users added, updated, and skipped. This step
may take a few minutes. When finished, you'll see an "IMPORT COMPLETE"
message along with any errors that may have occurred.
ISSUE CREDENTIALS
Once you have created users, you can issue credentials. Credentials are what let
users have access to entries.
Note: When adding card credentials, be aware of whether you have high frequency
(HF) readers, which require MIFARE/DESFire cards, or low frequency (LF) readers, that
use Wiegand cards.
l To issue credentials, click on a user to go to their User Details, then click on the
Credentials tab in the upper righthand corner.
l Select the type of credential you want to issue. Choose from:
o Mobile
o Cloud Key (used for providing Guest Access Links)
o Card: Openpath/MIFARE (CSN) — Fast (select this for Openpath HF key fobs
and cards)
o Card: Openpath DESFire (Encrypted) — Secure (select this for Openpath HF
cards)
o Card: Wiegand ID (select this for Openpath LF key fobs and cards)
Version 3.6 © Openpath 2021 15l Enter the required information then click Create.
ADD A MOBILE CREDENTIAL
After you add a mobile credential, click Send to email the user instructions on how to
set up their mobile device as a credential. The Activation Pending column indicates
that an email has been sent, but the user has not yet activated their mobile
credential.
ADD A WIEGAND CREDENTIAL
If you're adding a Wiegand credential, you need to specify the card format. For
Openpath LF cards, select Prox 26-bit (H10301).
If you're unsure of the card format, you can use the Raw 64-bit option and enter the
card number. If you're unsure of the card number, you can swipe the card at the
reader and take note of the rejected access entry under Reports > Activity Logs. The
card number will be displayed under the Credential Detail column.
If you'd like to send card credential data to a third-party control panel, set Use for
Gateway to Enabled. You must also configure the Wiegand reader to enable this
feature. See WIEGAND DEVICE.
USER ACCESS
The Access tab on the User Details page is where you can assign groups, sites, and
zones, as well as enable Remote Unlock for a user.
l Use the Groups field to add a user to a group and give them access to zones
available for that group. See CREATE GROUPS.
l Alternatively, you can manually assign access to sites and zones by using the
toggle buttons.
l Enable Override Permission to give the user permission to unlock entries in the
Lockdown (Override Only) state.
l Enable Remote Unlock to let the user unlock a door remotely (i.e. physically
outside of Bluetooth range of the door reader) using the mobile app.
l The Group Schedules column will display any applicable Group Schedules if
you assigned a group with a schedule.
l The User Schedule column lets you assign user-specific schedules. See USER
SCHEDULES .
Version 3.6 © Openpath 2021 16Figure 12 User Access
USER SECURITY
The Security tab is where you can manage Multi-Factor Authentication (MFA)
credentials. You cannot add MFA credentials for other users — only view and delete.
You can add a MFA credential for yourself under MY PROFILE .
MANAGING USERS
From the User Management screen, use the checkboxes and Batch Actions to
change the status of individual or multiple users:
l Activate Users: reactivates a suspended user
l Suspend Users: disables credential usage and admin portal access (if granted
to the user)
l Delete Users: revokes access from the user but still keeps the user in the system
for reporting and record keeping purposes
l Reset Anti-Passback: if using Anti-Passback, resets a user's Anti-Passback
state. See ANTI-PASSBACK AND OCCUPANCY MANAGEMENT.
l Create Mobile Credentials: automatically creates mobile credentials for the
selected users
Version 3.6 © Openpath 2021 17l Send Mobile Credentials: send mobile setup emails to the selected users. If a
user has multiple mobile credentials, they'll receive multiple setup emails.
l Disable Remote Unlock: disables remote unlock permissions for the selected
users
l Enable Remote Unlock: enables remote unlock permissions for the selected
users
GUEST ACCESS LINKS AND WEBHOOK URLS
Users with Cloud Keys can share temporary Guest Access Links and generate
webhook URLs. Webhook URLs can be used to unlock entries via a web browser or
integrated into software or external services.
l To generate links, click on a user to go to their User Details, then click on the
Credentials tab in the upper righthand corner. Next to the Cloud Key credential,
click Get Webhook URL.
l A window will pop up where you can select which entries the URL will unlock:
o Choose the entries
o Edit the labels (optional)
o Provide a description
o Enter a Start and End Time (optional)
o Click Generate Links
l Use the Guest Access Link for sharing access with a person; use the API Link for
your own software or other external service.
Version 3.6 © Openpath 2021 18Figure 13 Generate Webhook URL Note: A Cloud Key can have multiple webhooks for multiple entries associated with it. Deleting a Cloud Key credential will also remove all the valid webhooks associated with it. GROUP MANAGEMENT The Group Management page is where you can create and manage groups for users. Groups let you assign access and entry permissions for one or more users, and they're useful for organizing your user base by department or role. You can export group data to CSV by clicking the Export Data icon. Version 3.6 © Openpath 2021 19
Figure 14 Group Management

CREATE GROUPS

   l   To create a new group, click the Add Group button (+) on the top right corner.
       Enter a name, description, and assign users.
   l   Next, select which sites and/or zones this group will have access to.
   l   When you have finished, click the Save button to save your new group.

Version 3.6                     © Openpath 2021                                20
Figure 15 Create Group ROLE MANAGEMENT A role is a set of portal access permissions that can be assigned to users. There are two default roles that cannot be edited: l Super Admin — gives full portal access with edit permissions l Super Admin Read-Only — gives full portal access with read permissions Note: Users with the Super Admin role can assign and revoke portal access for other users. Version 3.6 © Openpath 2021 21
Figure 16 Role Management

CREATE ROLES

   l   To create a new role, click the Add Role button (+) on the top right corner. Enter
       a name, description, and assign users.
   l   Select the permissions you'd like this role to have, then click the Save button in
       the lower right corner.

Note: You can assign multiple roles to the same user. The user's permissions will be
cumulative across all assigned roles.

GRANULAR PERMISSIONS

Granular Permissions gives additional specificity when creating Roles. For example,
you create a role that limits access to just the Entry Dashboard (see example below).
Or, create a role with full portal access but only for one site.

Note: Hardware Dashboard is tied to the "Hardware" permission, not the Dashboard
permissions.

Note: You cannot limit access to a specific site's users—if you create a role that has
access to users, that role will have access to all users within that org.

Version 3.6                      © Openpath 2021                                  22
Figure 17 Create Role
USER SCHEDULES
The User Schedules page is where you can define schedules for users and groups.
User and Group Schedules are useful if you want to restrict access or trigger methods
for certain users/groups. For example, you can define normal business hours for
employees or require that certain users only use key cards.
You can export schedule data to CSV by clicking the Export Data icon.
Figure 18 User Schedules
Version 3.6 © Openpath 2021 23CREATE USER SCHEDULE
l To create a User/Group schedule, click the Add User Schedule button (+) on the
top right corner. Enter a name, then click Save.
l Next, click on the Scheduled Events tab to define the schedule. Click the Add
Event button.
l Choose between a Repeating Event and a One-Time Event. In this example,
we're creating a normal business hours schedule, so we'll define a Repeating
Event.
l Enter a Start and End Time, choose a Time Zone, and select which days this
event will occur.
l Enter a Start Date and End Date (optional), and set the Scheduled State.
Note: A User/Group schedule cannot be more permissive than what the entry allows.
In this example, we've defined the Scheduled State as "Standard Security" which only
works if the entry state is also set to Standard Security or Convenience (but not say,
Strict Security).
Figure 19 Edit User Schedule
MULTIPLE SCHEDULES
You can assign multiple User/Group schedules to users/groups. Access is cumulative
of the assigned schedules. For example, if a user has a group schedule that gives
access 9:00 am to 5:00 pm and a user schedule that gives access 3:00 pm to 9:00
pm, then that user will have a combined access of 9:00 am to 9:00 pm.
Version 3.6 © Openpath 2021 24CUSTOM FIELDS
You can create custom, optional fields for users that appear when you create and
edit users, and also appear in the User Management table.
1. To create a custom field, click on the Add Custom Field button (+) on the top
right corner
2. Enter a name for the field and select a Field Type from the dropdown:
a. Checkbox
b. Date
c. Dropdown
d. Text
3. The field is enabled by default—if you do not want to use the field just yet, click
the slider to disable
4. Click Save
5. If you selected a Dropdown field, click Create Dropdown Item and enter a
name, click Save, then repeat for the remaining dropdown options
6. The fields you create will appear at the bottom of User Details and can be
viewed in the User Management table by clicking Filter Columns and clicking
the checkbox next to the field
Figure 20 Custom Fields
SITES
Sites are physical locations (like office buildings) comprised of zones and entries. You
should create a site for every location where you have Openpath installed.
Version 3.6 © Openpath 2021 25SITE MANAGEMENT
The Site Management page is where you can view and manage sites. You can export
site data to CSV by clicking the Export Data icon.
Figure 21 Site Management
CREATE SITES
l To create a new site, click the Add Site button.
l Enter a Site Name, address, and phone number, then click the Save button.
ZONE MANAGEMENT
The Zone Management page is where you can view and manage zones. Zones are
groups of one or more entries that you can assign to sites. Zones are useful for
breaking up large sites into smaller areas like floors or common areas (in multi-
tenant scenarios). Most significantly, zones are the units of physical access
permissions that you assign to users.
You can export zone data to CSV by clicking the Export Data icon. Click the Filter
Columns icon to show or hide columns.
Version 3.6 © Openpath 2021 26Figure 22 Zone Management
ZONE SHARING
Zones can be shared between multiple Openpath customers. This is useful if you're a
landlord who wants to share a zone of common entries with multiple tenants.
Recipients cannot edit shared zones.
CREATE ZONE
l To create a zone, click the Add Zone button (+) in the top right corner.
l Enter a name and description (optional) and select the site to which the zone
will be assigned.
o Note: A zone can only be assigned to one site, but a site can have multiple
zones assigned to it.
l Next, add User Groups and Users to the zone (optional).
l If you want to share this zone to a different Organization, enter the Org ID(s)
(optional).
l Click the Save button to save your new zone.
ANTI-PASSBACK AND OCCUPANCY MANAGEMENT
Anti-Passback lets you define a sequence in which entries must be accessed in order
to gain entry. Sequences are defined using Areas — each Area contains a set of
inbound and outbound entries. For each Area, after every successful inbound entry
the user must exit through an outbound entry before entering an inbound entry
again. This feature is commonly used with parking gates and helps prevent users
from sharing credentials with other users. You can also use Anti-Passback to limit
occupancy and prevent users from accessing inbound entries until enough users exit
through outbound entries.
Version 3.6 © Openpath 2021 27l To set up Anti-Passback on a zone, click on the zone to edit it, then click on the
Anti-Passback tab in the upper righthand corner
l Enter an Expiration time in seconds after which the Anti-Passback state will
reset for the user.
l Enable Reset Anti-Passback Periodically to configure a schedule during which
a user is not limited to Anti-Passback logic until after their second unlock
attempt
l Enable Use Contact Sensor to only change a user's Anti-Passback state until
after the Contact Sensor reports open
l Enable Shared-To Orgs Can Reset Anti-Passback if you want orgs sharing this
zone to have permission to reset Anti-Passback for their users.
l Lastly, define the Area(s) within the zone to be enforced by Anti-Passback
o Enter a name
o Set the Inbound Mode and Outbound Mode, which determines how the
system reacts to Anti-Passback breaches:
n None — access is granted; no additional response
n Alert — access is granted and an event is generated
n Enforce — access is denied and an event is generated
o Add Inbound and Outbound Entries
n Note: An entry can only be used once within an Area, either as
Inbound or Outbound but not both; however an entry can be used in
multiple Areas. In addition, all entries within an Area must reside on
the same ACU, and all entries belonging to the parent zone must
reside on the same ACU.
o If limiting occupancy, select either Alert or Enforce (definitions above)
from the Occupancy Limiting Mode dropdown, then enter the Occupancy
Limit
o Click Add Area
o Click Save
Internally, the ACU tracks each user's most recent direction of movement (inbound or
outbound) within each Area. When the user's most recent direction is known, then an
attempt by that user to move in the same direction again will result in an Anti-
Passback Breach event. When the user's most recent direction is unknown, as in the
case of a newly created Area, or following a scheduled or manual Reset action, then
the user's next movement will be allowed in either direction, after which normal rules
will apply again.
Version 3.6 © Openpath 2021 28Anti-Passback Breach events can trigger alerts. See ALERT SETTINGS . They can also be
used to trigger custom integrations. See RULES ENGINE .
Note: Anti-Passback logic also applies to Cloud Key credentials and other remote
unlock methods. In general, you might not want to allow remote unlock methods on
zones with Anti-Passback enabled.
RESET ANTI-PASSBACK
You can reset Anti-Passback in two ways: on the Zone level and on the User level.
l To reset Anti-Passback on the Zone level, go to Zone Management and click
Reset Anti-Passback under the Anti-Passback column.
l To reset Anti-Passback on a User (or multiple Users), see MANAGING USERS.
MULTIPLE AREA ANTI-PASSBACK
Most Anti-Passback scenarios will only require a single Area, but multiple Areas can
be used to create multi-step sequences of entry access. In this example, all four
Readers reside on the same ACU and are configured across three Areas, resulting in a
complex flow of movement.
Figure 23 Anti-passback logic
Version 3.6 © Openpath 2021 29ENTRY MANAGEMENT
Entry Management is where you can add and manage entries. Generally speaking,
entries are doors, but can also be gates, turnstiles, and elevator floors. An entry is
often secured with an Openpath reader or wireless lock. You can export entry data to
CSV by clicking the Export Data icon. Click the Filter Columns icon to show or hide
columns.
Figure 24 Entry Management
Note: It is likely that your Openpath installer may provision some or all of the following
features for you during the installation process.
CREATE ENTRY
l Enter a name and select the zone
l From the Cloud Gateway Device Type dropdown, select whether this is entry is
configured with Openpath hardware (Reader and ACU) or with Allegion Schlage
hardware (Gateway and Lock)
l If using Openpath hardware, select the Controller (ACU). If using Schlage
hardware, select the Schlage Wireless Lock
Version 3.6 © Openpath 2021 30Figure 25 Create Entry
ENTRY SETTINGS
ENTRY BEHAVIOR
Figure 26 Entry Behavior
Entry Behavior is where you set the Default State for the entry. See ENTRY STATE
MANAGEMENT . You can also assign an Entry Schedule, which is optional. See ENTRY
SCHEDULES .
Version 3.6 © Openpath 2021 31Note: Entries configured with Allegion Schlage NDEB and LEB Wireless Locks only
support Unlocked, No Entry, and Convenience states. Schlage Control locks do not
support entry states.
SCHLAGE WIRELESS LOCK
Figure 27 Schlage Wireless Lock
Entries configured with Schlage Wireless Locks have this additional section.
l (NDEB/LEB only) Ajar Detection and Forced Open Detection are always
enabled for wireless locks
l Entry Open Duration determines how long the entry will remain unlocked
(maximum 30 seconds)
l (NDEB/LEB only) Card Reader Sensitivity is set to Normal by default, but you
can select High or Max for more reliable reading of key fobs
CONTACT SENSOR
Version 3.6 © Openpath 2021 32Figure 28 Contact Sensor
A contact sensor detects if an entry is open.
l Port — select the port for the contact sensor to which the entry is wired
l Ajar Feature — if enabled, you can specify the maximum allowed time the door
can be ajar before an event is generated indicating the door is ajar. If disabled,
there will be no system action if the door is ajar.
l Duration — the maximum allowed time the door can be ajar before events are
generated
l Unit — select whether to use seconds or minutes
l Forced-Open Detection — if enabled, an entry opening without first unlocking
through Openpath or triggering the REX will generate an event
Contact sensor events can trigger alerts. See ALERT SETTINGS . They can also be used
to trigger custom integrations. See RULES ENGINE .
ENTRY/EXIT HARDWARE
Figure 29 Entry/Exit Hardware
Entry/Exit Hardware is where you can select a relay to use on the ACU (or expansion
board), like for controlling electric strikes or maglocks.
l Port — select which port to assign the reader, from Relay 1-4. Technically, the
electric strike is wired to one of the 4 ACU ports, and the reader is wired to the
strike. You will need to select the ACU relay for which this reader/entry is wired
to the ACU.
l Entry Open Duration — enter a time (between 1 second and 10 minutes) for how
long the entry remains unlocked before reverting back to its default state.
l Unit — select whether to use seconds or minutes
Version 3.6 © Openpath 2021 33l Invert Output — this advanced setting is typically only needed for elevator
relays; if enabled, it flips the NC/NO configuration of the physical relay
OPENPATH READER
Figure 30 Openpath Reader
Associate the entry with the Openpath Reader.
l Port — select the port on the ACU to which the Openpath Reader is connected.
l Card Reading — enable this to allow RFID/NFC cards at this reader.
l Wave to Unlock — enable this to allow Wave to Unlock and Touch Entry.
l Mobile Authorization Range — This range specifies how close the mobile
device must be to the reader in order to register a Wave to Unlock. Set the range
using the slider.
l Wave Detection Range — This range specifies how close the hand must be to
the Openpath reader to initiate the unlock attempt—this behavior may vary
depending on your environment and this setting might require adjustment
l Auto Proximity Unlock (Elevators Only) — enable this to unlock the entry when
a user with a valid mobile credential is in range of the reader. Set the range
using the slider.
l Advanced Options — toggle this to configure advanced range options for the
Openpath Reader:
l Mobile Reader Range — the distance that the reader can detect a mobile
phone that is in BLE range
Version 3.6 © Openpath 2021 34l Mobile Beacon Range — the distance that the beacon can detect a mobile
phone and "wakes up" the Openpath app
REQUEST TO EXIT
Figure 31 Request to Exit
Often, doors will have a Request to Exit button or sensor that will unlock the door from
the inside.
l Port — select the port for the Request to Exit device to which the entry is wired
l Mode — this is an electrical term regarding how the Request to Exit device sends
the command to the ACU. Your installer will be able to give you guidance on
whether the Mode should be set to Normally Closed or Normally Open for a
particular entry configuration.
l Trigger Relay to Unlock Entry — if enabled, a triggered REX will open the
associated Relay(s) and prevent forced-open alarms
WIEGAND DEVICE
Figure 32 Wiegand Device
Openpath is compatible with legacy Wiegand Devices.
Version 3.6 © Openpath 2021 35l Port — select the port for the Wiegand Device to which this entry is wired
l Mode — select the Mode to set which direction the card credential data is sent:
o Use Input to receive data from devices such as a Wiegand reader
o Use Output (Gateway) to send credential data to a third—party control
panel. See CONFIGURING OPENPATH WITH LEGACY SYSTEMS for more
information.
ADD CONTROL
l If an entry has more than one of any controls (Openpath Readers, Entry/Exit
Hardware, Contact Sensor, Request to Exit, or Wiegand Device) installed, you can
select which additional control(s) you would like to associate with the entry
l Once you add an additional control, it will appear in the relevant section on this
page
Figure 33 Additional Controls
ENTRY STATE MANAGEMENT
An Entry State defines whether an entry is unlocked and what access methods may
be used to unlock it. Openpath provides the following default Entry States:
l Unlocked — no credential is required for access
l No Entry — no entry allowed, even with an otherwise valid credential
l Lockdown - Override Only — no entry allowed, even with an otherwise valid
credential, except for override unlock requests
l Convenience — allows all valid credentials and trigger methods
l Onsite Only — allows all valid onsite credentials and trigger methods
l Standard — allows most mobile access and cards, and excludes remote mobile
1FA and third-party Wiegand methods
l Strict — allows only interactive 2FA onsite mobile access and encrypted smart
cards. Excludes all remote, 1FA, and non-encrypted methods.
Version 3.6 © Openpath 2021 36The Trigger Methods column refers to the number of ways that an entry can be
unlocked in that particular state.
Figure 34 Entry State Management
Click on an Entry State in order to view the trigger methods included in that State.
ADD ENTRY STATE
1. To create a new Entry State, click the Add Entry State button (+) in the top right
corner
Version 3.6 © Openpath 2021 37Figure 35 Add Entry State
2. Use the sliders to enable the trigger methods you want to be valid with this Entry
State. Definitions for the various methods are provided below.
3. Click the Save button when finished
TRIGGER METHOD DEFINITIONS
l Mobile 1FA: An unlock request that is triggered either from a mobile device that
has no homescreen PIN-code, biometric, or other similar protection, or from a
device whose homescreen is currently not unlocked.
l Mobile 2FA: An unlock request that is triggered from a device with PIN-code,
biometric, or other similar protection on the homescreen, and whose
homescreen is currently unlocked. Therefore in order to trigger a Mobile 2FA
unlock, a person must both be in possession of the mobile device, as well as
know or possess the PIN-code or biometric needed to unlock the device.
l Wave: An unlock request that is triggered by passing a hand in close proximity
to, a Wave-enabled Openpath Smart Reader, and which is authenticated by the
mobile credential provisioned into Wave-enabled Openpath Mobile Access
app.
l Auto: An unlock request that is triggered by being in close proximity to an Auto-
enabled Openpath Smart Reader, and which is authenticated by the mobile
Version 3.6 © Openpath 2021 38credential provisioned into Auto-enabled Openpath Mobile Access app. This
mode is often used for elevator scenarios.
l Remote: An unlock request that is triggered while the user is not near the entry.
l Onsite: Opposite of Remote; an unlock request that is triggered while the user is
near the entry.
l Near Reader: An unlock request that is considered Onsite because the mobile
device is within Bluetooth range of the entry's Openpath Reader.
l Over BLE: A mobile unlock request that is sent over BLE (Bluetooth Low Energy)
through the Openpath Reader. Such a request is always Onsite.
l Over WiFi: A mobile unlock request that is sent over the mobile device's WiFi
connection over the local network directly to the Openpath Access Control Unit.
Such a request may be considered Onsite or Remote depending on whether the
mobile device is in range of the entry's Reader.
l Over Cloud: A mobile unlock request that is sent over the mobile device's WiFi or
cell/LTE connection, and routed via the Openpath cloud back to the Access
Control Unit. Such a request, if permitted, enables Remote unlock from
anywhere in the world where the mobile device has an internet connection, but
also may be considered Onsite if the mobile device is in range of the entry's
Reader.
l Geofence: A mobile unlock request that uses a device's location services to
support an onsite unlock.
l Over NFC: A mobile unlock request triggered by holding a mobile device close
to the Openpath Reader. This entry state only works with Android devices that
support NFC.
l Override: An unlock request that is typically used with Lockdown plans.
ENTRY SCHEDULES
Entry Schedules allow for entries to be in a specific state (e.g. locked, unlocked, etc)
based on date and time. For example, an entry can be set to an unlocked state
during normal business hours, Monday — Friday but remain locked (its Default Entry
State) when the Schedule is inactive.
1. Click Add Entry Schedule, enter a name, then click Next
Version 3.6 © Openpath 2021 39Figure 36 Add Entry Schedule
2. Assign this Entry Schedule to entries by either typing in the names of the entries
or using the dropdown
3. Click Add Event to create a new schedule
a. Choose between a Repeating Event and a One-Time Event
b. Enter a Start and End Time, choose a Time Zone, and select which days this
event will occur (if a Repeating Event)
c. Enter a Start Date and End Date (optional)
d. Set the Scheduled State and if desired, enable and set Trigger after an
unlock method
e. Click Save
Version 3.6 © Openpath 2021 40Figure 37 Add Event
LOCKDOWN PLAN MANAGEMENT
This is where you can view and manage Lockdown Plans. You can export Lockdown
Plan data to CSV by clicking the Export Data icon.
CREATE LOCKDOWN PLAN
1. Click Add Lockdown Plan
2. Give the plan a useful name and assign a rank. The rank is important because it
determines which plans take priority in the case of triggering multiple plans that
share entries. The lower the number, the higher the rank.
3. Optionally, you can enter a time after which the plan will auto-revert using
Auto-Revert Plan. If you do not want the Lockdown Plan to revert automatically,
leave this value blank.
Version 3.6 © Openpath 2021 414. Optionally, you can enable the Use standard (free-eligible) zone
configuration slider to create a Lockdown Plan that includes all zones with
triggered states of Lockdown - Override Only.
5. Click Add Zone to select which entries this Lockdown Plan will affect
a. Note: You cannot add zones that have been shared with you to a
Lockdown Plan
6. Select the desired Entry State for the zone. For lockdown scenarios, we
recommend using Lockdown - Override Only. This means only users with
Override permissions are able to unlock entries in this state.
Figure 38 Create Lockdown Plan
7. Click Save
8. Go to the User Config tab to select Users and Groups that can trigger and revert
the Lockdown Plan
Version 3.6 © Openpath 2021 42Figure 39 User trigger and revert permissions 9. Click Save TRIGGER A LOCKDOWN PLAN Note: You must have a Cloud Key Credential to trigger and revert Lockdown Plans from the Control Center 1. Click on Lockdown from the top right corner 2. Click Trigger or Revert on the desired Lockdown Plan Version 3.6 © Openpath 2021 43
Figure 40 Trigger or revert lockdown plan

HARDWARE
ACU MANAGEMENT
The ACU Management screen is where you can view and manage ACUs and SDCs.
You can export ACU data to CSV by clicking the Export Data icon. Click the Filter
Column icon to show or hide columns.

                               Figure 41 ACU Management

CREATE

   1. Go to https://control.openpath.com/login and log in
  2. Go to Administration > Quick Start

Version 3.6                    © Openpath 2021                                44
3. Enter a Site Name and any other relevant site information (optional), then click
Next
4. Enter how many controllers are located at your Site:
a. Enter names for the controllers
b. From the Controller Type dropdowns, select
i. 4 Door Controller (OP-AS-01) — for first gen Smart Hubs
ii. Single Door Controller (SDC)
iii. Core Series ACU — for Core Series Smart Hubs
c. Enter the number of expansion boards connected to the controllers, then
select the types used:
i. Openpath 4-Port Expansion
ii. Openpath 8-Port Expansion
iii. Openpath 16-Port Elevator
d. Click Next
5. Enter how many Readers are connected to the controllers and enter names,
then click Next
6. Review your Site Details, then click Confirm & Submit. It may take a few minutes
for setup to complete.
To add one
1. To add a new , click the Add ACU button (+)
2. Enter a name for the
3. From the Controller Type dropdown, select
a. 4 Door Controller (OP-AS-01) — for first gen Smart Hubs
b. Single Door Controller (SDC)
c. Core Series ACU — for Core Series Smart Hubs
4. If your also connects to an expansion board, then from the Add Expansion
Board dropdown, select and add the appropriate type(s):
a. Openpath 4-Port Expansion
b. Openpath 8-Port Expansion
c. Openpath 16-Port Elevator
5. A description will appear in green. Click Save.
Version 3.6 © Openpath 2021 45Figure 42 Create ACU
Once you add an ACU to the system, you need to register it (also known as
provisioning). For Smart Hubs, please refer to the Openpath Installation Guide. For
Single Door Controllers, refer to the Openpath SDC Installation Guide.
ADD EXPANSION BOARD
You need to edit ACUs when you install additional expansion boards in existing Smart
Hubs.
1. To edit an ACU, click on the ACU from the ACU Management page
2. From the Add Expansion Board dropdown, select and add the expansion board
3. Click Save
EDIT ACU PORTS
From the Edit ACU page, click on the Ports tab to view and manage ACU ports:
l In the Options column, click on the Ports icon open Port Options
l Click on the Input Type dropdown to change a Contact Sensor, Request to Exit
input or AUX I/O to a different input type, Wiegand Device, or to a Generic input.
This is useful for creating rules. See RULES ENGINE .
l You can only change the Input Type on a port that has not yet been assigned to
an entry
END OF LINE SUPERVISION
The SDC and Core Series Smart Hubs support end-of-line (EOL) supervision:
Version 3.6 © Openpath 2021 46l Click on the Cable icon to open Cable Options
l Click on the End of Line Supervision dropdown to select Line Shorted Detect,
Line Cut Detect, or Both
l The setting selected must match your physical wiring configuration, see the
Openpath Installation Guide for more information
READER MANAGEMENT
The Reader Management screen is where you can view and manage readers. You
can export Reader data to CSV by clicking the Export Data icon. Click the Filter
Columns icon to show or hide columns.
Figure 43 Reader Management
CREATE READER
1. To add a new reader, click the Add Reader button (+) on the top right corner
2. Enter a name for the reader — names are usually relevant to the location where
the reader is installed
3. Select the ACU to which this reader belongs
4. Select the port to which this reader is wired
5. Click Save
Version 3.6 © Openpath 2021 47Figure 44 Create Reader
WIRELESS LOCK MANAGEMENT
If you have the Allegion integration enabled, you can view and manage wireless locks
and gateways.
From this page, you can select locks and click Batch Actions to update firmware.
Figure 45 Wireless Locks Management
Version 3.6 © Openpath 2021 48EDIT LOCK
To configure a NDEB or LEB Lock:
1. From Wireless Lock Management, click on the name of the lock to edit it
2. Under Basic Settings, you can do the following:
a. From the Power Failure dropdown, select how the lock will behave in the
event of the battery failing
i. As Is -- lock will remain in the same state
ii. Safe -- unlocked
iii. Secure -- locked
b. Enable or disable the Beeper on the lock when a credential is scanned
c. Adjust the interior LED settings
d. Enable or disable the Invalid Card Audit, which logs invalid credentials
3. Under Reader Settings, choose which type of card and fob credentials may be
used at this lock
a. For Openpath DESFire EV1, EV2, and EV3 select 14443 UID (CSN)
b. For Openpath DESFire EV3-A, select 14443 Secure Mifare
i. Note: You cannot enable 14443 UID (CSN) and 14443 Secure
Mifare/Mifare Plus/EV1 (NOC) at the same time
4. Under Mobile Credential, choose whether to enable mobile credentials on this
lock
a. Adjust Communication Range to determine how close the mobile
credential needs to be to the lock before appearing as a nearby entry in
the app
b. Adjust Performance to determine how often the mobile app scans for
locks
5. Click Save
To configure a Control Lock:
1. From Wireless Lock Management, click on the name of the lock to edit it
2. Under Basic Settings, you can do the following:
a. Enable or disable the Beeper on the lock when a credential is scanned
b. Enable or disable the Invalid Card Audit, which logs invalid credentials
3. Reader Settings cannot be edited on Control locks; high frequency cards and
fobs are enabled by default
4. Under Mobile Credential, choose whether to enable mobile credentials on this
lock
Version 3.6 © Openpath 2021 495. Adjust Communication Range to determine how close the mobile credential
needs to be to the lock before appearing as a nearby entry in the app
6. Adjust Performance to determine how often the mobile app scans for locks
WIRELESS LOCK GATEWAY MANAGEMENT
This page shows you the list of gateways synced using the Allegion ENGAGE™ app.
From here, you can Sync Gateways and Update Firmware.
Figure 46 Wireless Lock Gateway Management
REPORTS
Reports are where you can view user, entry, and Control Center activity.
Openpath offers a wide variety of report types:
l Activity Logs — display a list of all unlock requests across your Openpath
access control system
l User and Entry Activity Reports — view user activity and entry activity via
helpful charts and diagrams
l Visual Activity Report — view video snapshots related to entry events, and filter
by user, site, entry, and time
o In order to use this report, you must first set up the Cisco Meraki integration
l Entry Access Report — view which users have access to any given entry
l User Access Report — select or type in the name of a user to view all entries
they have access to
Version 3.6 © Openpath 2021 50l Portal Audit Report — shows a log of changes made in the Control Center or
through the Openpath API
l Credential Management — view all credentials within your organization filtered
based on credential type
To generate a report:
1. Under Reports, click on the report type you'd like to generate
2. Select a time period for the report
3. (Activity Logs only) Select Report Delivery:
a. Deliver to Browser — When using this method, do not refresh or close the
browser tab. Reports may take a few minutes to generate. Not
recommended for large datasets.
b. Deliver via Email — Useful for large datasets, select this method to run the
report in the background and receive an email when the report is done.
You can deliver the report to multiple email addresses.
4. Click Search
5. To download a report, click Export to CSV
To schedule a report (Premium and Enterprise plans only):
1. Go to Reports > Scheduled Reports
2. Click Add Scheduled Report
3. Enter a name for the scheduled report, then select the type of report (currently
only Activity Logs is supported)
4. Select a time period for the report and configure report settings
5. Enter email addresses to send the reports to and select a Frequency
6. Click Save
To view report history (Premium and Enterprise plans only):
1. Go to Reports > Scheduled Reports, then go to the Report History tab
2. Previously generated scheduled reports will appear here. A scheduled report will
expire after 30 days. Click Download to download a CSV file of the report.
INTEGRATIONS
Integrations are programmatic links to third party software and services, that let you
sync users and add functionality to apps you already use.
Version 3.6 © Openpath 2021 51This page lists available integrations. Click on the integration to learn more about
setup and configuration.
Identity provider integrations let you add and sync users from providers you already
use. Currently, Openpath integrates with Google G Suite, Microsoft Azure Active
Directory, and Okta.
GOOGLE G SUITE
Note: To enable this feature, you must have administrative privileges in your Google G
Suite account.
1. Under Integrations > All Integrations, click on the G Suite tile
2. Google will prompt you to sign in. Sign in with your G Suite account and allow
Openpath to access your users and groups. This is also where you can enable
the Single Sign On feature. Be sure to take note of the namespace.
3. After signing in, you'll be directed back to Openpath where you can enable the
following settings:
a. Auto-sync every 1 hour/15 minutes — this will sync Openpath with G Suite
once every hour or once every 15 minutes depending on which user
management package you're using (see Administration > Account for
package details)
b. Auto-create mobile credential — this will create a mobile credential for
every user
c. Auto-create cloud key credential — this will create a Cloud Key
credential for every user
d. Enable Single Sign-On (SSO) for users with portal access — this will let
users log into the Control Center with their Google credentials
e. Only import users from groups that have an Openpath group
mapping — if this is enabled, no users will be imported from G Suite if they
are not assigned to an Openpath group
f. Auto-remove users from groups — this will remove users from Openpath
groups if they no longer exist in G Suite groups
Version 3.6 © Openpath 2021 52Figure 47 Sync settings
4. To map a specific group from G Suite to Openpath (required if you enabled
Only import users from groups that have an Openpath group mapping),
click +Create Group Mapping
d. Select the group from G Suite
e. Select the group from Openpath
f. Click +Create Group Mapping
5. Repeat step 4 until all groups that need to be mapped have been created
Figure 48 Group mapping
MICROSOFT AZURE ACTIVE DIRECTORY
Note: To enable this feature, you must have the Global Administrator role.
Version 3.6 © Openpath 2021 531. Under Integrations > All Integrations, click on the Microsoft Azure AD tile
2. Microsoft will prompt you to sign in. Sign in with your Azure AD account and
allow Openpath to access your users and groups. This is also where you can
enable the Single Sign On feature. Be sure to take note of the namespace.
3. After signing in, you'll be directed back to Openpath where you can enable the
following settings:
a. Auto-sync every 1 hour/15 minutes — this will sync Openpath with Azure
AD once every hour or once every 15 minutes depending on which user
management package you're using (see Administration > Account for
package details)
b. Auto-create mobile credential — this will create a mobile credential for
every user
c. Auto-create cloud key credential — this will create a Cloud Key
credential for every user
d. Enable Single Sign-On (SSO) for users with portal access — this will let
users log into the Control Center with their Azure credentials
e. Only import users from groups that have an Openpath group
mapping — if this is enabled, no users will be imported from Azure if they
are not assigned to an Openpath group
f. Auto-remove users from groups — this will remove users from Openpath
groups if they no longer exist in Azure groups
Version 3.6 © Openpath 2021 54Figure 49 Sync settings
4. To map a specific group from Azure to Openpath (required if you enabled Only
import users from groups that have an Openpath group mapping),
click +Create Group Mapping
a. Select the group from Azure
b. Select the group from Openpath
c. Click +Create Group Mapping
5. Repeat step 4 until all groups that need to be mapped have been created
Figure 50 Group mapping
OKTA
Note: To enable this feature, you must have administrative privileges in your Okta
account. We recommend using a dedicated service account that uses only the
"Group" role as that role contains only the permissions that Openpath requires to
synchronize your users and groups.
1. Under Integrations > All Integrations, click on the Okta tile
2. Enter your API URL. This should be the Okta domain for your organization,
prefixed with https://, for example, https://yourcompanyname.okta.com.
3. Enter an API Key. First you'll need to generate an Okta API Key (Token) associated
with the Okta service account you have created for this integration. Ideally you
should create a dedicated API Key to be used only with the Openpath
integration, so that you have control over the lifecycle of this integration.
a. Note: Once you save the API Key, Openpath does not use or otherwise
expose the API Key anywhere except when using it to call Okta to
synchronize users and groups.
Version 3.6 © Openpath 2021 55You can also read