Oracle Hospitality Cruise Shipboard Property Management System - Administration User Guide - Oracle Help Center
←
→
Page content transcription
If your browser does not render page correctly, please read the page content below

Oracle® Hospitality Cruise Shipboard
Property Management System
Administration User Guide

    Release 20.2
    F44428-01
    September 2021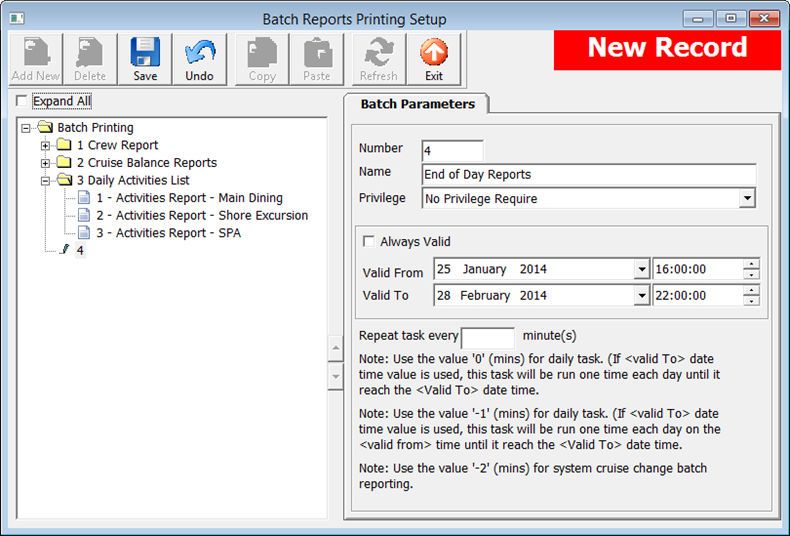
Oracle Hospitality Cruise Shipboard Property Management System Administration User Guide, Release 20.2

F44428-01

Copyright © 1995, 2021, Oracle and/or its affiliates.

This software and related documentation are provided under a license agreement containing restrictions on
use and disclosure and are protected by intellectual property laws. Except as expressly permitted in your
license agreement or allowed by law, you may not use, copy, reproduce, translate, broadcast, modify, license,
transmit, distribute, exhibit, perform, publish, or display any part, in any form, or by any means. Reverse
engineering, disassembly, or decompilation of this software, unless required by law for interoperability, is
prohibited.

The information contained herein is subject to change without notice and is not warranted to be error-free. If
you find any errors, please report them to us in writing.

If this is software or related documentation that is delivered to the U.S. Government or anyone licensing it on
behalf of the U.S. Government, then the following notice is applicable:

U.S. GOVERNMENT END USERS: Oracle programs (including any operating system, integrated software,
any programs embedded, installed or activated on delivered hardware, and modifications of such programs)
and Oracle computer documentation or other Oracle data delivered to or accessed by U.S. Government end
users are "commercial computer software" or "commercial computer software documentation" pursuant to the
applicable Federal Acquisition Regulation and agency-specific supplemental regulations. As such, the use,
reproduction, duplication, release, display, disclosure, modification, preparation of derivative works, and/or
adaptation of i) Oracle programs (including any operating system, integrated software, any programs
embedded, installed or activated on delivered hardware, and modifications of such programs), ii) Oracle
computer documentation and/or iii) other Oracle data, is subject to the rights and limitations specified in the
license contained in the applicable contract. The terms governing the U.S. Government’s use of Oracle cloud
services are defined by the applicable contract for such services. No other rights are granted to the U.S.
Government.

This software or hardware is developed for general use in a variety of information management applications.
It is not developed or intended for use in any inherently dangerous applications, including applications that
may create a risk of personal injury. If you use this software or hardware in dangerous applications, then you
shall be responsible to take all appropriate fail-safe, backup, redundancy, and other measures to ensure its
safe use. Oracle Corporation and its affiliates disclaim any liability for any damages caused by use of this
software or hardware in dangerous applications.

Oracle, Java, and MySQL are registered trademarks of Oracle and/or its affiliates. Other names may be
trademarks of their respective owners.

Intel and Intel Inside are trademarks or registered trademarks of Intel Corporation. All SPARC trademarks are
used under license and are trademarks or registered trademarks of SPARC International, Inc. AMD, Epyc,
and the AMD logo are trademarks or registered trademarks of Advanced Micro Devices. UNIX is a registered
trademark of The Open Group.

This software or hardware and documentation may provide access to or information about content, products,
and services from third parties. Oracle Corporation and its affiliates are not responsible for and expressly
disclaim all warranties of any kind with respect to third-party content, products, and services unless otherwise
set forth in an applicable agreement between you and Oracle. Oracle Corporation and its affiliates will not be
responsible for any loss, costs, or damages incurred due to your access to or use of third-party content,
products, or services, except as set forth in an applicable agreement between you and Oracle.
Contents
    Preface

    Prerequisite, Supported Systems and Compatibility

1   Administration

2   System Setup
    Harbour Setup                                        2-2
        Setting Up a Harbour/Port                        2-2
        Removing a Harbour/Port                          2-3
    System Cruise Setup                                  2-3
        Creating System Cruise                           2-4
        Adding Port Day to Cruise                        2-4
            Removing Port Day                            2-4
        Copying Cruise Day                               2-5
            Removing a Cruise                            2-5
    System Date Change                                   2-5
        Performing System Date Change                    2-6
    System Cruise Change                                 2-6
        Performing System Cruise Change                  2-6
    Database Parameters                                  2-7
        Defining the days to keep log files              2-8
    Airport Setup                                        2-9
        Adding Airport Code Manually                     2-9
    Company Entity                                       2-9
        Assigning Company ID                            2-11
    Time Zone Change                                    2-11
    Batch Reports Printing Setup                        2-11
        Adding Report to Batch Printing                 2-12
        Copying Batch Details to Other Report           2-13

                                                          iii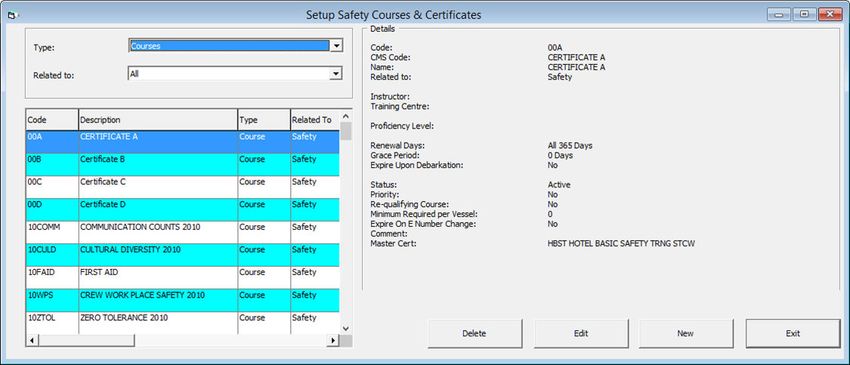
Deleting Batch Report Details               2-13
    Reports Setup                                   2-13
        Adding New Report                           2-15
        Removing a Report                           2-16
        Exporting a Report                          2-17
    Change Debark/Embark Date                       2-17
    Labels Setup                                    2-17

3   Financial Setup
    Department Codes                                 3-1
        Main Department                              3-1
            Adding a Main Department Code            3-2
            Deleting a Main Department               3-2
        Sub-Department                               3-2
            Adding a Debit Sub-Department            3-5
            Adding a Credit Sub-Department           3-5
            Deleting Sub-Department Code             3-5
        Currencies                                   3-6
            Adding Currency Rate                     3-6
        Merchant Details                             3-6
        Pre-Selection Groups                         3-7
        Stateroom Upgrade Setup                      3-7
        Discount Templates                           3-7
        Quick Posting Template                       3-8
        Import Credit Card Bin                       3-8
        Disallow Manual Posting Applications         3-8
        Department Grouping                          3-8
        VAT Handling                                 3-8
            VAT Tax Class                            3-9
            VAT Tax Rate                             3-9
            Activating a Tax Rate                   3-10
            VAT Tax Reminder                        3-10

4   Itinerary Setup
    Adding an Activity                               4-1
    Copying an Activity Setup                        4-2
    Add Package Price                                4-3
    Adding Team/Time Frame                           4-3

                                               iv
Removing an Activity                                            4-3

5   Events
    Adding an Event                                                 5-2
    Setting Up Event Location                                       5-2
        Adding Event Table/Seat                                     5-2
        Adding an Event Exception                                   5-3

6   Vendors
    Setting Up a Vendor                                             6-1

7   Safety Setup
    Safety Setup Type                                               7-1
    Configuring Safety Codes in Standard Drill                      7-5
        Setting Up Muster Station                                   7-5
        Setting Up Lifeboat/Liferaft                                7-6
        Setting Up Drill Definition                                 7-7
        Setting Up Course and Certificates                          7-7
    Advance Safety Drill Mode                                       7-8
        Setting Up Muster Station In Advance Drill Mode             7-9
        Setting Up Lifeboat/Liferaft in Advance Drill Mode         7-10
        Setting Up Safety Function in Advance Drill Mode           7-10
        Setting Up Drill Type                                      7-11
        Setting Up Drill Definition in Advance Drill Mode          7-11
        Setting Up Drill Template in Advance Drill Mode            7-12
        Setting Up Course and Certificates in Advance Drill Mode   7-13

8   Stateroom Setup
    Adding, Editing and Copying A Stateroom                         8-1
        Editinga a Cabin                                            8-2
        Copying a Cabin Code                                        8-2
    Batch Check-In/Out                                              8-2
    Feature/Amenity Item                                            8-3
    Cabin Cleaning State Color                                      8-3
    Deck Plan Designer                                              8-4
        Editing a Deck Plan                                         8-5
        Linking a Plan                                              8-5
        Deck Plan Setup                                             8-5

                                                                     v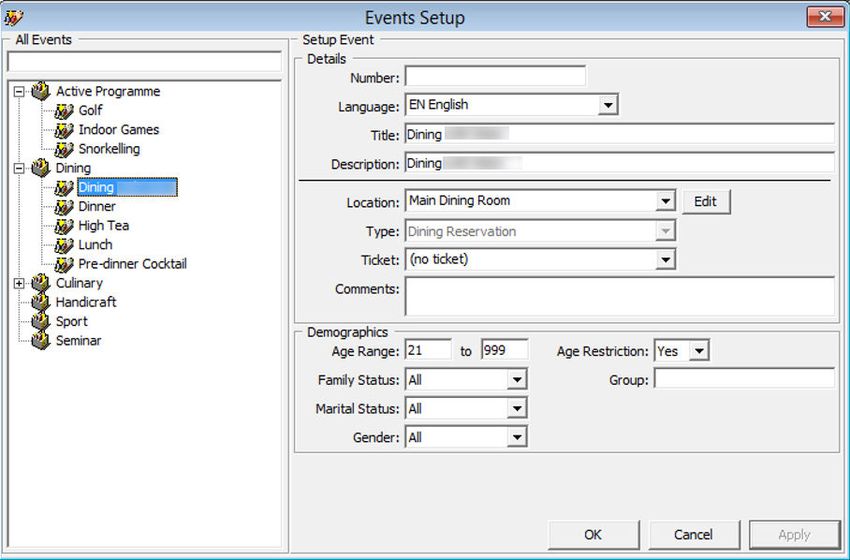
Ving Card Crew Key Type                 8-5
     Common Access Area                      8-5
        Common Access Area Name              8-6
        Common Access Area Definition        8-6

9    System Codes
     Setting Up System Codes                 9-2
     Nationality Codes                       9-2
        Setting Up Nationality Groups        9-2
        Setting Up Nationality Codes         9-3
     Setting Up Document Types               9-3
     Setting Up General Reason Code          9-4
     Setting Up Comment Departments          9-4
     Enabling/Disabling Log Entry            9-5

10   Package Plans

11   Maintenance Code Setup
     Workers in Workgroup                    11-2
     Adding Task Code                        11-2
     Adding Items Code                       11-3

12   Gift Card

13   POS Discount

14   Security Display Setup

15   Visa Type Setup

                                        vi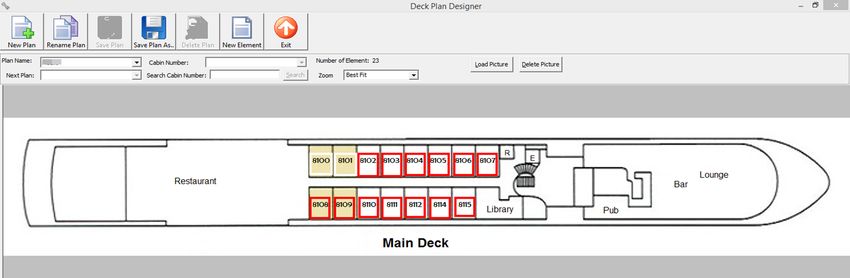
16   Multimedia File Maintenance

17   Board Card Printing Template
     Creating Board Card Printing Template   17-4
        Removing Template                    17-4

18   Security Alert Setup

19   Beeper Setup

20   Security

21   Photo Setup
     Upload/Export Photos                    21-1
     Export Document                         21-5

                                              vii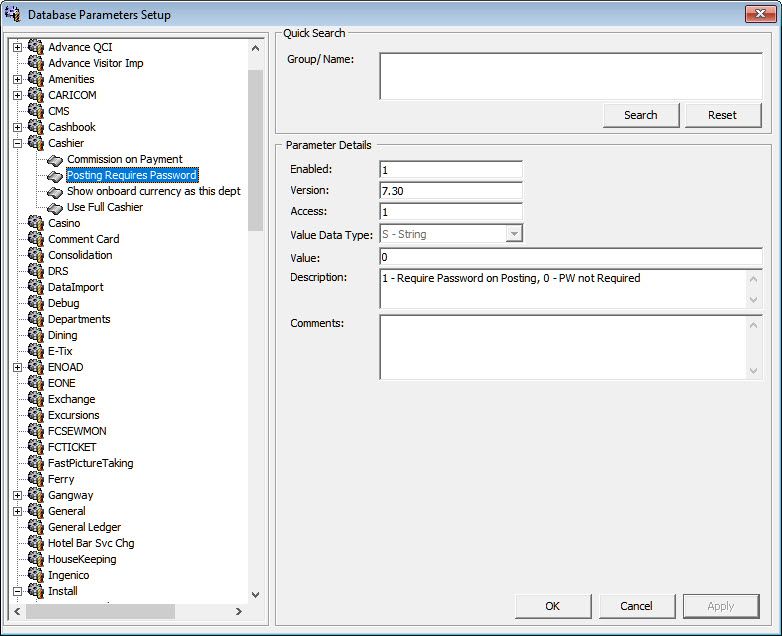
Preface

Preface
      Oracle Hospitality Cruise Shipboard Property Management System (SPMS) solution
      offers the ship side users an access to the ship data. The Administration module is the
      backbone of the SPMS, where system codes are built according to the approved
      Ship’s Operational guidelines and requirements. As each of these codes may link to
      other fields or require other codes to be setup first, it is advisable to study and
      understand the relationship of each requirement before you start coding. The System
      Administrator, Chief Purser, Accounting Purser, Crew Purser, Cruise Director, Group
      Coordinator and Safety Officer are the key personnels responsible in configuring and
      maintaining these codes.

      Audience
      This document is for technical personnel, application specialist and users of SPMS.

      Customer Support
      To contact Oracle Customer Support, access My Oracle Support at the following URL:
      https://support.oracle.com
      When contacting Customer Support, please provide the following:
      •   Product version and program/module name
      •   Functional and technical description of the problem (include business impact)
      •   Detailed step-by-step instructions to re-create
      •   Exact error message received
      •   Screenshots of each step you take

      Documentation
      Oracle Hospitality product documentation is available on the Oracle Help Center at
      http://docs.oracle.com/en/industries/hospitality/.

      Revision History

      Table 1   Revision History

      Date                                         Description of Change
      September 2021                               Initial Publication

                                                                                            viii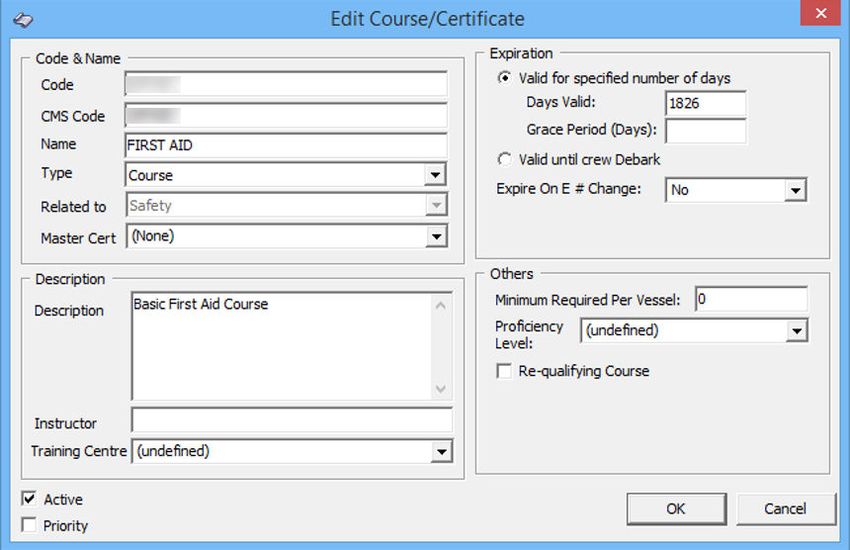
Prerequisite, Supported Systems and
Compatibility
      This section describes the minimum requirements for the Administration module.

      Prerequisites
      •   OHC Administration.exe

      Compatibility
      SPMS version 20.2 or later. For customers operating on version 20.2 and below, database
      upgrade to the recommended or latest version is required

                                                                                                ix
1
Administration
       The Administration Menu comprises of configuration input fields require by the Ship
       Operation. Some of these codes depend on another set of codes, and may result in some
       functions not working as desire if they are not properly setup. Consult Oracle Hospitality
       Cruise Support if you have any questions about configuring the codes.

                                                                                                    1-1
2
System Setup
In Administration, System Setup Menu, configurations such as Port of call, System Cruise,
System Date Change, System Cruise Change and Database Parameters are setup.
Figure 2-1 Administration Menu
2-1Chapter 2
Harbour Setup
Harbour Setup
The Harbour Setup function enable you to maintain the Port the ship embark and the
local agent handling the port administration.
Setting Up a Harbour/Port
Figure 2-2 Harbour Setup
1. From the Administration Menu, select System Setup, then Harbour Setup
under the sub-category.
2. In the left pane of the Harbour Setup window, right-click and select Add New to
add a new code.
3. In the Description field, enter the short code and description of the harbour name.
4. In the Comment field, enter the ISO Port Codes using an angle bracket and
comma as separator, if any. The system also inserts the standard ISO Port codes
from APIS during installation/update in the Comment field.
5. Select the Country from the drop-down list, if any.
6. In the Port Agent Info section, enter the Port Agent information and the click
Apply to save the entry. The Enabled check box is checked by default. Uncheck
the check box to disable the code from the selection window.
2-2Chapter 2
System Cruise Setup
Removing a Harbour/Port
1. From the Harbour Setup window, right-click the Port code and select Remove.
2. Click OK to save and close the window.
System Cruise Setup
Before the Ship sets sail on its voyage, you must setup the start/end of the cruise in System
Cruise Setup, detailing the start and end date, arrival/departure time at each port and the
base currency.
Figure 2-3 Cruise Setup
Table 2-1 Cruise Setup Field Definition
Field Name Description
Description Short code of the cruise. Mainly use to identify
the cruise
Start Date The start date of the cruise.
Island Date Special coded description for General Ledger
(GL) Interface.
2-3Chapter 2
System Cruise Setup
Table 2-1 (Cont.) Cruise Setup Field Definition
Field Name Description
Itinerary ID An identifier for the voyage/cruise.
Center ID Special coded description for GL.
Currency Official on board currency. See Financial Setup,
Currencies
External Cruise ID Cruise ID from an external party.
Safety Assembly Time Schedule Safety Assembly Time for the cruise.
Creating System Cruise
1. Select System Setup, then System Cruise Setup from the drop-down list.
2. In the Cruise Setup window, right-click the All Cruises pane and select Add
Cruise to open a blank setup form.
3. Enter the Description, Start Date, Island Date, Itinerary and Currency.
4. Click Apply to save.
Adding Port Day to Cruise
1. At the All Cruises section of the Cruise Setup form, right-click on the Cruise
Name and select Add New Port/Day.
2. At the Setup Cruise form, enter the Date, Description, Port Comments, Weather
and select from the drop-down list the Arrival Port, IPM Port Type, Arrival
Country, Arrival Time and Departure Date/Time.
3. Click Apply to save the form.
4. Repeat the above steps for additional port day.
Note:
You cannot alter the Port Day once the date is entered. You are require
to first remove and re-enter the port day before adding the remaining
port day.
Removing Port Day
1. At the All Cruises pane, right-click on the Port Date you wish to remove.
2. Select Remove Port/Day option.
2-4Chapter 2
System Date Change
Note:
The system validates all reservations against the port day before a port/day or
cruise is removed. If there are linked reservations found, amend the booking
before proceeding.
Copying Cruise Day
The Copy Cruise function copies the same cruise setup/itineraries into a future date. If the
information is completely different, we recommend that you create the cruise from scratch
and add the port day individually.
1. In the All Cruise section, select the Cruise Day, then right-click and select Copy Cruise.
Figure 2-4 Duplicate Cruise
2. Insert the Start Date and Description in the Duplicate Cruise window, then click Add.
The copy cruise is not allowed if a Start Date exist.
3. Click OK to confirm and populate the information in All Cruises section.
Removing a Cruise
You can only remove a cruise when there are no reservation records attached to the cruise
day. This option is dimmed when the system detects there is a link to a port day.
1. At the All Cruises section, expand the Cruise Day container and select the port day to
remove by right-clicking the date.
2. Repeat above step until all the port day for that cruise is removed.
3. Right-click on the Cruise Day and select Remove Cruise.
4. Click OK to exit and return to System Cruise setup.
System Date Change
The Night Auditor or appointed user from the Finance Department is responsible to perform
the System Date Change nightly. Before you run the System Date Change, all revenue
2-5Chapter 2
System Cruise Change
centers must be in balance, and this includes the Point-of-Sale (POS) System,
Cashbook and other processes deem necessary by the ship operator.
Performing System Date Change
1. From the System Setup drop-down menu, select System Date Change.
Note:
You are not allowed to proceed when the Cashier’s sessions is still
active.
2. At the System Date Change prompt, confirm the New System Date by clicking
OK.
Figure 2-5 System Date Change
3. You will receive a warning message when expected disembarking guest/crew
remain as check-in in the system. Select Yes to proceed or No to return to the
previous menu and resolve all pending check out.
4. When you select Yes, a progress window Closing pay period shall prompt once
the System Date Change commences. This only appears if the Payroll system is
linked, and it changes all the pending reservations status for the date to No-Show.
5. Once the System Date Change completes, you will receive an window indicating
the new system date. Click OK to close the prompt.
System Cruise Change
At the end of each cruise, all the revenue centers and system accounts must be in
balance and closed before you start a new cruise. This task is performed by the Chief
Purser.
Performing System Cruise Change
Important:
The following process sets all accounts to Closed. All outstanding balances
are carried forward to the next cruise. Do proceed with caution
2-6Chapter 2
Database Parameters
1. Select System Cruise Change.
2. At the System Cruise Change prompt, click OK to confirm the New System Cruise.
Figure 2-6 System Cruise Change
3. You will receive a ‘Open Balance Warning’ if an unbalanced System Account is detected.
Select Yes to proceed or No to return to previous menu and then resolve all pending
check out.
4. Once the cruise change completes, the application will return to the Main menu.
Database Parameters
The application is deployed with a set of Database Parameters that controls the operability
and functionality of the module. These system parameters are grouped by module, followed
by its function. Please consult Oracle Hospitality Cruise Customer Support prior to changing
any of these parameters to avoid adverse implications.
2-7Chapter 2
Database Parameters
Figure 2-7 Database Parameter
1. From the System Setup menu, select Database Parameters.
2. In the Database Parameters Setup window, click the plus (+) key to expand the
group or navigate to Quick Search section, and search the parameter name in
Group/Name field and then click Search.
3. Changing the value at the Parameter Details changes the behavior of the
functions.
a. Enabled: By default, all parameters are set to Enabled. In order to disable a
parameter, change the value to 0 (0 = Disabled/ 1 = Enabled).
b. Value: The acceptable value is defined in the description.
Defining the days to keep log files
You can to keep an activity log of certain functions, particularly the Interfaces. The
number of days is keep is set up in Database Parameter:
• Group Interface, Days to keep log file.
• Group Gangway, Gangway Log Days
Once defined, the system checks the log entries when the module starts and purge
entries older than the days enter.
2-8Chapter 2
Airport Setup
Airport Setup
The Airport Setup code is used in Crew and Management Module, Flight Overview window. It
allow you to arrange a passenger or crew arrival pickup or departure drop-off. You can also
import an airport list instead of inserting the details manually, and this list must be save in
eXtensible Markup Language (XML) format (IATA_AIRPORT_List.XML) in Oracle Hospitality
Cruise folder.
1. From the System Setup menu, select Airport Setup (IATA).
2. In the Airport (IATA) setup window, the import commences once it detects the
IATA_AIRPORT_List.xml file.
3. Click Yes at the Admin prompt to confirm the data to import, and then OK when the
import is successful.
Adding Airport Code Manually
1. At the Airport Setup (IATA) setup, All Airport section, right-click and select Add New.
2. Enter a short code and description in the Description field.
3. Enter a comment in the Comment field, if any.
4. Click Apply to save.
Company Entity
This function allows you to enter the company entity of the ship.
1. From the System Setup menu, select Company Entity Setup.
2. Right-click on the left pane of the form and select Add New.
3. Enter all the information in the Entity Details section and then click Apply.
2-9Chapter 2
Company Entity
Figure 2-8 Company Entities Setup
Table 2-2 Field Definition of Company Entities Setup
Field Name Description
Entity ID Company Entity ID, provided by SPMS
Code Company or Ship Code
Name Company or Ship name
Enabled Set to True
Record ID Defines the record ID representing an
entity
Type Type of Entity
• 1 = Vessel/Ship
• 2 = Headquarter
• 3 = Warehouse
Address Address of entity
City & Country Code Country of entity
Phone Phone
Fax Fax
Email Email address
Print Order Report ID Print Order Report ID used by Materials
Management System (MM)
License License Code provided by SPMS
2-10Chapter 2
Time Zone Change
Table 2-2 (Cont.) Field Definition of Company Entities Setup
Field Name Description
IDEA Enabled Field use by MMS and is defaulted to
False
Assigning Company ID
1. At the left pane of Company Entity Setup window, right-click the entity name and select
Set Who Am I.
2. At the confirmation prompt, select Yes to update information to Parameter Who Am I
link.
3. Restart the application for change to take effect.
Time Zone Change
This function enables you to set the ship’s clock forward or backward when the ship travels
through different time zones, thus recording an accurate crew work hours. This function is
only used in Time & Attendance module.
1. From the System Setup option, select Timezone Change Setup.
2. At the Timezone Change Setup window, right-click on the left pane and select Add.
3. In the Details section, select the Data and Time from the drop-down list when the change
should take place.
4. Enter the number of hours in the Change Hours filed and a remark of the change.
5. Click Apply to save.
Batch Reports Printing Setup
The function enable you to setup a group of reports to print at a scheduled time and it
requires the OHC Auto Report application to be running at all times.
1. At the System Setup option, select Reports Batch Printing Setup.
2-11Chapter 2
Batch Reports Printing Setup
Figure 2-9 Batch Reports Printing Setup
2. In the Batch Reports Printing Setup window ribbon bar, click the Add New button.
3. Enter the all the required fields and then click Save.
Adding Report to Batch Printing
1. Select the Report Group from the Batch Printing tree.
2. In the Report Parameters tab, select an Action Type from the drop-down list.
Table 2-3 Batch Report Printing Options
Option Description
1 – Skip Option to skip the selection process.
2 – Report Enable a search option and report
selection from existing report database.
3 – External Program The function call an external program
when running the Batch Report. Only
external program that is defined in
Parameter, “General”,“External
Program List” is allowed to be save.
4 – Call Batch Printing Enable to link and include existing report
group to the current.
3. In the Report Name field, click Search to look up for the report.
4. Select the day of the week from the Schedule drop-down field.
5. Choose the Output method from the drop-down list. If the selected methods is to
save to file, enter the Export File name and path and Email Address for the files
to be sent to the specific user.
2-12Chapter 2
Reports Setup
6. Click Save at the ribbon bar to save.
Copying Batch Details to Other Report
1. Select the Report Group from the tree and then click the Copy button at the ribbon bar.
2. In the Report Group to copy to, click Add New and then Paste.
3. Click the Save button to save.
Deleting Batch Report Details
1. Select the Report Group from the Batch Printing tree and then click Delete button at the
ribbon bar.
2. At the confirmation prompt, click Yes to proceed.
Note:
This action deletes the record permanently. Please proceed with caution.
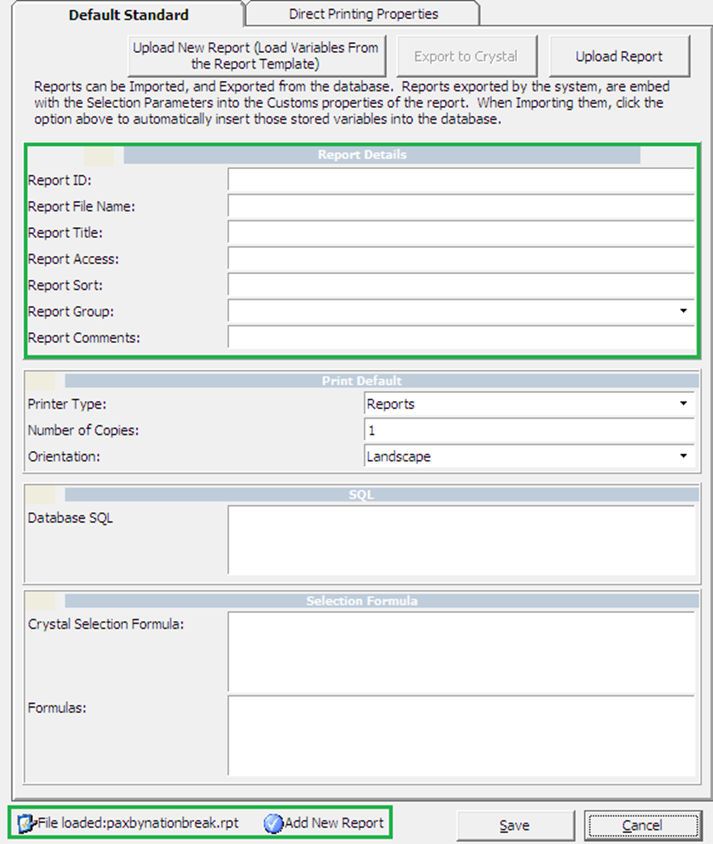
Reports Setup
The Report Setup function allows you to add customized Crystal reports to the existing
System report set, or export the report template for use on another ship or for further
customization.
2-13Chapter 2
Reports Setup
Figure 2-10 Report Setup
Table 2-4 Setup Functions In Report
Figure Description
1 Tools function that uploads report
templates from a public folder.
2 List of report set available, including those
that was manually uploaded.
3 Search function that enables you to search
for a report.
4 Report detail of the report. For example,
Report ID, User Access, Report Group.
5 Default printer configuration.
6 Formula embedded in the Crystal Report
template.
7 Selection criterion input required from the
user prior to generating a report.
2-14Chapter 2
Reports Setup
Adding New Report
1. From the System Setup option, select Reports Setup.
2. In the User Customizable Report Setup, Current Report List pane, right-click and
select Add New Report to enable the fields on the right pane.
3. Navigate to the right pane and select Upload New Report (Load Variables From the
Report Template) or Upload Report.
4. Search for the .RPT file on your local drive if you are uploaded a report template.
5. In the Report Details section, enter the following information:
a. Report ID: Unique ID of customized report.
b. Report File Name: Crystal Report file name, for example, pabxnationbreak.rpt.
c. Report Title: Report name to show in Current Report List.
d. Report Access: User Access Right to view/print report.
e. Report Sort: Sort order of the report within the assigned report group.
f. Report Group: Group this report belongs to. Select from the drop-down list.
g. Report Comments: Additional comments/Information pertaining to this report.
2-15Chapter 2
Reports Setup
Figure 2-11 Default Standard for Report
6. In the Print Default section, select the Printer Type, Number of Copies and the
Print Orientation.
7. Click Save to add the report to the list.
8. Click OK at the ‘Save New Report’ prompt. The newly added report name is
shown at the bottom of the screen
Removing a Report
1. In the User Customizable Report Setup window, expand the Current Report List
tree by clicking the plus (+) key.
2. Right-click the report name you wish to remove and then select Remove Report.
3. Click Yes when prompt.
2-16Chapter 2
Change Debark/Embark Date
Exporting a Report
1. In the User Customizable Report Setup window, expand the Current Report List tree.
2. Click the Export to Crystal button in the Default Standard tab.
3. Select the location to save the file and note that the file type is indicated as Crystal
Report.
Change Debark/Embark Date
This function allows you to change the bulk change a Debark or Embark Date when the need
arises. For example, passengers are not allowed to debark due to severe weather condition.
1. From the System Setup option, select Change Debark Date or Change Embark Date.
2. Select the date from the From/To Date field and check the applicable passenger type
and the status.
3. Select a New Date and check the Reset Boardcards check box if you need to issue new
boardcard.
4. Click OK and then select Yes to proceed or No to abort.
Labels Setup
The system is pre-installed with a range of hard coded labels for use in various functions. You
may modify the description of the labels to suit the Ship’s operation. Consult Oracle
Hospitality Cruise Support if you wish to change the description of these labels.
2-173
Financial Setup
In the Financial Setup function, you can create and manage the Ship's accounting codes,
ensuring the daily revenues/expenses are correctly mapped to the codes configured. A
greater financial reporting can be achieved through a well thought out system of accounts. It
is highly recommended for shore side accounting personnel to play a key role in creating/
developing the accounts and revisit this setup from time to time. Configuration of these codes
is under the responsibility of System Administrator, Chief Purser and Accounting Purser.
Department Codes
The Department Codes is where all debit and credit posting codes are stored, and codes
entered are mapped to the Back Office Accounting System using the General Ledger (GL) ID.
These codes are sub-divided into several codes within a Main Group.
Figure 3-1 Main/Sub-Department Setup
Main Department
The Main Department code is the higher level of grouping of the approved Chart of Account
and in this instance, the revenue or cost centers. The Main Department Setup comprises of
two tabs; a Debit and Credit tab. In general, the Debit departments are the revenue centers
and outlets, where as the Credit department represents the payment methods accepted by
the Ship. All the codes are entered through Administration, Financial Setup, Department
Codes.
3-1Chapter 3
Department Codes
Adding a Main Department Code
1. From the Administration, Financial Setup menu, select Department Codes
option.
2. Select either a debit or a credit tab.
3. Click the New button located at the bottom of the screen.
4. Enter the code, description and other required fields approved in by your Financial
Department and then click OK to save.
Table 3-1 Main Department Code
Field Description
Code Department code in numeric character
Description Description or name of the code
Other Description Alternative name or other description of
the code, if any
Sub-Department Code Pre-defined Sub-Department code of
Automatic Service Charge
Percentage to distribute Percentage value of Automatic Service
Charge to distribute
% for Team Server 1 % of Service Charge to distribute by
Team
% for Team Server 2 % of Service Charge to distribute by
Team
% for Pool Distribution % of Service Charge to distribute from
Service Charge Pool.
External ID Department Location ID
Credit Limit Overall Floor Limit Allowed
Deleting a Main Department
1. From the Main Department Codes setup, select the code and then click the Delete
button.
2. At the confirmation prompt, click Yes to proceed.
Note:
Once a code is used and has transactions linked, you are not allowed to
delete it. You can choose to hide the code using the Hide button.
Sub-Department
You can only add a Sub-Department when Main Department code is present. The
information required in a debit sub-department code defers from credit sub-department
code although the process to create them are similar.
3-2Chapter 3
Department Codes
Table 3-2 Debit Sub-Department Field Definitions
Field Name Description
Type of Posting System coded posting type: Posting
Department (D) or Tax Department (DX)
Department Code Department Code in numeric characters only.
Description Description of the code.
Other Description Additional description of the code, if any.
Department Grouping Code use to group certain department codes
for reporting purposes.
POS Revenue Center Revenue Center code defined in POS System,
use in Interface mapping.
POS Sales Itemizer no Sales Itemizer number defined in POS system.
POS Sales Period Sales Period defined in POS.
POS Revenue C.Desc Revenue center description from POS System.
D.Code for Gratuities M. Manual Service Charge Department Code.
D.Code for Gratuities A. Auto Service Charge Department Code.
D.Code for Taxes Department code for Taxes, use in Interface
mapping.
Gratuity Typ Not in Use
Gratuity/Service Tax Department Not in Use
PBX Call Type Call charge type from PBX System, use in
Interface mapping.
Max. Daily Limit Maximum Daily Limit allowable for this code.
Service Charge Dept. Service Charge Department for Casino
postings.
Service Charge Service Charge Value.
Max. Cruise Limit Maximum Cruise Limit allowable for this code.
Req. Signature During Folio Payout Define whether signature is required on folio
payout.
Guest/Crew Discounts Dept. Applicable discount department code
Dept. Security Level Defined User Security Access Level 1 – 9.
Eligible Department Check box that determines the department are
non-eligible for refund.
Origin General Ledger codes defined in Chart of
Accounts.
VAT Tax Class Classification of VAT Tax.
Casino Department Determines whether the department code
belongs to Casino.
Exclude from Revenue Overview Revenue to be excluded from Revenue
Overview function in Management.
3-3Chapter 3
Department Codes
Table 3-3 Credit Sub-Department Field Definitions
Field Name Description
Payment Type The payment type of this code. For
example, Cash, Foreign Currency, Credit
Card, Check, Cabin Charge, City Ledger
Department Code Department Code in numeric characters
only.
Description Description of the code.
Other Description Additional description of the code, if any.
Department Grouping Code use to group certain department
codes for reporting purposes.
Credit Card Digits Acceptable credit card digits associated
with the type of credit card.
Credit Card ID Short code of credit card type.
Credit Card Internal ID Internal credit card id preset by the system.
Credit Card Merchant ID Card Merchant ID.
Foreign Currency Code ISO Currency codes. Refer to Typ_Cur when
the payment type=CF Foreign Currency.
Floor Limit Maximum limit allowed in guest account
for this card type.
Crew Floor Limit Maximum limit allowed in Crew account
for this card type.
Minimum Authorization Value Minimum amount to obtain from card
merchant.
Commission Department Department code for chargeable
commission.
Commission Rate % of applicable commission or value
defined if 'Commission is fix value' is
checked.
Daily Limit Daily Posting limit.
Debit Card No Commission Commission is exempted if checked.
Commission is fixed value Applicable commission is value based
instead of %.
Auto Balance (Interface) Auto Balance function for cash/credit card
posting via interface.
Rewards Card Denotes Rewards Card if checked.
Gift Card Denotes Gift card if checked.
POS Tender Type No. Tender Media Number defined in POS
System
System Account No. The Account Number defined in System
Account
Incentives Payout Group Incentive payout group setup from Crew
Incentive.
External Department ID External Department ID for payment from
3rd party system.
3-4Chapter 3
Department Codes
Table 3-3 (Cont.) Credit Sub-Department Field Definitions
Field Name Description
External Itemizer ID External Itemizer ID from third–party
system.
Allow Posting to Guest Cabin Posting allowed via Micros POS System.
Allow Posting to Crew Cabin Posting allowed via Micros POS System.
Allow Posting to Gift Card Posting allowed via Micros POS System.
G.Ledger Id. General Ledger codes in Chart of Accounts.
Eligible Department If the check box is checked, the department
are non-eligible for refund.
Dept. Security Level Defined User Security Access Level 1 – 9
Req. Signature During Folio Payout Define whether signature is required on
folio payout
Credit Card Disclaimer Note Disclaimer note to print on invoice when
payment is by credit card.
Department for routing Payment Type allowed for routing.
Adding a Debit Sub-Department
1. From the Main Department Setup window, select the Debit tab and then the
Department Code.
2. Click New to open the Debit Department Code Setup form.
3. Enter the code, description and other required fields approved by your Financial System.
4. Click OK to save.
Adding a Credit Sub-Department
1. From the Main Department Setup window, select the Credit tab and then the
Department Code.
2. Click New to open the Payment Setup form.
3. Enter the code, description and other required fields approved by your Financial System.
4. Click OK to save.
Note:
No posting is allowed when a credit code does not have a floor limit assigned or
the value is 0.00. The parameter “General”,”Check Buyer Limit” and “Check
Credit Limit” is used to validate and manage the credit limit during posting.
Deleting Sub-Department Code
1. From the Main Department Setup window, select the Sub-Department to delete.
2. Click the Delete button located at the bottom of the screen.
3-5Chapter 3
Department Codes
3. At the confirmation prompt, select Yes to delete the code.
Note:
It is not possible to delete a code that has transaction linked to it. Once
the code is deleted, is not reversible. If the code is no longer in use and
deleting is not possible, use the Hide/Show function to disable them.
Currencies
This Currencies function enables you to input the currency rate used in Currency
Exchange module. You can also update the exchange rates from Currency Exchange
module itself. This feature uses the Currency Codes configured in Credit Sub-
Department.
Adding Currency Rate
1. From the Financial Setup menu, select Currencies.
2. In the All Currencies section, right-click and select Add Rate.
3. Navigate to Setup Exchange Rates section and select the currency code from
Currency/Check drop-down list.
4. Enter the Valid From date, Minimum Denomination (Buy/Sell) and select the
Rate Calculation method from the drop-down list.
5. Checking the Disable From check box disables the currency from showing in the
Currency Exchange module from date specified. Disabled currency are marked
with an asterisk *.
6. Enter the Available Notes, if any. If you have specified the Available Notes, the
system uses the Available Notes for calculation and ignore the Minimum
Denomination setup.
7. Enter the Exchange Rates and Commission % or Min. Commission, then click
OK to save.
Removing Currency Rate
A currency rates can be easily removed by right-clicking the currency rate and select
Remove Rate.
Merchant Details
For every credit card provider the Ship deals with, you must create a Merchant
credential to facilitate the credit card authorization and handling. Such information is
provided by the third-party service provider.
1. From the Financial Setup menu, select Credit Card Merchant Setup.
2. On the left pane of the setup screen, right-click and select Add New.
3. Select the Credit Card Type and Currency from the drop-down list.
4. Enter the Terminal ID, Bank ID, Decimal, IP Port, Merchant Login ID and
Merchant Password.
3-6Chapter 3
Department Codes
5. Click OK to save.
6. Repeat the above steps for other credit card type accepted by the merchant.
Pre-Selection Groups
The Pre-Selection Groups allow you to categorize numerous department codes into a group,
for use in Routing and Discount assignment.
1. From the Financial Setup menu, select the Department Groups Setup.
2. On the left pane of the setup screen, right-click and select Add Department Group.
3. In the Department Groups section, enter the Description of the group and the
Department Codes.
4. Click OK to save.
Stateroom Upgrade Setup
In the Stateroom Upgrade Setup function, you can create a price table and manage the price
differences to charge when a performing a cabin upgrade.
1. From the Financial Setup menu, select Stateroom Upgrade Setup.
2. In the Price Table for Upgrades screen, click New.
3. In the Edit Upgrade Prices window, select a category from the Category Identifier.
Note:
The Cabin Categories only appears if these are set up in Stateroom setup.
Sorting the category pricing from higher to lower is recommended.
4. Enter the Sorting, Price and Maximum Person allowed.
5. Click OK to save.
Discount Templates
The Discount Templates function enable you set up various discount types template, for use
in Discount, Routing and Package Handling.
1. From the Financial Setup menu, select Discount Templates.
2. On the left pane of the setup screen, right-click and select Add New.
3. Navigate to the Fidelio Department section and then click Add. This launches the
Discounts window.
4. In the Discounts window, enter the Percentage, number of count to apply in the How
Much section. When the Percentage check box is unchecked, the discount becomes a
value based discount. If the Apply Count field is blank, this discount is unlimited.
5. Select the applicable Department Code and then click OK to apply.
3-7Chapter 3
Department Codes
Quick Posting Template
This function enable you to create a criterion filter to be use in Quick Posting function
in Cashier Function. For example, a posting to specific nationality.
1. From the Financial Setup menu, select Quick Posting Templates.
2. On the left panel of the setup screen, right-click and select Add New.
3. Enter the short code and description in the Description field and then insert the
criterion in the Comments field.
4. Click OK to save.
Import Credit Card Bin
You can import a complete set of eligible Bank Identification Number (BIN) provided by
the Credit card provider by and overrides the previously loaded BIN information during
the reload process.
1. From the Financial Setup menu, select Import Credit Card Bin file.
2. At the bottom of the screen, select the BIN file to import.
3. By default, all the check boxes are check. Click Import to save the information into
the BIN table.
4. Click Close to exit.
Disallow Manual Posting Applications
This function is use to prevent users from manually posting a transaction through the
listed application when the posting is set to No in the guest account.
1. From the Financial Setup menu, select Disallow Manual Posting Applications.
2. Right-click on the left pane and select Add New.
3. Enter a short code and the application name in the Description field.
4. Click Apply to save.
Department Grouping
This function allow you to categorize a department group for use as financial
classification and in report grouping.
1. From the Financial Setup menu, select Department Grouping.
2. Right-click the left pane and select Add New.
3. Enter a short code and description in the Description Field and then click OK to
save.
VAT Handling
Before you use the VAT Handling, these VAT components must be in place.
• VAT Tax Class
3-8Chapter 3
Department Codes
• VAT Tax Rate
VAT Tax Class
The VAT Tax Class a tax group classification. For example, a Regular Tax, Reduced Tax and
others.
1. From the Financial Setup menu, select VAT Tax Class.
2. On the left pane of the setup screen, right-click and select Add New.
3. Enter the short code and the application name in the Description Field and click Apply
to save.
VAT Tax Rate
The VAT Tax Rate code is used to define the various tax rate applicable to each country or
class, and the tax posting code.
Figure 3-2 VAT Tax Rate Per Country Setup
1. From the Financial Setup menu, select VAT Tax Rate.
3-9Chapter 3
Department Codes
2. Click Add New at the ribbon bar and then select the Country code from the drop-
down list.
3. Click Save.
4. Expand the Country container and select the Tax Class.
5. Insert the tax rate in the VAT Tax Rate field and select the Tax Department code
from the drop-down list.
6. Click Save to save the changes.
Activating a Tax Rate
This function enable you to apply the correct Tax Rate based on the cruise location
and stores the information in Parameter, “General”,”Current VAT Tax Country”. A
system restart is required on all posting modules for changes to take effect.
1. From the Financial Setup menu, select Activate Tax Rate.
2. Select the country tax to activate from the drop-down list and then click OK.
3. At the confirmation prompt, select Yes to activate.
VAT Tax Reminder
A reminder can be added to remind you when to activate the tax country on date
specified.
Figure 3-3 VAT Tax Reminder
1. Front the Financial Setup menu, select VAT Tax Reminder.
2. Click Add New at the ribbon bar, and then select the Date and Time from the
drop-down list.
3. At the Active Tax Country, select the Country the tax to be activated.
4. Click Save to save and exit.
3-104
Itinerary Setup
The Itinerary Setup is function that enables you to plan the daily activities available for each
voyage by Location, Events, Packages or through an Agent. The information entered here
are shown as an information board in the Management, Itinerary Overview , and they are
entered through Administration, Itinerary Setup.
Adding an Activity
Figure 4-1 Activities Setup
Table 4-1 Field Description of Activities Setup
Field Name Description
Type/Title The type of activity and title
Language The language offered in this activity
Title Title of the activity
Description Brief description of the activity
Start DateTime Start date and time of the activity
4-1Chapter 4
Copying an Activity Setup
Table 4-1 (Cont.) Field Description of Activities Setup
Field Name Description
Duration Time Duration of the activity
Deadline DateTime Booking deadline date/time
Setup Time Setup time require in minutes
Dates Accuracy Activity dates accuracy (1-All Accurate, 2-All
Approximate, 3-Starting Approx., 4-Duration
Approx.)
Clean-up Time Clean up time in minutes
Location Location of the activity
Comments Comments for the activity
Waiting List Waiting List is allowed/disallowed
Booking Status Activity booking status (Enable/Disable)
Booking Options Activity booking options — Booking is
required or not.
Min/Max Available Minimum or Maximum number of bookings
allowed
Agent/Vendor Agent/Vendor Name
Adult Cost Price Agent/Vendor Cost Price
Child Cost Price Agent/Vendor Cost Price
Department Agent/Vendor Posting Department
1. From the Itinerary Setup menu, select Activities.
2. One the left pane, right-click on the selected Cruise Day.
3. Select Add Activity from option menu.
4. In the Setup Activity section, update the all the activities details.
5. Click the More Details button to insert the Meeting Date/Time, clothing
requirements and other information and click OK to return to previous screen.
6. In the Reservation section, select the appropriate booking options from the drop-
down list.
7. Enter the pricing and select the Agent/Vendor providing the service.
8. Click OK to save.
Copying an Activity Setup
An existing activity can be copied into the future cruise by day or by activity instead of
re-creating every single activity.
1. From the Activities setup window, right-click on the Cruise Day and select Copy
Day/Activity.
2. In the Duplicate whole day window, enter the date to copy to, then click Add.
3. Click OK to copy the activities.
4-2Chapter 4
Add Package Price
Note:
To copy a single activity, select an Activity instead of by Cruise Day.
Add Package Price
The Add Package/Price is an additional information field for the activity and they are not
meant for posting.
Adding Team/Time Frame
You can add the team member required to handle the activities by indicating the time and
number of member required.
1. In the Activities Setup window, right-click on the activities details and select Add Team/
Time Frame.
2. In the Team/Time Frame section, enter the number of team member and select the time
to reserve from and duration.
3. Click OK to save.
Removing an Activity
Activities that are no longer required or has been added as duplicate can be easily removed
by right-clicking on the activity and select Remove Activity. If the activity has a Team/Time
Frame or Packages/Price information, you must remove these first before removing the
activity.
4-35
Events
The section describes the setup of an activity category, its location and requirements.
Figure 5-1 Event Setup Screen
Table 5-1 Event Setup Field Definition
Field Name Description
Number Order Number of the Event
Language Language used in the event
Title Event Title
Description Short description of the event
Location Location of the event
Type Type of event
Ticket Determine if the event is ticket based or not
Comments Additional comments of the event
Age Range Age Range, if any
Age Restriction Age Restriction, if any
5-1Chapter 5
Adding an Event
Table 5-1 (Cont.) Event Setup Field Definition
Field Name Description
Family Status Family Status of attendees, if any
Marital Status Marital Status, if any
Gender Target gender, if any
Group Group name for special event
Adding an Event
1. From the Itinerary Setup drop-down menu, select Events.
2. In the All Events section, right-click and select Add Event Type.
3. Enter a short code and description in the Description field and then click OK.
4. Select the Event Type, then right-click and select Add Event.
5. In the Details section, enter the event number, title and description of the event.
6. Select a Location, Type and Ticket from the drop-down list.
7. In the Demographics section, enter the Age Range and select the Family
Status, Marital Status, Gender and Age Restriction from the drop-down list.
8. Click OK to save the entry.
Setting Up Event Location
The Location is use to describe to the location where event/activity is held.
1. From the Itinerary Setup menu, select Locations.
2. In the All Locations section, right-click and select All Location.
3. In the Setup Location Section, enter a code and description in the Title field, select
the Deck from the drop-down list and attach a picture, if any.
4. Select the Availability Status and appropriate prompt to use for an overbooked
location and click OK to save.
5. Select the Location, the right-click and select Add Table/Seat.
6. In the Details section, enter the even number, title and description.
7. Select a Location, Type and Ticket from the drop-down list.
8. In the Demographics section, enter the Age Range and select the Family Status,
Marital Status, Gender and Age Restriction from the down-down list.
Adding Event Table/Seat
1. In the Location Setup window, right-click on the location.
2. Click Add Table/Seats.
3. Fill in all the fields.
4. Click OK to save.
5-2Chapter 5
Setting Up Event Location
Adding an Event Exception
1. At the Location Setup window, right-click and select Add Exception.
2. Fill in the information and select the Reason from the drop-down list.
3. Click OK to save.
4. Location that has an exception are marked with an Exclamation mark.
5-36
Vendors
The Vendors/Agents Setup is used for storing store contact information of vendors/agents
handling the events.
Figure 6-1 Agents/Vendors Setup
Setting Up a Vendor
1. From the Agents/Vendors Setup window, right-click and select Add Agent.
2. Enter the Agents details and then navigate to Comments tab to add the additional
comments or document image.
3. In the Comments tab, click Add Comment to enter a new comment and the relevant
details.
4. Navigate to the Document tab to upload, scan or export an image file.
5. Click Save.
6. Click OK to save the Agent details.
6-17
Safety Setup
The Safety Setup contains all the codes required in Standard Safety Drill and Advance Safety
Drill modes. The setup varies depending on the mode defined in Parameter group, Safety,
Advance Safety Drill (0=Standard Safety Drill / 1 = Advance Safety Drill).
Safety Setup Type
In below figures, you will see the list of codes available to Standard Safety Drill and
Advanced Safety Drill mode.
Below is the function codes available to Standard Safety Drill mode where Parameter,
Safety, Advance Safety Drill set to “0”.
7-1Chapter 7
Safety Setup Type
Figure 7-1 Standard Safety Drill Setup Codes
Below is the function codes available to Advanced Safety Drill mode where
Parameter, Safety, Advance Safety Drill set to “1”
7-2Chapter 7
Safety Setup Type
Figure 7-2 Advance Safety Drill Setup Codes
Table 7-1 Safety Setup Configuration Codes
Function Name Definition
Deck Setup Define the deck location in Muster Station
Setup. Available in Advance Safety Drill.
Fire Zone Setup Define the Fire Zone for the drill in Muster
Station Setup. Available in Advance Safety
Drill.
7-3Chapter 7
Safety Setup Type
Table 7-1 (Cont.) Safety Setup Configuration Codes
Function Name Definition
Stair Well Setup Define the stairwell location in Muster Station
Setup. Available in Advance Safety Drill.
Muster Station Setup (definable label - Define the assembly location.
TYP_LBL = SFTMST)
Lifeboat Setup (definable label - TYP_LBL = Define the lifeboat or life raft capacity.
SFTBOT)
Gangway Locations Define the location of gangway.
Safety Department (definable label - TYP_LBL Define the department responsible for safety
= SFTDIV) for each location.
Safety Group (definable label - TYP_LBL = Define the responsibilities and task of each
SFTSGP) safety group.
Safety Position (definable label - TYP_LBL = Define the position of the crew.
SFTCRW)
Safety Role (definable label - TYP_CLBL = Define the role of the safety crew.
SFTROL)
Safety Function (definable label – TYP_LBL = Define the role of crew in command of
SFTFCT) Survival Craft.
Safety Drill Type Define the type of drills.
Drill Location Define the location of the schedule drill.
Available in Standard Safety Drill only.
Drill Instructorship Define the instructor responsible for the
scheduled drill. Available in Standard Safety
Drill only.
Drill Definition Definition of drills.
Drill Template Setup Template for each drill type.
Absence Reason Absent reason from attending safety drill.
Available in Advance Safety Drill only.
Excuse Request Reason Reason to be excused from attending safety
drill. Available in Advance Safety Drill only.
Excuse Unapproved Reason Reason for not approving the excuse request.
Available in Advance Safety Drill only.
Interview Comment A comment field used during interview as a
predefined comment, or you can input using
free text. Available in Advance Safety Drill
only.
Course & Certificates Type of Courses and Certification required for
each drill type.
Proficiency Level Proficiency level offered in Courses and
Certification.
Accredited Training Centers Reputable Safety training centres recognized
by the ship.
7-4Chapter 7
Configuring Safety Codes in Standard Drill
Configuring Safety Codes in Standard Drill
Majority of the setup windows are the same in Standard Safety Drill mode and below are the
steps to configure the new codes for Gangway Locations, Safety Department, Safety Group,
Safety Position, Safety Role, Safety Function, Safety Drill Type, Drill Location, Drill
Instructorship, Course Type and Accredited Training Centers.
1. From the Safety Setup menu, select the code to configure.
2. Right-click the blank space on the left and select Add New.
3. Enter a short code and the name, and further describe the code in the Comments field.
4. The Enabled field is checked by default. Un-checking the box will disable the code.
5. Click Apply to save the code.
6. Right-clicking the code and select Remove will delete the code from the system.
Setting Up Muster Station
A Muster Station is a required field in the Safety Drill setup and this must be setup before you
configure any Safety Drill. The layout of the configuration screen differs, depending on the
mode setup in Parameter group, Safety, Advance Safety Drill.
1. From the Safety Setup menu, select Muster Station.
2. Right-click on the blank space and select Add Muster Station.
3. Enter a short code, field name and the Capacity allowed.
4. Select the Lifeboat Type from the drop-down list and insert an Emergency Phone No, if
any.
5. Right-clicking the code and select Copy Muster Station allow you to copy the
information and add more codes.
6. In the Duplicate Muster Station window, enter the Muster Station and description.
7. Click Apply to save.
Figure 7-3 Muster Station Setup
7-5Chapter 7
Configuring Safety Codes in Standard Drill
Setting Up Lifeboat/Liferaft
A lifeboat/liferaft has a maximum capacity and does require a number of qualified crew
to handle them in the event of an emergency.
Figure 7-4 Lifeboat/Liferaft Setup
Table 7-2 Lifeboat/Liferaft Setup Field Definition
Field Name Description
Description Short code and description of the lifeboat/
liferaft.
Type The type of lifeboat/liferaft. These codes
are predefined and hard coded.
Min. Crew with CPSC Required Minimum number of CPSC certified crew
on lifeboat/liferaft.
Max Capacity Maximum capacity allowed per lifeboat/
liferaft.
Operators/Crew Assigned Number of crew assigned to this lifeboat/
raft.
Max Certified Capacity Maximum certified capacity of the lifeboat/
raft.
Muster Station Raft Crane Raft crane the lifeboat is assigned to in
Muster Station.
Launch Sequence Launch sequence of the lifeboat.
Remarks Additional remarks of the lifeboat.
To setup the codes, repeat steps in Setting Up Muster Station. You can also duplicate
an existing Lifeboat code using the same steps.
7-6Chapter 7
Configuring Safety Codes in Standard Drill
Setting Up Drill Definition
In the Drill Definition code setup, this is where you defines the type of drills, attendance
requirement and identify drills that are Course and Certificate related.
Figure 7-5 Drill Definition Setup
1. From the Safety Setup menu, select the Drill Definition.
2. To add a new drill, click Add New.
3. Select the Status from the drop-down list. and enter the Drill Code and description.
4. In the Drill Definition section, select the Drill Type from the drop-down list.
5. Enter the Unit of Frequency and Required x Days after embarkation.
6. Click Save to save the record.
7. Select the drill and click Modify.
8. Enter the Location, Instructor, Required Operational Positions and Assigned
Manning Number.
9. At the Location and Instructor section, right-click and select Add New.
10. Select the location from the drop-down list and enter the comment or function, if any.
11. At the Required Operational Positions section, right-click and select Add New.
12. Add a position individually or select Add All to select multiple positions or all.
13. In the Assigned Manning Number section, repeat step 7 and select Assigned Manning
number.
Setting Up Course and Certificates
The Courses and Certificates code allow you to define the type Courses and Certifications
required for each drill type, and identify the certificates expiry during on Emergency # (E
Number) change.
7-7Chapter 7
Advance Safety Drill Mode
Figure 7-6 Course and Certificates Setup Window
1. Select the Course and Certificates from the Safety Setup menu.
2. In the Course and Certificate window, click New.
3. In the Code and Name section, enter the code and the name of the course.
4. Select the Type and Related to from the drop-down list.
5. Enter the course description, instructor’s name and the training center location.
6. Select the type of expiration section.
7. Enter the Minimum Required Per Vessel.
8. The Active check box is checked by default. Un-check if you wish to disable the
course.
9. Check the Priority check box if the course is a priority.
10. Click OK to save the code.
Advance Safety Drill Mode
The Advance Safety Drill mode has more configuration codes in comparison to the
Standard Safety Drill mode. Below are the additional codes.
• Deck Setup
• Fire Zone Setup
• Stair Well Setup
• Absence Reason
• Excuse Request Reason
• Excuse Unapprove Reason
• Interview Comment
These functions is enabled with Parameter, “Safety”,”Advance Safety Drill” set to
‘1’.
7-8You can also read