Owner's Manual Care and Maintenance - Marvin Windows
←
→
Page content transcription
If your browser does not render page correctly, please read the page content below
Owner's Manual Care and Maintenance
02 I N FI N I T Y® FRO M M A RV I N® OW N ER ' S M A N UA L
Table of Contents
04   I N T RO D U C T I O N
04   How to Use this Manual
04   Warranty Registration
05   Hazard Notations

05   AN N UAL C H EC KL I ST

06   PA R T I D E N T I F I C AT I O N
06   Windows
07   Doors

08   GLASS
08   Condensation
08   Mildew Removal
09   Tempered Glass
09   Glass Breakage
09   Cleaning Glass

10   INTERIOR EVERWOOD® FINISH
10   Finishing or Painting EverWood
10   Preparing and Cleaning EverWood
10   Applying a High Quality Gel Stain
11   Applying a Protective Top Coat Finish
11   Applying a Paint Finish

11   BARE INTERIOR WOOD
11   Painting Wood
11   Staining Wood

12   U LT R E X ® F I B E RG L A S S
12   Cleaning Ultrex
12   Painting Ultrex

13   H A RD WA RE
13   Cleaning Hardware
13   Physical Vapor Deposition (PVD) Finish

14   SCREEN
14   Cleaning Screen

15   CARE AND MAINTENANCE
16   Double and Single Hung
19   Slider/Glider
20   Casement
21   Awning
22   Special Shape and Round Top
23   Sliding French/Patio Door
25   Inswing French Door
I N T RO D U C T I O N

Welcome to                                                                      Thank you for your recent purchase of

the Infinity Family                                                             durable, beautiful and low-maintenance
                                                                                Infinity from Marvin windows and doors.

How to Use this Manual
This manual is designed to teach you the basics about your new Infinity windows and doors. You’ll find photos to help
you identify your Infinity products, general information on cleaning and answers to common questions. There are
also simple, small things you can do to ensure satisfaction. If you have a question or experience a problem with your
windows that is not mentioned in this manual, just call your local Infinity partner for help or visit infinitywindows.com.

Warranty
Infinity from Marvin is committed to bringing you products of the highest quality and value. Our made-to-order
manufacturing philosophy is one example of our commitment. Our warranty, another.

Please visit the warranty section of our website infinitywindows.com/warranty for full warranty details on your product.

Warranty Registration
To obtain the Limited Lifetime Warranty, you must register your products with Infinity within 60 days of product
installation by completing the Warranty Registration form available at infinitywindows.com/warranty. You may also
register by calling 1-800-533-6898. If you do not register your products within 60 days of installation, you will not
receive the Limited Lifetime Warranty; instead, you will receive the 10/20 Limited Warranty.

04    I N FI N I T Y® FRO M M A RV I N® OW N ER ' S M A N UA L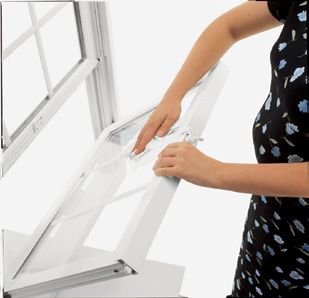
Hazard Notations
Please familiarize yourself with the following hazard
notations used throughout this manual.

WARNING                                                           S E E K A S S I S TA N C E

Mistake or misuse could result in personal injury and/            Help from another individual is necessary to perform
or severe damage to unit, equipment and/or structure.             the task safely and correctly.

CAUTION                                                           TIPS/HINTS

Mistake or misuse could cause damage to the window or             Information on alternative procedure, definitions
result in faulty installation and unit performance.               and helpful hints.

           AN N UAL C H EC KL I ST

Keep your windows and doors operating
smoothly with routine care and maintenance.
01   Safety first: use caution on ladders, wear protective eye-wear and clothing. When working with primers, paints,
     stains, cleaning solutions, etc. make sure to use and dispose according to local codes or manufacturer’s instructions.

02   Inspect weather strip for damage or loss of performance. Your local Infinity partner can help determine
     if the weather strip needs replacement. Take care when using paints, stains or varnishes as these products can
     damage weather stripping.

03   Examine window or door’s interior and exterior finish. Periodic cleaning and touch-up can extend the life of your
     finish. (See repainting /refinishing information on pages 10 through 12).

04   Inspect exterior caulking around the outer edges of the window or door frame. Trim off any loose caulk and reseal
     any gaps with a good quality caulk.

05   Check all hardware (locks, opening mechanisms, etc.) for smooth operation.

06   Inspect exposed hardware screws; tighten if loose.

07   Clean sand, dirt or dust from door and window hinges, sills and tracks.

08   Life happens, windows and doors get dirty. Wash your windows and door with an approved cleaning solution
     found at infinitywindows.com/care.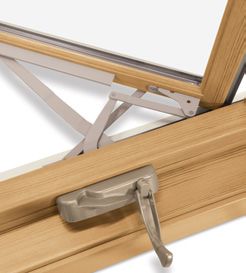
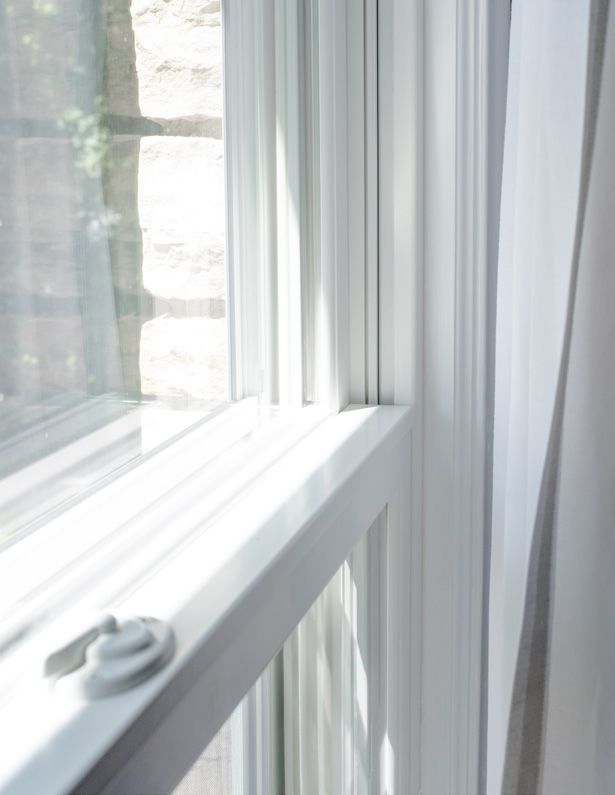
PA R T I D E N T I F I C AT I O N

Windows                                                                                        FRAME

In this manual, you’ll find operation and                                                      LITE
maintenance information for Infinity from Marvin
windows beginning on page 16. Refer to the product
illustrations for the names of your particular
                                                                                               CHECK RAIL
windows, and use the illustration to help identify
window components.

*Infinity Double Hung shown for illustrative
 purposes only.

                                                                                               SILL

Infinity Window Styles                                                SASH

     DOUBLE AND                            S L I D E R /G L I D E R          CASEMENT   AW N I N G
     SINGLE HUNG

       SPECIAL SHAPE AND
            RO U N D T O P

06     I N FI N I T Y® FRO M M A RV I N® OW N ER ' S M A N UA L
PA R T I D E N T I F I C AT I O N

Doors                                                                                                             RAIL

In this manual, you’ll find operation and maintenance
information for Infinity from Marvin doors beginning on
page 23. Refer to the product illustrations for the names
of your particular doors, and use the illustration below to                                     STI L E
help identify door components.

Sliding French and Sliding patio doors are available in 2, 3
and 4 panel configurations. Inswing French door is
available in 1, 2 and 3 panel configurations.

*Infinity Sliding Patio Door shown for illustrative
 purposes only.

                                                             FRAME

                                                              SILL

                                                                                             PA N E L S
Infinity Door Styles

                                                                   * Infinity XX Inswing French shown for illustrative purposes only.

       SLIDING FRENCH DOOR                            S L I D I N G PAT I O D O O R                       INSWING FRENCH DOOR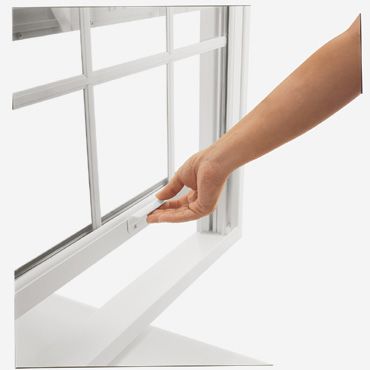
GLASS

Keep your glass looking and performing its best.
Condensation
Before reading this section, pour yourself a nice tall glass of ice water. During cold winters, there is a large
temperature difference between inside and outside of your home. When the temperature drops outdoors, the glass
on your windows usually has a lower surface temperature than other surfaces in your home and is the first place that
you’ll notice condensation in your home. This is not due to any defect in your window or door, it’s simply a sign of
needing to reduce the humidity in your home.

Warm air is capable of holding more moisture than cool air. As warm vapor filled air comes in contact with a cool
surface it loses its ability to hold moisture. When moisture laden air reaches its dew point, moisture condenses on the
nearest cool surface. Generally the most obvious surfaces in your home where you’ll notice condensation are on your
windows or the glass of ice water sitting in front of you.

Excessive humidity is more likely to occur in newer or recently remodeled homes with tight, energy efficient
construction, causing a build-up of moisture to the interior. Information on excessive humidity and how to reduce
condensation on your windows can be found on the Internet by searching for “window condensation”.

Mildew Removal
If your home has excessive interior moisture, you may experience some discoloration on various parts of your home,
including the lower portions of your windows or doors. This discoloration may be the result of mildew growth and can
be removed with an approved cleaning solution found at infinitywindows.com/care.

Mildew is a fungus that thrives on warmth and moisture. Mildew growth is usually brown or black in color and may be
mistaken for dirt. The presence of mildew can be confirmed by placing a drop of household bleach on the suspected
mildew area. If small gas bubbles develop in the droplet of bleach, mildew does exist and can be removed with an
approved cleaning solution found at infinitywindows.com/care.

           Wear protective eyewear and skin protection, and keep the area well ventilated.
           Make sure the surface is clean and reapply if the discoloration persists.

08    I N FI N I T Y® FRO M M A RV I N® OW N ER ' S M A N UA L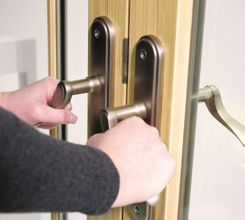
Tempered Glass
Tempered glass is sometimes used on Infinity windows and doors for code or safety reasons. Tempered glass is
heated and cooled at an accelerated rate, adding strength and shatter resistance. You may notice a slight amount of
distortion – this is normal and due to the tempered glass manufacturing process. The logo in the corner of each piece
of tempered glass is required by code and safety regulations.
Glass Breakage
Should the glass in your window or door break, make sure you use the appropriate personal protection
equipment to remove the broken glass; eyeglasses or goggles, sturdy gloves and heavy protective clothing.
Dispose of broken glass in a secure container. Failure to properly handle and dispose of glass could
result in injury.
*Contact your Infinity partner for information on sash or panel replacement.
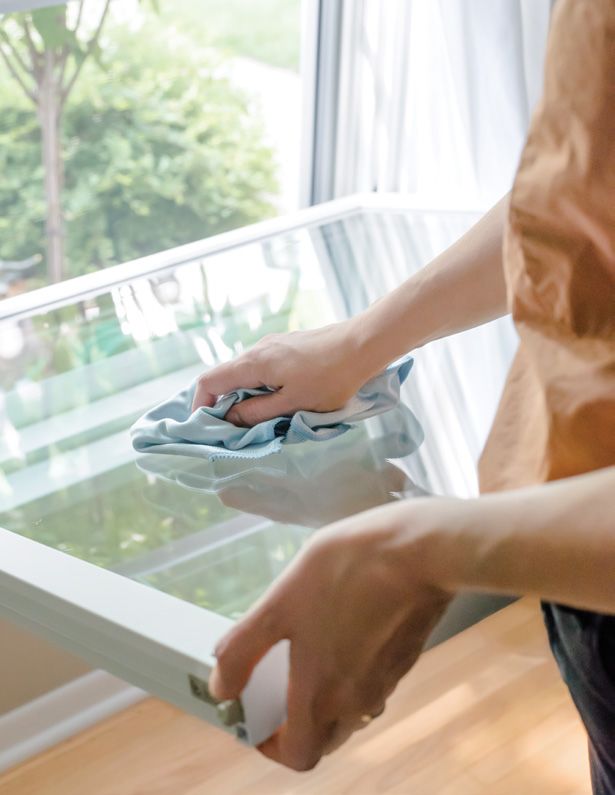
Cleaning Glass
The best method to clean the glass on your Infinity products is to first soak the glass surface with clean water to
loosen dirt or debris. Use an approved cleaning solution found at infinitywindows.com/care and apply with a scratch
resistant applicator. Immediately after washing the glass, remove all of the cleaning solution with a squeegee. Make
sure no harsh particles are trapped between the glass and the cleaning material. Window and door gaskets, sealants
and frames are susceptible to deterioration if cleaning solutions are not rinsed and dried after cleaning.
Do not use razor blades, knives or scrapers
for cleaning glass surfaces.
DO
• Clean glass when dirt and residue appear
• Determine if coated glass surfaces are exposed
• Exercise special care when cleaning coated glass surfaces
• Start cleaning at the top of the building and continue to lower levels
• Soak the glass with clean water to loosen dirt and debris
• Use an approved cleaning solution found at infinitywindows.com/care
• Dry all cleaning solution from window gaskets, sealants and frames
• Clean one small window and check to see if procedures have caused any damage
DON'T
• Use scrapers of any size or type for cleaning glass
• Allow dirt and residue to remain on glass for an extended period of time
• Clean tinted or coated glass in direct sunlight
• Allow water or cleaning residue to remain on glass or adjacent materials
• Begin cleaning without rinsing excessive dirt debris
• Use abrasive cleaning solutions or materials
• Allow metal parts of cleaning equipment to contact the glass
• Trap abrasive particles between the cleaning materials and glass surface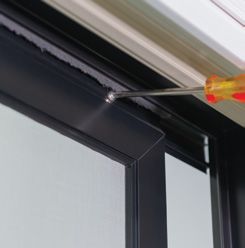
INTERIOR EVERWOOD® FINISH

Looks and stains like wood — without the maintenance.
Read these instructions thoroughly before beginning to stain or paint your Infinity window or door.
Once finished, it is very difficult to remove the stain or paint and refinish the unit.

Finishing or Painting EverWood
Stainable, paintable Infinity products feature EverWood, an interior engineered wood grain surface that requires
a paint or gel stain finish to be applied before or immediately after installation.

            When applying gel stain or paint finish avoid contact with plastic or vinyl parts such as weather strip,
            hardware, handles or rollers. Stain and paints can cause damage and may require replacement.

DON'T

•      Sand or use abrasive cleaners on EverWood.
•      Allow EverWood to come in contact with petroleum distillates such as benzene, toluene or kerosene.
•      Allow EverWood to come in contact with silicon or other adhesives prior to finishing.

Preparing and Cleaning EverWood
Clean the EverWood surface with a damp cloth soaked in warm water. Wipe down with a dry cloth and allow the
surface to thoroughly dry. If the surface has become soiled try cleaning with an approved cleaning solution found at
infinitywindows.com/care. Rinse off cleaning residue with warm water and let thoroughly dry.

Applying a High Quality Gel Stain
Read and follow gel stain manufacturer’s instructions and warnings for application, preparation and clean-up. Apply
the gel stain with a brush in the direction of the wood grain on the supplied test strip of EverWood to determine if the
gel stain adequately matches your existing finish before applying stain to the unit.

If the stock gel stain applied to the EverWood test strip does not match your existing finish it is possible to
custom mix gel stains by adding colorants or combining colors. The exact process will depend on the brand of gel
stain you are using. Infinity recommends contacting a stain/paint specialty store to custom mix a matching color
for your application.

After a good match has been obtained on a sample apply gel stain evenly with a brush to the unit.

     C H ESTN U T     DARK OAK           MAPLE         DARK MAPLE     C H E R RY      MAHOGANY      RO S E W O O D     WA L N U T

10      I N FI N I T Y® FRO M M A RV I N® OW N ER ' S M A N UA L
Applying a Protective Top Coat Finish
Let the gel stain dry overnight. Test an area to see if the surface is dry by wiping the stained surface with a clean cloth.
If stain appears on the cloth the stain needs to dry longer. After the stain has completely dried, Infinity recommends
using a high quality water-based polyurethane finish. Follow the finish manufacturer’s instructions and warnings for
application, surface preparation and clean up. Use a clean brush to apply a top coat, lightly sand the surface with 400
grit sandpaper taking extra care not to sand through the finish surface, then apply one more coat of finish.
Applying a Paint Finish
Read and follow the paint manufacturer’s instructions and warnings for application, preparation and clean up. Test a
high-quality latex or oil based paint applied in the direction of the wood grain on a sample piece of EverWood before
applying paint to the unit.
EverWood does not require the use of a prime coat.
One coat of high quality paint generally provides adequate coverage.
BARE INTERIOR WOOD
Finishing or painting bare wood products
from the Marvin Elevate Collection.
If you have a brand new, bare wood Elevate door, you must finish it immediately to prevent possible damage to the
wood. Make sure bare wood door interior surface is clean and dry. Remove any handling marks, debris or effects of
exposure to moisture by sanding lightly with fine sandpaper and wiping clean before applying your choice of finish. It
is important that you do not paint locks, hardware, weather strip or jamb liners. Avoid contact with plastic parts and
vinyl weather strip; paint and stain can damage these parts.
Painting Wood
Use only a high quality oil base or latex paint. To provide a good adhesion of paint, a compatible prime coat should be
applied. Paint with panels opened or removed, do not close until thoroughly dry. Apply one coat of primer and two
coats of top quality paint according to the paint manufacturer's instructions.
Do not apply paint to the Marvin Elevate Collection factory prefinish
without first contacting your Infinity dealer for proper instructions.
Staining Wood
Apply stain according to the manufacturer’s instructions. Apply as many coats of stain as necessary to achieve
the desired color. After the stain is thoroughly dry, apply at least two coats of finish. Marvin recommends
varnish or polyurethane.
Prior to staining natural wood it is desirable to apply a wood conditioner
to obtain a more even finish. Follow manufacturer’s instructions.U LT R E X ® F I B E RG L A S S
Easy cleaning for a fiberglass finish that lasts.
Infinity windows and doors are built with strong, durable Ultrex fiberglass that is 8 times stronger than vinyl. Our
proprietary finish is three times thicker than the competition, and performs without fear of UV degradation — and is
virtually maintenance free. No sanding, scraping or painting required.
Cleaning Ultrex
Remove dirt by washing with an approved cleaning solution found at infinitywindows.com/care and rise with water.
Clean with a soft cloth or soft brush to remove any bugs, grime, dirt or dust. Do not use an abrasive applicator or
use extreme pressure.
No solvents, paint thinner or other chemicals of any type are recommended for use with Ultrex, as they may affect the
functionality and appearance of the coating.
DON'T
• Apply approved cleaning solutions with any abrasive materials or applicators.
• Use a scrubbing action or extreme pressure.
• Use solvents, paint thinner or other chemicals, as they may affect the integrity, functionality
and appearance of the coating.
Do not allow Naptha to come in contact
with EverWood ® material.
Painting Ultrex
You will need to supply:
• 320-400 grit sandpaper
• Masking tape
• Foam painting brush
• Quality exterior grade acrylic latex paint
01 Thoroughly sand the factory finish with 320-400 grit sandpaper.
02 Wash the surface with water and an approved cleaning solution found at infinitywindows.com/care
to remove contaminants, rinse with clear water and dry thoroughly.
03 Mask any window components that will not be painted.
04 Coat the Ultrex with a quality exterior grade acrylic latex paint.
05 Acrylic latex products gain full adhesion after seven to ten days cure.
12 I N FI N I T Y® FRO M M A RV I N® OW N ER ' S M A N UA LH A RD WA RE
Keep handles and locks looking their best.
Cleaning Hardware
Use a clean, soft, damp cloth to polish and remove fingerprints from window and door hardware. To remove heavier
deposits, use an approved cleaning solution found at infinitywindows.com/care. Remove traces of water and cleaner and
dry thoroughly with a soft cloth. When using any proprietary cleaner always follow the advice given by the manufacturer.
DON'T
• Use household cleaners, window cleaning solutions, abrasive cleaners, bleaches, solvents, polishes
or other chemicals unless specifically recommended by the hardware's manufacturer.
• Allow keys, rings or other sharp objects to strike the hardware.
Physical Vapor Deposition (PVD) Finish
PVD finishes are available as an option for door hardware. PVD hardware undergoes a state of the art process known as
Physical Vapor Deposition. A layer of hard-wearing metals are deposited onto the solid brass substrate which means it
has been given a tough finish to resist fading and discoloration by direct sunlight, humidity and most other environmental
factors, even in coastal areas.
To help retain the appearance of your PVD products for many years to come, a little periodic maintenance is required to
remove any atmospheric deposits from the surface of the product.
• Once every two months clean the surface of the product thoroughly with a non-abrasive cloth and warm water.
• To remove heavier deposits, use an approved cleaning solution found at infinitywindows.com/care.
Remove traces of water and cleaner and dry thoroughly with a soft cloth.
• When using any proprietary cleaner always follow the advice given by the manufacturer in handling cleaning materials.
• Do not use any abrasive cleaning materials or solvents when cleaning your PVD products.SCREEN
Keeping your screens clean.
Cleaning Screen
Remove the screens, lay them on a flat clean area and spray off any dust or debris with water from your garden hose.
Allow the screens to completely air dry before replacing in the window or door. If you live in a cold climate, it is
recommended that in the winter you remove the screen from your doors. The mesh may collect snow and ice, causing
it to sag. Please see individual sections for instructions on screen removal. Contact your Infinity partner if you require
assistance with screen replacement.
Infinity screens are designed to stand up to everyday use. However, screens are not intended to act
as a safety device. Do not allow children or pets to sit or play on window sills, or to push or fall against
window screens, as this could result in a fall through the window or door opening.
Screen will not stop child from falling out window.
Keep child away from open window.
14 I N FI N I T Y® FRO M M A RV I N® OW N ER ' S M A N UA LCARE AND MAINTENANCE
Taking care of your Infinity windows and doors.
In the following pages you’ll find maintenance information on individual Infinity products. Refer to the product
illustrations for the names of your particular windows or doors.
Information in this section includes maintenance and operational tips. Read completely through the instructions
before beginning to work on your windows to make sure you have any necessary tools and parts.
Exterior finishes on doors can be cared for in the same manner as Infinity windows. See interior and exterior
maintenance information. Take care with your door’s sill — make sure you prevent damage by not getting any paint,
solvent or chemicals on sills. See individual door sections for any specialized sill care.
If you are having problems not explained in this manual, or continue to have issues, contact your local Infinity partner.
When contacting your Infinity partner it may be helpful to provide them with
the “Customer Service Serial Number” etched on the upper right corner of the glass.
CI IG CIG
L G A B C C ® -X 0
I G o w -X In 1 / 2
C
AB C ® -
E3 02 fin N 234 IGM
In 1 / 3 ity T FR 56 A ®
fin N 234 IGM 66 M C -
fro 3 1 78
ity T FR 56 A ® m 1
C -
fro 3 1 78 Ma
M
m 1 rv
in
Ma
rv
in
Customer Service Customer Service
Serial Number Serial Number
LO W E 3 O P TI O N LO W E 2 O P TI O NCARE AND MAINTENANCE
Double and Single Hung
Operation and Maintenance
Double hung windows have two operable sash in the frame that slide up and down. Single hung windows have a fixed
upper sash and a bottom sash in the frame that slides up and down.
Periodically clean the jamb where the sash slides. Keep dirt and grease free by washing with a gentle dish detergent.
Check the exterior caulking on your double hung windows annually. Visit infinitywindows.com/windows/double-hung
or infinitywindows.com/windows/single-hung to find videos on proper cleaning and operation.
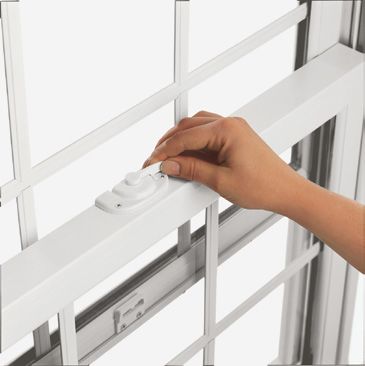
How to Tilt Your Double and Single Hung
To tilt the bottom sash, unlock the unit and raise the sash about 4". Push down on the tilt button located on top of the
sash lock base. Rotate the sash lock past the tilt button and ease top edge of bottom sash to a horizontal position.
To tilt the top sash, lower the sash about half-way. Pull the tilt latches inward (located on the top edge of the sash rail)
simultaneously until they clear unit frame. Ease top of sash to a horizontal position.
*Only the bottom sash will tilt on a single hung window.
Tilt Button
Sash lift
Sash Lift
16 I N FI N I T Y® FRO M M A RV I N® OW N ER ' S M A N UA LRemoving Double and Single Hung Sash
To remove the bottom sash, tilt the sash using the same technique described in the previous section. When sash is in a
horizontal position, lift both sides of the sash upward 2-3" (51-76 mm) (raising pivot pins out of each clutch). Now rotate
the sash until pivot pins clear the jambs and remove the bottom sash from the frame.
To remove the top sash, tilt the sash using the same technique described in the previous section. When the sash is in a
horizontal position, lift both sides upward 2-3" (51-76 mm) (raising pivot pins out of each clutch). Finally, rotate the sash
until the pivot pins clear the jambs and remove the top sash from the frame.
Larger sized sash can be heavy and awkward to handle.
To avoid injury use assistant to remove larger sash.
Replacing Double and Single Hung Sash
Hold the sash exterior side up with the top rail facing towards you. Rotate and insert the sash so the sash pins clear the
frame and place it so the lower sash pin is 2-3" (51-76 mm) above the clutch. Rotate the sash to the horizontal position
and lower it down until the pivot pins are fully seated into the clutches. Simultaneously pull in on both tilt latches and
tilt the sash up into place. Release the tilt latches and operate the sash to ensure that the sash is operating smoothly.
Check sash pivot pins to ensure they are fully engaged in the clutch cams before proceeding.
Repeat above procedures for bottom sash, except retract the sash check rail guides with the tilt button on the sash lock
base when installing.
Tilt latch
Jamb liners
Sash LockResetting a Slipped Clutch Assembly
Measure the clutch dimension from sill on the opposing balance assembly for the same sash and temporarily mark that
dimension on the jamb carrier that contains the released clutch, must be within 1/8" (3 mm). Using a flat screwdriver,
rotate the balance clutch cam in the clutch assembly to the released position. Hold the screwdriver firmly and slide the
clutch assembly down the jamb carrier to the mark. Rotate the balance clutch cam to the open locked position (cam
opening up). Release the screwdriver carefully from the clutch assembly (it must lock in place or damage will occur).
Compare clutch heights from the sill for the sash affected. They MUST be within 1/8" (3 mm) of each other or damage
may occur when sash are reinstalled, adjust height as needed.
Clutches are under extreme spring tension.
Removing and Installing the Screen
To remove the screen lift up the bottom sash to its fully raised position. Grasp and pull inward on both plunger bolts
and push outward on the screen. Grasp the frame of the screen and pull down slightly on the screen until it clears
the screen channel. Turn the screen sideways and bring it in through the bottom sash opening. To replace the screen
reverse the above procedure.
Clutch assembly
Balance clutch
Plunger bolt
18 I N FI N I T Y® FRO M M A RV I N® OW N ER ' S M A N UA LCARE AND MAINTENANCE
Slider/Glider
Operation and Maintenance
Slider windows glide horizontally from the left or right.
Periodically clean the tracks where the sash must glide. Keep tracks dirt and grease free, clean surface with
a damp cloth soaked in warm water and wipe down with a dry cloth allowing the surface to thoroughly dry.
Visit infinitywindows.com/windows/slider to find a video on proper cleaning and operation.
Removing Slider Sash
Slide the operating sash to stationary side of the unit (2”-3” (51-76 mm) from stationary jamb). With latches depressed,
located at the top of the sash, tilt the sash inward until it clears the unit frame; lift the sash off the sill track. To replace
the sash, reverse the above procedures.
*Only the operating sash of a slider can be removed from the frame.
Removing and Installing the Screen
To remove the screen open the operator sash completely. Grasp the screen pull tabs located on the jamb stile side of
the screen. Pull the tabs toward the center of the unit until the screen frame can clear the screen channel. Push the
screen out to the exterior and turn diagonally to bring into the dwelling.
Replace the screen with the operator sash completely open and position the screen on the exterior of the window with
the springs toward the meeting stile of the unit. Making sure the springs are seated in the screen channel, pull on side
tabs until the screen clears the frame. Pull screen in toward the interior until the jamb stile of the screen aligns with
screen channel; release tabs.
*Pull tab away from frame and then push out.
Sash rollers
Tilt latch
Pull tabCARE AND MAINTENANCE
Casement
Operation and Maintenance
Casement windows are side-hinged to swing out from the left or right and crank in and out. The roto-gear is the
operating mechanism that opens and closes your casement windows. Your casement lock seals the window tightly closed,
so excessive cranking when closing your window does not improve the seal and may damage your roto-gear.
Roto-gears should be lubricated once a year with white lithium grease (available at any hardware store) to keep operation
smooth. The hinge joints and locking mechanism should be lubricated on occasion with a silicone based spray. Be sure to
clean off all dirt, debris or sand before lubrication.
Excessive lubrication may cause damage to the finish of your window.
Avoid getting oil and solvents on your finish.
Make sure that any excess is immediately removed.
The sash tracks should be occasionally cleaned out with a soft bristle brush. Visit infinitywindows.com/windows/casement
to find a video on proper cleaning and operation. If your casement is less than 24 3/8" (721 mm) in width, your roto-gear
arms and assembly may differ from those shown below.
Removing and Installing the Screen
To remove casement screen, grasp screen clip. Lift upward and draw screen towards you, removing screen from channel.
To install casement screen, place screen into the upper screen channel. Lift upward and push screen tight against frame.
Release screen lift to seat screen into place.
Roto-gear arms
Keeper
Sash lock
Crank handle
20 I N FI N I T Y® FRO M M A RV I N® OW N ER ' S M A N UA LCARE AND MAINTENANCE
Awning
Operation and Maintenance
Awning windows are top-hinged and swing out from the bottom. The roto-gear is the operating mechanism that opens
and closes your awning windows. Your awning lock seals the window tightly closed, so excessive cranking when closing
your window does not improve the seal and may damage your roto-gear.
Roto-gears should be lubricated once a year with white lithium grease (available at any hardware store) to keep
operation smooth. The hinge joints and locking mechanism should be lubricated on occasion with a silicone based
spray. Be sure to clean off all dirt, debris or sand before lubrication.
Excessive lubrication may cause damage to the finish of your window.
Avoid getting oil and solvents on your finish.
Make sure that any excess is immediately removed.
The sash tracks should be occasionally cleaned out with a soft bristle brush. Visit infinitywindows.com/windows/awning
to find a video on proper cleaning and operation.
Removing and Installing the Screen
To remove awning screen, grasp screen clip. Lift upward and draw screen towards you, removing screen from channel.
To install awning screen, place screen into the upper screen channel. Lift upward and push screen tight against frame.
Release screen lift to seat screen into place.
Roto-gear arms
Crank handle
Sash hinge
Sash lock
Keeper Screen clipCARE AND MAINTENANCE
Special Shape and Round Top
Maintenance
Most Infinity Round Top and Special Shape windows and all Direct Glaze windows are non-operational, meaning
they do not open or close, so there are no maintenance requirements for hardware or weather stripping. Clean
the glass occasionally, and maintain the interior or exterior surfaces on the same schedule as your other windows.
Visit infinitywindows.com/windows/special-shape or infinitywindows.com/windows/round-top to find videos on
proper cleaning.
Special Shapes Round Tops
TRAPEZOID P E N TA G O N RIGHT LEFT H A L F RO U N D E Y E B RO W RIGHT LEFT
TRIANGLE TRIANGLE ABOVE ABOVE Q UARTE R Q UARTE R
SPRINGLINE SPRINGLINE RO U N D RO U N D
O C TA G O N R E C TA N G L E TRIANGLE HEXAGON H A L F RO U N D E Y E B RO W F U L L C I RC L E
22 I N FI N I T Y® FRO M M A RV I N® OW N ER ' S M A N UA LCARE AND MAINTENANCE
Sliding French/Patio Door
Operation and Maintenance
The Sliding French/Patio doors slide horizontally and require very little maintenance to keep them functioning efficiently.
Most problems can be eliminated by keeping the sill clean — ensuring smooth door operation. Door handles can be
wiped down with a damp cloth to remove fingerprints and smudges. It is very seldom that door rollers, lock and hinges
require lubrication. Occasionally use spray lubricant to keep operation smooth (rollers are visible underneath the
operator panel). Visit infinitywindows.com/doors/sliding-french or infinitywindows.com/doors/sliding-patio to find
videos on proper cleaning and operation.
If you live in a cold climate, it is recommended that you remove the screen door in the winter. The screen mesh may
collect snow and ice, causing it to sag. If you need door panels removed, please contact your Infinity partner for either
detailed instructions or for a service person to remove the panel for you.
Panel Adjustment Procedure
If necessary, panel adjustment allows you to make minor adjustments to your Infinity Sliding Patio or
Sliding French door after it has been permanently installed.
You will need to supply:
• Small putty knife
• Standard and #2 Phillips screwdriver
01 Using small putty knife or standard screwdriver remove two roller adjustment hole caps
from bottom rail of operating panel.
02 Slide operating panel 1/2''-3/4'' away from locking jamb.
03 Adjust rollers (to raise/lower panel) by turning adjustment screws with standard screwdriver.
04 If an even reveal is unobtainable along entire length of panel, ensure locking jamb is shimmed plumb and level.
05 Check panel operation. If satisfactory, replace adjustment hole caps.
Adjustment screw Adjust until
even revealRemoving the Screen
To remove the screen panel, unlock and partially open the screen door. From the exterior, pry the screen panel guide
up with a putty knife starting at one corner. Pull the guide off the track working your way toward the other end. Once
the bottom of the screen panel is completely released from the sill track, pivot the bottom of the screen out and
push the top of panel approximately 5 degrees toward the head jamb.
This will release the screen panel rollers from the head jamb screen track. Remove the panel from the door.
To reinstall the screen, hold the screen panel with the top rollers facing you. While tilting the bottom of the screen
panel away from the door, lift the rollers into the screen track and pull the panel toward your body to engage the
rollers in the track. Make sure the rollers are seated in the track by moving the screen panel back and forth. Once you
are sure the rollers are fully seated, pivot the screen panel into position toward the sill and place the bottom screen
panel guide into the sill track by lifting it with your fingers or by lifting with a stiff putty knife.
The screen can be adjusted from the interior by loosening or tightening the top roller screw nearest the locking jamb.
Adjust the screen so that it is parallel to the locking jamb or casing. An even reveal should be achieved along the
entire height of the jamb.
Screen Track
Screen Roller
24 I N FI N I T Y® FRO M M A RV I N® OW N ER ' S M A N UA LCARE AND MAINTENANCE
Inswing French Door
Operation and Maintenance
The Inswing French door requires very little maintenance.
To maintain sill appearance, wash with a mild soap and water solution. If you need door panels removed, please
contact your Infinity partner for either detailed instructions or for a service person to remove the panel for you.
Visit infinitywindows.com/doors/inswing-french to find a video on proper cleaning and operation.
Handle Operation for Multi-Point Lock
Always close and lock your passive panel first and the operating panel (with thumb turn) second. Infinity's multi-point
hardware has locking bolts at the head and base of the door. Lifting the handle 45 degrees upward will set the head
and foot bolts in place for a secure seal. A 90 degree turn of the key from the outside or the thumb turn on the inside
will lock the deadbolt in the handle assembly. When the deadbolt is unlocked, downward pressure on the handles will
release the bolts and latch and the door will open. Securely lock by engaging the deadbolt, head and foot bolts; using
only one or the other does not offer full security.
Locking bolt
Deadbolt
Thumb turnHinge Adjustment Procedure
The Infinity Inswing French Door's adjustable hinge system allows you to make minor adjustments after it has
been permanently installed.
*Adjustable hinges are not intended to compensate for an improperly installed unit.
Adjustments should only be made when panel misalignment is visible or causes poor operation of door/lock.
Make any adjustments in small increments (one rotation per hinge), starting with the bottom hinge and working
up to the top hinge. Repeat the process as necessary adjusting one rotation at a time. Check results, readjust or
proceed as required.
The vertical adjustment screws are located on the bottom of the hinge barrels. The horizontal adjustment screws are
located on the face of the hinges. Each screw has an adjustment range of approximately 7 turns.
01 Check panel clearance at sill and head jamb. The panel should have 3/16" (5 mm) clearance
at head jamb and at bottom.
02 Align panel vertically as needed by adjusting the screws on the bottom of the hinge barrels.
The vertical adjustment screw should be adjusted equal amounts starting with the bottom hinge.
Check index mark on hinge to determine amount and direction of panel movement. See illustration.
03 Check panel alignment with locking jamb; panel should have 3/16" (5 mm) clearance along the jamb.
04 Rotate horizontal adjustment screw clockwise to decrease, counterclockwise to increase jamb/panel clearance
at the appropriate hinge. If increasing clearance at top, bottom hinge may have to be adjusted to decrease
clearance to avoid hinge binding. See illustration.
Hinge barrel
3/16" (5mm)
3/16" (5mm)
Adjustment screw
Adjustment screw
26 I N FI N I T Y® FRO M M A RV I N® OW N ER ' S M A N UA LRemoving the Screen
If you live in a cold climate, it is recommended that during the winter months you remove the screen door to avoid
snow and ice from collecting, causing the mesh to sag.
To remove the swinging screen door, first open the active screen panel and disconnect the auto closer. Remove the
#6 x ½" screw attaching the closer to the head jamb bracket. Then remove the hinge pins from the active screen
panel hinges, remove the panel from the hinges and store. On XX configurations, open the passive screen panel and
remove the hinge pins in the same manner as the active.
Adjust the closing tension on your swinging screen door by loosening the two screws and attaching the door bracket
to the screen panel. Slide the bracket and closer left or right as needed and tighten screws. Adjust the closing speed
by tightening or loosening the adjusting screw located at the rear of the cylinder assembly.
*Both panels operate in an XX configuration.
Closer Speed
Adjustment Screw
Hinge Screws Closer Tension
Adjustment ScrewStill have questions?
We can help.
Thanks for purchasing Infinity windows and doors for your home.
We're always here to help, and our local partners are, too.
Give us a call or visit us online, anytime.
Call 1-800-372-1072 for homeowner support. In Canada, call 1-800-263-6161.
Or visit us at infinitywindows.com.
©2020 Marvin Lumber and Cedar Co., LLC.
All rights reserved. ®Registered trademark of Marvin Lumber and Cedar Co., LLC.
ENERGY STAR ® and the ENERGY STAR certification marks are registered U.S. marks.
Product specifications subject to change without notice.
Part #19970331. March 2020.You can also read