OWNER'S MANUAL - Turn your day ahhh round! - Nordic Hot Tubs
←
→
Page content transcription
If your browser does not render page correctly, please read the page content below

OWNER’S MANUAL

                          Turn your day ahhh…round!
WARNING              This product can expose you to chemicals
including propylene oxide, which is known to the State of California
to cause cancer and birth defects or other reproductive harm.
For more information go to www.P65Warnings.ca.gov.                                 113579
                                                                         Conforms to ANSI/UL Std 1563
                                                                       Certified to CSA Std C22.2 No. 218.1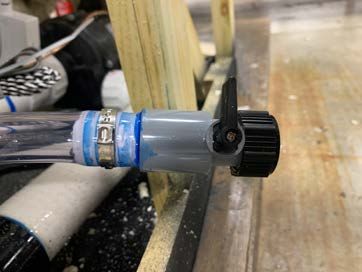
Thank You!
First and foremost, I appreciate your purchase of a Nordic Hot Tub. With so many
brands available, we are humbled by your choice.

Nordic was founded in 1995 on 4 key principles which we still believe in and build
into our product today. These principles are known by our employees and dealer
partners across the globe as S.T.A.R. We believe every tub should be Simple,
Therapeutic, Affordable, and Reliable.

Rest assured, your new hot tub was hand-built with pride and craftmanship
second to none in the industry by a group of dedicated employees. Quality has
always been our focus, hands on testing and quality control is the lifeblood of our
company. Along with the craftsmanship, our team goes to extreme measures to only
select the finest components from industry-leading vendors who believe in a level
of quality like we do.

A great product is only as good as our great dealer network around the globe.
Our dealer selection process is as stringent as our manufacturing process. Not just
anyone can sell Nordic Hot Tubs, only the best will do when representing our brand.

We genuinely appreciate the opportunity to provide you with the best hot tub
available and know your new hot tub will provide you therapeutic wellness, family
enjoyment, and soulful relaxation for years to come.

Thank you for your purchase and welcome to the Nordic Hot Tub family!

Best Regards,

Maurizio Vozza
Owner/CEO
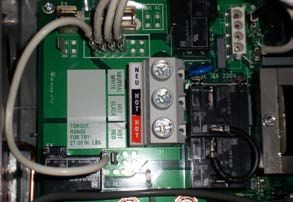
TABLE OF CONTENTS

Important Safety Instructions . . . . . . . . . . . . . . . . . . . . . . . . . . . . . 4

Placement of You Hot Tub . . . . . . . . . . . . . . . . . . . . . . . . . . . . . . . . 6

Power Installation Instructions and Requirements . . . . . . . . . . . 7

Quick Start Guide . . . . . . . . . . . . . . . . . . . . . . . . . . . . . . . . . . . . . . 13

Operating Instructions . . . . . . . . . . . . . . . . . . . . . . . . . . . . . . . . . . 15

Diagnostic Messages . . . . . . . . . . . . . . . . . . . . . . . . . . . . . . . . . . . 17

Operating the rest of the Hot Tub . . . . . . . . . . . . . . . . . . . . . . . . 18

Troubleshooting . . . . . . . . . . . . . . . . . . . . . . . . . . . . . . . . . . . . . . . 22

Water Treatment Instructions . . . . . . . . . . . . . . . . . . . . . . . . . . . . 23

Understanding Hot Water Chemistry . . . . . . . . . . . . . . . . . . . . . 24

Common Water Q&A . . . . . . . . . . . . . . . . . . . . . . . . . . . . . . . . . . . 26

Periodic Cleaning and Care . . . . . . . . . . . . . . . . . . . . . . . . . . . . . 27

Winterizing Your Hot Tub  . . . . . . . . . . . . . . . . . . . . . . . . . . . . . . . 28

Warranty Registration . . . . . . . . . . . . . . . . . . . . . . . . . . . . . . . . . . . 29

Quick Reference by Model / Voltage & Amps by Series . . . . . 31

 Your Owner’s Manual Provides Important Safety Information.
         PLEASE SAVE THESE INSTRUCTIONS.

                                          N.P.I.
                  4655 Patterson Ave. SE, Grand Rapids, MI USA 49512

                                                                        NORDIC HOT TUBS        |   OWNER’S MANUAL   |   3
IMPORTANT SAFETY INSTRUCTIONS
                                     PLEASE READ AND FOLLOW ALL INSTRUCTIONS.

DANGER- Risk of drowning                                         • The use of alcohol, drugs, or medication before or
                                                                   during hot tub use may lead to unconsciousness with the
DANGER – Risk of Accidental Drowning. Extreme caution
                                                                   possibility of drowning.
must be exercised to prevent unauthorized access by
children. To avoid accidents, ensure children cannot use this    • Obese persons and persons with a history of heart
hot tub unless they are supervised at all times.                   disease, low or high blood pressure, circulatory system
                                                                   problems, diabetes, or any condition requiring medical
WARNING: Hot tub covers are equipped with clip tie-
                                                                   treatment should consult a physician before using a hot
downs or snap locks. There is no representation the cover
                                                                   tub.
tie-downs or snap locks will prevent access to the hot tub.
Cover locks are to discourage unsupervised children from         • Persons using medication should consult a physician
entering the hot tub and to secure cover in high-wind              before using a hot tub since some medication may induce
conditions.                                                        drowsiness while other medication may affect heart rate,
                                                                   blood pressure, and circulation.
WARNING: DO NOT USE SPAS OR HOT TUBS UNLESS
ALL SUCTION GUARDS ARE VGB COMPLIANT AND                         • Do not use hot tub immediately following strenuous
INSTALLED TO PREVENT BODY AND HAIR ENTRAPMENT.                     exercise
• Risk of drowning or injury. The suction fittings in this hot   • Individuals with infectious diseases should not use a spa
  tub are sized to match the specific water flow created by        or hot tub
  the pump. Should the need arise to replace the suction         • Please use caution when entering or exiting spa or hot tub
  fittings or the pump, be sure the flow rates are compatible
                                                                 • Prolonged immersion in spa or hot tub may be hazardous
  and the replacement cover is VGB compliant. (Virginia
                                                                   to your health
  Graeme Baker Pool and Spa Safety Act) Never operate
  hot tub if the suction fittings are broken or missing.         • Never jump or dive into you hot tub
  Never replace a suction fitting with one which is not VGB
  compliant or rated less than the flow rate marked on the
  original suction fitting.                                      DANGER- Risk of Hyperthermia
                                                                 • WARNING: Prolonged immersion in hot water may
                                                                   induce hyperthermia. Hyperthermia occurs when
DANGER- Risk of injury                                             the internal temperature of the body reaches a level
WARNING – To reduce the risk of injury:                            several degrees above the normal body temperature of
                                                                   98.6°F (37°C). The symptoms of hyperthermia include
• The water in a hot tub should never exceed 40°C
                                                                   drowsiness, lethargy, and an increase in the internal
  (104°F). Water temperatures between 38°C (100°F) and
                                                                   temperature of the body. The effects of hyperthermia are:
  40°C(104°F). are considered safe for a healthy adult.
  Lower water temperatures are recommended for young             • Unawareness of impending hazard;
  children and when hot tub use exceeds 10 minutes.              • Failure to perceive heat;
• Pregnant (or possibly pregnant) women should consult           • Failure to recognize the need to exit the hot tub;
  with their physician before entering                           • Physical inability to exit the hot tub;
• Since excessive water temperatures have a high potential       • Fetal damage in pregnant women;
  for causing fetal damage during the early months of
  pregnancy, pregnant or possibly pregnant women should          • Unconsciousness and danger of drowning.
  limit spa water temperatures to 38°C (100°F).                  WARNING: THE USE OF ALCOHOL OR DRUGS CAN
• Before entering a hot tub, the user should measure the         GREATLY INCREASE THE RISK OF FATAL HYPERTHERMIA
  water temperature with an accurate thermometer since           IN HOT TUBS OR SPAS.
  the tolerance of water temperature-regulating devices
  varies.

4   |   NORDIC HOT TUBS   |   OWNER’S MANUAL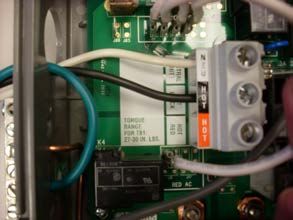
DANGER- Risk of electric shock                                      WARNING: When using this electrical equipment, basic
                                                                    safety precautions should always be followed, including the
CAUTION – Risk of Electric Shock- do not leave
                                                                    following:
compartment door open.
                                                                    • A green colored terminal or a terminal marked G, GR,
CAUTION – Risk of Electric Shock- replace components only
                                                                      Ground, Grounding, or with the           symbol is located
with identical components.
                                                                      inside the supply terminal box or compartment. To reduce
WARNING – Prevent Electrocution:                                      the risk of electric shock, this terminal must be connected
• Do not connect any auxiliary components (for example                to the grounding means provided in the electric supply
  cable, additional speakers, headphones, additional audio/           service panel with a continuous copper wire equivalent in
  video components, etc.) to the system.                              size to the circuit conductors supplying this equipment.
• Do not permit electric appliances (such as a light,               • At least two lugs marked “BONDING LUGS” are provided
  telephone, radio, or television) within 1.5M (5 ft) of this hot     on the external surface or on the inside of the supply
  tub                                                                 terminal box or compartment. To reduce the risk of
• These units are not provided with an outdoor antenna;               electric shock, connect the local common bonding grid
  when provided, it should be installed in accordance with            in the area of the hot tub or spa to these terminals with an
  Article 810 of the National Electrical Code, ANSI/NFPA 70.          insulated or bare copper conductor not smaller than No.
                                                                      6 AWG (13 mm2).
• Do not service this product yourself as opening or
  removing covers may expose you to dangerous voltage               • All field-installed metal components such as rails, ladders,
  or other risk of injury. Refer all servicing to qualified           drains or other similar hardware within 1.5 m(5 ft) of
  service personnel.                                                  the spa or hot tub shall be bonded to the equipment
                                                                      grounding bus with copper conductors not smaller than
• When the power supply connections or power supply                   No. 6 AWG (13 mm2).
  cord(s) are damaged; if water is entering the audio/video
  compartment or any electrical equipment compartment               CAUTION: TEST THE GROUND FAULT CIRCUIT
  area; if the protective shields or barriers are showing signs     INTERRUPTER BEFORE EACH USE OF THE SPA.
  of deterioration; or if there are signs of other potential
  damage to the unit, turn off the unit and refer servicing to
  a qualified service personnel.
• This unit should be subjected to periodic routine
  maintenance (for example, once every 3 months) to make
  sure that the unit is operating properly.

                      Please read through this again and SAVE THESE INSTRUCTIONS
                                        (we care about your safety!)

                                                                                      NORDIC HOT TUBS   |   OWNER’S MANUAL   |   5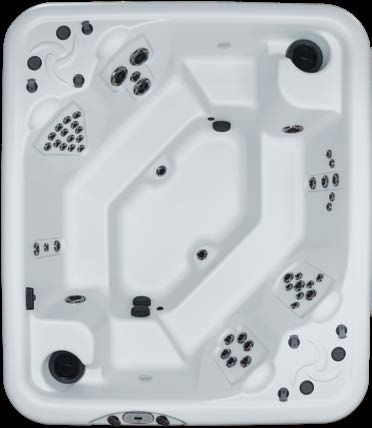
PLACEMENT OF YOUR HOT TUB

There are several items to consider before deciding on a               access the drain or the equipment pack. You can provide
location for your new hot tub. We’ve listed a few of them              access via a lift-out section of the deck or position the
below.                                                                 access panel at an outside edge of your deck. Check with
1. PERMISSION: your state, province, city, township, or                your builder for additional ideas they may have.
   association may have rules related to access, construction        5. THE PATH: a nice clean path is best so sand, mud, and
   permits, fences, gates, and delivery methods and routes.             grass clippings aren’t tracked into your new hot tub.
   Please check with them to make sure your plans meet                  Tracked-in dirt makes keeping the water sparkling clean
   their criteria. Don’t forget to look for power lines if a crane      and properly balanced a challenge.
   needs to place the hot tub on a raised location.                  6. THE VIEW: take things like the intended use and number
2. SUPPORT: It is extremely important the base on which                 of users into consideration. If it is intended for relaxation
   the hot tub is placed is smooth, level, and can uniformly            or a quiet night for 2, then a cozy corner with the view of
   support the complete weight without settling or shifting.            a lake or mountain, etc. would be great. Don’t forget to
   If these requirements are not met, possible damage to                take the view of your neighbors into consideration as well.
   your cabinet or tub shell may result. Damage caused by               If it will be used for play time for the kids and their friends,
   improper support is not covered under warranty. It is the            make sure to leave plenty of room around it for climbing
   responsibility of the hot tub owner to meet these require-           in and out and access to toys.
   ments and to assure the integrity of the hot tub support at       7. THE WEATHER: if you live in a Northern region like we
   all times. A level concrete slab or a well-supported wood            do, it is a great idea to place the hot tub close to a door-
   deck (built to code) is ideal.                                       way to reduce your time in the cold and snow.
3. DRAINAGE: Don’t forget the water will occasionally need           NOTE: Please keep your hot tub covered whenever it is not
   to be drained. Make sure that you don’t have sensitive            being used- especially when it is empty. The shell surface
   vegetation or erosion concerns. A regular garden hose             can be damaged if it is left dry and exposed to direct sun-
   can be attached to the drain fitting so the old water can         light.
   be directed to an appropriate area. A small submersible
   pump can also be used. Also, make sure rain water and
   snow melt is directed away from the base of your new hot
   tub. External water damage from flooding may damage
   the electronics and pump which will void your warranty.
4. ACCESS: if you have decided to drop your new hot tub
   into a deck (which looks great and makes it easy to get
   in and out of), you will eventually need to remove the
   service panel (on the same side as the topside control) to

6   |   NORDIC HOT TUBS   |   OWNER’S MANUAL
POWER INSTALLATION INSTRUCTIONS

WIRING LOCATIONS
Some installations work best to drill a hole in the side panels and others require the wiring to come up from the bottom.
We’ve included line drawings with approximate “safe” locations for the wiring to be plumbed in from the bottom. Please
reference the following drawings.

                    IMPULSE, SPORT, CROWN II & IMPULSE DP

                                                                                            78.5" Diameter
                                                   A good location for
                                                     the wire to enter
                                                   through the bottom
                                                   is 3" to 4"left and 8"
                                                     to 10" back from
                                                     the left corner of
                                                      the access door
                                       3-4"

                                              8-10"
                                                        Access Panel

                          CROWN, WARRIOR XL & CROWN XL

                                                                                             84" Diameter
                                                A good location for
                                                 the wire to enter
                                              through the bottom is
                                              12" from the center of
                                               the access panel and
                                                6" from the edge of
                                                     the cabinet
                                                             12"
                                                      6"

                                                           Access Panel

                                                                                 NORDIC HOT TUBS   |   OWNER’S MANUAL   |   7
POWER INSTALLATION INSTRUCTIONS CONTINUED

   BELLA                                                                                             D’AMOUR
                                                     Access Panel                                                         20" radius

                                           A good location                34"
                                            for the wire to
                                            enter through          8"
              17.5" radius                   the bottom.
                                                              8"                                                             Access Panel
                                                                                                                                                       84"
                                                                                        10" radius
                                     82"

                                                                                                                                             28-30"
                                                                                                          A good location 8-10"
                                                                                                           for the wire to
                                                                                                           enter through
                                                                                                            the bottom.
                                                                                               72"

                                                                                                                       20" radius

                                                                                                         68"

                RETREAT                                                                ESCAPE
                                                    10" radius                                                                      10" radius

                                                                    80"                                                  A good location              81.5"
                                                                                            A good location
                                                                                             for the wire to               for the wire to
                                                                                             enter through                 enter through
                                                                                4-6"          the bottom is                 the bottom is
                                                                                            4-6" from the left            8-10" from the
                     A good location for the wire to                                                                     front and 12-24"
                      enter through the bottom is                                           side and 24-28"
                                                                                             from the front                from the right
                       4-6" from the left side and                                                                         side of the tub
                         12-16" from the front                            24-28"

12-16"
                                                                                                                                                      8-10"
                              Access Panel                                                                Access Panel
             4-6"                                                                                                                         12-24"

                                     70"                                                                         79"

    8    |     NORDIC HOT TUBS   |   OWNER’S MANUAL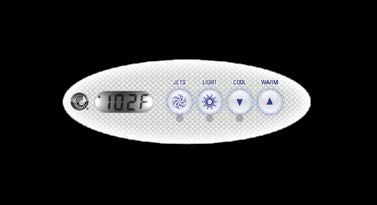
STELLA
                                                                                       10" radius

                                                                                                          62.75"

                                               20"
                                                        Clear area for the wire to
                                                     6" enter through the bottom
                                   12"
                                         12"

                                                             Access Panel

                                                                  84.75"

                                                                                       RENDEZVOUS

ENCORE & JUBILEE
                                                                                                                                     10" radius

                                                     10" radius

                                                                                                                                                      96"
                                                                           84.75"

                                                                                                       A good location for the
            20"                                                                                       wire to enter through the
                       Clear area for the wire to                                                    bottom is 16" from the left
                  6"   enter through the bottom
12"                                                                                                 side and 6-8" from the front

      12"
                                                                                6-8"
                          Access Panel                                                                        Access Panel
                                                                                           16"
                              84.75"                                                                               79"

                                                                                                    NORDIC HOT TUBS      |   OWNER’S MANUAL   |   9
POWER INSTALLATION INSTRUCTIONS CONTINUED
ELECTRICAL WIRING INSTRUCTIONS
Important Notice: The electrical installation of this tub must meet the requirements of all applicable country, province, state,
and local codes. The electrical installation must be performed by a qualified, licensed electrician and be approved by the
local building/electrical inspection authority.
WARNING: DO NOT TURN ON POWER UNTIL TUB IS FILLED COMPLETELY WITH WATER!
240 VOLT SERVICE
• NO PLUG-IN CONNECTIONS OR EXTENSION CORDS ARE TO BE USED IN CONJUNCTION WITH THE OPERATION
OF THIS TUB. All wiring must be permanently connected (hard wired) to the equipment pack. Power supply that is not in
accordance with these instructions will void warranty.
• This tub requires the power supply be on a dedicated circuit with no other electrical appliances or lights sharing the
circuit that is providing power to the hot tub.
• DO NOT USE ALUMINUM WIRE.
• ALL WIRING MUST BE COPPER and properly insulated.
• A suitable ground fault circuit interrupter (GFCI) as required by the local building and electrical inspection authority, must
be included in the electrical circuit supplied to the hot tub.
• Proper wire size must be used in accordance to the local building/ electrical inspection authority.
• All wires must be securely hooked up or damage could result. TIGHTEN SECURELY!
• A minimum 8 gauge wire size must be used between the GFCI and the hot tub system connection
• Any wire runs over 50 feet require a numerically smaller wire diameter- please check your local codes for requirements
• Any mis-wiring may void your warranty. Please reference the included wiring diagram for the correct connections.
240 VOLT CONVERSION (Classic and Modern Series)
The Classic and Modern Series hot tubs have been configured to be
connected to 120 volts. They can be converted to be wired to 240 volts by
following the following steps:
J11
1. Make sure that the power has been switched off at the main breaker
2. Remove the Cabinet Access Panel Remove Jumper Wire
3. Remove the system controller cover
4. Remove the jumper connecting J11 and J32. J32
5. Switch DIP switch A10 to off (down).
6. Wire the controller as outlined in the 240volt wiring instructions
7. Attach system controller cover
8. Attach Cabinet Service Panel
Toggle switch #10 needs to be in the “down”
position. (shown in the “up” position)
10 | NORDIC HOT TUBS | OWNER’S MANUAL240V WIRING SCHEMATIC
NORDIC HOT TUBS | OWNER’S MANUAL | 11POWER INSTALLATION INSTRUCTIONS CONTINUED
120 VOLT CORD CONNECTION OPTION (110-all-in, Classic and Modern Series)
The cord connection option is only available for 120V operation on the models rated 12/15 A. Only the manufacturer
recommended power cord and GFCI should be used for cord connected installations. Only plug the cord into a dedicated
120V/15 amp receptacle after following the steps below.
Electrical installation should be performed by a qualified, licensed electrician.
Warning: Make sure that cord is unplugged from the wall socket prior to proceeding with the following steps.
1. Remove cabinet service panel. The panel is secured with Phillips Head truss machine screws.
2. Remove system controller cover.
3. If spa was manufactured with a cord, disconnect cord wires from
terminal TB1 and ground wire from ground bar.
4. Loosen cord strain relief.
5. Remove cord.
6. Remove strain relief.
7. Drill hole for conduit through bottom or side of spa.
8. Secure conduit at system controller box.
9. Connect hot and neutral wires to corresponding terminals TB1.
Connect ground wire to grounding bar on the outside of box by
running it though hole marked for ground wire. Double check that all
electrical connections are tight.
10. Reinstall system cover and hot tub access panel.
WARNING: DO NOT TURN ON POWER UNTIL TUB IS FILLED COMPLETELY WITH WATER!
HOT TUB ANATOMY
Air Controls Air Controls
Cup Holders Cup Holders
Suction Fittings
Light
Whirlpool Jet Ozone Jet
Air Controls
Topside Control
Filter Cup Holder
Air Controls
Waterfall Jet
Access Panel (side of cabinet)
12 | NORDIC HOT TUBS | OWNER’S MANUALQUICK START GUIDE
1. Wipe down the hot tub interior if needed.
2. Open access panel be removing Phillips Head truss machine screws.
3. Use a garden hose to fill your hot tub through the empty filter canister (to avoid air pockets during filling) to a minimum
level of 2 inches (5.08cm) over the filter skimmer.
Note: CITY OR WELL WATER IS PREFERRED. DO NOT USE WATER THROUGH A WATER SOFTENER.
• If your hot tub has a floating weir, pull the weir straight up and then rotate the filter counter-clockwise until it is free
and can be pulled straight out.
• If your hot tub has a visible basket, rotate the basket counter-clockwise to remove it. The filter will pull straight out.
4. Locate the shut-off T-valves. Make sure they are in the up or open position.
NORDIC HOT TUBS | OWNER’S MANUAL | 13QUICK START GUIDE CONTINUED
5. Check heater and pump unions. Occasionally during shipping these become loosened. A simple tightening of these (if
necessary) will do, being careful not to over tighten.
unions
unions
6. Once water has reached correct level, remove the garden hose, replace the filter and basket or floating weir and turn
power on to the hot tub.
7. To activate jets and to purge air from the pump, press/push Jet 1 button located on the top side control. A second press/
push will put the pump on high speed. Repeat this process until water flows from the jets. When the jets are working, set
the pump to low speed.
8. Add chemicals to your water prior to heating the water. Please see your dealer for recommendations.
9. Set the temperature located on the top side control to the desired setting. The heater will shut off when the water
temperature reaches the set temperature. Default is 100°F.
10. Place the hot tub cover on tub. Keeping the cover on the hot tub when the tub is not in use will help minimize operating
costs.
11. The time it will take for the water temperature to reach the desired setting will vary.
14 | NORDIC HOT TUBS | OWNER’S MANUALOPERATING INSTRUCTIONS
SINGLE PUMP SYSTEM
INITIAL START-UP Pump 1 low-speed is responsible for heating and filtration
and will be referred to simply as the pump.
Your spa will enter Priming Mode (Pr ) when it is energized.
During Priming Mode, press “Jets” button repeatedly In multi-button sequences, if the buttons are pressed too
and be sure the pump is free of air. Priming Mode lasts quickly in sequence, they may not register.
less than 5 minutes. Press “Warm” to exit. After Priming Low speed pump will run every 30 minutes from 2 to 5
Mode, the spa will run in Standard Mode (see Mode minutes to check the tubs water
section).
Controller used on All-In-110 Series and Bella Models Controller used on Classic, Modern, and Sport Series
TEMP CONTROL (80°F - 104°F / 26°C - 40°C) MODE
Mode is changed by pressing “Warm” or “Cool” then “Light”.
The last measured water temperature is constantly
Some tubs will have the modes disabled from the factory.
displayed. The water temperature displayed is current only
when the pump has been running for at least 1 minute. STANDARD MODE maintains set temperature. St will be
To display the set temperature, press “Warm” or “Cool” displayed momentarily when you switch into Standard
once. To change the set temperature, press a temperature Mode.
button again before the display stops flashing. Each press of ECONOMY MODE heats the spa to the set temperature
“Warm” or “Cool” will adjust the set temperature. After three only during filter cycles. Ec will display when water temp
seconds, the display will stop flashing and begin to display is not current, and will alternate with water temp when the
the current spa temperature. pump is running.
SLEEP MODE heats the spa to within 20°F/10°C of the set
JETS temperature only during filter cycles. SL will display when
water temp is not current, and will alternate with water temp
Press “Jets” to turn the pump on or off, and to shift between
when the pump is running.
low and high speeds. If left running, the pump will turn off
after a preset length of time of 2 hours for low speed and 15
minutes for high speed. Low speed may run automatically at PRESET FILTER CYCLES
times, during which it cannot be deactivated from the panel, The first preset filter cycle begins 6 minutes after the spa is
but high speed may be operated. The ozone generator (if energized. The second preset filter cycle begins 12 hours
installed) will activate anytime low speed is running. later. Filter duration is programmable for 1, 2, 3, 4, 5, 6, 7, or
8 hours. The default filter time is 1 hour. To program, press
LIGHT “Warm” then “Jets.” Press “Warm or Cool” to adjust. Press
“Jets” to exit programming.
Press “Light” to operate the spa light. Turns off after 4 hours.
AUTOMATIC POLLING (in Standard Mode)
The pump will activate for 2-5 minutes every 30 minutes to
check the temperature. This also happens whenever the
temperature is adjusted.
NORDIC HOT TUBS | OWNER’S MANUAL | 15OPERATING INSTRUCTIONS CONTINUED
TWO PUMP SYSTEM (LUXURY SERIES CONTROLLER)
INITIAL START-UP Pump 1 low-speed is responsible for heating and filtration
and will be referred to simply as the pump.
Your spa will enter Priming Mode (Pr) when it is energized.
During Priming Mode, press “Jets” button repeatedly In multi-button sequences, if the buttons are pressed too
and be sure the pump is free of air. Priming Mode lasts quickly in sequence, they may not register.
less than 5 minutes. Press “Warm” to exit. After Priming Low speed pump will run every 30 minutes from 2 to 5
Mode, the spa will run in Standard Mode (see Mode minutes to check the tubs water
section).
TEMP CONTROL (80°F - 104°F / 26°C - 40°C) MODE
The last measured water temperature is constantly Mode is changed by pressing “Warm” or “Cool,” then
displayed. The water temperature displayed is current only pressing “Mode.”
when the pump has been running for at least 2 minutes. To Standard Mode maintains set temperature. Std will be
display the set temperature, press “Warm” or “Cool” once. displayed momentarily when you switch into Standard
To change the set temperature, press a temperature button Mode.
again before the display stops flashing. After three seconds,
the display will stop flashing and begin to display the Economy Mode heats the spa to the set temperature only
current spa temperature. during filter cycles. “Ecn” will display when water temp is not
current, and will alternate with water temp when the pump is
running.
JETS 1
Sleep Mode heats the spa to within 20°F/10°C of the set
Press “Jets 1” to turn pump 1 on or off, and to shift between temperature only during filter cycles. SLP will display when
low and high speeds. The low-speed will turn off after 4 water temp is not current, and will alternate with water temp
hours. High-speed will turn off after 15 minutes. Low-speed when the pump is running.
may run automatically at times, during which it cannot
be deactivated from the panel, but high-speed may be PRESET FILTER CYCLES
operated. The first preset filter cycle begins 6 minutes after the spa is
energized. The second preset filter cycle begins 12 hours
JETS 2 later. Filter duration is programmable for 2, 4, 6, or 8 hours
or for continuous filtration (indicated by FILC ). The default
Press “Jets 2” to turn pump 2 on or off, and to shift between
filter time is 2 hours. To program, press “Warm” or “Cool,”
low and high speeds. The device will turn off after 15
then “Jets 1.” Press “Warm” or “Cool” to adjust. Press “Jets
minutes.
1” to exit programming. Low-speed pump 1 and the ozone
LIGHT generator (if installed) run during filtration.
Press “Light” to operate the spa light. Turns off after 4 hours. AUTOMATIC POLLING (in Standard Mode)
The pump will activate for 2-5 minutes every 30 minutes to
check the temperature. This also happens whenever the
temperature is adjusted.
16 | NORDIC HOT TUBS | OWNER’S MANUALDIAGNOSTIC MESSAGES
MESSAGE MEANING ACTION REQUIRED
1 Pump 2 Pump
No message on display. The control panel will be displayed until power returns. Spa settings will be
Power has been cut off to the spa. preserved until next power up.
Temperature unknown. After the pump has been running for two minutes, the current water
temperature will be displayed
“Overheat – The spa has shut down” DO NOT ENTER THE WATER. Remove the spa cover and allow water to cool. Once
One of the sensors has detected 118ºF / the heater was cooled, reset by pushing any button. If spa does not reset, shut
47.8ºC at the heater. off the power to the spa and call your dealer or service organization.
“Overheat – The spa has shut down” DO NOT ENTER THE WATER. Remove the spa cover and allow water to cool to
One of the sensors has detected that the spa 107ºF / 41.7ºC. the spa should reset. If spa does not reset, shut off the power to
water is 110ºF / 43.5ºC. the spa and call your dealer or service organization.
Spa is shut down.* The sensor that is plugged If the problem persists, contact your dealer or service organization.(May appear
into the sensor “A” jack is not working temporarily in an overheat condition.)
Spa is shut down.* The sensor that is plugged If the problem persists, contact your dealer or service organization.(May appear
into the sensor “B” jack is not working temporarily in an overheat condition.)
Sensors are out of balance. If alternating with If the problem persists, contact your dealer or service organization.
spa temperature, it may just be a temporary
condition. If flashing by itself, spa is shut
down.*
A significant difference between temperature If the water level is normal, make sure all pumps have been primed. If the
sensors has been detected. This could indicate problem persists, contact your dealer or service organization.
a flow problem.
Persistent low flow problems. )Displays on the Follow action required for message. Heating capability of the spa will not reset
fifth occurrence of message within 24 hours.) automatically, you may press any button to reset.
heater is shut down, but other spa functions
continue to run normally.
Possible inadequate water, poor flow, or air If water level is normal, make sure all pumps have been primed. Press any
bubbles detected in the heater. Spa is shut button to reset. This message will reset within 15 minutes. If problem persists
down for 15 minutes. contact your dealer or service organization.
Inadequate water detected in heater. (displays Follow action required for message. Spa will not reset automatically reset. Press
on third occurrence of message.) Spa is shut any button to reset manually.
down.
“Ice” – Potential freeze condition detected. No action required. All equipment will automatically activate regardless of spa
status. The equipment stays on 4 minutes after the sensors detect that the spa
temperature has risen to 45ºF / 7.2ºC or higher. An optional freeze sensor may
be added to protect against extraordinary freeze conditions. Auxiliary freeze
sensor protection is advisable in colder climates. See your dealer for details.
NORDIC HOT TUBS | OWNER’S MANUAL | 17OPERATING THE REST OF THE HOT TUB
DTS ™ NORDIC STAR ™ WHIRLPOOL JET(S):
Your hot tub is equipped with at least one Whirlpool Diverter jet (2, 3 or 4 positions depending on tub model purchased),
located on the filter wall on most models. These jets, when turned, will divert water to either the Whirlpool Jet or to different
groups of wall jets. Each position is reached with a 90 degree turn of the whirlpool jet face. It is recommended to turn the
collar of the whirlpool diverter jet while the jets are in low speed operation and turn clockwise when possible. Remember,
turning your diverter will affect the flow of water to different seat jets. Turn the whirlpool diverter to see which jets turn on/off
in each position and adjust to suit your personal needs.
2-WAY DIVERTER: 1 All Seats
With a 2-way diverter the whirlpool jet will either be on or
off. If the whirlpool jet is on, the flow to the wall jets will be
off and all the water will flow out of the whirlpool jet. If the
whirlpool jet is turned off, the flow will be diverted equally
to all the wall jets in the tub.
2 Whirlpool
4-WAY DIVERTER:
With a 4-way diverter, the whirlpool jet will either be on 1
or off. The other (3) positions direct water flow to different
groups of wall jets depending on which model you have.
If the whirlpool is on all the flow goes thru the whirlpool
and all wall jets are off. If you turn the whirlpool off you
have 3 options to divert the water.
1. All the wall jets in the tub run equally.
2. Half the wall jets will be on the other half will be off.
4 2
3. Half that was previously on in option 2 will now be off
and the half that was off will now be on. Remember the
half that is on/off in option 2 & 3 depends on which
model you own.
4. All of the water will come out of the Whirlpool jet
Note: Turn clockwise
3
18 | NORDIC HOT TUBS | OWNER’S MANUALDUAL DIVERTER HOT TUBS
RENDEZVOUS LS
This model offers (2) 2-way whirlpool diverter
jets. Each one will operate one half of the tub
as described in the 2-way diverter section.
Diverter 2
Diverter 1
Seat
3
CROWN XL DTS™
The Crown XL is the only hot tub offered with (2)
Whirlpool jets that affect one another. They also each Seat
2
have their own function and control certain seats.
The top diverter has (4) positions: Seat
1. Only the Whirlpool Jet On 4
2. Only Seat 1 On
3. Only Seat 4 and 5 On
Seat
4. Seats 1,4, and 5 On 1
The Bottom Diverter has (3) positions: Bottom
Diverter
1. Only the Whirlpool Jet On Top
Diverter
2. Whirlpool and Seats 2 and 3 On Seat
5
3. Whirlpool Jet off and additional pressure is
applied to the jets to the top diverter.
NORDIC HOT TUBS | OWNER’S MANUAL | 19OPERATING THE REST OF THE HOT TUB CONTINUED AIR CONTROLS: Your hot tub has at least one air control. This air control allows air to mix with the water which streams out of your jets. Each air control is responsible for a section of jets or a whirlpool diverter jet. In order for the air control to have any effect, the jet(s) it controls must be on and have water flow. In extremely cold weather conditions, it is a good idea to rotate them to the off position when the tub is not in use to help maintain efficiency. NOTE: Rotate, do not lift. NORDIC STAR ™ JETS: There are several water jets which can be individually adjusted to customize the amount of waterflow through each. This feature allows you to create the perfect experience in each seat. To increase waterflow to a jet simply turn the jet counter- clockwise till you feel a stop in the turn. Jet should be fully open for maximum flow. To turn a jet off, turn the jet clockwise till you feel a stop in the turn. The jet should be off. When the jet is turned off you will still feel a trickle amount of water through the jet for safety purposes. These jets can be removed for cleaning or replacement by turning them fully counter- clockwise till you feel the stop and then continue an additional 1/16th turn to force it past the stopping point. Now the jet insert should be able to be pulled out. To reinstall the jet simply align the nipple on the back of the jet with the grove in the jet housing on the wall, push the jet in and turn clockwise. TOPSIDE CONTROL PAD: Your hot tub is equipped with an electronic topside control pad. The topside control pad will allow you to control the speed of the pump, the light, and the temperature setting, as well as some programming options. Familiarize yourself with the topside control by viewing the Operation Guide on page 15. LED LIGHTING SYSTEM: The LED Lighting System consists of individual light nodes which are in coordination with the LED light housed in the light lens within the vessel of the spa. The light varies in color and function by pressing the light button. To turn on the system, simply press the button once. To turn it off, re-press the light button. To change the color or light function, press the light button quickly in succession. If the light has been off for more than 3 seconds it will resume at the last color setting selected. Certain models may receive the optional NLP ™ Northern Light Package or the MLP™ Mood Lighting Package. The operation is the same but more items will be illuminated. 20 | NORDIC HOT TUBS | OWNER’S MANUAL
NORDIC CASCADE ™ LED WATERFALL JET
The Nordic Cascade™ LED Waterfall jet has an angled design which allows for
a beautiful arcing waterfall. The water flow can be controlled with the built-in
adjustment handle. Just rotate it left or right to adjust the flow to perfectly meet
the ambiance you desire.
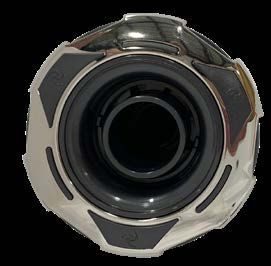
FILTERS:
Periodic filter maintenance is required in order to maintain proper hot tub water quality and performance of equipment
supplied with this hot tub. The manufacturer recommends cleaning your filters with high pressure water flow once a week.
It is recommended filters be soaked in a quality filter cleaning solution once a month before high pressure spraying of the
filter cartridge is applied. It can be removed for cleaning or replacement one of two ways:
1. If your hot tub has a floating weir, pull the weir straight up and then rotate
the filter counter-clockwise until it is free and can be pulled straight out.
2. If your hot tub has a visible basket, just rotate the basket counter-clockwise
to remove it. The filter will pull straight out.
NORDIC HOT TUBS | OWNER’S MANUAL | 21TROUBLESHOOTING
New start-ups occasionally have an issue or two which need to be addressed. Don’t worry- you can check some of these
without calling for a service technician.
Symptoms Solutions
No water movement (air lock) T-valves must be in “UP” position or loosen (1) of the pump unions to
allow the trapped air to escape
GFCI keeps tripping Incorrect GFCI Wiring- ask service technician or electrician to verify
wiring
Water in equipment area Check: drain cap, pump and heater unions, pump plug
Only a portion of the jets work Check that jets are open, rotate Whirlpool Diverter jet
Note: If problems persist after performing the suggested solutions, please contact your dealer to assist in resolving the
problem. For any problems not listed above, please contact your dealer.
WARNING! Shock Hazard! No User Serviceable Parts.
Do not attempt service of this control system. Contact your dealer or service organization
for assistance. Follow all owner’s manual power connection instructions. Installation must
be performed by a qualified, licensed electrician and all grounding connections must be
properly installed.
22 | NORDIC HOT TUBS | OWNER’S MANUALWATER TREATMENT INSTRUCTIONS
WATER QUALITY in 1 spot (near the filter). This causes the chemicals to
disperse very quickly and it will be hard to manage the
As the owner of a Nordic Hot Tub it is important to maintain
proper levels. Once the chemicals are gone, algae and
proper water quality to keep your hot tub and equipment
bacteria can grow quickly.
in excellent condition. Please consult your Spa and Pool
Professional on how to maintain proper water quality. If your o The increased chemicals getting continually drawn into
spa is equipped with an Ozone Generator, it will produce the filter can stain or fade the shell. This is not covered
ozone only when the hot tub is running on low speed or under warranty.
during a filter cycle (2-pump systems). It cannot be used as o Floaters are typically loaded with larger tablets or bars.
the sole means to maintaining safe spa water- you will need Small pieces of the chemicals (larger than granular
to use sanitizers to keep your water sparkling and clean. products) can break off and settle on the seats and floors.
Those can chemically burn, stain, or blister the surface.
• Nordic does not recommend the use of any Bromine
OZONATOR product. Why?
Some models include an ozonator. Ozone reduces the o Bromine can fade or discolor your shell surface. This is
required amount of sanitation chemicals required to keep not covered under warranty
your water clean, but it does not completely eliminate it.
o Bromine off-gassing combined with ozone can be
Any time pump 1 is running, ozone is being generated
dangerous in higher concentrations
and injected into your hot tub via a small jet located in the
footwell. The 2-pump systems only turn the ozonator on • Do not use pool chemicals including muriatic acid or
when it is running in a filter cycle. household bleach (liquid sodium hypochlorite)
• Do not use tablets or sticks. Only use granular products.
• Do not use polyhexamethylene biguanide products
SANITATION (hydrogen peroxide)
Sanitizers are intended to kill bacteria and keep water • Failure to maintain proper chemical balance (pH,
clean. Nordic recommends Dichlor Granular Chlorine as Alkalinity, and Hardness) could also negate your warranty.
a sanitizer. You will need to decide which brand sanitizer • The use of Salt Systems will void the warranty.
you wish to use. Please consult with your spa retailer for
what is available and its proper use. They will have the best Remember: Your Nordic dealer is a trained chemical
understanding of what is required to keep the water in your specialist and can assist you with your questions and water
area balanced. analysis if requested.
WARNINGS: ADDING CHEMICALS
• The improper use of any sanitizing system including 1. Lift the cover and fold it back and out of the way.
Dichlor Granular Chlorine could negate our warranty. 2. Turn the pumps on high speed.
WHY? 3. Slowly sprinkle the correctly measured granular products
o Undissolved granules left on the shell surface can into the water. Directly over the filter basket or floating
discolor, chemically burn, and blister the shell surface. weir is an ideal location. For the Bella, slowly pour the
This includes areas of the shell above the water line. granules near the side-mounted skimmer face.
o Slowly sprinkle the correctly measured granular 4. Let the spa run until it reaches the time-out time (ap-
products into the water. Directly over the filter basket proximately 15 minutes) at which point it will drop to low
or floating weir is an ideal location. For the Bella, slowly speed. Let it run on low speed for an additional 15-20
pour the granules near the side-mounted skimmer face. minutes before reinstalling the cover to allow all of the
• WARNING: Do not confuse the term “Dichlor” with off-gassing to finish.
“Trichlor”- they are not the same. Trichlor is very Note: Chemical off-gassing can damage your cover and
acidic and will damage several components of your void its warranty.
new hot tub. 5. Reinstall the cover and latch or lock it.
• The use of a floater can potentially damage the shell of Note: Chemical off-gassing can damage your cover and
your hot tub and is not covered under warranty. Why? void its warranty.
o Floating dispensers have a tendency to end up staying
NORDIC HOT TUBS | OWNER’S MANUAL | 23UNDERSTANDING HOT WATER CHEMISTRY
Several things need to be checked and adjusted regularly. STEP 3: CALCIUM HARNESS (CH)
We will break things down for you in order to keep it as easy
Calcium Hardness is the next thing to check. It is a measure
to understand as possible. You’ll be a pro in no time, but
of the total amount of dissolved calcium in the water. If there
please contact your authorized dealer to get started. They
is too much dissolved calcium in the water, scale can build-
will know what works best for the water supply in your area.
up on the shell surface and inside the equipment. If it is too
Your dealer will be able to supply you with water test strips
low, the water can become corrosive to the equipment.
to measure the items noted below. There are also drop-style
testers available if you prefer. • If the CH is too high, scale can build up on the shell
surface and inside the equipment- this can damage the
heater and pump. This is commonly referred to as “hard
water”. A generic calcium reducer will lower the CH in
STEP 1: TOTAL ALKALINITY (TA) the water. A stain and scale inhibitor can also help reduce
Total Alkalinity is the best place to start. It is the measure of build-up.
the total levels of Bicarbonates, Hydroxides, Carbonites, and • If your CH is too low, a general CH increaser can be add-
other alkaline substances in the water. An easy way to think ed to the water.
of it is as a “buffer” for the pH. It is a measurement of the
• CH levels range from 75 to 275 on most scales and the
water’s ability to resist changes to the pH level in the water.
ideal CH balance is between 150 and 200.
• If the TA level is too high, the pH level will be difficult to
bring down. Either add more water to your hot tub or add
sodium bisulfate (pH/Alkalinity down).
STEP 4: SANITIZERS
• If the TA level is too low, the pH will fluctuate all over the
Sanitizers (ie: Dichlor) kills bacteria, algae, and other
place. Erratic pH can cause scaling and corrosion prob-
microscopic organisms as well as break them down for
lems with your tub. Add sodium carbonate (pH/Alkalinity
filtration to be effective. Chlorine levels are measured
up) to correct.
in PPM (parts per million) and occasionally need to be
• TA levels and range from 20-180 with the ideal TA balance “shocked” to keep the levels in check. When they are
being between 80 and 120. correct, there is very little odor or irritation caused by the
spa water. Most Nordic spas will require between ¼ and ½
ounce of granular Dichlor to get started.
STEP 2: pH
pH is the measure of how acidic or alkaline your water is. NOTE: Do not add sanitizer until TA, CH, and PH are
Values above 7.8 are too alkaline and values below 7.2 are correct.
too acidic. If the pH is too high or too low, you risk damage • Chlorine levels between 3.0 and 5.0 are ideal without
to your spa shell, the equipment, and the water can be using an ozonator
generally uncomfortable to enjoy.
• Chlorine levels between 2.0 and 4.0 are ideal when you
• If the pH is too high (alkaline), the sanitizer will become are using and ozonator.
less effective, scale can build up on the spa shell and
equipment, the water may become cloudy, and the filter
may become plugged. You can add sodium bisulfate (pH Normal sanitation does not eliminate and filter certain forms
down) to the water to correct it. of contamination which ends up in the water. Sun tan lotion,
sweat, body oils, and hair spray, etc. require a little “kick”
• If the pH is too low (acidic), sanitizers will dissipate quickly,
to help get them broken down for filtration. This “kick” is
the water may corrode equipment, and make the water
known as Shocking the water.
unpleasant to sit in. You can add sodium hydrogen car-
bonate (pH/alkaline up) to correct it. • Add 1 ounce of non-chlorinated shock a minimum of
once every week.
• pH levels vary between 6.6 and 8.2 with between 7.2
and 7.8 being ideal. • Additional non-chlorinated shock can help clear up
cloudy water and unpleasant odors; or after heavy bather
NOTE: After adding pH up or pH down, it is important loads
to wait at least 2 hours before re-testing the water.
NOTE: the spa must run on high speed a minimum of
30 minutes with the cover removed whenever shock is
added. The cover can be damaged by the off-gassing
from the shock treatment.
24 | NORDIC HOT TUBS | OWNER’S MANUALSTEP 5: FILTRATION
Your new spa will require a certain amount filtration DO’S AND DON’T S
time to keep the water clean and sparkling. The factory
default setting is F2 which means your hot tub will filter (2) • Do add chemicals slowly into the filter basket,
continuous hours, twice a day. If you change the setting to floating weir, or skimmer face
F4, it will filter (4) continuous hours at a time twice a day.
You may need more than this depending on the bather load • Do use only granular sodium dichlor
and frequency of use. Your dealer or authorized service (chlorine)
representative will be able to give you recommendations
based on your anticipated use. • Do remove the hot tub cover to prevent
damage when adding chemicals and for 30
The default start time is the time you power-up your spa
minutes after to allow for proper off-gassing
with the breaker. The first filtration cycle will begin within
a few minutes of power-up. The 2nd filter cycle will begin • Don’t use any formed tablet or bar sanitizers
12 hours later. You can use this power-up timing to control
when your hot tub runs. This is useful for avoiding on-peak • Don’t use a floater for chemical distribution
electric charges or avoiding filtering during the heat of
the afternoon in warmer climates. (this helps stabilize the o They have a tendency to over-sanitize or
temperature) under-sanitize your water
o Damage to the shell can occur
NOTE: Please reference the topside control instructions
earlier in this manual for further instructions on setting the o This will not be covered under warranty
filter cycles.
• Don’t use any sanitizer that is not designed
specifically for hot tub use
Additional Note: Your dealer or authorized service
representative will be your best resource for water • Don’t splash any chemicals on the shell
chemistry-related questions that you may have. They will be
or siding (please clean immediately with a
happy to answer any questions that you may have.
garden hose and cloth)
• Don’t use swimming pool (muriatic) acid to
lower pH
• Don’t use household bleach to sanitize the
water (liquid sodium hypochlorite)
• Don’t sprinkle any chemicals onto the water
surface unless it is above the filter (except
Bella)
NORDIC HOT TUBS | OWNER’S MANUAL | 25COMMON WATER Q & A
PROBLEM CAUSE SOLUTION
Calcium deposits • Hard water. Clean with a non-abrasive hot tub surface cleaner.
on the shell surface • pH, total alkalinity not in balance Test water, adjust pH as needed.
Add a stain and scale control chemical
Cloudy water • pH, total alkalinity not in balance. Add a water clarifier. Circular for a minimum of 30 minutes.
• Damages or dirty filer Add water has cleared, clean filter cartridge with a filter
• Addition of incompatible cleaner or replace if necessary. Test chlorine and pH levels,
chemicals adjust if necessary.
• Low chlorine level
• Buildup of oils, soap, foreign Change water.
matter
Colored water • Copper or iron metals in Hot Tub Add an iron/stain and scale remover.
due to water supply or corrosion of Test pH, adjust if necessary.
heater.
• Total alkalinity, pH are low.
Excessive foam • pH, total alkalinity not in balance Add an anti-foam agent.
• Low calcium hardness Add shock.
• Inadequate oxidation
• Addition of incompatible Adjust chlorine level.
chemicals Test pH, adjust if necessary.
• Buildup of body oils and/or Take water sample to dealer to check total alkalinity and
contaminants calcium hardness. Change water.
Eye and skin • pH, total alkalinity not in balance Test pH and chlorine levels, adjust if necessary
irritation • Inadequate chlorine level
• Addition of incompatible
chemicals
Odor • Inadequate ventilation Test pH and chlorine levels, adjust if necessary.
• Addition of incompatible Clean with non-abrasive hot tub surface cleaner.
chemicals
• Insufficient oxidation Clean the underside of the cover with a cover cleaner or
• Inadequate cleaning of cover. mild soap and warm water.
• Low pH. Add shock.
• Chemical overdose
Waterline deposits • Buildup of body oils, impurities Test pH and chlorine levels, adjust if necessary.
and staining • Use of clarifying agents with ozone. Clean with non-abrasive hot tub surface cleaner.
• Hard water (minerals in water).
Add a scale/stain control chemical.
Take water sample to your dealer
26 | NORDIC HOT TUBS | OWNER’S MANUALPERIODIC CLEANING AND CARE
Your new hot tub has been constructed to hold up to the PERMASHELL®
elements for a lifetime and a little periodic cleaning will keep
PermaShell® cleans very easy because of its durable poly
it looking new. Below is a list of how to care for the various
material. A spray pool and spa cleaner that is low in “suds”
components of your tub. Occasionally you will need to drain
and is applied then wiped off will most of the time be
and re-fill your hot tub. We recommend every 3 months
sufficient. With stubborn stains or marks, a “soft” scrub
depending on the typical bather load and frequency of use.
cleaner with very low abrasion (elements) will help when
Water which remains cloudy after shocking is a clue it’s time.
used with a non-abrasive cleaning pad. A Magic Eraser
This is the perfect time to clean the shell, siding, and cover
works as well.
as noted below.
DRAINING YOUR HOT TUB HIGHWOOD® – MAHOGANY, TEAKWOOD,
CHARCOAL, BLACK
1. Turn the power off to the hot tub at the GFCI breaker
2. Remove the access panel Maintenance for Highwood® is to use mild soap and water.
3. Locate the drain Some strong household cleaners/solvents can cause
damage/fading to the surface of the cabinet. All cleaners
should be tested on an out-of-the-way section of cabinet
before cleaning.
WESTERN RED CEDAR
As with any wood product, maintaining the “new” look
requires a consistent schedule of treating your cabinet
with a quality Tung or Teak Oil product. Either can be easily
applied by wiping it on with a clean rag or sponge.
COVER OR HOT TUB LID
See manufacturer’s warranty and maintenance procedures.
When adding any chemicals or using a spa or hot tub
“shock”, the cover must be removed for 30 minutes.
Failure to remove cover may cause damage to cover.
4. Remove the safety cap and connect a garden hose. Make
sure to route the hose to a location that will not damage
vegetation or erode sensitive landscaping NOTE: Please visit www.nordichottubs.com for more
information and tips regarding use and cleaning
5. Rotate the handle on the drain assembly and let it empty
until fully drained. It may be necessary to use a wet/dry
shop vac to remove the last remaining water from the WARNING: The improper use of any sanitizing system
footwell and seat bases. including Di-Chlor Granular Chlorine could negate our
6. Close the drain valve, disconnect the garden hose, and warranty. The use of Bromine or Chlorine tablets in a floater
reinstall the safety cap. or Biguanide Chemicals can potentially damage (fade) the
shell of your hot tub and is not covered under warranty.
7. Reinstall the access panel, clean the shell, siding and
Failure to maintain proper chemical balance (pH, Alkalinity,
cover (as noted below) and refill your hot tub.
and Hardness) could also negate your warranty. Nordic
8. Do not turn the power back on until the hot tub is full. does not recommend the use of any Bromine product with
Ozone. The use of Salt Systems will void the warranty.
Note: You will need to balance your water since it has been
refilled.
NORDIC HOT TUBS | OWNER’S MANUAL | 27WINTERIZING YOUR HOT TUB
While we feel some of the best times to use your spa can A couple of things you should be aware of:
be during the colder months, we understand there can When a tub is drained and left empty, o-rings and pump
be a need for some owners to close their tubs during the seals can dry out and lose their ability to seal properly. You
winter months. We feel winterization should be left to the should closely inspect for small leaks in the equipment
professionals, but if done carefully using the following area when you perform your restart. If you are unsure of the
instructions, your risk of damage from freezing can be location of the o-rings and pump seal, contact your dealer
minimized. Please note, we do not warrant against freezing for help. If replaced early the damage caused by these
damage in a tub which has been inappropriately winterized, failures can be inexpensive to fix.
either by the owner of by a professional service center.
WINTERIZING INSTRUCTIONS RE-START
When restarting your tub, you will want to fill the tub and run
all of the jets on high speed for 10-15 minutes. This will help
Things that will be needed:
flush the residue of the antifreeze out of the plumbing. Then
• 2-3 gallons of NON-TOXIC (R-V type) antifreeze drain the tub, clean the sides with an approved cleaner,
• a strong wet/dry vacuum (shop vac) place your filter back into the filter canister, re-fill your tub
• a turkey-baster and balance your chemicals.
• 1 or 2 light plastic bowls approximately 5” diameter You may notice slightly more foaming than normal when
you first start using your tub, this can be reduced with anti-
• TIME approx. 2 hours foaming agents and generally gets better over the first week
or two of usage as the filter removes the anti-freeze and
Instructions organic residue left behind after rinsing and cleaning.
1. Drain your tub. Inside the equipment room there is a Make sure you check your filter at least once per week and
spigot for a garden hose. It is attached to a clear vinyl rinse it out as needed for the first few weeks. You may also
hose near the main control box. find it necessary to soak your filter in a filter cleaner after a
few days, depending on the level of contaminant left in the
2. With a wet-vac, remove any water remaining in the foot-
tub after the re-start.
well. Then with each jet in the open position, vacuum
each jet nozzle until no more water comes out. DO NOT
FORGET the small ozone jet in the foot-well.
3. With the vacuum over the whirlpool jet nozzle(s) and
plastic bowls over the suction covers in the footwell,
change it to each diverter position until there is no more
water being drawn out.
4. Remove your filter, clean it and place in storage until you
restart your tub. Pour NON-TOXIC antifreeze into the
filter canister until it runs out into the foot-well of your tub
through the suction covers.
5. With the turkey-baster, squirt a small amount of NON-
TOXIC antifreeze into each jet. Usually the side jets will
take around one ounce, and the whirlpool jet(s) will take
several ounces (about 5 squirts per whirlpool jet). DO
NOT FORGET the small ozone jet that is located in the
foot-well of your tub.
6. Place the cover on the tub, and place a tarp over the tub
and cover. Making sure to securely tie down the tarp. The
tarp will help reduce the amount of weather your tub is
exposed to.
28 | NORDIC HOT TUBS | OWNER’S MANUALYou can also read