OWNERS AND SERVICE MANUAL - INNOVATIVE CONCEPTS IN ENTERTAINMENT INC. 10123 MAIN STREET, CLARENCE, NY 14031
←
→
Page content transcription
If your browser does not render page correctly, please read the page content below
OWNERS AND SERVICE MANUAL
INNOVATIVE CONCEPTS IN ENTERTAINMENT INC.
        10123 MAIN STREET, CLARENCE, NY 14031
                SERVICE: 1-716-759-0360
                   FAX: 1-716-759-0884
              E-MAIL: service@icegame.com
              WEBSITE: www.icegame.com
                          1
TABLE OF CONTENTS
INTRODUCTION…………………….…………………..PAGE 3
GAME FEATURES
GAME PLAY
ASSEMBLY……………………………...………………..PAGE 4 - 6
SAFETY PRECAUTIONS
GAME SET-UP
CUSTOMIZING YOUR GAME..…………………...…...PAGE 7 - 9
ENTERING SET-UP MODE
CHANGING GAME SETTINGS
PROGRAMMING MODES
QUICK TROUBLESHOOTING…..………………..……PAGE 10
MAINTENANCE & TROUBLESHOOTING...……........PAGE 11 - 14
OPERATIONAL BACKGROUND
MECHANICAL REPAIR
MECHANICAL MAINTENANCE
ELECTRONIC & ELECTRICAL REPAIR
OPTIONAL ACCESSORIES….…………………….…..PAGE 15
TICKET DISPENSER
DOLLAR BILL VALIDATOR
ABOUT LINKING…………………………………...…....PAGE 16
PARTS LISTING………………………………………....PAGE 17-18
BALL GATE ASSEMBLY………………………………..PAGE 19-20
WARRANTY INFORMATION…………………………..PAGE 21
ICEDOC HF9001
REVISION F 1-04-2011
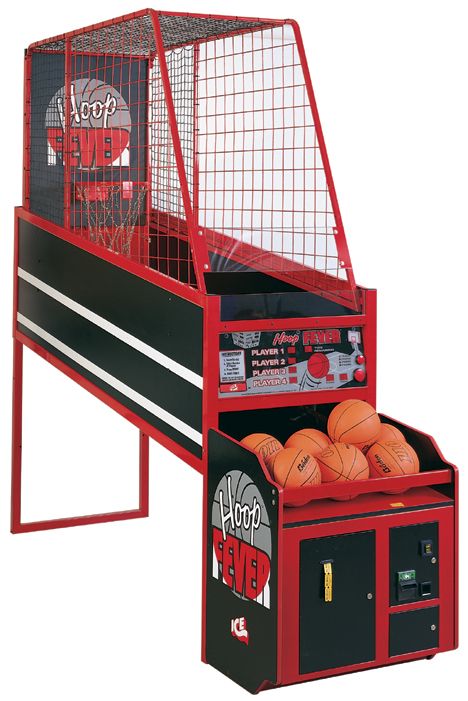
2INTRODUCTION
GAME FEATURES GAME PLAY
HOOP FEVER™ is a revolutionary concept in Coin Oper- HOOP FEVER™ is an electromechanical coin operated
ated basketball games. You will see that this game in- amusement game designed to be played by one to four
cludes many features which make it the obvious choice players.
for your location
HOOP FEVER™ is a game similar to the traditional bas-
HOOP FEVER™ PLAY. HOOP FEVER™ incorporates a ketball games already on the market. However, we have
STATIONARY basket that is user friendly and realistic. made this an even more exciting game. The net remains
Fun and easy to play for players of all ages, yet challeng- stationary as the player shoots over and over. Two points
ing enough for even the expert basketball players. Prac- are awarded for each basket scored. When 10 seconds
tice your basketball skills and try to better your last score remain in the game, it awards the player three points for
or compete against three other players. all baskets scored.
CONTROL PANEL. Attractive LED displays are used to LINKING is a popular option used in locations where
display all scoring and vital information such as time, more than one game is to be used. The games are
credits and high score. The control panel is laid out in a “linked” to add direct head to head action between the
convenient user friendly fashion, making it easy for play- game players. This option is built into each Main PC
ers to operate. Board, and is easy as connecting a phone line and setting
a number in the programming mode.
HEAVY DUTY CONSTRUCTION is incorporated through-
out the game by using only heavy gage metals and plas-
tics. The game can be assembled and disassembled
many times without any harm to the game. You will ap-
preciate this feature if you move your games often.
HIGH TECH GAME ELECTRONICS. Solid state electron-
ics are used throughout the game for their rugged reliabil-
ity as well as making it virtually impossible to connect har-
nessing the wrong way. Heavy duty optical sensors are
used throughout.
Digital sound effects are used for optimum dependability.
Over twenty sound effects are incorporated into the sound
effect circuitry. The game electronics have been highly
integrated into the Main PC Board assembly, making it
easy to repair games. The game has a full feature self-
test system to make troubleshooting easier.
OPTIONS. A ticket dispenser and/or a dollar bill validator
can be ordered with your game.
3ASSEMBLY
BEFORE YOU BEGIN
WARNING: WHEN INSTALLING THIS GAME,
A 3 PRONG GROUNDED A.C. RECEPTACLE MUST BE
USED. FAILURE TO DO SO COULD RESULT IN
INJURY TO YOURSELF OR OTHERS. FAILURE TO
USE A GROUNDED RECEPTACLE COULD ALSO
CAUSE IMPROPER GAME OPERATION, OR DAMAGE
TO THE ELECTRONICS
DO NOT DEFEAT OR REMOVE THE GROUNDING
PRONG ON THE POWER CORD FOR THE SAME REA-
SON AS GIVEN ABOVE. USING AN IMPROPERLY
GROUNDED GAME COULD VOID YOUR WARRANTY.
HAVE A QUALIFIED ELECTRICIAN CHECK YOUR A.C.
RECEPTACLE TO BE SURE THE GROUND IS FUNC-
TIONING PROPERLY.
TOOLS NEEDED
Before you start, you will need the following items:
Fig. 1
7/16” Combination Wrench
7/16” Deep Well Socket
Ratchet
Side Cutters 5. Move the cabinet to the front of the frame and bolt it
Adjustable Pliers to the frame by installing the mounting bolts through
#2 Square Drive Bit the back of the front legs and into the front cabinet’s
mounting holes. Secure with (6) 1/4-20 X 3” security
5/32” Security Wrench
head Allen bolts and 6 flat black washers. (See Fig. 2)
If you plan on moving your game often, or would like to
speed up assembly, a cordless Drill is a good idea.
Your game requires a MINIMUM CEILING HEIGHT of
96” (8 feet). Check clearance before proceeding.
SET-UP
1. To begin, remove the game from the shipping con-
tainers.
2. Locate the main framework of the game. It may be
easier to assemble if the framework is laid on its side.
3. Locate the two “U” shaped legs, and insert them into
the bottom of the frame. At the front of the frame, use
the set of holes closer to the bottom of the legs. At the
rear of the frame, use the holes closer to the top of
the legs. Secure with (4) 1/4-20 X 2 1/2” bolts, (8) flat
washers and (4) Nylock nuts. (See Fig. 1) Fig. 2
4. Stand the frame up and move it into its permanent
position. It is a good idea to carry the frame rather
than slide it.
6. Locate the harness that is tie wrapped up at the front
NOTE: IT WOULD BE A GOOD IDEA TO GET HELP of the frame. Cut the tie wrap and feed the harness
WHEN LIFTING THE GAME TO THE UPRIGHT POSI- through the frame and into the opening in the rear of
TION. THREE PEOPLE RECOMMENDED. THIS WILL the cabinet. Connect the harness to the connector
KEEP THE GAME FROM SLIDING WHEN LIFTED. located inside the cabinet.
4ASSEMBLY
7. Assemble the mesh framework using the two large NOTE: WHEN INSTALLING FOR A 9 FT. GAME, USE
frame sides and the two connecting pipes supplied. THE BOTTOM SET OF HOLES ON THE FRONT OF
Assemble using (4) 1/4-20 X 2” full thread bolts and THE MESH FRAME, THE MIDDLE SET OF HOLES FOR
(4) flat washers. (See Fig. 3) A 8 1/2 FT. GAME AND THE UPPER SET OF HOLES
FOR AN 8 FT. GAME. (WHEN SETTING UP AN 8 FT.
a) Feed the pipes through the tie wraps that are con- GAME, YOU MAY WISH TO OMIT THE REBOUND
nected to the mesh. GUARD)
b) Separate the two frames until the pipes go between
them. 9. Install the Frame assembly to the game. It can be
c) Start the bolts by hand, then secure with a wrench. adjusted to three heights: 9ft., 8 1/2 ft. and 8 ft.
Please install to the highest possible height. Install by
NOTE: Netting on frames not shown for clarity. lifting the frame inside the game to one of the 3 sets
of mounting holes, and secure with (4) 1/4-20 X 1 1/2”
NOTE: DO NOT OVER TIGHTEN THE BOLTS IN THE Allen head bolts, inserts and (4) flat black washers.
PIPES, OR THE INSERTS COULD BE DAMAGED. BE (See Fig. 5)
CAREFUL NOT TO CROSS THREAD THE BOLTS IN
THE PIPES.
Fig. 3
8. Install the backboard with basket onto the side cages
using the (8) 1/4-20 X 5/8” button head Allen cap
screws supplied. (See Fig. 4)
Fig. 5
10. Feed the sensor gray cable and ground wire into the
backboard harness hole. Connect the four single pin
mate-lock connectors from the gray sensor cable into
the gray chassis cable, and the green/yellow wires
that all run along the right hand side of the game.
Connect the single pin mate-lock connectors as fol-
lows:
Fig. 4 Green to White
Black to Black
Red to Red
Green/Yellow to Green/Yellow
5ASSEMBLY
11. Install the rebound guard using (2) 1/4-20 X 1 3/4”
bolts, (4) flat washers and (2) Nylock nuts. (See Fig. LINKING
6)
For linking hook-up instructions, see Option #19 under
“Customizing”.
THANK YOU FOR YOUR PURCHASE OF THE
HOOP FEVER™ BASKETBALL GAME.
Fig. 6
12. Put the basketballs into the game. BE SURE THAT
THEY ARE NOT OVER INFLATED. THIS COULD
CAUSE THE BALL GATE TO OSCILLATE EXCES-
SIVELY.
13. Plug the game in and follow the game set-up proce-
dures listed in this manual.
14. Open the control panel on the game by removing the
3 Allen head bolts and washers that secure the panel
to the frame. Tilt the panel forwards, and connect the
battery harness to the Main Board. The battery con-
nector will be the only one loose in the cabinet. Re-
attach the control panel.
15. Test the game completely after set-up, and call our
service department if you have any problems, ques-
tions or comments.
I.C.E. SERVICE DEPARTMENT
716-759-0360
NORMAL BUSINESS HOURS ARE:
MONDAY – FRIDAY, 9:00 AM TO 6:00 PM EST
6CUSTOMIZING YOUR GAME
CUSTOMIZING YOUR GAME PROGRAMMING
This section will discuss subjects such as setting up cred-
its, time per game, awards, etc. the section below will MODE #1
show how to enter into the programming mode and how COUNTER
to adjust many of the game’s operating parameters.
The counter is used to keep a running total of games
played on the machine since it was first built. This counter
is not re-settable unless power is removed from the bat-
ENTERING SET-UP MODE tery backup on the PC Board. (small round battery)
You must enter set-up mode to adjust all of the game fea- NOTE: If power is removed from the PC Board, all other
tures. This can be accomplished in the following manner: custom game settings will have to be re-entered.
1. Open the game’s coin door. This is the upper door
located on the upper right side of the lower cabinet.
MODE #2
COIN MECHANISM #1
2. Locate the Counter / Programming button. It is lo-
cated on the left hand side of the bracket that is at- This adjusts the amount of coins needed to receive 1
tached to the cash box enclosure. The Counter / Pro- credit on the game’s LEFT HAND COIN MECHANISM.
gramming button instruction decal is located on the Set this number to reflect how many coins per credit.
cash box enclosure. This will give you a brief descrip- Example: 2 Quarters per credit—enter the number 2.
tion of the features outlined below, as well as how to
use them. MODE #3
3. Press the Counter / Programming button. COIN MECHANISM #2
4. If you wish to only read the “Counter”, look at the This adjusts how many coins are required to receive 1
“Player” displays to get the latest counter information. credit on the game’s RIGHT HAND COIN MECHANISM.
The display should be read from the bottom left This mechanism is set differently, so it can be used for
(Player#4) position. Once you are done reading the fractional credits. For normal use, set a “1” for this mode.
counter, press the Counter / Programming button If you wish to use this for coins with a different value than
once again to return to game play. that of coin mech #1, contact our service department for
set-up information for your particular application.
CHANGING GAME SETTINGS FREE PLAY
You can set your game up for free play by adjusting the
WHEN YOU PUSH THE Counter / Programming button, coins per credit for coin 1 to “0”.
you will notice that along with the counter numbers shown
in the “Player #” locations, there is a #1 shown in the
“Credits / Time Left” display. This is the counter’s “mode” MODE #4
number. Each programmable “mode” on the game has a CREDITS PER DOLLAR BILL
number associated with it.
This option controls how many credits you will receive for
1. To advance through the different modes, press the each dollar bill inserted.
“Start” button. Each push of the button will advance
you to the next mode. Whenever you are done with
any programming changes, push the Counter / Pro-
MODE #5
gramming button to return to normal game play. CURRENT CREDITS
2. The current value for each mode will be shown in the This displays the credits currently in the game. You can
“Player #4” location. manually remove or add credits to the game by changing
the value of this number.
3. To change the shown value to a lower number, press
the middle “Player Select” button. MODE #6
TIME PER CREDIT
This adjusts, in seconds, how long each game will last.
The game can be adjusted from 20 to 99 seconds. The
recommended time is 40 seconds.
7CUSTOMIZING YOUR GAME
MODE #7 MODE #14
GAME POINTS PER AWARD ATTRACT MODE
This adjusts how many tickets are given away for the ON / OFF / TYPE
game. The number displayed set the points required to
win an award. Setting this number to “0” will turn off the Use this setting to control the type of attract mode you
dispenser. would like. Setting a “1” gives you attract mode sound
only. Setting a “0” turns the attract mode off.
MODE #8 MODE #15
NOT USED ATTRACT INTERVAL
This determines the length of time between attract
MODE #9 modes. Change this number to change the amount of
time in MINUTES between attract modes. Setting this
NOT USED number to “0” turns this option off.
MODE #16
MODE #10 FREE GAME THRESHOLD
JUST FOR PLAYING This option allows you to select a POINT THRESHOLD,
This feature is valuable in 2 respects….. where a free game will be awarded for the game. Once
this threshold is reached, a FREE GAME will be awarded
1. This can be set to any value desired, so that if a to the player, playing the game at that time. The free
player, especially a young child who can not get the game is awarded immediately after completion of the paid
minimum points required to earn awards, can still be game where the threshold had been broken.
dispensed.
Setting the value of this option to “0”, turns the option off.
2. This setting can give a predetermined amount of tick- Any other value sets that as the threshold value. We rec-
ets or cards per game, REGARDLESS of points ommend 40 POINTS as a good starting point for the
scored, if the “points per award” and “winner” settings game.
are set to “0”.
MODE #17
MODE #11 NOT USED
AWARD THRESHOLD MODE #18
This mode is used to set the minimum number of points
needed to get any awards whatsoever. Set the number to NOT USED
match the score you wish to achieve before awards are
dispensed. Setting this number to “0” turns the option off. MODE #19
LINKING STATION I.D.’S
MODE #12 NOTE: FAILURE TO OBSERVE THE INSTRUCTIONS
LISTED BELOW WILL RESULT IN IMPROPER OPERA-
WINNER AWARDS TION OF ANY GAMES WHICH HAVE BEEN LINKED
This setting is used by itself if you want the WINNER TOGETHER.
ONLY to get awards in a multiple player game. The num-
ber of awards dispensed is determined by the number Each linked game must be connected with a modular
selected. A setting of “0” will turn off this option. The win- phone line. Use no longer than a 12 ft. cord to link the
ner awards are in addition to any other awards being dis- games together.
persed.
Connect the games together by snapping a phone line
jack on the back of the Main PC Board on the first game.
Connect the cord to the jack on the back of the Main PC
MODE #13 Board on the second game. When more than 2 games
NOT USED are linked, connect another phone cord to the back of the
Main PC Board on the second game and run it to the pre-
ceding game and so on.
8CUSTOMIZING YOUR GAME
When the linking option is used, each game must have 2. The face panel push buttons should light if they are
it’s own unique “I.D. Number” so that the games can prop- working correctly.
erly link and talk to each other. Enter Mode #19 on all
games, then set a number that is different for each game. 3. Move the coin mech micro switch wires. An audible
The number used may be 0 through 13. the numbers 14 sound will be heard if they are working correctly.
and 15 are reserved for the Jackpot Marquee. (Sold as a
separate option) 4. Throw a ball into the basket. If the sensor is working
correctly, an audible sound will be heard.
Observe that game I.D.’s on all games are different, then
exit programming mode on all games at the same time. To exit the self test mode, press the “Counter / Program-
ming” button inside the coin door.
MODE #20
CREDIT DISCOUNTING GAME TESTING
This mode enables the game to give the players an extra It is easy and advisable to test your game after installa-
game when multiple coins are inserted. The number tion. After the game is set up and all options have been
shown will be how many coins must be inserted for an set up correctly, perform the following tests:
extra game. Example: setting a “6” would mean that for
every 6 coins inserted, an extra game would be given. 1. Test for proper acceptance of money.
Setting a “0” turns this mode off. The default value for this
mode is”0”. 2. Test for proper dispensing of tickets, if you have set
that option.
MODE #21 3. Test for proper game play, including proper scoring.
NOT USED 4. Test for proper retention of game memory, when the
game power is shut off and turned back on.
MODE #22 5. Be sure to check your electronic game counter and
BEACON LIGHT POINT write down any information you may wish to record.
THRESHOLD 6. When testing linked games, be sure all of the game
This option allows you to select a point threshold, where scores show up properly.
the optional point beacon light will turn on. Once this point
threshold value is reached, the beacon light will turn on.
Setting the value to “0”turns the option off. Any other
value sets that as the threshold value.
NOTE: WHEN SETTING UP MULTIPLE
GAMES IN THE SAME LOCATION, IT IS A
GOOD IDEA TO TURN THE ATTRACT MODE
OFF ON ALL BUT 1 GAME.
BURN IN SELF TEST MODE
This allows you to enter the BURN-IN SELF TEST
MODE, which can be very handy in problem diagnostics.
To enter this mode, press and hold the GAME SELECT
and START buttons at the same time WHEN IN MODE
#1.
Perform the following tests when in this mode:
1. Press the face panel push buttons to check for their
proper operation. An audible sound will be heard if
working properly.
9QUICK TROUBLESHOOTING
PROBLEM PROBABLE CAUSE SOLUTION
NO SPOTLIGHT BAD FUSE AT POWER MODULE INSPECT MAIN FUSES
GAME UNPLUGGED CHECK POWER CORD
TRIPPED CIRCUIT BREAKER CHECK BREAKER BOX
DAMAGED POWER CORD REPLACE CORD
BURNED OUT BULB REPLACE BULB
GAME WIRING BAD CHECK WITH VOLTMETER
BALL GATE WILL NOT OPEN OR BAD OR LOOSE MICROSWITCH CHECK OR RETIGHTEN
CLOSE BAD FUSE ON MAIN PC BOARD CHECK ALL FUSES
BAD WIRING TO SWITCH OR MOTOR CHECK WITH VOLTMETER
BAD MAIN PC BOARD REPAIR OR REPLACE PC BOARD
BAD GEAR BOX REPLACE GEAR BOX
BALL GATE STOP IMPROPERLY SET RE-ADJUST UNTIL CAM TOUCHES
MICROSWITCH
PUSHBUTTONS DO NOT LIGHT BAD BULB IN BUTTON CHANGE LIGHT BULB
OR WORK PROPERLY BAD MICROSWITCH IN BUTTON REPLACE MICROSWITCH
BAD WIRING TO MAIN PC BOARD CHECK WITH VOLTMETER
BLOWN FUSE ON MAIN PC BOARD CHECK ALL FUSES
BAD MAIN PC BOARD REPLACR MAIN PC BOARD
BUTTON STUCK SHUT REMOVE AND CLEAN BUTTON
BALLS DO NOT SCORE BAD SENSOR REPLACE SENSOR
CORRECTLY SENSOR DIRTY CLEAN (USE NO SOLVENTS)
REFLECTIVE STRIP DIRTY CLEAN (USE NO SOLVENTS)
BAD HARNESSING OR WIRING CHECK WITH VOLTMETER
BAD MAIN PC BOARD REPLACE MAIN PC BOARD
BAD BATTERY CHECK CHARGING CIRCUIT OR
REPLACE BATTERY
GAME DOES NOT TAKE OR ADD BAD MAIN PC BOARD REPLACE MAIN PC BOARD
MONEY CORRECTLY BAD MICROSWITCH OR DBV REPLACE SWITCH OR DBV
BAD WIRING TO MICROSWITCH OR DBV CHECK WITH VOLTMETER
GAME PROGRAMMING SET WRONG RESET GAME PROGRAMMING
GAME DOES NOT DISPENSE BAD TICKET DISPENSER REPLACE TICKET DISPENSER
TICKETS CORRECTLY BAD WIRING TO DISPENSER CHECK WITH VOLTMETER
OUT OF TICKETS ADD TICKETS
TICKET SENSOR IS DIRTY CLEAN SENSOR ON DISPENSER
DISPENSER JAMMED REMOVE TICKET JAM
GAME PROGRAMMING SET WRONG RESET PROGRAMMING
BAD MAIN PC BOARD REPLACE MAIN PC BOARD
NO OR LOW GAME SOUND VOLUME TURNED DOWN TURN UP VOLUME
DEFECTIVE VOLUME POT REPLACE POT
BAD SPEAKER REPLACE SPEAKER
BAD WIRING TO MAIN PC BOARD CHECK WITH VOLTMETER
BAD MAIN PC BOARD REPLACE MAIN PC BOARD
BALLS DO NOT DISPENSE GAME HAS EITHER TOO MANY OR TOO FEW GAME IS DESIGNED TO WORK
QUICKLY ENOUGH OR JAM IN BALLS WITH 7 BALLS
THE GAME
ALARM GOES OFF BALL GATE CAN NOT CLOSE (SEE BALL GATE)
FREQUENTLY BALL SENSOR WORKING INCORRECTLY (SEE BALL SENSORS)
BAD MAIN PC BOARD REPLACE MAIN PC BOARD
BALLS JAMMED IN GATE TOO MANY BALLS IN GAME
DISPLAY LED’S DO NOT WORK BAD MAIN PC BOARD REPLACE PC BOARD
PROPERLY BAD FUSE ON MAIN PC BOARD CHECK ALL FUSES
GAME WILL NOT RETAIN BAD MAIN PC BOARD REPLACE PC BOARD
CUSTOM PROGRAM SETTINGS BAD OR WEAK MEMORY BATTERY REPLACE BATTERY ON MAIN PC
BOARD
LINKED GAMES NOT SCORING GAME ID’S SET THE SAME CHANGE ALL GAMES TO
OR WORKING CORRECTLY DIFFERENT ID NUMBERS
10MAINTENANCE & TROUBLESHOOTING
bly. (Hint: a long extension on a ratchet can be helpful
OPERATIONAL BACKGROUND for this operation.)
The following will outline the basic operating principles of Pull the ball gate from the end by the bearing towards
the HOOPS FEVER™ basketball game. you. (the front of the game)
The game incorporates a Reflex Photoelectric polarized The gear motor can now be pulled away from the re-
sensor detection system for counting balls that go through taining bracket.
the hoop.
Remove the two Allen head set screws to remove the
The ball gate uses micro switches to determine position- ball gate from the gear motor.
ing of the gate, which are activated by the cam on the ball
gate shaft. NOTE: When removing wires from the micro switches
or motor, it is VERY important to make sure all wires
The gear motor uses a combination of hardware and soft- are returned to their proper terminals. Failure to do so
ware control to protect against over current damage. will result in improper operation of the ball gate and
When an over current condition is detected, the motor will could damage the game. The wires are color coded
shut off automatically. The game microprocessor will then so it will be easy to document where each wire goes.
decide whether or not the motor should be turned on. It
will also determine at that time which way the motor IMPORTANT: Mark the position of the micro switch
should run. mounting bracket so that the switch actuators will line
up correctly with the cam on the ball gate when the
MECHANICAL REPAIR unit is re-assembled.
Use thread locking compound on the Allen head set
IMPORTANT: USE ONLY ICE REPLACEMENT PARTS screws when re-assembling the ball gate to the gear
WHEN SERVICING YOUR GAME. USING NON-ICE AP- motor.
PROVED PARTS COULD VOID YOUR WARRANTY,
AND COULD CAUSE SERIOUS DAMAGE TO THE Assemble in reverse order of disassembly. Tighten all
GAME OR INJURY TO OTHERS. hardware securely.
IF YOU HAVE ANY QUESTIONS REGARDING REPAIR Re-test for proper operation
AFTER READING THIS SECTION, CALL OUR SERVICE
DEPARTMENT BEFORE PROCEEDING AT: Temporarily shut off AC power, reconnect battery and
turn AC power back on.
I.C.E. SERVICE DEPARTMENT
716-759-0360
NORMAL BUSINESS HOURS ARE: LIGHT BULB REPLACEMENT:
MONDAY – FRIDAY, 9:00 AM TO 6:00 PM EST WARNING: TURN OFF GAME POWER BEFORE
REPLACING THE LIGHT BULB.
BALL GATE SERVICE: Replace the bulb by removing the screws that secure
the control panel to the game. Carefully remove the
Remove both battery and AC power control panel, and set it on the front of the game. Re-
place the light bulb and install the control panel to the
Unfasten the (6) square drive screws and remove the game.
ball gate housing, located on the right hand side of
REPLACEMENT BULB:
the ball gate assembly.
110 WATT ROUGH SERVICE SPOTLIGHT
Unbolt the control panel from the front of the game to
gain access to the control panel.
Unplug the two mate-lock connectors (2 pin connector HOOP SENSOR REPLACEMENT:
with the yellow/black and brown/white wires and the
three pin connector with the red, black and blue Turn off all AC power to the game and unplug the
wires) located to the right of the transformer. Cut any battery back-up circuitry. (disconnect the 2 pin mate-
tie-wraps holding the harnessing. lock connector from the PC Board)
Remove the two bolts that hold the ball gate bearing Standing in the ball return tray, unscrew the (4)
in place, located on the left hand side of the assem- screws and Nylock nuts that hold the two sensor(s) to
their sensor bracket(s).
11MAINTENANCE & TROUBLESHOOTING
Disconnect the (3) (green, red and black wires) single good understanding of the game’s basic operating pa-
mate lock connectors from the gray sensor cable be- rameters.
hind the backboard. Remove the gray wire feeding
through the backboard harness hole. Remove the WARNING: EXERCISE CAUTION WHENEVER WORK-
sensor assembly. Note how the sensor cable feeds ING WITH ELECTRONICS, THEY CAN BE VERY SUS-
through the basket net loops. CEPTIBLE TO DAMAGE FROM SHORT CIRCUITING,
OR PHYSICAL ABUSE. ALWAYS UNPLUG THE GAME
Remove the sensor(s). The two sensors are held onto WHEN WORKING ON HIGH VOLTAGE AREAS OF THE
the sensor bracket by (4) #6-32 X 1/2” hex spacers. GAME, SUCH AS THE TRANSFORMER.
Replace with new sensor assembly using the previ- USE EXTREME CAUTION WHEN USING VOLTME-
ous directions in reverse. TERS TO DO CIRCUIT CHECKS IF THE GAME POWER
HAS BEEN LEFT ON.
ALWAYS REMOVE THE BATTERY BACK-UP POWER
MECHANICAL MAINTENANCE WHEN WORKING ON THE GAME. THIS IS NECES-
SARY AS SOME CIRCUITS ARE CONSTANTLY UN-
DER POWER FROM THE BATTERY.
IMPORTANT: FOLLOW THE SUGGESTED MAINTE-
NANCE TO ENSURE THE BEST OPERATION POSSI-
WHEN USING A VOLTMETER, BE SURE IS SET TO
BLE FOR YOUR GAME.
THE CORRECT VOLTAGE OR RESISTANCE RANGE
BEFORE USING. THIS CAN PREVENT POSSIBLE
GENERAL CLEANING DAMAGE TO THE PC BOARD OR MISDIAGNOSIS.
Clean the surfaces of the cabinet and decals with a com- ALWAYS REMOVE POWER TO THE GAME WHEN
mercial cleaner such as 409™ or Fantastic™. Do NOT PLUGGING OR UNPLUGGING PC BOARDS.
use cleaners such as Wildcat pinball cleaner or alcohol. It
can take the finish off of the decals. Use Pledge™ on all IT IS NECESSARY TO USE ICE REPLACEMENT
plastic and painted surfaces. This product works PARTS TO CONTINUE WARRANTY COVERAGE. USE
especially well on clear plastics. Please note that other OF NON-ICE APPROVED PARTS WILL NOT ONLY
spray polishes do not work as well. VOID YOUR WARRANTY, BUT COULD CAUSE SERI-
OUS HARM TO THE GAME, OR CAUSE SERIOUS
BODILY INJURY.
BASKETBALLS IF YOU HAVE ANY QUESTIONS REGARDING REPAIR
AFTER READING THIS SECTION, CALL OUR SERVICE
The basketballs should be checked every week for proper DEPARTMENT BEFORE PROCEEDING AT:
inflation. A bicycle tire pump and inflating needle can be
purchased at any sporting goods store and most large
discount stores. I.C.E. SERVICE DEPARTMENT
716-759-0360
Keeping the balls properly inflated will make it more diffi- NORMAL BUSINESS HOURS ARE:
cult to pull them past the ball gate. It will also create more MONDAY – FRIDAY, 9:00 AM TO 6:00 PM EST
realistic basketball action when interacting with the hoop.
Any 8” basketball will work with this game.
NOTE: DO NOT OVER-INFLATE THE BASKETBALLS. FUSES
THIS CAN CAUSE DAMAGE TO THE BALL AND
SHORTEN THE LIFE OF THE BALLS. Fuses are the first items that should be checked when the
game is inoperable or works incorrectly.
There are 4 fuses in the game. Two fuses are located in
ELECTRONIC AND the electronics control panel on a fuse block to the right of
ELECTRICAL REPAIR the fan, above the transformer.
To check or service the fuses, FIRST REMOVE THE
The following section will describe repair procedures and POWER CORD. FAILURE TO DO SO COULD RESULT
trouble shooting hints for the game electronics. IN SERIOUS INJURY OR DEATH. Using a small flat
blade screwdriver, pry the fuse from the fuse block. Pull
Please read the section “Operational Background” in the the fuse from the fuse block and test the fuses. Be sure to
beginning of Maintenance and Trouble Shooting to get a replace the fuses with the same type and value.
12MAINTENANCE & TROUBLESHOOTING
There are 2 fuses located on the Main PC Board. These These numbers are also indicated on the transformer it-
fuses protect the low voltage sides of the game, the 5 volt self.
and 12 volt DC. Be sure game power is off when check-
ing or replacing these fuses. Replace the Main PC Board The AC wire that is on one of the above taps is the only
fuses with the original type and value. USE SLO-BLO wire you should move. Please use a blank fast-on, on any
MDQ TYPE fuses only. open terminals, to protect against shock hazards.
Other types of slo-blo fuses may cause unexpected prob-
lems with the game.
MAIN PC BOARD
TRANSFORMER IMPORTANT: BEFORE REMOVING THE MAIN PC
BOARD OR CHANGING THE MEMORY BATTERY, GO
ALL AC POWER MUST BE REMOVED FROM THE INTO THE OPTIONS MODE AND RECORD YOUR
GAME WHEN SERVICING THIS COMPONENT. IT IS A COUNTER AND GAME SETTINGS, SO THEY CAN BE
GOOD IDEA TO ACTUALLY REMOVE THE POWER RE-ENTERED AFTER SERVICING HAS BEEN COM-
CORD FROM THE WALL OR FLOOR OUTLET WHEN PLETED.
CHANGING THE TRANSFORMER.
The Main PC Board is located on the back of the Control
CAREFULLY document where each color wire goes BE- Panel. Remove the 3 bolts that hold the panel to the
FORE removing any wires. game and flip the Control Panel out.
Remove the 4 screws that hold the transformer to the Remove all AC power before removing the Main PC
game frame. Board.
Replace and reconnect the transformer. Disconnect all mate-lock connectors from the PC Board.
TAKE ANY FAST-ONS THAT WERE ON THE OLD Remove the 6 retaining fasteners and remove the PC
TRANSFORMER COVERING THE UNUSED AC TERMI- Board.
NALS OFF AND TRANSFER THEM TO THE NEW
TRANSFORMER. THIS IS NECESSARY AS THE LEADS Install in the reverse order.
ON THE TRANSFORMER HAVE POWER ON THEM.
If you are installing a new memory battery or new PC
Board, after installation, reset all custom game program-
ming into system memory.
CHANGING AC VOLTAGES
When you receive your game from the factory, it should
be set to the proper AC voltage. If for some reason how- BALL SENSORS
ever, it needs to be set to a different AC voltage, follow
these directions. The ball sensors are a through beam infra-red pair. To
test, walk into the game, and pass a ball through the hoop
Unplug the game from the AC outlet. when a game is being plated.
The AC input taps for the transformer are located on the NOTE: DO NOT USE YOUR HAND TO TEST THE SEN-
front left hand side of the transformer, as viewed from the SOR, AS THE INFRA-RED BEAM CAN USUALLY SEE
opening of the access door. THROUGH A HAND, AND WILL NOT GIVE YOU AN AC-
CURATE TEST.
The AC taps can be further identified by the fact that
there are 5 taps in a row. (The only place on the trans- When you pass the ball through the hoop, you should
former where there are 5 taps in a row.) hear the swish sound from the game. If you hear the
sound, the sensors are good.
The bottom tap is the 0 volt tap. One side of the AC line
should always be left attached to this terminal. If you do not hear the sound, check the transmitter sensor
with an I.R. Detector card. (Radio Shack part no. 276-
The 5 taps FROM THE BOTTOM OF THE TRANS- 099) The transmitter is the unit with the lit LED in it. If you
FORMER UP are as follows: do not see any reflected I.R. light, do a voltage check to
be sure the sensors are receiving power. If the sensors
240 VAC are not receiving power, fix the power problem and pro-
210 VAC ceed.
115 VAC
90 VAC
0 VAC 13MAINTENANCE & TROUBLESHOOTING
If you see reflected I.R. light, perform a continuity check
to make sure the signal from the I.R. receiver is getting
back to the Main PC Board.
If you have no reflected light and it has been established
that there is power, you have a defective TRANSMITTER.
If you have reflected light and have established that the
wiring between the receiver and Main PC Board is good,
there is a high probability that the receiver is bad.
There is one final check you can make to be sure the
problem is not on the Main PC Board. Use a wire jumper
or paper clip and jump between pins 12 & 14 on the P5
connector of the Main PC Board. If you do this when a
game is in progress, a “swish” sound should be heard
each time you MOMENTARILY jump those terminals. If
the sound is heard, and the wiring to the sensor is good,
and the transmitter works correctly, then the receiver is
definitely bad.
If you need to replace either of the sensors, refer to the
“Hoop Sensor Replacement” section in the mechanical
repair area for directions on how to replace the sensors.
14OPTIONAL ACCESSORIES
OVERVIEW DOLLAR BILL VALIDATOR
IF YOU DO NOT FIND ANSWERS TO YOUR QUES- Refer to the supplied manual for all information other than
TIONS IN THIS SECTION, REFER TO THE ACCOMPA- software settings.
NYING MANUAL FOR YOUR PARTICULAR PRODUCT,
OR CALL OUR SERVICE DEPARTMENT. The validator normally requires no adjustments other than
checking to see that the proper voltage is present. This
Validator runs on 12 volt DC power, with a minimum of
I.C.E. SERVICE DEPARTMENT 11.5 volts DC. The Validator will not work correctly with
voltages below that specified.
716-759-0360
NORMAL BUSINESS HOURS ARE: The validator may work improperly or not at all if it is not
MONDAY – FRIDAY, 9:00 AM TO 6:00 PM EST grounded properly.
The unit should be cleaned periodically to ensure proper
operation. Blow out as much dirt as possible. Then use a
TICKET DISPENSER cotton swab (Q-Tip) to get into the front opening to re-
move any remaining dirt or debris. Clean the stacker belts
Refer to the supplied service manual for all information with a rubber rejuvenator. Clean any other dirt from the
other than software settings. unit with isopropyl alcohol.
The ticket dispenser comes pre-set from the factory to That game comes from the factory pre-set at 2 credits per
dispense 1 ticket for every 5 points scored. In addition to bill. You can change this by entering the “GAME OP-
this, if the game player did not score enough points to get TIONS” screen. (see GAME OPTIONS settings section
1 ticket, the game is preset to give the player 1 ticket “just for more information)
for playing”.
These settings can be adjusted by changing the ticket
options in the “GAME OPTIONS” mode. If you change the
memory battery or Main PC Board, you may have to reset
the value for these options.
You can also set the game up so that the winner of MUL-
TIPLE player games ONLY, wins tickets or that a certain
amount of points must be scored BEFORE ANY tickets
will be dispensed. This is the threshold option.
15ABOUT LINKING
With LINKING it will be possible for your customers to
enjoy exciting Head to Head competition when two or
more HOOP FEVER™ games are connected together. In
fact, you can link as many as fourteen HOOP FEVER™
games together.
Game linking is accomplished through the “Link” button
located in the upper right hand corner of the control panel.
When enough money is inserted into the game to create
one or more credits, the “Link” button will begin to flash. If
a player on another game pushes their “Link” button, the
games are now linked together. Once the games are
linked together, they become 1 player only games. When
any of the players push the “Start” button, the game be-
gins.
When the game is over, the top four players are ranked
on the display. The game spotlight will flash for the win-
ner.
TICKET SETTINGS
Ticket settings will work in the same fashion as a regular
HOOP FEVER™ game. Be sure all of the games linked
together are set EXACTLY the same. Using different set-
tings could yield unexpected results.
NOTE: WHEN LINKING 1 OR MORE
GAMES TOGETHER, IT IS ADVISIBLE
TO TURN THE ATTRACT MODE OFF
ON ALL BUT 1 GAME. THIS WILL
ELIMINATE STRANGE SOUNDS FROM
MORE THAN 1 ATTRACT MODE PLAY-
ING, BUT NOT AT THE SAME TIME.
16PARTS LISTINGS
MECHANICAL PARTS GRAPHICS & DECALS
HF1005-P100 Coin door panel, frame
HF1006D-P802X Coin door assembly HF7001 Programming decal
HF1007-P802 Accessory door/ticket door HF7002 Backboard overlay
HF1008-P802 Cash box door HF7005 Front cabinet decal
BB1009 Cash box enclosure (galvanized) HF7008 Decal I.C.E. logo
HF1017-P100 Cover IR emitter (small) 7031 “Suitable for indoor use only” decal
HF1018-P100 Cover IR receiver (large) 7032 “Caution replace fuse…..) decal
HF1019-P100 Bracket (backboard side) 7033 “Warning disconnect power…..) decal
NB1039-P100 Hoop (15”) Only for games 7035 “On/off” decal
manufactured before 8/8/07 7037 “5 amp fuse” decal
NB1039-P100x Hoop 15” Only for games 7039 “Caution hot surface” decal
Manufactured after 8/8/07 7041 “6 amp warning” decal
(reflector) HF9001 Service manual
HF1054-P100 Frame, red BT3013 Rebound guard upper
HF1055-P100 Mesh frame side HF3013X Rebound guard upper kit w/brackets
HF1058-P100 Ball stop rail BT3025 Rebound guard lower 6”
HF1060-P100 Ball deflector HF2005 Start button (large)
HF1062-P100 Rebound guard mounting bracket HF2006 Select player button (medium)
HS3001 Basketball B110 rubber BT2218 Link button
HF3052 Backboard HF2020SX linking kit option
SF3008 Basketball net (2 pcs per game) HF2006X blue rotating light
BT3009 Frame netting NB2035X blue strobe light
BB5001 Cash box HF3005 Control panel (specify link or non)
5014 Door lock HF1016-P802 Sensor bracket (NB3004X)
6459 Allen wrench (security) 3026 Tube cap
PC60615A #2 square drive bit
NB3001 Basketball pvc leather
BT1022-P802 Ball gate black
HF1056-P100 connecting pipe
ELECTRICAL & ELECTRONIC
PARTS
2007 Speaker
2364X Fan assembly
HF2034X Main P.C. Board -
specify software when ordering
BT2002 Transformer
BB2005 Micro switch
BB2008X Ball gate motor (3269)
HF3004X Net sensor assembly (trans & rec)
Only for games manufactured before
8/8/07
NB3004X Net sensor assembly
(runs off reflector)
Only for games manufactured after
8/8/07
E20407 Battery, 3.2 volt
BT2027X 20 ft. line cord
BB2023 Long life lamp bulb (5000 hr.)
BB2006 Power module (42r37-3153-150)
BB2022X Flood lamp socket
17MAJOR PARTS LAYOUT
HF1056-P100
NB1039-P100X
HF1062-P100 + BT3013
Sold together as a assembly:
HF3013X
HF1060-P100
HF1062-P100
BT3013
BT3025
HF2006
HF2005
HF1058-P100
HF1006D-P802X
HF1008-P802X
HF1007
1819
20
21
WARRANTY POLICY
I.C.E. Inc warrants all components in new machines to be free of defects in materials and workmanship for
the period listed below:

        ■ 180 days on Main PCB’s, Computers & Motors
        ■ 1 year on all LCD monitor panels
        ■ 90 days on all other electronic and mechanical components
        ■ 30 days on all I.C.E. repairs and parts purchases

I.C.E. Inc shall not be obligated to furnish a warranty request under the following conditions:

        ■ Equipment or parts have failed through normal wear and tear
        ■ Equipment has been subjected to unwarranted stress, abuse or neglect
        ■ Equipment has been damaged as a result of arbitrary repair/modification

Products will only be covered under warranty by obtaining an I.C.E. authorized RMA #. To obtain an RMA #
please provide I.C.E. tech support with the game serial # or original I.C.E. invoice # and a detailed description
of the failure or fault symptoms.

I.C.E. Inc will assume no liability whatsoever for costs associated with labor or travel time to replace defective
parts. All defective warranty covered components will be replaced with new or factory refurbished compo-
nents equal to OEM specifications.

I.C.E. Inc will cover domestic UPS ground, or comparable shipping costs during the warranty period. Interna-
tional or expedited shipments are available for an additional charge. To obtain credit defective parts must be
returned to I.C.E. Inc, at the customer’s expense, within 30 days. After 30 days a 15% re-stocking fee will
apply to all returns.

ICE distributors are independent, privately owned and operated. In their judgment, they may sell parts and/or
accessories other than those manufactured by I.C.E. Inc. We cannot be responsible for the quality, suitability
or safety of any non-I.C.E. part or modification (including labor) that is performed by such a distributor.

                                       Innovative Concepts in Entertainment
                                                  10123 Main St.
                                                Clarence, NY 14031
                                            Phone #: (716) - 759 – 0360
                                             Fax #: (716) – 759 – 0884
                                                www.icegame.com

                                                             22
You can also read