PAPER DOLLS BONUS PRINCESS BLOCKS - The Red Boot Quilt Company
←
→
Page content transcription
If your browser does not render page correctly, please read the page content below
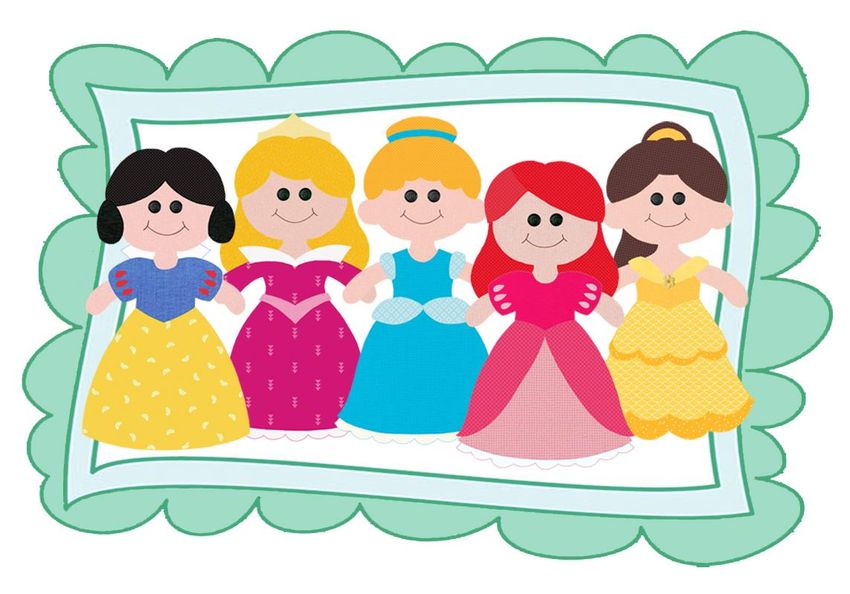
PAPER DOLLS
 BONUS PRINCESS BLOCKS

The Red Boot Quilt Company

PRINTING INSTRUCTIONS
PLEASE READ BEFORE YOU PRINT YOUR PATTERN/S
Hi lovely quilters and crafters,
A few of you are having problems with the templates and/or images in our
PDF patterns printing with a black background. Thankfully this is uncommon
and only occurs in approx. 1 in 250 patterns sold.
This is due to differences between the various apps, devices, and printers we all use.
All of our patterns are test printed multiple times by a group of reviewers before release. If we find an issue
we correct it immediately and update the pattern concerned.
We’ve found, after an extensive review of the problem, that it happens mostly on Apple devices, especially if
you are printing from ‘preview’ or your browser window.
Regardless of what device you use, 99.9% of black background issues are solved by the following –
1. Always save the PDF file to your hard drive.
2. Always open the file using a PDF reader (eg. Adobe or Foxit) not your browser.
3. Always print from the PDF reader. Never print from your browser window.
4. Always print a template test page - use the draft print options to save printer ink if something
goes wrong.
5. Printing in black & white instead of colour sometimes resolves the problem.
toni xx
The Red Boot Quilt Co.
redbootquilts@bigpond.com
NB. The instructions and information contained here are given in good faith, but no guarantee is given due to the
fact we have no control over your computer, device, and/or printer. We are not liable for the ink used when printing
our patterns.
© Antonie Alexander, The Red Boot Quilt Company 2021
www.theredbootquiltcompany.com Email: redbootquilts@bigpond.com
BEFORE THE FUN BEGINS
Please read all instructions before you begin.
Abbreviations. “WOF” = ‘width of the fabric’.
Requirements are based on fabric 115cm (44in) wide unless otherwise stated. Fabric requirements may differ
from person to person due to cutting methods. If in doubt it is a good idea to purchase a little extra fabric.
Fusible webbing requirements will vary greatly between products and projects; assume you will need a lot and go
from there!
1/4in seam allowances are used throughout unless otherwise stated.
Pre-washed 100% cotton fabrics are recommended.
Please refer to the photo of the project and the quilt diagrams to help with colour choices and layout.
The templates are reversed for your convenience. I would recommend using an appliqué mat with all but the
most simple appliqué shapes.
Our patterns are proof-read and made by our lovely testers but sometimes mistakes do slip by us. Please let us know
if you come across an error so we can correct it.
This design and its instructions, diagrams, and templates are protected by copyright. They may not be reproduced
by any process. The instructions and information contained in this pattern are given in good faith, but no guarantee
is given due to the fact we have no control over the techniques and materials used. This pattern is not intended to
replace a class.
A NOTE ABOUT BUTTONS
I like to use buttons on my projects but they aren’t suitable for children under three (3) years of age due to
them being a choking hazard. Replace buttons with appliqué or embroidery when you are making the project.
Safety eyes are available from all good craft stores. Always follow the manufacturer’s instructions.
IMPORTANT! HOW TO PRINT TEMPLATES FROM PDF PATTERNS
All templates are provided at their full size. Ensure your printer is set to print at 100% and deselect the scaling and
cropping options. Ensure you deselect the option that says “print to printer margins”. Do centre the page.
Some templates may be divided into two or more sections and will need to be joined to make the complete template.
Simply match the shapes along the dashed or dotted lines as marked on the template, then use adhesive tape to stick
them together. Occasionally a shape will distort a tiny bit in the printing process, simply adjust where necessary.
Backstitch Chain Stitch Running Stitch Blanket Stitch Cross Stitch
Satin Stitch French Knot
© Antonie Alexander, The Red Boot Quilt Company 2021
www.theredbootquiltcompany.com Email: redbootquilts@bigpond.com
PAPER DOLLS
BONUS PRINCESS BLOCKS
                 © Antonie Alexander,
     The Red Boot Quilt Company 2021

                 HAIR
  Optional—backstitch the outline of
   the hair band then fill with satin
    stitch using contrasting thread.

                 Tip!
       The numbers represent
        the order in which the
         appliqué shapes are
           fused together.
PAPER DOLLS—BONUS PRINCESS BLOCKS
© Antonie Alexander, The Red Boot Quilt Company 2021
SLEEVE DETAIL
Optional—backstitch the
outline of the sleeve detail
then fill with satin stitch
using contrasting thread.PAPER DOLLS—BONUS PRINCESS BLOCKS
© Antonie Alexander, The Red Boot Quilt Company 2021
SLEEVE DETAIL
Optional—backstitch the
outline of the sleeve detail
then fill with satin stitch
using contrasting thread.PAPER DOLLS—BONUS PRINCESS BLOCKS © Antonie Alexander, The Red Boot Quilt Company 2021
PAPER DOLLS—BONUS PRINCESS BLOCKS
© Antonie Alexander, The Red Boot Quilt Company 2021
HAIR
Optional—backstitch the outline of
the hair band then fill with satin
stitch using contrasting thread.You can also read