Pexip Infinity and Microsoft Azure Deployment Guide - Software Version 25.4 Document Version 25.4.a May 2021
←
→
Page content transcription
If your browser does not render page correctly, please read the page content below

Pexip Infinity and Microsoft Azure

       Deployment Guide

           Software Version 25.4

          Document Version 25.4.a

                 May 2021
Pexip Infinity and Microsoft Azure Deployment Guide

Contents

Introduction                                                                                                     4

Deployment guidelines                                                                                            5
   Deployment models                                                                                             5
   Deployment options                                                                                            5
   Limitations                                                                                                   6
   Recommended instance types and call capacity guidelines                                                       6
   Capacity planning                                                                                             6
   IP addressing                                                                                                 6
   Assumptions and prerequisites                                                                                 7
   Multiple Virtual Networks                                                                                     7

Configuring your Azure subscription                                                                              8

Preparing your Azure environment                                                                                 9
   Creating a Virtual Network                                                                               12
   Creating a Storage Account                                                                               12

Configuring Azure Network Security Groups                                                                   15
   Inbound security rules                                                                                   15
   Outbound security rules                                                                                  15
   Deployment scenarios and inter-node communication requirements for multiple Virtual Networks             16
   Azure Resource Manager (ARM) templates for deploying a security group                                    16
   Creating a Network Security Group via the Azure portal                                                   16

Obtaining and preparing disk images for Azure deployments                                                   18
   Preparing disk images for use                                                                            18
   Running the script via your Windows client                                                               19
   Version information for previous Pexip Infinity releases                                                 20

Creating VM instances in Azure for your Pexip nodes                                                         22
   Creating a VM instance                                                                                   22
   Azure Resource Manager (ARM) templates for deploying a VM instance                                       28
       Troubleshooting instance size errors                                                                 29

Deploying a Management Node in Azure                                                                        31

Initial platform configuration — Azure                                                                      33
   Accessing the Pexip Infinity Administrator interface                                                     33
   Configuring the Pexip Infinity platform                                                                  33
   Next step                                                                                                34

© 2021 Pexip AS                                                Version 25.4.a May 2021            Page 2 of 42
Pexip Infinity and Microsoft Azure Deployment Guide

Deploying a Conferencing Node in Azure                                                                             35

Configuring dynamic bursting to the Microsoft Azure cloud                                                          36
   Configuring your system for dynamic bursting to Microsoft Azure                                                 36
       Firewall addresses/ports required for access to the Azure APIs for cloud bursting                           36
       Setting up your bursting nodes in Microsoft Azure and enabling bursting in Pexip Infinity                   36
       Configuring an Active Directory (AD) application and permissions for controlling overflow nodes             37
   Configuring the bursting threshold                                                                              38
   Manually starting an overflow node                                                                              38
   Converting between overflow and "always on" Microsoft Azure Conferencing Nodes                                  39

Managing Azure instances                                                                                           40
   Temporarily removing (stopping) a Conferencing Node instance                                                    40
   Reinstating (restarting) a stopped Conferencing Node instance                                                   40
   Permanently removing a Conferencing Node instance                                                               41
   Backing up VM instances (guidelines)                                                                            41
   Converting VM instances to managed disks and to premium performance                                             41

© 2021 Pexip AS                                               Version 25.4.a May 2021                    Page 3 of 42
Pexip Infinity and Microsoft Azure Deployment Guide                                                      Introduction

Introduction
The Microsoft Azure Virtual Machines (VMs) service provides scalable computing capacity in the Microsoft Azure cloud. Using Azure
eliminates your need to invest in hardware up front, so you can deploy Pexip Infinity even faster.
You can use Azure to launch as many or as few virtual servers as you need, and use those virtual servers to host a Pexip
Infinity Management Node and as many Conferencing Nodes as required for your Pexip Infinity platform.
Azure enables you to scale up or down to handle changes in requirements or spikes in conferencing requirements. You can also use the
Azure APIs and the Pexip Infinity management API to monitor usage and bring up / tear down Conferencing Nodes as required to meet
conferencing demand, or allow Pexip Infinity to handle this automatically for you via its dynamic bursting capabilities.
Pexip publishes disk images for the Pexip Infinity Management Node and Conferencing Nodes. These images may be used to launch
instances of each node type as required.

© 2021 Pexip AS                                               Version 25.4.a May 2021                                      Page 4 of 42
Pexip Infinity and Microsoft Azure Deployment Guide                                                Deployment guidelines

Deployment guidelines
This section summarizes the Azure deployment options and limitations, and provides guidance on our recommended Azure instance
types, security groups and IP addressing options.
This flowchart provides an overview of the basic steps involved in deploying the Pexip Infinity platform on Azure:

Deployment models
Azure has two deployment models: Classic and Resource Manager.
Resource Manager is the recommended deployment model for new workloads and is the only model supported by Pexip Infinity.

Deployment options
There are three main deployment options for your Pexip Infinity platform when using the Azure cloud:

 l   Private cloud: all nodes are deployed within Azure. Private addressing is used for all nodes and connectivity is achieved by
     configuring a VPN tunnel between the corporate network and Azure. As all nodes are private, this is equivalent to an on-premises
     deployment which is only available to users internal to the organization.
 l   Public cloud: all nodes are deployed within Azure. All nodes have a private address but, in addition, public IP addresses are
     allocated to each node. The node's private addresses are only used for inter-node communications. Each node's public address is
     then configured on the relevant node as a static NAT address. Access to the nodes is permitted from the public internet, or a
     restricted subset of networks, as required. Any systems or endpoints that will send signaling and media traffic to those Pexip
     Infinity nodes must send that traffic to the public address of those nodes. If you have internal systems or endpoints
     communicating with those nodes, you must ensure that your local network allows such routing.
 l   Hybrid cloud: the Management Node, and optionally some Conferencing Nodes, are deployed in the corporate network. A VPN
     tunnel is created between the corporate network and Azure. Additional Conferencing Nodes are deployed in Azure and are
     managed from the on-premises Management Node. The Azure-hosted Conferencing Nodes can be either internally-facing,
     privately-addressed (private cloud) nodes; or externally-facing, publicly-addressed (public cloud) nodes; or a combination of
     private and public nodes (where the private nodes are in a different Pexip Infinity system location to the public nodes). You may
     also want to consider dynamic bursting, where the Azure-hosted Conferencing Nodes are only started up and used when you have
     reached capacity on your on-premises nodes.

© 2021 Pexip AS                                               Version 25.4.a May 2021                                         Page 5 of 42
Pexip Infinity and Microsoft Azure Deployment Guide                                                 Deployment guidelines

All of the Pexip nodes that you deploy in the cloud are completely dedicated to running the Pexip Infinity platform— you maintain full
data ownership and control of those nodes.

Limitations
The following limitations currently apply:

 l   The OS username is always admin, regardless of any other username configured through the Azure Portal.
 l   SSH keys are the preferred authentication mechanism for Pexip Infinity instances hosted in the Azure Cloud. Password-based
     authentication also works, however, and will use the password provisioned at instance deployment time.
     Note that:
      o   Pexip Infinity node instances only support a single SSH key pair.
      o   If you are using a Linux or Mac SSH client to access your instance you must use the chmod command to make sure that your
          private key file on your local client (SSH private keys are never uploaded) is not publicly viewable. For example, if the name of
          your private key file is my-key-pair.pem, use the following command: chmod 400 /path/my-key-pair.pem
     See https://docs.microsoft.com/en-us/azure/virtual-machines/linux/ssh-from-windows for more information about using SSH on
     Azure.
 l   We do not support Azure deployments in China or Germany.

Recommended instance types and call capacity guidelines
Azure instances come in many different sizes. In general, Pexip Infinity Conferencing Nodes should be considered compute intensive
and Management Nodes reflect a more general-purpose workload. Our Server design recommendations also apply to cloud-based
deployments.
For deployments of up to 20 Conferencing Nodes, we recommend using:

 l   Management Node: an F4s v2 instance.
 l   Transcoding Conferencing Nodes: either an F8s v2 instance (for smaller deployments) or an F16s v2 instance (for larger
     deployments).
 l   Proxying Edge Nodes: an F4s v2 instance.

An F8s v2 instance should provide capacity for approximately 15 HD / 37 SD / 270 audio-only calls per Transcoding Conferencing Node,
and an F16s v2 instance should provide capacity for approximately 30 HD / 70 SD / 450 audio-only calls per Transcoding Conferencing
Node.
If the Fsv2 series is not available in your region you can use an F-series for your nodes.

Capacity planning
By default, Azure Resource Manager virtual machine cores have a regional total limit and a regional per series (F, Fsv2, etc.) limit, that
are enforced per subscription. Typically, for each subscription, the default quota allows up to 10-20 CPU cores per region and 10-20
cores per series. An F8s v2 instance uses 8 CPU cores. Thus, with the default limits in place, only two F8s v2 instances may be deployed
(as only 4 CPU cores will remain in either quota pool, which is insufficient for another F8s v2 instance).
The allocated quota may be increased by opening a support ticket with Microsoft via the Azure Portal. Ensure that you request a
sufficient number of CPU cores. For example, if 10 Transcoding Conferencing Nodes are required, then the quota must be increased to
8 cores x 10 F8s v2 instances = 80 CPU cores of type F8s v2. It may take a number of days for the quota increase request to be
processed. For more information see https://docs.microsoft.com/en-us/azure/azure-subscription-service-limits.

IP addressing
Within a Virtual Network, an instance's private IP addresses can initially be allocated dynamically (using DHCP) or statically. However,
after the private IP address has been assigned to the instance it remains fixed and associated with that instance until the instance is
terminated. The allocated IP address is displayed in the Azure portal.

© 2021 Pexip AS                                                Version 25.4.a May 2021                                          Page 6 of 42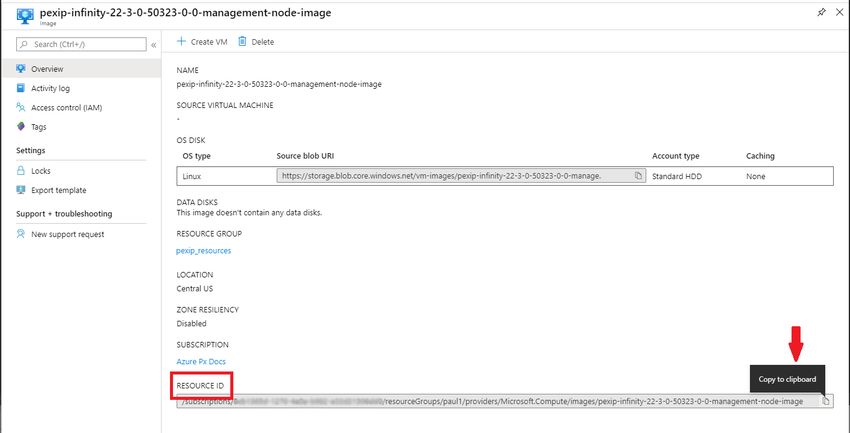
Pexip Infinity and Microsoft Azure Deployment Guide                                                 Deployment guidelines

Public IP addresses may be associated with an instance. Public IPs may be dynamic (allocated at launch/start time) or statically
configured. Dynamic public IP addresses do not remain associated with an instance if it is stopped — and thus it will receive a new
public IP address when it is next started.
Pexip Infinity nodes must always be configured with the private IP address associated with its instance, as it is used for all internal
communication between nodes. To associate an instance's public IP address with the node, configure that public IP address as the
node's Static NAT address (via Platform > Conferencing Nodes).

Assumptions and prerequisites
The Pexip Infinity deployment instructions assume that within Azure you have already:

 l   signed up for Azure and created a user account, administrator groups etc.
 l   decided in which Azure region/location to deploy your Pexip Infinity platform (one Management Node and one or more associated
     Conferencing Nodes)
 l   created a Resource Group, Virtual Network, and Storage Account in the chosen Azure region (see Preparing your Azure
     environment)
 l   (if necessary) configured a VPN tunnel from the corporate/management network to the Azure Virtual Network
 l   set your subscription's Microsoft partner ID to Pexip (see Configuring your Azure subscription)
 l   created a Network Security Group (see Configuring Azure Network Security Groups for port requirements)

For more information on setting up your Azure Virtual Machine environment, see https://docs.microsoft.com/en-us/azure/virtual-
machines/linux/overview.

Multiple Virtual Networks
Pexip Infinity node instances that are hosted on Azure may be deployed across multiple Azure Virtual Networks (VNets), where each
Azure VNet (and the Conferencing Nodes within it) maps onto a Pexip Infinity system location. See Configuring Azure Network Security
Groups for port requirements when using multiple VNets.

 l   From version 21 of Pexip Infinity, you can deploy your Conferencing Nodes in Azure across peered regions (Global VNet Peering).
     See https://docs.microsoft.com/en-us/azure/virtual-network/virtual-network-peering-overview for more information about virtual
     network peering. Note that if you are upgrading to version 21 or later, you must not delete the VPN gateway until after you have
     upgraded. You can then delete the gateway and enable VNet peering.
 l   For version 20 or earlier, you must use a VNet-to-VNet VPN gateway connection; do not use VNet peering. See
     https://azure.microsoft.com/en-gb/documentation/articles/vpn-gateway-howto-vnet-vnet-resource-manager-portal/ for
     information about how to create a connection between Azure VNets.

© 2021 Pexip AS                                                Version 25.4.a May 2021                                          Page 7 of 42
Pexip Infinity and Microsoft Azure Deployment Guide                                       Configuring your Azure subscription

Configuring your Azure subscription
We recommend setting up a separate subscription for your Pexip deployment.
    We recommend using a separate subscription because Azure Resource Manager enforces a per hour limit on the number of
    requests it transacts, hence it's possible for hard limits to be reached if you have other applications that are also transacting with
    Resource Manager within the same subscription. This applies mainly if you intend to use dynamic bursting into Azure.
If you have an Enterprise Agreement (EA) or Pay-As-You-Go subscription, and you are using this subscription primarily for your Pexip
platform, you can link Pexip to this subscription — assigning Pexip as the Microsoft partner provides telemetry to Microsoft that Pexip
is associated with the resources consumed by this subscription. This does not apply if you are in the Azure Cloud Solution Provider
(CSP) program.
To set your subscription's Microsoft partner ID to Pexip:

1. From the Azure portal, select Subscriptions.
2. Select the subscription you are using for your Pexip deployment.
3. Select Partner Information.
4. In the Microsoft partner ID field , enter 4240224 (Pexip's reference ID) and select Validate ID.
    Partner: Pexip AS should be displayed.

5. Select Save partner.

© 2021 Pexip AS                                               Version 25.4.a May 2021                                             Page 8 of 42
Pexip Infinity and Microsoft Azure Deployment Guide Preparing your Azure environment Preparing your Azure environment This topic explains how to prepare your Azure environment before installing Pexip Infinity. It describes how to set up your Resource Group, Virtual Network and Storage Account in your chosen Azure region. This guide assumes you are starting with a fresh Azure portal. Note that the images shown in this guide depict an example deployment. Unless explicitly stated, you should use your own resource names and address spaces etc. as appropriate for your own environment. Also, as the Azure portal is regularly updated, some images and labels shown here may not directly match the currently available options. The diagram below shows how the various resource elements that you need to create within the Azure environment are related to each other. This topic explains how to create the shared Resource Group, Virtual Network and Storage Account. Subsequent topics in this guide explain how the prepared disk image is created, and how the Resource Groups are created for your VM instances for each Pexip node. Using the Azure portal or PowerShell This guide provides examples of how to complete the tasks using either the Azure portal, or via PowerShell. When using PowerShell commands you must first sign in to your Azure subscription with the Connect-AzAccount command and follow the on-screen directions to authenticate. © 2021 Pexip AS Version 25.4.a May 2021 Page 9 of 42
Pexip Infinity and Microsoft Azure Deployment Guide                                Preparing your Azure environment

If necessary you can change the subscription context with the command:
Set-AzContext -SubscriptionId "xxxx-xxxx-xxxx-xxxx"

where xxxx-xxxx-xxxx-xxxx is the ID of the subscription you want to use.
See Running the script via your Windows client for more information about running PowerShell scripts and Azure Resource Manager.

© 2021 Pexip AS                                               Version 25.4.a May 2021                                   Page 10 of 42
Pexip Infinity and Microsoft Azure Deployment Guide                                      Preparing your Azure environment

Creating a Resource Group
Resource Groups are logical containers for a collection of resources used for your Pexip deployment.
We recommend that all of your shared resources use the same Resource Group. The shared resources that you should place in this
Resource Group include:

 l   Network Security Group
 l   Virtual Network
 l   Storage Account
 l   Prepared disk images (these are used to create the individual VM instances for your Conferencing Nodes and Management Node)

When you deploy your Pexip Infinity nodes, we recommend that each VM instance that you create for your Conferencing Nodes or
Management Node is deployed in its own Resource Group. This is not a mandatory requirement but it does allow you to subsequently
manage each of your VM instance's resources more easily.

 Azure portal                                                                                          Powershell

 1. Decide in which region you are going to deploy your Pexip system. You can see the regions and      Use the New-AzResourceGroup
    their physical geographic locations at https://azure.microsoft.com/en-gb/global-                   command:
    infrastructure/regions/.                                                                           New-AzResourceGroup -Name
                                                                                                        -Location
 2. Configure a Resource Group for your shared resources.
      a. To create a new Resource Group, from the Azure portal select Resource Groups and select +
                                                                                                       For example:
         Add.
                                                                                                       New-AzResourceGroup -Name pexip_
                                                                                                       resources -Location centralus

      b. Select your Subscription, enter your Resource group name, select your Region, and then
         select Review + Create.

      c. On the Summary page, select Create.

© 2021 Pexip AS                                               Version 25.4.a May 2021                                         Page 11 of 42
Pexip Infinity and Microsoft Azure Deployment Guide Preparing your Azure environment
Creating a Virtual Network
A Virtual Network allows Azure resources to securely communicate with each other, and is where your VM instances will be deployed.
See https://docs.microsoft.com/en-us/azure/virtual-network/virtual-networks-overview for more information.
Azure portal Powershell
1. From the Azure portal, select Virtual Networks, and select + Add. 1. Create the virtual network:
2. Configure the Virtual Network's properties: $virtualNetwork = New-AzVirtualNetwork
-ResourceGroupName -Location -Name
and then ensure you select your Subscription, Resource group and your Location. -AddressPrefix
b. Select Create.
2. Add a subnet:
$subnetConfig = Add-
AzVirtualNetworkSubnetConfig -Name
default -AddressPrefix
-VirtualNetwork $virtualNetwork
3. Associate the subnet to the virtual
network:
$virtualNetwork | Set-AzVirtualNetwork
For example:
$virtualNetwork = New-AzVirtualNetwork -
ResourceGroupName pexip_resources -
Location centralus -Name pexip_virtual_
network -AddressPrefix 10.0.0.0/24
$subnetConfig = Add-
AzVirtualNetworkSubnetConfig -Name default
-AddressPrefix 10.0.0.0/24 -VirtualNetwork
$virtualNetwork
$virtualNetwork | Set-AzVirtualNetwork
Creating a Storage Account
A general-purpose storage account provides access to all of the Azure storage services, and is used for storing the prepared Pexip
Infinity VHD images and VM boot diagnostics. (We recommend that the Azure VMs use managed disks, and thus the VMs are not
associated with a storage account.)
Note that a storage account cannot use Premium storage if it is used for VM boot diagnostics.
For more information on Azure disk types see https://docs.microsoft.com/en-us/azure/virtual-machines/windows/disks-types.
© 2021 Pexip AS Version 25.4.a May 2021 Page 12 of 42Pexip Infinity and Microsoft Azure Deployment Guide Preparing your Azure environment
Azure portal Powershell
1. From the Azure portal, select Storage Accounts, and select + Add. Use the New-AzStorageAccount command:
2. Configure the Storage Account's Basic properties: New-AzStorageAccount -ResourceGroupName
-Name -Location -
SkuName Standard_LRS -Kind StorageV2
b. Leave the deployment model as Resource Manager.
c. Give it a Storage account name. For example:
d. Select your Location. New-AzStorageAccount -ResourceGroupName
pexip_resources -Name pexipastore -
e. Set Performance to Standard. Location centralus -SkuName Standard_LRS -
Kind StorageV2
f. Select an Account kind of StorageV2.
g. Set Replication to Locally redundant storage (LRS).
h. Select Review + create.
i. Review your inputs and select Create.
You now have a Resource Group, Storage Account and Virtual Network for your Pexip deployment.
© 2021 Pexip AS Version 25.4.a May 2021 Page 13 of 42Pexip Infinity and Microsoft Azure Deployment Guide Preparing your Azure environment © 2021 Pexip AS Version 25.4.a May 2021 Page 14 of 42
Pexip Infinity and Microsoft Azure Deployment Guide                             Configuring Azure Network Security Groups

Configuring Azure Network Security Groups
Access to Azure instances is restricted by the Azure firewall. This may be configured by associating a subnet or instance with a Network
Security Group which specifies the permitted inbound and outbound traffic from the group.
A minimal security group that permits access to a public-cloud style Pexip Infinity deployment is described below and is defined within
the Azure Resource Manager (ARM) templates that we provide.

Inbound security rules
These rules allow administrative/management access to the Management Node and Conferencing Nodes, and allow call signaling and
media to Conferencing Nodes:

 Priority         Name                         Source                                  Destination   Service                     Action

 105              HTTP                         Any                                     Any           TCP/80                      Allow

 110              HTTPS                        Any                                     Any           TCP/443                     Allow

 115              H.323 CS                     Any                                     Any           TCP/1720                    Allow

 120              SIP TCP                      Any                                     Any           TCP/5060                    Allow

 125              SIP TLS                      Any                                     Any           TCP/5061                    Allow

 130              TCP call signaling           Any                                     Any           TCP/33000-39999             Allow

 135              TCP call media               Any                                     Any           TCP/40000-49999             Allow

 140              H.323 LS                     Any                                     Any           UDP/1719                    Allow

 145              SIP UDP *                    Any                                     Any           UDP/5060                    Allow

 150              UDP call signaling           Any                                     Any           UDP/33000-39999             Allow

 155              UDP call media               Any                                     Any           UDP/40000-49999             Allow

 160              Management traffic           CIDR block:

 * Only required if you intend to enable SIP over UDP.

Where Any implies any source/destination and  should be restricted to a single IP address or
subnet for management access only.

Outbound security rules
The default Azure network security group rules suffice. These permit outbound traffic to the same Virtual Network, or to the Internet.
A single security group can be applied to the Management Node and all Conferencing Nodes. However, if you want to apply further
restrictions to your Management Node (for example, to exclude the TCP/UDP signaling and media ports), then you can configure
additional security groups and use them as appropriate for each Azure instance.
Remember that the Management Node and all Conferencing Nodes must be able to communicate with each other. If your instances
only have private addresses, ensure that the necessary external systems such as NTP and DNS servers are routable from those nodes.
For further information on the ports and protocols specified here, see Pexip Infinity port usage guide.

© 2021 Pexip AS                                                  Version 25.4.a May 2021                                         Page 15 of 42
Pexip Infinity and Microsoft Azure Deployment Guide                                Configuring Azure Network Security Groups

Deployment scenarios and inter-node communication requirements for
multiple Virtual Networks
In a basic deployment, your Pexip Infinity platform will be deployed within a
single Azure Virtual Network (VNet).
In larger deployments you may choose to deploy your Conferencing Nodes
across multiple VNets — in which case there must be a directly routable path
(no NAT) between all nodes that allows UDP port 500 (IKE), and IP Protocol
50 (IPsec ESP) to pass between all nodes in both directions.
These routing requirements and their influence on the various deployment
models is as follows:

 l   Public/private cloud on a single Azure virtual network: the Management
     Node and Conferencing Nodes are all within the same virtual network
     and communicate with each other within the network over IPsec which is
     allowed by default within the VNet.
 l   Hybrid cloud on a single Azure virtual network: as for public/private cloud above, except that your VPN tunnel must allow the
     IPsec traffic between your on-premises nodes and your cloud-hosted nodes.
 l   Conferencing Nodes spread over multiple Azure virtual networks: you should use Global VNet Peering — this means that all
     network traffic between the peered virtual networks, including the IPsec traffic between nodes, is private and travels over the
     Azure backbone. (Do not set up a VNet-to-VNet VPN gateway between each virtual network.)

Note that in all cases the Azure Network Security Group templates that we provide allow call signaling and media connectivity into the
Pexip Infinity platform.

Azure Resource Manager (ARM) templates for deploying a security group
Pexip provides two ARM templates — one with, and one without, SIP UDP access enabled — which may be used to deploy a security
group containing the above rules. These templates may be used from PowerShell or the Azure CLI. Alternatively, you may use the
Azure Portal to deploy a security group using the relevant template (see below).
The details of each template are as follows. You should pick the one most suitable for your needs.

 Name                      SIP UDP            Template URL                                                            Resources created
                           access

 security-group            Disabled           https://pexipas.blob.core.windows.net/templates/20171026/security-      Network security
                                              group.json                                                              group

                                              (launch in Azure Portal)

 security-group-with-      Enabled            https://pexipas.blob.core.windows.net/templates/20171026/security-      Network security
 sip-udp                                      group-with-sip-udp.json                                                 group

                                              (launch in Azure Portal)

Both templates contain the following parameters:

 Name                        Description

 managementNetwork           Network from which to permit management traffic (CIDR notation e.g. 198.51.100.1/32).

 securityGroupName           Name of the security group to create.

Creating a Network Security Group via the Azure portal
To set up a Network Security Group via the Azure portal:

© 2021 Pexip AS                                                Version 25.4.a May 2021                                            Page 16 of 42
Pexip Infinity and Microsoft Azure Deployment Guide Configuring Azure Network Security Groups
1. Select the appropriate ARM Template URL link from the table above and sign in to the Azure portal if required.
2. Select your Subscription and Resource group.
3. Supply the template parameters (Settings):
o The Management Network from which to permit management traffic (CIDR notation e.g. 198.51.100.1/32).
o The Security Group Name.
4. Agree to the legal terms.
5. Select Purchase.
© 2021 Pexip AS Version 25.4.a May 2021 Page 17 of 42Pexip Infinity and Microsoft Azure Deployment Guide Obtaining and preparing disk images for Azure deployments
Obtaining and preparing disk images for Azure deployments
Pexip publishes Azure-optimized disk images for the Management Node and for Conferencing Nodes. This topic includes a PowerShell
script that copies and prepares your disk images, and instructions for running the script via a Windows client.
Preparing disk images for use
Before you can use the published Pexip Infinity disk images, you must copy them into your Azure environment. This guide refers to a
disk image copied into your Azure environment as a prepared disk image. All deployment operations use prepared disk images.
The following PowerShell script copies both of the published VHDs (for a Management Node and for a Conferencing Node) to your
storage account (into a storage container called vm-images) and then creates an image from those VHDs so that they may be used to
deploy VM instances. Note that these images can be stored in your shared resource group (whereas we recommend that each VM
instance created from these images is deployed in its own resource group).
You must edit the variables in the script to provide the name of the:
l Azure subscription ($subscriptionName)
l region (location) to use ($regionName)
l resource group ($resourceGroupName)
l storage account ($storageAccountName)
l Pexip Infinity version-build number to use ($version — currently 25-4-0-59565-0-0 for v25.4 software). If you are running an older
version of Pexip Infinity software, see Version information for previous Pexip Infinity releases.
# Name of your Azure subscription
$subscriptionName = ""
# Name of the Azure region (location) to use
$regionName = ""
# Name of the resource group to use
$resourceGroupName = ""
# Name of the storage account to copy the disk images into
$storageAccountName = ""
# Name of the container within the storage account to copy the disk images into
$containerName = "vm-images"
# Version of Pexip Infinity to copy
$version = "25-4-0-59565-0-0"
# Add your Azure account to the PowerShell environment
Import-Module Az -MinimumVersion 4.7.0
Connect-AzAccount
# Set the current subscription
Get-AzSubscription -SubscriptionName $subscriptionName | Select-AzSubscription
# Obtain the access key for the storage account
$storageAccountKey = Get-AzStorageAccountKey -ResourceGroupName $resourceGroupName -Name $storageAccountName
If($storageAccountKey.GetType().Name -eq "StorageAccountKeys") {
# Az.Storage < 1.1.0
$storageAccountKey = $storageAccountKey.Key1
} Else {
# Az.Storage 1.1.0
$storageAccountKey = $storageAccountKey[0].Value
}
# Create the storage access context
$ctx = New-AzStorageContext -StorageAccountName $storageAccountName -StorageAccountKey $storageAccountKey
# Create the container
New-AzStorageContainer -Name $containerName -Context $ctx
# Start copying the Management Node image
$mgmt = Start-AzStorageBlobCopy -AbsoluteUri "https://pexipas.blob.core.windows.net/infinity/$version/management-node.vhd" -DestContainer
$containerName -DestBlob "pexip-infinity-$version-management-node.vhd" -DestContext $ctx
# Start copying the Conferencing Node image
© 2021 Pexip AS Version 25.4.a May 2021 Page 18 of 42Pexip Infinity and Microsoft Azure Deployment Guide Obtaining and preparing disk images for Azure deployments
$cnfc = Start-AzStorageBlobCopy -AbsoluteUri "https://pexipas.blob.core.windows.net/infinity/$version/conferencing-node.vhd" -DestContainer
$containerName -DestBlob "pexip-infinity-$version-conferencing-node.vhd" -DestContext $ctx
# Wait for the Management Node image to finish copying
$status = Get-AzStorageBlobCopyState -Blob $mgmt.Name -Container $containerName -Context $ctx
While($status.Status -eq "Pending") {
$status
$status = Get-AzStorageBlobCopyState -Blob $mgmt.Name -Container $containerName -Context $ctx
Start-Sleep 10
}
$status
# Wait for the Conferencing Node image to finish copying
$status = Get-AzStorageBlobCopyState -Blob $cnfc.Name -Container $containerName -Context $ctx
While($status.Status -eq "Pending") {
$status
$status = Get-AzStorageBlobCopyState -Blob $cnfc.Name -Container $containerName -Context $ctx
Start-Sleep 10
}
$status
# Create Azure images from the vhd files
$imageConfigMgmt = New-AzImageConfig -Location $regionName
$osDiskVhdUriMgmt = $mgmt.ICloudBlob.Uri.AbsoluteUri
Set-AzImageOsDisk -Image $imageConfigMgmt -OsType "Linux" -OsState "Generalized" -StorageAccountType "Premium_LRS" -BlobUri $osDiskVhdUriMgmt
$imageMgmt = New-AzImage -Image $imageConfigMgmt -ImageName "pexip-infinity-$version-management-node-image" -ResourceGroupName
$resourceGroupName
$imageConfigCnfc = New-AzImageConfig -Location $regionName
$osDiskVhdUriCnfc = $cnfc.ICloudBlob.Uri.AbsoluteUri
Set-AzImageOsDisk -Image $imageConfigCnfc -OsType "Linux" -OsState "Generalized" -StorageAccountType "Premium_LRS" -BlobUri $osDiskVhdUriCnfc
$imageCnfc = New-AzImage -Image $imageConfigCnfc -ImageName "pexip-infinity-$version-conferencing-node-image" -ResourceGroupName
$resourceGroupName
# Print out the prepared disk image resource IDs for later use
"Management Node disk image resource ID: " + $imageMgmt.Id
"Conferencing Node disk image resource ID: " + $imageCnfc.Id
Running the script via your Windows client
To run the PowerShell script from your Windows PC, you need to connect your local machine to Azure:
1. From your PC, run PowerShell ISE as Administrator by right-clicking on it and selecting Run as Administrator.
2. When in PowerShell run the following two commands:
a. Install-Module -Name Az -MinimumVersion 4.7.0 -AllowClobber -Scope AllUsers
This installs the Azure Resource Manager modules from the PowerShell Gallery.
b. Install-Module Azure
This installs the Azure Service Management module from the PowerShell Gallery.
If you get any prompts while running these commands, select Y for Yes.
See https://docs.microsoft.com/en-gb/powershell/azure/ for more information about Azure PowerShell.
3. Copy and paste the PowerShell script from above into a text editor and add in your Subscription Name, Region Name, Resource
Group Name and Storage Account name (where shown below), and then save the file as a .ps1 file.
© 2021 Pexip AS Version 25.4.a May 2021 Page 19 of 42Pexip Infinity and Microsoft Azure Deployment Guide Obtaining and preparing disk images for Azure deployments
4. Run the script:
a. Close the file, right-click on it and select Run with PowerShell.
b. You are prompted to login, so enter your Azure login credentials.
c. The script will run and copy the images over to your Azure environment. This takes approximately 10 minutes
5. You can use the Azure portal to confirm when the VHD files have been copied across and the images have been created. From the
Azure portal go to your Azure dashboard and select your Resource Group used for shared resources. You will see the Pexip
Management Node and Conferencing Node prepared disk images.
Now that you have your prepared disk images in your Azure environment, you can use them to create the VM instances in Azure in
which you can deploy the Pexip Infinity Management Node and Conferencing Nodes.
Version information for previous Pexip Infinity releases
If you are running an older version of Pexip Infinity software, and you want to deploy a new Conferencing Node, you must use a
published Pexip Infinity disk image version that corresponds to the software version running on your Management Node. This includes
dot releases — so for example, for a v21.2 Management Node you must install a v21.2 Conferencing Node rather than a v21
Conferencing Node. Similarly, if your system has been upgraded since you first installed the Management Node and some Conferencing
Nodes, you will need to obtain and prepare the appropriate Conferencing Node image corresponding to the software version you are
currently running.
To obtain the published disk images for older software versions (for both the Management Node and for a Conferencing Node) you
need to use the appropriate software version number in the PowerShell scripts supplied above.
You must replace the current version number (25-4-0-59565-0-0) with the relevant older version as given in the table below:
Pexip Infinity release Version number to use in script
v25.3 25-3-0-59550-0-0
v25.2 25-2-0-59509-0-0
v25.1 25-1-0-59484-0-0
v25 25-0-0-59437-0-0
© 2021 Pexip AS Version 25.4.a May 2021 Page 20 of 42Pexip Infinity and Microsoft Azure Deployment Guide Obtaining and preparing disk images for Azure deployments Pexip Infinity release Version number to use in script v24.3 24-3-0-55796-0-0 v24.2 24-2-0-55786-0-0 v24.1 24-1-0-55723-0-0 v24 24-0-0-55691-0-0 v23.4 23-4-0-53067-0-0 v23.3 23-3-0-53045-0-0 v23.2 23-2-0-53012-0-0 v23.1 23-1-0-52969-0-0 v23 23-0-0-52924-0-0 v22.3 22-3-0-50323-0-0 v22.2 22-2-0-50309-0-0 v22.1 22-1-0-50295-0-0 v22 22-0-0-50285-0-0 v21.2 21-2-0-48377-0-0 v21.1 21-1-0-48372-0-0 v21 21-0-0-48340-0-0 v20.1 20-1-0-45433-0-0 v20 20-0-0-45400-0-0 v19 19-0-0-43079-0-0 v18 18-0-0-42462-0-0 © 2021 Pexip AS Version 25.4.a May 2021 Page 21 of 42
Pexip Infinity and Microsoft Azure Deployment Guide                   Creating VM instances in Azure for your Pexip nodes

Creating VM instances in Azure for your Pexip nodes
To deploy a Pexip Infinity Management Node or a Conferencing Node within Azure you must create an Azure VM instance and then use
that instance to host that Pexip node.
This section describes how to create a VM instance from a prepared disk image. You must create a separate VM instance for each Pexip
node.
Note that you must deploy the Management Node in your Pexip Infinity platform (either on-premises or in Azure) before deploying any
Conferencing Nodes. You must also have prepared your Azure environment.

Creating a VM instance
You follow the same basic procedure for creating a VM instance in Azure regardless of whether you are creating the Management
Node or a Conferencing Node. The main differences are the VM Image Resource ID and VM size that you need to use.
To create the VM instance:

1. Create a new resource group to hold the instance.
    We recommend that each VM instance (i.e. the Management Node and each Conferencing Node) is deployed in its own resource
    group.
     a. Go to Resource Groups and select + Add.
    b. Select your Subscription and enter your Resource group name, such as pexmgr for the Management Node, or pexconf01,
       pexconf02 etc. for a Conferencing Node.
     c. Select your Region, and then select Review + Create.

    Resource Group for the Management Node

© 2021 Pexip AS                                               Version 25.4.a May 2021                                        Page 22 of 42
Pexip Infinity and Microsoft Azure Deployment Guide Creating VM instances in Azure for your Pexip nodes
Resource Group for a Conferencing Node
d. On the Summary page, select Create.
The equivalent example PowerShell commands are:
New-AzResourceGroup -Name pexmgr -Location
New-AzResourceGroup -Name pexconf01 -Location
2. Deploy the instance into the new resource group. This procedure describes how to do this via the Azure portal using an ARM
template provided by Pexip:
a. Decide which ARM template to use from the table below, and then use the "launch in Azure Portal" link to launch the
template (after signing in to Azure if necessary).
© 2021 Pexip AS Version 25.4.a May 2021 Page 23 of 42Pexip Infinity and Microsoft Azure Deployment Guide Creating VM instances in Azure for your Pexip nodes
b. Enter the Basics by selecting your Subscription, Resource group and Location (region).
c. Complete the Settings (these are based on the template's parameters):
Name Description
Vm Image ID The Resource ID of the Azure image (which is in the style
/subscriptions/mysubscriptionid/resourceGroups/myressourcegroup/providers/Microsoft.Compute/images/myima
ge).
This resource ID can be obtained from the Azure portal by selecting your Resource Group used for shared
resources, and then selecting either your Management Node or Conferencing Node image, and then copying the
displayed Resource ID.
Management Node image resource ID
Conferencing Node image resource ID
Dns Domain The domain name label (i.e. hostname) for the Virtual Machine.
Name Label
When deploying an instance with a public IP address, this label must be the host part only — the name must not
contain any periods.
Ip Address The statically-assigned private IP address for the Virtual Machine.
This must be within the IP range of your Virtual Network. Note that the first and last IP addresses of each subnet are
reserved for protocol conformance, along with the x.x.x.1-x.x.x.3 addresses of each subnet, which are used for
Azure services.
© 2021 Pexip AS Version 25.4.a May 2021 Page 24 of 42Pexip Infinity and Microsoft Azure Deployment Guide Creating VM instances in Azure for your Pexip nodes
Name Description
Admin For password-based authentication templates, this is the password for logging into the Virtual Machine. Note that
Credential Azure requires a strong password (such as a mix of upper case, lower case and numeric characters).
For SSH key-based templates, this is the public SSH key for logging into the Virtual Machine (e.g. ssh-rsa AAA....
user@host).
Vm Size The size of the Virtual Machine (typically F4s v2 for a Management Node or F8s v2 for a Transcoding Conferencing
Node). You can change the Size later from within the Azure portal (Virtual Machine settings), if required. See
Recommended instance types and call capacity guidelines for more information.
Azure regularly updates the instance types that can be deployed in each region. Therefore, you may receive a "The
requested size for resource is currently not available in location zones" style error when deploying
a node. See Troubleshooting instance size errors for help in resolving these errors.
Diagnostics The name of the storage account to use for boot diagnostics. This can be the same storage account that is used to
Storage hold the prepared disk images. Note that this storage account cannot use Premium storage.
Account
Name
Network The name of the Virtual Network to connect to.
Name
Network The name of the Virtual Network subnet in which to place the Virtual Machine.
Subnet
Name
Network The name of the Network Security Group to apply to the Virtual Machine.
Security
Group Name
Network The name of the Resource Group containing the Virtual Network and Network Security Group.
Resource
Group
d. Review and confirm the Terms and Conditions.
e. Select Purchase to deploy the instance.
© 2021 Pexip AS Version 25.4.a May 2021 Page 25 of 42Pexip Infinity and Microsoft Azure Deployment Guide Creating VM instances in Azure for your Pexip nodes
Management Node VM deployment
© 2021 Pexip AS Version 25.4.a May 2021 Page 26 of 42Pexip Infinity and Microsoft Azure Deployment Guide Creating VM instances in Azure for your Pexip nodes
Conferencing Node VM deployment
3. It can sometimes take several minutes for your instance to be created and start running. You can use the Azure portal to monitor
the status of your new instance.
If the instance deployment fails, review the Azure event diagnostics to help identify the problem.
4. You can now complete the deployment of the Pexip node.
© 2021 Pexip AS Version 25.4.a May 2021 Page 27 of 42Pexip Infinity and Microsoft Azure Deployment Guide Creating VM instances in Azure for your Pexip nodes
See either Deploying a Management Node in Azure or Deploying a Conferencing Node in Azure as appropriate.
To deploy a template via PowerShell commands, follow this model:
$Credential=ConvertTo-SecureString –asplaintext –force
New-AzResourceGroupDeployment -ResourceGroupName -TemplateUri -vmImageID "" -dnsDomainNameLabel pexmgr -ipAddress "" -adminCredential $Credential -vmSize -
diagnosticsStorageAccountName -networkName -networkSubnetName -networkSecurityGroupName -networkResourceGroup
For example, for a Management Node using the template for password-based authentication and a public IP address:
$Credential=ConvertTo-SecureString Abcd_2468 –asplaintext –force
New-AzResourceGroupDeployment -ResourceGroupName pexmgr -TemplateUri
https://pexipas.blob.core.windows.net/templates/20202402/virtual-machine-password-static-public-ip.json -vmImageID
"/subscriptions/1bc-etc-9yz/resourceGroups/pexip_resources/providers/Microsoft.Compute/images/pexip-infinity-22-3-0-50323-0-0-
management-node-image" -dnsDomainNameLabel pexmgr -ipAddress "10.0.0.5" -adminCredential $Credential -vmSize Standard_F4s_v2 -
diagnosticsStorageAccountName pexipastore -networkName pexip_virtual_network -networkSubnetName default -networkSecurityGroupName
PexSecGroup -networkResourceGroup pexip_resources
Azure Resource Manager (ARM) templates for deploying a VM instance
Pexip provides ARM templates which may be used to deploy a VM instance into a resource group (as described above). These
templates may be used from PowerShell or the Azure CLI. Alternatively, you can use the templates to deploy an instance via the Azure
Portal.
The templates allow you to choose whether to deploy an instance with either password-based or SSH-key based authentication, and
either with or without a public address. Every template enables boot diagnostics for the Virtual Machine instance.
When you deploy this template, Microsoft is able to identify the installation of Pexip software with the Azure resources that are
deployed. Microsoft is able to correlate the Azure resources that are used to support the software. Microsoft collects this
information to provide the best experiences with their products and to operate their business. The data is collected and governed
by Microsoft's privacy policies, which can be found at https://www.microsoft.com/trustcenter. Please contact your Pexip
authorized support representative if you do not want to share with Microsoft the telemetry of the VMs that are running Pexip
software.
Pick the template most suitable for your needs. Every template can be used to launch either a Management Node or a Conferencing
Node instance.
Name Authentication Public IP Template URL Resources
address created
virtual- Password based Yes (static) https://pexipas.blob.core.windows.net/templates/20202402/virtual- l Public IP
machine- machine-password-static-public-ip.json address
password- l Network
(launch in Azure Portal)
static- interface
public-ip
l Virtual
Machine
virtual- Password based No https://pexipas.blob.core.windows.net/templates/20202402/virtual- l Network
machine- machine-password-no-public-ip.json interface
password- l Virtual
(launch in Azure Portal)
no-public-ip Machine
virtual- SSH key based Yes (static) https://pexipas.blob.core.windows.net/templates/20202402/virtual- l Public IP
machine- machine-sshkey-static-public-ip.json address
sshkey- l Network
(launch in Azure Portal)
static- interface
public-ip
l Virtual
Machine
virtual- SSH key based No https://pexipas.blob.core.windows.net/templates/20202402/virtual- l Network
machine- machine-sshkey-no-public-ip.json interface
sshkey-no- l Virtual
(launch in Azure Portal)
public-ip Machine
© 2021 Pexip AS Version 25.4.a May 2021 Page 28 of 42Pexip Infinity and Microsoft Azure Deployment Guide Creating VM instances in Azure for your Pexip nodes
Previously, the ARM templates and guidelines provided by Pexip for deploying VM instances used unmanaged disks in a storage
account with standard performance. The current ARM templates use managed disks. VMs deployed with a mix of managed and
unmanaged disks can co-exist in your Pexip Infinity deployment, however you may want to convert any previously deployed VMs to
use managed disks with premium performance. For more information see Converting VM instances to managed disks and to premium
performance.
Troubleshooting instance size errors
Azure regularly updates the instance types that can be deployed in each region. Therefore, you may receive a "The requested size for
resource is currently not available in location zones" style error when deploying a node.
To resolve these types of errors you can edit the Pexip ARM template to add in a supported instance type for that region:
1. Obtain a list of available compute resources for your region:
a. Run a PowerShell command in the format Get-AzComputeResourceSku | where {$_.Locations -icontains ""}
For example: Get-AzComputeResourceSku | where {$_.Locations -icontains "uksouth"}
This will output a list of resources, including VirtualMachines, for example:
b. Identify a resource name that is not tagged as "NotAvailableForSubscription" in your region.
2. Edit the Pexip ARM template and add in the resource that you have identified above:
a. Start to deploy the instance, using the "launch in Azure Portal" link to launch the template as usual.
b. Select Edit template.
c. In the vmSize section, add in the name of resource that you have identified above.
Ensure that you maintain the correct style and structure of the list:
© 2021 Pexip AS Version 25.4.a May 2021 Page 29 of 42Pexip Infinity and Microsoft Azure Deployment Guide Creating VM instances in Azure for your Pexip nodes
d. Select Save.
You can now continue to deploy your node.
3. Complete the Settings as described above, but for Vm Size select the name of the resource you added to the template.
You can change the Size later from within the Azure portal (Virtual Machine settings), if required.
© 2021 Pexip AS Version 25.4.a May 2021 Page 30 of 42Pexip Infinity and Microsoft Azure Deployment Guide Deploying a Management Node in Azure
Deploying a Management Node in Azure
As with all Pexip Infinity deployments, you must first deploy the Management Node before deploying any Conferencing Nodes. In a
hybrid cloud deployment the Management Node may be deployed in the corporate network or in Azure. This section describes how to
deploy the Management Node in Azure.
To deploy a Management Node in Azure:
1. Create a VM instance using the prepared Management Node disk image. For more information on this, see:
o Obtaining and preparing disk images for Azure deployments
o Creating VM instances in Azure for your Pexip nodes
2. If you are using SSH key-based authentication (instead of password-based authentication), after the Management Node instance
has booted, you must SSH into the instance to set the operating system password:
a. Use an SSH client to access the Management Node by its private IP address, supplying your private key file as appropriate.
If you cannot access the Management Node, check that you have allowed the appropriate source addresses in your Network
Security Group inbound security rules for management traffic.
b. Follow the login process in the SSH session:
i. At the login prompt, enter the username admin.
ii. Supply the key passphrase, if requested.
iii. At the "Enter new UNIX password:" prompt, enter your desired password, and then when prompted, enter the password
again.
This will then log you out and terminate your SSH session.
3. Complete the Pexip Infinity installation wizard:
a. Connect to the Management Node:
n If using key-based authentication: reconnect over SSH into the Management Node instance by its private IP address.
n If using password-based authentication: you can connect via the Azure portal's serial console — go to Virtual Machines,
select your Management Node VM instance, and then select Serial console.
b. Log in as admin, and — if you are using password-based authentication — enter the password you supplied when using the
ARM template.
You are presented with another login prompt:
[sudo] password for admin:
© 2021 Pexip AS Version 25.4.a May 2021 Page 31 of 42Pexip Infinity and Microsoft Azure Deployment Guide Deploying a Management Node in Azure
c. Enter the operating system administrator password (for SSH key-based authentication this is the password you just created in
the previous step; for password-based authentication you must enter again the password you supplied when using the ARM
template).
The Pexip installation wizard will begin after a short delay.
d. Complete the installation wizard to apply basic configuration to the Management Node:
i. Accept the defaults for the IP address, Network mask and Gateway settings.
ii. Enter your required Hostname and Domain suffix for the Management Node.
iii. Configure one or more DNS servers and NTP servers. You must override the default values if it is a private deployment.
iv. Set the Web administration username and password.
v. Select whether to Enable incident reporting and whether to Send deployment and usage statistics to Pexip.
The DNS and NTP servers at the default addresses are only accessible if your instance has a public IP address.
The installation wizard will fail if the NTP server address cannot be resolved and reached.
After successfully completing the wizard, the SSH connection will be lost as the Management Node reboots.
4. After a few minutes you will be able to use the Pexip Infinity Administrator interface to access and configure the Management
Node (remember to use https to connect to the node if you have only configured https access rules in your security group). You
can configure your Pexip Infinity platform licenses, VMRs, aliases, locations etc. as described in Initial platform configuration —
Azure before you go on to add Conferencing Nodes.
© 2021 Pexip AS Version 25.4.a May 2021 Page 32 of 42Pexip Infinity and Microsoft Azure Deployment Guide Initial platform configuration — Azure
Initial platform configuration — Azure
After you have run the installation wizard, you must perform some preliminary configuration of the Pexip Infinity platform before you
can deploy a Conferencing Node.
This section lists the configuration required, and provides a summary of each step with a link to further information.
All configuration should be done using the Pexip Infinity Administrator interface.
No changes should be made to any Pexip VM via the terminal interface (other than as described when running the initial Pexip
installation wizard) unless directed to do so by Pexip support. This includes (but is not limited to) changes to the time zone,
changes to IP tables, configuration of Ethernet interfaces, or the installation of any third-party code/applications.
Accessing the Pexip Infinity Administrator interface
The Pexip Infinity Administrator interface is hosted on the Management Node. To access this:
1. Open a web browser and type in the IP address or DNS name that you assigned to the Management Node using the installation
wizard (you may need to wait a minute or so after installation is complete before you can access the Administrator interface).
2. Until you have uploaded appropriate TLS certificates to the Management Node, your browser may present you with a warning that
the website's security certificate is not trusted. You should proceed, but upload appropriate TLS certificates to the Management
Node (and Conferencing Nodes, when they have been created) as soon as possible.
The Pexip Infinity Conferencing Platform login page will appear.
3. Log in using the web administration username and password you set using the installation wizard.
You are now ready to begin configuring the Pexip Infinity platform and deploying Conferencing Nodes.
As a first step, we strongly recommend that you configure at least 2 additional NTP servers or NTP server pools to ensure that log
entries from all nodes are properly synchronized.
It may take some time for any configuration changes to take effect across the Conferencing Nodes. In typical deployments,
configuration replication is performed approximately once per minute. However, in very large deployments (more than 60
Conferencing Nodes), configuration replication intervals are extended, and it may take longer for configuration changes to be applied
to all Conferencing Nodes (the administrator log shows when each node has been updated).
Brief details of how to perform the initial configuration are given below. For complete information on how to configure your Pexip
Infinity solution, see the Pexip Infinity technical documentation website at docs.pexip.com.
Configuring the Pexip Infinity platform
This table lists the Pexip Infinity platform configuration steps that are required before you can deploy Conferencing Nodes and make
calls.
Configuration Purpose
step
1. Enable DNS Pexip Infinity uses DNS to resolve the hostnames of external system components including NTP servers, syslog servers,
SNMP servers and web proxies. It is also used for call routing purposes — SIP proxies, gatekeepers, external call control
(System > DNS
and conferencing systems and so on. The address of at least one DNS server must be added to your system.
Servers)
You will already have configured at least one DNS server when running the install wizard, but you can now change it or
add more DNS servers.
© 2021 Pexip AS Version 25.4.a May 2021 Page 33 of 42Pexip Infinity and Microsoft Azure Deployment Guide Initial platform configuration — Azure
Configuration Purpose
step
2. Enable NTP Pexip Infinity uses NTP servers to obtain accurate system time. This is necessary to ensure correct operation, including
configuration replication and log timestamps.
(System > NTP
Servers) We strongly recommend that you configure at least three distinct NTP servers or NTP server pools on all your host servers
and the Management Node itself. This ensures that log entries from all nodes are properly synchronized.
You will already have configured at least one NTP server when running the install wizard, but you can now change it or
add more NTP servers.
3. Add licenses You must install a system license with sufficient concurrent call capacity for your environment before you can place calls
to Pexip Infinity services.
(Platform >
Licenses)
4. Add a These are labels that allow you to group together Conferencing Nodes that are in the same datacenter. You must have at
system location least one location configured before you can deploy a Conferencing Node.
(Platform >
Locations)
5. Upload TLS You must install TLS certificates on the Management Node and — when you deploy them — each Conferencing Node. TLS
certificates certificates are used by these systems to verify their identity to clients connecting to them.
(Platform > TLS All nodes are deployed with self-signed certificates, but we strongly recommend they are replaced with ones signed by
Certificates) either an external CA or a trusted internal CA.
6. Add Virtual Conferences take place in Virtual Meeting Rooms and Virtual Auditoriums. VMR configuration includes any PINs required
Meeting Rooms to access the conference. You must deploy at least one Conferencing Node before you can call into a conference.
(Services >
Virtual Meeting
RoomS)
7. Add an alias A Virtual Meeting Room or Virtual Auditorium can have more than one alias. Conference participants can access a Virtual
for the Virtual Meeting Room or Virtual Auditorium by dialing any one of its aliases.
Meeting Room
(done while
adding the
Virtual Meeting
Room)
Next step
You are now ready to deploy a Conferencing Node — see Deploying a Conferencing Node in Azure for more information.
© 2021 Pexip AS Version 25.4.a May 2021 Page 34 of 42You can also read