PHARMCAS CONFIGURATION PORTAL - 2020-2021 PHARMCAS HELP GUIDE - AACP
←
→
Page content transcription
If your browser does not render page correctly, please read the page content below
PharmCAS Configuration Portal
2020-2021 PharmCAS Help Guide

© 2017 Liaison International. All Rights Reserved.

                                                     1|Page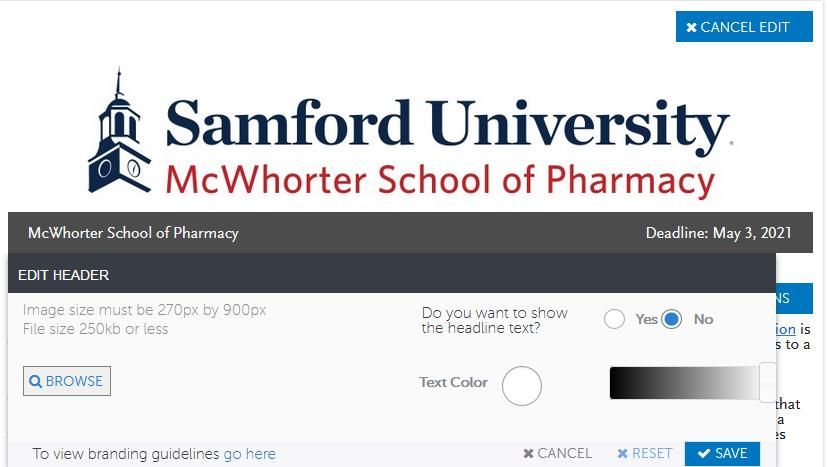
Table of Contents
Introduction ............................................................................................................................... 3
  What is the CAS Configuration Portal? .............................................................................................3
Before you Get Started ............................................................................................................... 4
  Review the PharmCAS Application...................................................................................................4
  Be Aware of Cycle Rollovers ............................................................................................................4
  Save Often ......................................................................................................................................4

Configuring your Programs ......................................................................................................... 5
  Access your Programs .....................................................................................................................5
     Add a New Program .............................................................................................................................. 6
     Copy an Existing Program ..................................................................................................................... 6
     Edit Program Data................................................................................................................................. 6
  Brand your Program Materials Page ................................................................................................8
     Select a Branding Image ....................................................................................................................... 8
     Upload your Branding Image (Recommended) .................................................................................... 9
     Create Introductory and Instructional Text (Required) ........................................................................ 9
     Set Up your Program Home Page Introduction (Required) ................................................................ 10
  Customizing your Program ............................................................................................................ 12
  Configure Questions (Optional) ..................................................................................................... 13
     Add Question Sets .............................................................................................................................. 14
     Add Questions..................................................................................................................................... 15
  Configure Prerequisites (Optional) ................................................................................................ 16
  Configure Documents (Optional) ................................................................................................... 17
  Preview your Programs ................................................................................................................. 18
  Submit Program for CAS Approval ................................................................................................. 20
     Monitor your Program Status ............................................................................................................. 20

                                                                                                                                                     2|Page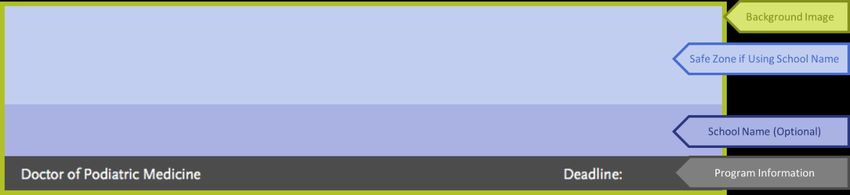
Introduction

What is the CAS Configuration Portal?
The CAS Configuration Portal is where you’ll configure your program’s requirements, settings, and
branding for the PharmCAS application.

The application is divided into four sections:

    1.   Personal Information
    2.   Academic History
    3.   Supporting Information
    4.   Program Materials

The first three sections contain the data elements and questions that are common across all
participating programs, such as biographic information, standardized test scores, evaluations, etc. Using
the CAS Configuration Portal, you can configure the fourth section to provide information about your
program and school, as well as collect additional information from applicants.

Information you collect in the Program Materials section is then available in the Applicant’s Profile in
WebAdMIT and can be included in Lists, Reports, and Exports. This information is only available to your
program.

Please review this guide carefully before configuring your programs. For a detailed step-by step
walkthrough of the process, refer to the following training resources:

WebAdMIT Configuration Portal On-Demand Course

WebAdMIT Help Center for Configuration Portal Training

                                                                                                            3
Before you Get Started
Review the PharmCAS Application
Before you configure your programs, it’s important to review the sections of the application that are
common across all programs. This will help you determine which questions are already included in the
application by default and what program-specific questions you may need to add.
In late May 2020, to review the application sections, navigate to:
https://pharmcas2021playground.prelaunch.liaisoncas.com and create a test account (i.e. an account with
“test” in your name).
Be Aware of Cycle Rollovers
All program materials pages from the current cycle will be automatically rolled over to the new cycle and
available for editing. You can jump to the Edit Program Data section for information on editing the
rolled-over pages; however, we recommend reviewing the entire guide to help you determine what
edits to make.
Save Often
Save your information at least every fifteen minutes to prevent the system from timing out on you.
4Configuring your Programs
Access your Programs
1. Log into Prelaunch WebAdMIT with your username and password.
All primary school users must log into the Prelaunch WebAdMIT environment for configuration
changes and updates: https://prelaunch.webadmit.org.
2. Click CAS Configuration Portal under Management in the left menu.
3. The Configuration Portal launches in a new window. Select PharmCAS on the left.
4. Select the current application cycle.
5. Select your organization or school.
5Add a New Program
To create a new program, follow the steps below. Note:
All program materials pages from a
1. Click + Program at the bottom of the page.
current cycle will be automatically
2. Click + Add.
rolled over to a new cycle and
3. Enter the program data and click Save. available to edit. There is no need to
Helpful Tip: Use the WebAdMIT Name field to create a create new program pages; you may
nickname for your program that is only visible within simply edit the page that has been
WebAdMIT. This is useful if you have many programs with rolled over. See the Edit Program Data
similar names. section below for more information.
Copy an Existing Program
Copying existing programs can save you time, particularly if an existing program has the same or similar data to
the program you want to create.
1. Click + Program at the bottom of the Home page.
2. Click Copy.
3. Select the program you want to copy.
4. To copy all the program configurations into your new program (branding, custom questions, documents,
etc.), click the Copy All Program Settings checkbox. If you only want to copy the program data (name,
deadline date, graduate track, etc.), leave this unselected.
5. Click Copy.
Your new program is created with the same name as the original and “-copy-1” is appended. Be sure to edit the
new program to update the name, data, etc.
Edit Program Data
It’s important to review a program’s data for accuracy. To edit a program, hover your mouse over it and
click Details. Then, click Edit at the bottom of the Program Settings section.
67
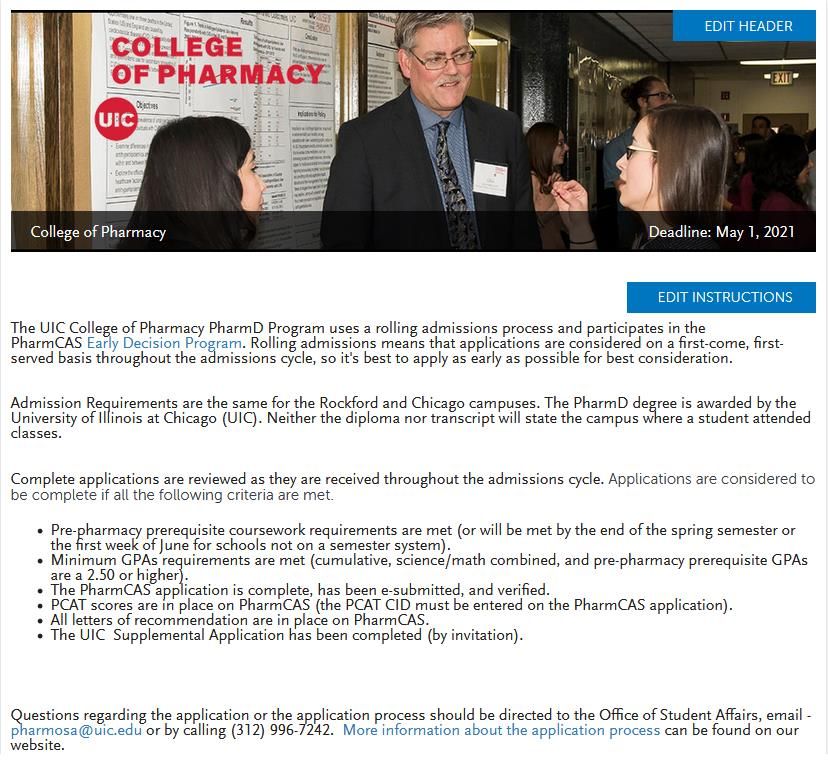
Brand your Program Materials Page
The home page is the first page applicants see when they view your program in the Program Materials
section. From here, applicants can jump to the other parts of the Program Materials section you
enabled, like Questions, Prerequisites, and Documents.

Select a Branding Image
Your branding image appears on the top of your home page. We recommend using an image that is
consistent with your program or school’s branding. This is the only section where applicants will see
your specific program’s branding, so make it count!

Branding image guidelines:

    ✓ Images must be in .jpeg, .tiff, or .png format and no larger than 250kb.
    ✓ File names cannot contain spaces or special characters.
    ✓ Your overall image size should be 900 px by 270 px, but consider the following:
           o A banner with your program information will cover a bottom portion of your image.
           o You can choose to display your school’s name in the headline text if it is not already part
              of your image.

Once you have at least one program, you can configure your branding.

                                                                                                           8
Upload your Branding Image (Recommended)
1. Click the Palette icon.
2. Click Edit Header.
3. Click Browse and select your image. To review the branding guidelines, click the link at the
bottom of the page.
4. Select whether you want to show your program’s name in the headline text. If this is already
part of your image, select No.
5. If you choose to show headline text, select a contrasting text color below.
6. Click Save.
Create Introductory and Instructional Text (Required)
The text you include on the home page will be an applicant’s first look at your program and school-
specific information in the application. You should include an introduction, instructions on how to be a
successful applicant, and important details about your program and school.
You can also include information on your specific requirements. Some examples include:
• Previously-earned degrees
• GPA
• Test scores, such as PCAT
• Needed experience
• State restrictions
• Deadline requirements
9• Supplemental applications or fees, if applicable
• Any optional information from the Supporting Information section that applicants should
complete to apply to your program
You can include a link to your program’s page within your school’s website, but make sure that all
pertinent information included on your website is also included in the home page text. This makes it
easier for applicants to find the information they need in one place.
The home page is a required section in both the Configuration Portal and the PharmCAS application.
Applicants will view your program home page before submitting their application, even if you disable
the optional sections.
Set Up your Program Home Page Introduction (Required)
1. Click the Palette icon to open the Branding section.
2. Click Edit Instructions.
3. Use the HTML editor to create your content.
4. Click Save.
Content formatting tips:
✓ There is no limit to the length of text, but 1,500 characters or less is recommended for the best
visual display.
✓ Use the bold, italic, and underline options to format your text, as needed.
✓ Use the bulleted list, numbered list, and indent options to structure your text.
✓ Use the link icon to add links to websites or email addresses. Links open in a new browser
window.
10Example of branded homepage:
11Customizing your Program
Under the EDITOR link, you can customize your program with Custom Questions, Prerequisites, and Document
pages. From the Program details page, click the Program Settings icon to configure these pages.
On the Program Editor pages, click the checkboxes next to each page you want to use. Then, click each
link to customize pages.
12Configure Questions (Optional)
In this section, you can add custom questions that are not included in the common sections of the
application or that are specific to your school or program. These questions can be either required or
optional for applicants.
New features for the 2020-2021 Cycle:
1. Multiple Choice Questions Configured with One Answer Option: This feature allows users to
configure multiple choice questions with only one response option. PharmCAS users have an
opportunity to learn about this feature during the Configuration Portal webinar. Learn more
here.
2. New Question Rules Link: This feature includes a link to 'Rules Builder' in the configuration portal
which will allow users to show or hide items in the Program Materials (Quadrant 4) section of
the PharmCAS application based on specific conditions defined by the school user (e.g.,
conditional questions). Learn more here.
3. Reapplicant Questions Added as Program Questions: For each program in PharmCAS, the
following two questions will be preloaded in the custom questions section of the Configuration
Portal:
• Question Block: Previous Applications to this Program
o Question 1: Have you previously applied to this PharmD program? (Yes/No,
Required)
o Question 2: If you are reapplying to this program, how have you strengthened
your application? (Essay, 500 characters, Conditionally Required if Question 1 is
"Yes")
Note: Programs that wish to opt-out of these questions must remove them from their custom
questions before submitting configurations to the AACP for review.
13For consideration:
• Staff recommends that schools ask no more than 3-5 custom questions.
• Consider eliminating any custom questions that are not essential to your local admissions review
process or predicative of success in the PharmD program.
• If the school's custom questions include an essay, consider reducing the character limit.
Common question examples include:
• “Which of our two campuses are you interested in?”
• “Why are you interested in this program?”
You can also use these questions as reminders to ensure applicants fulfill your requirements. For
example:
• “We require four letters of references, have you completed the Evaluations section of your
application?”
Before adding your custom questions, review your application to determine what questions you need to
add. We also recommend reviewing any supplemental applications your school or program may use as
these custom questions may eliminate the need for supplemental applications.
Add Question Sets
Question Sets can be used to group questions together in a specific category (e.g. “Research Interests,”
“Graduate Assistantship Questions,” etc.). You must create at least one Question Set to use the custom
question functionality.
1. Click the Program Settings icon.
2. Click the Questions checkbox on the left.
3. Add instructions about the questions in the Applicant Instructions field. This text will appear at
the top of the page.
4. Click + Add Question Set.
5. Add header text. This appears as a title above your question(s) (e.g. “Research Interests,”
“Graduate Assistantship Questions,” etc.) and can be used to summarize the questions you are
asking or provide other relevant details.
6. Add an optional description.
7. Click + Add.
14Add Questions
Once you create a Question Set, you can add questions to it. There are several question types you can
choose from, depending on the format in which you expect applicants to answer each question:
• Multiple Choice: Questions can be single or multiple answer.
o Single answer questions can appear with radio buttons or drop-down menus for
applicants to select. Applicants can choose only one response.
o Multiple answer questions appear with checkboxes for applicants to select. Applicants
can choose one or more responses.
• Essay: Questions appear with a text box where applicants can type their response. You can set
the maximum number of characters that applicants can enter. If you want the question to
appear as a short, one-line answer, set the character limit to 50 characters. If you want
applicants to enter a longer answer, set the character limit to 250 characters or more. The
maximum number of characters allowed is 9,999.
• Either/Or: Questions appear with radio buttons where applicants can choose from two
responses.
• Section Text Box: A block of instructional text that you can insert to provide applicants with
additional information. This is not an actual question so applicants will not be able to enter any
responses. We recommend only using this option if you have a very specific use case.
• Date: Questions appear with a text box where applicants must enter their response in date
format via a calendar picker.
• Numeric: Questions appear with a text box where applicants must enter a number. You can set
the maximum number of characters (not including any decimal points, if applicable) that
applicants can use.
1. Click + Add Question.
2. Select whether the question is required or not.
3. Enter a Question Description. Only the first 250 characters of the question are displayed.
4. Select a Question Type from the drop-down.
5. Configure additional options, depending on the Question Type selected.
6. Click Add.
7. Add more questions and question sets as needed and click Save.
15Configure Prerequisites (Optional)
In this section, you can list the prerequisite courses, credits, and grades required for entry to your
program. Applicants will then self-identify which courses they feel meet your prerequisite coursework
requirements.
Prerequisite course collection is optional for each program. The prerequisite matching section is
completely configurable to each pharmacy school. If a school believes it is a barrier to applicants, it may
want to reduce the number of courses included for an applicant to match (recommended 10 or less) or
turn-off the section entirely.
You can add instructions that help guide applicants through selecting their prerequisites. You can also
add descriptions for each prerequisite, explaining how you expect applicants to match the prerequisite.
This field can contain a maximum of 250 characters, so you may need to shorten descriptions if cutting
and pasting from another resource.
You should identify prerequisites by subject types, not university course numbers (i.e. “Introductory
Biology” instead of “BIOL 101”) as students from different institutions may not be familiar with your
course numbering system.
1. Click the Program Settings icon.
2. Click the Prerequisites checkbox on the left.
3. Enter any custom instructions you want to provide in the Applicant Instructions HTML editor.
4. Click + Prerequisite.
5. Enter the following details for each course.
• Title: Enter a descriptive title (e.g. “Chemistry Lab” – not CHEM 101L).
• Description: Enter a description that is 250 characters or less (e.g. “Chemistry Lab courses
much be for science majors and taken within the last 5 years to fulfill our requirements.”).
• Minimum Grade: Enter a number from 0-4, including 2 digits after the decimal point (e.g.
2.50).
• Minimum Credits: Enter a number from 0-4 without decimals (e.g. 3).
6. Click + Prerequisites to continue adding courses as needed.
7. Click Save.
New feature for the 2020-2021 Cycle:
1. Reorder Prerequisites: This feature allows users to drag and drop to reorder course prerequisites,
as needed, during configuration. Learn more here.
16Configure Documents (Optional)
In this section, you can ask applicants to upload supplemental documentation, such as:
• Test Score Report
• Publication
• Shadowing/Healthcare Experience Documentation
If you choose to require this, be sure to provide specific instructions.
1. Click the Program Settings icon.
2. Click the Documents checkbox on the left.
3. In the Applicant Instructions field, add text that prompts applicants to upload the document
type, along with relevant instructions.
4. Use the Request toggle next to the document type in the Program Documents section to define
whether the document is requested. This setting must be enabled (indicated by a green
checkmark) for applicants to see it listed on the Documents page.
5. Use the Require toggle to define whether the document is required. If this setting is enabled
(indicated by a green checkmark), applicants cannot submit to your program unless they upload
the document. If you want this question to be optional, leave the setting disabled (indicated by
a gray x).
6. Specify the maximum number of documents that applicants can upload. If you set the document
to required, this will be the number of documents applicants must upload to apply to your
program. If the document is not required, this will be the number of documents applicants have
the option of uploading but can still apply without doing so. You cannot collect more than 5
documents for an individual document type regardless of whether it is required or optional.
7. Click Save.
17Preview your Programs
Once you’re done configuring your home page, branding, and additional sections, you can preview how
your program materials page will appear to applicants in the application.
1. Click the Home icon.
2. Scroll down to the Program Settings section and confirm that the sections you want to include
are enabled. Sections that are not enabled will not be visible in the application.
3. Click the eye icon to preview each section.
4. Carefully review each page to confirm that the formatting and requirements are correct and
make any necessary edits before submitting your program for approval. If you need to make any
changes, click Edit at the bottom of the page. Note that when previewing, you can only view
how the page looks for applicants; you cannot interact with any of the elements (i.e. drop-down
menus, text fields, etc.).
18Examples of the Questions, Prerequisites, and Documents views for applicants:
19Submit Program for CAS Approval
Once you configured and reviewed your program materials pages, you must submit your program to
PharmCAS for review and approval. Your program will not be live in the application until it receives
approval. If errors are found, your program will be sent back to you for edits.
1. Click the home icon.
2. Scroll down to the Program Settings section and click Submit for Review.
Once your program is approved, you can only edit the home page, and branding. You cannot edit any
other sections of the program, such as Questions, Documents, or Prerequisites.
Monitor your Program Status
Your program can be in different statuses:
• Draft means that this is a new program that you can fully edit. It has not been sent to the
PharmCAS administrator for approval and is not available to applicants (even if the open date
has passed).
• Ready for Review means that you submitted the program for review and approval by the
PharmCAS administrator. It is currently locked, and you cannot make changes.
• Approved means that the program was submitted to the PharmCAS administrator and was
approved. Active programs are either live in the application or will become live on the program
start date. If the program has not yet opened, applicants can view it as a future program on the
Program Selection page in the application. Only the program deadline date, home page, and
branding can be edited in this status.
• Closed means that the program was live on the application but is no longer available to
applicants because the deadline date has passed. The program deadline date, home page, and
branding cannot be edited by admissions users.
20Checklist: CAS Configuration
Review the Application
Review the current application to get a sense of the questions that are already included and
what you may want to add.
Start to pull together any details about your program and school that you want to share
with applicants in the application.
Beware of Cycle Rollovers
Keep in mind that all pages from the current cycle will be rolled over to the new cycle.
Brand your Program Materials Page
Work with your Marketing or PR department to choose a branding image that meets the
size and format specifications.
Pull together your program’s introductory text and instructions, as well as any requirements
information, including supplemental items/fees if you use a two-part application process.
Configure Questions (Optional)
Review current school and supplemental applications to help you determine which
questions you need to ask.
Configure Prerequisites (Optional)
Pull together information on prerequisites, including any instructions.
Configure Documents (Optional)
Ensure you have specific instructions for any documents you are requesting.
Preview and Submit your Program
Monitor your program’s status.
21You can also read