Precinct Central Touchpad - Poll Worker Training Guide Early Voting State of New Jersey - Salem County Board of Elections
←
→
Page content transcription
If your browser does not render page correctly, please read the page content below

Precinct Central Touchpad
Poll Worker Training Guide
Early Voting

State of New Jersey
Precinct Central Touchpad | Poll Worker Training Guide

Assembly                                                                                                                                  3
The Launchpad                                                                                                                             8
The Launchpad Menu                                                                                                                        9
Searching for a Voter (Manual Voter Search)                                                                                              10
Searching for a Voter (Scan Voter ID or Barcode)                                                                                         12
Checking-In a Voter                                                                                                                      13
Help Guides & Phone Numbers                                                                                                              21
Check-In Totals                                                                                                                          22
Check-In Logs                                                                                                                            23
Closing the Election                                                                                                                     24

                                                                                                                         Page 2 of 22
      Copyright© by Tenex Software Solutions, Inc. Reproduction or distribution is prohibited without written consent.   Rev: 07.28.21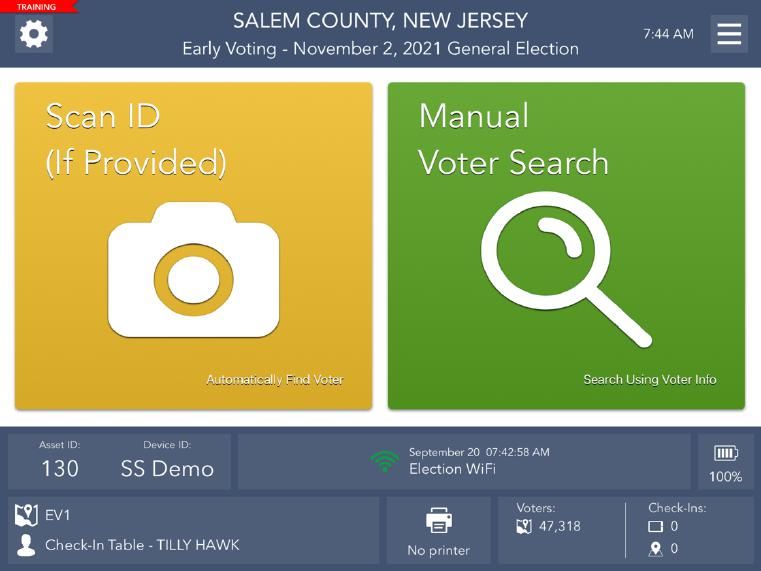
Precinct Central Touchpad | Poll Worker Training Guide

Assembly
Follow the steps below to setup the Touchpad Check-In Stations prior to the opening of
the polls.

       1. Set the carrying case containing
          the Touchpad units on the check-
          in table.

       2. Open the case by unlatching the
          two locks at the top of the case.

       3. Once opened, you will see a
          Touchpad, an ExpressVote printer
          with an attached print server, and
          their associated charging cords and
          accessories.

       4. Remove the Touchpad,
          ExpressVote printer, and print
          server with cords from the case
          and place them on the table along
          with the charging cords and
          accessories.

       5.       Remove and power on the
                Nighthawk and plug in to the
                power source. (Nighthawk model
                will vary).

                                                                                                                         Page 3 of 22
      Copyright© by Tenex Software Solutions, Inc. Reproduction or distribution is prohibited without written consent.   Rev: 07.28.21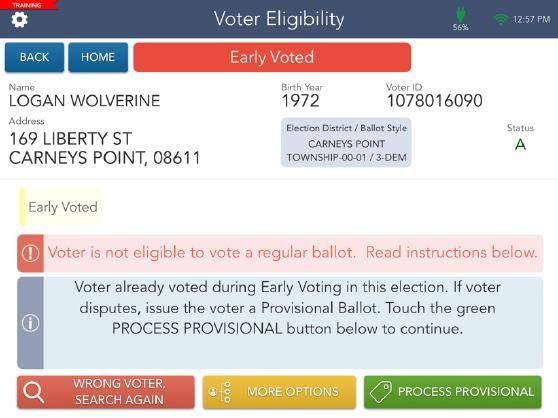
Precinct Central Touchpad | Poll Worker Training Guide

      6.       Open your Touchpad by inserting
               your finger under the tab
               opposite the hinge. Open the case
               as if opening a book, break the
               binding and flip open. Set the
               Touchpad on the table.

      7.       Locate your charging cord. Insert
               the compatible end of the white
               charger into the charging port of
               the Touchpad.

      8.       Plug the brick into a power outlet.
               The Touchpad will now turn on
               automatically.

      9. Plug in the ExpressVote printer
         and Print Server. Verify that both
         are powered on – you should see a
         steady red light when the print
         server is powered on.

      10. To set up the Epson thermal
          printer, start by connecting the
          charging block to its power cord.

                                                                                                                        Page 4 of 22
     Copyright© by Tenex Software Solutions, Inc. Reproduction or distribution is prohibited without written consent.   Rev: 07.28.21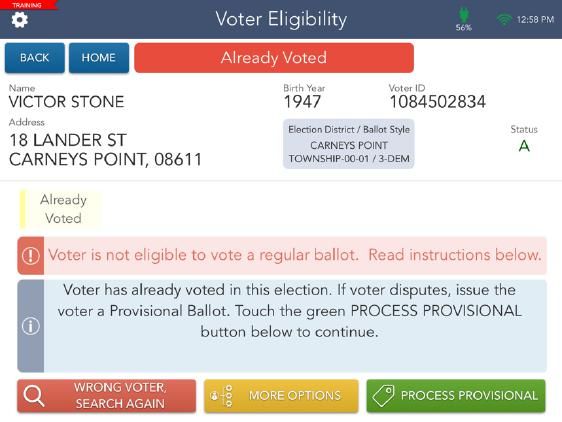
Precinct Central Touchpad | Poll Worker Training Guide

      11. Plug the power cord into an outlet.

      12. Push the power button at the top
          of the printer to turn it on.

      13. All hardware is now set up and ready to start.

                                                                                                                        Page 5 of 22
     Copyright© by Tenex Software Solutions, Inc. Reproduction or distribution is prohibited without written consent.   Rev: 07.28.21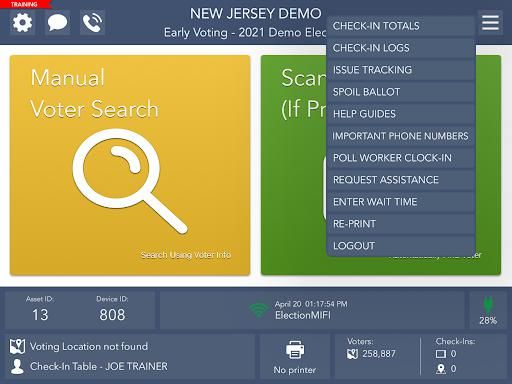
Precinct Central Touchpad | Poll Worker Training Guide

Logging into the Touchpad

      1. Perform a test print each morning to ensure
         your ExpressVote printers are paired
         correctly.

            Start by opening your Troubleshooting menu
            and navigating to the Expressvote printer
            section.

            Load your ExpressVote printer with ballot
            stock and tap on Test Printer.

            Once the ballot has printed, continue with
            login.

      2. The EPB application will automatically
         launch. Prior to logging in, verify that, if using
         a printer, the printer icon is green. Further,
         verify the charging icon is green. Most
         importantly, verify that there is a green
         connectivity icon in the Connectivity and
         Sideways Status bar, not a red broken heart.
         Once finished, touch the green START
         button to begin logging in.

      3. Enter your full first and last name using the
         pop-up keyboard and touch CONTINUE.

      4. Enter the password given then touch
         UNLOCK DEVICE.

                                                                                                                        Page 6 of 22
     Copyright© by Tenex Software Solutions, Inc. Reproduction or distribution is prohibited without written consent.   Rev: 07.28.21
Precinct Central Touchpad | Poll Worker Training Guide

      5. If printers are being used for this election in
         your county, a Poll Opening Report will print.
         Touch CONTINUE to complete the login
         process.

      6. The Zero Report will print. Touch
         CONTINUE to get to the Launchpad.

                                                                                                                        Page 7 of 22
     Copyright© by Tenex Software Solutions, Inc. Reproduction or distribution is prohibited without written consent.   Rev: 07.28.21
Precinct Central Touchpad | Poll Worker Training Guide

The Launchpad
This is your home screen. After every check-in you should arrive back at this screen.

At the top of the screen you will see:                                            At the bottom of the screen you will see:

    Troubleshooting Menu                                                                Voting Location, Job Title, and
    Jurisdiction Name                                                               Username
    Launchpad Menu                                                                           Connectivity and sideways status
                                                                                             Battery status

                                             Yellow and Green Search Buttons

    To search for a voter by scanning their ID, touch DRIVER’S LICENSE SCAN
    To search for a voter manually, touch MANUAL VOTER SEARCH

                                                                                                                          Page 8 of 22
       Copyright© by Tenex Software Solutions, Inc. Reproduction or distribution is prohibited without written consent.   Rev: 07.28.21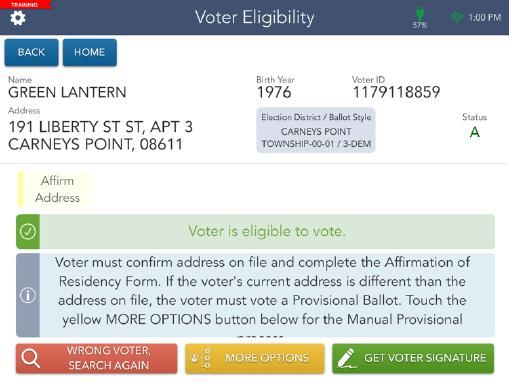
Precinct Central Touchpad | Poll Worker Training Guide
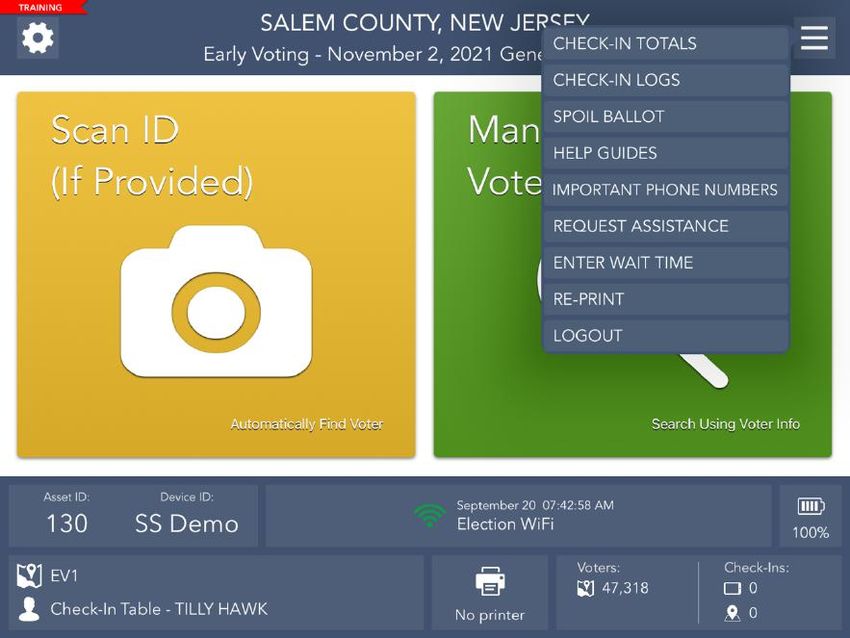
The Launchpad Menu
The Launchpad Menu provides menu options to access additional system functions.
● Check-in Logs – Use this feature to view a running log of all check-ins.
● Check-in Totals – View running totals of different ballot styles issued throughout
the day.
● Spoil Ballot – Use this feature to spoil and / or reissue a ballot to a voter
● Help Guides – View Informational guides and videos on Election Day.
● Important Phone Numbers – Gives access to a directory of phone numbers for
election officers and voting equipment assistance.
● Enter Wait Time – Upload current wait times back to the Elections Office
● Request Assistance – Allows poll workers to notify the Elections Office of any
incidents or concerns at a polling location
● Logout – Use this feature to temporarily logout for a break or to close the
election at the end of the day.
Page 9 of 28
Copyright© by Tenex Software Solutions, Inc. Reproduction or distribution is prohibited without written consent. Rev: 09.23.21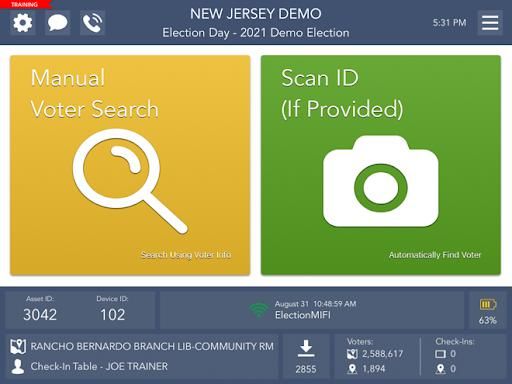
Precinct Central Touchpad | Poll Worker Training Guide

Searching for a Voter
Manual Voter Search

   1. To search for a voter using a valid
      ID type, touch the yellow Manual
      Voter Search button on the
      Launchpad screen.

   2. Using information provided by the
      voter, use one of the five available
      search options to search for the
      voter’s record. Enter the voter’s
      information into the search fields
      chosen by using the on-screen
      keyboard and touch the green
      SEARCH button to continue.

   3. If only one voter matches the
      search criteria, the Voter
      Identification screen will appear
      automatically. Continue checking in
      your voter.

       If more than one voter matches the
       search criteria, your screen will
       look like the one on the left with a
       list of all possible matches. Touch
       the correct voter from the list and
       then touch the green CONTINUE
       button.

                                                                                                                        Page 10 of 28
     Copyright© by Tenex Software Solutions, Inc. Reproduction or distribution is prohibited without written consent.   Rev: 09.23.21
Precinct Central Touchpad | Poll Worker Training Guide
4. After you select a voter, you will be
redirected to the Voter Eligibility
screen. The voter’s information will
be displayed. Touch GET VOTER
SIGNATURE to navigate to the
Voter Signature screen.
Page 11 of 28
Copyright© by Tenex Software Solutions, Inc. Reproduction or distribution is prohibited without written consent. Rev: 09.23.21Precinct Central Touchpad | Poll Worker Training Guide
Searching for a Voter
Scan Photo ID or Barcode from Sample Ballot
1. To search for a voter using their
state ID, touch the green Scan ID
(If Provided) button on the
Launchpad screen.
2. Place the state ID in front of the
camera lens on the back of the
Touchpad so that it can be seen in
the green box on the screen. The
Touchpad will begin scanning
automatically.
3. After you’ve scanned the voter’s
ID, you will be redirected to the
Voter Eligibility screen. The voter’s
information will be displayed.
Touch GET VOTER SIGNATURE to
navigate to the Voter Signature
screen.
Page 12 of 28
Copyright© by Tenex Software Solutions, Inc. Reproduction or distribution is prohibited without written consent. Rev: 09.23.21Precinct Central Touchpad | Poll Worker Training Guide
Checking-In a Voter
1. Once you have found the correct
voter, their information will display
on the Voter Eligibility screen.
If the voter is eligible to vote via a
regular ballot, the screen will
display a green “Voter is eligible to
vote” message.
Select GET VOTER SIGNATURE to
continue processing them.
2. The Voter Signature screen will
appear. Tilt the Touchpad screen
toward the voter and have them
sign with the provided stylus. Once
they have signed, they will need to
select the DONE button.
3. Flip the screen back toward you
and verify that a complete and
valid signature has been captured.
Select the ISSUE BALLOT button
to continue.
Page 13 of 28
Copyright© by Tenex Software Solutions, Inc. Reproduction or distribution is prohibited without written consent. Rev: 09.23.21Precinct Central Touchpad | Poll Worker Training Guide
4. A popup will appear. Initial in the
box, then select DONE.
5. Enter the Ballot Stub number in the
Ballot Stub Number box and press
PROCESS.
6. Great job! Hand the voter the
printed ballot card and direct them
to the voting machines. Press
PROCESS NEXT VOTER to
proceed.
Page 14 of 28
Copyright© by Tenex Software Solutions, Inc. Reproduction or distribution is prohibited without written consent. Rev: 09.23.21Precinct Central Touchpad | Poll Worker Training Guide
Spoiling a Ballot
1. To spoil a ballot, open the
Launchpad Menu and select the
SPOIL BALLOT link.
2. Search for and select the voter
check-in you would like to spoil,
then click the green SPOIL button.
3. Select the reason the ballot is being
spoiled and whether or not you will
be issuing the voter a replacement
ballot. After you’ve done so, select
CONTINUE.
Page 15 of 28
Copyright© by Tenex Software Solutions, Inc. Reproduction or distribution is prohibited without written consent. Rev: 09.23.21Precinct Central Touchpad | Poll Worker Training Guide
4. Select YES to confirm that you
would like to spoil the ballot.
If you are not issuing a replacement
ballot, steps 5-6 will not apply to
you. Instead, you will be redirected
to the Processing Complete screen
where you can begin processing
the next voter.
5. The Voter Signature screen will
appear. Ask the voter to review the
oath displayed above the signature
line, then have them sign with the
provided stylus. Once they have
signed, they will need to select the
DONE button.
Once they have done so, tilt the
screen back toward you and
continue the voter check-in
process as you normally would.
6. Once you come to the Processing
Complete screen, review any
additional instructions for reissuing
ballots in the blue info box.
Select PROCESS NEXT VOTER
once you have finished and move
onto the next voter.
Page 16 of 28
Copyright© by Tenex Software Solutions, Inc. Reproduction or distribution is prohibited without written consent. Rev: 09.23.21Precinct Central Touchpad | Poll Worker Training Guide
Mail-in Ballot — Requested
1. When a voter has requested a
mail-in ballot and tries to vote
in-person, they will have to
vote provisional.
Select Process Provisional to
continue. Check-in as usual.
Mail-in Ballot — Returned
1. When a voter has returned a
mail-in ballot and tries to vote
in-person, they will have to
vote provisional.
Select Process Provisional to
continue. Check-in as usual.
Page 17 of 28
Copyright© by Tenex Software Solutions, Inc. Reproduction or distribution is prohibited without written consent. Rev: 09.23.21Precinct Central Touchpad | Poll Worker Training Guide
Early Voted
1. When a voter has early
voted and tries to cast a
ballot on Election Day, they
will have to cast a
provisional ballot.
Select Process
Provisional to continue.
Check-in as usual.
Already Voted
1. When a voter has already
voted and tries to cast a
ballot on Election Day, they
will have to cast a
provisional ballot.
Select Process
Provisional to continue.
Check-in as usual.
Page 18 of 28
Copyright© by Tenex Software Solutions, Inc. Reproduction or distribution is prohibited without written consent. Rev: 09.23.21Precinct Central Touchpad | Poll Worker Training Guide
ID Required
1. Some voters are required to
present a form of ID to cast a
ballot.
Touch the Record ID button
to proceed with the check-in.
2. Select the ID type provided by
the voter. If voter did not
provide ID, touch Not Provided—
voter will vote provisionally.
Once the ID type is selected,
check-in as usual.
Page 19 of 28
Copyright© by Tenex Software Solutions, Inc. Reproduction or distribution is prohibited without written consent. Rev: 09.23.21Precinct Central Touchpad | Poll Worker Training Guide
Affirm Address
1. In some cases, the voter must
confirm the address on file and
complete the Affirmation of
Residency Form. If the voter’s
current address is different than
the address on file, the voter
must vote a Provisional Ballot.
Under the More Options
dropdown, there are the
following options: (1) Manual
Provisional, (2) Challenge
Voter, and (3) Request
Assistance.
Once the steps above have
been completed, touch Get
Voter Signature and sign-in as
usual.
Page 20 of 28
Copyright© by Tenex Software Solutions, Inc. Reproduction or distribution is prohibited without written consent. Rev: 09.23.21Precinct Central Touchpad | Poll Worker Training Guide
Help Guides & Phone Numbers
1. On Election Day, there may be
times when questions come up.
These questions can often be easily
answered by reviewing information
housed in the Touchpad.
Informational documents and
videos can be reviewed from the
Touchpad, as well as contact
information for key election staff.
The Help Guides and Important
Phone Numbers pages can be from
the Launchpad Menu.
2. Once you have been redirected to
the Help Guides page, a list of
available videos and/or documents
will appear in the left menu.
To view a document or video,
select it from the list and select the
OPEN DOCUMENT button.
3. Once you have been redirected to
the Important Phone Numbers
Page a list of contacts will appear.
Select a contact from the contact
list to view their phone number.
Page 21 of 28
Copyright© by Tenex Software Solutions, Inc. Reproduction or distribution is prohibited without written consent. Rev: 09.23.21Precinct Central Touchpad | Poll Worker Training Guide
Check-In Totals
Select the CHECK-IN TOTALS link from the Launchpad Menu to view this screen. Here,
you will be able to see a running total of all ballots issued throughout the day.
These totals allow you to account for all ballots issued. In the Include For section at the
top left of the screen, select This Touchpad , To view only the current day’s check-ins,
select the appropriate date in the Select Date dropdown.
Page 22 of 28
Copyright© by Tenex Software Solutions, Inc. Reproduction or distribution is prohibited without written consent. Rev: 09.23.21Precinct Central Touchpad | Poll Worker Training Guide
Check-In Logs
Select the CHECK-IN LOGS link from the Launchpad Menu to view this screen. During
Election Day, a log is kept of all the voters who have been checked in on a particular
Touchpad or at the location.
These logs allow you to account for all voters checked in as well as any spoiled and
provisional ballots. To change from This Location to This Touchpad, select the
appropriate button in the Include For section.
Select a voter to view an image of their signature.
Page 23 of 28
Copyright© by Tenex Software Solutions, Inc. Reproduction or distribution is prohibited without written consent. Rev: 09.23.21Precinct Central Touchpad | Poll Worker Training Guide
Closing the Election
1. Once the election has ended, it is
time to close the election on the
Touchpads. From the Launchpad,
open the Launchpad Menu and
select LOGOUT.
2. A pop-up will appear. Select the
yellow CLOSE FOR THE DAY
button to begin the closing process.
This closing process will be
completed at the end of each day.
3. A warning screen will appear. If you
are ready to close the election,
select YES.
Page 24 of 28
Copyright© by Tenex Software Solutions, Inc. Reproduction or distribution is prohibited without written consent. Rev: 09.23.21Precinct Central Touchpad | Poll Worker Training Guide
4. Enter the passwords you’ve been
given to lock the device then select
the LOCK DEVICE button.
5. An orange screen will appear with a
“Synchronizing Device” message.
Wait for the message to disappear.
6. Congratulations, you have closed
out your election!
If your Device has not sent all
transactions, PENDING will appear
in the left-hand corner.
Don’t panic! This is normal.
Complete the rest of your end-of-
election procedures.
7. Power down the Touchpad by holding down the power button. Place equipment back
into their carrying cases.
Page 25 of 28
Copyright© by Tenex Software Solutions, Inc. Reproduction or distribution is prohibited without written consent. Rev: 09.23.21You can also read