PRO TOOLS | DOCK GUIDE - AND EUCONTROL 3.7 - AVID
←
→
Page content transcription
If your browser does not render page correctly, please read the page content below
Pro Tools | Dock Guide
           and EuControl 3.7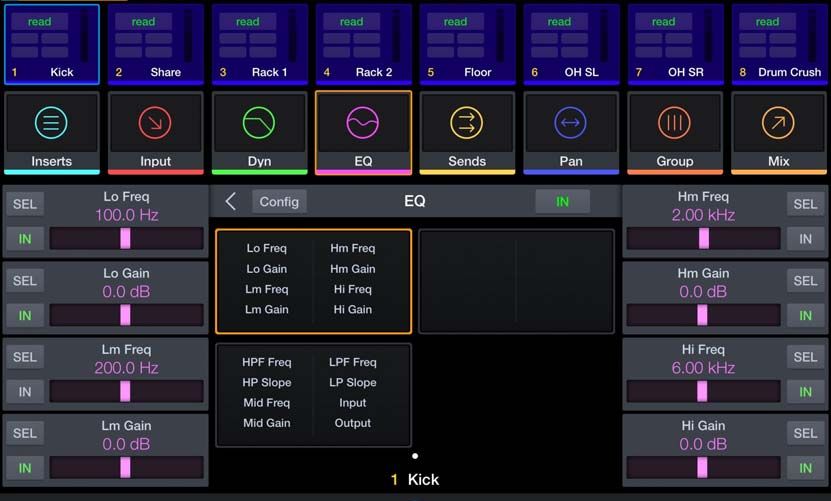
Legal Notices
© 2017 Avid Technology, Inc., (“Avid”), all rights reserved. This guide may not be duplicated in whole or in part without the written consent of Avid.

003, 192 Digital I/O, 192 I/O, 96 I/O, 96i I/O, Adrenaline, AirSpeed, ALEX, Alienbrain, AME, AniMatte, Archive, Archive II, Assistant Station, AudioPages,
AudioStation, AutoLoop, AutoSync, Avid, Avid Active, Avid Advanced Response, Avid DNA, Avid DNxcel, Avid DNxHD, Avid DS Assist Station, Avid Ignite,
Avid Liquid, Avid Media Engine, Avid Media Processor, Avid MEDIArray, Avid Mojo, Avid Remote Response, Avid Unity, Avid Unity ISIS, Avid VideoRAID,
AvidRAID, AvidShare, AVIDstripe, AVX, Beat Detective, Beauty Without The Bandwidth, Beyond Reality, BF Essentials, Bomb Factory, Bruno, C|24,
CaptureManager, ChromaCurve, ChromaWheel, Cineractive Engine, Cineractive Player, Cineractive Viewer, Color Conductor, Command|8, Control|24,
Cosmonaut Voice, CountDown, d2, d3, DAE, D-Command, D-Control, Deko, DekoCast, D-Fi, D-fx, Digi 002, Digi 003, DigiBase, Digidesign,
Digidesign Audio Engine, Digidesign Development Partners, Digidesign Intelligent Noise Reduction, Digidesign TDM Bus, DigiLink, DigiMeter, DigiPanner,
DigiProNet, DigiRack, DigiSerial, DigiSnake, DigiSystem, Digital Choreography, Digital Nonlinear Accelerator, DigiTest, DigiTranslator, DigiWear, DINR, DNxchange,
Do More, DPP-1, D-Show, DSP Manager, DS-StorageCalc, DV Toolkit, DVD Complete, D-Verb, Eleven, EM, Euphonix, EUCON, EveryPhase, Expander,
ExpertRender, Fairchild, FastBreak, Fast Track, Film Cutter, FilmScribe, Flexevent, FluidMotion, Frame Chase, FXDeko, HD Core, HD Process, HDpack,
Home-to-Hollywood, HyperSPACE, HyperSPACE HDCAM, iKnowledge, Impact, Improv, iNEWS, iNEWS Assign, iNEWS ControlAir, InGame, Instantwrite, Instinct,
Intelligent Content Management, Intelligent Digital Actor Technology, IntelliRender, Intelli-Sat, Intelli-Sat Broadcasting Recording Manager, InterFX, Interplay,
inTONE, Intraframe, iS Expander, iS9, iS18, iS23, iS36, ISIS, IsoSync, LaunchPad, LeaderPlus, LFX, Lightning, Link & Sync, ListSync, LKT-200, Lo-Fi,
MachineControl, Magic Mask, Make Anything Hollywood, make manage move|media, Marquee, MassivePack, MassivePack Pro, Maxim, Mbox, Media Composer,
MediaFlow, MediaLog, MediaMix, Media Reader, Media Recorder, MEDIArray, MediaServer, MediaShare, MetaFuze, MetaSync, MIDI I/O, Mix Rack, Moviestar,
MultiShell, NaturalMatch, NewsCutter, NewsView, NewsVision, Nitris, NL3D, NLP, NSDOS, NSWIN, OMF, OMF Interchange, OMM, OnDVD,
Open Media Framework, Open Media Management, Painterly Effects, Palladium, Personal Q, PET, Podcast Factory, PowerSwap, PRE, ProControl, ProEncode,
Profiler, Pro Tools, Pro Tools|HD, Pro Tools LE, Pro Tools M-Powered, Pro Transfer, QuickPunch, QuietDrive, Realtime Motion Synthesis, Recti-Fi,
Reel Tape Delay, Reel Tape Flanger, Reel Tape Saturation, Reprise, Res Rocket Surfer, Reso, RetroLoop, Reverb One, ReVibe, Revolution, rS9, rS18, RTAS,
Salesview, Sci-Fi, Scorch, ScriptSync, SecureProductionEnvironment, Shape-to-Shape, ShuttleCase, Sibelius, SimulPlay, SimulRecord, Slightly Rude Compressor,
Smack!, Soft SampleCell, Soft-Clip Limiter, SoundReplacer, SPACE, SPACEShift, SpectraGraph, SpectraMatte, SteadyGlide, Streamfactory, Streamgenie,
StreamRAID, SubCap, Sundance, Sundance Digital, SurroundScope, Symphony, SYNC HD, SYNC I/O, Synchronic, SynchroScope, Syntax, TDM FlexCable,
TechFlix, Tel-Ray, Thunder, TimeLiner, Titansync, Titan, TL Aggro, TL AutoPan, TL Drum Rehab, TL Everyphase, TL Fauxlder, TL In Tune, TL MasterMeter,
TL Metro, TL Space, TL Utilities, tools for storytellers, Transit, TransJammer, Trillium Lane Labs, TruTouch, UnityRAID, Vari-Fi, Video the Web Way, VideoRAID,
VideoSPACE, VTEM, Work-N-Play, Xdeck, X-Form, and XMON are either registered trademarks or trademarks of Avid Technology, Inc. in the United States and/or
other countries.

Bonjour, the Bonjour logo, and the Bonjour symbol are trademarks of Apple Computer, Inc.

Thunderbolt and the Thunderbolt logo are trademarks of Intel Corporation in the U.S. and/or other countries.

This product may be protected by one or more U.S. and non-U.S. patents. Details are available at www.avid.com/patents.

Product features, specifications, system requirements, and availability are subject to change without notice.

Guide Part Number 9329-65890-00 REV A 10/16
Contents

Introduction . . . . . . . . . . . . . . . . . . . . . . . . . . . . . . . . . . . . . . . . . . . . . . . . . . . . . . . . . . . . . . . . . . . . . . . . . . . . . . . . . . . . . . 1
             What’s Included . . . . . . . . . . . . . . . . . . . . . . . . . . . . . . . . . . . . . . . . . . . . . . . . . . . . . . . . . . . . . . . . . . . . . . . . . . . . . 2
             Additional Required Equipment . . . . . . . . . . . . . . . . . . . . . . . . . . . . . . . . . . . . . . . . . . . . . . . . . . . . . . . . . . . . . . . . 2
             Optional Equipment . . . . . . . . . . . . . . . . . . . . . . . . . . . . . . . . . . . . . . . . . . . . . . . . . . . . . . . . . . . . . . . . . . . . . . . . . . 2
             System Requirements and Compatibility . . . . . . . . . . . . . . . . . . . . . . . . . . . . . . . . . . . . . . . . . . . . . . . . . . . . . . . . . 2
             Registration . . . . . . . . . . . . . . . . . . . . . . . . . . . . . . . . . . . . . . . . . . . . . . . . . . . . . . . . . . . . . . . . . . . . . . . . . . . . . . . . 2
             About This Guide . . . . . . . . . . . . . . . . . . . . . . . . . . . . . . . . . . . . . . . . . . . . . . . . . . . . . . . . . . . . . . . . . . . . . . . . . . . . 2
             Conventions Used in This Guide . . . . . . . . . . . . . . . . . . . . . . . . . . . . . . . . . . . . . . . . . . . . . . . . . . . . . . . . . . . . . . . . 3
             Hardware Switches on the Dock and S3 Control Surface . . . . . . . . . . . . . . . . . . . . . . . . . . . . . . . . . . . . . . . . . . . . 3
             How to Use this PDF Guide . . . . . . . . . . . . . . . . . . . . . . . . . . . . . . . . . . . . . . . . . . . . . . . . . . . . . . . . . . . . . . . . . . . . 4
             Resources . . . . . . . . . . . . . . . . . . . . . . . . . . . . . . . . . . . . . . . . . . . . . . . . . . . . . . . . . . . . . . . . . . . . . . . . . . . . . . . . . . 4

Installation and Setup . . . . . . . . . . . . . . . . . . . . . . . . . . . . . . . . . . . . . . . . . . . . . . . . . . . . . . . . . . . . . . . . . . . . . . . . . . . . . 5
             Connecting the Dock . . . . . . . . . . . . . . . . . . . . . . . . . . . . . . . . . . . . . . . . . . . . . . . . . . . . . . . . . . . . . . . . . . . . . . . . . 5
             Installing EuControl Software . . . . . . . . . . . . . . . . . . . . . . . . . . . . . . . . . . . . . . . . . . . . . . . . . . . . . . . . . . . . . . . . . . 7
             Updating Dock Firmware . . . . . . . . . . . . . . . . . . . . . . . . . . . . . . . . . . . . . . . . . . . . . . . . . . . . . . . . . . . . . . . . . . . . . . 8
             Installing and Connecting Pro Tools | Control . . . . . . . . . . . . . . . . . . . . . . . . . . . . . . . . . . . . . . . . . . . . . . . . . . . . . 9
             Enabling EUCON in Pro Tools . . . . . . . . . . . . . . . . . . . . . . . . . . . . . . . . . . . . . . . . . . . . . . . . . . . . . . . . . . . . . . . . . 10
             Confirming EUCON . . . . . . . . . . . . . . . . . . . . . . . . . . . . . . . . . . . . . . . . . . . . . . . . . . . . . . . . . . . . . . . . . . . . . . . . . 11
             Connecting a Second Workstation . . . . . . . . . . . . . . . . . . . . . . . . . . . . . . . . . . . . . . . . . . . . . . . . . . . . . . . . . . . . . 12
             Connecting a Footswitch . . . . . . . . . . . . . . . . . . . . . . . . . . . . . . . . . . . . . . . . . . . . . . . . . . . . . . . . . . . . . . . . . . . . . 13
             Kensington Lock . . . . . . . . . . . . . . . . . . . . . . . . . . . . . . . . . . . . . . . . . . . . . . . . . . . . . . . . . . . . . . . . . . . . . . . . . . . 13
             Powering-On Your System After Initial Setup . . . . . . . . . . . . . . . . . . . . . . . . . . . . . . . . . . . . . . . . . . . . . . . . . . . . . 13
             AutoLaunch Settings . . . . . . . . . . . . . . . . . . . . . . . . . . . . . . . . . . . . . . . . . . . . . . . . . . . . . . . . . . . . . . . . . . . . . . . . 14
             Installing Appsets for EuControl Products . . . . . . . . . . . . . . . . . . . . . . . . . . . . . . . . . . . . . . . . . . . . . . . . . . . . . . . 15

Dock Surface Controls Overview . . . . . . . . . . . . . . . . . . . . . . . . . . . . . . . . . . . . . . . . . . . . . . . . . . . . . . . . . . . . . . . . . . 16
             iPad Stand . . . . . . . . . . . . . . . . . . . . . . . . . . . . . . . . . . . . . . . . . . . . . . . . . . . . . . . . . . . . . . . . . . . . . . . . . . . . . . . . 17
             Soft Knobs . . . . . . . . . . . . . . . . . . . . . . . . . . . . . . . . . . . . . . . . . . . . . . . . . . . . . . . . . . . . . . . . . . . . . . . . . . . . . . . . 17
             Soft Keys . . . . . . . . . . . . . . . . . . . . . . . . . . . . . . . . . . . . . . . . . . . . . . . . . . . . . . . . . . . . . . . . . . . . . . . . . . . . . . . . . 18
             Left Control . . . . . . . . . . . . . . . . . . . . . . . . . . . . . . . . . . . . . . . . . . . . . . . . . . . . . . . . . . . . . . . . . . . . . . . . . . . . . . . . 18
             Right Control and Vertical Touchstrip. . . . . . . . . . . . . . . . . . . . . . . . . . . . . . . . . . . . . . . . . . . . . . . . . . . . . . . . . . . 19
             Wheel and Horizontal Touchstrip . . . . . . . . . . . . . . . . . . . . . . . . . . . . . . . . . . . . . . . . . . . . . . . . . . . . . . . . . . . . . . 19
             Transport . . . . . . . . . . . . . . . . . . . . . . . . . . . . . . . . . . . . . . . . . . . . . . . . . . . . . . . . . . . . . . . . . . . . . . . . . . . . . . . . . 20
             Channel Strip . . . . . . . . . . . . . . . . . . . . . . . . . . . . . . . . . . . . . . . . . . . . . . . . . . . . . . . . . . . . . . . . . . . . . . . . . . . . . . 20
             Control Room/Monitor . . . . . . . . . . . . . . . . . . . . . . . . . . . . . . . . . . . . . . . . . . . . . . . . . . . . . . . . . . . . . . . . . . . . . . . 21
             Surface SHIFT . . . . . . . . . . . . . . . . . . . . . . . . . . . . . . . . . . . . . . . . . . . . . . . . . . . . . . . . . . . . . . . . . . . . . . . . . . . . . . 21

Pro Tools | Dock Guide                                                                                                                                                                   iii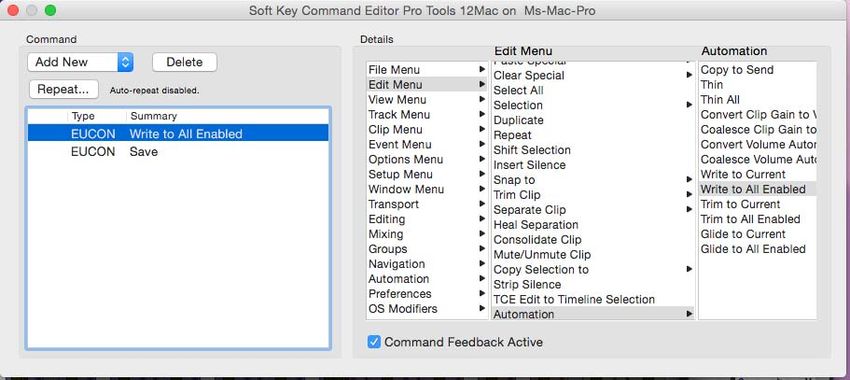
Using the Dock with Pro Tools . . . . . . . . . . . . . . . . . . . . . . . . . . . . . . . . . . . . . . . . . . . . . . . . . . . . . . . . . . . . . . . . . . . 22
             Track Basics . . . . . . . . . . . . . . . . . . . . . . . . . . . . . . . . . . . . . . . . . . . . . . . . . . . . . . . . . . . . . . . . . . . . . . . . . . . . . . . 22
             Adjusting Track Parameters with the Soft Knobs. . . . . . . . . . . . . . . . . . . . . . . . . . . . . . . . . . . . . . . . . . . . . . . . . . 25
             Wheel . . . . . . . . . . . . . . . . . . . . . . . . . . . . . . . . . . . . . . . . . . . . . . . . . . . . . . . . . . . . . . . . . . . . . . . . . . . . . . . . . . . . 28
             Working with VCAs . . . . . . . . . . . . . . . . . . . . . . . . . . . . . . . . . . . . . . . . . . . . . . . . . . . . . . . . . . . . . . . . . . . . . . . . . 29
             Working with Automation . . . . . . . . . . . . . . . . . . . . . . . . . . . . . . . . . . . . . . . . . . . . . . . . . . . . . . . . . . . . . . . . . . . . 30
             Surround Panning . . . . . . . . . . . . . . . . . . . . . . . . . . . . . . . . . . . . . . . . . . . . . . . . . . . . . . . . . . . . . . . . . . . . . . . . . . 34

Soft Keys . . . . . . . . . . . . . . . . . . . . . . . . . . . . . . . . . . . . . . . . . . . . . . . . . . . . . . . . . . . . . . . . . . . . . . . . . . . . . . . . . . . . . . . 36
             Viewing Soft Key Assignments in the Soft Key Editor . . . . . . . . . . . . . . . . . . . . . . . . . . . . . . . . . . . . . . . . . . . . . . 36
             Using the Soft Key Editor. . . . . . . . . . . . . . . . . . . . . . . . . . . . . . . . . . . . . . . . . . . . . . . . . . . . . . . . . . . . . . . . . . . . . 38

EuControl Software . . . . . . . . . . . . . . . . . . . . . . . . . . . . . . . . . . . . . . . . . . . . . . . . . . . . . . . . . . . . . . . . . . . . . . . . . . . . . . 42
             Accessing EuControl Settings. . . . . . . . . . . . . . . . . . . . . . . . . . . . . . . . . . . . . . . . . . . . . . . . . . . . . . . . . . . . . . . . . 42
             Surfaces . . . . . . . . . . . . . . . . . . . . . . . . . . . . . . . . . . . . . . . . . . . . . . . . . . . . . . . . . . . . . . . . . . . . . . . . . . . . . . . . . . 43
             Workstations . . . . . . . . . . . . . . . . . . . . . . . . . . . . . . . . . . . . . . . . . . . . . . . . . . . . . . . . . . . . . . . . . . . . . . . . . . . . . . 45
             General . . . . . . . . . . . . . . . . . . . . . . . . . . . . . . . . . . . . . . . . . . . . . . . . . . . . . . . . . . . . . . . . . . . . . . . . . . . . . . . . . . . 47
             Preferences. . . . . . . . . . . . . . . . . . . . . . . . . . . . . . . . . . . . . . . . . . . . . . . . . . . . . . . . . . . . . . . . . . . . . . . . . . . . . . . . 49
             Assign . . . . . . . . . . . . . . . . . . . . . . . . . . . . . . . . . . . . . . . . . . . . . . . . . . . . . . . . . . . . . . . . . . . . . . . . . . . . . . . . . . . . 51
             Layouts . . . . . . . . . . . . . . . . . . . . . . . . . . . . . . . . . . . . . . . . . . . . . . . . . . . . . . . . . . . . . . . . . . . . . . . . . . . . . . . . . . . 52
             Soft Keys . . . . . . . . . . . . . . . . . . . . . . . . . . . . . . . . . . . . . . . . . . . . . . . . . . . . . . . . . . . . . . . . . . . . . . . . . . . . . . . . . 52
             Restart EUCON Applications . . . . . . . . . . . . . . . . . . . . . . . . . . . . . . . . . . . . . . . . . . . . . . . . . . . . . . . . . . . . . . . . . . 52

Appendix A. Specifications. . . . . . . . . . . . . . . . . . . . . . . . . . . . . . . . . . . . . . . . . . . . . . . . . . . . . . . . . . . . . . . . . . . . . . . . . . 53
             Mechanical . . . . . . . . . . . . . . . . . . . . . . . . . . . . . . . . . . . . . . . . . . . . . . . . . . . . . . . . . . . . . . . . . . . . . . . . . . . . . . . . 53
             Environmental . . . . . . . . . . . . . . . . . . . . . . . . . . . . . . . . . . . . . . . . . . . . . . . . . . . . . . . . . . . . . . . . . . . . . . . . . . . . . 53
             Dimensions . . . . . . . . . . . . . . . . . . . . . . . . . . . . . . . . . . . . . . . . . . . . . . . . . . . . . . . . . . . . . . . . . . . . . . . . . . . . . . . . 54
             Test Mode . . . . . . . . . . . . . . . . . . . . . . . . . . . . . . . . . . . . . . . . . . . . . . . . . . . . . . . . . . . . . . . . . . . . . . . . . . . . . . . . . 54

Appendix B. Avid S3 Dock Link Kit . . . . . . . . . . . . . . . . . . . . . . . . . . . . . . . . . . . . . . . . . . . . . . . . . . . . . . . . . . . . . . . . . . . 55
             Installing the S3 Dock Link Kit. . . . . . . . . . . . . . . . . . . . . . . . . . . . . . . . . . . . . . . . . . . . . . . . . . . . . . . . . . . . . . . . . 55

Appendix C. Compliance Information . . . . . . . . . . . . . . . . . . . . . . . . . . . . . . . . . . . . . . . . . . . . . . . . . . . . . . . . . . . . . . . . . 59
             Environmental Compliance . . . . . . . . . . . . . . . . . . . . . . . . . . . . . . . . . . . . . . . . . . . . . . . . . . . . . . . . . . . . . . . . . . . 59
             EMC (Electromagnetic Compliance) . . . . . . . . . . . . . . . . . . . . . . . . . . . . . . . . . . . . . . . . . . . . . . . . . . . . . . . . . . . . 60
             Safety Compliance . . . . . . . . . . . . . . . . . . . . . . . . . . . . . . . . . . . . . . . . . . . . . . . . . . . . . . . . . . . . . . . . . . . . . . . . . . 61

Pro Tools | Dock Guide                                                                                                                                                                     iv
Introduction

Welcome to the Pro Tools® | Dock studio controller and iPad dock from Avid®. The Dock uses Avid’s high-speed EUCONTM
(Extended User Control) control protocol to enable fully integrated control of Pro Tools and other EUCON-compatible audio and
video applications via a 100 MB/s Ethernet connection.

The Dock is designed to be used with Avid’s Pro Tools | Control app for iPad. The Dock/Control combination can also be used si-
multaneously with the Pro Tools | S3 studio controller, and/or with other Avid Artist series media controllers. This guide focuses
on using the Dock with the Control app.

Pro Tools | Dock with Pro Tools | Control app on iPad (iPad not included)

EuControl Software
EuControl lets your workstation computer find, link, and communicate with the Dock and Control app via the EUCON protocol.
EuControl also lets you set preferences for and customize the controls on your Dock, S3, or other Artist series media controller. Eu-
Control software must be installed on the workstation computer before you can use the Dock with your application.

Introduction                                                                                                                      1
What’s Included
• Pro Tools | Dock control surface
• Power cable and power adapter
• Cat5e (350 MHz) Ethernet crossover cable
• Documentation pack, which includes the EuControl software Activation Card, Dock Welcome Card, Pro Tools | Dock Safety &
  Regulatory Guide, Health and Safety Guide, and a warranty card

Additional Required Equipment
• A supported Apple iPad with the most recent version of the Pro Tools | Control App from Avid. Pro Tools | Control requires a
  data (host) connection between the iPad and your primary workstation, using either of the following:
  • Wi-Fi*
  -or-
  • Apple Lightning to USB 3 Camera Adapter + USB 2 Ethernet adapter connected to iPad running iOS 9.3.x or later. A Light-
    ning cable connected to a power source such as the USB port on the Dock is required to power the Camera Adapter. For more
    information, visit www.apple.com.

     *The Dock does not provide Wi-Fi; a wireless router is required. For more information, see the Pro Tools | Control Guide.pdf.

Optional Equipment
• A USB-Ethernet adapter or Thunderbolt-Ethernet adapter, if there is no available Ethernet port on your workstation.
• If your system also includes an S3 and you want to use it as an audio interface, a qualified AVB-compatible Ethernet switch is
  required.
• If your system also includes an S3, the Pro Tools | Dock Link Kit is available to mechanically attach the Dock to the S3. For more
  information, visit www.shop.avid.com.

System Requirements and Compatibility
  • One Dock can be used with EuControl Software at a time.
  • One Dock can be used in conjunction with Pro Tools | Control, one Pro Tools | S3, one Artist Color, and up to four Artist Mix.
  • Avid can only assure compatibility and provide support for hardware and software it has tested and approved. For
    compatibility information and other resources, visit:
  www.avid.com/S3-Surface-Support

Registration
Review the enclosed Registration Information Card and follow the instructions on it to quickly register your purchase online.
By registering, you become eligible to receive the following:
• Technical support information
• Software update and upgrade notices
• Hardware warranty information

About This Guide
This guide covers using the Dock control surface and Pro Tools | Control app (referred to as the Control app) with Pro Tools and
other EUCON-compatible applications. This guide also covers how you can use the Dock/Control combination along with a
Pro Tools | S3 control surface or supported Artist Series media controller.

For information about Dock support in DAWs and applications from our Development Partners, contact the manufacturer.
Introduction                                                                                                                      2
Conventions Used in This Guide
All of our guides use the following conventions to indicate menu choices and key commands:

 Convention                 Action

 File > Save                Choose Save from the File menu

 Control+N                  Hold down the Control key and press the N key

 Control-click              Hold down the Control key and click the mouse button

 Right-click                Click with the right mouse button

The names of Commands, Options, and Settings that appear on-screen are in a different font.

The following symbols are used to highlight important information:

      User Tips are helpful hints for getting the most from your system.

      Important Notices include information that could affect your data or the performance of your system.

      Shortcuts show you useful keyboard or mouse shortcuts.

      Cross References point to related sections in this guide and other Avid guides.

Hardware Switches on the Dock and S3 Control Surface
The names of switches on the Dock and S3 control surface are shown in bold, such as Sel. The two Surface SHIFT switches are
indicated by bold text, in all-caps to distinguish them from references to the Multi Select/SHIFT Global Modifier switch (S3 only)
and the Shift key on your computer keyboard.

                    SHIFT                                                      SHIFT

Surface SHIFT switches

Accessing Secondary Functions Using Surface SHIFT
The Surface SHIFT switches are used in conjunction with other switches to access a secondary layer of functions. The primary
function of switches are shown directly on each switch. Most secondary functions are listed next to each switch, or on the switch
but in black text with a white background. For example, for the Rec/A switch, Rec (track record enable) is the primary function
and A (track Automation mode) is the secondary function. (You can swap the primary and secondary function for this switch in Eu-
Control).

The following terminology is used to describe Dock SHIFT functions, for example:

To enable Do to All:
   • “Press and hold the Dock SHIFT switch then press the Do to Sel/Do to All switch.”

is written as
   • “Press SHIFT + Do to Sel/Do to All.”

 Introduction                                                                                                                   3
How to Use this PDF Guide
These are some useful features of this PDF:
   • The Bookmarks on the left serve as a continuously visible table of contents. Click a + symbol to expand that heading to show
     subheadings. Click the – symbol to collapse a subheading. Click on a subject heading to jump to that page.
   • The Table of Contents provides active links to their pages. Select the hand cursor, allow it to hover over the heading until it
     turns into a finger. Then click to locate to that subject and page.
   • Any text entry in blue is an active link. Click on the link to go to that section.
   • Select Find from the Edit menu to search for a subject.

Resources
The Avid website (www.avid.com) is your best online source for information to help you get the most out of your Avid system.
The following are just a few of the services and features available.

Account Activation and Product Registration
Activate your product to access downloads in your Avid account (or quickly create an account if you don’t have one). Register your
purchase online, download software, updates, documentation, and other resources.
https://www.avid.com/account

Support and Downloads
Contact Avid Customer Success (technical support); download software updates and the latest online manuals; browse the Com-
patibility documents for system requirements; search the online Knowledge Base or join the worldwide Avid user community on
the User Conference.

For the Dock visit:
   https://www.avid.com/Dock-Support

For S3 visit:
   http://www.avid.com/S3-Surface-Support

For Artist Mix and other Artist Series media controllers visit:
   http://euphonix.avid.com/main.php

Products and Developers
Learn about Avid products; download demo software or learn about our Development Partners and their plug-ins, applications, and
hardware.
https://www.avid.com/Products/index.html

Get Started Fast Video Tutorials
Watch video tutorials for Dock, S3, and other EuControl products on YouTube:
   Get Started Fast with Pro Tools | S3 and Dock

 Introduction                                                                                                                     4
Installation and Setup

This section shows how to get your Dock set up as a studio controller, and consists of the following steps:

    • Connecting the Dock
    • Installing EuControl Software
    • Updating Dock Firmware
    • Installing and Connecting Pro Tools | Control
    • Enabling EUCON in Pro Tools
    • Confirming EUCON
    • AutoLaunch Settings

Connecting the Dock
Connecting the Dock involves the following steps.
    • Connecting Power
    • Connecting Ethernet
    • Powering the Dock On

Connecting Power
To connect your Dock to your workstation computer:

1   Connect the male (AC) end of the included power supply into a power outlet.
2   Connect the DC output cable from the power adapter to the DC In jack on the back panel.

Connecting the power cable to the DC In jack

Installation and Setup                                                                                        5
Connecting Ethernet
Depending on your configuration requirements, you can connect the Dock directly to your workstation computer (the computer
running Pro Tools or other DAW), to a router or switch that is then connected to your workstation computer, or to an S3 that is con-
nected to your workstation computer.

      Standard routers and switches can be used if you are using the Dock without a Pro Tools | S3, or with an S3 but only using the
      S3 as a control surface. However, to use the built-in AVB audio I/O on the S3, the S3 must be connected directly to the computer
      or to an AVB-compatible Ethernet switch. Visit www.avid.com/Dock-Support for information on compatible peripherals.

To connect Ethernet between the Dock and your workstation computer:

1   Connect one end of an Ethernet Crossover cable into the Ethernet port on the back panel of the Dock.

Ethernet port on the back panel of the Dock

2   Connect the other end of the Ethernet cable to an available Ethernet port on your computer, or to the computer’s Thunderbolt
    port using an Ethernet-to-Thunderbolt (or Ethernet-to-USB) adapter.
    Or, if your system includes a Dock and an S3 you can connect the Dock to Network port B on the S3, and connect S3 network
    port A to your workstation.

      The Dock cannot connect to your workstation computer using a wireless connection. A hard-wired network connection is required.

3   If you want to connect the Dock to a local area network, or to connect additional Artist Series media controllers, connect the
    Ethernet cable to an Ethernet router or switch, and make sure the router or switch is powered on before powering on the Dock.

Joining the Dock to S3
If you are using the Dock along with an S3, you can use the Avid S3 Dock Link kit (not included) to securely attach them to each
other. The Link kit lets you attach the Dock to either the left or right of S3 to keep the stable and aligned. You can install the Link
Kit at any time. To learn how, see Avid S3 Dock Link Kit.

Powering the Dock On
To power the Dock on:
1   Press the power switch on the back of the Dock to the “on” position.
    The fader jumps and the LEDs blink during initialization.

When the Dock is initially powered on, but not yet attached in the My Surfaces list in EuControl Settings, the LEDs cycle from
dim to light purple. When the Dock is attached in My Surfaces, the 12 switch LEDs in the center light solid purple. When attached
and an application with Soft Keys is focused, the assigned Soft Key colors are shown in the switch LEDs.
2   When the Dock is finished initializing, proceed to Installing EuControl Software.

 Installation and Setup                                                                                                                  6
Installing EuControl Software
Next, install EuControl software on your workstation computer. An Internet connection is required to download EuControl.
To install EuControl software:
1 Visit www.avid.com/account and log into your Avid account.
To create an account if you don’t already have one, follow the instructions on the included EuControl Activation card (visit
www.avid.com/activationcard, click to select EuControl, then follow the on-screen instructions to create an account.
2 When you are logged into your Avid account, click Avid Software Activation and Download (under My Products).
3 On the Activate Product page, enter your EuControl Activation Code exactly as it appears on your EuControl Activation card
(included in the Welcome packet) then click the Activate Product button.
4 Follow the instructions on-screen to complete your product activation and download the latest EuControl software for your
workstation computer platform (Mac or Windows).
5 When download is complete, locate the EuControl installer on your computer and double-click it to mount it (DMG on Mac) or
uncompress it (ZIP for Windows).
6 In the resulting folder, locate and double-click the Install_EuControl file.
7 Follow the on-screen instructions to complete the installation.
8 When installation is complete, click Quit (Mac) or Finish (Windows). EuControl software on your computer launches automat-
ically and is running when its icon appears:
Mac Wait up to 60 seconds. A lit EuControl icon in the menu bar indicates correct installation and your surface is attached in
EuControl.
Lit EuControl icon in the Mac menu bar
Windows Wait up to 60 seconds. A lit EuControl icon appears in the system tray at the bottom of the screen. If you don't see the
EuControl icon, it could be automatically hidden by Windows. Click on the small white arrow to show hidden icons.
Lit EuControl icon in the hidden icons view of the Windows system tray
9 If the lit EuControl icon does not appear, do any of the following:
• See Add to add the Dock manually.
• Click the EuControl icon in the menu bar (Mac) or right-click the choose Restart EUCON Applications (see Restart EUCON
Applications for more information).
• Shut down the Dock and your computer, then turn them on (Dock first, then the workstation computer).
• See www.avid.com/Dock-Support for the most current troubleshooting information.
10 Proceed to Updating Dock Firmware.
Installation and Setup 7Updating Dock Firmware
After installing EuControl, make sure your Dock and other Artist Series or S3 media controllers are running the latest firmware.
The firmware is provided within EuControl, so an Internet connection is not required.
To update firmware:
1 Click (Mac) or double-click (Windows) the EuControl icon and select EuControl Settings.
2 If necessary, click Surfaces to display the Surfaces tab.
Surfaces tab
3 Click PT | Dock in the My Surfaces list so it is highlighted.
If the Dock does not appear in the My Surfaces list, add it manually by clicking to select it in the All Surfaces list and then click
Add.
4 Click Update Firmware. If the Update Firmware dialog shows a message that the surface is up to date, no further action is nec-
essary.
5 If the firmware needs to be updated, follow the instructions in the Update Firmware dialog box to proceed, and make sure to ob-
serve the following guidelines when updating firmware:
• Ensure that the Dock is connected to a trustworthy power source.
• Do not power off the Dock during the update or attempt to interrupt the update.
The status of the firmware update is shown in the EuControl dialog.
6 Click Done when the firmware update is complete, then proceed to Enabling EUCON in Pro Tools.
Installation and Setup 8Installing and Connecting Pro Tools | Control
Before proceeding, make sure your iPad is running the most recent version of the Pro Tools | Control app, and that it appears in the
My Surfaces list in EuControl. See the Pro Tools Control Guide.pdf for instructions on downloading, installing, and connecting the
app.
After you have installed the Control app and connected it to your network, place your iPad in the stand built into the Dock. The
Dock comes with an iPad Mini Riser pre-installed which increases the viewing angle for iPad Mini and also accommodates iPad
Air. The iPad Mini Riser can be removed if not needed.
If using an iPad Air, use a right-angle Lightning cable to keep the cable clear of the knobs.
iPad mounted in Dock (shown at left) and removable Mini Riser (shown at right)
To keep your iPad charged, connect your iPad to the USB port on the back of the Dock.
USB port on the back panel of the Dock
The back panel USB port is for charging and powering your iPad, only. Data communication with EuControl requires a Wi-Fi
connection, or an Apple Camera Connection Kit and adapters. For more information, see the Pro Tools | Control Guide.pdf.
Installation and Setup 9Enabling EUCON in Pro Tools
When you first connect your Dock, you must enable EUCON in Pro Tools, EUCON subsequently remains enabled in Pro Tools un-
less you disable it. To enable EUCON in other DAWs, see the documentation provided by the manufacturer.
To enable EuControl in Pro Tools:
1 Launch Pro Tools. If the Dashboard dialog appears, close it.
2 Choose Setup > Peripherals, and click the Ethernet Controllers tab.
3 Select Enable EUCON.
Enable EUCON check box
4 Click OK. You do not need to configure any other Ethernet Controllers settings. These settings do not apply to EUCON.
Pro Tools scans your system until it identifies attached EUCON-compatible hardware. When Pro Tools finishes scanning your
system, your controllers are ready to use with Pro Tools.
Before ever de-selecting Enable EUCON be sure to go to EuControl Settings > Surfaces and remove all attached surfaces.
5 Proceed to Confirming EUCON.
If you have recently updated from an earlier version of Pro Tools, go to Installing Appsets for EuControl Products.
Installation and Setup 10Confirming EUCON
To confirm installation and communication:
1 Make sure you have enabled EUCON.
2 Open a session if one is not already open.
3 Verify that the Tracks or Mixer view in the Control app shows the track names from the Pro Tools session.
Pro Tools | Control Tracks view showing the first 16 tracks in a session
• In the Pro Tools Mix window, verify that the names of the tracks currently banked to the channel strips on S3 are highlighted
with blue-green borders.
Pro Tools Mix window showing tracks currently banked to the S3 channel strips
4 Proceed to any of the following:
• To connect a second workstation computer, go to Connecting a Second Workstation.
• To connect a footswitch, go to Connecting a Footswitch.
• For instructions on using your S3 after initial installation, see Powering-On Your System After Initial Setup.
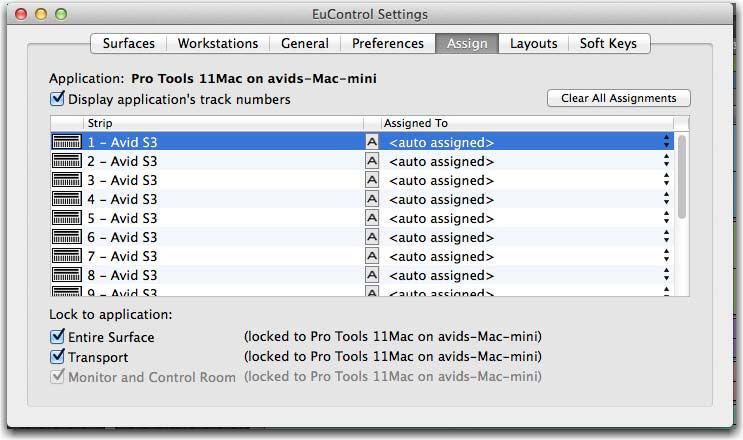
Installation and Setup 11Connecting a Second Workstation
The Dock can control applications running on a second computer connected to the same network as the primary computer, referred
to in this guide as a workstation. If EuControl is running on the same workstation as all your audio/video applications you can skip
these instructions.
To be able to control a second workstation:
1 Quit (Mac) or Exit (Windows) Pro Tools and any other EUCON applications running on any of your workstations.
2 Transfer the EuControl installer onto the second computer. After downloading, make sure the installer is mounted (DMG on
Mac) or uncompressed (ZIP for Windows).
3 In the Extras folder, double-click the Install EuCon Workstation (Mac) installer and follow the instructions to install the Eu-
Control Workstation software.
4 When installation has finished, go to Spotlight (Mac) or Search (Windows), and type “MC Client” to locate the application.
5 Launch MC Client to enable control of the secondary workstation.
6 On the primary workstation, do each of the following:
• Open EuControl Settings, go to the Workstations tab, and click to enable Enable External Workstations. Follow the prompt
and wait until EUCON applications restart. You must also manually relaunch your DAW.
• Go to System Preferences > EUCON (Mac) or Control Panel > EUCON (Windows), click the Network Interface selector and
choose the port used for your EUCON network connection (such as Ethernet 1).
7 On the secondary workstation, do each of the following:
• Go to System Preferences > EUCON (Mac) or Control Panel > EUCON
(Windows).
• Make sure the Network Interface selector shows the correct network port for
your EUCON connection.
• If it is not already enabled, click to enable Enable as External Workstation.
Follow the prompt and wait until EUCON applications restart. You must also
manually relaunch your DAW.
8 Open the EuControl Settings window by doing either of the following:
• On Mac, click the EuControl icon on the taskbar and select EuControl Set-
tings.
• On Windows, double-click the EuControl icon in the system tray and select
EuControl Settings. If you don't see the EuControl icon, it could be auto-
matically hidden by Windows. Click on the small white arrow to show hidden icons, then double-click the EuControl icon.
9 In EuControl Settings, go to the Workstations tab.
10 Select your secondary workstation in the All Workstations list, then click Add to add it to the My Workstations list.
You can now switch between workstations by doing either of the following:
• On the Dock, S3, or other Artist Series media controller, press the Workstation switch. For example, on the Dock press
SHIFT+App/Workstation.
• In the Workstations tab of EuControl Settings, select the desired workstation in the My Workstations list and click Attach. If
you are using the Control app without any other Artist Series controllers, you must use this method to switch workstations.
See Workstations for information on the other features of the Workstations tab.
Installation and Setup 12Connecting a Footswitch
The Dock has a 1/4-inch footswitch input on the back panel, which can be used to punch in and out of recording in your DAW. See
Footswitch for more information on configuring the footswitch.
Footswitch input on the back of the Dock
Kensington Lock
The Dock provides a Kensington Lock to secure your unit.
Powering-On Your System After Initial Setup
After the initial installation and setup, your system must be powered on in a specific order, as follows:
1 If connecting to a router, connect the Dock and any other Artist Series media controllers to the router, connect the router to the
workstation computer, and power on the router.
2 If connecting directly, connect the Dock to the workstation computer.
3 Power on the Dock.
If your system also includes an S3, confirm that S3 is in Studio Mode (see the Pro Tools S3 Guide.pdf for instructions).
4 Once the Dock is finished initializing, power on the workstation computer.
If the Dock is not recognized by EuControl on your workstation computer (for example, because you powered the Dock on
after powering on the workstation computer), click the unlit EuControl icon in the menu bar (Mac) or System tray (Windows)
and choose Restart EUCON Applications... to relaunch EuControl and re-initiate the connection.
Installation and Setup 13AutoLaunch Settings
You can enable or disable auto-launch for EuControl, WSControl, and/or XMON using the new AutoLaunch selector.
To configure AutoLaunch on Mac:
1 Make sure EuControl or S6 WSControl is installed, then do the following:
Mac Click on the EuControl or WSControl icon in the menu bar.
EuControl Auto-launch Apps selector (at left) and WSControl icon (at right)
Windows Right-click on the EuControl or WSControl icon in the System Tray at the bottom of the screen.
Auto-launch Apps selector (EuControl shown)
2 From the Auto-launch Apps sub-menu, choose any of the following (you can enable more than one):
• EuControl (for S3, Dock, Pro Tools | Control, and Artist Series)
• WSControl (for S6)
• XMON
Installation and Setup 14Installing Appsets for EuControl Products
Avid provides a set of pre-configured Soft Key commands (Appset) for Pro Tools | Dock, Pro Tools | Control, Pro Tools | S3, and
Artist series control surfaces. Perform the tasks in this section to make sure you get the latest Appset functionality when using your
controller(s) with Pro Tools and other EUCON™-aware applications.
To download the latest Appset:
1 Visit www.avid.com/account, log into your Avid account and download the “EuControl Appsets vX.X.zip” to your computer.
Note: To access this file you must first register using the Control app, or using the EuControl Software Activation Card included
with the Dock.
As an alternative, visit EuControl Appsets and download the “EuControl Appsets vX.X.zip” from our Knowledge Base.
2 When download is complete, locate the downloaded “EuControl Appsets vX.X.zip” on your computer and double-click it to ex-
pand it (Mac) or uncompress it (Windows).
To install the latest Appset:
1 On your computer, go to the following locations:
• On Mac, go to: /Library/Application Support/Euphonix/UserSets/MC2User/MC_USER_SET_Root
• On Windows, make sure “Show hidden files and folders” is enabled, and go to:
C:\Users\\AppData\Roaming\Euphonix\UserSets\MC2User\MC_USER_SET_Root\
2 If an XML file is located in this folder, move the file to a different location and take note of that location as you might want to
use it in the future.
3 In the “EuControl Appsets vX.X” folder you downloaded and expanded, locate the appset files for your DAWs.
For example, for Pro Tools 12, locate the files called Pro Tools 12Mac.xml or Pro Tools 12Win.xml. If you are running
Pro Tools 11 instead of Pro Tools 12, locate the file Pro Tools 11Mac.xml or Pro Tools 11Win.xml.
4 Move the desired .xml file into the MC_USER_SET_Root folder.
5 Restart all EUCON applications by doing the following:
• On Mac, click the EuControl icon on the taskbar and select Restart EUCON Applications, then click Yes.
• On Windows, click the EuControl icon in the Task or System tray (Windows) and select Restart EUCON Applications, then
click Yes. Unused icons will be shown in the Hidden icons view.
6 Your EuControl surface will now recognize the new Appset.
Installation and Setup 15Dock Surface Controls Overview
This section provides an overview of the surface controls on the Dock when using it with the Control app and EUCON-compatible
applications.
The primary function of each switch is labeled directly on the switch. The secondary (SHIFT or ALT) function is labeled next to
the switch.
For audio workflows, see Using the Dock with Pro Tools.
1
2 2
Solo
3 9
Monitor
Mute Control Room
Write to
Preview Write Join All/Sel Nudge Bank Bank Nudge 1
12
Punch Auto Zoom Zoom
Preview Touch Start Scroll H Scroll V
Join H V
Sel
6
0
Suspend
Preview Latch
4 Susp
Auto
End Mark In Jog
5 Shuttle Mark Out
2
Rec 5
Capture Touch Off Punch User 1 Move Do to Do to All
Latch Sel Sel 3
8 10
20
Punch
Capture Trim Wndow Next Workstation App OK
4
6
Auto
Clip 30 Read User 2 Save Cancel
Match ALT
40
1 2 3 4
60
BACK+ USER P/ P ROLL Rec Mode Loop Rec
7
SHIFT SHIFT
10 10
Pro Tools | Dock top panel
1 – iPad Stand 6 – Wheel and Horizontal Touchstrip
2 – Soft Knobs 7 – Transport
3 – Soft Keys 8 – Channel Strip
4 – Left Control 9 – Control Room/Monitor
5 – Right Control and Vertical Touchstrip 10 – Surface SHIFT
Dock Surface Controls Overview 16iPad Stand
Provides a stand for securely mounting an iPad (not included) running the Pro Tools | Control app. The included Mini-Riser in-
creases the viewing angle for iPad Mini tablets, or it can be removed to fit larger iPad models in the stand. The Soft Knobs sur-
rounding the iPad stand correspond to controls on-screen in the app, as do the Soft Keys below the stand.
1
2 2
Solo
3
Monitor
Mute Control Room
iPad stand (1), Soft Knobs (2), and Soft Keys (3)
A back panel USB port lets you charge your iPad via Lightning cable while in the Dock. This USB port is for charging, only, it is
not a data/host connection.
Soft Knobs
These eight touch-sensitive encoders provide parameter control over the currently focused knobset displayed in the Control app,
such as EQ or Dynamics controls in Channel view, and pan controls in Mixer or Channel view. The Soft Knobs are dual-function
encoders that can be rotated to select and adjust values, and pressed to toggle certain functions.
The term “knobset” refers to different sets of parameter types, such as input, EQ, Dynamics, and sends.
Working with different knobsets from the Soft Knobs requires just a few simple steps:
1 Select or attention a track, or select a function or parameter.
For example, on the iPad use Channel view to attention a specific track and function. Or from an S3, press a Channel Encoder
Assign switch to focus that function (such as EQ). The Control app displays available parameters for the track or function.
2 To navigate to or select a track parameter or other choice shown on the iPad screen, press the Soft Knob next to that choice.
3 To adjust a parameter shown in the iPad, rotate a Soft Knob.
Soft Knobs surrounding the Control app in Channel view, EQ selected
Dock Surface Controls Overview 17Soft Keys
These sixteen switches engage the corresponding Soft Key assignment in the Control app. Default (factory) Soft Key assignments
are available automatically, and you can customize assignments using the Soft Key Editor in EuControl Settings.
Soft Keys shown in Mixer view
In the default Pro Tools appset, the two Soft Keys at the far left are assigned to the Fader and Soft Keys buttons. The two Soft Keys
at the far right are assigned to ^ and v, which scroll the displayed Soft Keys up or down, respectively. The twelve switches in the
center are assigned to the Soft Keys shown across the bottom of the Control app screen.
The 16 Soft Key switches on the Dock are separate from the Soft Keys view in the Control app, which provides multiple pages of
Soft Keys, each with four rows of six Soft Keys. For more information, see Soft Keys.
Left Control
These twelve switches provide dedicated automation controls.
Primary switch functions include track Automation mode selectors such as Write,
Write to
Touch, Latch, Touch Latch, Trim, Read, Join, Auto Join, Suspend, Off, and
Preview Write Join All/Sel (Automation) Window. These switches let you select the corresponding Automation
mode for the currently attentioned track, all selected tracks, or all tracks. By default,
the switch LEDs in the Left Control section indicate track automation modes globally
Punch Auto
Preview Touch Start for the session. For example, if the session contains some tracks in Read and other
Join
tracks in Touch automation modes, the Read and Touch switch LEDs on the Dock are
Suspend
lit. You can instead have switch LEDs only indicate automation mode for the cur-
Susp End
Preview Latch rently attentioned track using the Dock Automation Mode Buttons Follow Atten-
Auto
tioned Channel setting.
Capture Touch Punch
Latch
Off Secondary switch functions, accessed by enabling the ALT switch, provide advanced
automation commands including Preview, Punch Preview, Suspend Preview,
Punch
Capture, Punch Capture and AutoMatch, as well as Write To... commands
Trim Wndow Next
Capture (All/Sel, Start, End, Punch, and Next). The ALT switch is a latching “page 2”
switch that only affects the switches in the Left Control section. Using ALT lets you
Auto select advanced automation functions while still being able to access primary or sec-
Match Read ALT ondary switch functions in other sections.
For complete information on how to assign track Automation mode, and how you can
optimize switch and LED behavior, see Working with Automation.
Dock Surface Controls Overview 18Right Control and Vertical Touchstrip
These twelve switches include controls for navigation (such as Bank and Nudge), Wheel modes (such as Jog, Shuttle, Zoom,
and Scroll), and utility controls (such as OK, Cancel and the App/Workstation switch).
The EUCON Show Me icon is shown between the Save and
Cancel switches. Pressing Save + Cancel simultaneously
shows Soft Key assignments in EuControl.
Nudge Bank Bank Nudge 1
VerticalTouchstrip
Scroll H Zoom
H
Zoom
V
Scroll V To the right of the switches is a vertical, continuous Touchstrip
with four zones labeled 1, 2, 3, and 4 from top to bottom. By
2
default, these zones are assigned to the following functions:
Mark In Jog Shuttle Mark Out
Touchstrip (vertical) primary and SHIFT functions
Zone Primary Layer SHIFT Layer
User 1 Move Do to Do to All
Sel Sel 3
1 unassigned Preferences
2 unassigned Task Manager
Workstation App OK
3 unassigned Workspace
4
User 2 Save Cancel 4 unassigned Video window
The primary layer functions are left unassigned so you can cus-
tomize them however you choose.
For information on how you can customize the touchstrip, see Touchstrip Soft Key Assignments.
Wheel and Horizontal Touchstrip
The Wheel can be used to jog, shuttle, scroll, and zoom, mark in and out
o
points, move selections, and adjust clip gain, as determined by the Wheel
N
Sel
mode switches in the Right Control and Vertical Touchstrip section.
art Sc Below the Wheel is a horizontal continuous Touchstrip with four zones la-
beled 1, 2, 3, and 4 from left to right. By default, these zones are assigned to
nd M the following functions:
Touchstrip (horizontal) primary and SHIFT functions
nch U
Zone Primary Layer SHIFT Layer
xt Wor
1 unassigned Mix/Edit Window toggle
U 2 unassigned Hide All Floating Windows
3 unassigned Memory Locations Window
1 2 3 4
4 unassigned System Usage Window
The primary layer functions are left unassigned so you can customize them however you choose.
For information on how you can customize the touchstrip, see Touchstrip Soft Key Assignments.
Dock Surface Controls Overview 19Transport
These seven switches provide basic Transport commands RTZ (Return to Zero), Rewind, Fast Forward, Stop, Play, Record, and
Loop on/off in their primary layer, and extended Transport commands in the SHIFT layer.
BACK+ USER P/ P ROLL Rec Mode Loop Rec
The following table lists all the primary and secondary functions of the Transport switches.
Transport switches, primary and SHIFT functions
Primary Layer SHIFT Layer
||< (Return to Zero) Back + Play
> (Fast Forward) Next
(Stop) User (assignable in EuControl)
> (Play) Pre/Post-Roll on/off
(Record) Record Mode
Loop (playback) Loop Record
Channel Strip
The Dock provides one channel strip with a Solo switch, a Mute switch, a 100mm motorized touch-sen-
sitive fader, a channel select (Sel) switch, a Record Enable (Rec)/Automation Mode (A) switch, and a Solo
level meter.
Mute
Solo
The Solo switch lights yellow when that track is soloed.
12
Mute
6
The track is muted (off) when the strip Mute switch is lit, and is on (unmuted) when not lit.
Sel
0
Fader 5
Rec
The fader controls the level for the track assigned to the channel strip. It is motorized so it reflects changes 10
made in the application, such as automation. It is also touch sensitive, which some applications use for au-
tomation. 20
When the Select by Touch General preference is selected in the EuControl Settings application (see Clip 30
Select by Touch), touching a fader selects that track in the application and attentions it on that strip. This
is the same as pressing the fader Sel switch. 40
60
Holding down the Option (Mac) or Alt (Windows) key on your computer keyboard and touching a
fader sets it to unity gain.
Holding down Surface SHIFT and touching the fader also resets it to unity.
On systems that include an S3 or other controller, the Dock fader ignores fader Flip.
Dock Surface Controls Overview 20Channel Sel and Rec/A Switches
The channel strip features channel Sel and Rec/A switches that operate as follows:
Sel Selects that track in the application, and attentions it.
.
In Pro Tools and other applications, multiple tracks can be selected, but only one can be attentioned. In this case, the attentioned
track is the last one selected.
Rec/A Record-enables a track in the application.
• In Pro Tools, the Rec switch flashes red to indicate that track is enabled (armed) for recording, and is lit solid when recording
is in progress.
• Pressing a lit Rec switch disables that track for recording.
A (SHIFT + Rec/A) Changes the automation mode for a track.The selected automation mode appears in the channel strip (Mixer
view) and Track tile (Tracks view) on-screen in the Control app.
Configuring the Rec/A Switch Priority
You can swap the default function of this switch in EuControl. When swapped, the default function (without SHIFT) changes the
track automation mode, and the SHIFT function record enables the track. For more information, see Rec/Auto Switch Press.
Control Room/Monitor
This encoder defaults to Control Room level, and its SHIFT function to Monitor level in supported applications.
Monitor
Control Room
Surface SHIFT
Most switches have secondary functions that are shown next to each switch (such as Bank/Using the Dock with Pro Tools
This section provides information on the latest Appset functionality when using the Dock and Control app with the latest version
of Pro Tools. If you have updated from a previous version of Pro Tools, see Installing Appsets for EuControl Products.
Track Basics
This section shows how to select, bank and nudge tracks to assign them to the Dock channel strip to be able to adjust track volume,
solo, mute, record enable, or select a track automation mode.
Selecting Tracks
Selecting a track also attentions it, assigning it to the Dock channel strip and selecting it in Pro Tools. You can select tracks in Mixer
or Tracks view in the Control app, on-screen in Pro Tools, and/or from S3 (if present).
To select and attention a track in Mixer view:
Tap the track name under the fader for the desired track.
A blue rectangle surrounds the selected track’s fader strip, and surrounds the selected track in the Universe Scroller.
To select a track in Tracks view:
1 Tap Select in the Toolbar to enable it (lit).
Select button enabled in the Toolbar
2 Tap the desired track tile. A blue rectangle surrounds the track tile, and surrounds the selected track in the Universe Scroller.
Indication of a selected track (“8 Drum Crush”) in Tracks view
S3 and Artist Series Note
S3 and other Artist Series media controllers provide additional ways to select and/or attention tracks. When these units are used
with a Dock, the attentioned track will always be assigned to the fader strip on the Dock.
For more information on selecting and attention tracks on S3, see the Pro Tools S3 Guide.pdf.
Using the Dock with Pro Tools 22Banking
You can use the Bank and Nudge switches to navigate through tracks shown in the Control app. By default, Bank and Nudge
switches on the Dock only bank the Control app. To have tracks shown in the focused DAW follow, enable the App banks DAW
option in the Control app local options (gear icon).
On systems that include an S3 or other Artist Series media controller, the Bank and Nudge switches on those controllers affect all
connected surfaces (but not the Control app).
To bank tracks:
1 Press < Bank to bank the previous set of eight tracks, or Bank > to bank to the next set of eight tracks.
2 Press the SHIFT + Bank>/Nudge > switch to nudge tracks one channel to the right. If tracks 1–16 were assigned to fader strips
1–16, tracks 2–17 are now assigned to the 16 fader strips.
3 Press the SHIFT + < Bank/< Nudge switch to nudge tracks on channel to the left.
Nudge Bank Bank Nudge
Nudge and Bank switches
Adjusting Track Volume, Solo, and Mute
v
Once a track is assigned to the Dock channel strip, you can adjust its volume, solo, and
mute using the controls in the strip.
Solo
To adjust track volume:
Adjust the fader for that track. Mute
To reset the fader to default (0 dB):
Hold SHIFT and touch the fader.
12
To solo or mute a track:
6
Press the Solo or Mute switch.
Sel
0
You can also adjust volume, solo and mute of any track in the Control app.
Rec 5
To adjust track volume in the Control app:
10
Tap Mixer to show Mixer view, bank to the desired track, then touch the desired fader
and slide vertically. 20
Clip 30
To adjust track volume in Tracks view:
1 Tap Tracks to show Tracks view, tap a track tile, then tap Fader (or press its corre- 40
sponding Soft Key switch on the Dock). 60
2 In the Fader pop-up, touch the fader and slide vertically.
3 Do either of the following:
• Tap another track tile to adjust its level.
• Tap Fader again to close the Fader pop-up.
To reset a track’s fader level to default (0 db):
Double-tap a fader cap.
For more information, see the Pro Tools Control Guide.pdf
Using the Dock with Pro Tools 23Record Enabling Tracks
You can record enable tracks from the Dock channel strip, and from Mixer or Tracks view
in the Control app. A track must have a valid input to be record enabled. Solo
To record enable a track from the Dock channel strip: Mute
Press the channel Rec switch. The switch flashes red.
You can swap the primary and SHIFT functions of the Rec/A switch in the General tab 12
of EuControl Settings. For more information, see General. 6
Sel
0
To record-enable tracks in Mixer view:
Rec 5
Tap Mixer, bank to the desired track, then tap the record-enable button for each track 10
you want to record to.
20
The fader cap for each record-enabled track lights red and the record enable button
Clip 30
blinks red.
40
60
To record-enable tracks in Tracks view:
1 Tap Tracks, bank to the desired track, then tap the RECORD track function button so
it is highlighted.
2 Tap the track tiles for the tracks you want to record to.
The record-enable indicator for each track blinks red.
Using the Dock with Pro Tools 24Adjusting Track Parameters with the Soft Knobs
The combination of the Control app and Dock provide a powerful and intuitive way to adjust most track parameters.
• Channel view lets you quickly navigate among track parameters by selecting a parameter type such as Inserts, Input, or EQ
in the Function scroller.
• The Soft Knobs surrounding the iPad automatically map to whichever parameters you are viewing in the Control app.
To start using the Soft Knobs:
1 See Selecting Tracks to learn how to attention a track to the Dock.
2 In the Control app, tap Channel if it is not already selected. Channel view appears on the iPad.
1
2 2
Channel view, with Inserts selected in the Function scroller
The upper part of Channel view provides the same Tab bar and Universe Scroller as Tracks view, along with a single row of Track
tiles. Along the bottom of Channel view is the same Toolbar as in Tracks view, letting you view Transport controls or Soft Keys.
The other elements of Channel view are the following (numbers refer to the figure, above).
1 – Function Scroller Tiles to select the desired function, such as Inserts, Input, Dynamics, EQ, Sends, Pan, Group, and Mix.
2 – Function View Four parameter blocks on each side, each showing their currently assigned parameters. Parameter blocks align
with, and correspond to, the Soft Knobs on the left and right sides of the Dock. The center of the Function View varies with the cho-
sen function.
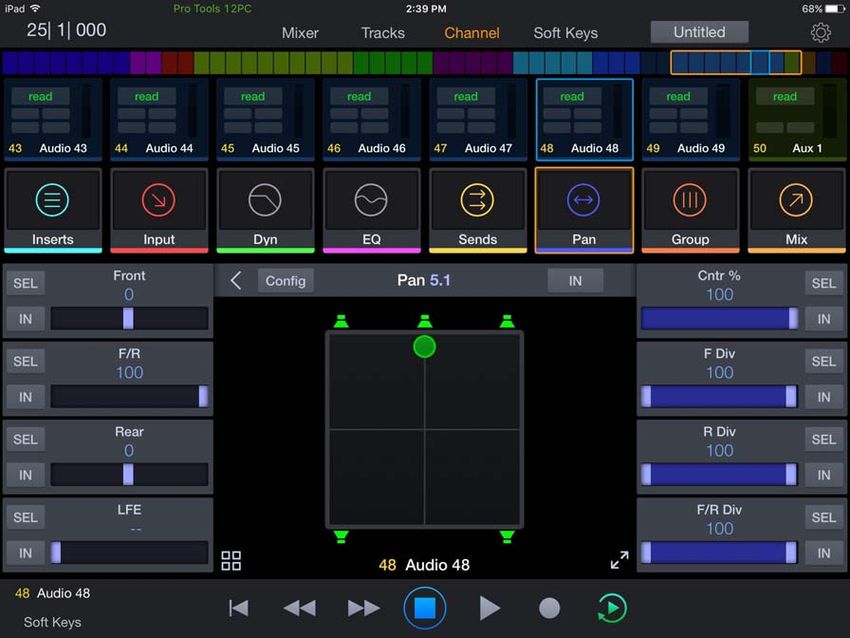
Using the Dock with Pro Tools 25Using Channel View to Adjust Plug-Ins, Dynamics, EQ, Sends, and Pan
To use Channel view:
1 Tap a Function block.
The lower area of the screen displays parameters for the chosen function.
Channel view, EQ selected
2 To adjust a displayed parameter, rotate and/or press the corresponding knob on the Dock. For example:
• To adjust Low-Mid Band Gain shown above, tap the EQ function block and then rotate the lower left Soft Knob on the Dock.
To reset a variable parameter (frequency, gain, or Q) to its default setting, press the corresponding encoder.
• To use the Dock knobs to pan, tap the Pan function block and then rotate two upper left Soft Knobs as appropriate.
3 For two-state or in/out parameters, tap the Sel or In buttons in the corresponding slot. For example:
• To turn a band on or off, tap the IN button for a band’s Gain.
• To access Q for a band in EQ3 tap the Sel button in the slot for the desired frequency. That slot displays Q. Tap Sel again to
return to Freq.
• To change filter Type (such as Peak or Shelf), tap the IN button for the desired band’s Frequency control.
Additional parameters might be available with other plug-ins, so check with the manufacturer for more information.
Plug-in Parameter Mapping
Plug-in parameter mapping depends on the selected knobset (function), as follows:
Inserts In the Inserts knobset parameters are mapped according to the manufacturer’s specifications. Parameter mapping can vary
between plug-ins, even of the same type.
EQ and Dyn In the EQ and Dyn knobsets, parameter mappings are standardized across types of plug-ins. For example, the thresh-
old controls for two compressor plug-ins from different manufacturers appear on the same encoder.
Using the Dock with Pro Tools 26Assigning Track Input and Output, Inserts, Sends, and Group Membership
You can route track I/O, work with track groups, and assign plug-ins and sends using the Dock and Channel view in
Pro Tools | Control.
The following example shows how to assign track input. The same basic steps apply for track output and group functions.
Assigning Track Input
To assign track input:
1 Attention a track (see Selecting Tracks to learn how to attention a track to the Dock).
2 In the Control app, tap Channel if it is not already selected.
3 In the Function scroller, tap Input.
Any currently assigned input is shown in the upper left slot of the Function view.
Or, to assign group membership tap Group. To assign track output, tap Mix.
4 Press the upper left knob on the Dock (the knob that corresponds to the upper left slot in the Function view).
The next level of choices appears in slots in the Function view. For Input, the choices are interface and bus.
5 Rotate the knob for interface or bus (or swipe the on-screen input selector) to select the desired input source.
6 Tap the In button on-screen to assign the selected input source.
Inserting a Plug-In
The next example shows how to insert a plug-in on a track. The same basic steps apply for assigning sends.
To assign a plug-in to a track:
1 Attention a track (see Selecting Tracks to learn how to attention a track to the Dock).
2 In the Control app, tap Channel if it is not already selected.
3 In the Function scroller, tap Insert.
Any currently assigned plug-ins are shown in slots of the Function view.
To assign a send, tap Sends.
4 To adjust a plug-in already inserted on the track, press the knob for that plug-in then use the knobs and on-screen buttons to ad-
just parameters.
5 To insert a new plug-in, tap the Config button on-screen (in the upper part of the Function view).
The Config button lights orange.
Config button enabled
Using the Dock with Pro Tools 27You can also read