Proxy Admin Guide 1.4.3 - Linux - Aspera
←
→
Page content transcription
If your browser does not render page correctly, please read the page content below
Proxy Admin Guide 1.4.3
              Linux
Revision:146 Generated:04/05/2019 07:37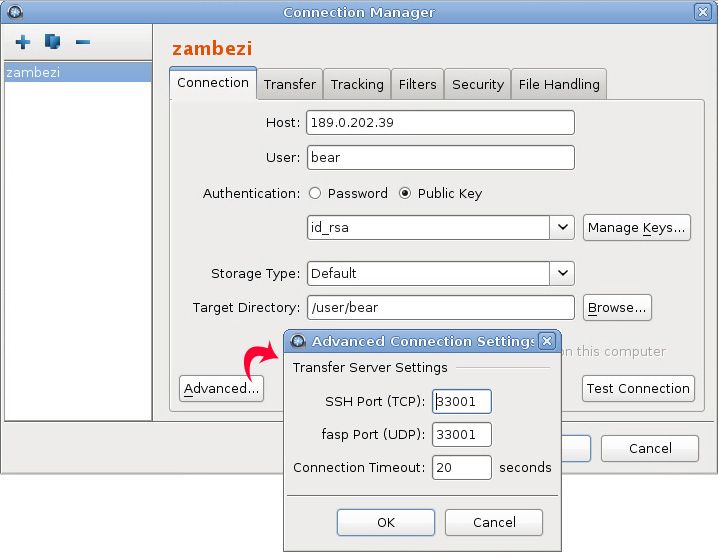
Contents

  Introduction............................................................................................................... 3

  Installation................................................................................................................. 4
          System Requirements............................................................................................................................................4
          Installing IBM Aspera Proxy............................................................................................................................... 5
          Uninstalling IBM Aspera Proxy...........................................................................................................................6

  Forward Proxy.......................................................................................................... 7
          Configuring the Proxy Server for Forward Proxy............................................................................................... 7
          Forward Proxy Firewall Configuration.............................................................................................................. 10
          Configuring the Client........................................................................................................................................ 10
          Transferring from the Command Line through Forward Proxy........................................................................ 12

  Reverse Proxy..........................................................................................................13
          Configuring the Proxy Server for Reverse Proxy..............................................................................................13
                 Creating and Authorizing Users on the Proxy Server........................................................................... 13
                 Creating a Group of Proxy Users (Optional).........................................................................................14
                 Granting sudo Access to Proxy Users Individually or as a Group........................................................ 14
                 Configure Reverse Proxy Settings......................................................................................................... 15
          Reverse Proxy Configuration Options............................................................................................................... 16
          UDP Port Reuse..................................................................................................................................................19
          Load Balancing................................................................................................................................................... 20
          Source-Port Filtering...........................................................................................................................................21
          Reverse Proxy Firewall Configuration...............................................................................................................22
          Configuring Internal Servers.............................................................................................................................. 22
          Transferring Files with Reverse Proxy.............................................................................................................. 22
          Using IBM Aspera Sync and IBM Aspera Drive with Reverse Proxy............................................................. 26
          Configuring Reverse Proxy for Use with Faspex and Shares........................................................................... 28
                 Configuring the Transfer Nodes.............................................................................................................28
                 Configuring the Proxy Server................................................................................................................ 29
          Configuring Reverse Proxy for HTTP Fallback with Nginx.............................................................................30
          Lua Scripting with Reverse Proxy..................................................................................................................... 30

  Appendices............................................................................................................... 31
          Securing your SSH Server................................................................................................................................. 31
                 Changing the TCP Port.......................................................................................................................... 32
                 Restricting User Access..........................................................................................................................34
          Troubleshooting...................................................................................................................................................36

  Technical Support................................................................................................... 39

  Legal Notice............................................................................................................. 39
| Introduction | 3

Introduction
  IBM Aspera Proxy protects your organization’s network while enabling secure, high-speed FASP transfers to and
  from highly restrictive network environments. Built on top of the Linux kernel, it allows transparent pass-through of
  FASP transfer sessions across secure DMZs without impeding transfer speeds or compromising the security of your
  internal network.
  IBM Aspera Proxy also supports load balancing, high availability, and flexible security policies. It consolidates FASP
  transfers in and out of a corporate network and enables precise control over which users can initiate transfers with
  remote Aspera transfer servers. With Proxy support built into all Aspera desktop and browser-based transfer clients,
  its configuration and use is straightforward for all your users.
  IBM Aspera Proxy supports both forward (outbound) and reverse (inbound) proxy modes, allowing FASP transfers to
  be initiated by users who are either inside or outside the corporate network.

  Forward Proxy
  Forward proxy provides a secure way for users behind company network firewalls to initiate requests for FASP
  transfers of files that are on servers outside the firewall. It addresses the following customer use cases:
  •   Limited-use Internet access: Your enterprise has security requirements that prevent you from deploying IBM
      Aspera Enterprise Server (or IBM Aspera Connect Server) inside your DMZ. Organizations often limit general
      Internet access for their employees, which can affect the FASP protocol even if used for legitimate business
      needs. IBM Aspera Proxy provides secure access to the Aspera transfer servers residing outside of your corporate
      network without exposing users’ IP addresses. It also enforces strict user authentication for Aspera clients that
      initiate connections to the outside servers.
  •   Consolidation and control of FASP transfers: If you are an IT systems manager and want to establish better
      control and security around FASP transfers that your internal users initiate, IBM Aspera Proxy can fulfill your
      requirements without impeding the users’ experience. It provides a single point through which all FASP transfers
      flow in and out of your corporate network, hiding internal clients’ IP addresses and allowing you to control which
      users can initiate FASP transfers, without slowing down the speed of the transfers.

  Reverse Proxy
  Reverse proxy provides a secure way for users outside company network firewalls to initiate requests for FASP
  transfers from servers inside the firewall. It addresses the following customer use case:
| Installation | 4

   •   Trusted partners need access to files on your servers: Customers want to allow users outside their company
       firewall to initiate FASP transfers to and from servers inside the company network.
   Reverse proxy is usually deployed inside a DMZ, on top of a Linux-based server. Multiple proxy instances can
   also be launched on a server cluster, behind an enterprise-grade load balancer, forming a high-availability solution.
   Reverse proxy currently employs the same security model as IBM Aspera Enterprise Server and Connect Server,
   based on the SSHD service. As a result, no changes are needed on the client side. Once authenticated, the proxy
   server invokes one program: ascp_rproxy, which is in charge of bidirectional forwarding of SSH control traffic
   and FASP (UDP) traffic between the client and the internal server.
   The ascp_rproxy program maintains an SSH connection with the ascp client when it’s invoked by the SSHD
   service. A second SSH connection is set up between the proxy server and the internal Enterprise Server instance by
   virtue of a pre-installed SSH key. It then bridges the two SSH connections, by forwarding incoming data from one
   connection to the other, in both directions. In order to forward FASP (UDP) traffic, the ascp_rproxy program
   proxy server sets up a dynamic network address translation (DNAT) rule using the Linux iptables kernel module.
   Since UDP traffic forwarding is done using the Linux iptables kernel module, high-speed packet forwarding can
   be achieved without any reduction in speed.

Installation

System Requirements
   Your IBM Aspera Proxy server requires the following:
   •   A Linux system (See the release notes for a list of supported Linux systems and versions.)
   •   iptables v1.3.0+ installed and not blocking TCP/UDP 33001
   •   Exclusive control of the following iptables/chains:

       nat/prerouting
       nat/postrouting
| Installation | 5
filter/forwarding
Warning: Do not install IBM Aspera Proxy on a machine where IBM Aspera Enterprise Server or IBM
Aspera Connect Server is installed. If these products are already installed, be sure to remove them before
installing Proxy.
Installing IBM Aspera Proxy
To install IBM Aspera Proxy, log into your computer as root, and follow the steps below.
1. Download the Aspera product installer from the Aspera download site.
Use the credentials Aspera has provided to your organization to access:
http://downloads.asperasoft.com/en/downloads/42
If you need help determining your access credentials, contact your Aspera account manager.
2. Launch the installer by running the following commands with root privileges:
RPM
# rpm -Uvh ibm-aspera-proxy-version.rpm
For upgrades, use -U instead of -i. -U is the same except that it removes all other versions of the
package after the new one is installed.
DEB
# dpkg -i aspera-proxy-version.deb
For upgrades, see your system's man page or other documentation for dpkg.
This starts the IBM Aspera Proxy daemon and makes adjustments to the iptables system settings.
3. Install the license.
In a terminal window, create the following file. Open the file with a text editor and paste your license key string
into it:
/opt/aspera/proxy/etc/aspera-license
If you’re updating an existing license, open the file and replace the existing license string with a new one.
Save and close the file, then run the following command to verify the installed version is correct:
# ascp -A
4. Review or update OpenSSH authentication methods.
Open your SSH server configuration file with a text editor:
/etc/ssh/sshd_config
To allow public key authentication, set PubkeyAuthentication to yes. If you also plan to allow password
authentication, which is less secure than keys, set PasswordAuthentication to yes:
...
PubkeyAuthentication yes
PasswordAuthentication yes
...
Note: For information about security options with Aspera products, see Appendix: Securing Your SSH Server.
Save and close the file, then run one of the following commands to restart SSH.| Installation | 6
Note: Depending on the Linux type and version, your system's restart procedure uses either init or systemd.
To determine which of these your system uses, you can run either or both the following:
$ ps -C systemd
$ ps -C init
If the output reports that there are systemd processes, use the systemctl command. If no systemd
processes are reported, you can generally assume the system uses init. (Although the above command for init
searched for init, a return of init may be misleading if it's actually a symlink to systemd.)
systemd
# systemctl sshd restart
init
# service ssh restart
5. Generate a new self-signed certificate.
Self-signed certificates that use an IP address instead of a hostname can no longer be used. For security reasons, if
the Proxy server uses the self-signed certificates that were generated during installation, transfers through forward
proxy are now refused, because these certificates do not include the hostname. Also, if you are upgrading from a
previous version of Proxy, your client certificates may be using an IP address instead of the hostname.
To generate a new certificate and key that includes the hostname, run the following command on the Proxy server:
# /opt/aspera/proxy/bin/generate-cert.sh hostname
This command replaces the existing aspera_server_cert.pem in the Proxy installation with a new
certificate that includes the hostname.
Uninstalling IBM Aspera Proxy
The following steps explain how to uninstall Proxy from your Linux system:
1. Obtain the name of the Proxy package installed on your system by running the command below that corresponds
to the type of Linux system you're using:
RPM
$ rpm -q aspera-proxy
DEB
$ dpkg -l aspera-proxy
Determine the Aspera Proxy package name from the command output. For example, on Debian, the above dpkg
command returns something similar to the following:
||/ Name Version Description
+++-================-==============-================================
ii ibm-aspera-proxy 1.2.2.100179-2 IBM Aspera Proxy Server
In this example, the package name is ibm-aspera-proxy-1.2.2.100179.| Forward Proxy | 7
2. Uninstall this package by running the command below that corresponds to your type of Linux system, replacing
pkg_name with the package name derived in the previous step.
RPM
$ rpm -e pkg_name
DEB
$ dpkg -r pkg_name
Forward Proxy
Configuring the Proxy Server for Forward Proxy
The configuration steps below require setting values in the proxy server's aspera.conf file, which is found in the
following location:.
/opt/aspera/proxy/etc/aspera.conf
You can edit the file manually or by using the asconfigurator utility. Both methods are described below.
The asconfigurator command is located in /opt/aspera/proxy/bin. The examples below assume that
the command is already on the path. You can either add it to root's path or prefix the command with the path each time
you execute it.
1. Enable HTTP and/or HTTPS.
Run the following commands:
# asconfigurator -x "set_server_data;enable_http,true"
# asconfigurator -x "set_server_data;enable_https,true"
These commands create the following lines in aspera.conf, which can also be added to the
section manually:
...
true
true
...
2. Enable the proxy server.
Run the following command:
# asconfigurator -x "set_server_data;proxy_enabled,true"
This command creates the following lines in aspera.conf, which can also be added to the section
manually:
...
true
...| Forward Proxy | 8
This is the only setting on the proxy server that's required to begin using forward proxy. However, you may need
to change other settings based on your unique network configuration.
3. Update additional forward proxy settings, as needed.
To use asconfigurator to set proxy options, use the following syntax:
# asconfigurator -x "set_server_data;parameter,value"
The table below shows the parameters and options used in the / section of
aspera.conf. To also view all forward-proxy configuration options and the asconfigurator command to
set them, run the asuserdata command as follows:
# /opt/aspera/proxy/bin/asuserdata -+
Note: The asuserdata -+ command displays the default values for the server setup, not the currently set
values.
asconfigurator parameter Description Default Value
aspera.conf option
proxy_enabled Disable or enable the proxy server. Must be set to true false
to turn on the service.
proxy_authentication Disable or enable the authentication requirement for false
the proxy server.
proxy_bind_ip_address The IP address that the proxy server binds to (also 0.0.0.0
the IP address that the client connects to). The default
value, 0.0.0.0, allows the proxy server to bind to all
available interfaces.
proxy_bind_ip_netmask The netmask for the proxy_bind_ip_address. blank (null)
proxy_port_range_low The lower bound of the port range. Ensure that the 5000
firewall allows the port range you specify.
proxy_port_range_high The upper bound of the port range. Ensure that the 10000
firewall allows the port range you specify.
proxy_cleanup_interval The interval, in seconds, at which the proxy server 0
scans and cleans up expired sessions.
proxy_session_timeout The interval, in seconds, after which a session times 0
out if no keep-alive updates have been received.
proxy_keepalive_interval The interval, in seconds, at which an ascp client sends 0
keep-alive requests. This option is propagated to the
client.| Forward Proxy | 9
Below is an example of the portion of the section in aspera.conf:
...
true
false
0.0.0.0
5000
10000
0
0
0
...| Forward Proxy | 10
On the proxy machine, create a node API user by running asnodeadmin command:
$ sudo /opt/aspera/proxy/bin/asnodeadmin -au node_api_user -p password -
x transfer_user
The transfer user must be an existing user on the proxy server.
Forward Proxy Firewall Configuration
Note: If you have a local firewall on your proxy server (such as iptables), verify that it is not blocking the SSH and
FASP transfer ports.
Internal Firewall
If outbound connections are restricted by the internal firewall, the firewall must be open to the following ports.
• outbound TCP/9091 and 9092 (or whatever ports are configured for HTTP and HTTPS the client transfer
application). These are the ports through which a client on the internal network establishes communication with
the proxy server.
• outbound TCP and UDP/5000-10000 (or whatever range of ports are set in aspera.conf using
port_range_low and port_range_high). These are the ports the client uses for SSH and FASP data
transfer.
External Firewall
If outbound connections are restricted by the external firewall, the external firewall must allow outbound TCP and
UDP/33001 for SSH and FASP data transfer.
If the destination server has a Windows, FreeBSD, or Isilon operating system that does not allow concurrent transfers
to bind to the same UDP port, the external firewall must allow a range of UDP ports, for example outbound
UDP/33001-33100.
Configuring the Client
You configure your client transfer application by specifying your proxy host, port number, username, and password.
In the Enterprise Server GUI, go to Preferences > Proxy. Note that the transfer proxy feature is disabled by default.
On this screen, you can do the following:
• Configure connections on a case-by-case basis using this screen.
• Configure proxy settings for all transfers by clicking Global Preferences. This requires root privileges.| Forward Proxy | 11
Case-by-Case Settings
1. Check the Enable transfer proxy checkbox if you want to turn on transfer proxy and override global settings for
connecting to your proxy server.
2. Enter the proxy server’s hostname or IP address, and enter the port number.
3. Enable the Secure checkbox if your proxy server allows secure connections.
4. Enter the proxy server’s Node API username and password. This is the Node API user you created when you were
configuring the proxy server. (See Configuring the Proxy Server for Forward Proxy on page 7.)
Global Settings
Setting global preferences for proxy transfers requires root/admin privileges. To configure your global proxy settings,
click the Global Preferences button. In the Global Preferences window, fill out the choices as follows:
1. Check the Enable transfer proxy checkbox. Note that the transfer proxy facility is disabled by default.
2. Enter the proxy server’s hostname or IP address, and enter the port number.
3. Enable the Secure checkbox if your proxy server requires secure connections (recommended).
4. Enter the proxy server’s Node API username and password. This is the Node API user you created when you were
configuring the proxy server. (See Configuring the Proxy Server for Forward Proxy on page 7.)| Forward Proxy | 12
Transferring from the Command Line through Forward Proxy
Command-line ascp and ascp4 transfers can be run through a forward proxy. The syntax depends on whether
proxy authentication is required—that is, whether// is set to false.
In either case, you are prompted for your password unless the environment variable ASPERA_SCP_PASS=password
has already been set. Specify the Proxy port if you are using a port other than the default ports for DNAT and DNATS
protocols (ports 9091 and 9092).
Note: If you are transferring with ascp4, the version of ascp4 on the server and on the client must be the same.
• With no proxy authentication required ( is set to false in aspera.conf):
$ ascp options --proxy
dnat[s]://proxy_username@proxy_hostname[:port] source_file1[,source_file2,...] userna
• With proxy authentication ( is set to true in aspera.conf):
$ ascp options --proxy
dnat[s]://proxy_username:password@proxy_hostname[:port] source_file1[,source_file2,..
If the environment variable ASPERA_PROXY_PASS=proxy_server_password has been set, you do not need to
specify the proxy server password.
Examples
• No proxy authentication required: In the following command the user Sue transfers the file /data/file1 to /
Sue_data/ on ihost.com, through the proxy server at phost.com. The username user is necessary but
only as a placeholder; it can be anything. No password is required. After running the command, Sue is prompted
for the ascp password.
$ ascp --proxy dnat://user@phost.com /data/file1 Sue@ihost.com:/Sue_data/| Reverse Proxy | 13
• Proxy authentication required: The following example is the same as above, except that authentication is required.
In this case, the proxy user (aspera_proxy) and password (pa33w0rd) are required. After running the
command, Sue is prompted for the ascp password.
$ ascp --proxy dnats://aspera_proxy:pa33w0rd@phost.com /data/file1
Sue@ihost.com:/Sue_data/
Reverse Proxy
Configuring the Proxy Server for Reverse Proxy
Reverse proxy is used to route incoming transfers from the proxy server to the internal destination. In order to do so,
user accounts must be set up on the proxy server and rules that dictate how transfers are routed must be configured.
The instructions below describe the steps to set up user accounts, grant them sudo access, and configure settings and
logging.
Creating and Authorizing Users on the Proxy Server
Proxy user accounts can be set up in two ways:
• Squashed user account: Multiple users make transfers to a single “squashed” user account on the internal
destination server. No individual accounts are required on the destination server, but individual accounts are still
required on the proxy server. The squash-user account is required only on the destination server, not on the proxy
server. At the destinatoin, the transferred files are owned by the squash-user. The squashed approach is generally
considered the best choice for IBM Aspera Faspex.
• Individual user accounts: Each user makes transfers to their own account on the destination server. The
individual user accounts must exist at the destination, as well as on the proxy server. When transferred files arrive
at the destination, they are still owned by the user who initiated the transfer. The individual-account approach is
generally considered the better choice for transfers initiated from IBM Aspera transfer servers (a.k.a. IBM Aspera
Connect Server and IBM Aspera Enterprise Server).
Proxy supports a mix of these two approaches. The following steps cover the setup of both squashed and individual
accounts:
1. Log into the Proxy server as root and create an account for each user.
You do not need to set up a squashed user account on the Proxy server, but you do need individual accounts for
each user that will use the squashed account.
2. For each user, set the default shell to /bin/aspshell by running the following command:
$ chsh -s /bin/aspshell username
For example:
$ chsh -s /bin/aspshell bear
Changing shell for bear.
Warning: "/bin/aspshell" is not listed in /etc/shells.
Shell changed.
The warning message can be safely ignored.
3. Generate an SSH key pair for each user on the proxy server:
$ su - username -c ssh-keygen| Reverse Proxy | 14
By default, ssh-keygen generates and copies the private key (usually id_rsa) and public key (usually
id_rsa.pub) to the .ssh directory in the user’s home directory, typically /home/username/.ssh.
If you are using a squashed user account on the Proxy server, generate an SSH key pair on the Proxy server using
the same command.
4. Add the public keys for individual or squashed user accounts to the appropriate server.
For each user, create the file authorized_keys in /home/username/.ssh on the Proxy server. Copy and
paste the text of each user's public key into their corresponding authorized_keys file.
For a squashed user account, create the file /home/squash_username/.ssh/authorized_keys on the
internal server(s) and copy and paste the text of the squashed user's public key into their authorized_keys
file.
Creating a Group of Proxy Users (Optional)
Managing permissions for Proxy users is often easier if they are part of a system group.
1. Create a group for Proxy users.
# groupadd group_name
2. Confirm the group was created.
# cat /etc/group
The new group should appear at the end of list.
3. To add users to the group, run the following command:
# usermod -a -G group_name username
Granting sudo Access to Proxy Users Individually or as a Group
You can grant sudo access to users individually or as a group.
1. Edit the /etc/sudoers file by running the following command:
# visudo
2. Under the line Defaults requiretty, add the following line for the user or group that will use the Proxy
server:
Defaults:username !requiretty
Defaults:%group_name !requiretty
3. Grant sudo access to users or groups.
For users, add the following line under the root ALL=(ALL) ALL line:
username ALL=(ALL) NOPASSWD: /sbin/iptables-restore
For a group, add the following line under the line %wheel ALL=(ALL) ALL or %sudo ALL=(ALL) ALL
(depending on your operating system):
%group_name ALL=(ALL) NOPASSWD: /sbin/iptables-restore
4. Save your changes and exit.| Reverse Proxy | 15
Configure Reverse Proxy Settings
The configuration steps below require setting values in the proxy server's aspera.conf file, which is found in the
following location:.
/opt/aspera/proxy/etc/aspera.conf
You can edit the file manually, or by using the asconfigurator utility. Both methods are described below.
The asconfigurator command is located in /opt/aspera/proxy/bin. The examples below assume that
the command is already on the path. You can either add it to root's path or prepend the path to the command each time
you execute it.
For more information about the aspera.conf settings and corresponding asconfigurator settings, see
Reverse Proxy Configuration Options on page 16.
1. Enable reverse proxy:
# asconfigurator -x "set_server_data;rproxy_enabled,true"
This adds the following to the section of /opt/aspera/proxy/etc/aspera.conf:
true
2. Create forwarding rules.
Single Rule: If you are only setting one rule, you can use asconfigurator commands. Rules must specify a
host, which is the IP address of the internal destination. You can also specify the port to use, rather than the default
22. To set a rule and specify the file to use for SSH authentication, run the following commands:
# asconfigurator -x
"set_server_data;rproxy_rules_rule_host,host_ip_address[:port]"
# asconfigurator -x "set_server_data;rproxy_rules_rule_keyfile,filepath"
Multiple Rules: You can specify different rules keyed by the IP address or host name used for connecting
to the Proxy server. For example, using multiple rules allows you to set one rule block for transfers to
faspex.asperasoft.com and set another for transfers to shares.asperasoft.com.
Authentication: Each rule requires a setting of $(user)/.ssh/id_rsa, which specifies the
location of the SSH private keyfile. If no is specified, the proxy server uses the proxy user’s
account to authenticate with the internal server.
For example, to set a rule such that transfers destined for Proxy host 7.7.7.7 are forwarded to internal server
10.0.0.10, add the following:
true
10.0.0.10:22
/home/$(user)/.ssh/id_rsa| Reverse Proxy | 16
To set an additional rule such that transfers destined for 7.7.7.8 should be forwarded to the squashed user account
xfer on internal server 10.0.0.30, add the following:
true
10.0.0.10:22
10.0.0.30:22
xfer
/opt/aspera/proxy/etc/ssh_keys/id_rsa
3. Set up logging for reverse proxy.
a. In /etc/rsyslog.d, create the file aspera.conf. Enter the following in the file:
local2.* -/var/log/aspera.log
& stop
(The above example is for CentOS 7. In other Linux platforms, the equivalent commands are similar.)
b. Restart the logger:
# systemctl restart rsyslog
c. Create the file /etc/logrotate.d/aspera containing the following:
/var/log/aspera.log {
daily
rotate 15
copytruncate
postrotate
chmod 644 /var/log/aspera || true
endscript
compress
}
Reverse Proxy Configuration Options
Single rule: If you are configuring a single rule, you can use asconfigurator to set most options, using the
syntax:
# asconfigurator -x "set_server_data;parameter,value"
Multiple rules: If you are configuring multiple rules or setting options that do not have asconfigurator
parameters, you must manually edit the Proxy configuration file found in:
/opt/aspera/proxy/etc/aspera.conf| Reverse Proxy | 17
To display a list all reverse-proxy configuration options in well-formed XML, run:
# /opt/aspera/proxy/bin/asuserdata -s
Configuration options and default values for the reverse proxy server are contained in the subsection of
the section. The following table describes these options. For an example of an aspera.conf file that
incorporates these options, see the example below.
Reverse Proxy Configuration Options
aspera.conf option Description Default Value
asconfigurator parameter
Turn reverse proxy on/off (true/false). false
rproxy_enabled
Set the logging level. 0 - Log connection status. 1 - Log 0
only debug message level 1. 2 - Log only debug message
rproxy_log_level level 2.
Rule with no conditional attributes. N/A
setting can be used to set rules for different hosts and
(no asconfigurator option)
different ports. Requires an ascp client version 3.1 or
later.
Rule specifying the IP address of the proxy server. (none)
(no asconfigurator option)
(no asconfigurator option)
IP address and optional SSH port of internal destination, blank (null)
with the syntax ip_address[:port]. The default port (if
rproxy_rules_rule_host unspecified) is 22.
Specifies a list of hosts for load balancing and SSH port (none)
(no asconfigurator option) reuse. Each host is listed as ip_address:port. See Load
Balancing and UDP Port Reuse on page 19.
Proxy server port that receives UDP traffic. 33001
rproxy_rules_rule_proxy_port
Bind the outgoing TCP/UDP channel to a specified IP blank (null)
address. By default (no value set), outgoing TCP traffic
rproxy_rules_rule_bind_source_addressuses a system-assigned IP address and UDP traffic uses
the source IP address.
Important: For Proxy servers with more than one NIC,
must be specified to| Reverse Proxy | 18
aspera.conf option Description Default Value
asconfigurator parameter
identify the interface for the connection with Enterprise
Server.
Enables load balancing and specifies the method for round_robin
distributing transfers to a list of multiple destintations.
(no asconfigurator option)
Round-robin selection is currently the only supported
method. For details, see Load Balancing.
Squash account name used for authenticating with the blank (null)
internal server.
rproxy_rules_rule_squash_user
Path and file of the SSH private key for authenticating blank (null)
with the internal server.
rproxy_rules_rule_keyfile
Enable/disable (true/false) reverse proxy source-port false
filtering on or off (true/false). CAUTION: Setting this
rproxy_rules_rule_src_port_filtering
option to false reduces reverse proxy security and
therefore should be used only when necessary. For
details, see Source-Port Filtering.
Setting this option to false enables reverse proxy to true
create iptables rules that increment the UDP port number
rproxy_rules_rule_udp_port_reuse
to which clients send each concurrent transfer and the
internal server's UDP port to which the transfer is routed.
For details, see UDP Port Reuse on page 19. Note:
Must be set to false for Windows destinations.
Sample aspera.conf for Reverse Proxy
The sample below includes three example rules.
1. Minimal rule. Incoming transfers are forwarded to the specified internal host (10.0.0.10:22) if they have been
sent by users with valid SSH key authentication. Other configuration options take default values and load
balancing is not enabled.
2. Load balancing rule. Incoming transfers are forwarded to the specified internal hosts (10.20.103.133-135:33001).
As in rule 1, only transfers sent by users with valid SSH key authentication are allowed through the reverse
proxy. Since three hosts have been specified and the default UDP port is 33001, the three incremental ports
UDP/33001-33003 must be open on the external firewall.
3. UDP port reuse and squash user account rule. Incoming transfers to the proxy server with the IP address of
10.20.101.151 that are destined to an internal Windows server are received and forwarded on incremental UDP
ports beginning with 5555. Transfers are forwarded as the squash user once the clients have been authenticated
on the proxy server. The incremental UDP ports beginning with 5555 and up to the number of concurrent UDP
transfers allowed must be open on the external firewall. For example, if 10 concurrent UDP streams are allowed,
UDP ports 5555-5565 must be open.
...
true
0
10.0.0.10:22
/home/$(user)/.ssh/id_rsa| Reverse Proxy | 19
10.20.103.133:33001
10.20.103.134:33001
10.20.103.135:33001
/home/$(user)/.ssh/id_rsa
true
round_robin
5555
sender
/opt/aspera/proxy/etc/ssh_keys/id_rsa
false
...
UDP Port Reuse
When an ascp server is running on Windows, concurrent transfers cannot bind to the same UDP port. Each
concurrent transfer will bind to the next open port starting from the default port of 33001.
When the nodes behind the reverse proxy server are Windows hosts, the iptables rules that are created must account
for this and create a rule that routes traffic from a UDP port on the proxy server to a UDP port on the destination host.
To enable this feature set the option to false. When set to false, reverse proxy creates rules
where each concurrent transfer through the proxy server gets an incremented UDP port number for the clients to send
to. Then the iptables rule routes the traffic from that port to the ascp server's port. In this scenario, the UDP ports are
incremented by 1 with each concurrent connection. The following diagram shows how the UDP ports on the proxy
server and the Windows target are updated with each concurrent transfer.
In prior versions of IBM Aspera Proxy, this configuration could be achieved by setting to 0.
However, setting it to zero is no longer supported and now results in an error.
For information about how to set up load balancing when = false, see Load Balancing on
page 20.| Reverse Proxy | 20
Note: When setting to false, and thereby enabling the use of incremented UDP port
numbers, make sure the UDP ports specified by are open on the external firewall.
Load Balancing
The host rule for a single proxy instance can include a list of multiple destination servers that reverse proxy will use
to distribute transfer sessions. If a destination does not respond, reverse proxy marks it as faulty, logs this information,
and tries the next destination in the list. While the server is marked as faulty, reverse proxy will not forward transfers
to it. After two minutes, the faulty mark is removed, and the server is returned to the list of available servers.
Enabling Load Balancing
To turn on the balancing feature in the proxy server's aspera.conf, set to round_robin
(currently the only supported balancing method). Each destination is specified with a tag and the host tags
list is defined using . Each specifies the destination host's IP address and the SSH port to which it
connects. For example:
round_robin
10.20.103.133:33001
10.20.103.134:33001
10.20.103.135:33001
/home/$(user)/.ssh/id_rsa
UDP Port Requirements for Load Balancing
Load balancing requires exposing multiple UDP ports on reverse proxy. Ports are opened based on the value specified
by (33001 if not specified). The formula for port exposure is proxy port base + the number of the
host in the load-balance configuration. For example, if the load is to be balanced among three host destinations and
the aspera.conf configuration uses the default UDP proxy port value (33001), the three UDP ports for reverse
proxy will be 33001, 33002, 33003. In this case, the port numbers used on the destination hosts do not matter.
The reverse proxy server in the above example determines port numbers by incrementing from proxy port 33001, the
default port number. However, users may want to expose different port numbers to the outside world. To do this, set
to a different value, and reverse proxy will use this as the starting point for opening the series of
consecutive port numbers for load balancing, turning off UDP port reuse, or combinations of both. For example, if
is set to 5555 in the above configuration, the four proxy ports that would be opened are 5555, 5556,
5557, and 5558.
Note: When setting up load balancing, make sure the UDP ports specified by are allowed on the
firewall.
UDP Port Reuse and Load Balancing on Windows
If load balancing is used because the destination hosts are Windows, must be set to false.
In the setup below, concurrent transfers from four clients are being load-balanced between two Windows destinations.| Reverse Proxy | 21
Source-Port Filtering
The option in aspera.conf enables or disables source-port filtering (true or
false). By default, source-port filtering is disabled (false).
When Source-Port Filtering is Enabled (true)
When source-port filtering is enabled, reverse proxy restricts client connections to only those UDP source ports
specified internally by each transfer session. Enabling source-port filtering allows the reverse proxy to use UDP ports
as dictated by network connections between clients and servers. Use this option only if there are network address
translation (NAT) devices between the client and the reverse proxy that require the ports set up by the UDP sockets
remain intact and unchanged. Setting this option to true requires changes to any firewalls in front of your reverse
proxy to allow for the different UDP ports.
When Source-Port Filtering is Disabled (false)
In cases where client-side firewalls change the specified source port in transit, source-port filtering must be disabled
to allow the connection to be established. When disabling source-port filtering, make sure the UDP ports specified by
are allowed on the external firewall.
One indication that source-port filtering may need to be disabled is when client connections fail with a timeout such
as “Error establishing UDP connection (check UDP port and firewall)”. Aspera transfer logs on either the client or
server side will also show "Client unable to connect to server (check UDP port and firewall)” or “Server unable to
hear from client (check UDP port and firewall)”. If the same timeout errors still occur when source-port filtering is
disabled, this generally indicates that traffic is being blocked at a firewall. For related information, see UDP Port and
Firewall Timeout Errors on page 37.
Note: Disabling source-port filtering relaxes reverse proxy security and therefore should be used only when
necessary.| Reverse Proxy | 22
Reverse Proxy Firewall Configuration
Note: If you have a local firewall on your proxy server (such as iptables), verify that it is not blocking the SSH and
FASP transfer ports.
External Firewall: The TCP and UDP ports on which the internal server is listening must be allowed. By default,
these are TCP and UDP/33001.
Internal Firewall: The TCP and UDP ports on which the internal server is listening must be allowed, but only for
connections originating from the proxy server.. By default, the ports are TCP and UDP/33001.
Note: If proxy_port has been set to a value other than 33001, or has been set to a range to accommodate load
balancing or UDP port reuse, then that port or range of ports must be allowed through the external and internal
firewalls. For more information on port configuration for load balancing, see Load Balancing on page 20. For
more information on port configuration for UDP port reuse, see UDP Port Reuse on page 19.
Configuring Internal Servers
The internal node must be running an Aspera Transfer server (a.k.a. Enterprise Server or Connect Server).
1. Log into the internal node as root.
2. Create an account for each user who is not using the squash-user account. If you are using a squash-user account,
create an account for the squash user.
3. For each user, including the squash user, create the file /home/user/.ssh/authorized_keys. Copy and
paste the text from the user's public key (generated for that user when you ran ssh-keygen on the proxy server)
into the authorized_keys file.
Transferring Files with Reverse Proxy
Once the configuration tasks have been completed for the proxy server, internal destination server, and external
clients, file transfers from external users are completely transparent. To make transfers to the internal server, users
need only specify the following:
• the IP address or domain name on the proxy server that corresponds to the internal destination
• the correct SSH port for the connection to the proxy server
• the target directory on the internal destination server
• any optional parameters related to a transfer session
From the Command Line
The following configuration examples show the squash-user and individual-account approaches in the same system:| Reverse Proxy | 23 * Although the user names on the external client are bear and bobcat in the above example, they do not need to correspond to user names on the Proxy server and internal server. The reverse-proxy rules for each configuration are defined on the proxy server in aspera.conf:
| Reverse Proxy | 24

Users bear and bobcat have valid SSH key pairs and accounts on the proxy server. From the command line, bear
runs the following ascp command specifying the proxy instance governed by the squash rule:

Since the rule for proxy instance 189.0.202.39 specifies a squash user (xfer), the file belonging to bear, bobcat, or
anyone using that proxy instance, will be owned by xfer when it arrives on the internal server.
The -P 33001 flag specifies the SSH port on the proxy server (not the port on the internal server, which is specified
in the rule). The port must be specified on the command line if port 22 is disabled in /etc/ssh/sshd_config.
Users bear and bobcat have valid SSH key pairs and accounts on both the proxy server and the internal server.
From the command line, bobcat runs the following ascp command specifying the proxy instance for the
individual-user approach:

 $ ascp -P 33001 testfile_bobcat bobcat@189.0.202.40:/user/bobcat

Since the rule for proxy instance 189.0.202.40 does not specify a squash user, the file will still be owned by bobcat
when it arrives on the internal server.

From the Enterprise Server GUI
All GUI-based Aspera transfer products can be used with IBM Aspera Proxy, as well.
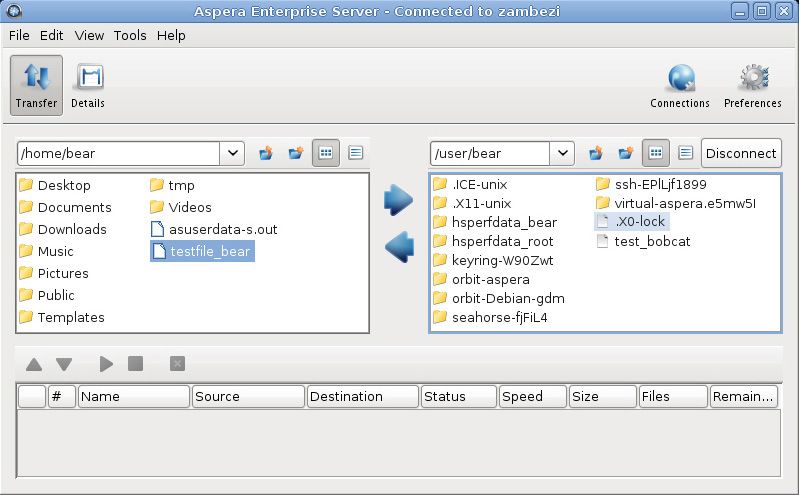
| Reverse Proxy | 25

For example, user bear could also have made the above transfer with the Enterprise Server GUI. In the following
display, bear has set up a connection called “zambezi” using the same parameters as above. The IP address of the
proxy instance 189.0.202.39 (squash-user rule) is specified as the host. The filename forbear’s private SSH key is
specified under Authentication/Public Key. The target directory on the internal server is specified as /user/bear.
The ports are specified as 33001 on the Advanced Connection Settings menu accessed from the Advanced button.

When bear's connection to the proxy server is established, the /tmp target directory on the internal server is visible
as in the right-hand panel in the display below, and ready for bear to make the transfer.
| Reverse Proxy | 26

Using IBM Aspera Sync and IBM Aspera Drive with Reverse Proxy
   Using Sync and Drive with reverse proxy offers the following advantages:
   •    Allows large Sync transfers to make use of Proxy's round-robin load-balancing feature, thereby spreading the load,
        increasing efficiency, and providing a form of high availability. For details, see Load Balancing.
   •    Allows Drive users outside a corporate network firewall to sync with internal corporate storage.

   Configuring Sync for Reverse Proxy with Round-Robin Load Balancing
   Normally, the SQL database used by async is located on the transfer server. However, when using reverse proxy in
   a round-robin load-balancing configuration, async can connect to multiple servers. The database must be stored in a
   remote NFS mount.
   To configure async to store the database in a remote storage, run the following command on each of the round-robin
   servers:

       # asconfigurator -x "set_node_data;async_db_dir,remote_dir"

   Note that async proxy sessions are always logged to syslog.
| Reverse Proxy | 27
Configuring Drive for Reverse Proxy with Round-Robin Load Balancing
External Aspera Drive users can view and transfer files and directories on internal Aspera servers (usually IBM
Aspera Shares or IBM Aspera Faspex, although IBM Aspera Enterprise Server, Connect Server, or Point-to-Point
Client can also be used) through Reverse Proxy with additional configuration. In the following diagram, the external
Drive user connects to the internal Shares or Faspex server (through Reverse Proxy) through which they can access
content on the load-balanced internal Aspera servers.
1. On the internal Aspera server, set the value for in aspera.conf as the IP address or
hostname of the Proxy server by running the following command:
# asconfigurator -x "set_server_data;server_name,proxy_address"
2. On the internal Aspera server, choose or create an Aspera transfer user (a system user that has a docroot
configured in aspera.conf) and then associate the transfer user with a Node API username and password.
For more information, see the admin guide for your Aspera server. To create a system user, assign a docroot, and
associate the transfer user with a Node API user, run the following commands:
# useradd username
# asconfigurator -x
"set_user_data;user_name,username;absolute,docroot_path"
# /opt/aspera/bin/asnodeadmin -a -u node_api_username -p node_api_passwd -
x username
3. On the load-balanced internal Aspera servers, configure the database storage as described in the previous section
for Aspera Sync.
4. On the Proxy server, create a user account that has the same username as the transfer user on the internal Aspera
server.| Reverse Proxy | 28
5. On the Proxy server, configure the transfer user with the Aspera public key by running the following commands:
# mkdir /home/username/.ssh
# cat /opt/aspera/proxy/var/aspera_tokenauth_id_rsa.pub > /
home/username/.ssh/authorized_keys
# chown -R username:username /home/username/.ssh
# chmod 700 /home/username
# chmod 700 /home/username/.ssh
# chmod 600 /home/username/.ssh/authorized_keys
6. On the Proxy server, create a new SSH key pair for the transfer user to authenticate to the internal Aspera server.
Run the following command in the .ssh folder to create a key pair. For key_type, specify either RSA (rsa) or
ED25519 (ed25519). At the prompt for the key-pair's filename, press ENTER to use the default name id_rsa
or id_ed25519, or enter a different name, such as your username. For a passphrase, you can either enter a
password or press return twice to leave it blank:
# ssh-keygen -t key_type
Retrieve the public key from /home/username/.ssh/key_name.pub and append it to the transfer user's
authorized_keys file on the internal Aspera server by using a process similar to the previous step.
Configuring Reverse Proxy for Use with Faspex and Shares
To use IBM Aspera Faspex and IBM Aspera Shares from behind a reverse proxy, you must configure both the transfer
nodes (Connect Server, Enterprise Server, or Point-to-Point) that are used by Faspex and Shares and are running
behind a reverse proxy, and the proxy server.
Configuring the Transfer Nodes
1. Set the transfer user's default shell to aspshell.
The transfer user's username is typically faspex for Faspex and asp1 or shares for Shares. The method to set the
default shell to aspshell varies by operating system:
• Windows: Set the transfer user's docroot in the GUI to automatically set up the user with the Aspera shell.
• Linux and Mac OS X: Change the transfer user's default shell by running the following commands as root.
For example, using user faspex as the user):
$ chsh -s /bin/aspshell faspex
If a warning message appears saying /bin/aspshell is not listed in /etc/shells, it can be safely
ignored.
• Mac OS X:You can also change the transfer user's default shell from the GUI. In System Preferences, click
Accounts or Users & Groups (depending on your version). Click Click the lock to make changes and enter
admin credentials. Right-click the transfer-user account name and click Advanced Options. Look for the
"Login shell" field and replace the default value /bin/bash with /bin/aspshell.
For further information about aspshell, see the guide for your Aspera server product (Connect Server,
Enterprise Server, or Point-to-Point).
2. Configure token authentication is set for the transfer user.
Token authentication can be set in the GUI or using the asconfigurator command.
Note: If the transfer nodes are in a cluster, use the same token encryption key on all nodes in the cluster.
From the GUI:
• Click the Configuration button to open the Server Configuration dialog.
• Click the Users tab and click the transfer user. In the righthand pane, click the Authorization tab.| Reverse Proxy | 29
• For Incoming Transfers and Outgoing Transfers, select Override and select token from the dropdown
menu.
• For Token Encryption Key, select Override and set the value to your encryption key.
Using asconfigurator:
• For Linux and Mac OS X, open a Terminal window as root. For Windows, launch Command Prompt as an
administrator (click Start, right-click Command Prompt, and click Run as administrator).
• To require a valid token for transfers to this computer, run the following command:
# asconfigurator -x
"set_user_data;user_name,transfer_username;authorization_transfer_in_value,token"
• To require a valid token for transfers from this computer, run the following command:
# asconfigurator -x
"set_user_data;user_name,transfer_username;authorization_transfer_out_value,token"
• To specify the token encryption key, run the following command:
# asconfigurator -x
"set_user_data;user_name,transfer_username;token_encryption_key,my_secret_key"
3. Authorize a public SSH key for use by the transfer user.
Log in as the transfer user to ensure that the user will own any files that are created. Create the directory /.ssh in
the transfer user's home directory and create the file authorized_keys (with no .txt extension) in the new
/.ssh directory:
Windows C:\Users\faspex\.ssh\authorized_keys
Linux /home/faspex/.ssh/authorized_keys
Mac OS X /Users/faspex/.ssh/authorized_keys
Aspera provides a public key in the file aspera_tokenauth_id_rsa.pub stored in the following locations:
Windows C:\Program Files[ (x86)]\Aspera\Enterprise Server\var
\aspera_tokenauth_id_rsa.pub
Linux /opt/aspera/var/aspera_tokenauth_id_rsa.pub
Mac OS X /Library/Aspera/var/aspera_tokenauth_id_rsa.pub
Copy and paste the public key into the transfer user's authorized_keys file. Save the file and confirm that
.ssh and authorized_keys are owned by the user.
Note: On Linux and Mac OS X, permissions on these files must be set as specified in the admin guide for your
server product. See Configuring for Faspex or Configuring for Shares.
Configuring the Proxy Server
1. Create the faspex or shares transfer user on the proxy server.
For instructions on creating the transfer user, see Configuring the Server for Reverse Proxy. Set the default shell to
aspshell, as described above in Configuring the Transfer Nodes.
2. Confirm the transfer user is using the correct SSH private key.
File permissions for the private key must be set as follows for Faspex (transfer user faspex), similarly for Shares:
# cd /home/faspex
# chown faspex:faspex .ssh
# chmod 700 .ssh| Reverse Proxy | 30
# chmod 600 .ssh/id_rsa
3. Authorize the public SSH key for use by the transfer user.
Cut and paste the public key text from /opt/aspera/var/aspera_tokenauth_id_rsa.pub into the
file /home/transfer_username/.ssh/authorized_keys, as described in step 3 in the above section.
Note: You may use a newly generated set of SSH private/public keys for authenticating the transfer sessions
coming from the reverse proxy to the transfer node, rather than those provided by Aspera. This ensures that no
FASP transfer session can be established without going through the reverse proxy.
Configuring Reverse Proxy for HTTP Fallback with Nginx
IBM Aspera Proxy can be configured to handle HTTP Fallback transfers so that the internal Aspera transfer server
does not connect directly to the Internet. Proxy does this using the Nginx™ web server, which is packaged with Proxy
but must be configured as described in the following steps.
1. Create the Aspera-specific Nginx configuration file.
The Proxy installer includes an Aspera-specific example Nginx configuration file /opt/aspera/nginx/
nginx.conf.example. Copy this file to create the file that Nginx uses, /opt/aspera/nginx/
nginx.conf, by running the following command:
# cp /opt/aspera/nginx/nginx.conf.example /opt/aspera/nginx/nginx.conf
2. Edit nginx.conf with a text editor.
Comments within the file show you where to enter the IP addresses of your internal servers. If your internal
Aspera servers use a different port other than 8080 for HTTP or 8443 for HTTPS connections, change the values
in nginx.conf to match.
3. Restart the Nginx server.
# service asperanginx restart
4. Verify your configuration.
You can test your configuration from the command line or using a web browser.
Command line: Run the following command:
# netstat -anp | grep nginx
The output is similar to the following if the IP addresses and ports have been configured correctly:
tcp 0 0 0.0.0.0:8443 0.0.0.0:* LISTEN 6438/nginx: master
tcp 0 0 0.0.0.0:8080 0.0.0.0:* LISTEN 6438/nginx: master
Web browser: Enter the following address in your web browser, for HTTP or HTTPS, and using the correct port
if different from the default:
http://proxy_ip_address:8080/aspera/http/server_status
https://proxy_ip_address:8443/aspera/https/server_status
Lua Scripting with Reverse Proxy
Reverse proxy supports dynamic evaluation of HTTP fallback requests using Lua scripting. Lua scripts can be used
to allow, reject, or modify HTTP fallback transfer requests in real time as they are received by the Proxy server. Lua
scripts have access to the HTTP request information such as body, headers, and URL. The Lua scripting facility is
included in the Nginx™ software that is distributed with IBM Aspera Proxy.
Configuring LuaYou can also read