Google Earth Outreach Training - Workbook for Indigenous Mapping Workshop
←
→
Page content transcription
If your browser does not render page correctly, please read the page content below

Google Earth Outreach Training
Workbook for Indigenous Mapping Workshop
The workbook is a companion to the Indigenous Mapping Network – Google Tribal Geo Tech Workshop, to guide
you through the demonstrations and exercises during the workshop, and as a resource for further self-paced
training in the future for yourself and your entire community or organization.

Overview of Google Earth & Maps ........................................................................................................ 3

Introduction to Google Earth ............................................................................................................... 4
        What is Google Earth?
        Navigating in Google Earth
        Exploring Google Earth panels
        Adding existing content to Google Earth
        Tutorials:
                 1. Annotating Google Earth with placemarks, paths, and polygons
                    (includes adding images and videos to balloons)
                 2. Adding photos & image overlays in Google Earth
                 3. Importing GPS data into Google Earth
                 4. Importing GIS data into Google Earth Pro
                 5. Using snapshot views to create your own views
                 6. Creating a narrated tour in Google Earth
                 7. Embedding Earth on your website

Introduction to Google Maps ............................................................................................................... 57
        What is Google Maps?
        Navigating in Google Maps
        Changing the background data in Google Maps
        Searching in Google Maps
        Tutorials:
                 1. Creating a map using My Maps
                 2. Collaborating on your map
                 3. Embedding your Map in your website

Resources & Links for Google Earth & Maps...........................................................................................80

                                             Download all data for this workbook here:
                              http://sites.google.com/site/imnworkshop/data-for-workshop/data.zip

                                                      Important Links:
                                Main Workshop Site: http://sites.google.com/site/imnworkshop
                                 Indigenous Mapping Network: http://indigenousmapping.net
                                   Google Earth Outreach: http://earth.google.com/outreach
                               Google Geo Developers: http://code.google.com/more/#google-geo

© 2010 Google                                                                                                                                    1
© 2010 Google 2

Overview of Google Earth & Maps
This guide will help you develop intriguing Google Earth content for your organization. It includes useful
information about creating content, as well as step-by-step exercises to help get you started!

Why use Google Earth & Maps?
   • They are powerful interactive tools for communicating your organizations’ projects.
   • They are easy to use.
   • They are designed for users who are not highly technical or map experts.
   • They are a way to store, visualize, and distribute geographic data and information.

How are Google Earth & Maps different?

            Google Earth is…
               • 3-dimensional
               • Viewed in the Google Earth
                    application
                    (which is downloaded and installed)
               • Users must be connected to Internet
                    at first, but some data can be
                    “cached” for off-line use.

            Google Maps is…
               • 2-dimensional
               • Viewed in a web browser (e.g. Mozilla
                   Firefox, Google Chrome, Apple Safari,
                   Internet Explorer)
               • Users must be connected to Internet
                   to view your map.

            Google Earth Plug-in is…
               • 3-dimensional
               • Viewed in a web browser (e.g. Mozilla
                    Firefox, Apple Safari, Internet
                    Explorer), although users must
                    download a browser plug-in the first
                    time they ever view Google Earth in a
                    browser.
               • Users must be connected to Internet
                    at first, but some data can be
                    “cached” for off-line use.

© 2010 Google                                                                                                3
Introduction to Using and
                           Creating Content in Google Earth
What is Google Earth?
Google Earth is a software application you install on your PC or Mac computer, which allows you to explore the
world and its rich geographic information electronically. There is also a Google Earth Plug-in for the browser that
allows you to embed Google Earth in your website. For these exercises, you will be using the application installed
on your computer.

Much of the data, including the imagery, roads, borders, and other information are stored on Google servers and
the software dynamically downloads only the data you are viewing. For this reason

The imagery in Google Earth is not in real-time -- most of the data was acquired 1-5 years ago.

© 2010 Google                                                                                                     4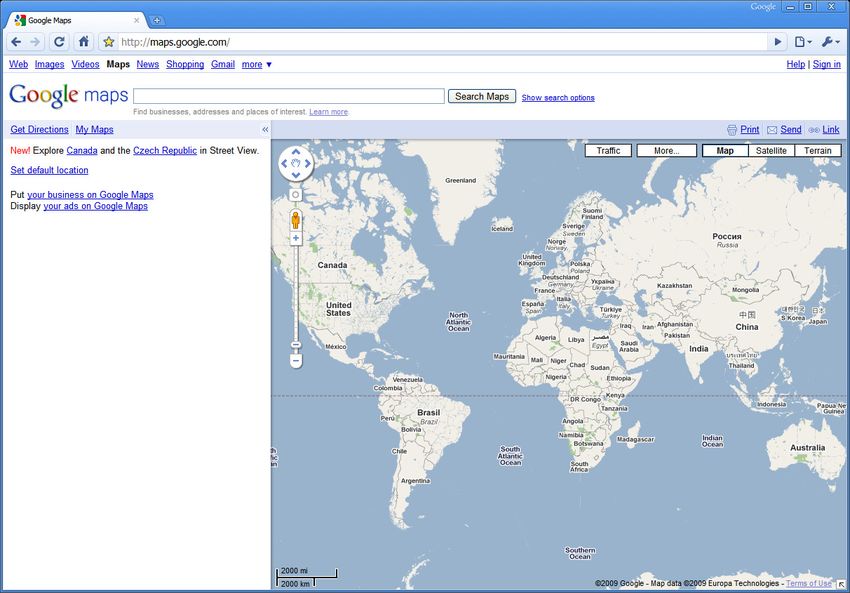
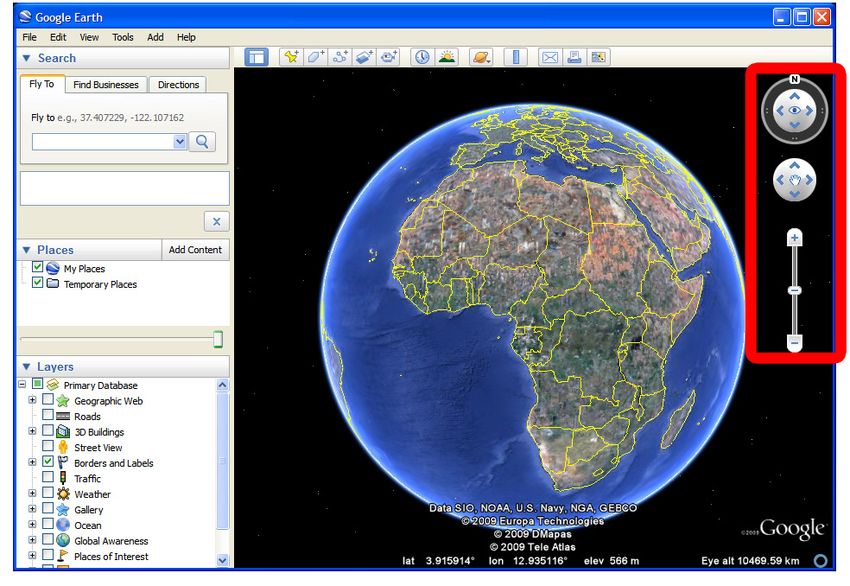
Navigating in Google Earth
To navigate in Google Earth, use the navigation tools in the upper-right corner of the 3D viewer.

1. Rotate the map by clicking and dragging the gray ring around. To
   return the map to north as pointing up, click the   once.

2. Move your view, or tilt the viewer and look around from a different
   perspective, by clicking the arrows around the eye.

3. Move (or "pan") around the map, by clicking the arrows
   outside hand.

4. Zoom in or out on the map, by clicking and dragging the zoom
    slider. You can also click on the zoom in    or out    buttons to
    zoom in, or double-click these buttons to zoom in or out all the
    way.

You can also use your mouse! Navigate by double-clicking with your
left mouse button (to zoom in) or your right mouse button (to zoom
out). You can also use the mouse wheel to zoom in and out.

© 2010 Google                                                                                       5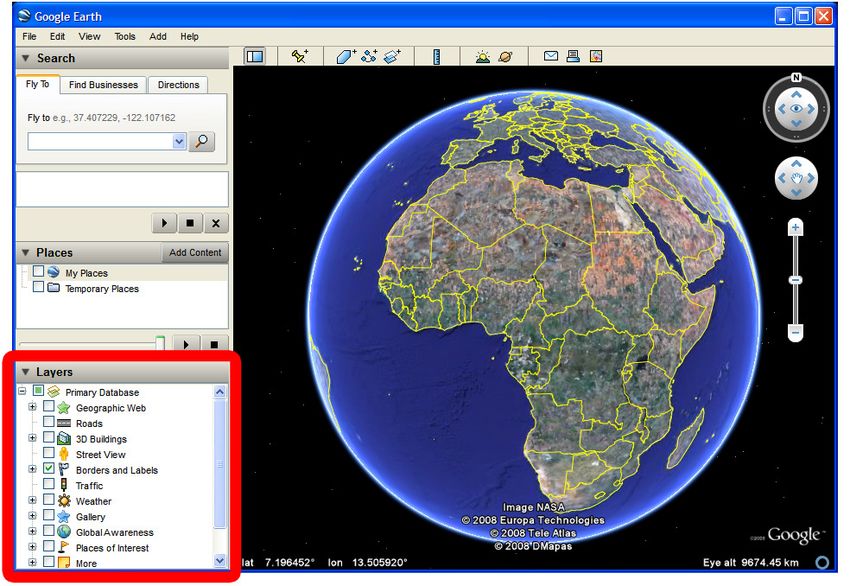
Exploring Google Earth Panels
The Search panel

Use the Search panel to search for places, businesses, organizations, and cities, and to get directions.

1. Use    the Fly To tab to search for places, including:
    •      Cities and addresses
    •      Places of interest (parks, monuments, etc.)
    •      Coordinates (latitude, longitude)

2. Type nairobi, kenya into the search box, and click the search
button:

3. Use the Find Businesses tab to search for business, or
organizations. Type in a business or organization to search for it.

4. Use the Directions tab to search for directions between two
places. Find directions between your organization and Google, or
between two cities.

5. Clear the search results and start over by clicking the clear
button:

© 2010 Google                                                                                              6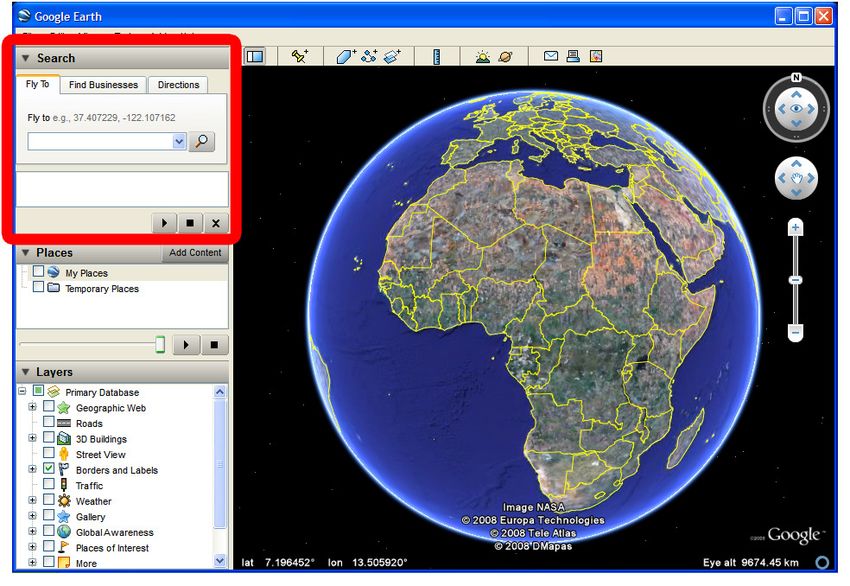
The Layers panel

Use the Layers panel to view the
permanent layers in Google Earth,
including borders, roads, and other
data.

Please note:
    • Layers are viewable in the Layers Panel by everyone who has Google Earth. Some of it is dynamic, and is
        updated automatically over time. Some of it is static, and does not change.
    • Most of the data layers are licensed from data providers and are LOCKED (you don't have control over it),
        including Roads, Border and labels, and Terrain.
    • Some of the layers are created by users, including Panoramio and Wikipedia (under Geographic Web),
        and the Google Earth Community and YouTube (under Gallery).

© 2010 Google                                                                                                 7
The Places panel

Use the Places panel to organize and save your places that you visit, your favorite locations, address or listing
searches, and more. The Places panel is also where you view your own Google Earth data that you've created, and
other people's Google Earth data that you've downloaded from the Internet.

All data located in the My Places folder is saved for subsequent Google Earth sessions. When you quit Google
Earth, and start it again, the data will still be under My Places.

Data located in the Temporary Places folder are temporary, and will not be saved for the next time you start
Google Earth again.

To move data from Temporary Places to My Places, click-and-drag each item to the My Places folder. The data
will now be saved in Google Earth.

Data in the Places panel are viewable only on the computer you are using. This is similar to viewing a document
in Microsoft Word – the file is not online and public to the world – you are simply viewing a file on your computer.

© 2010 Google                                                                                                     8
Adding existing content to Google Earth
To find data to add to Google Earth, use the Add Content button in the Places panel to link to the Google Earth
Gallery.

You must be connected to the Internet to use this button!

1. Click on the Add Content button in the Places panel.

An Internet browser opens in a frame within Google Earth. The Google Earth Gallery webpage opens.

2. Click the     button at the top right corner of the Internet frame to open the Internet in an external frame,
   which will open the same page in your Internet browser application.

3. In the browser pane, search for Africa or another location or topic to search the Google Earth Gallery for
   project files about that location or topic. These are Google Earth projects that other people have created in
   Google Earth and then uploaded to the Google Earth Gallery webpage.

4. Find a project you would like to view in Google Earth, and click the link

The Google Earth KML project file is loaded into your Temporary Places in the Places panel.

© 2010 Google                                                                                                      9

To open and view a Google Earth project file that exists on your computer:

1. Go to the File menu, and choose Open...

2. Navigate to a KML file on your computer, and click Open.

The KML file will be added to your Places panel. If you have My Places selected at the time your open the file,
the data will be added there. If you have Temporary Places selected, it will be added there.

© 2010 Google                                                                                                     10
3. Click on a volcano placemark.

A balloon opens, displaying information about the placemark you clicked on. A balloon is a window that can
display text, images, movies, tables, graphs, and other information about a location.

4. Click on other volcano placemarks to view information and images about other volcanoes.

© 2010 Google                                                                                                11
Annotating Google Earth with placemarks, paths, and polygons
Google Earth makes it easy to create a map with annotations such as data and information about your projects.
You can add placemarks (points), paths (lines), polygons in Google Earth, and add text, images, and videos to the
pop-up balloons. You can then share it with multiple people!

For this tutorial, we will use an example of Bristlecone Pine Tree research in the White Mountains. The images
and videos, as well as the inspiration for this tutorial example, are from Adelia Barber's work at the White
Mountain Research Center. Read more about her work in the Google Earth Outreach case study
(http://earth.google.com/outreach/cs_adelia.html).

Let's get started!

1. Open Google Earth on your computer.

2. In the Search Panel, enter "White Mountains, CA" into the Fly To box, and click     . Google Earth will fly
you to the White Mountains.

© 2010 Google                                                                                                    12
3. Find the toolbar above the 3D viewer:

4. Each button on the toolbar has a purpose. Find the tools for create a placemark, path, and polygon:

Let's add data!

© 2010 Google                                                                                            13
Add placemarks

1. Click the Add Placemark button        in the toolbar. A placemark is automatically added to Google Earth. Also,
a New Placemark dialog box appears.

2. Move your placemark's location by clicking and dragging its icon, or by typing a latitude and longitude into the
New Placemark dialog box.

3. In the New Placemark dialog box, type in a name for the placemark in the Name field. In this example, we
typed "Bristlecone Pine Tree".

4. Type in a description for the placemark in the Description field, which will be displayed when a user clicks on
the placemark. In this example, we typed "This is one of the world's oldest living trees."

5. Click on the icon button in the top-right corner of the window, and choose an icon for your placemark and
press OK. In this example, we chose a tree icon. You can also click on Add Custom Icon... to use a custom icon,
such as your logo.

© 2010 Google                                                                                                    14
6. Click on the Style, Color tab, and choose a color, scale (or size), and opacity for the placemark icon and label
text. In this example, we choose to change our label color to green.

7. When you are finished creating your placemark, click OK and your placemark will appear in the Places panel.
When you click on your placemark's icon or hyperlinked name in Google Earth, a pop-up balloon will appear with
your placemark's name and description.

© 2010 Google                                                                                                     15
Tips:
    •   To edit a placemark's location, name, or description, right-click on the placemark in the 3D viewer or in
        the Places panel, and choose Properties (on a PC) or Get Info (on a Mac). Click-and-drag the icon to
        change the location, or edit the name and description and click OK.

Add paths

1. Click the Add Path button       at the top left of your map. A New Path dialog box appears, and your cursor
changes to      .

2. Click on a series of places on the map form a path. Each time you click, a new node is added to your path.
You can also click-and-drag to create frequent nodes, which makes a smoother path. In this example, we will
create a path marking the tree line.

© 2010 Google                                                                                                    16
3. In the New Path dialog box, type in a name for the path in the Name field. In this example, we typed "Tree
Line".
4. Click on the Style, Color tab, and choose a color, width, and opacity for the path. In this example, we choose a
dark green color, a width of 5.0, and an opacity of 75%.
Tips:
• To play a tour of the path and fly along its route, click the Play Tour button:
• To edit a path's location, name, or description, right-click on the path in the 3D viewer or in the Places
panel, and choose Properties (on a PC) or Get Info (on a Mac). Then you can edit the title and
description and click OK. Right-click your mouse to delete recently-created nodes. You can also click-
and-drag any nodes to reshape the path.
© 2010 Google 17Add polygons 1. Click the Add Polygon button at the top left of your map. A New Polygon dialog box appears, and your cursor changes to . 2. Click on a series of places on the map to form a polygon. Each time you click, a new node is added to your polygon. You can also click-and-drag to create frequent nodes, which makes a smoother boundary to your polygon. In this example, we will create a polygon around the White Mountains (you may have to zoom out to see the entire mountain range). 3. In the New Polygon dialog box, type in a name for the polygon in the Name field. In this example, we typed "White Mountains". 4. Type in a description for the polygon in the Description field, which will be displayed in the polygon's pop-up balloon. In this example, we typed "The White Mountains are home to Bristlecone Pine Trees." 5. Click on the Style, Color tab, and choose a color, width, and opacity for the boundary lines. Choose a color and opacity for your polygon area, and determine if you want the polygon filled and outlined, only filled, or only outlined. In this example, we chose green colors, a line width of "10.0", and medium opacities. 6. Click on the Altitude tab, and change the altitude mode to "Relative to ground" (not "Clamped to ground"). Then move the slider to increase altitude, or height, of the polygon if desired. Check the box to extend the sides, or walls of the polygon, to the ground. © 2010 Google 18
Tips:
    •   To edit a polygon's location, name, or description, right-click on the path in the 3D viewer or in the
        Places panel, and choose Properties (on a PC) or Get Info (on a Mac). Then you can edit the title and
        description and click OK. Right-click your mouse to delete recently-created nodes. You can also click-
        and-drag any nodes to reshape the polygon.
    •   Polygons can be used as 3D bar graphs in Google Earth. One example is the USHMM’s Crisis in Darfur
        layer, which uses polygons to represent number of refugees and displaced people.

© 2010 Google                                                                                                    19
Organize your places with folders
1. To add a folder, go to the Add menu and select Folder.
2. In the New Folder dialog box, type in a name for the folder in the Name field. In this example, we typed "My
Google Earth Project".
3. Click OK. Your new folder is added to the Places panel.
4. Click-and-drag each place (your placemarks, paths, and polygons)
into the folder to organize your project.
Tips:
• To play a tour of all the items in the folder, click the Play
Folder button:
• To edit a folder's name or description, right-click on the
folder in the Places panel, and choose Properties (on a PC)
or Get Info (on a Mac).
© 2010 Google 20Embed images in your balloons
Google Earth balloons can be customized using HTML. You can add font sizes, styles, and colors, links, tables,
and images into your balloons by including it as HTML in the Description.
1. Choose a placemark you've already created, such as the placemark created earlier in this tutorial.
2. To edit the placemark, right-click on the placemark in the 3D viewer or in the Places panel, and choose
Properties (on a PC) or Get Info (on a Mac).
3. Copy and paste the following HTML code into the Description field of your placemark. It references a
photograph of a bristlecone pine tree that is online.
4. Click OK to finish editing the placemark.
5. Click on the placemark in the 3D viewer, and you will see the image in the placemark's balloon!
Tips:
• If you want to embed an image from your computer’s hard drive, simply type or paste in the image’s file
path. For example, to embed a picture from your ‘My Pictures’ folder, type in:
© 2010 Google 216. To add more content to your balloon, such as text and links, you can use more HTML code tags, such as the
following code:
For more information about Bristlecone Pine trees, see the White Mountain Research Station
7. Click OK to finish editing the placemark. The placemark's balloon now has the image, as well as text and a
link!
Tips:
• You can use a program like Adobe Dreamweaver or freeware NVU to preview the balloon design as you
edit the HTML code.
• You can also upload all of your photographs to PicasaWeb, and click the link. Then
copy the embed code, and paste it in your balloon’s Description field to embed your photos from
PicasaWeb into your balloon.
© 2010 Google 22Embed YouTube videos in your balloons You can easily embed a YouTube video into a placemark balloon in Google Earth. 1. Upload your video to YouTube (http://www.youtube.com) or choose a video that's already uploaded. 2. On the YouTube video's webpage, find the Embed field. Click in the Embed field to select it, and copy the HTML code there. The code looks similar to this: 3. Choose a placemark you've already created, such as the placemark created earlier in this tutorial. 4. To edit the placemark, right-click on the placemark in the 3D viewer or in the Places panel, and choose Properties (on a PC) or Get Info (on a Mac). 5. In the Description field, paste the YouTube HTML code which you copied in Step 2. © 2010 Google 23
6. Click OK.

7. Now when you click on the placemark, its balloon has the YouTube video!

© 2010 Google                                                                24
Save your project and share with others

Google Earth allows you to save your
project to your computer in the .kmz
file format.

1. Right-click on your project folder,
and select Save Place As... or click on
the folder and then go to the File menu,
and select Save Place As...

2. Enter a name for your .kmz file, and
click Save to save it to your computer.
You will now find your KMZ file on your
computer.

You can share the map you created by
emailing the .kmz file to your friends
and co-workers, posting it on your
website with a link to download it, or
embedding it with Google Earth on your
website or blog (see the Embedding
Earth into your Website section).

Tips:
    •   A Google Earth project file is a KML file, with a filetype extension of .kml or .kmz. KMZ files are
        compressed files that are smaller than KML files. If you used any custom images or photos from your
        computer, Google Earth will include them in compressed KMZ files so that others can see them too. We
        recommend saving your Google Earth projects as .kmz for a smaller file.
    •   When you save your Google Earth KML project file to your computer, it is private. If you upload the file to
        a web server, or e-mail it your friend or colleague, then it is no longer private. This is similar to putting
        any file, such as a PDF file, up on the web or e-mailing it to someone.

© 2010 Google                                                                                                      25
Creating Photos & Image Overlays in Google Earth In Google Earth, you can easily drape your own images or maps over the terrain, as well as overlay your photographs in the places they were taken to create a photographic tour! For this tutorial, we will use the example of draping a scanned trail map of Glacier National Park as an image overlay, and placing a photographic overlay of Grinnell Point at sunset, in Glacier National Park, USA. The images used in this tutorial, including a map of Glacier National Park and a photograph of Grinnell Point are both from Wikimedia Commons. Let's get started! 1. Open Google Earth. 2. Zoom to the area where you want to overlay your map. For this example, search for "Glacier National Park, USA". Google Earth will automatically zoom you into the Glacier National Park area. 3. For this exercise, make the Terrain layer visible. Go to the Layers panel, and scroll to the bottom. Check the box next to Terrain to make it visible. Also, it is a good idea to make the Parks and Recreation Areas layer visible. To do this, expand the folder Places of Interest, and then check the box next to Parks and Recreation Areas. © 2010 Google 26
4. Find the image overlay tool in the toolbar. Later, you'll use the Add menu, and select Photo.

5. Now, let's add overlays!

Add an image overlay

1. Click the Add Image Overlay button        to add a new image overlay. A New Image Overlay dialog box
appears, and a green outline is placed on the Earth.

2. In the New Image Overlay dialog box, type in a name for the image overlay in the Name field. In this example,
we typed "Glacier National Park Map".

3. Copy and paste the link below into the Link field, or click "Browse..." and find an image to add from your local
hard drive. In this example, we will use the following URL from the Internet:

     http://upload.wikimedia.org/wikipedia/commons/3/31/Map_of_Glacier_National_Park.jpg

4. Move the Transparency slider to the left to make the image a little transparent, which will assist you in placing
the image in the correct location. Use the park boundaries to help you align the park boundaries on the map with
the boundaries in Google Earth.

© 2010 Google                                                                                                     27
5. Use the center cross-hair marker to move the image overlay on the globe and position it in the right location. 6. Use the triangle marker at the left to rotate the image for better placement. 7. Use any of the corner or side anchors to stretch or skew the selected corner or side. If you press the Shift key when selecting this marker, the image is scaled from the center. 8. Click OK when you are finished. The map is now listed in the Places panel, and can be saved to a KML file with other Google Earth project data you have created. © 2010 Google 28
Add a photo overlay

1. Zoom to the area where you want to overlay your photograph. While you are in Glacier National Park, search for
"Grinnell Point". Google Earth will automatically zoom you to Grinnell Point.

You may choose to make the Mountains and USA Features layers visible in Google Earth. To do this, go to the
Layers panel, scroll to the bottom, and expand the folder Places of Interest, then Geographic Features, and then
check the box next to Mountains and USA Features.

2. Orient the view (heading and tilt) to match the heading and perspective of the photograph of Grinnell Point
that we will be adding to Google Earth. You want to be looking at the same view in Google Earth that the
photographer was looking at when they took the photograph. In this example, we will tilt Google Earth so we are
looking at Grinnell Point.

© 2010 Google                                                                                                     29
3. Go to the Add menu, and choose Photo. A New Photo Overlay dialog box appears.

4. In the New Photo Overlay dialog box, type in a name for the image overlay in the Name field. In this example,
we typed "Grinnell Point at Sunrise".

5. Copy and paste the link below into the Link field, or click "Browse..." and find a photograph on your local hard
drive. In this example, we will use the following URL from the Internet:

    http://upload.wikimedia.org/wikipedia/commons/9/92/Grinnell_Peak_Sunrise.jpg

© 2010 Google                                                                                                    30
6. Move the Transparency slider to the left to make the image a little transparent, which will assist you in placing the image in the correct location. Adjust the Earth's position behind the photo by using the Look joystick to change your perspective, as if you were slightly turning your head. 7. Click OK. The photo has been added to Google Earth in the location you set. Now, when people double-click on your photo's camera icon in the 3D viewer or Places panel, they will be flown into the photo. Notice how the navigational tools change into photo navigation tools so you can get inside and explore the photograph! © 2010 Google 31
Importing Global Positioning Systems (GPS) data in Google Earth
Google Earth can import GPS data in two ways: through a direct connection to your handheld GPS device, or
through a GPS file, such as a .gpx file, downloaded to your computer by other third-party software like GPS Babel
(www.gpsbabel.org). This tutorial will guide you how to add GPS data to Google Earth using both of these
methods.

In this tutorial, we will import a GPS .gpx file of elephant tracks. The data has been contributed by Save the
Elephants (savetheelephants.org).

Let's get started!

1. Open Google Earth.

2. If you have data stored on your Garmin or Magellan handheld GPS device, connect your device to your
computer using your USB or Serial port connector, and turn on the device. This will be the data you use for the
next section.

3. You will also want some GPS data with which to experiment later in the tutorial. Find the sample dataset
GPS_track_Save-the-Elephants.gpx to your computer. These data have been shared by Save the Elephants, and
are for use for this tutorial.

Import GPS data from your handheld GPS device

If you do not have a GPS unit with data on it to use during this tutorial, just read over this section briefly before
skipping to the next section.

1. Make sure that your Garmin or Magellan handheld GPS device is connected to your computer using your USB
or Serial port connector, and that your GPS device is turned on.

Note: If you are using a USB connection, you may need to first install a driver for your GPS device. Drivers can be
found on the CD that came with your device, or downloaded from the device manufacturer's web site.

2. Go to the Tools menu and select GPS.

© 2010 Google                                                                                                       32
3. In the GPS Import window, go to the Historical tab
and choose your device: Garmin or Magellan.

4. Check the boxes if you want to import Waypoints,
Tracks, and/or Routes.

5. Click Import. Your data will be downloaded from
your device directly into Google Earth, where you can
view and save it as described below.

6. Data imported from a GPS handheld device can be
animated because it has time stamps (date and time)
of when it was collected by the GPS device. Simply
select the GPS data in the Places panel, and click Play
on the Time Controls.

7. Save your GPS data to a KML file by right-clicking on your GPS data folder in the Places panel, and selecting
Save Place As... or select the GPS device data in the Places panel, go to the File menu, and select Save Place
As...

© 2010 Google                                                                                                  33
Tips:
    •   You can also get data from your GPS device in real time. For example, if you go out in the field with your
        laptop, you can view your current location live on Google Earth. From the GPS Import dialog box, select
        the Real Time tab to see options for viewing live data. You'll need to make sure that your GPS device is
        connected and streaming data using one of the supported protocols (NMEA is the most common).
    •   Before you disconnect your laptop from the internet and go out in the field, be sure to use Google Earth
        to fly to and view the places you'll be visiting so that the relevant imagery is saved in the cache on your
        hard drive.

Import GPS data from a file

If you have GPS data stored in a GPX or other type of file, you can open it in Google Earth. Also, if you have a
GPS device for which Google Earth does not support direct connections, but which can export data to a file, you
can still view your GPS data in Google Earth. Read the instructions that came with your GPS device for exporting
data from your device to a file on your computer. You can also use third-party software like GPS Babel
(www.gpsbabel.org) to download the GPX file to your computer.

1. If you do not have your own file to use (supported file formats are .gpx, .loc, and .mps), you can download and
use this sample file provided by Save the Elephants: GPS_track_Save-the-Elephants.gpx

2. Go to the File menu, select Open...

3. In the Open window, change the filetype to the GPS file types by using the Files of type list and selecting Gps
(*.gpx, *.loc, *.mps).

4. Navigate to the appropriate location on your computer and select the GPS file.

5. Click Open to begin the import process.

6. In the GPS Data Import dialog box that appears, choose to download Waypoints, Tracks, and Routes. Also,
choose to Draw lines for tracks and routes, and to Adjust altitudes to ground height.

© 2010 Google                                                                                                    34
7. Click OK. The file is imported and can be viewed in Google Earth as described below.
Once you've loaded your GPS data into Google Earth, you can edit the waypoint placemarks and track paths, and
add more information about the waypoints and tracks in the balloons.
Tip:
• You can also import a .gpx file from your computer by simply dragging and dropping it into Google Earth.
© 2010 Google 35View and save your GPS data 1. Once you have loaded your GPS data into Google Earth, you can edit the waypoint placemarks and track paths, and add more information about the waypoints and tracks in the balloons. To edit a feature in Google Earth, right-click on the feature in the 3D viewer or the Places panel, and choose Properties (on a PC) or Get Info (on a Mac). 2. Data imported from a GPS handheld device can be animated because it has time stamps (date and time) of when it was collected by the GPS device. Simply select (highlight) the folder of GPS data in the Places panel, and click Play on the Time Controls. 3. To save your GPS data to a KML file on your hard drive, right-click (Ctrl-click on a Mac) on your GPS data folder in the Places panel, and select Save Place As. The image below shows a final product of Save the Elephant's GPS track of an elephant they monitor. © 2010 Google 36
Importing Geographic Information Systems (GIS) data in Google Earth
If you have Geographic Information Systems (GIS) data, you can import it into Google Earth Pro so it can be used
as part of your Google Earth visualizations. If you have Google Earth Pro, you can import many kinds of GIS data
directly using the methods described in this tutorial. If you are using the free version of Google Earth, there are
other tools for converting GIS data to KML, a few of which are listed at the end of this tutorial.

In order for Google Earth Pro to import your data and place it in the correct location on the Earth, all GIS data
must have the correct coordinate system (WGS 84) defined. For example, ESRI shapefiles must have a projection
file (.prj) associated with them and GeoTIFFs must have a Tiff World File (.tfw) associated with them.

This tutorial will guide you through how to import GIS data into Google Earth Pro so it can be used as part of your
Google Earth visualizations. We will import a shapefile of rivers and a GeoTIFF of land cover in Southeast Asia.
The rivers dataset was created from data downloaded from the Digital Chart of the World
(www.maproom.psu.edu/dcw/). The land cover dataset was created from data downloaded from the Global Land
Cover Characteristics (GLCC) database (http://edc2.usgs.gov/glcc/glcc.php).

For this tutorial, you will need Google Earth Pro installed on your computer. If you are a non-profit organization,
you may qualify for a free license of Google Earth Pro! See eligibility requirements and apply for a software grant
here: http://earth.google.com/outreach/grants.html. If you are not a non-profit or do not qualify, you may buy it or
download a 7-day free trial here.

Let's get started!

1. Open Google Earth Pro.

2. Find the Rivers_in_SEAsia_shapefile shapefile files and LandCover_in_SEAsia_grid TIF files in your data folder
on your computer.

Import a GIS shapefile, or other vector dataset

1. Select Import... from the File menu.

2. Select your data’s file type from the Files of type menu. For this example, choose ESRI Shape (*.shp) from the
Files of type menu, select Rivers_in_Southeast_Asia.shp, and click Open.

© 2010 Google                                                                                                     37
If you have MapInfo .tab data, choose MapInfo (*.tab) from the Files of type menu, select your TAB file and click
Open.

3. A message will appear, stating that the file contains more than 2500 features and could cause application
performance degradation.

When you see this message, you can choose to import just a sample, restrict to your current view, or import all.

4. Click the Import all button.

© 2010 Google                                                                                                      38
5. A message will appear, asking if you would like to create a Style Template. Click Yes.

In the next Style Template Settings dialog box, you will create a style template for the rivers, which will include
colors, labels, and icons.

6. Under the Name tab, choose the field in the shapefile that you would like to use for the name labels for the
data in Google Earth. You can use the preview table to view which field contains the content you would like to
use for the labels.

For this example, select “NAM” in the drop-down menu. This is the field in the shapefile that contains the names
of the rivers.

7. Under the Color tab, select to Use single color, and click on the color swatch to the right. This causes the color
settings to appear.

8. In the Select Color dialog box, choose a color for the river dataset. For this example, select a blue color, and
click OK.

© 2010 Google                                                                                                         39
9. Under the Height tab, keep Clamp features to ground selected. This will keep the rivers clamped to the
ground, following the terrain.

10. Click OK to finish your style.

11. A dialog box will appear, asking if you would like to save your style template you just created. If you wish to
save it for future use, click Save. Otherwise, click Cancel. For this example, click Save.

© 2010 Google                                                                                                         40
Your GIS data now appears in Google Earth. Notice how the KML data is also listed in the Places panel under
Temporary Places. To save it in Google Earth, click-and-drag this file to My Places.

© 2010 Google                                                                                                 41
Import GeoTIFF, or other raster dataset

1. To import a raster data, select Import… from the File menu. Select the appropriate file format from the Files
of type at the bottom, select the file you want to import, and click Open. For this example, select GeoTIFF (*.tif),
select the LandCover_SEAsia.tif file, and click Open.

2. In the New Image Overlay dialog box that appears, give a name to your raster overlay, and click OK.

© 2010 Google                                                                                                     42
Because the raster dataset in georeferenced to a coordinate system, it is automatically placed in the appropriate
location. The land cover GeoTIFF has been imported into Google Earth and is located in the Places panel.

In addition to importing GIS data into Google Earth Pro, you can also use many other tools and software programs
to convert GIS data to KML files for use in Google Earth. GIS software, like ESRI ArcGIS and MapInfo, have tools
to export GIS data into KML format for use in Google Earth.
    • Shp2Kml, a free utility that converts shapefiles to KML: http://www.zonums.com/shp2kml.html
    • ESRI ArcGIS contains tools in the ArcToolbox (3D Analyst > Conversion > To KML) for converting vector
         and raster GIS data to KML.
    • Export to KML Utility is a free toolbar extension for ArcGIS.
    • Arc2Earth is an extension for ArcGIS that converts GIS data to KML: http://www.arc2earth.com/
    • MapInfo Professional has a MapInfo Professional Google Earth Link Utility.
    • MapWindow GIS has Shape2Earth, a tool for converting GIS data to KML: http://shape2earth.com/

© 2010 Google                                                                                                   43
Using Views and Perspectives in Google Earth You can set unique camera angles (perspectives) of your placemarks in Google Earth, by using "Snapshot View." You can control how users view your placemarks when they double-click on them or when you're recording a narrated tour of your Google Earth layer. This tutorial will guide you through how to set the camera angle, or perspective by using "Snapshot View." Let's get started! 1. Open Google Earth. 2. Open geo_example_jgi_without_views.kmz from the data folder you downloaded in Google Earth. For this exercise, make the Terrain layer visible. Go to the Layer Panel, and scroll to the bottom. Check the box next to Terrain to make it visible. Create Snapshot Views 1. Notice how there is no unique camera angle, or perspective, set for the placemarks -- when you double-click on a placemark, the Earth doesn't tilt or rotate to a unique perspective. 2. Use the mouse or the navigation tools to orient the Earth to a unique perspective for a placemark. For example, zoom into the placemark labeled "Flirt", and tilt and rotate the Earth to a unique perspective. © 2010 Google 44
3. Right-click on the "Flirt" placemark in the Places panel, and select Snapshot View. This will save your unique
camera angle, or perspective, for this placemark.

Using Snapshot Views can be very effective for telling stories and guiding users through your Google Earth layer
in a controlled manner, helping them get the unique perspectives you want them to see.

4. You can also set the Snapshot View in the Properties window. To open the Properties, right-click on the
placemark in the 3D viewer or in the Places panel, and choose Properties (on a PC) or Get Info (on a Mac). Go to
the View tab, and click the Snapshot Current View button.

© 2010 Google                                                                                                      45
Now, when you double-click on that placemark in the 3D viewer or in the Places panel, Google Earth will fly to
that saved view.

5. You can also assign a Snapshot View to a folder. To do this, right-click on the folder in the Places planel, and
choose Snapshot View.

Similar to when you double-click on a placemark, double-clicking on the folder will fly to that saved view.

© 2010 Google                                                                                                     46
Creating a Narrated Tour in Google Earth
Google Earth 5.0 and above gives you the ability to tell your story in a more compelling way, taking users on a
narrated tour through your map. As the guide, you can provide a voiceover, show pop-up balloons along the way,
and fly users around the globe, creating a video-like experience. Since the tour is within Google Earth, users can
pause at any time, explore the planet on their own, and pick up the tour again later. This tutorial will guide you
through how to create a tour using the new KML Touring tools available in Google Earth 5.0 and above.

In this exercise, we will create a tour of a Google Earth project using data from Jane Gooddall Institute's
Chimpanzee Blog.

Let's get started!

1. Open Google Earth.

2. Open geo_example_jgi_with_views.kmz from the data folder you downloaded in Google Earth.

3. For this exercise, make the Terrain layer visible. Go to the Layers panel, and scroll to the bottom. Check the
box next to Terrain to make it visible.

4. Now, let's record a tour!

Create a KML Tour

1. Click the Add Tour button       in the toolbar, or go to the Add menu, and select Tour.

The tour recording tools appear in the lower-left corner of the 3D viewer:

2. Click the Record button        to start recording actions and movements in Google Earth. The button changes
to red       and the time counter begins counting up, showing the duration of your current KML Tour.

© 2010 Google                                                                                                       47
3. Create your tour by flying, zooming, panning, and rotating the globe. Do what you would do if you were
showing your Google Earth project to a user or audience in person. A 3D Space Navigator, like the one created by
3D Connexion (www.3dconnexion.com), can be extremely helpful for navigating smoothly across the globe.

4. Double-click on placemarks in the Places panel to move to their unique camera angle or view. In this example,
double-click on the placemark 'Flirt', then 'Patti', and so on. You can also pop placemark balloons and turn on
and off your placemarks, paths and polygons in the Places panel.

5. When you are finished creating your tour, stop recording by clicking the Record button      again. Your
recording stops, and the Tour Player appears in the bottom-left corner of the 3D viewer. The KML Tour that you
just created automatically begins playing.

© 2010 Google                                                                                                    48
6. To save your KML Tour, click the Save to File button in the Tour Player, and give your KML Tour a name.

It is then stored in the Places panel.

© 2010 Google                                                                                                49
7. To save it to a permanent .kmz file, right-click the tour in your Places panel, choose Save Places As…, and
save your .kmz file to a location on your computer.

If you used content in your tour (clicked on placemarks, popped balloons, etc), you must put those along with the
tour into a single folder, and save that entire folder as a KMZ; otherwise, they will have the tour only, and no
content.

Re-record a tour to add new actions

Want to add more actions to your tour? You can modify and extend a previous tour by re-recording a new tour
while playing back the original tour.

1. Make sure your original tour is in the Places panel.

2. Click on the Add Tour button        in the toolbar to add a tour. The tour recording tools appear at the lower
left.

3. Click the Record button      to start capturing a new tour. After clicking the record button, the time counter
starts advancing, showing the duration of your new tour.

4. Now start your original tour by double-clicking on it in the Places panel, or select it with the mouse and click
the Play Tour button        underneath the Places panel. You are now recording a new tour while playing back the
original one.

5. You can pause the original tour, add some new actions or camera movements, and then un-pause/play the
original tour to continue. Note: if you move the earth during the pause of the original tour, when you hit play on
the original tour the camera will jump to the where the original tour left off.

© 2010 Google                                                                                                        50
6. Once the original tour is done playing back, since you are still recording a new tour, you can continue to add
new actions or even start playing back another tour!

Recording Narration

1. When creating a new tour, if you click the microphone button        instead of the record button, recording will
start and Google Earth will start capturing audio from your computer's microphone, as well as movements and
actions in the 3D viewer. You can also turn on/off audio recording by clicking the microphone button again.

Audio recorded through your microphone is captured as an .mp3 file that is saved with the tour when you save it
as a KMZ file.

2. Make sure when saving a Tour with audio narration to set the 'Save as Type' option in the Save window to
KMZ, otherwise the audio will not be included in your file.

Tips & Tricks for Touring
    • When adding an iteration to an existing tour, you can click and hold on a location on the globe (i.e.
        building, mountaintop, etc.), and the camera will stay on that location, swiveling around it. When you un-
        click from that location, the previously recorded tour will continue as before.
    • Navigation through time is captured in the tour, so if you drag the time slider while recording a tour, any
        actions that cause changes in the 3D viewer (appearing/disappearing points, animations, etc) will be
        recorded. For example, if you have Historical Imagery turned on (link), or have a time-animated KML in
        My Places, try recording a tour and also manipulating the time slider (in the upper left of the 3D map
        view). This allows you to make tours of time-animated layers, like the Declan Butler Avian Flu map, and
        also showing historic imagery from different time periods.
    • KML Touring allows for more advanced actions than can be recorded by the simple Add Tour feature in
        Google Earth. This includes dynamically moving placemarks, lines and 3D models, adding pauses to the
        tour, and changing the styles of your features during the tour. However, you will need to hand-edit the
        KML to create these actions. Please see the Touring in KML documentation on the KML documentation
        site for more information.

© 2010 Google                                                                                                       51
Embed your Google Earth Project in your Website You can embed your Google Earth Project in your website or blog by using the Embed KML gadget! This tutorial will guide you through how to embed your Google Earth project in your website or blog using the Embed KML gadget. In this exercise, we're going to embed a Google Earth project of Women for Women International. You can also choose your favorite example from the Showcase to insert into the gadget. Let's get started! 1. Open Google Earth, and save your project as a KMZ file to your computer. 2. If you would like to embed your own Google Earth KML or KMZ file onto your website, upload your file onto your web server, so that it is accessible online. You can also upload your file to your website or use other web pages like Google Sites (http://sites.google.com). Use the Embed KML gadget 1. Open a web browser, and go to the Embed KML gadget on the Internet: http://tr.im/embedkml 2. Under the Display Settings, enter a name for your embed window, set the size for your Earth window, and choose a frame color. 3. Under the Gadget Settings, enter the URL link to the KMZ file on the web. For this example, enter the following URL: http://earth.google.com/ gallery/kmz/women_for_women.kmz 4 Select a view mode (Earth or Maps), and select how you want the embedded map to initially load and if you want to show 3D buildings, roads, borders, and other data. 5. Click the Get the Code button. 6. Select the code at the bottom of the Embed KML Gadget, and copy it. © 2010 Google 52
Embed your Google Earth project in a website or blog

In this example, we are using Blogger as a hosting mechanism. You can use other web hosting services if you
wish. Remember: the best place to embed the map is on your website!

1. Go to blogger.com, and log in with your Google account.

2. Create a new post, and paste the HTML code from the Embed KML Gadget into the post window.

3. Click Publish Post and view the blog. If you have the Google Earth Plug-in installed on your computer, your
Google Earth project will appear on your blog!

© 2010 Google                                                                                                    53
Here is a published blog post of the Women for Women International Google Earth project, created with the
Embed KML gadget:

© 2010 Google                                                                                               54
Use the Embed Tour gadget

1. Open a web browser, and go to the Embed Tour
gadget: http://tr.im/embedtour

2. Under the Display Settings, enter a name for your
embed window, set the size for your Earth window,
and choose a frame color.

3. Under the Gadget Settings, enter the URL link to
the KMZ file (with a tour included) on the web. For
this example, enter the following URL:

http://mw1.google.com/mw-earth-vectordb/
blog/plugin_tours/lake_chad_tour.kmz

4. Select a view mode (Earth or Maps), and select how
you want the embedded map to initially load and if
you want to show 3D buildings, roads, borders, and
other data.

5. Click the Get the Code button.

6. Select the code at the bottom of the Embed Tour Gadget, and copy it.

© 2010 Google                                                             55
Embed your Google Earth tour in a website or blog

In this example, we are using
Blogger as a hosting mechanism for
your tour. You can use other web
hosting services if you wish.
Remember: the best place to
embed the map is on your website!

1. Go to blogger.com, and log in
with your Google account.

2. Create a new post, and paste the
HTML code from the Embed Tour
Gadget into the post window.

3. Click Publish Post and view the
blog. If you have the Google Earth
Plug-in installed on your computer,
your Google Earth project will
appear on your blog!

Here is a published blog post of
UNEP's Lake Chad Google Earth
tour, created with the Embed Tour
gadget:

© 2010 Google                                       56
Introduction to Using and
                           Creating Content in Google Maps
What is Google Maps?
Google Maps is a free, web-application
that lets you search for addresses and
places of interest in any web browser.

There are two ways to create a custom
map with Google Maps:
• Use the My Maps tab to create a
    map.
• Use the Maps API (Application
    Programming Interface) to create a
    highly customized Google Map.

You can also add gadgets, tools, and
other content in the form of Mapplets
and KML files.

Go to Google Maps at
http://maps.google.com now!

Navigating in Google Maps
To navigate in Google Maps, use the navigation tools:

1. Use directional arrows to move
   the map up, down, left, and right.

2. Click here to locate yourself on the map.

3. Click here to view street-level photographs,
available in some areas of the world.

4. Click here to zoom in.

5. Drag the zoom slider up or down
to zoom in or out incrementally.
6. Click here to zoom out.
7. Or use your mouse:
    • Click-and-drag the map to move the map around.
    • Double-click the right-mouse button to zoom in and the left-mouse button to zoom out.
    • Scroll the mouse wheel to zoom in and out.

© 2010 Google                                                                                 57
Changing the background data in Google Maps
To change the background data, use the background data buttons:
1. Click “Traffic” to view live 2. Click “Map” to show roads, 3. Click “Terrain” to show
traffic conditions, available in parks borders, and bodies of physical elevation as shaded
selected areas of the world. water. relief.
6. Click “Satellite” to aerial and
5. Check “Photos” or “Wikipedia” satellite imagery. Check “Show
to view geo-tagged Panoramio labels” to view names of cities,
photographs and Wikipedia entries. countries, etc.
© 2010 Google 58Searching in Google Maps
1. Search for places:
• Organization or business name or type
• Addresses, towns, and cities, such as “Nairobi, Kenya”
• Places of interest (parks, etc.)
• Coordinates (latitude, longitude)
2. Search for directions between cities, addresses, locations, or other places of interest. You can add multiple
stop along the route to your results – simply click-and-drag any part of the line to the new stop to add it to the
route.
In most areas of the world, searching for cities and finding directions between two cities is available. In some
area, however, directions are not available. Search for specific addresses is available in selected areas of the
world. Oftentimes, search results include user-generated data, depicted with blue markers.
© 2010 Google 59Creating Maps Using My Maps
Creating your own maps has never been simpler. With the My Maps feature in Google Maps, you can mark
locations, paths, and regions of interest on a personalized map, and share it with the world! You can even add
descriptive text, embed photos and videos, and view your map on Google Earth.
With the My Maps feature in Google Maps, there are a number of exciting things you can do for your organization.
Here are a few ideas:
• Plan an event and distribute information to participants.
• Generate a map locating your organization's branches across the country or across the globe for anyone to
see.
• Map out your volunteer base and geographically plan objectives for reaching out.
This tutorial will guide you through an example of organizing a beach cleanup day like the one shown below:
We would like our map to show the following things: the meeting point, the path that each team will follow, the
end point, and where we'll have our picnic at the end of the cleanup. Feel free to follow along, modifying
locations and descriptions to suit your own needs. You'll be surprised at how fun and easy it is!
Let's get started!
1. Go to Google Maps: http://maps.google.com
2. Sign in to your Google Account if you have not already done so using the link on top right corner.
3. Click on the My Maps link under the search box.
4. Click the Create new map button.
© 2010 Google 605. Add a title and description for your map. You can make your map public or unlisted. We'll make ours public so that it shows up in search results. 6. Click the Save button. 7. Let's zoom into the Santa Cruz Beach area. Type "Santa Cruz Beach, USA" in the search box and zoom in to get a closer look. Once you've zoomed in, click the My Maps link to come back to your map. © 2010 Google 61
8. Click on the Satellite button located at the top right of your map. Under the Satellite button, keep Show labels
checked. By doing this, we'll be able to see the aerial imagery as well as road information.

Now let's add data!

© 2010 Google                                                                                                    62
Adding placemarks: Let's mark locations for group meeting points!

1. Click      at the top left of your map. Your cursor should change into a placemark icon with an "X" crosshairs.
The crosshairs indicate where the placemark will fall.

2. Let’s first mark the starting point for our beach cleanup. Move the cursor to the appropriate location. If you
want to dismiss this placemark, press the Escape key.

3. Click your mouse button to place your placemark. It should bounce into place.

4. Add a title and description.

© 2010 Google                                                                                                       63
Your description can be plain text, rich text, or HTML code:

                Plain text                           Rich text                             Edit HTML

1. Simply enter a plain text           2. Use different text fonts, sizes,    3. Edit the HTML directly.
   description.                        styles, and colors. Add hyperlinks,    Copy-and-paste from a web
                                       lists, and images.                     design software, or embed a
                                                                              YouTube video.

5. You can also change the icon for your placemark by clicking the icon in the top right corner of the info
window.

If you want to add a custom icon, such as your organization's logo, to the map, click "Add an icon." Enter in the
complete website address URL to your logo image on the Internet (e.g.
http://www.myorganization.org/our_logo.jpg). The ideal size for your logo is 64 x 64 pixels. For this example, type
in:

                   http://www.cleanuptheworld.org/images/en/new_version_logo_for_website_en.jpg

© 2010 Google                                                                                                    64
6. Click OK to save your placemark.
7. Add another placemark for the ending point. Here's what your map will look like after adding these two
placemarks.
Tips:
• To move any placemark on your map, drag-and-drop any placemark to the new location. Note that you
can only edit or move placemarks on your maps, not others' maps.
• To edit a placemark's title or description, click on the placemark to open the info window. Edit the title
and description and click OK.
Adding lines: Let's show the paths to take!
1. Click . Your cursor appears like this:
2. First we'll show the path that the first group, Group A, should take. Move the cursor to the appropriate location
and click to start drawing the line. If you want to dismiss this line, press the Escape key.
3. Click your mouse button at each point of your line.
4. To finish drawing your line, double-click the last end point.
5. Add a title and description.
6. You can also change the color, transparency, and width of your line by clicking the color swatch in the top
right corner of the info window.
© 2010 Google 657. Click OK to save your line.
8. Add another line for the second group, Group B. Here's what your map will look like after adding these two
paths.
Tips:
• To move a line on your map, mouse over the line to make the end points appear. Click and drag the
points to move them.
• To delete a point from your line, right-click on the point and choose Delete from the context menu.
© 2010 Google 66• To add a point to your line, you can either click on one of the semi-transparent points, or right-click on
the line and choose Add a point from the context menu.
• To edit a line's title or description, click on it to open the info window. Edit the title and description and
click OK.
Adding shapes: Let's show our picnic area and the parking lot!
1. Click . Your cursor appears like this:
2. We can now draw a box around our picnic area. Move the cursor to the appropriate location and click to start
the shape. If you want to dismiss this shape, press the Escape key.
3. Click your mouse button at each end point of your shape.
4. To finish drawing your shape, double-click the last end point or click on the starting point to complete the
shape.
5. Add a title and description.
6. You can also change the color and
transparency of your shape by clicking the
color swatch in the top right corner of the info
window.
7. Click OK to save your shape.
8. Create another region to show the parking lot area. Here's what your map will look like after adding these
regions.
© 2010 Google 67Tips:
• To move a shape on your map, mouse over the shape to make the end points appear. Click and drag the
points to move them.
• To delete a point from your shape, right-click on the point and select Delete from the context menu.
• To add a point to your shape, you can either click on one of the semi-transparent points, or right-click on
the shape and choose Add a point from the context menu.
• To edit a shape's title or description, click on it to open the info window. Edit the title and description
and click OK.
Add photos to your map
1. Still in Edit mode, create a new placemark or click on the placemark you wish to add the photo to. You can
also open the placemark by clicking it in the list in the left-hand panel.
2. With the placemark open, click the Rich Text link.
3. Then click on the Image icon. Enter the website address URL to the image's location on the web (e.g.
http://www.myorganization.org/img/beachcleanup.jpg). Images less than 400 pixels will fit best inside the pop-up
balloon. For this example, enter the following URL:
http://www.cleanuptheworld.org/images/en/jordan_the-royal-marine-conservation-society-of-jordan--large.jpg
4. You'll see the image appear in the balloon description.
© 2010 Google 68You can also read