#PRP1742 Star Trek TOS Phaser 2 Prop Kit Assembly Manual
←
→
Page content transcription
If your browser does not render page correctly, please read the page content below
#PRP1742
                                         ™
           Star Trek TOS Phaser 2
           Prop Kit Assembly Manual

         Thank you for your purchase of the Roddenberry.com Star Trek Phaser 2 Kit.
These instructions will enable you to make an accurate replica of the Original Series Phaser 2 with
snap-in Phaser 1, as made for the Star Trek: Deep Space Nine episode “Trials and Tribbleations.”
      You may also finish the kit as seen in its various incarnations from The Original Series.

       The resin-cast parts of this phaser kit are molded directly off the master pattern of the
 “Trials and Tribbleations” Phaser sculpted by Michael Moore. The kit parts have been upgraded
from those used on the filmed props, and the kit features hollow body parts for both lighter weight
   and end-user upgradability, a rotating ring on the emitter nozzle, “see through” heat sink fins,
                            and turning safety and power setting knobs.
2 #PRP1742 - STAR TREK: TOS Phaser 2 Prop Kit Assembly Manual
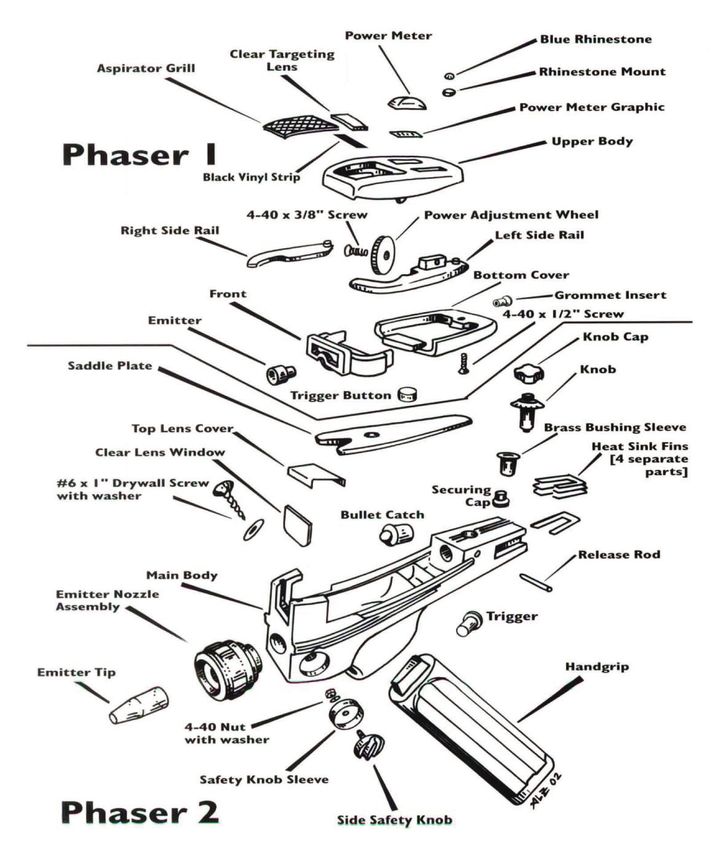
BASIC LAYOUT AND INVENTORY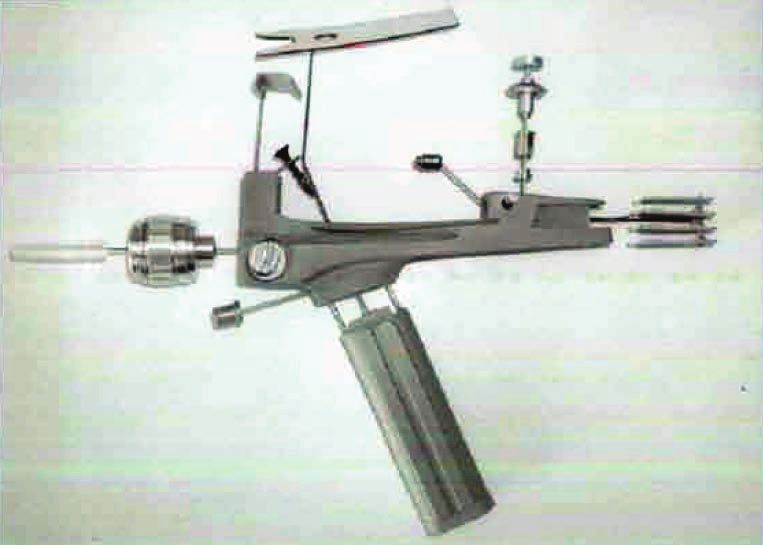
#PRP1742 - STAR TREK: TOS Phaser 2 Prop Kit Assembly Manual                                  3

Notes on making a TOS First Season ''Black and White'' Phaser:
Read all of the instructions first. If you wish to make a TOS First Season “Black and White” Phaser, then
make the following modifications as you assemble your kit....

Paints needed:
Semi-Flat or Gloss Black spray paint (Phaser 1 and Phaser 2 Body)
Gloss White or Pearlescent White (Handgrip)

Parts not included:
7/16” or 1/2” diameter x 1/2” length polished aluminum rod
Scribed styrene sheet (Evergreen brand hobby plastic)

Phaser 1 Modifications:
Take the aspirator grill and bend it the other way -- the smooth side is out. Glue this with epoxy to the
body, do not fill in the seams. Leave off the clear plex targeting lens for now and glue this on with the
black vinyl underneath like for the standard Phaser 1 after painting.

Glue on the side rails (the adjustment wheel can be installed later, or masked before painting) and the
front before painting, then sand flush with the surface so it all appears as one piece, putty and sand
smooth.

Fill in and sand the power meter hole.

Paint semi-gloss or gloss black, including the side rails and the aspirator grill area.

After curing, glue on the clear targeting lens, and add the emitter tube and trigger button.

The power meter graphics consists of cutting out numbers 1 and 10 in white squares and affixing them
in place at either end of the surface where the plastic meter would go. The half-round meter is not used,
and the graphic numbers are exposed.

The rhinestone is not used with the B/W phaser.

Phaser 2 Modifications:

The power adjustment knob is a plain polished aluminum rod sticking out of the body, approximately
7/16” to 1/2” in diameter and about 3/16” to 1/4” exposed. This can also be ringed by a finishing washer
available at hardware stores if you want. Neither part is included; you’ll need to make those yourself.

The metal heat sink may still be used -- it is painted the body color -- or you may bondo in the heat sink
cavity on the body and either scribe in lines simulating the heat sink detail or use scribed Evergreen brand
styrene hobby plastic in its place.

The body is painted a semi-gloss or gloss black (using the same paint as on your Phaser 1), and the
handgrip is gloss white...or if you can find it, a pearlescent white.

All else is the same -- the release rod, side safety knob, top metal cover, lens window, trigger, and emitter
nozzle are unchanged.

Good luck with your kit!
4                   #PRP1742 - STAR TREK: TOS Phaser 2 Prop Kit Assembly Manual

    Parts List for Phaser 1:
    1 Upper Body
    1 Front
    1 Bottom Cover
    1 Aspirator Grill
    1 Clear Plex Targeting Lens
    1 Black Vinyl Strip
    1 Adjustment Wheel
    1 Power Meter with power level graphic
    1 Emitter
    1 Trigger Button
    1 Left Side Rail
    1 Right Side Rail
    1 Blue Rhinestone
    1 Rhinestone Mount
    1 4-40 x 3/8” Screw
    1 4-40 x 1/2” Screw
    1 Grommet Insert
    1 180 grit sandpaper
    1 320 grit sandpaper
    1 “Scotchbrite” pad

    Tools and supplies needed:
    All of these can be found in your local
    hardware store...                            Spray Paints:
                                                 Spray primer (sandable scratch-filler type)
    Epoxy glue -- 5 minute curing                Krylon “Shadow Gray” (for Trials and Tribbleations)
    Fine sandpaper -- 400 to 600 grit            Zynolyte Dark Gray Primer (for TOS)
    Small jeweler’s file (flat or half-round)    Krylon Matte Finish or Testors Dullcote
    Automotive spot putty                          (if you’re using a primer as the color coat)
    Hobby knife (X-Acto brand or similar)        Semi-Flat or Gloss Black (for TOS)
    Small brass wire brush (resembles a
        large toothbrush)
    Hand drill with 1/8” drill bit
    Some sort of hand saw (fine hobby saw or
    hacksaw)
                                                 Optional Tools and supples:
    Cyanoacrylate glue (medium “gap-filling”     Automotive body filler (Bondo brand or similar)
       type recommended)                         Dremel brand moto tool or similar
    Masking tape                                 Metal polish (Simichrome or other)
    Toothpicks                                   Velcro

    Wash your resin parts with soap and water to remove any lingering traces of mold
    release before you begin.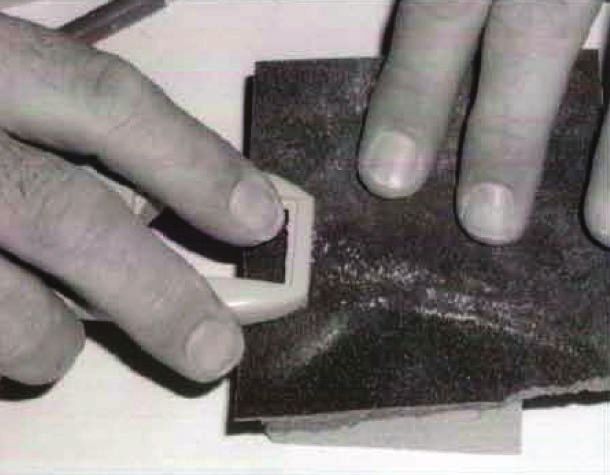
#PRP1742 - STAR TREK: TOS Phaser 2 Prop Kit Assembly Manual                              5

              Step 1: Start by cutting off the sprues (if present) with your saw and
              sanding the flashing and mold lines from the three main resin body
              parts. Then fill any objectionable scratches and holes with the spot
              putty. While the resin parts were pressure-cast to minimize bubbles
              and voids, there may still be small bubbles present in the castings that
              will need to be filled and sanded.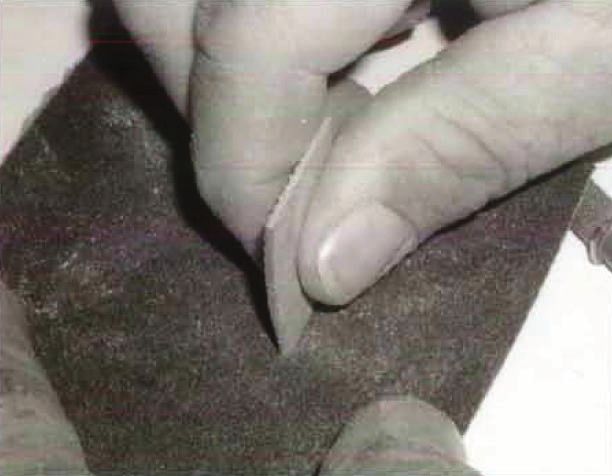
6 #PRP1742 - STAR TREK: TOS Phaser 2 Prop Kit Assembly Manual
Step 2: While the putty is drying, sand the edges and mold lines off of the cast metal parts. As you work,
continually check the fit of your parts and sand or file away any resin or metal that interferes with proper fit
and function.
Step 3: The aspirator grill finish is achieved by wire brushing the top surface with your small brass brush.
Brush with the diamond pattern in both directions to give it the desired finish.
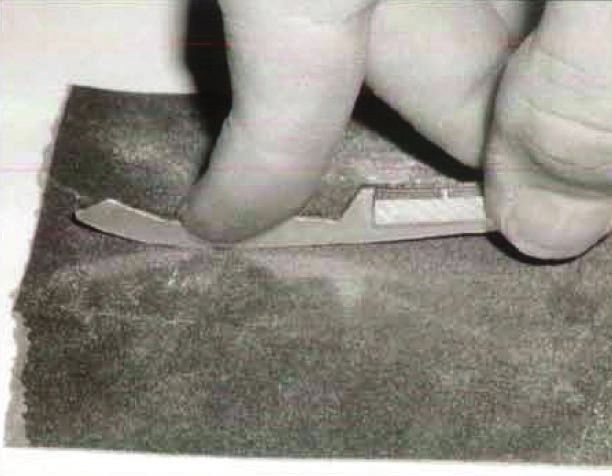
Step 4: Sand the outer edges of the two side rails until smooth (down to 400-600 grit). Be careful, as they
are easily bent. Rubbing them with the Scotchbrite pad will give the rails a nice brushed look, or they can
be polished with metal polish.
The rails and the aspirator grill can be bent slightly for a more even fit -- be careful not to over-bend.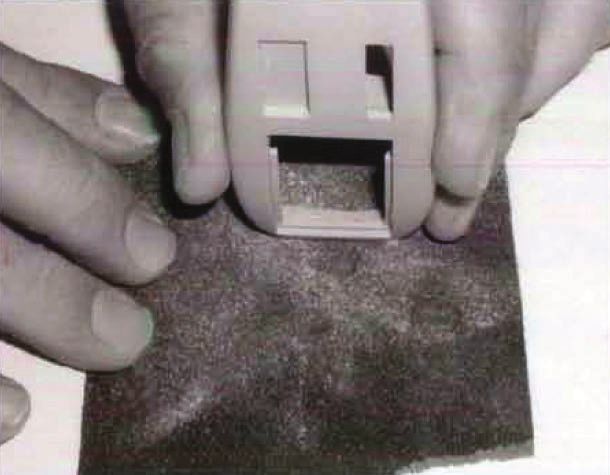
#PRP1742 - STAR TREK: TOS Phaser 2 Prop Kit Assembly Manual                                       7

Step 5: Try the fit of the clear plex targeting lens and the aspirator grill, sand either or both parts until they
fit. The targeting lens may not appear to be even to the surface of the body. You may add material to the
low end or cut away material from the high end on the body until it looks good to you.

Step 6: Drill a 1/8” hole into the end of the bottom cover, enough for the grommet insert to fit in. The
grommet may be installed before or after painting.

Step 7: Clean the hole in the front where the emitter tube fits in.
8                      #PRP1742 - STAR TREK: TOS Phaser 2 Prop Kit Assembly Manual

    Step 8: Install the adjustment wheel onto the left side rail using the 4-40 x 3/8” screw. You will want this
    slightly loose so the wheel spins freely. Fit this assembly onto the phaser, and file away the slot in the body
    if it interferes with the smooth spinning of the wheel (see next photo below). Be sure to file at an angle
    to avoid filing away any of the visible slot. Try the fit again to be sure it works; once satisfied as to the
    function, glue the end of the screw with cyanoacrylate glue so it can’t work its way loose.

    Step 9: Once again, continue to test fit your parts!
#PRP1742 - STAR TREK: TOS Phaser 2 Prop Kit Assembly Manual                                  9

Step 10: Make yourself some small hangers so you can hang your resin parts for painting. It may help to
slightly roughen up your surfaces with 320-400 grit sandpaper before you spray your first coat of primer.
You may mask off the areas that you’ll be gluing parts to before you paint, as glued parts do not adhere
well to painted surfaces.

After your first coat of primer dries, check the finish of the surfaces. The primer coat may reveal scratches
and other flaws that were not visible to you before, use the spot putty and sand those spots. Primer again
and repeat if needed -- it may take several putty, sanding, and primer steps before you get a surface that
you’re pleased with.

When the final primer coat is dried enough, spray on your first coat of color. ”Trials and Tribbleations”
phasers were painted Krylon Shadow Gray, or you have the choice of using Zynolyte Dark Gray Primer or
similar, or a semi-flat or gloss black color coat if you want to paint a color used on TOS.

If you’re using a primer as your color, give your phaser a final coat of clear Krylon Matte Finish, Testor’s
Dullcote, or another brand of clear finish.

You may if you wish wet sand in between coats with 600 grit or finer sandpaper for an ultimate smooth
finish.

Allow your painted body parts to dry and cure before you handle them again, allow several hours or
overnight before you begin final assembly. If you’ve masked any areas before painting, remove the
masking tape carefully so you don’t lift your freshly painted surfaces. You may need to score the tape
edges with a hobby knife before lifting the tape off.
10                      #PRP1742 - STAR TREK: TOS Phaser 2 Prop Kit Assembly Manual

     Step 11: Before gluing your parts on, roughen up any surfaces you’re gluing together. This is also
     necessary to remove paint from your joints since resin glues better to resin and metal than it does to paint.
     Be very careful you do not damage any visible surfaces. While gluing, try to avoid handling the phaser any
     more than necessary to keep glue fingerprints off. Allow sufficient cure time in between installing parts.

     Step 12: Start by gluing the side rails to the upper body, one at a time. You can wipe away excess
     “outside” glue while it’s still wet, or you can leave it alone without touching it and pick away at the glue with
     toothpicks when it starts to cure but before full hardness -- there is a small window of opportunity when you
     can do this without damaging finished surfaces. When the glue is soft without being sticky and stringy is
     best for this; it will get progressively harder to remove glue this way the more it is curing.
#PRP1742 - STAR TREK: TOS Phaser 2 Prop Kit Assembly Manual 11 Step 13: You may use your own preference for the order in which the rest of the parts assemble. Glue the front on using cyanoacrylate on the resin-to-resin joint, or epoxy if you want to have the convenience of moving the parts slightly for final positioning. Look at the front of the phaser and make sure you’re putting it on straight and even; once in place it will be hard to correct a visual mistake. Spread epoxy inside where the front butts up on the rails. Install the emitter either before or after gluing the front, it sticks out approximately 1/16 of an inch (see photos on the bottom). Spread epoxy around the emitter on the inside; it is not necessary to put glue in before pushing the emitter in the hole. Glue on the aspirator grill with epoxy. You may spread glue inside the body for greater strength; this also applies for all the other parts.
12                      #PRP1742 - STAR TREK: TOS Phaser 2 Prop Kit Assembly Manual

     Step 14: Put the black vinyl tape on one surface of the clear plex targeting lens, this helps to keep from
     seeing into the interior of the phaser. Glue the taped targeting lens onto the phaser, tape side down. You
     may want to add a piece of support plastic at the joint of the targeting lens and aspirator grill, or at least add
     extra glue there inside the phaser.

     Step 15: Epoxy the power meter onto the graphic. You may use your choice of power number ranges;
     there is enough length on the graphic so if you make a mistake with your gluing, you can peel off the
     graphic and try again. When the glue has been curing for a few minutes, cut away the excess graphic with
     your hobby knife before it achieves full cured hardness.

     The “Trials and Tribbleations” Phaser 1 had a blue rhinestone in between the meter and adjustment wheel.
     Many of the TOS phasers didn’t have the rhinestone or used a red one, so its installation is purely a matter
     of preference as well as what color you use (he Blue “Trials and Tribbleations” rhinestone is the only one
     supplied).
#PRP1742 - STAR TREK: TOS Phaser 2 Prop Kit Assembly Manual 13 Step 16: To install the rhinestone, scrape away a very small patch of paint where the rhinestone goes. There is no specific place imprinted on the casting for this; you’ll have to eyeball its placement. Sand the metal rhinestone mount until flat. Place a tiny drop of epoxy on this patch then very carefully put the rhinestone mount in place, using tweezers if needed. The rhinestone may be glued onto the plate either before or after it goes on the phaser. Step 17: Epoxy on the power meter assembly; make sure it fits in the hole before you glue it. Step 18: Glue the trigger button onto the bottom cover.
14                     #PRP1742 - STAR TREK: TOS Phaser 2 Prop Kit Assembly Manual

     Step 19: Secure the bottom cover with the 4-40 x 1/2” screw. If you wish, you may affix a piece of Velcro
     to the cover to carry your phaser with a costume.

                   Enjoy your new Phaser 1 or insert it in place to be part of your Phaser 2!

                       Phaser 2 assembly instructions follow...
#PRP1742 - STAR TREK: TOS Phaser 2 Prop Kit Assembly Manual 15
Parts List for Phaser 2:
1 Phaser 1 Instructions
and Parts
1 Main Body
1 Handgrip
1 Emitter Nozzle with
turning ring assembled,
and acrylic emitter tip
1 Clear Lens Window
1 Set of 4 Heat Sink Fins
1 Top Lens Cover
1 Side Safety Knob with
Sleeve (includes 4-40 nut
and washer)
1 Power Setting Knob
(includes knob cap, knob,
brass bushing sleeve, and
securing cap)
1 Trigger
1 Bullet Catch
1 Phaser 1 Release Rod
(nonfunctional)
1 Saddle Plate template and plastic strip
1 #6 x 1” Dry Wall Screw and Washer Tools and supplies needed:
1 180 grit Sandpaper
1 320 Grip Sandpaper All of these can be found in your local hardware
1 “Scotchbrite” Pad store...
Hobby knife (X-Acto brand or similar)
Paints Needed: Fine sandpaper (400 to 600 grit)
Hand drill with 1/8”, 5/32”, and 5/16” drill bits
Black brush-on paint with small brush, Small jeweler’s files (flat and round)
or black spray paint Automotive spot putty
Spray primer (sandable scratch-filler type) Auto body filler (Bondo brand or similar)
Krylon “Smoke Gray” spray paint Epoxy glue (5 minute type)
(for “Trials and Tribbleations”) Cyanoacrylate glue (Medium “gap-filling” type
recommended)
Metal polish (Simichrome or similar)
Optional paints for TOS Phasers: Philips screwdriver (#2)
Body: A mild solvent such as naphtha or alcohol
Krylon All-Purpose Grey primer
(also an alternative to Smoke Gray)
Krylon Matte Finish or other clear paint
(necessary if using a primer as the final color)
Krylon Slate Blue or other blue-grey paint
Optional Tools:
Dremel brand moto tool or similar
Handgrip: Masking tape
Semi-flat or Gloss Black
Dark Bronze or Anthracite Grey16 #PRP1742 - STAR TREK: TOS Phaser 2 Prop Kit Assembly Manual
Note: These instructions assume you have completed the included Phaser 1 kit -- if not, you may want to
build that first. Certain instructions are repeated here; depending on which version of the phaser you are
making, the order of work can be changed.
Instructions for making certain parts functional are in italics.
Wash your resin parts with soap and water to remove any residual mold release.
Test fit your parts as you are working on the phaser.
Step 20: Start by removing any residual sprues and mold flash and lines from all parts, and putty or bondo
all objectionable scratches, mold lines, dips, or holes. While the resin parts were pressure-cast, there
might still be small bubbles present in the castings that need to be filled in. Most such bubbles will be
concentrated on the bottom front edge of the main body below where the emitter nozzle goes.
Step 21: The cast metal parts may be sanded smoother and rubbed with the Scotchbrite pad for a brushed
finish, or can be sanded to 600 grit or finer and polished with the metal polish.
Sand the metal front top cover smooth, and scotchbrite the surface with the grain going side to side.#PRP1742 - STAR TREK: TOS Phaser 2 Prop Kit Assembly Manual 17 Step 22: Test fit the acrylic emitter tip into the machined emitter nozzle. If it is too tight, it may be sanded until it is as tight or as loose as you want. Epoxy the tip in place -- where the taper begins on the acrylic tip is where it starts to be visible in the emitter hole. Step 23: Drill a 5/32” hole in the side of the main body where the release rod goes. The amount it sticks out of the finished prop is entirely up to you. 1/8” to 1/4” is good, but make sure the rod won’t interfere with inserting the bullet catch. The main body is cast with a 1/4” hole for the power setting knob. If you are gluing the knob permanently in place without it having the capacity to turn, leave this hole alone and cut off the knob axle short enough for the knob to bottom out.
18                      #PRP1742 - STAR TREK: TOS Phaser 2 Prop Kit Assembly Manual

     Step 24: For anyone who wants a functioning knob, enlarge and deepen the top knob hole using a 5/16”
     drill bit, enough for the axle and brass bushing sleeve to fit in with the securing cap at the end...it must
     have clearance for turning. Be sure you drill straight, as any angle will cause the knob to sit angled to the
     surface.

     Step 25: Drill a 5/16” hole in the body where the side safety knob goes, in the middle of the cast-in
     depression. Enlarge the metal safety knob sleeve hole with a knife or a 1/8” drill bit for the knob screw to
     go in and turn freely.

     Step 26: Sand the circumference of the safety knob if it doesn’t fit into the sleeve. Secure with the 4-40 nut
     and washer, leaving it loose so the knob can turn without interference. Very sparingly glue the nut to the
     screw with cyanoacrylate or epoxy; it only has to stay in place on the screw, and will rotate with the knob
     without it coming loose after gluing the knob assembly onto the phaser.
#PRP1742 - STAR TREK: TOS Phaser 2 Prop Kit Assembly Manual 19 Step 27: Drill a 5/32” or 1/8” hole into the upper end of the handgrip, deep enough for the drywall screw. For a “Trials and Tribbleations” phaser, the body and handgrip are painted the same color, so you can attach the grip on the body at this point if you want to, using the drywall screw and washer and gluing the tightened joint with cyanoacrylate inside the body so it can’t move on you. Otherwise, leave it separate to make it easier to paint each part two different colors. Step 28: The heat sink fin parts are numbered 1 through 4, with #4 being the bottom [tabs stick up], followed by #3, then #2 and finally #1 with the smooth side up. Sand the edges of the fins until smooth and test fit the unglued heat sink in the phaser. It may be easier to not have the four fins tacked together before final assembly. You may need to sand or file the front and/or rear ends of the fins if the angles do not visually line up evenly. You may also wish to paint the visible portions of the tabs in your chosen phaser body color or black.
20 #PRP1742 - STAR TREK: TOS Phaser 2 Prop Kit Assembly Manual
Step 29: Make the Phaser 2 body saddle plate using the supplied plastic strip and template You may want
to make a copy of the template before starting, in case you make a mistake with the plastic strip.
Attach the paper template with tape; or if you have it, use double-sided tape or a low tack spray glue such
as 3M brand Spray 77. Cut out your template using a hobby knife; you can score and snap the excess
plastic away. Drill out the hole and file or Dremel the oval shape.
Naphtha or denatured alcohol is good for cleaning up residual glue -- do not use lacquer thinner, acetone,
or MEK on styrene or acrylic parts since they will chemically melt on you and ruin the parts.
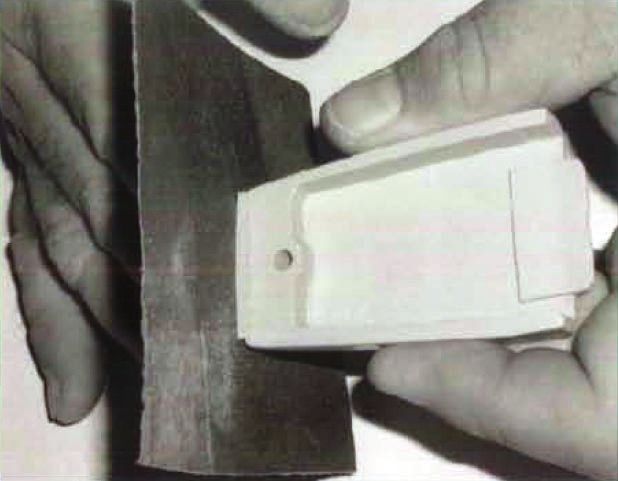
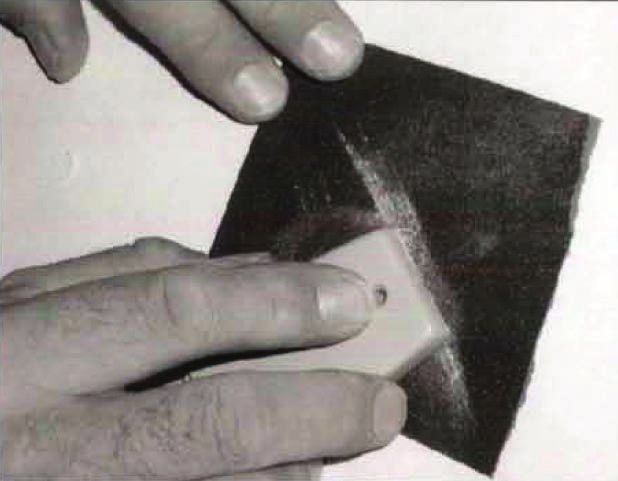
Step 30: Test fit the saddle and sand away more if needed until you’re satisfied with the fit. Also snap in
your completed Phaser 1 to make sure the oval hole has enough clearance for the Phaser 1 trigger button.
Test fit the bullet catch in the pre-drilled hole -- if the Phaser 1 grommet doesn’t line up properly (either the
Phaser 1 is too high off the Phaser 2 body or hits bottom without it catching), you’ll need to Dremel the hole
bigger in one direction or the other until the Phaser 1 is seated in the right place. You may also have to
counter bore the hole deeper to make the catch sit in more if you have trouble pushing the Phaser 1 into
place.
At this point, you have the option of painting your resin parts and saddle plate separately, or you can screw
the handgrip on and glue it in place permanently, then glue in the trigger, and glue on the saddle plate and
bondo and smooth the seams; but you will then have to mask the trigger and one or the other resin parts
for a two-tone finish.#PRP1742 - STAR TREK: TOS Phaser 2 Prop Kit Assembly Manual 21 Step 31: When your resin parts and cover plate are fully prepared, spray on your first coat of primer. After your first coat of primer dries, check the finish of the surfaces. The primer coat may reveal scratches and other flaws that were not visible to you before; use the spot putty and sand those spots. Primer again and repeat if needed -- it may take several putty, sanding, and primer steps before you get a surface that you’re pleased with. When the final primer coat is dried enough, spray on your first coat of color. The “Trials and Tribbleations” Phaser 2 body and handgrip were painted Krylon Smoke Gray, or you have the choice of using any of the colors suggested in the paint list for TOS phasers. If you’re using a primer as your final color, give your phaser a coat of clear Krylon Matte Finish, Testors Dullcote, or another brand of clear finish over the primer. You may wet sand in between coats of paint with 600 or finer grit sandpaper for an ultimate smooth finish. Allow your painted body parts to dry and cure before you handle them again, allow several hours or overnight before you begin final assembly. If you’ve masked any areas before painting, remove the masking tape carefully so you don’t lift your freshly painted surfaces. You may need to score the tape edges with a knife before lifting the tape off. Any areas on the body that will have parts glued to it will need to have the paint scraped away. Be very careful to not damage any paint surfaces that will be visible. Allow the epoxy to set and harden on each part before going on to the next part to be glued.
22                     #PRP1742 - STAR TREK: TOS Phaser 2 Prop Kit Assembly Manual

     Step 32: If you haven’t done this before now, screw on and epoxy or cyano glue the handgrip to the body.
     The screw will hold the grip in place, the glue assures the grip won’t flex or twist on you.

     Step 33: The trigger goes in next from the inside. Epoxy glue this from the inside so you can’t accidentally
     push this in when playing with your phaser.
#PRP1742 - STAR TREK: TOS Phaser 2 Prop Kit Assembly Manual 23 Step 34: The body saddle plate glues on next. The seams are okay to be visible since the Phaser 1 covers this whole section of the Phaser 2. You can hide the seams if you want to with bondo; it’s just a lot more work to do this after painting than before. Step 35: The bullet catch is installed by spreading a small amount of epoxy in the hole then inserting the catch, making sure you don’t get any glue inside the catch where the spring is. Test press the catch frequently to be sure it still functions. Only a little glue is necessary. Step 36: Before assembling the power setting knob, make the graduated numbers stand out by drawing on the numbers and lines with a black felt pen, then wipe the excess away with naphtha or alcohol. Paint the knob cap with brush-on or spray black paint, then glue this onto the top of the knob.
24                      #PRP1742 - STAR TREK: TOS Phaser 2 Prop Kit Assembly Manual

     Step 37: For a nonfunctioning knob, cut off the stem so the knob is short enough to fit in the existing hole.
     And after painting and assembling the knob cap to the knob, epoxy in place.

     For a functioning knob assembly: assemble the lower knob by inserting the brass bushing sleeve with the
     wide part up (see photo above). Make sure this sleeve turns freely on the axle, sand away at the axle until
     it is no longer tight if necessary.

     Step 38: Insert the securing cap and (very sparingly!) glue into the hole with cyano. The brass sleeve
     should still turn freely and should have a little up/down play, the securing cap will turn with the rest of the
     knob.

     Step 39: Glue on the knob with epoxy by inserting the knob into the hole part of the way, then apply a little
     epoxy to the brass sleeve, then push in the rest of the way. With luck, you didn’t glue anything other than
     the sleeve and you have a working power setting knob.
#PRP1742 - STAR TREK: TOS Phaser 2 Prop Kit Assembly Manual 25 Step 40: Press the release rod into the side. This may be glued or not depending on how loose the fit is. Step 41: Epoxy glue the heat sink to the back of the body. You may need to tweak the individual fins for proper spacing before the glue sets. Step 42: Epoxy glue the side safety knob assembly into place without getting epoxy onto the turning nut and screw.
26                      #PRP1742 - STAR TREK: TOS Phaser 2 Prop Kit Assembly Manual

     Step 43: Test fit the clear lens window; if it doesn’t go in, sand the edges until it fits. Epoxy the metal top
     lens cover in place, both on top and underneath.

     Step 44: Glue on your emitter nozzle assembly.
#PRP1742 - STAR TREK: TOS Phaser 2 Prop Kit Assembly Manual 27 Step 45: Snap on your Phaser 1 and admire your handiwork because you’re done! IMPORTANT NOTES: The reproduction of the Roddenberry.com Star Trek TOS Phaser 2 Kit or any of its parts by any means known or yet to be invented (including molding and recasting, reverse-engineering, or 3D scanning/SLA printing) is expressly prohibited by United States and international copyright and product protection laws. Copyright © 2009 Roddenberry Productions. Star Trek and related marks and logos are Trademarks of CBS Studios Inc. All rights reserved.
You can also read