PSP B-Scanner - Operation Manual - VSTBuzz
←
→
Page content transcription
If your browser does not render page correctly, please read the page content below
PSP B-Scanner

Operation Manual
Credits
Plug-in Design: Mateusz Woźniak & Piotr Kryger
Programming and Algorithms: Piotr Kryger
Algorithms' Supervision and Programming Assistance: Mateusz Woźniak
Graphics: Mateusz Woźniak
Documentation: Piotr Kryger & Orren Merton
Product Manager: Antoni Ożyński

Acknowledgements
Thanks to all our customers around the world for ideas and help in development of new plug-ins!

By using this software you agree to the terms of any license agreement accompanying it. “PSP”, the PSP logo,
“PSP B-Scanner”, and “It’s the sound that counts!” are trademarks of PSPaudioware.com s.c.
Hammond, Hammond A-100, Hammond B-2, Hammond B-3, Hammond C-2, Hammond C-3 and Hammond
RT-3 are trademarks of respective owners and are used only for reference purposes.
All other trademarks are the property of their respective owners.
© 2016 PSPaudioware.com s.c.
Table of Contents
   CREDITS..................................................................................................... 2
   ACKNOWLEDGEMENTS............................................................................... 2
   TABLE OF CONTENTS.................................................................................. 3
   END USER LICENSE AGREEMENT................................................................ 4
   OVERVIEW................................................................................................. 5
         COMPATIBILITY........................................................................................... 5
         LIMITATIONS OF THE DEMO VERSION .....................................................................5
   CONTROLS .................................................................................................6
         CENTER SECTION........................................................................................ 6
         FAST SECTION........................................................................................... 8
         SLOW SECTION.......................................................................................... 9
         MIDI BAR............................................................................................ 10
         PRESET BAR........................................................................................... 11
   SUPPORT.................................................................................................. 12
   USER COMMENTS..................................................................................... 12

                                                      3
End User License Agreement
PREFACE: This End-User License Agreement (“EULA”) is a legal agreement between you and
PSPaudioware.com s.c. (PSP) for the PSP product accompanying this EULA, which includes computer
software and may include associated media, printed materials, and “online” or electronic documentation
(“SOFTWARE”). By installing, copying, or using the SOFTWARE, you agree to be bound by the terms of this
EULA. If you do not agree to the terms of this EULA, you may not use the SOFTWARE.
The SOFTWARE is protected by copyright laws and international copyright treaties, as well as other
intellectual property laws and treaties. The SOFTWARE is licensed, not sold.
LICENSE: You may install and use a copy of the current version of the SOFTWARE, or in its place, any prior
version for the same operating system, on as many machines as you want as long as you are the only user of
those DAWs. If more users use the software you must buy an additional license for each workstation. The
DEMO VERSION of the SOFTWARE is NOT LICENSED FOR COMMERCIAL USE.
RESTRICTIONS: You may not transfer, modify, rent, lease, loan, resell, distribute, network, electronically
transmit or merge the SOFTWARE. You may not reverse engineer, decompile or disassemble the SOFTWARE,
or otherwise attempt to discover the SOFTWARE source code. You are not permitted to copy the SOFTWARE
or any of the accompanying documentation.
COPYRIGHTS: All title and copyrights in and to the SOFTWARE (including but not limited to any images,
photographs, animations, video, audio, music, text, and “applets” incorporated into the SOFTWARE), the
accompanying printed materials, and any copies of the SOFTWARE are owned by PSP. The SOFTWARE is
protected by copyright laws and international treaty provisions. Unauthorized reproduction or distribution of the
SOFTWARE or documentation is subject to civil and criminal penalties.
DISCLAIMER OF WARRANTY: The SOFTWARE is provided “AS IS” and without warranty of any kind.
The entire risk arising out of the use or performance of the SOFTWARE and documentation remains with user.
To the maximum extent permitted by applicable law, PSP further disclaims all warranties, either express or
implied, including, but not limited to, implied warranties of merchantability and fitness for a particular purpose,
with regard to the SOFTWARE, and any accompanying hardware. To the maximum extent permitted by
applicable law, in no event shall PSP be liable for any consequential, incidental, direct, indirect, special,
punitive, or other damages whatsoever (including, without limitation, damages for loss of business profits,
business interruption, loss of business information, or other pecuniary loss) arising out of this EULA or the use
of or inability to use the SOFTWARE, even if PSP has been advised of the possibility of such damages.
MISCELLANEOUS: This EULA is governed by Polish law. Should you have any questions concerning this
EULA, or if you wish to contact PSP for any reason, please write to:
PSPaudioware.com s.c.
Kwadratowa 4/19
05-509 Józefosław
Poland
4Overview
We’re very excited to present to you the PSP B-Scanner, an emulation of the analog scanner-based effect
available in the most sought-after models of vintage Hammond tonewheel organs (such as B-3, C-3, A-100 and
others). Although the PSP B-Scanner has been meticulously designed to recreate the classic sound of the
Hammond B-3 Vibrato and Chorus, it offers a wide range of options allowing you to maximize the potential of
this unique effect.
Compatibility
PSP B-Scanner is compatible with most applications that can host VST, RTAS, AAX and Audio Unit plug-ins.
Minimum System Requirements
PC Mac
VST AudioUnit
Windows XP, Vista, 7, 8 or 10 Mac OSX 10.8 – 10.11 or later
VST 2.4 compatible application 32 or 64-bit host application capable of
RTAS running AudioUnit plug-ins with Cocoa
Windows XP, Vista, 7 or 8 view
ProTools LE 8.0.0 or ProTools TDM 8.0.0 VST
(or later) Mac OSX 10.8 – 10.11 or later
AAX 32 or 64-bit VST 2.4 compatible host
Windows XP, Vista, 7 or 8 application
Pro Tools 11 or Pro Tools HD 11 RTAS
Mac OSX 10.8 – 10.10 or later
ProTools LE 8.0.0 or ProTools TDM 8.0.0
(or later)
AAX
Mac OSX 10.8 – 10.10 or later
Pro Tools 11 or Pro Tools HD 11
Limitations of the demo version
We offer a 14-day evaluation period without any audio interruption or control limitations. To get access to the
plug-in and your unique authorization details simply log-in to your account at our user area. Enjoy!
5Controls
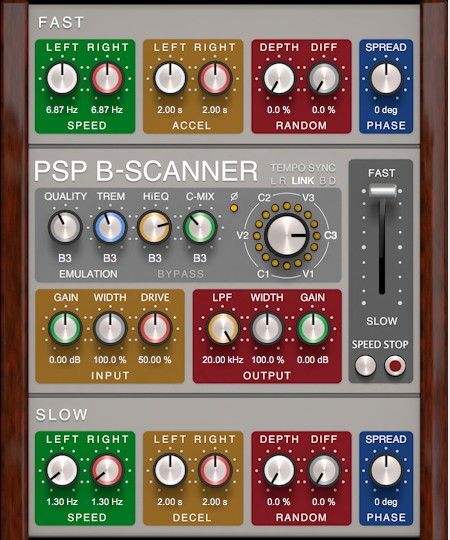
PSP B-Scanner's front panel is divided into three sections. The center section contains general controls, and the
upper and lower sections offer dedicated controls for the Fast and Slow speed settings, respectively. Please read
the description of individual controls below in order to learn how to get the most out of this plug-in.
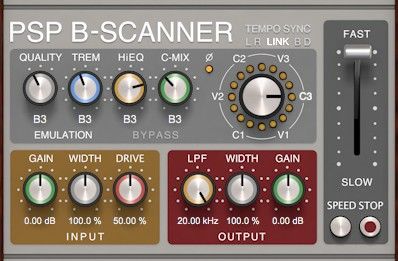
Center Section
This section of the plug-in contains the global parameters controls of the plug-in. These include the Mode
Selector, various emulation settings as well as input and output ampliFer settings. The most important
parameter is the Mode Selector, allowing you to set the character of the effect by selecting one of six different
modes. Other important features include the Speed Lever, which allows you to set the rotation speed, and the
Speed and Stop buttons, which are used respectively for switching between speeds and stopping the rotation of
the scanner motor completely.
PSP B-SCANNER
Click on this label to open the about box of the plug-in. The about box contains information about this plug-in,
the current version number and your authorization details. Click anywhere in the about box area to close it.
SPEED Lever
The speed lever is the main way to smoothly control the speed of the plug-in. It is possible to jump to any
chosen position by clicking on that position, or by clicking the SLOW and FAST labels (which automatically
set the lever position to minimum/maximum, respectively). Please note that this lever does not control the
speed directly as the rotation speed is always subject to inertia – its parameters (acceleration time, deceleration
time) can be deFned for both channels in the Slow and Fast sections of the plug-in.
SPEED Button
This button immediately shifts the speed lever to Fast or Slow positions depending on the current state of the
plug-in’s speed settings including the previously set speed and lever setting.
STOP Button
Use this button to stop the scanner motor. When clicked, stop mode is engaged and the button illuminates red.
The second click of this button disengages stop mode and switches the rotation to its previous settings (as set by
the lever).
EMULATION
This set of knobs controls various settings of the scanner emulation.
• MODE Selector
The mode selector lets you choose from one of the six modes available in the plug-in:
V1, C1, V2, C2, V3 and C3.
6The control's settings correspond to the Vibrato Switch available on Hammond tonewheel organs
equipped with the Selesctive Vibrato system (Hammond A-100, B-2, B-3, C-2, C-3, RT-3 and similar).
The setting names beginning with V, indicate Vibrato modes, while the modes beginning with C stand
for Chorus modes. The number next to the letter V or C, generally, refers to the perceived “depth” of
the chorus or vibrato effect. The larger the number, the stronger the effect.
You may also click on the mode name labels to change the current MODE setting.
• HiEQ knob – controls the high frequency response (brightness) of the scanner.
• QUALITY rotary switch – offers the following scanner conFgurations:
◦ B3 – modelled on the classic 16-position scanner,
◦ HiRes – an original 48-position design, much smoother (especially when the scanner motor is
rotating at a low frequency, such as 1 Hz).
◦ SMOOTH – softens the output of the scanner further by replacing the scanner with smooth,
continuous modulation.
• TREM knob – controls the amount of the tremolo effect in the scanner emulation.
• C-MIX knob – controls the chorus mix – the ratio between the wet signal (i.e. processed through the
scanner) and the dry (unprocessed) signal. This setting has no effect in the Vibrato (V) modes.
INPUT
There are three knobs in the INPUT section.
• GAIN knob – controls the scanner input gain.
• WIDTH knob – sets the input width, values higher than 100% widen the stereo image of the input
signal.
• DRIVE knob – controls the non-linear behavior (saturation) of the scanner emulation.
OUTPUT
Similarly to the INPUT section, the OUTPUT section also features three knobs:
• LPF knob – sets the cutoff frequency of the low-pass Flter processing the output of the scanner.
• WIDTH knob – sets the stereo width of the output signal, values higher than 100% widen the stereo
image of the output signal.
• GAIN knob – controls the master output gain.
MODE SWITCH
This switch lets you select how individual rotation speeds and inertia parameters are expressed for the left and
the right channel.
• L R mode – the speed/inertia parameters for both channels are set as separate values (in Hz/seconds,
respectively [when the TEMPO SYNC switch is off, otherwise as note values]),
• LINK mode – the parameters are shown separately (like in the L R mode), but the ratio between them
remains constant (within possible range),
• B D mode – the parameters are shown in BASE DEV pairs consisting of a base value and the deviation,
applied to both channels, in opposite directions.
TEMPO SYNC SWITCH
Clicking on the TEMPO SYNC switch toggles the TEMPO SYNC mode. When the TEMPO SYNC mode is
enabled, the speeds and inertia parameters for both channels are expressed as note values ranging from a sixty-
fourth note triplet to a quadruple whole note. Note values are displayed as fractions with additional symbols,
e.g.:
• 1/2 – a half note,
• 1/4. - a dotted quarter note,
• 1/8t – an eighth note triplet,
• 1/16q – a sixteenth note quintuplet,
• 1/32s – a thirty-second note septuplet.
7BYPASS
Clicking on the BYPASS label will activate the bypass mode. When clicked, the label will turn bright red and
all processing inside the plug-in will be bypassed.
PHASE LED
The PHASE LED indicates the rotational phase difference between the left channel and the right channel. The
bright-yellow LED is lit when the channels are in-phase and unlit when the channels are out of phase.
SCANNER LED RING
The SCANNER LED RING, located to the right of centre of the EMULATION section, indicates the
momentary position of the scanner. When the left-channel scanner is in a position corresponding to a given
LED in the RING, the LED will turn bright green.
Similarly, when the right-channel scanner is in a position corresponding to the same LED, the diode will turn
bright red. If both channels are in the same position, the LED correlated with that position will turn yellow. In
general, the more yellow the LED, the higher the correlation between the momentary phases in the channels.
Fast Section
This section of the plug-in contains the set of controls that conFgure the FAST speed setting parameters.
SPEED
Contains two mode-switch-position-dependent controls:
In the L R or LINK modes:
• LEFT knob – controls the frequency of the fast rotation for the left channel.
• RIGHT knob – controls the frequency of the fast rotation for the right channel.
In the B D mode:
• BASE knob – controls the base frequency of the fast rotation (for both channels).
• DEV knob – controls the fast rotation frequency deviation for both channels.
ACCEL
Contains two mode-switch-position-dependent controls:
In the L R or LINK modes:
• LEFT knob – sets the transition time between slow and fast rotation speeds for the left channel.
• RIGHT knob – sets the transition time between slow and fast rotation speeds for the right channel.
In the B D mode:
• BASE knob – controls the base acceleration time (for both channels).
• DEV knob – controls the deviation of the acceleration time for both channels.
RANDOM
Contains the following controls:
• DEPTH knob – sets the random speed modulation depth (for both channels) when the Speed Lever is
set to FAST.
• DIFF knob – sets the amount of difference between the FAST random speed modulation in the left
channel and in the right channel (expressed as a percentage).
PHASE SPREAD – controls the scanner position phase offset between the left channel and the right channel
(in degrees).
Slow Section
This section of the plug-in contains the set of controls that conFgure the SLOW speed setting parameters.
SPEED
Contains two mode-switch position-dependent controls:
In the L R or LINK modes:
8• LEFT knob – controls the frequency of the slow rotation for the left channel.
• RIGHT knob – controls the frequency of the slow rotation for the right channel.
In the B D mode:
• BASE knob – controls the base frequency of the slow rotation (for both channels).
• DEV knob – controls the slow rotation frequency deviation for both channels.
DECEL
Contains two mode-switch-position-dependent controls:
In the L R or LINK modes:
• LEFT knob – sets the transition time between fast and slow rotation speeds for the left channel.
• RIGHT knob – sets the transition time between fast and slow rotation speeds for the right channel.
In the B D mode:
• BASE knob – controls the base deceleration time (for both channels).
• DEV knob – controls the deviation of the deceleration time for both channels.
RANDOM
Contains the following controls:
• DEPTH knob – sets the random speed modulation depth (for both channels) when the Speed Lever is
set to SLOW.
• DIFF knob – sets the amount of difference between the SLOW random speed modulation in the left
channel and in the right channel (expressed as a percentage).
PHASE SPREAD – controls the scanner position phase offset between the left channel and the right channel
(in degrees).
9MIDI Bar
Underneath the main plug-in’s GUI area there is a MIDI Bar which contains a set of MIDI controls and
indicators.
MIDI
Click the green arrow icon to load MIDI settings from a file on disk.
Click the red arrow icon to save MIDI settings.
Double click the MIDI label to permanently store the default MIDI settings
Press Command (Mac) or Control (PC) and double click the MIDI label to restore the factory default settings.
Channel Selector
This control allows you to select the MIDI channel to receive MIDI CC messages from. Available settings are
MIDI OFF, channel 1-16 or OMNI (receives messages from all MIDI channels).
Display
This display works in two modes. Upon placing the mouse pointer on one of the automatable controls in the
plugin editor, it displays the currently assigned MIDI controller (if no controller is assigned, the display will
read “not assigned”). If a MIDI CC message is received and the mouse pointer is not placed over one of the
controls, this control will display the name of the controller in bright green.
Learn
This control lets the user attach MIDI controller to one of the plug-in’s parameters.
A short guide on linking a controller to a parameter:
1. Click the MIDI Learn icon (shown above, highlighted), it will turn bright white upon clicking. The hint text
should display “MIDI Learn - please move a plug-in control to attach “.
2. Move the parameter that you want to map (for example, the Lever). The hint text should now display “ MIDI
Learn for: Lever - now please move a MIDI controller... “.
3. Move the desired controller on your MIDI keyboard or controller (for example, the mod wheel). The Lever
should now be linked to the mod wheel. The MIDI Learn icon's color should change back to gray. The hint text
will now display “MIDI Learn - successfully attached parameter: Lever to CC#1 ” for about
3 seconds. To save this configuration as the default, double-click the ‘MIDI' label located in the bottom left
corner of the plug-in window.
Forget
This control lets the user to detach a MIDI controller.
A short guide on unlinking a controller from a parameter.
1. Click the MIDI Forget icon (shown above, highlighted), it will turn bright white upon clicking. The hint text
should display “MIDI Forget - please move a plug-in control or a MIDI controller to
detach“.
102. Move the parameter that you want to unlink with the mouse pointer (for example, the Lever). Alternatively,
you can instead move the controller that you want to unlink on your MIDI keyboard or controller. The MIDI
Forget icon's color should change back to gray. The hint text will now display “ MIDI Forget -
successfully detached parameter: Lever from CC#1 “ for about 3 seconds. In order to reset to
default MIDI configuration, hold CMD (Mac) or CTRL (PC) and double-click the 'MIDI' label located in the
bottom left corner of the plug-in window.
Lever Mode Switch
This control sets the lever mode. Three modes are available:
• Cont - continuous mode
• Snap - quantized mode
• Swi3 - the 'three-state switch' mode (the lever acts as a three-state switch with stop in the middle)
Speed Mode Switch
This control sets the speed mode. Four modes are available:
• FastDwn - fast speed is set when the speed button is pressed, slow speed is set when the speed button is
released
• FastUp - fast speed is set when the speed button is released, slow speed is set when the speed button is
pressed
• Trigger - pressing the speed button triggers the scanner speed (from slow to fast, from fast to slow)
Hint Bar
Hint Text / MIDI Learn Guide Hints
on/off
Hint Text / MIDI Learn Guide
A short description of the control that your mouse is hovering over. In MIDI Learn/Forget mode, hint text dis-
plays information related to the parameter and/or control that is currently being linked. Double-clicking the dis -
played address (www.PSPaudioware.com) opens our website in a new browser window.
Hints on/off
Click to show or hide hints in the hint bar.
11Preset Bar
PSP B-Scanner is provided with a factory set of presets. Those presets were prepared to help you discover
available range of sounds and to better understand this plug-in. In addition, the presets can be used as a starting
point for further adjustments or as quick fix presets.
You can access these presets from the PSPaudioware standard PRESET bar at the bottom of the plug-in
interface. Here you can select from among the factory presets, and load and save individual, as well as banks of
presets. There are three sections to this bar, the PRESET section, the Preset window, and the BANK section.
BANK SECTION
Click the green arrow icon to load a bank from a disk.
Click the red arrow icon to save a bank.
Double click the BANK label to permanently store the default preset bank.
Press Command (Mac) or Control (PC) and double click to restore the factory default bank.
PRESET SECTION
Click the green arrow icon to load a preset.
Click the red arrow icon to save a preset.
Double click the PRESET label to permanently store the default preset.
Press Command (Mac) or Control (PC) and double click to restore the factory default preset.
PRESET EDIT BOX
Click the menu button to the right of the preset edit box to see the popup menu of all the presets in the currently
loaded preset bank and to choose a preset from the list.
Click the name of the preset to rename it.
PRESET SELECTION
Click on the bright left arrow to switch to a previous preset on the list.
Click on the bright right arrow to switch to a next preset on the list..
MEMO A and B
Both A and B are permanently stored on your disk. This allows you to compare alternative settings or share a
preset between various instances of the plug-in in the same project or even between various projects.
Click the green arrow icon to load a preset from memo A or B.
Click the red arrow icon to save a preset to memo A or B.
?
Click on the question mark whenever you need to open the operation manual.
12Support
If you have any questions about the principles or operation of our plug-ins, please visit our web site
www.PSPaudioware.com where you can find the latest product information, free software updates and answers
to the most frequently asked questions. You can also contact us by e-mail: support@PSPaudioware.com.
We will gladly answer all of your questions. As a rule we respond within 24 hours.
PSPaudioware.com s.c.
Kwadratowa 4/19
05-509 Józefosław
Poland
ph. +48 601 963 173
www.PSPaudioware.com
support@PSPaudioware.com
User Comments
We welcome any opinions and comments related to the PSP B-Scanner. We would also be grateful if you shared
with us your experiences using PSP B-Scanner. Please, contact us at:
contact@PSPaudioware.com
13PSPaudioware.com s.c.
Kwadratowa 4/19
05-509 Józefosław
Piaseczno
Poland
14You can also read