SCP-MOD SUPPLIER GUIDE: HOW TO GET STARTED - MARCH 2021 - MYEXOSTAR
←
→
Page content transcription
If your browser does not render page correctly, please read the page content below
SCP–MOD Supplier Guide:
     How to Get Started
               March 2021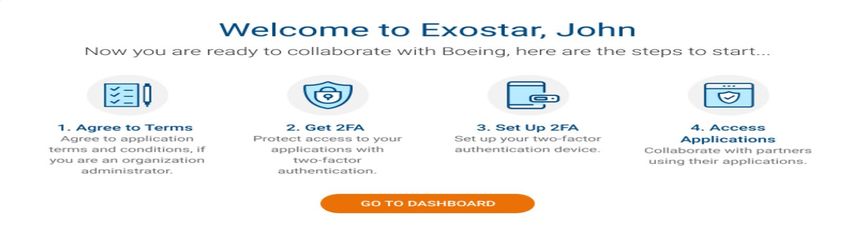
Table of Contents
Introduction ........................................................................................................................................... 2
    First Time Login ................................................................................................................................ 2
    Logging In after First Time Login ..................................................................................................... 5
General Navigation ............................................................................................................................... 6
    Header .............................................................................................................................................. 6
    Navigation Menu .............................................................................................................................. 7
    Commonly Used Icons ..................................................................................................................... 9
My Workspace.....................................................................................................................................10
Customize Your View of Data .............................................................................................................12
    Customize the My Workspace Page..............................................................................................12
    Customize View on a List Page ......................................................................................................13
    Customize View on a Details Page ................................................................................................14
Get Assistance .....................................................................................................................................15

Copyright ©2021 Exostar LLC. All rights reserved.                                                                                             1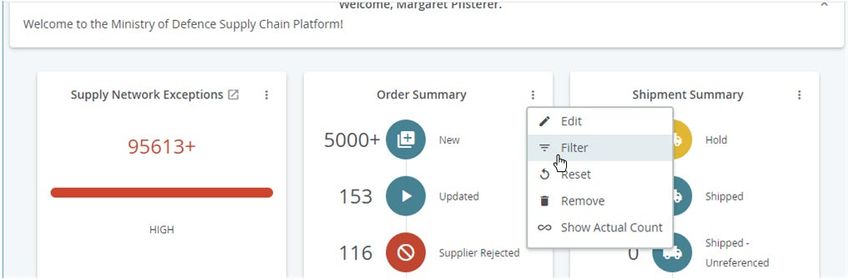
Introduction
 This quick reference guide is for new users of the Ministry of Defence Supply Chain
 Platform (SCP-MOD). It provides information on the following topics:
 •       How to complete the first-time login process into Exostar’s Managed Access Gateway
         (MAG) to Access SCP-MOD.
 •       How to navigate while working in SCP-MOD.
 •       How to use the My Workspace page.
 •       How to customize your view of data in SCP-MOD.
 •       How to get assistance.

First Time Login
 In order for your organization to access SCP-MOD, your company requires an Exostar
 MAG account. Your partner company must invite your organization to complete
 registration via email, for SCP-MOD.

 Please follow the instructions below to complete the MAG account activation process:
 In the You are Invited email, review the information. Click the ACTIVATE MY ACCOUNT
 button.

NOTES:
     •     Users receive email reminders to complete first-time login on the 14th day, the 28th day,
           the 42nd, as well as 14 days before the 180 day expiration period.
     •     Every reminder email provides a new activation link and when a user receives a new
           reminder email, the activation link in the old email expires.
     •     If a user clicks on an expired activation link, the user is prompted to enter their email
           address. Once the email address is validated, the user is sent a new first-time login
           activation link.

Copyright ©2021 Exostar LLC. All rights reserved.                                           2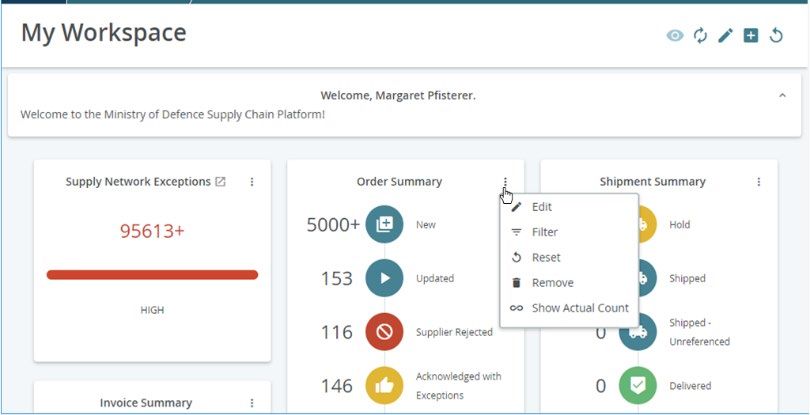
2. Create and confirm your new password. Once complete, click NEXT.

    NOTE: Review the password policy displayed on the screen.
    3. Select four unique security questions from the drop-down list, and enter an answer for
       each question. Click NEXT to complete the account activation process. The MAG
       Dashboard displays.

    4.   A confirmation screen displays. Click Go to Dashboard to access your MAG account.

Copyright ©2021 Exostar LLC. All rights reserved.                                      3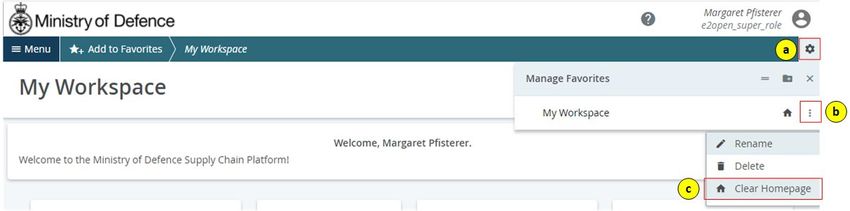
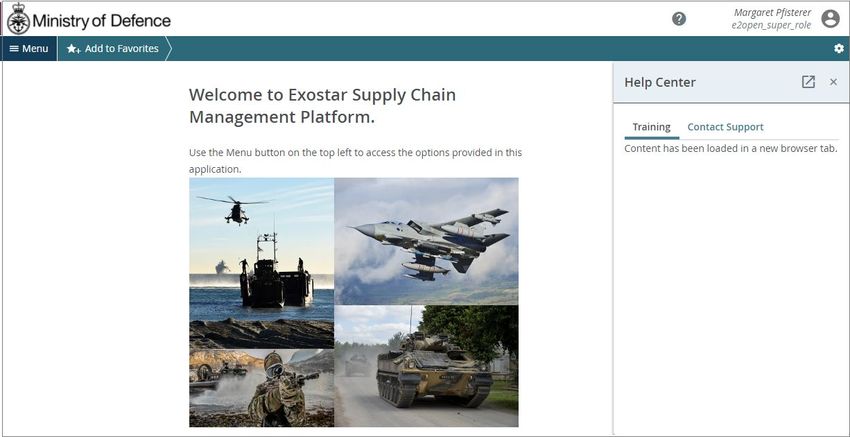
NOTE: If you are the Organization Administrator or SCP-MOD Application Administrator
 for your organization, you must accept the Terms and Conditions before your company
 can access SCP-MOD application. (If you do not accept the terms and conditions it will say
 Pending Terms.

    5. To accept terms and conditions, from your MAG Dashboard under the Applications
       section, locate the SCP-MOD application, click Agree to Terms button.

    6. Next click Continue to review the terms and conditions. Once you review the Terms and
       Conditions, please a check in the box for “I have read and agree to these terms and
       conditions”. Click Next.

Copyright ©2021 Exostar LLC. All rights reserved.                                       4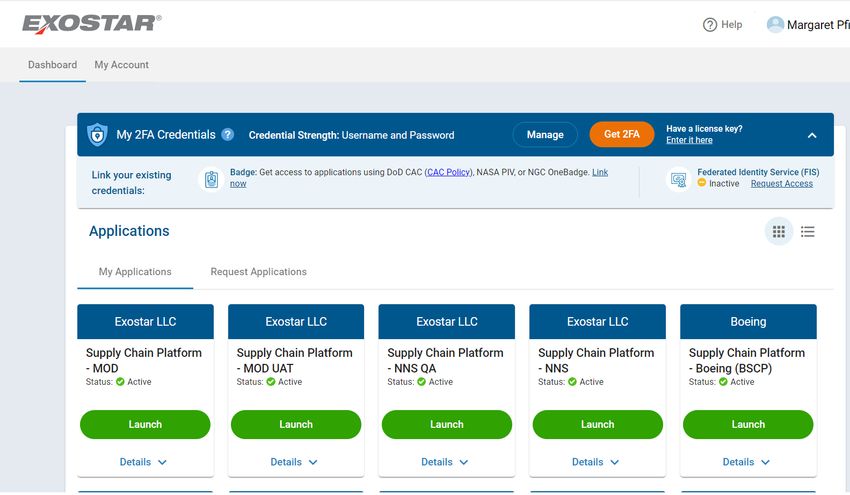
Now you will be able to access the SCP-MOD solution, click the green Launch button to
 open the application.

Logging In after First Time Login
Users who complete first-time login follow the steps below for all subsequent access to Exostar’s
MAG Platform.
    1. Go to https://portal.exostar.com.
    2. Enter your UserID. Click Next.

    3. Enter your Password. Click Next.

Copyright ©2021 Exostar LLC. All rights reserved.                                        5
4. On your MAG Dashboard, find the Applications section. Next locate the SCP-MOD
       application, then click Launch button.

 NOTE: To learn more about MAG please access the MyExostar “Get Started - SCP MOD”
 page.

General Navigation
The SCP-MOD application user interface (UI) has two main areas:
    1. Header
    2. Page Display

Header
The header is located at the topmost part of the screen. The top half of the header includes the
MOD logo, the Help icon, the User Name, the User Role, and the Profile icon. The bottom half
of the header displays the Menu and the Add to Favorites link.
    1. Navigation Menu Icon – Displays a drop-down menu that is the main way to navigate
       the application.
    2. Add to Favorites Link – Allows you to bookmark frequently-visited pages.
    3. Help Icon – Provides access to system help pages.
    4. User Name / User Role – Displays the name of the person accessing the application and
       Indicates the application privilege granted to the user.
    5. Manage Favorites – Allows the user to manage their “Favorites” list.

Copyright ©2021 Exostar LLC. All rights reserved.                                       6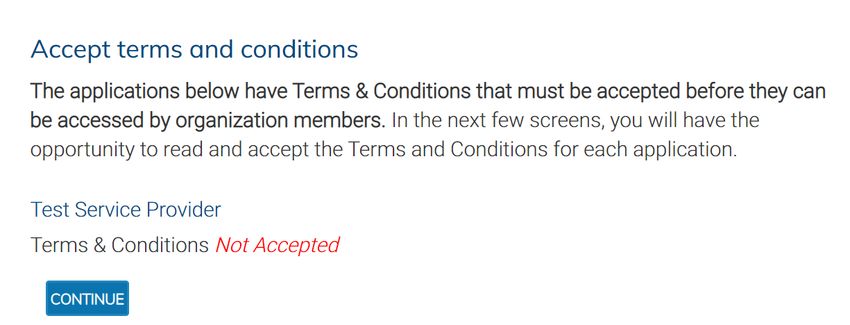
Navigation Menu
Below are the SCP-MOD navigation menu workflows at a high level:

     1. Home – Returns the user to the default home landing page.
     2. My Workspace – Displays a dashboard providing PO status summaries.
     3. Exceptions – Displays a dashboard of notifications about potential issues in the supply
          chain.
     4. Order Management – Facilitates searches for, and responses to, transactions (Purchase
          Orders, Shipments, and Invoices).
     5. Master Data – Facilitates Collab Attributes, Supplier Attributes, and Supplier Item
          Attributes setup.
     6. Upload/Download – Allows the user to upload and download .XLS files for transactions
          (Discrete Orders, Shipments, and Invoices).
     7. My Profile - Allows users to subscribe to/unsubscribe from email alerts.
     8. Administration – Allows administrators to assign roles to users.

Copyright ©2021 Exostar LLC. All rights reserved.                                        7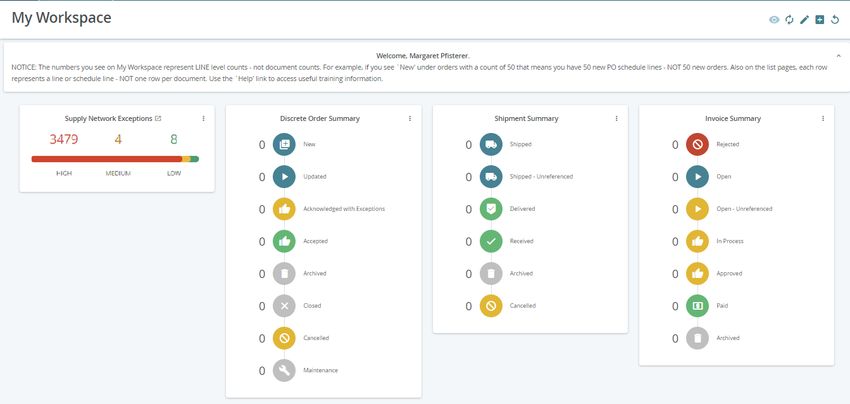
Search Function
 Use searching for all document types, when you have specific search criteria (a document
 number, an account name, or a date range, etc).
    1. Search for a document type from the Menu and select the option you wish to search under
       such as Order Management or Exceptions.
    2. You will need to select a sub-menu option such as Discrete Order or Shipment.

    3. From the sub-menu field, you will need to select an option you wish to search under such
       as Summary or Search.

    4. Enter search criteria such as an Order Number and then click Search.
       • Use an asterisk (*) as a wildcard.
       • Use a comma with no spaces to represent “or”;
          (Example: Searching in ‘Order Number’ with *334*,*335* will return results for
          all orders that have a 334 OR a 335 somewhere in the Order Number).

Copyright ©2021 Exostar LLC. All rights reserved.                                      8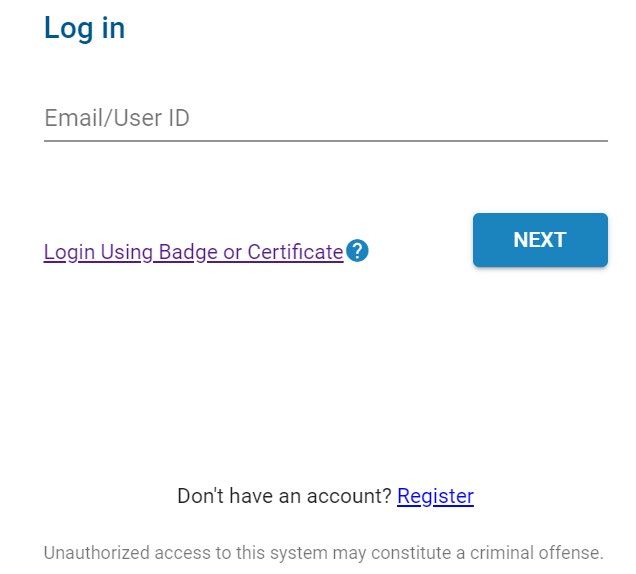
Summary Function
Use Summary pages to locate documents based on search criteria. The search results will
come back as a number of results per document status.

Commonly Used Icons

              Selection Checkbox: use to select line items. Top checkbox selects all rows on
              that page (but NOT all rows in a multiple page document – you must select
              each page separately).
              Configurator: select data fields to display on each page and their order on the
              page.
              Sort Order – click icon to change the sort order of a list from ascend to
              descend, the number indicates the sort priority.
              Export – use to export header or line item information for documents.
              NOTE: Many locations have an ‘Export’ button which may export different
              information for that page.

              Refresh – use to refresh the status of an upload or download request.

              Refresh – use to refresh the My Workspace page.

Copyright ©2021 Exostar LLC. All rights reserved.                                               9
My Workspace
The My Workspace page serves as a dashboard view of your transactions in the Supply
Chain Platform (SCP-MOD). The data is organized by document type (or business process)
and then by possible states for that document type. Each number that you will find on the
page is a link that takes you to the document type and state that you selected. My
Workspace automatically refreshes when lines move from one state to another as you are
working in SCP-MOD.
The counts on My Workspace are at the LINE level (or schedule line level for
orders).
• Each section represents a document type, such as Discrete Orders or Shipments.
• Each row represents a state for that document type.
• Each number represents the number of lines that are in the state that you selected (click
to see details). SCP-MOD will show a max of ‘+5000’ for any row on My Workspace.
The Supply Network Exceptions section (top left) contains alerts that can help you find critical
data. By clicking on a number link, you will go to a list page that meets the alert’s criteria (e.g.
missing responses).
You can configure the information that displays on My Workspace by clicking the Edit icon
in the top right corner of the page.
You can set up My Workspace as the first page you see each time you login to SCP-MOD:
1. Navigate to the My Workspace page.
Copyright ©2021 Exostar LLC. All rights reserved. 102. Click Add to Favorites.
3. On the Add to Favorites pop-up window, click View more options.
4. Select the Set as Homepage checkbox and click Save.
NOTE: To restore the default homepage, go to Manage Favorites:
a. Select the Configurator icon on the Menu bar.
b. Select the Menu icon for the My Workspace favorite.
Copyright ©2021 Exostar LLC. All rights reserved. 11c. Select Clear Homepage.
Customize Your View of Data
You can customize many SCP screens to only display information that is useful to you.
Customization can be done by any user, and it can be updated at any time. Customization
changes can be made as a default (stays in place even if you logout) or as a temporary
update (only in place for a particular login session).
Customize the My Workspace Page
Hide/show sections of the My Workspace page
1. Go to My Workspace.
2. In top right corner, click the Edit icon.
3. Select checkboxes for items to be shown on the My Workspace page.
4. Click Save.
Filter the data showing on the My Workspace page
1. Use the Menu icon by each section on My Workspace to display the options for that
section.
Copyright ©2021 Exostar LLC. All rights reserved. 122. Select the Filter option to set up filtering criteria for that section.
3. Enter the ‘Search’ criteria to be used for filtering.
4. Click Search.
5. When finished, click on Save Search.
6. A check mark will appear next to the filter icon on My Workspace, indicating a filter is on.
7. To modify or remove the filter:
a. Select the Filter option again.
b. Select the Update Portal Preference drop-down menu.
c. Select the Delete Portal Preference option.
Customize View on a List Page
1. Go to any list page (the result of a search or link from My Workspace, etc).
2. In the top right corner, click the Configurator icon.
3. Select Open Table Editor.
Copyright ©2021 Exostar LLC. All rights reserved. 134. Use left/right arrows to select items to be viewed on the details page.
a. The ‘Available columns’ section should contain any data fields that you do NOT want to
display on that list page.
5. Use up/down arrows to determine the layout on the screen – top of list shows as the first
column.
6. Save your changes.
NOTE: It is possible to change your choices. Simply repeat this process as required.
Customize View on a Details Page
1. Go to the details page for an Order Management document (Discrete Order, Shipment, or
Invoice).
2. In the top right corner, click the Configurator icon.
3. Select Open Table Editor.
4. Use left/right arrows to select items to be viewed on the details page.
a. The ‘Available columns’ section should contain any data fields that you do NOT want to
display on that list page.
5. Use up/down arrows to determine the layout on the screen – top of list shows as the first
column.
6. Save your changes.
NOTE: It is possible to change your choices – simply repeat this process as required.
Copyright ©2021 Exostar LLC. All rights reserved. 14Get Assistance
There are three ways to get assistance while you are working in SCP-MOD:
1. Read Reference Materials
• Go to the My Exostar website (https://my.exostar.com).
• Navigate to Customers → Ministry of Defense → Supply Chain Platform - MOD.
• There are step-by-step instructions and more to guide you through the features,
functionality, and usage of the SCP-MOD application.
Copyright ©2021 Exostar LLC. All rights reserved. 152. Access SCP-MOD Help
• On any screen in SCP-MOD, you can click on the Help icon.
• The help menu allows you to access the SCP-MOD training documentation or take you
to the Contact Support page.
3. Contact Exostar Customer Support
• Go to the My Exostar website (https://my.exostar.com).
• Click on the Support link (upper right of page).
• Complete the form to create an online support case or review the telephone numbers
and support hours for live assistance.
Copyright ©2021 Exostar LLC. All rights reserved. 16You can also read