SKYWIRE LTE CAT M1 AWS IOT WITH TLS - NIMBELINK CORP UPDATED: APRIL 2022
←
→
Page content transcription
If your browser does not render page correctly, please read the page content below
Skywire® LTE CAT M1
       AWS IoT with TLS
       NimbeLink Corp
       Updated: April 2022

© NimbeLink Corp. 2022. All rights reserved.
NimbeLink Corp. provides this documentation in support of its products for the internal use of its current and
prospective customers. The publication of this document does not create any other right or license in any party to
use any content contained in or referred to in this document and any modification or redistribution of this document
is not permitted. While efforts are made to ensure accuracy, typographical and other errors may exist in this
document. NimbeLink reserves the right to modify or discontinue its products and to modify this and any other
product documentation at any time.
All NimbeLink products are sold subject to its published Terms and Conditions, subject to any separate terms
agreed with its customers. No warranty of any type is extended by publication of this documentation, including, but
not limited to, implied warranties of merchantability, fitness for a particular purpose and non-infringement.

Amazon Web Services, AWS, and AWS IoT are registered trademarks of Amazon Web Services

NimbeLink and Skywire are registered trademarks of NimbeLink Corp. All trademarks, service marks and similar
designations referenced in this document are the property of their respective owners.

PN 1001933 rev 3                   © NimbeLink Corp. 2022. All rights reserved.                             1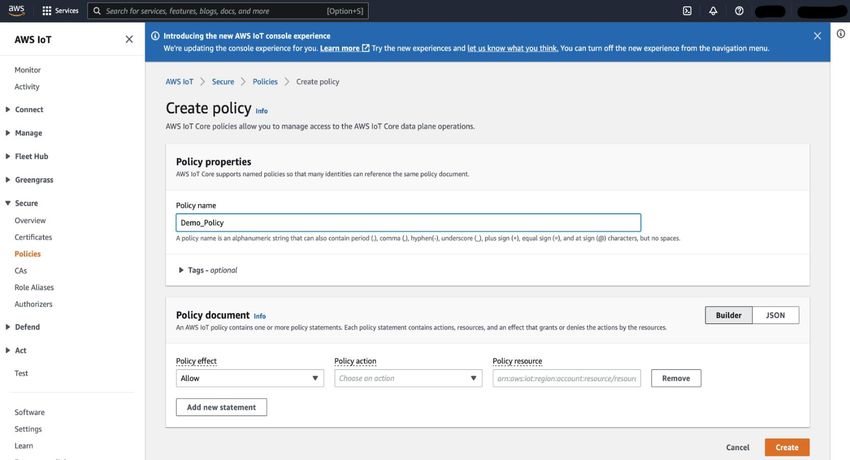
Table of Contents

 Contents
 Table of Contents ............................................................................................................... 2
 1. Introduction.................................................................................................................... 4
    1.1      Overview ............................................................................................................... 4
    1.2      Orderable Parts ..................................................................................................... 4
    1.3      Disclaimer.............................................................................................................. 4
 2. AWS IoT Setup ............................................................................................................. 5
    2.1      Preliminary Setup .................................................................................................. 5
    2.2      Create a Policy ...................................................................................................... 5
    2.3      Create a "Thing" .................................................................................................... 6
    2.4      Generate Certificates ............................................................................................ 8
    2.5      Attach the Policy to the "Thing" ............................................................................ 9
 3. Skywire Configuration ................................................................................................. 10
    3.1      Uploading Certificates ......................................................................................... 10
       3.1.1       Certificate Uploading Using a Linux Environment ....................................... 10
       3.1.2       Certificate Uploading Using a Windows Environment ................................ 11
    3.2      Verifying the Certificate Uploads ........................................................................ 13
    3.3      SSL Profile Configuration ................................................................................... 14
    3.4      Configure TCP/IP Context .................................................................................. 15
 4. Connect to Amazon AWS with HTTP ......................................................................... 16
    4.1      Opening an SSL Socket ..................................................................................... 16
    4.2      Sending an HTTP Request ................................................................................. 17
    4.3      Reading an HTTP Response.............................................................................. 18
    4.4      Closing an SSL Socket ....................................................................................... 19
 5. Working Examples ...................................................................................................... 19
    5.1      Initial Setup.......................................................................................................... 19
       5.1.1       Linux Certificate Upload ............................................................................... 20
       5.1.2       Windows Certificate Upload ......................................................................... 21
 PN 1001933 rev 3                        © NimbeLink Corp. 2022. All rights reserved.                                       2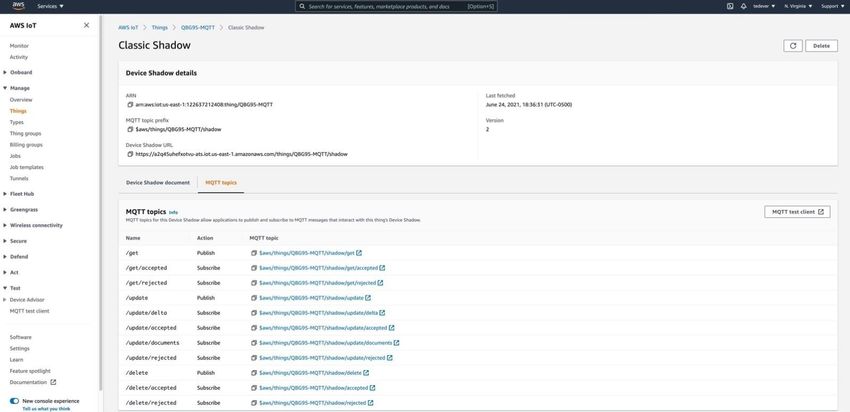
5.1.3       Connection Settings Configuration .............................................................. 22
   5.2      HTTP POST Example ......................................................................................... 24
   5.3      HTTP GET Example ........................................................................................... 26
6. Connect to AWS with MQTT on QBG95 .................................................................... 27
   6.1      Setting up the MQTT Client ................................................................................ 27
   6.2      Interacting using the AWS Device Shadow ....................................................... 29
7. Troubleshooting .......................................................................................................... 31
   7.1      HTTP Response Codes ...................................................................................... 31
      7.1.1       403 Forbidden .............................................................................................. 31
      7.1.2       400 Bad Request.......................................................................................... 31
   7.2      Verify Credentials ................................................................................................ 31
      7.2.1       Testing AWS Credentials using OpenSSL .................................................. 31

PN 1001933 rev 3                       © NimbeLink Corp. 2022. All rights reserved.                                     3
1. Introduction
1.1 Overview
This document serves as a guide for Amazon AWS connections using the NimbeLink
CAT M1 QBG9x Skywire. This tutorial will document the configuration of the modem and
the Amazon AWS settings, and will demonstrate two different connection examples.

1.2 Orderable Parts

  Orderable Device                Description                 Carrier        Network Type

      NL-SWDK              Skywire Development Kit                Any              Any

 NL-SW-LTE-QBG96                  LTE CAT M1                      Any              LTE

 NL-SW-LTE-QBG95                  LTE CAT M1                      Any              LTE

1.3 Disclaimer
There are two known issues with the SSL/TLS stack in the NL-SW-LTE-QBG96:
1. It does not validate the hostname in the server certificate.
2. It does not validate X509v3 Extended Key Usage for the end certificate in the chain.
Because the SSL/TLS stack does not validate the hostname, the device will trust any host
with a certificate signed by same global CA (certificate authority) if IP traffic is redirected
to that server.
The module manufacturer is aware of these issues, and is currently working on a fix that
we expect will be available in a future firmware release.
You may use the built-in SSL/TLS stack on the NL-SW-LTE-QBG96 knowing these
limitations, however at this time NimbeLink recommends using an external SSL/TLS stack
on your host processor to handle the connections, such as mbed TLS:
https://tls.mbed.org/
or WolfSSL:
https://www.wolfssl.com/
NimbeLink does not provide support for integrating these SSL/TLS stacks.

PN 1001933 rev 3             © NimbeLink Corp. 2022. All rights reserved.              4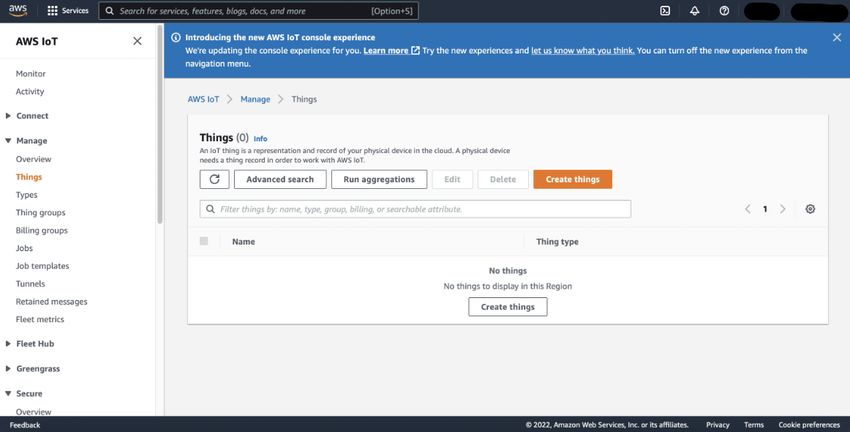
2. AWS IoT Setup
2.1 Preliminary Setup
Before starting, it is important to note that this guide assumes that the reader already has
a valid Amazon AWS account. If this is not the case, Amazon offers a free trial account
that can be used to test this guide. For more information about the free account, please
follow this link:
https://aws.amazon.com/free/

2.2 Create a Policy
The first step in the AWS connection process is to create a policy. Login to the AWS IoT
console at the following link:
https://console.aws.amazon.com/iot/
and navigate to the 'Secure' > 'Policies' menu. Once there, press the “Create a policy"
button located near the center of the screen.
In the next page, choose “iot:*" for the “Action" and “*" for the “Resource ARN" field.
Check the “Allow" box, and then click "Add Statement". Finally, click "Create" to create
the policy. Refer to the image below.

PN 1001933 rev 3            © NimbeLink Corp. 2022. All rights reserved.            5
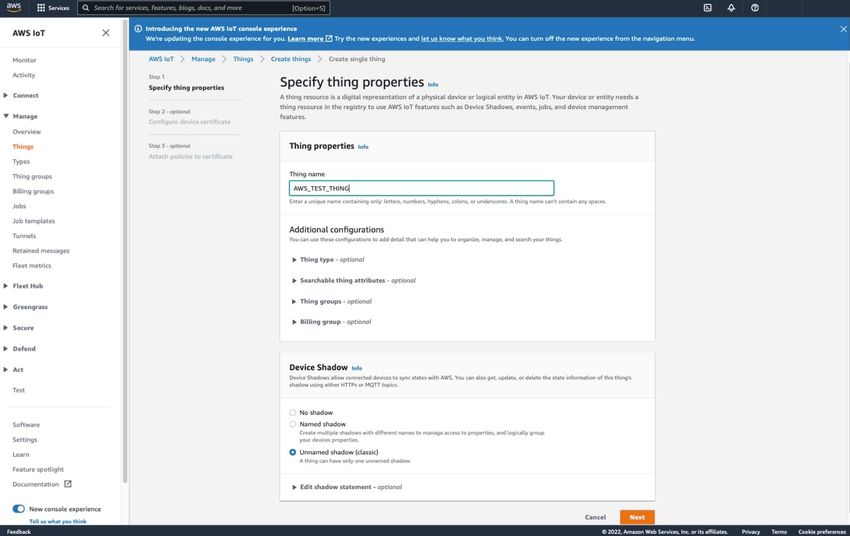
2.3 Create a "Thing"
Next, navigate to 'Manage' > 'Things' using the menu on the left-hand side of the
dashboard. Next, select ‘Create’ in the top right corner to make a new “thing". Refer to
the image below for reference.

PN 1001933 rev 3           © NimbeLink Corp. 2022. All rights reserved.          6
After pressing the “Create" button, select the “Create a single thing" option in the next
page that loads. In the following page, enter a custom name in the appropriate box, and
then press the “Next" button. The webpage should look something like this:

PN 1001933 rev 3           © NimbeLink Corp. 2022. All rights reserved.           7

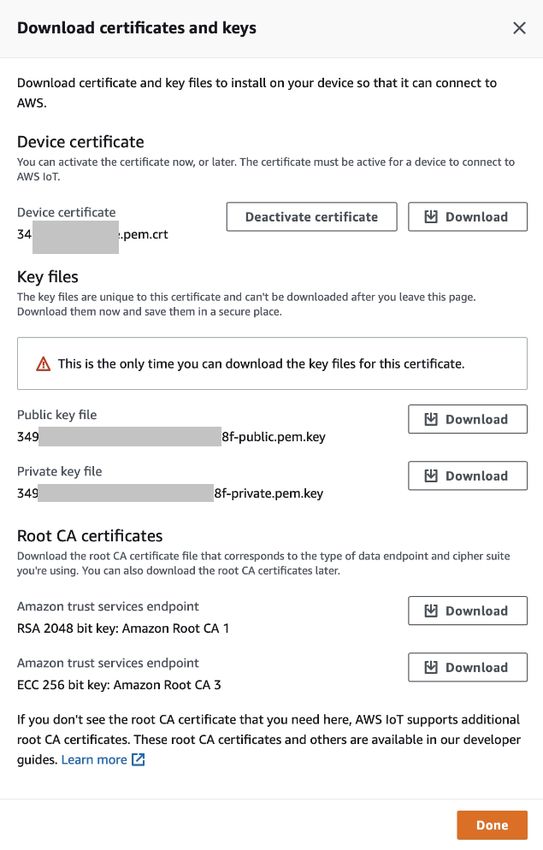
2.4 Generate Certificates
After pressing the “Next" button, select the “Create certificate" option in the next web page
that loads. Amazon AWS will then generate a client certificate, private key, and a public
key for the “thing" that was just created. Download these certificates and save them in a
convenient place. Also, be sure to download the Amazon AWS CA certificate as this will
be needed for the TLS connection.
Next, press the “Activate" button to assign the generated certificates to the “thing". Finally,
click “Attach a policy" to proceed to the next step. Refer to the image below for reference.

Note: The public and private key can only be downloaded from this page. Once this page
is navigated from, these files will no longer be available for download.

PN 1001933 rev 3             © NimbeLink Corp. 2022. All rights reserved.              8
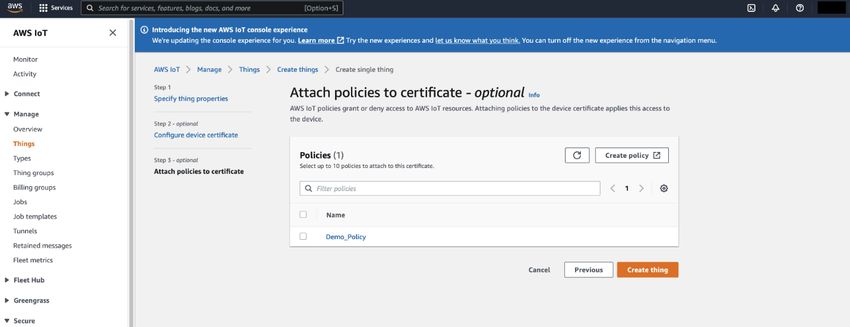
2.5 Attach the Policy to the "Thing"
After advancing to the next page, attach the policy created in Section 2.2 to the “thing"
created in Section 2.3. Refer to the image below as an example.

After each of the steps in Section 2 have been completed, proceed to Section 3 for the
Skywire configuration instructions.

PN 1001933 rev 3           © NimbeLink Corp. 2022. All rights reserved.           9
3. Skywire Configuration
3.1 Uploading Certificates
The first step in the configuration of the Skywire is to upload the certificates needed for
the TLS connection. These three certificates are the private key, client certificate and the
CA certificate.
The next two sections will lay out instructions for uploading the certificates in a Linux and
a Windows environment. Section 3.1.1 details the Linux instructions, while Section 3.1.2
contains the Windows instructions.

3.1.1 Certificate Uploading Using a Linux Environment
First open a terminal and navigate to the directory that contains the certificates that were
downloaded in Section 2.4. Type “ls -l" to list the contents of the directory on individual
lines. Take note of the file sizes of each of the relevant certificates. This information will
be needed shortly.
Next, establish a connection to the modem using a preferred serial console. Once the
serial console has been setup properly, issue the following command to read the contents
of the modem’s file system.
AT+QFLST
The terminal should respond with something similar to:
OK
If the command returns the names of any files that currently exist on the file system, it is
recommended to delete them if they are not needed. To do so, issue the following
command, replacing “cacert.pem" with the name of the file that is to be deleted.
Alternatively, delete all files on the system using the second command:
AT+QFDEL="cacert.pem" or AT+QFDEL="*"
After clearing out the file system, individually upload each of the three requisite
certificates by following the process below:
     1. Using the information returned by the “ls -l" command, determine the number
        of bytes for the certificate that is to be uploaded.
     2. Issue the AT command below, where "cacert.pem" is replaced with a unique
        name if desired, and "1758" is replaced with the correct number of bytes for the
        certificate being uploaded.
        AT+QFUPL="ufs:cacert.pem",1758,30

PN 1001933 rev 3            © NimbeLink Corp. 2022. All rights reserved.              10
● The value of “30" indicates the timeout for the upload
operation.
● The “ufs:" string must be prepended to the file name in
order for the certificates to function properly.
● It is recommended to name the files “cacert.pem",
“clientcert.pem" and “clientkey.pem" so that they are quickly and
easily distinguishable for later use.
3. The serial terminal will respond with “CONNECT", and will wait for data to be
entered. This data will be entered using the Linux terminal in step 4.
4. Without closing the serial console, issue the following command in a new Linux
terminal, where the name of the file is replaced with the name of the certificate in
question, and the destination is replaced with the appropriate path to the serial
line:
cat VeriSign-Class\3-Public-Primary-Certification-Authority-G5.pem > /dev/ttyUSB0
This command will pipe the contents of the certificate to the serial line, which will
then be stored in a file on the modem.
The serial line will respond with something similar to:
+QFUPL: 1758,384a
Where “1758" is the number of bytes written, and "384a" is the checksum for the
operation.
Repeat the four steps listed on the previous page until each of the three files have been
uploaded. Once the files are confirmed to have been uploaded successfully, proceed to
Section 3.2.
3.1.2 Certificate Uploading Using a Windows Environment
First open the Windows command prompt and navigate to the directory that contains the
certificates that were downloaded in Section 2.4. Type “dir" to list the contents of the
directory on individual lines. Take note of the file sizes of each of the relevant certificates.
This information will be needed shortly.
Next, establish a connection to the modem using a preferred serial console. Once the
serial console has been setup properly, issue the following command to read the contents
of the modem’s file system.
AT+QFLST
The terminal should respond with something similar to:
OK
PN 1001933 rev 3 © NimbeLink Corp. 2022. All rights reserved. 11If the command returns the names of any files that currently exist on the file system, it is
recommended to delete them if they are not needed. To do so, issue the following
command, replacing “cacert.pem" with the name of the file that is to be deleted.
Alternatively, delete all files on the system using the second command:
AT+QFDEL="cacert.pem" or AT+QFDEL="*"
After clearing out the file system, individually upload each of the three requisite
certificates by following the process below:
1. Using the information returned by the “dir" command, determine the number of
bytes for the certificate that is to be uploaded.
2. Issue the AT command on the next page, where "cacert.pem" is replaced with a
unique name if desired, and "1758" is replaced with the correct number of bytes
for the certificate being uploaded.
AT+QFUPL="ufs:cacert.pem",1758,30
● The value of “30" indicates the timeout for the upload
operation.
● The “ufs:" string must be prepended to the file name in
order for the certificates to function properly.
● It is recommended to name the files “cacert.pem",
“clientcert.pem" and “clientkey.pem" so that they are quickly and
easily distinguishable for later use.
3. The serial terminal will respond with “CONNECT", and will wait for data to be
entered. This data will be entered using the Windows command prompt in step 4.
4. First, disconnect the serial terminal from the COM port that the modem is
connected to. Only one program can have access to the serial line at a time,
which is why the terminal emulator must be disconnected during the certificate
upload phase.
Next, issue the following command in the command prompt, where the name of
the file is replaced with the name of the certificate being uploaded, and the
"COM10" string is replaced with the proper COM port number.
copy 8da6fe87f3-certificate.pem \\.\COM10
This command will pipe the contents of the certificate to the serial line, which will
then be stored in a file on the modem.
The serial line will respond with something similar to:
+QFUPL: 1224,384a
Where “1224" is the number of bytes written, and "384a" is the checksum for the
operation.
Repeat the four steps listed on the previous page until each of the three files have been
uploaded. After the files have been successfully uploaded, reattach the serial console to
the appropriate COM port. Once finished, proceed to Section 3.2.
PN 1001933 rev 3 © NimbeLink Corp. 2022. All rights reserved. 123.2 Verifying the Certificate Uploads To verify that the file upload was successful, issue the following command: AT+QFLST The terminal should respond with something similar to: +QFLST: "cacert.pem",1758 +QFLST: "clientcert.pem",1224 +QFLST: "clientkey.pem",1675 To further check the success of the upload, it is possible to open and read the contents of any of the files that were uploaded to the file system. To do so, issue the following command to open a file, replacing the filename accordingly: AT+QFOPEN="cacert.pem" The terminal should respond with something similar to: +QFOPEN: 1 Where “cacert.pem" is replaced with the name of the file to be opened, and “1" is the index in which the file was opened. To read the contents of the opened file, issue the following command: AT+QFREAD=1 Where “1" is replaced with the index that was listed in the response to the previous command. The terminal will respond with the contents of the file, which will be similar to: CONNECT 1758 -----BEGIN CERTIFICATE----- MIIE0zCCA7ugAwIBAgIQGNrRniZ96LtKIVjNzGs7SjANBgkqhkiG9w0BAQUFADCB yjELMAkGA1UEBhMCVVMxFzAVBgNVBAoTDlZlcmlTaWduLCBJbmMuMR8wHQYDVQQL . . . . . . . . . 4fQRbxC1lfznQgUy286dUV4otp6F01vvpX1FQHKOtw5rDgb7MzVIcbidJ4vEZV8N hnacRHr2lVz2XTIIM6RUthg/aFzyQkqFOFSDX9HoLPKsEdao7WNq -----END CERTIFICATE----- PN 1001933 rev 3 © NimbeLink Corp. 2022. All rights reserved. 13
Finally, to close the file, issue the following command:
AT+QFCLOSE=1
Where “1" is replaced with the index at which the file was opened. The terminal should
respond with:
OK
After each of the three files have been uploaded and verified properly, proceed to Section
3.3.

3.3 SSL Profile Configuration
The next step is to configure the SSL connection parameters on the Skywire. To do this,
issue the following set of commands which utilize the “AT+QSSLCFG" command. For
more detailed information about the “AT+QSSLCFG" command, refer to Quectel's SSL
application note located on the BG96 product page:
https://www.quectel.com/product/bg96.htm

     1. Configure the cipher suite:
        AT+QSSLCFG="ciphersuite",1,0x0035
        This command selects TLS_RSA_WITH_AES_256_CBC_SHA as the cipher
        suite used for the connection.
     2. Specify the paths to the certificates:
        AT+QSSLCFG="cacert",1,"ufs:cacert.pem"
        AT+QSSLCFG="clientcert",1,"ufs:clientcert.pem"
        AT+QSSLCFG="clientkey",1,"ufs:clientkey.pem"
        Note: Do not omit the “ufs:" string in the filename. If this is not included, the
        certificates will not be applied properly, and an error will be thrown.
     3. Specify the SSL protocol:
        AT+QSSLCFG="sslversion",1,3
        This command specifies that the SSL connection should use TLS1.2 protocol.
     4. Set the authentication mode for the SSL connection:
        AT+QSSLCFG="seclevel",1,2
        This command selects “Manage server and client authentication if requested by
        the remote server" mode for the SSL connection. This ensures that the
        connection will use all three of the certificates during the AWS connection.

PN 1001933 rev 3             © NimbeLink Corp. 2022. All rights reserved.              14
5. Set the negotiation time:
AT+QSSLCFG="negotiatetime",1,300
This command sets the maximum timeout in the SSL negotiation stage.
6. Enable checking for expired certificates:
AT+QSSLCFG="ignorelocaltime",1,0
This command enables validity checking for the certificates during the SSL
negotiation stage. An invalid certificate will result in a failed connection.
After the SSL configurations have been set properly, proceed to Section 3.4.
3.4 Configure TCP/IP Context
Next, a TCP/IP context must be defined. To do so, issue the following commands,
replacing “[APN]” with the appropriate APN.
Assuming the APN of the device has been previously configured according to the user
guide, it can be seen in the output of AT+CGDCONT?. Bolded below is the APN for a Verizon
device.
AT+CGDCONT?
+CGDCONT: 1,"IP","nimblink.gw12.vzwentp","0.0.0.0",0,0,0
+CGDCONT: 2,"IPV4V6","VZWADMIN","0.0.0.0.0.0.0.0.0.0.0.0.0.0.0.0",0,0,0
+CGDCONT: 3,"IPV4V6","VZWINTERNET","0.0.0.0.0.0.0.0.0.0.0.0.0.0.0.0",0,0,0
+CGDCONT: 4,"IPV4V6","VZWAPP","0.0.0.0.0.0.0.0.0.0.0.0.0.0.0.0",0,0,0
+CGDCONT: 5,"IPV4V6","VZWCLASS6","0.0.0.0.0.0.0.0.0.0.0.0.0.0.0.0",0,0,0
+CGDCONT: 6,"IPV4V6","VZWIOTTS","0.0.0.0.0.0.0.0.0.0.0.0.0.0.0.0",0,0,0
Now we can use the APN to configure our TCP/IP context.
AT+QICSGP=1,1,"[APN]"
To ensure that the previous command was entered properly, issue this command:
AT+QICSGP=1
The modem should respond with something similar to:
+QICSGP: 1,"[APN]","","",1
Next, activate the TCP/IP context by issuing the following command:
AT+QIACT=1
To check the status of the activation, use this command:
AT+QIACT?
The modem should respond with something similar to:
+QIACT: 1,1,1,"100.xx.yy.zz"
After the TCP/IP context has been activated successfully, proceed to Section 4.
PN 1001933 rev 3 © NimbeLink Corp. 2022. All rights reserved. 154. Connect to Amazon AWS with HTTP 4.1 Opening an SSL Socket After the Skywire has been configured properly, it is ready to establish a connection to the AWS server. First, find the endpoint for the “thing” that was created on the AWS website. To do this, navigate to the “Settings” page using the menu on the left-hand side of the AWS console page. The correct menu should look something like this: In the image above, the URL for the device endpoint has been partially censored. Record whatever URL shows up in this page, as it will be needed in the SSL socket connection command. PN 1001933 rev 3 © NimbeLink Corp. 2022. All rights reserved. 16
To open the SSL socket, issue the command below. Make sure to replace the device
endpoint in the AT command below with the endpoint that is unique to the AWS account
being used for this example.
AT+QSSLOPEN=1,1,1,"a272...amazonaws.com",8443,0
The first three "1" specify the PDP context, SSL configuration profile and the socket
index, respectively. The endpoint URL is the unique URL associated with the AWS
account, the “8443” specifies the port connected to, and the “0” specifies “Buffer
access mode”, which is similar to command mode.
After issuing this command, the modem will attempt to connect to the AWS endpoint. If
the connection is successful, the modem will return the following:
+QSSLOPEN: 1,0
The above text indicates that the SSL handshake was successful and that the socket has
been opened. If the modem responds with anything other than the above text, issue the
following command to get more information about the error:
AT+QIGETERROR
The above command will return something similar to this:
+QIGETERROR: x,
Where "x" is replaced with the error code, and "" is replaced with a
relevant error message.
After the SSL socket has been successfully been opened. Proceed to Section 4.2.

4.2 Sending an HTTP Request
After successfully opening an SSL socket, use the following command to send an HTTP
request to the AWS endpoint:
AT+QSSLSEND=1
Where "1" is the number of the socket used for the SSL connection.
After issuing this AT command, the modem will wait for text to be entered into the
terminal. This text can either be pasted or typed into the terminal. After all of the text
has been entered or pasted in, press "CTRL-Z" (Ascii 0x1A) to finalize the transmission.
See the text below for a sample HTTP POST request using the "AT+QSSLSEND"
command.
Also, take note of the text in red in the table on the next page. Any of the red text
indicates key presses, and are not to be typed explicitly. These key press sequences
are crucial in order to format the POST command properly. These key presses translate
to a carriage return “\r” and a newline character “\n” respectively. Be aware that some
terminals may enter both characters on a single keypress. Finally, bold text signifies
commands issued to the modem, and text pasted into the terminal.

PN 1001933 rev 3            © NimbeLink Corp. 2022. All rights reserved.            17
AT+QSSLSEND=1
  > POST /things/AWS_TEST_THING/shadow HTTP/1.1 "CTRL+M, CTRL+J"
  Host: a272y7s3bxum89.iot.us-east-2.amazonaws.com:8443 "CTRL+M, CTRL+J"
  Content-Type: application/json "CTRL+M, CTRL+J"
  Content-Length: 115 "CTRL+M, CTRL+J, CTRL+M, CTRL+J"

  {"state":{"desired":{"string1":"TLS Connect to AWS","string2":"Using the
  built-in stack","string3":"of the BG96"}}}
  "CTRL-Z"
  SEND OK
  +QSSLURC: "recv",1

As can be seen in the text above, the POST command was pasted into the terminal,
and the modem responded with "SEND OK" indicating that the transmission succeeded.
Also note that the "+QSSLURC: "recv",1" URC indicates that an HTTP response was
received. Section 4.3 will detail how to read this response.
Another important item to note is the "Content-Length: 115" line. In this case, the
value of "115" indicates that 115 bytes of data are being sent through the socket. This
helps the endpoint know how many bytes to consider as data. It is crucial to ensure that
this number is updated whenever the data JSON is edited.

4.3 Reading an HTTP Response
To read an HTTP response, issue the following command:
AT+QSSLRECV=1
Where "1" is replaced by the number of the socket used for the SSL connection.
In the case of the sample POST command in Section 4.2, the HTTP response is on the
next page.

PN 1001933 rev 3           © NimbeLink Corp. 2022. All rights reserved.          18
+QSSLRECV: 470
HTTP/1.1 200 OK
content-type: application/json
content-length: 281
date: Mon, 23 Jul 2018 22:12:44 GMT
x-amzn-RequestId: 5ea18d53-a6cc-b49f-8cf9-e4edd6a072e1
connection: keep-alive
{"state":{"desired":{"string1":"TLS Connect to AWS","string2":"Using the built-in
stack","string3":"of the
BG96"}},"metadata":{"desired":{"string1":{"timestamp":1532383964},"string2":{"timesta
mp":1532383964},"string3":{"timestamp":1532383964}}},"version":17,"timestamp":1532383
964}
4.4 Closing an SSL Socket
To close an SSL socket, issue the following command:
AT+QSSLCLOSE=1
Where "1" is replaced with number of the socket that was used for the SSL connection.
5. Working Examples
Section 5 contains two examples involving an HTTP POST and and HTTP GET operation
involving the AWS cloud.
The certificate upload procedure will be demonstrated for both a Linux and a Windows
environment, however note that the remainder of the process after the certificate upload
is identical for these two environments.
5.1 Initial Setup
This section details the configuration of the Skywire that is common to both of the HTTP
examples. Commands entered into the Windows command prompt and Linux terminal
will be colored red, while commands issued to the QBG96 will be colored black.
Additionally, commands issued to the modem by the user will be in boldface, while
responses from the modem will be in regular font.
Proceed to Section 5.1.1 for Linux certificate upload instructions, or Section 5.1.2 for
Windows certificate upload instructions.
PN 1001933 rev 3 © NimbeLink Corp. 2022. All rights reserved. 195.1.1 Linux Certificate Upload
First, upload the certificates needed for the SSL connection:
AT+QFLST
+QFLST: "cacert.pem",1758
+QFLST: "clientcert.pem",1224
+QFLST: "clientkey.pem",1675
AT+QFDEL="*"
OK
AT+QFUPL="ufs:cacert.pem",1758,30
CONNECT
cat VeriSign-Class\ 3-Public-Primary-Certification-Authority-G5.pem > /dev/ttyUSB0
+QFUPL: 1758,384a
OK
AT+QFUPL="ufs:clientcert.pem",1224,30
CONNECT
cat 8da6fe87f3-certificate.pem.crt > /dev/ttyUSB0
+QFUPL: 1224,7803
AT+QFUPL="ufs:clientkey.pem",1675,30
CONNECT
cat 8da6fe87f3-private.pem.key > /dev/ttyUSB0
+QFUPL: 1675,7c76
AT+QFLST
+QFLST: "cacert.pem",1758
+QFLST: "clientcert.pem",1224
+QFLST: "clientkey.pem",1675
OK
Once the certificates have been uploaded successfully, proceed to Section 5.1.3.
PN 1001933 rev 3 © NimbeLink Corp. 2022. All rights reserved. 205.1.2 Windows Certificate Upload
First, upload the certificates needed for the SSL connection:
AT+QFLST
+QFLST: "cacert.pem",1758
+QFLST: "clientcert.pem",1224
+QFLST: "clientkey.pem",1675
AT+QFDEL="*"
OK
AT+QFUPL="ufs:cacert.pem",1758,30
CONNECT
copy VeriSign-Class\ 3-Public-Primary-Certification-Authority-G5.pem \\.\COM10
+QFUPL: 1758,384a
OK
AT+QFUPL="ufs:clientcert.pem",1224,30
CONNECT
copy 8da6fe87f3-certificate.pem \\.\COM10
+QFUPL: 1224,7803
AT+QFUPL="ufs:clientkey.pem",1675,30
CONNECT
copy 8da6fe87f3-private.pem.key > \\.\COM10
+QFUPL: 1675,7c76
AT+QFLST
+QFLST: "cacert.pem",1758
+QFLST: "clientcert.pem",1224
+QFLST: "clientkey.pem",1675
OK
Once the certificates have been uploaded successfully, proceed to Section 5.1.3.
PN 1001933 rev 3 © NimbeLink Corp. 2022. All rights reserved. 215.1.3 Connection Settings Configuration After the files have been successfully uploaded, configure the SSL profile. AT+QSSLCFG="ciphersuite",1,0x0035 OK AT+QSSLCFG="sslversion",1,3 OK AT+QSSLCFG="cacert",1,"ufs:cacert.pem" OK AT+QSSLCFG="clientcert",1,"ufs:clientcert.pem" OK AT+QSSLCFG="clientkey",1,"ufs:clientkey.pem" OK AT+QSSLCFG="seclevel",1,2 OK AT+QSSLCFG="negotiatetime",1,300 OK AT+QSSLCFG="ignorelocaltime",1,0 OK PN 1001933 rev 3 © NimbeLink Corp. 2022. All rights reserved. 22
Next, configure the TCP/IP context. Be sure to replace "[APN]" with the appropriate APN.

 AT+QICSGP=1,1,"[APN]"
 OK

 AT+QIACT=1
 OK

 AT+QIACT?
 +QIACT: 1,1,1,"100.xx.yy.zz"

 OK

Finally, establish a connection with the AWS server.

 AT+QSSLOPEN=1,1,1,"a272...amazonaws.com",8443,0
 OK

 +QSSLOPEN: 1,0

After completing the configuration steps, proceed to either Section 5.2 or Section 5.3 for
an HTTP POST example, or an HTTP GET example, respectively.

PN 1001933 rev 3           © NimbeLink Corp. 2022. All rights reserved.            23
5.2 HTTP POST Example

After properly initializing the modem in Section 5.1, enter the commands below to
execute an HTTP POST request. For help with POST command formatting, refer to the
next page.
Note: the text in red indicates CTRL key sequences, and are not to be typed into the
terminal verbatim. Instead, press these CTRL key sequences in the order listed. Bold
text indicates commands, as well as text that was pasted into the terminal.

 AT+QSSLSEND=1
 > POST /things/AWS_TEST_THING/shadow HTTP/1.1 "CTRL+M, CTRL+J"
 Host: a272y7s3bxum89.iot.us-east-2.amazonaws.com:8443 "CTRL+M, CTRL+J"
 Content-Type: application/json "CTRL+M, CTRL+J"
 Content-Length: 115 "CTRL+M, CTRL+J, CTRL+M, CTRL+J"

 {"state":{"desired":{"string1":"TLS Connect to AWS","string2":"Using the built-
 in stack","string3":"of the BG96"}}}
 "CTRL-Z"

 SEND OK
 +QSSLURC: "recv",1

 AT+QSSLRECV=1
 +QSSLRECV: 470
 HTTP/1.1 200 OK
 content-type: application/json
 content-length: 281
 date: Mon, 23 Jul 2018 22:53:03 GMT
 x-amzn-RequestId: c89a85c0-4154-e2fd-63da-dd538aaa0459
 connection: keep-alive

 {"state":{"desired":{"string1":"TLS Connect to AWS","string2":"Using the built-
 in stack","string3":"of the
 BG96"}},"metadata":{"desired":{"string1":{"timestamp":1532386383},"string2":{"t
 imestamp":1532386383},"string3":{"timestamp":1532386383}}},"version":18,"timest
 amp":1532386383}

 OK

PN 1001933 rev 3          © NimbeLink Corp. 2022. All rights reserved.          24
Properly formatting the POST command can be challenging. Below are a few pointers
for correct POST command formatting and entry:
● It is usually impossible to paste the entire POST command all at once. Try
pasting the command in line-by-line as opposed to all at once.
● Press "CTRL+M, CTRL+J" after each line of the POST command. This sequence
enters in a newline and carriage return character after each line.
● Press "CTRL+M, CTRL+J, CTRL+M, CTRL+J" after the "Content-Length: 115"
line. In other words, insert two newline and carriage return sequences after this
line.
● Replace the "AWS_TEST_THING" identifier with the unique name assigned during
the "thing" creation in Section 2.3.
● Replace the AWS endpoint "a272...amazonaws.com:8443" with the unique
endpoint associated with the Amazon AWS account in use.
● If the contents of the JSON are changed for any reason, the integer argument of
the "Content-Length: 115" line must be modified.
In other words, if the JSON is made larger or smaller, the total number of bytes
being sent must be recalculated, and the "Content-Length: x" line must be
updated with the new length.
PN 1001933 rev 3 © NimbeLink Corp. 2022. All rights reserved. 255.3 HTTP GET Example
After properly initializing the modem in Section 5.1, enter the commands below to
execute an HTTP GET request.
Note: the text in red indicates CTRL key sequences, and are not to be typed into the
terminal verbatim. Instead, press these CTRL key sequences in the order listed. Bold
text indicates commands, as well as text that was pasted into the terminal.
AT+QSSLSEND=1
> GET /things/AWS_TEST_THING/shadow HTTP/1.1
"CTRL+M, CTRL+J, CTRL+M, CTRL+J, CTRL-Z"
SEND OK
+QSSLURC: "recv",1
AT+QSSLRECV=1
+QSSLRECV: 572
HTTP/1.1 200 OK
content-type: application/json
content-length: 383
date: Tue, 24 Jul 2018 20:15:08 GMT
x-amzn-RequestId: d60d0ee6-0b59-7647-4aa6-b8d50ef05a84
connection: keep-alive
{"state":{"desired":{"string1":"TLS Connect to AWS","string2":"Using
the built-in stack","string3":"of the BG96"},"delta":{"string1":"TLS
Connect to AWS","string2":"Using the built-in stack","string3":"of the
BG96"}},"metadata":{"desired":{"string1":{"timestamp":1532463231},"str
ing2":{"timestamp":1532463231},"string3":{"timestamp":1532463231}}},"v
ersion":19,"timestamp":1532463308}
OK
As per the HTTP POST example, be sure to replace the "AWS_TEST_THING" string with
whatever unique name was assigned to the AWS "thing" in Section 2.3.
PN 1001933 rev 3 © NimbeLink Corp. 2022. All rights reserved. 266. Connect to AWS with MQTT on QBG95 6.1 Setting up the MQTT Client This section will walk through connecting to AWS using the QBG95’s built-in MQTT client. For further in depth documentation, refer to Quectel’s BG95 & BG77 & BG600L Series MQTT Application Note. First we will configure MQTT client zero to enable SSL and to use SSL context one. This can be done with the below command where 0 is the MQTT client on the modem, the first 1 enables SSL, and the second 1 is the SSL context that we configured in previous steps. AT+QMTCFG="ssl",0,1,1 OK Next, we will open MQTT client zero to our AWS Endpoint on port 8883. Your endpoint will likely be similar to xxxxxxxx.iot.us-east-2.amazonaws.com with the x’s replaced and potentially a different region. The modem will initially respond with OK, and later an unsolicited response code (URC) will show the connection status. The response code should be zero, other values indicate errors. AT+QMTOPEN=0,"[Your AWS Endpoint]",8883 OK +QMTOPEN: 0,0 Next, we will establish a connection using the client id of the device. This is typically the name of the device you used to create the device in AWS in the steps above. The modem again will initially respond with OK, and an URC will show the connection status later. AT+QMTCONN=0,"[Your things name]” OK +QMTCONN: 0,0,0 PN 1001933 rev 3 © NimbeLink Corp. 2022. All rights reserved. 27
Now we will subscribe MQTT client zero to a topic. We use a message id of 1, the topic
for the device shadow update status, and a QoS of 1 (at least once).

 AT+QMTSUB=0,1,"$aws/things/[Your things name]/shadow/update/accepted",1
 OK

 +QMTSUB: 0,1,0,1

Once we have subscribed to a topic, we’ll publish a message to a topic. We use MQTT
client zero, a message id of 1, a QoS of 1, don’t retain the message (0), and publish to
the listed topic. The modem will then prompt us to enter a message which is sent by
pressing Ctrl-z.

 AT+QMTPUB=0,1,1,0,"$aws/things/[Your things name]/shadow/update/accepted"
 > This is publish data from client{Ctrl-z}
 OK

 +QMTPUB: 0,1,0

When the broker receives the message, it will be sent back to the modem since we
subscribed to the topic previously. An URC will be emitted similar to the one shown below.

 +QMTRECV: 0,1,”$aws/things/[Your things name]/shadow/update/accepted”,
 “This is publish data from client”

When we are finished, we can disconnect MQTT client zero from the AWS endpoint
broker.

 AT+QMTDISC=0
 OK

 +QMTDISC: 0,0

PN 1001933 rev 3           © NimbeLink Corp. 2022. All rights reserved.            28
6.2 Interacting using the AWS Device Shadow This section shows some visuals for interacting with a device using the AWS MQTT test client. This allows you to send and receive MQTT messages manually. Under the device shadow, click on the MQTT topics and select the update/accepted topic. Then click on “publish to a topic” and publish the sample message. PN 1001933 rev 3 © NimbeLink Corp. 2022. All rights reserved. 29
You should see on the terminal window the following response:

 +QMTRECV: 0,0,"$aws/things/[Your things name]/shadow/update/accepted","{
   "message": "Hello from AWS IoT console"
 }"

Then post the following message through the terminal window:

 AT+QMTPUB=0,1,1,0,"$aws/things/[Your things name]/shadow/update/accepted"
 > This is publish data from client{Ctrl-z}
 OK

 +QMTPUB: 0,1,0

On the AWS console you should see the message show up on the device shadow.

PN 1001933 rev 3          © NimbeLink Corp. 2022. All rights reserved.   30
7. Troubleshooting 7.1 HTTP Response Codes 7.1.1 403 Forbidden If a connection can be established, but the AWS response to the "GET" command is "403 Forbidden", make sure that the current AWS policy is set to allow all IoT actions. This can be done through the AWS IoT Console. 7.1.2 400 Bad Request If a connection can be established, but the AWS response to the "GET" or "POST" command is "400 Bad Request", make sure the syntax of the "GET" or "POST" command is correct. 7.2 Verify Credentials If for some reason the credentials for the AWS connection do not work, OpenSSL can be used to check their validity. This process is helpful for narrowing down the source of the connection issue. 7.2.1 Testing AWS Credentials using OpenSSL To test credentials with OpenSSL, first ensure that OpenSSL is properly installed on a Linux or Windows system. Next, navigate to the directory that contains the certificates that are being tested. Issue the following command to attempt a connection to AWS: openssl s_client -servername a272...amazonaws.com -connect a272...amazonaws.com:8443 -CAfile VeriSign-Class\ 3-Public-Primary-Certification- Authority-G5.pem -cert 8da6fe87f3-certificate.pem.crt -key 8da6fe87f3- private.pem.key -certform PEM -keyform PEM Be sure to replace any of the text in bold with unique certificate names, and the unique AWS endpoint URL. PN 1001933 rev 3 © NimbeLink Corp. 2022. All rights reserved. 31
If the connection is successful, the terminal should respond with "CONNECTED" followed
by some information about the connection, including the server certificate. To further
test the connection, type the following command, followed by the sequence "CTRL+M,
CTRL+J":
GET /things/AWS_TEST_THING/shadow HTTP/1.1
Remember to replace the "AWS_TEST_THING" string with the unique "thing" name
assigned in Section 2.3.
The server should respond with something similar to:

 HTTP/1.1 200 OK
 content-type: application/json
 content-length: 383
 date: Tue, 24 Jul 2018 22:35:57 GMT
 x-amzn-RequestId: 6ae1eb60-6910-9a7b-e8b0-6c6d2904e239
 connection: keep-alive

 {"state":{"desired":{"string1":"TLS Connect to AWS","string2":"Using
 the built-in stack","string3":"of the BG96"},"delta":{"string1":"TLS
 Connect to AWS","string2":"Using the built-in stack","string3":"of
 the
 BG96"}},"metadata":{"desired":{"string1":{"timestamp":1532463231},"st
 ring2":{"timestamp":1532463231},"string3":{"timestamp":1532463231}}},
 "version":19,"timestamp":1532471757}

If a valid connection can be established, then it is safe to say that the certificates are
indeed valid, and thus are not the source of the problem.

PN 1001933 rev 3             © NimbeLink Corp. 2022. All rights reserved.              32
You can also read