SPECTRA STORCYCLE SOLUTION GETTING STARTED - SPECTRALOGIC.COM
←
→
Page content transcription
If your browser does not render page correctly, please read the page content below
Spectra StorCycle Solution
   Getting Started

       SpectraLogic.com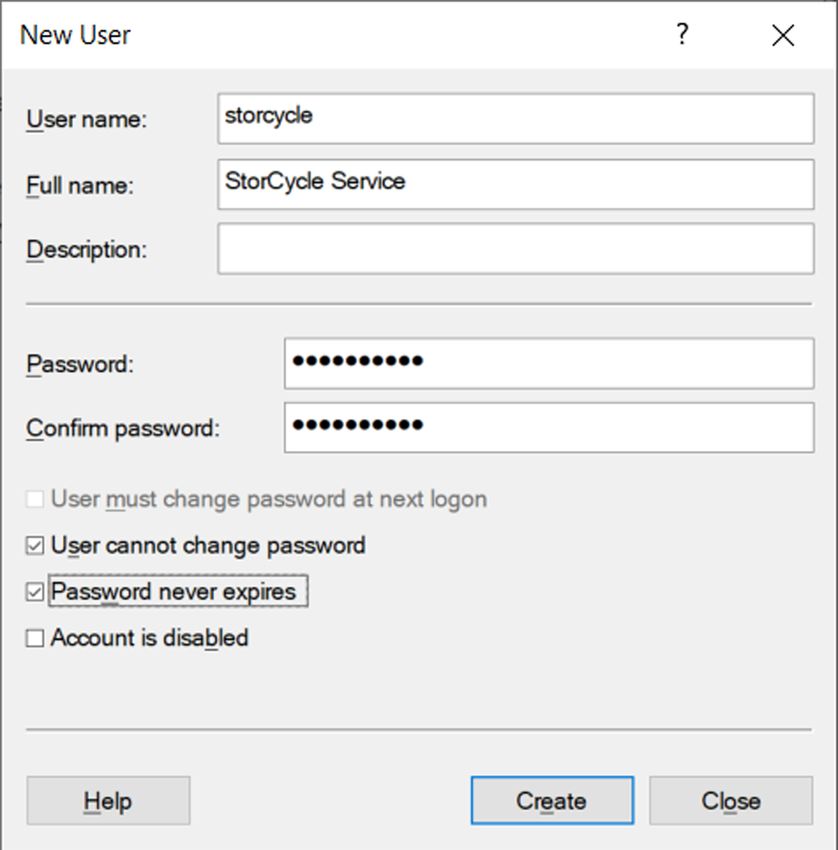
Legal Notices
Copyright
Copyright © 2019 - 2021 Spectra Logic Corporation. All rights reserved. This item and the information contained
herein are the property of Spectra Logic Corporation.

Notices
Except as expressly stated herein, Spectra Logic Corporation makes its products and associated
documentation on an “AS IS” BASIS, WITHOUT WARRANTY OF ANY KIND, EITHER EXPRESSED OR
IMPLIED, INCLUDING BUT NOT LIMITED TO THE IMPLIED WARRANTIES OF MERCHANTABILITY
OR FITNESS FOR A PARTICULAR PURPOSE, BOTH OF WHICH ARE EXPRESSLY DISCLAIMED. In no
event shall Spectra Logic be liable for any loss of profits, loss of business, loss of use or data, interruption
of business, or for indirect, special, incidental or consequential damages of any kind, even if Spectra Logic
has been advised of the possibility of such damages arising from any defect or error.
Information furnished in this manual is believed to be accurate and reliable. However, no responsibility is
assumed by Spectra Logic for its use. Due to continuing research and development, Spectra Logic may revise
this publication from time to time without notice, and reserves the right to change any product specification at
any time without notice.

Trademarks
BlackPearl, BlueScale, CC, RioBroker, Spectra, SpectraGuard, Spectra Logic, StorCycle, TeraPack, TFinity, and
TranScale are registered trademarks of Spectra Logic Corporation. Eon Protect and SeeVault are trademarks of
Spectra Logic Corporation. MigrationPass is a service mark of Spectra Logic Corporation. All rights reserved
worldwide. All other trademarks and registered trademarks are the property of their respective owners.

Part Number
90990147 Revision H

Revision History
      Revision        Date                 Description

            A         November 2019        First public release.

            B         January 2020         Updated for StorCycle 2.1.1.

            C         April 2020           Updated for StorCycle 3.0.1.

            D         July 2020            Updated for StorCycle 3.1.0.

            E         September 2020       Updated for StorCycle 3.2.0.

            F         January 2021         Updated for StorCycle 3.3.0.

            G         June 2021            Updated for StorCycle 3.5.0.

            H         October 2021         Updated for StorCycle 3.6.0.

    Note: To make sure you have the release notes for the most current version of the
          BlackPearl Release Notes, check the Spectra Logic Technical Support portal at
          support.spectralogic.com/documentation/release-notes/. You must sign into the
          portal before viewing Release Notes.

October 2021                                                          Getting Started-Spectra StorCycle Solution
                                                       -2-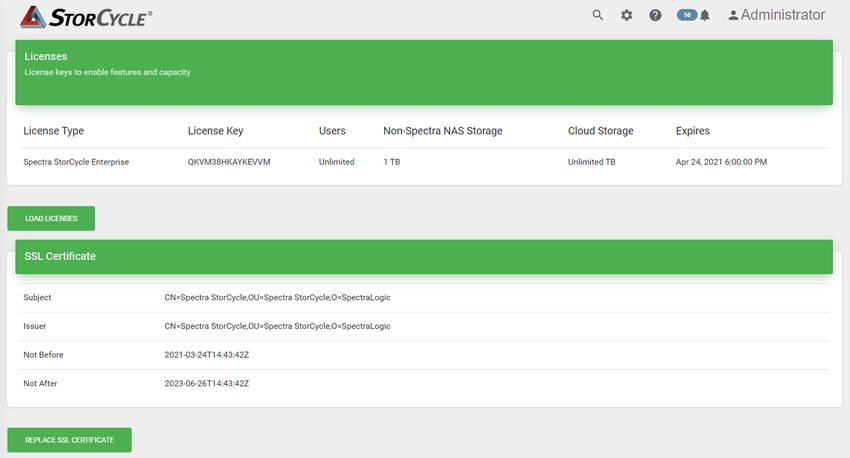
Contacting Spectra Logic
To Obtain General Information
Spectra Logic Website: spectralogic.com
United States Headquarters                           European Office
Spectra Logic Corporation                            Spectra Logic Europe Ltd.
6285 Lookout Road                                    329 Doncastle Road
Boulder, CO 80301                                    Bracknell
USA                                                  Berks, RG12 8PE
Phone: 1.800.833.1132 or 1.303.449.6400              United Kingdom
International: 1.303.449.6400                        Phone: 44 (0) 870.112.2150
Spectra Logic Technical Support
Technical Support Portal: support.spectralogic.com
                                                     Europe, Middle East, Africa
United States and Canada
                                                     Phone: 44 (0) 870.112.2185
Phone:
                                                     Deutsch Sprechende Kunden
Toll free US and Canada: 1.800.227.4637
                                                     Phone: 49 (0) 6028.9796.507
International: 1.303.449.0160
                                                     Email: spectralogic@stortrec.de
Mexico, Central and South America, Asia, Australia, and New Zealand
Phone: 1.303.449.0160
Spectra Logic Sales
Website: shop.spectralogic.com
United States and Canada                             Europe
Phone: 1.800.833.1132 or 1.303.449.6400              Phone: 44 (0) 870.112.2150
Email: sales@spectralogic.com                        Email: eurosales@spectralogic.com
To Obtain Documentation
Spectra Logic Website: support.spectralogic.com/documentation

October 2021                                                    Getting Started-Spectra StorCycle Solution
                                              -3-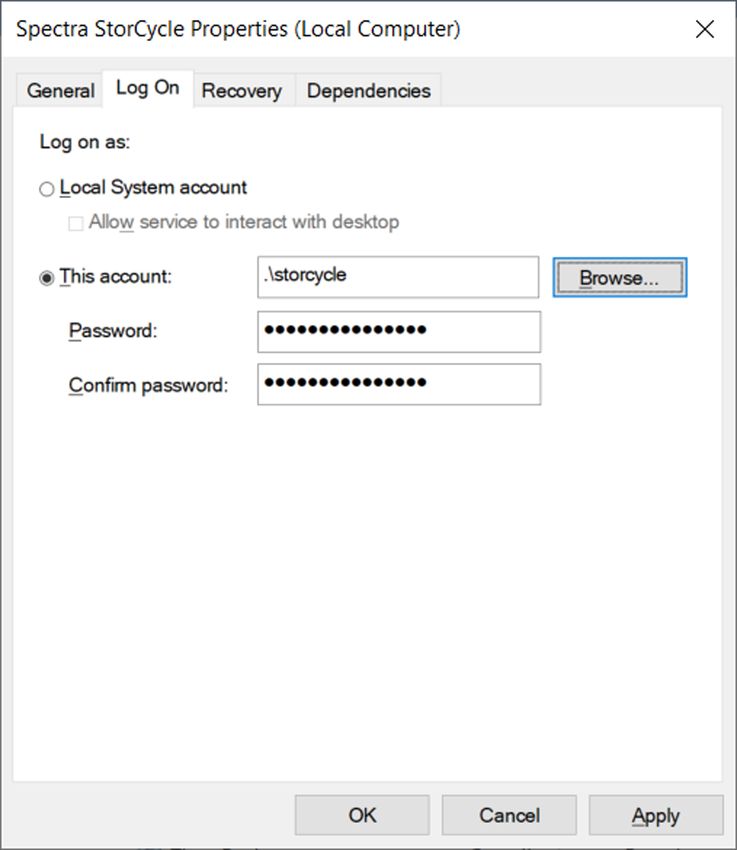
Table of Contents
    Contacting Spectra Logic                                       3
    Table of Contents                                              4

 Helpful Information                                               6

    Intended Audience                                              6
    User Interface Screens                                         6
    Typographical Conventions                                      6
    User Feedback                                                  7
    Related Publications                                           7

 Chapter 1 - Install the StorCycle Solution on a Windows Server    9

    Verify StorCycle Requirements                                 10
    Determine Server UUID and Request a License                   11
    Download and Install the StorCycle Software                   11
    Configure the User Account                                    11
      Configure a Domain Administrator                            12
      Configure a Local Group Administrator                       13
      Configure a Custom Owner of Files and Folders               14
    Configure for Transparent Access                              20
      Enable Remote Symbolic Links                                20

 Chapter 2 - Install the StorCycle Solution on a Linux Server     21

    Verify StorCycle Requirements                                 22
    Determine Server UUID and Request a License                   23
    Install the StorCycle Mongo Database and Repository           23
      Create the MongoDB Repository                               23
      Install MongoDB                                             23
    Install the StorCycle Solution                                24

                                           -4-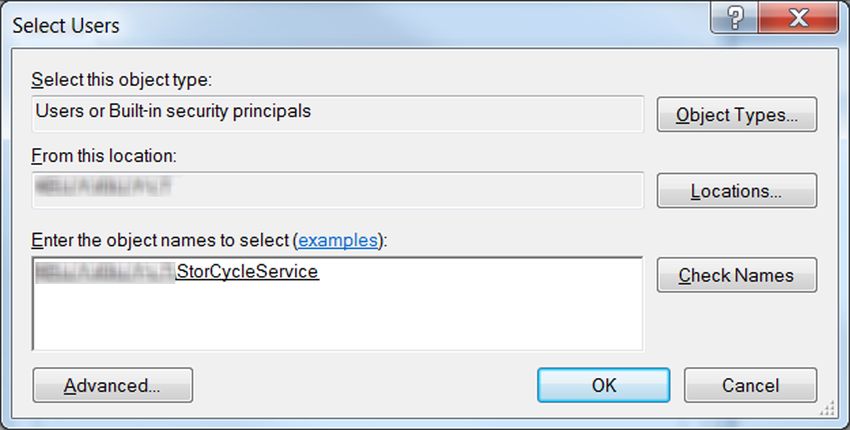
Table of Contents

      Start, Stop, and Restart the Services                                                24
      Mount Linux Storage Devices                                                          25

  Chapter 3 - Start Using the StorCycle Solution                                           26

      Log Into the User Interface                                                          26
      Load License Keys                                                                    28
      Next Steps                                                                           29

October 2021                                        Getting Started-Spectra StorCycle Solution
                                              -5-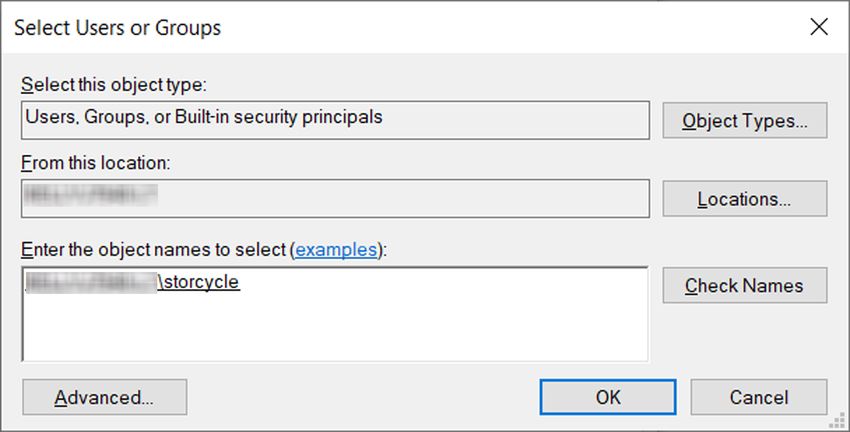
Helpful Information
These instructions describe how to configure, use, and monitor the Spectra® StorCycle®
Solution, sometimes referred to as the solution.

Intended Audience
This guide is intended for data center administrators and operators who maintain and
operate file storage systems. The information in this guide assumes a familiarity with
computing terminology. You also need to be familiar with installing, configuring, and using
data file storage and archival software.

User Interface Screens
The user interface changes as new features are added or other modifications are made
between software revisions. Therefore, the screens you see in the user interface may differ
from those shown in this guide.

Typographical Conventions
This document uses the following conventions to highlight important information:

                    Read text marked by the “Warning” symbol for information you must know to avoid
         WARNING personal injury.

                   Read text marked by the “Caution” symbol for information you must know to avoid
         CAUTION losing data.

                      Read text marked by the “Important” symbol for information that helps you
         IMPORTANT complete a procedure or avoid extra steps.

   Note: Read text marked with “Note” for additional information or suggestions about the
         current topic.

                                               -6-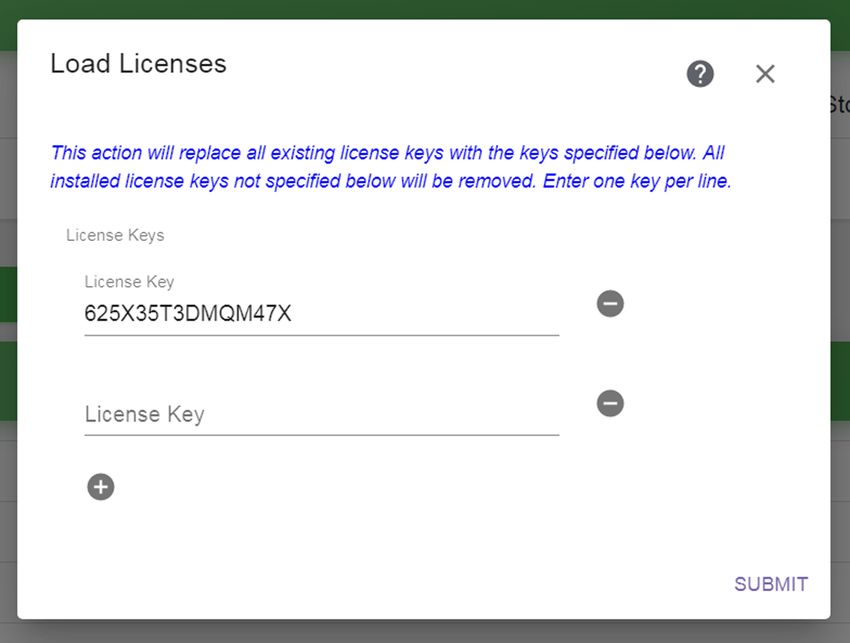
Helpful Information                                                                     User Feedback

User Feedback
Contact us at (800) 833-1132 to give us suggestions or feedback on our products and
documentation.

Related Publications
The latest revision of the following documents related to the Spectra Spectra StorCycle
Solution are available as PDF files on the Spectra Logic website at:
support.spectralogic.com/documentation.
• The Spectra StorCycle Solution Getting Started Guide provides a quick reference for installing
  and configuring the Spectra StorCycle solution.
• The Spectra StorCycle Solution User Guide provides detailed information about installing,
  configuring, and using the Spectra StorCycle solution. The content of this guide, for your
  revision of the StorCycle solution, is accessible by clicking Help   in the toolbar of the
  software.
The following document is available after logging into your Support portal account at:
support.spectralogic.com.
• The Spectra StorCycle Solution Release Notes and Documentation Updates provide the most up-
  to-date information about the solution, including information about the latest software
  releases and documentation updates.
For additional information about the Spectra BlackPearl® Converged Storage system and the
Spectra BlackPearl NAS solution, refer to the publications listed in this section.
• The Spectra BlackPearl Converged Storage System User Guide provides detailed information
   about configuring, using, and maintaining your BlackPearl system.
• The Spectra S3 API Reference provides information on understanding and using the Spectra
  S3 API.
• The Spectra BlackPearl Eon Browser User Guide provides installation and usage information
  for the BlackPearl Eon Browser.
• The Spectra BlackPearl NAS Solution User Guide provides information about configuring,
  using and maintaining your BlackPearl NAS solution.
• The Spectra Verde NAS Solution User Guide provides information about configuring, using
  and maintaining your Verde NAS solution.

October 2021                                                Getting Started-Spectra StorCycle Solution
                                              -7-
Helpful Information                                                             Related Publications

The following documents are available after logging into your Support portal account at:
support.spectralogic.com.
• The Spectra BlackPearl Converged Storage System Release Notes and Documentation Updates
  provide the most up-to-date information about the BlackPearl and BlackPearl NAS
  systems, including information about the latest software releases and documentation
  updates.
• The Spectra Verde NAS Solution Release Notes and Documentation Updates provide the most
  up-to-date information about the Verde NAS solution, including information about the
  latest software releases and documentation updates.
To access the documentation for the REST API, form the StorCycle server, go to
https://localhost/apidocs/#.

October 2021                                              Getting Started-Spectra StorCycle Solution
                                             -8-
Chapter 1 - Install the StorCycle
Solution on a Windows Server
This section describes how to do the initial installation of the Spectra StorCycle Solution on a
Windows server. For instructions to upgrade to a newer version of the Spectra StorCycle
Solution see Upgrade the StorCycle Solution.
The StorCycle solution is intended to migrate / store or copy inactive files. It is not intended
to backup or manage active files in primary storage.
The StorCycle solution runs on Windows servers and supports CIFS/SMB networked
storage or runs on Linux servers and supports NFS-protocol storage or CIFS/SMB
IMPORTANT networked storage.
If you are installing StorCycle on a Linux server, see Install the StorCycle Solution on
a Linux Server on page 21.
Verify StorCycle Requirements 10
Determine Server UUID and Request a License 11
Download and Install the StorCycle Software 11
Configure the User Account 11
Configure a Domain Administrator 12
Configure a Local Group Administrator 13
Configure a Custom Owner of Files and Folders 14
Configure for Transparent Access 20
Enable Remote Symbolic Links 20
-9-Chapter 1 - Install the StorCycle Solution on a Windows Server Verify StorCycle Requirements
Verify StorCycle Requirements
Ensure that the server you will use for StorCycle meets the following minimum requirements:
Notes:
• Additional RAM and CPU cores will improve file transfer speeds in most cases.
• Customers are responsible for maintaining patches and upgrades on the
operating system where StorCycle is installed.
• 32 GB RAM
• Four 64-bit CPU cores running at a minimum of 2.8 GHz
• 1 TB hard drive space on the server’s C: drive
• 10 GigE network or better
• Windows Server® 2016
• A network which supports reverse DNS lookups. If the network does not support reverse
DNS lookups, then the IPv4 address of the storage location is used in HTML links created
during a migrate / store job. See Migrate / Store Wizard—Set Targets in the User Guide
for more information.
• The StorCycle solution uses whatever domain is configured on the server, including
multiple / trusted domains, to access DNS (Domain Name System) to resolve UNC
(Universal Naming Convention) paths over the domain and uses Active Directory / LDAP
to verify restore users are valid on the domain.
• If BlackPearl storage locations are configured to group files into TAR or ZIP ‘packs’ (see
Enter BlackPearl Storage Location Information in the User Guide for more information),
the data to be packed is temporarily written to the server disk storage before it is
transferred.
• When using packing, the StorCycle solution requires enough disk space for ten times
the size of a pack (10 * 10 GiB), or the largest file that will be migrated / stored in a
pack, whichever is bigger, on the server’s C: drive.
• For maximum performance, Spectra Logic recommends that flash / SSD storage be
used for the StorCycle server disk storage when creating TAR or ZIP packs.
• Packing may use up to 500 GiB and the MongoDB will require (minimum) 4 GiB per
10 Million Files (assuming that no files being packed are larger than 10 GiB).
• Due to Windows limitations, the file system must meet the following requirements:
• Maximum file directory path length of 260 characters (Windows limitation)
• Maximum directory depth: whatever the maximum directory depth that is possible
within the constraints of the 260-character limit above
October 2021 Getting Started-Spectra StorCycle Solution
- 10 -Chapter 1 - Install the StorCycle Solution on a Windows Server Determine Server UUID and Request a License
• The user interface supports Google Chrome version 75 or later and requires a minimum
screen resolution of 1024 pixels.
Determine Server UUID and Request a License
The StorCycle license is tied to the UUID of the StorCycle server. Use the following
instructions to determine the UUID of the server.
1. On the StorCycle server, open a Command Prompt window.
2. Execute wmic csproduct get "UUID". This returns a string representation of the
UUID.
3. Send this UUID to Spectra Logic Technical Support (see Contacting Spectra Logic on
page 3) for license generation.
Download and Install the StorCycle Software
Use the following instructions to download and install the software.
1. Sign in to the server where you want the program to run as a user that is a member of the
“Administrators” Local Group.
2. Download the Spectra StorCycle solution installer.
3. Run the installer, ssc.revision.msi, where revision is the revision number for the
software.
4. Follow the on-screen instructions to install the software.
Configure the User Account
The StorCycle installation includes two services, the StorCycle service and the MongoDB®
service. By default, these services are run by the Local System User. However, the Local
System User often does not have access to all storage locations used by the StorCycle
solution, permissions to read from and write to the storage locations, and permissions to take
ownership of files.
October 2021 Getting Started-Spectra StorCycle Solution
- 11 -Chapter 1 - Install the StorCycle Solution on a Windows Server Configure the User Account
Use the table below to select the privileges to configure for the user running the StorCycle
service.
Note: Consult an IT administrator to configure the StorCycle service user.
Configuration
Role Privileges
Instructions
A domain Able to migrate / restore any files and folders on a Configure a
administrator - computer in the domain, with or without a two-way Domain
Recommended trust relationship. Administrator
on page 12
A local group Able to migrate / restore files and folders on the local Configure a
administrator computer to which the local group applies. This must Local Group
be configured on the StorCycle server and each source Administrator
storage location and target storage location. on page 13
A custom owner of Custom privileges on the StorCycle server, source Configure a
files and folders that storage locations, and target storage locations. Custom Owner
is not an of Files and
administrator - Not
Folders on
Recommended
page 14
Configure a Domain Administrator
1. Create a user account for running the StorCycle service.
Notes:
• If you want to use the same user as your Spectra NAS equipment, use all lower
case for the username.
• Spectra Logic recommends that you select the User cannot change password
and Password never expires check boxes when creating the new user.
2. Add the new user account as a member of the Domain Administrators group.
Note: The user must be an Administrator and not a Backup Operator. Windows does not
give Backup Operators permissions to write files and can not be used to create
HTML links and symbolic links on sources, or write files to most targets.
3. Configure the StorCycle service to run under the new user.
4. If migrate / store projects will replace files with symbolic links for transparent access,
ensure the new user can create symbolic links.
a. Use the keyboard shortcut Windows logo key+R to open the Run window.
October 2021 Getting Started-Spectra StorCycle Solution
- 12 -Chapter 1 - Install the StorCycle Solution on a Windows Server Configure the User Account
b. In the Open: field enter secpol.msc and click OK. The Local Security Policy window
displays.
c. Select Local Policies > User Rights Assignment, and then double-click Create symbolic
links. The Create symbolic links Properties screen displays.
d. Add the Service User account name created in Step 1.
5. Spectra Logic recommends mounting Isilon CIFS shares for the user running the StorCycle
solution using the "map network drive" wizard or the "net use" command.
6. Continue with Configure for Transparent Access on page 20.
Configure a Local Group Administrator
1. Create a User Account for running the StorCycle Service.
Notes:
• If you want to use the same user as your Spectra NAS equipment, use all lower
case for the username.
• Spectra Logic recommends that you select the User cannot change password
and Password never expires check boxes when creating the new user.
2. Make the new user account a local Administrator on the StorCycle server, all source
locations, and all target storage locations.
Note: The user must be an Administrator and not a Backup Operator. Windows does not
give Backup Operators permissions to write files and can not be used to create
HTML links and symbolic links on sources, or write files to most targets.
3. Configure the StorCycle service to run under the new user.
4. If migrate / store projects will replace files with symbolic links for transparent access,
ensure the new user can create symbolic links.
a. Use the keyboard shortcut Windows logo key+R to open the Run window.
b. In the Open: field enter secpol.msc and click OK. The Local Security Policy window
displays.
c. Select Local Policies > User Rights Assignment, and then double-click Create symbolic
links. The Create symbolic links Properties screen displays.
d. Add the Service User account name created in Step 1 on page 13.
5. Spectra Logic recommends mounting Isilon CIFS shares for the user running the StorCycle
solution using the "map network drive" wizard or the "net use" command.
6. Continue with Configure for Transparent Access on page 20.
October 2021 Getting Started-Spectra StorCycle Solution
- 13 -Chapter 1 - Install the StorCycle Solution on a Windows Server Configure the User Account
Configure a Custom Owner of Files and Folders
Create a user account for running the StorCycle service
a. Use the keyboard shortcut Windows logo key+R to open the Run window.
b. In the Open: field enter lusrmgr.msc and click OK. The Local Users and Groups
window displays.
c. Select the Users folder and select Action > New User. The New User dialog box
displays.
Figure 1 The New User dialog box.
d. Create a new user account that will be used for the StorCycle service.
Notes:
• If you want to use the same user as your Spectra NAS equipment, use all lower
case for the username.
• Spectra Logic recommends that you select the User cannot change password
and Password never expires check boxes when creating the new user.
i. Provide values for User name (for example, storcycle), Full name, and Password.
Record this information.
October 2021 Getting Started-Spectra StorCycle Solution
- 14 -Chapter 1 - Install the StorCycle Solution on a Windows Server Configure the User Account
ii. Clear the User must change password at next login check box.
iii. Select the User cannot change password and Password never expires check boxes.
iv. Click Create and click Close.
Give the new user account the privileges necessary for the StorCycle
solution
a. If network access is restricted by group, add the Service User Account to Groups with
access to every share that you want to access with the StorCycle solution.
Note: If the user under which the StorCycle service is running has read-only permissions
to a directory on a source storage location, then StorCycle will be unable to place
files into the directory with the same name created on a NAS target storage
location because the directory will have the same read-only permissions.
b. Double-click the Groups folder. The list of all available groups displays.
c. Select a Group that you want to add the Service User Account to and select Action >
Add to Group. The Group Properties dialog box displays.
d. Click Add. The Select Users, Computers, Service Accounts, or Groups dialog box
displays.
Figure 2 The Select Users, Computers, Service Accounts, or
Groups dialog box.
e. In the From this location field, select the name of the server. The dialog box changes to
Select User.
f. In the Enter the object names to select field, enter the Service User Account name
created in Create a user account for running the StorCycle service on page 14 and click
Check Names.
g. Click OK to add the Service User Account to the Group.
h. Repeat to as needed to add the Service User Account to additional groups.
October 2021 Getting Started-Spectra StorCycle Solution
- 15 -Chapter 1 - Install the StorCycle Solution on a Windows Server Configure the User Account
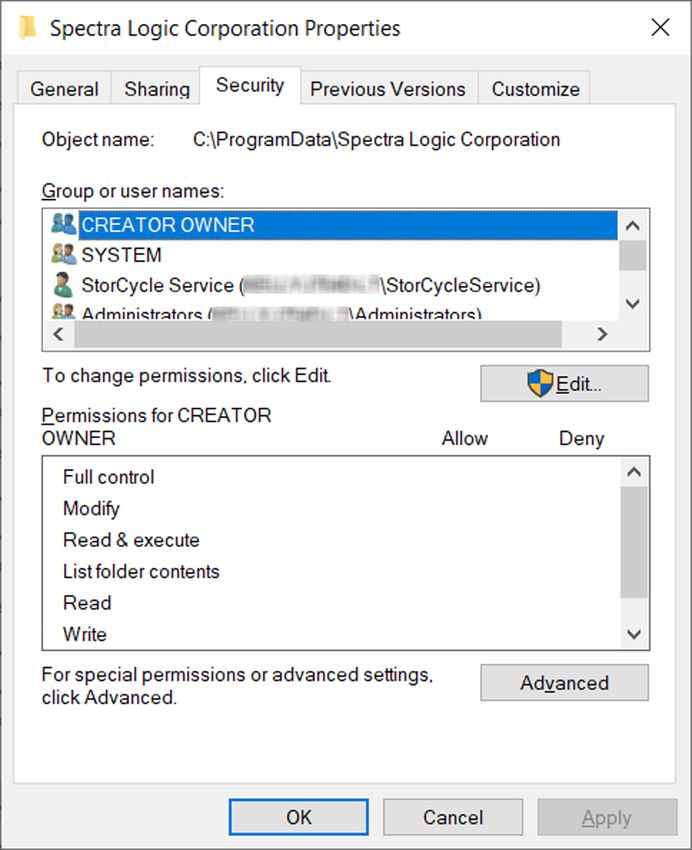
Give the Service User full control of the program data directory
a. Open File Explorer.
b. Browse to C:\ProgramData.
Note: ProgramData is a hidden folder, you may need to change File Explorer options to
see it.
c. Right click the Spectra Logic Corporation directory and select Properties. The Spectra
StorCycle Properties screen displays.
Figure 3 The Spectra Logic Corporation Properties dialog
box.
October 2021 Getting Started-Spectra StorCycle Solution
- 16 -Chapter 1 - Install the StorCycle Solution on a Windows Server Configure the User Account
d. Select the Security tab and click Edit, then click Add. The Select Users, Computers,
Service Accounts, or Groups dialog box displays.
Figure 4 The Select Users, Computers, Service Accounts, or
Groups dialog box.
e. Click Locations, select local computer, and then click OK. The dialog box changes to
Select Users or Groups.
f. In the Enter the object names to select field, enter the Service User account name
created in Configure a Custom Owner of Files and Folders on page 14 and click Check
Names, then click OK.
g. Select the newly created Service User account in the Group or user names field. In the
Permissions for pane, in the Allow column, select Full Control, and click OK.
h. Click OK again.
Configure the Service User to take ownership of files and other
objects
a. Use the keyboard shortcut Windows logo key+R to open the Run window.
b. In the Open: field enter secpol.msc and click OK. The Local Security Policy window
displays.
c. Select the Local Policies folder in the left pane, and double-click User Rights
Assignment in the right pane.
d. Double-click the policy Take ownership of files and other objects. The “Take
ownership of files and other object Properties” dialog box displays.
e. Click Add User or Group.... The Select Users, Computers, Service Accounts, or Groups
dialog box displays. See Figure 2 on page 15.
f. Click Object Types. The Object Types dialogue box displays.
g. Select all of the Object types listed and click OK.
October 2021 Getting Started-Spectra StorCycle Solution
- 17 -Chapter 1 - Install the StorCycle Solution on a Windows Server Configure the User Account
h. Click Locations and select the name of the server and click OK. The dialog box changes
to Select Users or Groups.
i. In the Enter the object names to select field, enter the Service User account name
created in Configure a Custom Owner of Files and Folders on page 14 and click Check
Names and then click OK.
j. Click OK again.
Configure Network Drive Access
The user running the StorCycle service must be able to access and have permission to
read and write on all of the storage locations in the StorCycle environment.
Notes:
• If the user under which the StorCycle service is running has read-only
permissions to a directory on a NAS source storage location, then StorCycle will
be unable to place files into the directory with the same name created on the
target storage location because the directory will have the same read-only
permissions.
• Spectra Logic recommends mounting Isilon CIFS shares for the user running the
StorCycle solution using the "map network drive" wizard or the "net use"
command.
a. Sign in to Windows using the new user account created in Configure a Custom Owner
of Files and Folders on page 14.
b. Open File Explorer.
c. Select This PC on the left.
d. Select the Computer tab.
e. Click Map Network Drive. The Map Network Drive dialog box displays.
f. Select a drive letter and enter a folder path for a Storage Location you want to use in
the StorCycle solution.
g. Select Reconnect at sign-in and Connect using different credentials.
h. Click Finish.
i. Enter the credentials for the user account you want to use to connect to the NAS
storage location. Select Remember my credentials and then click OK.
j. Repeat through for additional NAS storage locations.
October 2021 Getting Started-Spectra StorCycle Solution
- 18 -Chapter 1 - Install the StorCycle Solution on a Windows Server Configure the User Account
Configure the StorCycle service to run under the new user
a. Sign in to Windows with a user that is a member of the “Administrators” Local Group.
b. Use the keyboard shortcut Windows logo key+R to open the Run window.
c. In the Open: field enter services.msc and click OK. The Services screen displays.
d. Find and double-click the Spectra StorCycle service.
e. Select the Log On tab.
Figure 5 The Service Properties dialog box.
f. Select to log on as This account and enter the user name for the new user account
created in Configure a Custom Owner of Files and Folders on page 14. Enter and
confirm the password.
g. Click OK.
h. Select the service and then select Action > Restart.
October 2021 Getting Started-Spectra StorCycle Solution
- 19 -Chapter 1 - Install the StorCycle Solution on a Windows Server Configure for Transparent Access
Configure for Transparent Access
Replacing migrated / stored files with symbolic links allows transparent access to the files
after they are moved to secondary storage.
To use symbolic links, your source storage must support remote-to-remote
IMPORTANT symbolic links.
Enable Remote Symbolic Links
1. Open a Command Prompt as an Administrator.
2. To determine if symbolic links types are disabled, enter:
fsutil behavior query SymlinkEvaluation
3. If any symbolic link types report as disabled, enter the following:
fsutil behavior set SymlinkEvaluation L2L:1 R2R:1 L2R:1 R2L:1
October 2021 Getting Started-Spectra StorCycle Solution
- 20 -Chapter 2 - Install the StorCycle
Solution on a Linux Server
This section describes how to do an initial installation of the Spectra StorCycle Solution on a
Linux server. For instructions to upgrade to a newer version of the Spectra StorCycle Solution
see Upgrade the StorCycle Solution.
The StorCycle solution is intended to migrate / store or copy inactive files. It is not intended
to backup or manage active files in primary storage.
The commands listed in this document are for CentOS operating systems.
The StorCycle solution runs on Windows servers and supports CIFS/SMB networked
storage or runs on Linux servers and supports NFS-protocol storage or CIFS/SMB
IMPORTANT networked storage.
If you are installing StorCycle on a Windows server, see Install the StorCycle
Solution on a Windows Server on page 9.
Verify StorCycle Requirements 22
Determine Server UUID and Request a License 23
Install the StorCycle Mongo Database and Repository 23
Create the MongoDB Repository 23
Install MongoDB 23
Install the StorCycle Solution 24
Start, Stop, and Restart the Services 24
Mount Linux Storage Devices 25
- 21 -Chapter 2 - Install the StorCycle Solution on a Linux Server Verify StorCycle Requirements
Verify StorCycle Requirements
Ensure that the server you will use for StorCycle meets the following minimum requirements:
Notes:
• Additional RAM and CPU cores will improve file transfer speeds in most cases.
• Customers are responsible for maintaining patches and upgrades on the
operating system where StorCycle is installed.
• 32 GB RAM
• Four 64-bit CPU cores running at a minimum of 2.8 GHz
• 1 TB allocated to root (/dev/mapper/centos-root)
• 10 GigE network or better
• CentOS 7.9 or higher
• A network which supports reverse DNS lookups. If the network does not support reverse
DNS lookups, then the IPv4 address of the storage location is used in HTML links created
during a migrate / store job. See Migrate / Store Wizard—Set Targets in the User Guide
for more information.
• The StorCycle solution uses whatever domain is configured on the server, including
multiple / trusted domains, to access DNS (Domain Name System) to resolve UNC
(Universal Naming Convention) paths over the domain and uses Active Directory / LDAP
to verify restore users are valid on the domain.
• If BlackPearl storage locations are configured to group files into TAR or ZIP ‘packs’ (see
Enter BlackPearl Storage Location Information in the User Guide for more information),
the data to be packed is temporarily written to the server disk storage before it is
transferred.
• When using packing, the StorCycle solution requires enough server disk storage for
ten times the size of a pack (10 * 10 GiB), or the largest file that will be migrated /
stored in a pack, whichever is larger.
• For maximum performance, Spectra Logic recommends that flash / SSD storage be
used for the StorCycle server disk storage when creating TAR or ZIP packs.
• Packing may use up to 500 GiB and the MongoDB will require (minimum) 4 GiB
per 10 Million Files (assuming that no files being packed are larger than 10 GiB).
• The maximum file directory path length is 1024 characters.
• The user interface supports Google Chrome version 75 or later.
October 2021 Getting Started-Spectra StorCycle Solution
- 22 -Chapter 2 - Install the StorCycle Solution on a Linux Server Determine Server UUID and Request a License
Determine Server UUID and Request a License
The StorCycle license is tied to the UUID of the StorCycle server. To get the UUID of the
server, execute the following command in a shell:
cat /etc/machine-id
Send this UUID to Spectra Logic Technical Support (see Contacting Spectra Logic on page 3)
for license generation.
Install the StorCycle Mongo Database and
Repository
Use the Mongo Database Manual to Install MongoDB Community Edition. The following
instructions provide an example using Yum to create the Mongo Database Repository, install
the Mongo Database, and start the Mongo Database service.
Create the MongoDB Repository
Open the terminal and sign in as a superuser. Use your favorite editor to create a file called
/etc/yum.repos.d/mongodb-org-4.0.repo containing the following information:
[mongodb-org-4.0]
name=MongoDB Repository
baseurl=https://repo.mongodb.org/yum/redhat/$releasever/mongodb-org/4.0/x86_64/
gpgcheck=1
enabled=1
gpgkey=https://www.mongodb.org/static/pgp/server-4.0.asc
Install MongoDB
To begin the MongoDB installation, enter the following command into the shell.
sudo yum install -y mongodb-org
The installation creates the default directories with the owner and group set to mongod.
October 2021 Getting Started-Spectra StorCycle Solution
- 23 -Chapter 2 - Install the StorCycle Solution on a Linux Server Install the StorCycle Solution
Install the StorCycle Solution
The StorCycle.rpm file is delivered as a link from a Spectra representative. Move the .rpm file
to the server StorCycle will be installed on. Complete all Install the StorCycle Mongo
Database and Repository installation steps before running the .rpm StorCycle file. Go to the
directory in which the .rpm file is located or give the full path to the file. The .rpm must run
as root.
To install the StorCycle .rpm, use the following command:
sudo yum install -y ssc-production-X.X.X.XXX.XXXXXXXX.rpm
If desired, change the user from root using the following commands:
sudo chown -R user:group /var/lib/ssc
sudo vi /usr/lib/systemd/system/ssc.service
# User=root - change root to the new user name
sudo setcap CAP_NET_BIND_SERVICE=+eip /sbin/ssc
sudo systemctl restart ssc
Start, Stop, and Restart the Services
To check if the services are running, execute the following commands.
MongoDB: sudo systemctl status mongod
StorCycle: sudo systemctl status ssc
To start the mongod or StorCycle processes, issue the appropriate command below.
MongoDB: sudo systemctl start mongod
StorCycle: sudo systemctl start ssc
To stop the mongod or StorCycle processes, issue the appropriate command below.
MongoDB: sudo systemctl stop mongod
StorCycle: sudo systemctl stop ssc
To restart the mongod or StorCycle processes, issue the appropriate command below.
MongoDB: sudo systemctl restart mongod
StorCycle: sudo systemctl restart ssc
October 2021 Getting Started-Spectra StorCycle Solution
- 24 -Chapter 2 - Install the StorCycle Solution on a Linux Server Mount Linux Storage Devices
Mount Linux Storage Devices
Prior to configuring NAS storage in the StorCycle solution, mount the storage device(s) using
the following commands.
1. Create a directory.
sudo mkdir ./mount-point
2. Mount the share to the created directory.
For NFS shares, use the following:
sudo mount -t nfs server:/directory /mount-point
For CIFS shares, use the following:
sudo mount -t cifs -o
username="user",password="password",domain="domain",iocharset=utf8,
dir_mode=0755 //uncpath/to/share /mount-point
Note: In order for users to use symbolic links to access files in secondary storage, the
share must be mounted on the StorCycle Linux server using the same mount point
used by all users of the primary storage. For example, if users of the primary
storage mount 'nas_server/share1' as 'mnt/share1', then the StorCycle server must
also mount it as 'mnt/share1'. If the StorCycle server instead uses a different mount
point, symbolic links created by the StorCycle solution will not provide access to
the file.
October 2021 Getting Started-Spectra StorCycle Solution
- 25 -Chapter 3 - Start Using the StorCycle
Solution
This section describes how to get started using the Spectra StorCycle Solution after
completing the installation (see Install the StorCycle Solution on a Windows Server on page 9
or Install the StorCycle Solution on a Linux Server on page 21) and confirming that the
MongoDB and StorCycle services are running.
Log Into the User Interface 26
Load License Keys 28
Next Steps 29
Log Into the User Interface
Use the following instructions to log into the Spectra StorCycle solution user interface.
1. Using a supported web browser (see Supported Browsers), do one of the following:
Note: You must include https://.
• If you are on the server, enter https://localhost and press the Enter key.
• If you are on a host on the same network as the server, enter the IP address for the
Spectra StorCycle solution server with the https: port (for example
https://xxx.xxx.xxx.xxx/app) and press the Enter key.
The Login screen displays.
Figure 6 The Spectra StorCycle solution Login screen.
- 26 -Chapter 3 - Start Using the StorCycle Solution Log Into the User Interface
2. Enter the Domain for a Domain User or clear the Domain for a Non-Domain User.
Note: This field only displays when Active Directory / LDAP is configured.
3. Enter the primary administrator username and password.
The default username is administrator. The default password is spectra.
Notes:
• Usernames are case insensitive.
• Spectra Logic recommends that you change the default password for the
primary administrator (see Configure Users).
4. Click Login to log in.
After five unsuccessful login attempts, a local user is locked out and the password
must be reset by an administrator. See Reset a Password for instructions.
IMPORTANT Active Directory user login attempts follow Active Directory policies. To protect the
Active Directory server, the Spectra StorCycle solution adds a 1 second delay on the
next login attempt for every invalid login attempt.
The remainder of this guide assumes that you are logged in to the Spectra StorCycle
IMPORTANT solution user interface.
October 2021 Getting Started-Spectra StorCycle Solution
- 27 -Chapter 3 - Start Using the StorCycle Solution Load License Keys
Load License Keys
License keys enable features and capacity within the Spectra StorCycle solution.
Use the instructions below to load new license keys.
1. Click Settings in the toolbar and then select Licenses and SSL Certificate. The Licenses
and SSL Certificate screen displays showing any licenses currently installed in the
software.
Figure 7 The Licenses and SSL Certificate screen.
October 2021 Getting Started-Spectra StorCycle Solution
- 28 -Chapter 3 - Start Using the StorCycle Solution Next Steps
2. Click Load Licenses. The Load Licenses dialog box displays.
Figure 8 The Load Licenses dialog box.
3. Click the minus (-) sign next to any license that you want to remove.
4. Click the plus (+) sign to add a new line for entering a license. Enter all license keys,
exactly as provided, one per line.
5. Click Submit to save the license keys. The Licenses and SSL Certificate screen displays
with the newly entered keys listed.
Next Steps
At this point you can configure storage locations or additional settings. In the StorCycle User
Interface, click Help on any screen, then search for one of these topics.
• Configure Storage
• Configure additional settings:
• Configure Database Backup — After configuring target storage locations, Spectra Logic
strongly recommends that you configure Database Backup.
• Configure Active Directory
• Configure Users
• Configure Departments
• Load or Remove Licenses or Replace the SSL Certificate
• Configure SMTP
• Configure Global Settings
October 2021 Getting Started-Spectra StorCycle Solution
- 29 -You can also read