T200 Maintenance Forms - 2022 R1 Developer Course Customization - Revision: 3/23/2022 - Acumatica Open University
←
→
Page content transcription
If your browser does not render page correctly, please read the page content below
Developer Course

        Customization

T200 Maintenance Forms
       2022 R1

        Revision: 3/23/2022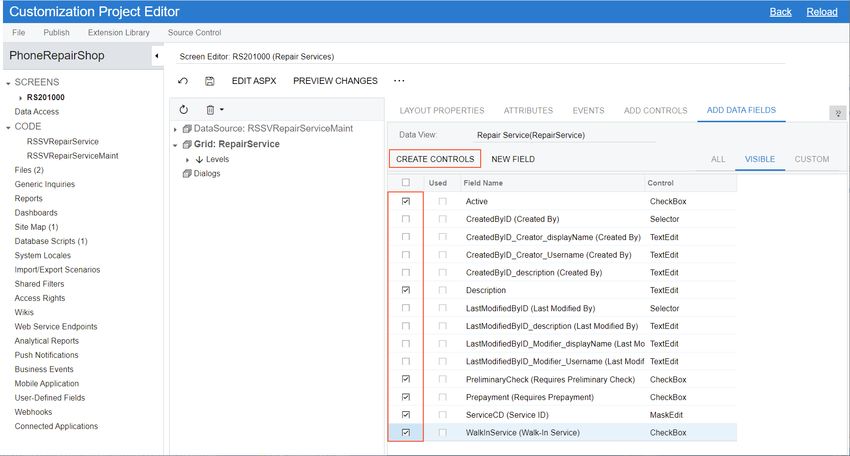
Contents | 2

Contents
  Copyright...............................................................................................................................................5
  Introduction...........................................................................................................................................6
  How to Use This Course.......................................................................................................................... 7
  Course Prerequisites...............................................................................................................................8
  Initial Configuration............................................................................................................................... 9
               Step 1: Preparing the Environment.................................................................................................................. 9
               Step 2: Deploying the Needed Acumatica ERP Instance for the Training Course...........................................9
               Step 3: Creating the Database Tables.............................................................................................................10
  Getting Started.....................................................................................................................................11
               Company Story and Customization Description............................................................................................11
               Application Programming Overview.............................................................................................................. 13
               Querying of the Data....................................................................................................................................... 15
  Part 1: Repair Services Maintenance Form.............................................................................................. 17
               Maintenance Forms......................................................................................................................................... 17
               Lesson 1.1: Prepare a Customization Project.................................................................................................17
                       Customization Projects.......................................................................................................................... 18
                       Step 1.1.1: Create the Customization Project....................................................................................... 18
                       Step 1.1.2: Add a Database Table Schema............................................................................................ 18
                       Lesson Summary.................................................................................................................................... 19
               Lesson 1.2: Create a Form............................................................................................................................... 19
                       Step 1.2.1: Use the New Screen Wizard to Create a Form Template....................................................20
                       Analysis of the Generated Code of the Graph.......................................................................................22
                       Lesson Summary.................................................................................................................................... 23
               Lesson 1.3: Make the New Form Visible in the UI.......................................................................................... 23
                       Step 1.3.1: Create the New Workspace..................................................................................................23
                       Step 1.3.2: Add the Link to the Workspace........................................................................................... 24
                       Step 1.3.3: Update the SiteMapNode Item............................................................................................26
                       Lesson Summary.................................................................................................................................... 27
               Lesson 1.4: Configure the Data Access Class .................................................................................................27
                       Definition of Data Access Classes ......................................................................................................... 27
                       Step 1.4.1: Generate a DAC.................................................................................................................... 28
                       Step 1.4.2: Configure the Attributes of the New DAC............................................................................29
                       Step 1.4.3: Configure a View.................................................................................................................. 33
                       Lesson Summary.................................................................................................................................... 35
Contents | 3

            Lesson 1.5: Configure the Form...................................................................................................................... 35
                    Step 1.5.1: Add Columns to the Grid..................................................................................................... 35
                    Step 1.5.2: Test the Form....................................................................................................................... 38
                    Lesson Summary.................................................................................................................................... 40
            Lesson 1.6: Add an Event Handler to the Walk-In Service Check Box...........................................................40
                    Step 1.6.1: Add an Event Handler in the Customization Project Editor............................................... 41
                    Step 1.6.2: Configure the CommitChanges Property............................................................................42
                    Step 1.6.3: Test the Event Handler........................................................................................................ 42
                    Lesson Summary.................................................................................................................................... 43
            Lesson 1.7: Debug the Customization Code...................................................................................................43
                    Step 1.7.1: Debug the Customization Code...........................................................................................44
                    Lesson Summary.................................................................................................................................... 45
            Lesson 1.8: Move the Customization Code to an Extension Library..............................................................45
                    Extension Libraries................................................................................................................................. 46
                    Step 1.8.1: Create an Extension Library.................................................................................................46
                    Step 1.8.2: Move Code from the Customization Project to the Extension Library...............................48
                    Step 1.8.3: Open Solution in Visual Studio........................................................................................... 50
                    Step 1.8.4: Build the Project in Visual Studio........................................................................................51
                    Step 1.8.5: Include the Extension Library in the Customization Project..............................................52
                    Lesson Summary.................................................................................................................................... 52
            Lesson 1.9: Add an Event Handler In Visual Studio....................................................................................... 53
                    Step 1.9.1: Add an Event Handler in Visual Studio............................................................................... 53
                    Step 1.9.2: Use Acuminator to Refactor the Event Handler Declaration..............................................54
                    Step 1.9.3: Test the Event Handlers (Self-Guided Exercise)..................................................................54
                    Lesson Summary.................................................................................................................................... 55
            Part 1 Summary............................................................................................................................................... 55
            Review Questions.............................................................................................................................................56
Part 2: Serviced Devices Maintenance Form............................................................................................ 58
            Initial Steps...................................................................................................................................................... 58
            Lesson 2.1: Create a Graph and a DAC in Visual Studio.................................................................................58
                    Step 2.1.1: Define the RSSVDeviceMaint Graph.................................................................................... 58
                    Step 2.1.2: Create a DAC in Visual Studio.............................................................................................. 59
                    Step 2.1.3: Configure the RSSVDeviceMaint Graph...............................................................................62
                    Lesson Summary.................................................................................................................................... 62
            Lesson 2.2: Create an ASPX Page in Visual Studio......................................................................................... 62
                    Step 2.2.1: Create the RS202000.aspx Page.......................................................................................... 63
Contents | 4
Step 2.2.2: Add ASPX and ASPX.CS Files to the Customization Project............................................... 64
Lesson Summary.................................................................................................................................... 65
Lesson 2.3: Configure a Form in Visual Studio...............................................................................................65
Step 2.3.1: Add Input Controls...............................................................................................................65
Step 2.3.2: Configure the Layout........................................................................................................... 66
Step 2.3.3: Update the Files in the Customization Project................................................................... 66
Lesson Summary.................................................................................................................................... 67
Lesson 2.4: Add the Form to the Site Map and Workspace........................................................................... 68
Step 2.4.1: Create a Site Map Item for the Form...................................................................................68
Step 2.4.2: Add the Site Map Item to the Customization Project......................................................... 69
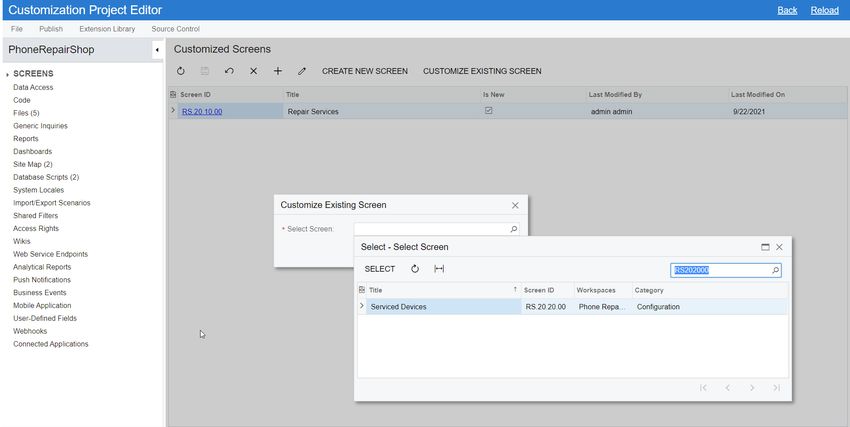
Step 2.4.3: Add the Form to the Screen Editor..................................................................................... 70
Step 2.4.4: Test the Form....................................................................................................................... 71
Lesson Summary.................................................................................................................................... 73
Lesson 2.5: Create a Substitute Form.............................................................................................................73
Step 2.5.1: Upload a Predefined Generic Inquiry................................................................................. 74
Step 2.5.2: Configure the Generic Inquiry as a Substitute Form..........................................................75
Step 2.5.3: Save the Generic Inquiry to the Customization Project..................................................... 76
Step 2.5.4: Test the Substitute Form..................................................................................................... 77
Lesson Summary.................................................................................................................................... 77
Part 2 Summary............................................................................................................................................... 78
Review Questions.............................................................................................................................................78
Course Summary.................................................................................................................................. 80
Appendix: Reference Implementation.................................................................................................... 81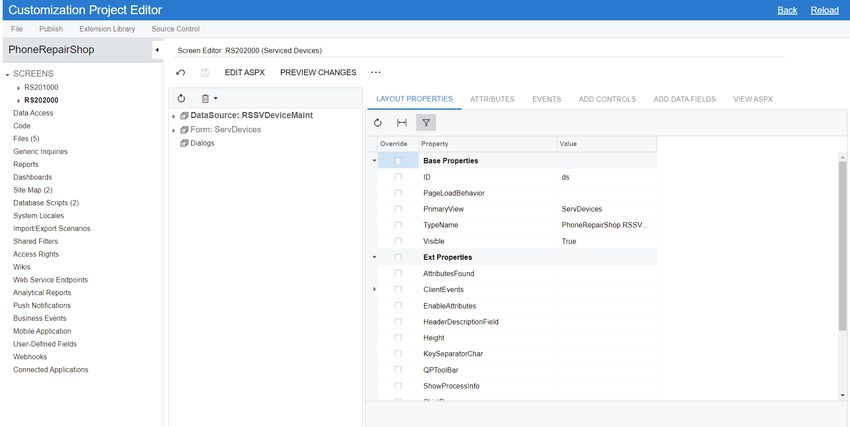
Copyright | 5 Copyright © 2022 Acumatica, Inc. ALL RIGHTS RESERVED. No part of this document may be reproduced, copied, or transmitted without the express prior consent of Acumatica, Inc. 3933 Lake Washington Blvd NE, # 350, Kirkland, WA 98033 Restricted Rights The product is provided with restricted rights. Use, duplication, or disclosure by the United States Government is subject to restrictions as set forth in the applicable License and Services Agreement and in subparagraph (c)(1)(ii) of the Rights in Technical Data and Computer Soware clause at DFARS 252.227-7013 or subparagraphs (c)(1) and (c)(2) of the Commercial Computer Soware-Restricted Rights at 48 CFR 52.227-19, as applicable. Disclaimer Acumatica, Inc. makes no representations or warranties with respect to the contents or use of this document, and specifically disclaims any express or implied warranties of merchantability or fitness for any particular purpose. Further, Acumatica, Inc. reserves the right to revise this document and make changes in its content at any time, without obligation to notify any person or entity of such revisions or changes. Trademarks Acumatica is a registered trademark of Acumatica, Inc. HubSpot is a registered trademark of HubSpot, Inc. Microso Exchange and Microso Exchange Server are registered trademarks of Microso Corporation. All other product names and services herein are trademarks or service marks of their respective companies. Soware Version: 2022 R1 Last Updated: 03/23/2022
Introduction | 6
Introduction
The Acumatica Cloud xRP Platform is the platform provided by Acumatica that is used to build the Acumatica
ERP application itself, any customizations of Acumatica ERP, the mobile application for Acumatica ERP, and
applications integrated with Acumatica ERP through the web services API.
Acumatica Framework provides the platform API, web controls, and other tools for the development of the UI and
business logic of an ERP application. The platform API is used for the development of Acumatica ERP and any
embedded applications (that is, customizations of Acumatica ERP). Acumatica Framework can also be used to
develop an ERP application from scratch.
Acumatica Customization Platform provides customization tools for the development of applications embedded
in Acumatica ERP. Developers that work with Acumatica Customization Platform use the platform API provided by
Acumatica Framework.
The T200 Maintenance Forms course introduces to you the main concepts of Acumatica Framework and Acumatica
Customization Platform based on examples of the creation of simple Acumatica ERP forms.
The course is intended for application developers who are starting to learn how to customize Acumatica ERP.
The course is based on a set of examples that demonstrate the general approach to customizing Acumatica
ERP. In the process of completing the examples, you will gain ideas about how to develop your own embedded
applications by using the customization tools. As you go through the course, you will start to develop the
customization for a cell phone repair shop, which you will continue in the further courses of the T series.
Aer you complete all the lessons of the course, you will be familiar with the basic programming techniques for the
customization of Acumatica ERP.
We recommend that you complete the examples in the order in which they are provided in the course,
because some examples use the results of previous ones.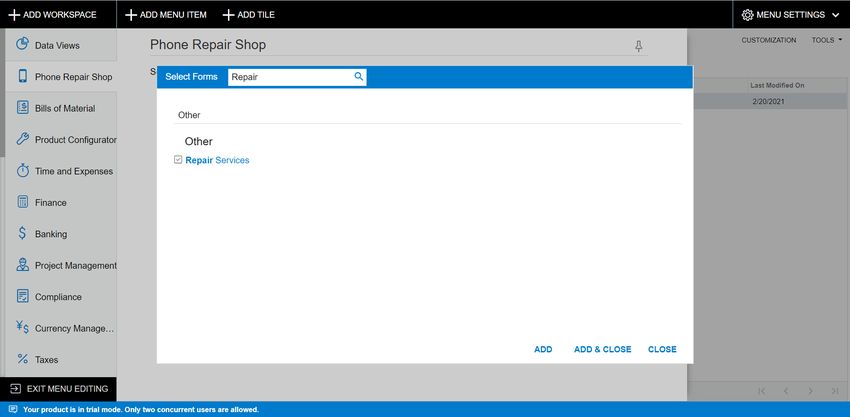
How to Use This Course | 7
How to Use This Course
To complete this course, you will complete the lessons from each part of the course in the order in which they are
presented and then pass the assessment test. More specifically, you will do the following:
1. Complete (or be sure you meet) Course Prerequisites, perform Initial Configuration, and carefully read Getting
Started.
2. Complete the lessons in both parts of the training guide.
3. In Partner University, take T200 Certification Test: Maintenance Forms.
Aer you pass the certification test, you will receive the Partner University certificate of course completion.
What Is in a Part?
The first part of the course explains how to create a custom Acumatica ERP form by using the Customization Project
Editor and how to move the code to an extension library.
The second part of the course explains how to create a new form in Visual Studio and configure a substitute form.
Each part of the course consists of lessons you should complete.
What Is in a Lesson?
Each lesson consists of steps that outline the procedures you are completing and describe the related concepts you
are learning.
What Are the Documentation Resources?
The complete Acumatica ERP and Acumatica Framework documentation is available on https://help.acumatica.com/
and is included in the Acumatica ERP instance. While viewing any form used in the course, you can click the Open
Help button in the top pane of the Acumatica ERP screen to bring up a form-specific Help menu; you can use the
links on this menu to quickly access form-related information and activities and to open a reference topic with
detailed descriptions of the form elements.
Licensing Information
For the educational purposes of this course, you use Acumatica ERP under the trial license, which does not require
activation and provides all available features. For the production use of the Acumatica ERP functionality, an
administrator has to activate the license the organization has purchased. Each particular feature may be subject to
additional licensing; please consult the Acumatica ERP sales policy for details.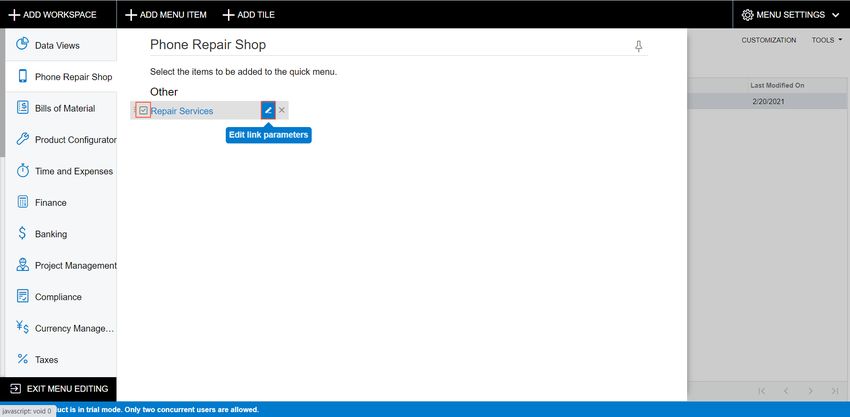
Course Prerequisites | 8

Course Prerequisites
   Before you begin completing lessons, you should make sure you have the needed knowledge and background, and
   that you have completed the configuration steps, as described in the following section.

Required Knowledge and Background
   To complete the course successfully, you should have the following required knowledge:
      • Proficiency with C#, including but not limited to the following features of the language:
          • Class structure
          • OOP (inheritance, interfaces, and polymorphism)
          • Usage and creation of attributes
          • Generics
          • Delegates, anonymous methods, and lambda expressions
      • Knowledge of the following main concepts of ASP.NET and web development:
          • Application states
          • The debugging of ASP.NET applications by using Visual Studio
          • The process of attaching to IIS by using Visual Studio debugging tools
          • Client- and server-side development
          • The structure of web forms
      • Experience with SQL Server, including doing the following:
          • Writing and debugging complex SQL queries (WHERE clauses, aggregates, and subqueries)
          • Understanding the database structure (primary keys, data types, and denormalization)
      • The following experience with IIS:
          • The configuration and deployment of ASP.NET websites
          • The configuration and securing of IIS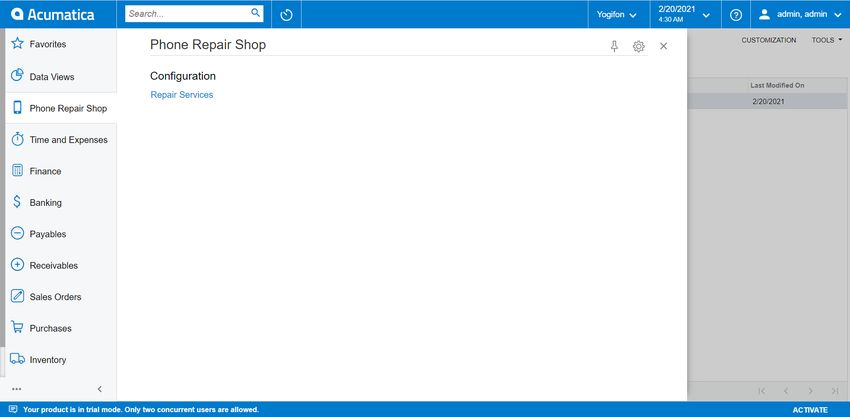
Initial Configuration | 9
Initial Configuration
You need to perform the prerequisite actions described in this part before you start to complete the course.
Step 1: Preparing the Environment
Prepare the environment for the training course as follows:
1. Make sure the environment that you are going to use for the training course conforms to the System
Requirements for Acumatica ERP 2022 R1.
2. Make sure that the Web Server (IIS) features that are listed in Configuring Web Server (IIS) Features are
turned on.
3. Install the Acuminator extension for Visual Studio.
4. Install Acumatica ERP. On the Main Soware Configuration page of the installation program, select the
Install Acumatica ERP and Install Debugger Tools check boxes.
If you have already installed Acumatica ERP without debugger tools, you should remove
Acumatica ERP and install it again with the Install Debugger Tools check box selected.
Reinstallation of Acumatica ERP does not affect existing Acumatica ERP instances. For details,
see To Install the Acumatica ERP Tools.
Step 2: Deploying the Needed Acumatica ERP Instance for the Training Course
You deploy an Acumatica ERP instance and configure it as follows:
1. To deploy a new application instance, open the Acumatica ERP Configuration Wizard, and do the following:
a. On the Database Configuration page, type the name of the database: PhoneRepairShop.
b. On the Tenant Setup page, set up a tenant with the I100 data inserted by specifying the following
settings:
• Login Tenant Name: MyTenant
• New: Selected
• Insert Data: I100
• Parent Tenant ID: 1
• Visible: Selected
c. On the Instance Configuration page, in the Local Path of the Instance box, select a folder that is
outside of the C:\Program Files (x86) or C:\Program Files folder. We recommend that
you store the website folder outside of these folders to avoid an issue with permission to work in these
folders when you perform customization of the website.
The system creates a new Acumatica ERP instance, adds a new tenant, and loads the selected data to it.
2. Sign in to the new tenant by using the following credentials:
• Username: admin
• Password: setup
Change the password when the system prompts you to do so.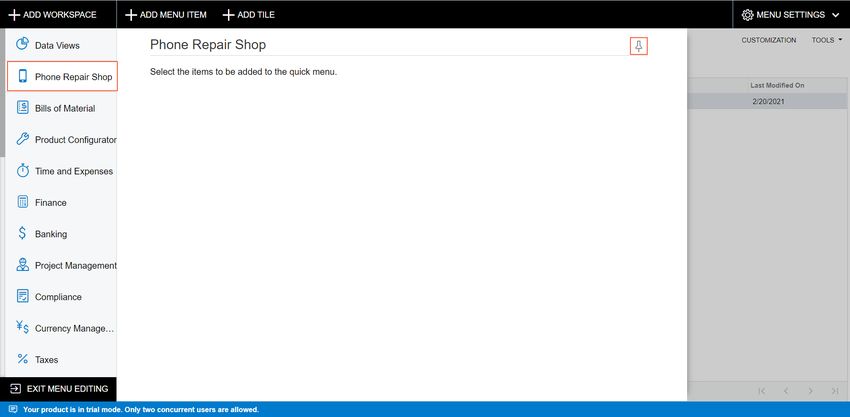
Initial Configuration | 10

       3. In the top right corner of the Acumatica ERP screen, click the username and then click My Profile. On the
          General Info tab of the User Profile (SM203010) form, which the system has opened, select YOGIFON in the
          Default Branch box; then click Save on the form toolbar.
          In subsequent sign-ins to this account, you will be signed in to this branch.
       4. Optional: Add the Customization Projects (SM204505) and Generic Inquiry (SM208000) forms to your favorites.
          For details about how to add a form to favorites, see Managing Favorites: General Information.

Step 3: Creating the Database Tables

   Add the RSSVRepairService and RSSVDevice tables to the instance database by executing the
   T200_DatabaseTables.sql script, which you can find in the course files.
   Before you can customize Acumatica ERP, tables for the instance database need to be designed and added to the
   database. For this course, the database scripts have been prepared in advance. This is why you needed to add them
   to the instance database.

             The design of database tables is outside of the scope of this course. For details on designing database
             tables for Acumatica ERP, see Designing the Database Structure and DACs.
Getting Started | 11
Getting Started
In this part of the course, you will review the company story and requirements to the customization that will
be performed in this training course. You will also get an overview of application programming with Acumatica
Framework.
Company Story and Customization Description
This topic describes the company story and explains what should be customized to meet the company's needs.
Company Story
The Smart Fix company specializes in repairing cell phones of several types. The company provides the following
services:
• Battery replacement: This service is provided on customer request and does not require any preliminary
diagnostic checks.
• Repair of liquid damage: This service requires a preliminary diagnostic check and a prepayment.
• Screen repair: This service is provided on customer request and does not require any preliminary diagnostic
checks.
To manage the list of devices serviced by the company and the list of services the company provides, the Acumatica
ERP instance of the Smart Fix company needs to be complemented with two maintenance forms: Repair Services
and Serviced Devices. In this course, you will customize Acumatica ERP by developing these maintenance forms.
Database Schema
For the customization task, two new tables are required: a table containing information about repair services, and
a table containing information about the serviced devices, as described in the previous section. You added these
tables to the database when you completed the initial configuration, which is described in Step 3: Creating the
Database Tables.
The design of database tables is outside of the scope of this course. For details, see Designing the
Database Structure and DACs.
The table containing information about the provided services is called RSSVRepairService and contains the
following custom columns:
• ServiceID: Is a primary key identifying a service.
• ServiceCD: Contains a service code.
In Acumatica ERP, CD is used for natural keys (such as ServiceCD), which means keys that are human-
readable and can have additional meaning. ID is used for surrogate keys (such as ServiceID), which are
pure identifiers. For details, see Naming Conventions for Tables (DACs) and Columns (Fields).
• Description: Contains a description of a repair service.
• Active: Indicates whether a service is active at the moment.
• WalkInService: Indicates whether a service is provided immediately aer a customer requested it.
• PreliminaryCheck: Indicates whether a service is provided aer a preliminary diagnostic check.
• Prepayment: Indicates whether a service requires prepayment.
The table containing information about devices is called RSSVDevice and contains the following custom
columns:Getting Started | 12
• DeviceID: Serves as a primary key identifying the device.
• DeviceCD: Contains the device code.
• Description: Contains a description of the device.
• Active: Indicates whether the device is being serviced at the moment.
• AvgComplexityOfRepair: Contains one of three possible values indicating the level of complexity of
the repair: Low, Medium, or High.
The Repair Services Form
The Repair Services form, which you will develop, will be used to view the list of services provided by the company.
By clicking buttons on the form toolbar, users will be able to add a new service, edit an existing service, and delete
a service. The following screenshot shows what this form should look like.
Figure: Service list on the Repair Services form
The Repair Services form will use the RSSVRepairService table.
The Serviced Devices Form
You will also develop the Serviced Devices form, which will be used to view the list of devices that are serviced
by the company. When a user brings up the form, the user will initially see a list of devices displayed in a grid.
When the user selects a device in the grid, a detail view of the record will be displayed. (The following screenshots
illustrate what these views look like.)Getting Started | 13 Figure: List and detail views of the Serviced Devices form The Serviced Devices form will use the RSSVDevice table. Application Programming Overview Acumatica Framework provides the platform and tools for developing cloud business applications. This topic explains the runtime structure of Acumatica Framework, introduces the main components of this platform, and illustrates the relationships between these components by using simple examples. Runtime Structure and Components An application written with Acumatica Framework has n-tier architecture with a clear separation of the presentation, business, and data access layers, as shown in the following diagram. You can find details about each layer in the sections below.
Getting Started | 14

Data Access Layer
   The data access layer of an application written using Acumatica Framework is implemented as a set of data access
   classes (DACs) that wrap data from database tables or data received through other external sources (such as
   Amazon Web Services).
   The instances of data access classes are maintained by the business logic layer. Between requests, these instances
   are stored in the session. On a standalone Acumatica ERP server, session data is stored in the server memory. In a
   cluster of application servers, session data is serialized and stored in a high-performance remote server through a
   custom optimized serialization mechanism.
   For details about data storage in a session, see Session. For details on working with the data access layer, see
   Accessing Data.
Getting Started | 15

Business Logic Layer
   The business logic is implemented though the business logic controller (also called graph). Graphs are classes that
   you derive from the special API class (PXGraph) and that are tied to one or more data access classes.
   Each graph conceptually consists of two parts:
       • Data views, which include the references to the required data access classes, their relationships, and other
         meta information
       • Business logic, which consists of actions and events associated with the modified data.
   Each graph can be accessed from the presentation layer or from the application code that is implemented within
   another graph. When the graph receives an execution request, it extracts the data required for request execution
   from the data access classes included in the data views, triggers business logic execution, returns the result of the
   execution to the requesting party, and updates the data access classes instances with the modified data.
   For details on working with the business logic layer, see Implementing Business Logic.

Presentation Layer
   The presentation layer provides access to the application business logic through the UI, web services, and
   Acumatica mobile application. The presentation layer is completely declarative and contains no business logic.
   The UI consists of ASPX webpages (which are based on the ASP.NET Web Forms technology) and reports created
   with Acumatica Report Designer. The ASPX webpages are bound to particular graphs.
   When the user requests a new webpage, the presentation layer is responsible for processing this request.
   Webpages are used for generating static HTML page content and providing additional service information
   required for the dynamic configuration of the web controls. When the user receives the requested page and starts
   browsing or entering data, the presentation layer is responsible for handling asynchronous HTTP requests. During
   processing, the presentation layer submits a request to the business logic layer for execution. Once execution is
   completed, the business logic layer analyzes any changes in the graph state and generates the response that is sent
   back to the browser as an XML document.
   For details on the configuration of ASPX webpages, see Configuring ASPX Pages and Reports.

Querying of the Data

   Acumatica Framework provides a custom language called BQL (business query language) that developers can use
   for writing database queries. BQL is written in C# and based on generic class syntax, but is still very similar to SQL
   syntax.
   Acumatica Framework provides two dialects of BQL: traditional BQL and fluent BQL. We recommend that you use
   fluent BQL because statements written in fluent BQL are simpler and shorter than the ones written with traditional
   BQL. Further in this topic, the examples are written in fluent BQL.

              You can also use LINQ to select records from the database or to apply additional filtering to the data
              of a BQL query. For details on which approach to use, see Comparison of Fluent BQL, Traditional BQL,
              and LINQ.

   BQL has almost the same keywords as SQL does, and they are placed in the same order as they are in SQL, as
   shown in the following example of BQL.

    SelectFrom.Where
Getting Started | 16
If the database provider is Microso SQL Server, the framework translates this expression into the following SQL
query.
SELECT * FROM Product
WHERE Product.AvailQty IS NOT NULL
AND Product.AvailQty > Product.BookedQty
BQL extends several benefits to the application developer. It does not depend on the specifics of the database
provider, and it is object-oriented and extendable. Another important benefit of BQL is compile-time syntax
validation, which helps to prevent SQL syntax errors.
Because BQL is implemented on top of generic classes, you need data types that represent database tables. In the
context of Acumatica Framework, these types are called data access classes (DACs). As an example of a DAC, you
would define the Product data access class as shown in the following code fragment to execute the SQL query
from the previous code example.
using System;
using PX.Data;
[PXCacheName("Product")]
public class Product : PX.Data.IBqlTable
{
// The property holding the ProductID value in a record
[PXDBIdentity(IsKey = true)]
public virtual int? ProductID { get; set; }
// The type used in BQL statements to reference the ProductID column
public abstract class productID : PX.Data.BQL.BqlInt.Field { }
// The property holding the AvailQty value in a record
[PXDBDecimal(2)]
public virtual decimal? AvailQty { get; set; }
// The type used in BQL statements to reference the AvailQty column
public abstract class availQty : PX.Data.BQL.BqlDecimal.Field { }
// The property holding the BookedQty value in a record
[PXDBDecimal(2)]
public virtual decimal? BookedQty { get; set; }
// The type used in BQL statements to reference the BookedQty column
public abstract class bookedQty : PX.Data.BQL.BqlDecimal.Field { }
}
Each table field is declared in a data access class in two different ways, each for a different purpose:
• As a public virtual property (which is also referred to as a property field) to hold the table field data
• As a public abstract class (which is also referred to as a class field or BQL field) to reference a field in
the BQL command
You will learn more about data access classes later in this course.
Related Links
• Querying Data in Acumatica FrameworkPart 1: Repair Services Maintenance Form | 17
Part 1: Repair Services Maintenance Form
In this part of the course, you will start with creating the first simple form of the application. You will create a
maintenance form, which is used to enter and maintain data that will be used on the main forms of the application:
data entry and processing forms.
In the Smart Fix company, when a user enters an order, the particular repair services of the order need to be
recorded. The user can select a particular repair service more quickly than type a description of it, and typed
descriptions would not be usable in inquiry or processing forms. While the company currently offers only a small
number of services (which is seldom added to, so a data entry form would not be useful), the set of repair services
may change over time, as the company expands and devices evolve. Thus, adding a drop-down box for the repair
service would not be a good option. Instead, the company needs a maintenance form where repair services can be
entered, maintained, and deleted or added as needed.
In this part of the course, you will design the Repair Services maintenance form, which will hold a list of the services
the repair shop provides and their basic settings.
Maintenance Forms
Maintenance forms are forms on which data can be entered about particular types of entities, which are then
available for selection on other forms. Compared with data entry forms, maintenance forms are generally used to
define fewer entities and are used more rarely.
When entities of a particular type have been defined on a maintenance form, users can select rather than
type them on a data entry form. However, unlike predefined options in a drop-down box, items defined on a
maintenance form and selected on other forms can be added by any user and made immediately available for
selection. The entities can also be selected on other types of forms, so that users can view (on an inquiry form or
report) and process (on a processing form) data filtered or organized by particular entities of the type.
For instance, in Acumatica ERP, a data entry form is used to enter AR invoices. Some of the settings for an invoice
can be defined on a maintenance form, such as credit terms used by customers to pay the company. These
maintenance entities are entered less frequently and are fewer in number than AR invoices are.
Lesson 1.1: Prepare a Customization Project
In this lesson, you will create a customization project, in which you will create maintenance forms as you complete
this course. You will add the first item, a database script, to the customization project.
Lesson Objectives
As you complete this lesson, you will learn the following:
• What customization project is
• How to create a customization project
• How to add a database script for a database table to the customization projectPart 1: Repair Services Maintenance Form | 18
Customization Projects
A customization project is a set of changes to the user interface, configuration data, and functionality of Acumatica
ERP. The customization project holds the changes that have been made for a particular customization, which might
include changes to the mobile site map, generic inquiries, and the properties of UI elements.
To apply the content of a customization project to an instance of Acumatica ERP, you have to publish the project.
Before the project is published, the changes exist only in the project and are not yet applied to an instance.
For details on customization projects, see Customization Project.
Step 1.1.1: Create the Customization Project
The creation of a customization project is a first step in the customization of Acumatica ERP. To create the
customization project you will use in this course, do the following:
1. In Acumatica ERP, open the Customization Projects (SM204505) form.
2. On the form toolbar, click Add Row.
3. In the Project Name column, enter the customization project name: PhoneRepairShop.
4. On the form toolbar, click Save.
You have created the customization project. In the next step, you will open the Customization Project Editor and
begin the customization.
Related Links
• To Create a New Project
Step 1.1.2: Add a Database Table Schema
In this step, you will add a table schema for the RSSVRepairService table, which you added to the instance
database as part of the course prerequisite steps. When you publish a customization on a different instance
of Acumatica ERP, the same table is created in the instance database based on the schema provided in the
customization project.
For details on database script items, see Database Scripts.
The design of database tables is outside of the scope of this course. For details on designing database
tables for Acumatica ERP, see Designing the Database Structure and DACs.
To add a table schema, do the following:
1. On the Customization Projects (SM204505) form, open the PhoneRepairShop customization project. The
system opens the project in the Customization Project Editor.
2. In the navigation pane, click Database Scripts.
3. On the toolbar of the Database Scripts page, click Add Custom Table Schema.Part 1: Repair Services Maintenance Form | 19
When you need to add a custom table to the instance database, we recommend adding the
custom table schema to the customization project, not the custom table script, because
a possible result of a custom SQL script is the loss of the integrity and consistency of the
application data. For details, see Changes in the Database Schema.
4. In the Add Custom Table Schema dialog box, which the system opens, start typing RSSVRepairService in the
Table box, and select the RSSVRepairService option.
5. Click OK.
The script for the RSSVRepairService table has been added to the customization project.
In the project, the schema is kept in XML format. When the customization project is published,
Acumatica Customization Platform will execute a procedure to create the table according to
the schema, while meeting all the requirements of Acumatica ERP.
Related Links
• To Add a Custom SQL Script to a Project
Lesson Summary
In this lesson, you have learned how to create customization projects and add database scripts to the project.
As you have completed the lesson, you have created the PhoneRepairShop customization project on the
Customization Projects (SM204505) form. You have used the Customization Project Editor to add database scripts for
custom tables to the customization project.
Lesson 1.2: Create a Form
In this lesson, you will use the Customization Project Editor to create a simple form with a grid.
The Repair Services maintenance form will hold the list of services that the repair shop provides. The form will
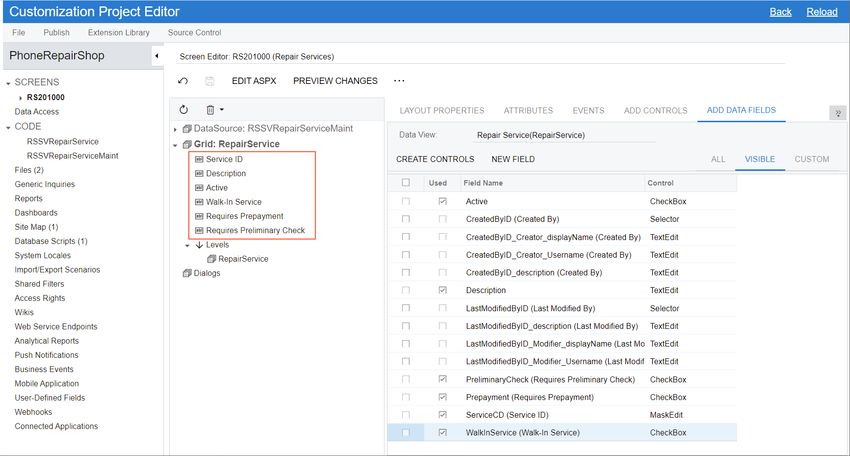
contain a toolbar and a grid. The columns of the grid are listed below, along with the data type and description of
each.
Column Name Data Type Description
Service ID String The identifier of the service
Description String The description of the service
Active Boolean An indicator of whether a service is currently provided
by the shop
Walk-In Service Boolean An indicator of whether this is a walk-in service
Requires Preliminary Check Boolean An indicator of whether the service requires diagnostic
checks
Requires Prepayment Boolean An indicator of whether this service should be prepaidPart 1: Repair Services Maintenance Form | 20
Lesson Objective
As you complete this lesson, you will learn how to create a form of the application by generating the needed items
with the New Screen wizard.
Step 1.2.1: Use the New Screen Wizard to Create a Form Template
To simplify the process of creating a new form, the Acumatica Customization Platform provides the New Screen
wizard, which creates a workable template for a new form. You open the New Screen wizard from the Customized
Screen page of the Customization Project Editor.
To create a form template for the Repair Services form, do the following:
1. Open the PhoneRepairShop customization project in the Customization Project Editor: Click the
PhoneRepairShop project name on the Customization Projects (SM204505) form.
2. On the navigation pane, click the Screens node.
The Customized Screen page opens with a blank table, as shown in the following screenshot.
Figure: The Customized Screen page of the Customization Project Editor
3. On the page toolbar, click Create New Screen.
4. In the Create New Screen dialog box, which Acumatica Customization Platform opens, specify the following
values, as shown in the screenshot below:
• Screen ID: RS.20.10.00
The form ID complies with the following Acumatica Framework conventions: RS is a two-letter identifier
indicating the part of the module (for Acumatica ERP) or subject area (which in this case is phone repair),
20 indicates a maintenance type of page, and 10 is the first sequential number of the maintenance page
in RS. For more information on naming conventions, see Form and Report Numbering.
• Graph Name: RSSVRepairServiceMaint
Every page must be associated with a graph, and the graph's name should start with a prefix and
end with a suffix. The prefix consists of the two-letter module name (in this case, RS) and a two-letter
application module prefix (in this case, SV to indicate service). The suffix indicates the type of the
webpage the graph is used for, in this case, Maint. For details, see Graph Naming.
• Graph Namespace: PhoneRepairShop. This box is filled automatically.
• Page Title: Repair ServicesPart 1: Repair Services Maintenance Form | 21
• Template: Grid (GridView)
A form template determines which basic containers the form will have: a form with boxes, a grid, a tab, or
a combination of these containers. For details, see To Create a Custom Form Template.
Figure: The Create New Screen dialog box
5. Click OK to create the form with these settings.
The Code Editor page opens with the generated code of the RSSVRepairServiceMaint class.
The wizard creates the form template and adds the following items to the customization project (all of
which can be viewed in the navigation pane of the Customization Project Editor).
Item Description
RS201000 This Screen item contains the new page content.
RSSVRepairService- This Code item contains the code template of the graph for the new form. This
Maint item is saved in the database. When you publish the project, the platform cre-
ates a copy of the code in the RSSVRepairServiceMaint.cs file in the
App_RuntimeCode folder of the Acumatica ERP application instance.
Pages\RS These File items contain ASPX page code for the new form. When you publish
\RS201000.aspx the project for the first time, the platform creates the files in the Pages\RS
folder of the Acumatica ERP application instance, and the platform creates
Pages\RS copies of these files in the pages_RS subfolder of the CstPublished fold-
\RS201000.aspx.cs er of the instance.
Repair Services This SiteMapNode item contains the site map object of the new form.
6. Publish the customization project. To do that, in the main menu of the Customization Project Editor, select
Publish > Publish Current Project.
The system opens the Compilation dialog box and displays the progress of publication in it. The publication
is completed when you see the Website updated. message in the dialog box.
7. Close the Compilation dialog box.
Related Links
• To Create a Custom Form Template
• To Add a New Custom Form to a Project
• GraphPart 1: Repair Services Maintenance Form | 22
Analysis of the Generated Code of the Graph
As stated in Application Programming Overview, graphs implement business logic in Acumatica ERP. A graph
provides the interface for the presentation logic to operate with the business data and relies on data access layer
components to store and retrieve the business data from the database.
A graph is derived from the PXGraph class with or without parameters. DACs are specified as parameters so that
layout or background processing operations can be configured.
The following code was generated for the RSSVRepairServiceMaint graph.
using System;
using PX.Data;
namespace PhoneRepairShop
{
public class RSSVRepairServiceMaint : PXGraph
{
public PXSave Save;
public PXCancel Cancel;
public PXFilter MasterView;
public PXFilter DetailsView;
[Serializable]
public class MasterTable : IBqlTable
{
}
[Serializable]
public class DetailsTable : IBqlTable
{
}
}
}
As you can see, the RSSVRepairServiceMaint graph is derived from the PXGraph class with itself as a
parameter. For details, see PXGraph Class.
In the graph, the following members are declared:
• The Save action, which commits the changes made to the data to the database and then reloads the
committed data.
• The Cancel action, which discards all the changes made to the data and reloads it from the database.
• The MasterView and DetailsView views, which are used as data members for the form control and the
grid control. You will add a custom view instead of these ones later in this course.
• The MasterTable and DetailsTable data access classes (DACs), which are used to work with data
in the database. You will remove DAC declarations from this graph and declare custom DACs later in this
course.
Related Links
• PXGraph ClassPart 1: Repair Services Maintenance Form | 23
Lesson Summary
In this lesson, you've learned how to create a new form by using the New Screen wizard. From the example of the
Repair Services form you created, you have learned about the following basic components of a form:
• The ASPX page
• The graph
• The site map node
Lesson 1.3: Make the New Form Visible in the UI
In Acumatica ERP, a workspace is a menu (which can be accessed from a link on the main menu of the product) that
contains links to the forms and reports of a particular area of the product.
Now that you have created the project items required for a new form, you need to add the form to a workspace so
that it appears in the Acumatica ERP UI. For the maintenance forms you are creating in this course, you will create a
new workspace.
Lesson Objectives
As you complete this lesson, you will learn how to do the following:
• Create a workspace
• Add a link to a custom form to the workspace
• Update the SiteMapNode item in the customization project
Step 1.3.1: Create the New Workspace
Before adding a form to the Acumatica ERP UI, you need to decide whether it will be organized in an existing
workspace or a new one. In this case, for the Repair Services (RS201000) form, you should create a new workspace,
which will contain all forms related to the phone repair shop.
To create this new workspace, do the following:
1.
On the main menu of Acumatica ERP (in the lower le corner), click the configuration menu button ( ),
and then click Edit Menu to switch to Menu Editing mode.
2. On the top toolbar (top le), click Add Workspace.
3. In the Workspace Parameters dialog box, specify the following settings:
• Icon: phone iphone
• Area: Other
• Title: Phone Repair Shop
4. Click OK to save your changes and close the dialog box.
5. Pin the new workspace to the main menu panel by clicking the Pin button, which is shown in the following
screenshot.
6. Move the workspace in the main menu panel so that the workspace is located below the Data Views
workspace.Part 1: Repair Services Maintenance Form | 24
The Menu Editing mode with the new workspace looks as shown in the following screenshot.
Figure: The Phone Repair Shop workspace in Menu Editing mode
Related Links
• User Interface: To Configure a Workspace
Step 1.3.2: Add the Link to the Workspace
Now that you have created the Phone Repair Shop workspace, you can add to it a link to the Repair Services
(RS201000) form.
To add this link to the workspace, do the following:
1. If you are not still in Menu editing mode, on the main menu of Acumatica ERP (in the lower le corner), click
the configuration menu button ( ), and then click Edit Menu.
2. On the main menu, click Phone Repair Shop.
3. On the top toolbar, click Add Menu Item.
4. In the Select Forms dialog box, which the system opens, select the check box le of Repair Services, as
shown in the following screenshot.Part 1: Repair Services Maintenance Form | 25 Figure: The Select Forms dialog box 5. Click Add & Close to add the link and close the dialog box. 6. Select the check box to the le of Repair Services to make the item to be added to the quick menu and click Edit link parameters, as shown in the following screenshot. Figure: The Edit button 7. In the Item Parameters dialog box, select the Configuration category and click OK. 8. In the bottom le corner of the screen, click Exit Menu Editing to save your changes and exit editing mode. 9. To make sure the link was added properly, on the main menu, click the Phone Repair Shop workspace menu item. This workspace should look as shown in the following screenshot.
Part 1: Repair Services Maintenance Form | 26

          Figure: The Phone Repair Shop workspace

   Related Links
       • User Interface: To Configure a Workspace

Step 1.3.3: Update the SiteMapNode Item

   When you configured the new form's location in Acumatica ERP in Step 1.3.1: Create the New Workspace and
   Step 1.3.2: Add the Link to the Workspace, the changes you made were saved to the database but not to the
   customization project. To save your changes to the site map in the customization project, do the following:
       1. In the Customization Project Editor, open the PhoneRepairShop customization project.
       2. On the navigation pane, click Site Map.
          The Site Map page opens, as shown in the following screenshot.
Part 1: Repair Services Maintenance Form | 27
Figure: The Site Map page
3. On the page toolbar, click Reload from Database.
4. Publish the customization project.
Related Links
• To Update a Site Map Node in a Project
Lesson Summary
In this lesson, you have learned how to add a new workspace to the Acumatica ERP UI, add links to a workspace,
and update the SiteMapNode item of the customization project.
Lesson 1.4: Configure the Data Access Class
In this lesson, you will configure the data access class (DAC) generated for the Repair Services page. You need this
class to access data from the database.
Lesson Objectives
As you complete this lesson, you will learn how to do the following:
• Generate and configure a DAC
• Configure a view in a graph
Definition of Data Access Classes
Data access classes (DACs) are types that represent database tables in the application. A data access class consists
of data fields. A data field definition consists of two members of the class, which have the same name except that it
differs by the case of the first letter:Part 1: Repair Services Maintenance Form | 28
• A public abstract class (which is also referred to as a class field or BQL field) that represents the data field in
BQL statements, such as companyType.
• A public virtual property (which is also referred to as a property field) that holds the field value, such as
CompanyType.
The following diagram shows the connection between a database table and DAC fields.
You can define a data access class by manually typing the code, or by using the Create Code File dialog box of the
Customization Project Editor. By using the dialog box, you can define the initial code of a data access class based
on the schema of the database table.
When you define a data access class, consider the following requirements:
• The class must have either the PXCacheName attribute or the PXHidden attribute.
The PXCacheName attribute specifies a user-friendly DAC name. This name can be used in generic
inquiries, reports, and the error message that is displayed when no setup data records exist. Without the
PXCacheName attribute, the error message would use the DAC name for the link.
The PXHidden attributes hides the DAC from generic inquiries, reports, and web services API clients.
• The class must be declared as implementing the PX.Data.IBqlTable interface.
• Abstract classes of data fields must be defined as implementing interfaces of the PX.Data.BQL
namespace.
• A DAC property field must have a nullable type (such as decimal? or DateTime?).
It is important to pay attention to the order in which fields are declared in a DAC: Every roundtrip Acumatica
Framework applies changes to DAC instances in the same order as their fields are declared. All field-level event
handlers are always raised in the same order as fields are declared in the DAC.
Related Links
• Data Access Class
• Designing the Database Structure and DACs
Step 1.4.1: Generate a DAC
Generate the DAC code and configure the generated code by doing the following:
1. Open the PhoneRepairShop customization project in the Customization Project Editor.
2. In the navigation pane, click Code.Part 1: Repair Services Maintenance Form | 29
The Code page opens. It already contains the record about the RSSVRepairServiceMaint graph
created in Step 1.2.1: Use the New Screen Wizard to Create a Form Template.
3. On the Code page toolbar, click Add New Record.
4. In the Create Code File dialog box, which opens, specify the following values:
• File Template: New DAC
• Class Name: RSSVRepairService
• Generate Members from Database: Selected
Figure: The Create Code File dialog box
5. Click OK to close the dialog box.
The new DAC code is opened in the Code Editor, as shown in the following screenshot.
Figure: The RSSVRepairService DAC code
Related Links
• To Create a New DAC
Step 1.4.2: Configure the Attributes of the New DAC
Aer the code of the RSSVRepairService DAC has been generated, you should configure attributes for each
field of the DAC.You can also read