Telkom ADSL 5100 Router - Quick Start Guide
←
→
Page content transcription
If your browser does not render page correctly, please read the page content below
Telkom ADSL 5100 Router

    Quick Start Guide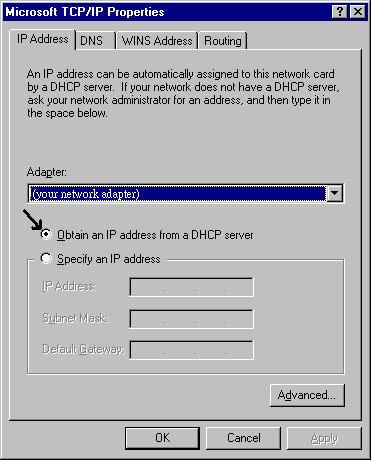
Telkom ADSL 5100

               For more detailed instructions on configuring and using the
               Telkom ADSL 5100, please refer to the on-line manual.

Package Contents

  1 X Telkom ADSL 5100 Router (modem)

  1 X RJ-11 ADSL/telephone Cable

  1 X Ethernet (CAT-5 LAN) Cable (Straight)

  1 X Integrated Surge protector and Power adapter unit (12VDC, 1A)

  1 X Console Cable (For technical support use only! Do not use unless requested by Telkom)

  2 X ADSL Micro filters

  1 X CD-ROM containing the utility, PC qualification test and the on-line manual

  1 X This Quick Start Guide

                 9    Do not use the Telkom ADSL 5100 in high humidity or high
                      temperature rooms and/or surroundings. I.e. Kitchens.
                 9    Do not use the same power source for the Telkom ADSL 5100 as
                      other equipment.
  Warning        9    Do not open or try to repair the Telkom ADSL 5100 yourself. If the
                      Telkom ADSL 5100 gets too hot, turn off the power immediately
                      and contact technical support on 0860 2C HELP (0860 22 43 57)

                 9    Place the Telkom ADSL 5100 on a stable surface.
                 9    Only use the power adapter that comes with the package. Using
                      a different voltage rating power adaptor may damage the router.
  Attention

                                                                                           1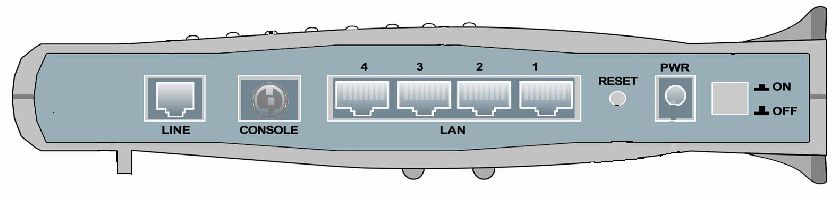
Quick Start Guide
The Front LEDs
                    1   2
                                                            5

Figure 1                           3                4

           LED                                          Meaning

                             Lit steady when there is a PPPoE connection using the internal
     1     PPP :
                            PPPoE of the router.

                            Lit steadily when successfully connected to an ADSL DSLAM
     2     ADSL:
                        (“linesync”).

                            Lit when connected to an Ethernet device.
           LAN Port
     3                      Green for 100Mbps; Orange for 10Mbps.
            1-4:
                            Blinking when data is Transmitted / Received.

     4     SYS :            Lit when the router is ready.

     5     PWR :            Lit when power is ON.

2
Telkom ADSL 5100
The Rear Ports

                   6      5                   4                                1

                                                                  3        2
Figure 2

           Port                                    Meaning

    1      Power Switch Power ON/OFF switch

    2      PWR          Connect the supplied power adapter to this jack.

                        The moment the device is powered on, press it to reset the device
                        or restore to factory default settings.
    3      RESET        0-3 seconds: reset the device
                        6 seconds above: restore to factory default settings (this is used
                        when you can not login to the router, e.g. forgot the password)

           LAN
                        Connect a UTP Ethernet cable (Cat-5 or Cat-5e) to one of the four
           1X — 4X
    4                   LAN ports when connecting to a PC or an office/home network of
           (RJ-45
           connector)   10Mbps or 100Mbps. You may use a straight or a crossover cable.

                        Console port is used for technical support purpose only.
           CONSOLE
    5                   (Do not use unless requested to do so by Telkom)

    6      LINE         Connect the protected (“out”) RJ-11 plug of the integrated surge
                        and power unit into this jack.

                                                                                             3
Quick Start Guide
Connecting Your Telkom ADSL 5100 Router
(Hardware Installation)
Follow the installation instructions below, using the overview sketch on the next page
(figure 3) and the corresponding letter indicators.
1. Power up the device
a) Plug the power adapter into the electrical wall-socket (A).
b) Plug the power pin-connector (male) into the router’s power socket (B).
c) Switch on the device.
d) Wait for approximately 20 seconds, then confirm that the “PWR” and “SYS”
LED’s (front panel lights) are steadily lit.
2. Connect the ADSL line
a) Plug the “IN” telephone cable of the integrated power & surge unit into the
Telkom wall-socket (C).
b) Plug the “OUT” telephone cable of the integrated power & surge unit into the
router’s “LINE” port (D).
c) Your router will now attempt to synchronize with the Telkom ADSL line. The
“ADSL” LED will come on, start to blink and after approximately 40 seconds be
steadily lit. If the “ADSL” LED does not come on, please refer to the
troubleshooting section at the end of this guide.
d) The Telkom ADSL 5100 router is, by default, distributed with a guest ISP
username and password. This guest account allows you access to the
www.telkom.co.za website only. Although this account only allows limited
access, it serves as a tool to confirm that your hardware installation and your
own PC’s network configuration has been completed successfully. This guest
account will cause your router’s “PPP” LED to be steadily lit now. We will again
refer to this guest account at a later stage of the installation process.
3. Connect the LAN (network) cable
a) Plug one end of the enclosed Ethernet (CAT-5 LAN) cable into one of the
router’s LAN ports, you may choose any of the 4 ports (E).
b) Plug the other end of the Ethernet (CAT-5 LAN) cable into your computer’s
network port or network hub/switch (F).
c) Confirm that the corresponding LAN LED is lit.
d) You can connect up to 4 network devices directly to the Telkom ADSL 5100 as
shown in the overview sketch.
4. Connect the ADSL micro filters
a) If you also intend to use traditional telephones (for voice calls) on the ADSL line,
you need to connect the included ADSL micro filters. (These units filter out any
data noise on your voice lines.)
b) Plug the micro filter into the Telkom wall-socket from where you intend to utilize
your traditional telephone (G).
c) Plug the telephone into the micro filter (H).
d) Important Note: Make sure that you do not connect any micro filters between
the Telkom wall socket used for the router and the router itself. Refer to the
overview sketch, from indicator (C) to indicator (D).
4Telkom ADSL 5100
Figure 3: Hardware Installation Overview
Once the hardware is correctly installed and the “ADSL” & “PPP” LED is steadily lit then you can
proceed with the next section of the quick start guide.
Advanced users:
9 Advanced users may access the router on the following IP
address: 10.0.0.2
9 The default username and password is “admin” and “admin”.
9 Important Note: It is a security risk to leave your username and
Attention password as the default. Please change them. Please refer to the
online user manual for assistance.
9 The following sections of this guide are only applicable to users
running Microsoft Windows operating systems. If you are running
a different operating system, please refer to the manual for
assistance in installing the Telkom ADSL 5100.
5Quick Start Guide
Configuring PC in Windows XP
1. Go to Start / Control Panel (switch to
Classic View). In the Control Panel,
double-click on Network Connections
2. Double-click Local Area Connection.
3. In the Local Area Connection Status
window, click Properties.
4. Select Internet Protocol (TCP/IP) and click
Properties.
5. Select the Obtain an IP address
automatically and the Obtain DNS server
address automatically radio buttons.
6. Click OK.
7. Click OK again to close Local Area
Connection properties.
8. Close Local Area Connection status window.
9. Close Network Connections window to finish
the configuration.
6Telkom ADSL 5100
Configuring PC in Windows 2000
1. Go to Start / Settings / Control Panel. In the Control
Panel, double-click on Network and Dial-up
Connections.
2. Double-click Local Area Connection.
3. In the Local Area Connection Status window
click Properties.
4. Select Internet Protocol (TCP/IP) and click
Properties.
5. Select the Obtain an IP address
automatically and the Obtain DNS server
address automatically radio buttons.
6. Click OK.
7. Click OK again to close Local Area
Connection properties.
8. Close Local Area Connection status window.
9. Close Network Connections window to finish
the configuration.
7Quick Start Guide
Configuring PC in Windows 98/Me
1. Go to Start / Settings / Control Panel. In
the Control Panel, double-click on Network
and choose the Configuration tab.
2. Select TCP/IP ->
NE2000 Compatible, or the name of your
Network Interface Card (NIC) in your PC.
3. Select the Obtain an IP address
automatically radio button.
4. Then select the DNS Configuration tab.
5. Select the Disable DNS radio button and
click OK.
6. Click OK again to finish the configuration.
8Telkom ADSL 5100
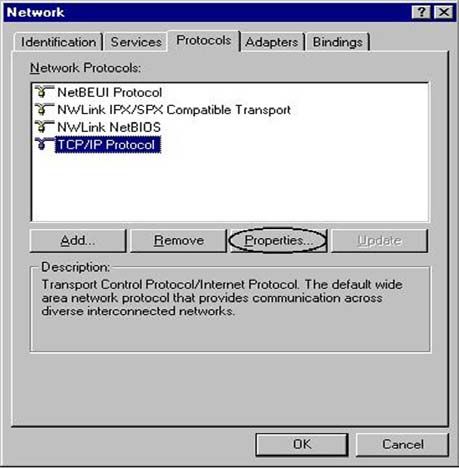
Configuring PC in Windows NT4.0
1. Go to Start / Settings / Control Panel. In
the Control Panel, double-click on Network
and choose the Protocols tab.
2. Select TCP/IP Protocol and click
Properties.
3. Select the Obtain an IP address from a
DHCP server radio button.
4. Now select the DNS tab and make sure that
no DNS is specified.
5. Click OK to close TCP/IP Properties.
6. Click OK again to close the Network
window.
9Quick Start Guide
Configuring Your Telkom ADSL 5100
Now that the hardware installation is complete you will need to perform certain actions to
complete the installation. All these actions are made easy by using the enclosed Telkom
ADSL 5100 CD.
In this section you will:
1) Verify that your computer meets the minimum requirements for Telkom ADSL
2) Test your guest account connection to the www.telkom.co.za website
3) Install (and run) the utility which will setup your own ISP account details on the
router
4) Read the router’s manual. This is optional, but recommended if you want to use
some more advanced features of the router. If you only want to surf the Internet
and get your e-mail, you do not need to look at the manual.
9 It is important that you read the supplementary information
supplied to you on the right side of the CD’s auto run menu. It
supplies valuable information on how to use the menu and
explains the function of each button.
Please follow the next few steps to successfully complete your router setup.
1) Insert the Telkom ADSL 5100 CD now.
2) The CD will auto run and the menu screen will appear as shown in figure 4 below.
Auto run Menu (Figure 4)
10Telkom ADSL 5100
9 If nothing happens when you insert the CD, please refer to the
troubleshooting section at the end of this guide.
3) Click “PC Qualification Test”. A program will open to verify that your PC meets the
minimum requirements. Just follow the instructions and when complete, close the
program to return to the menu screen.
4) Next, click on the “Test link to www.telkom.co.za” button. Your web-browser will
now open and attempt to connect to the Telkom website. If you are using the
web-browser for the first time, the browser will prompt you to complete a few
simple setup instructions. If you are able to see the Telkom website, please
proceed to the next step. If you do not see the Telkom website, please make sure
that you have performed the previous steps of this quick guide correctly. If the
problem persists, contact technical support on 0860 2C HELP (0860 22 43 57).
9 Before you continue, make sure that you do not have
any software firewalls running. These will include
programs like: Norton Internet Security, TrendMicro’s
PC-Cillin, Bit-Defender, McAfee, etc. Please disable
these programs temporarily to perform the next step. It is
also important to remember to re-activate your software
firewall after you have completed this step.
5) Click the “Install utility” button. An install wizard will now run that will install the
Telkom ADSL 5100 utility onto your PC. Just follow the onscreen instructions. After
you have clicked “Finished”, the installation has completed. You may now run the
utility by clicking on the “ADSL Configuration” shortcut, or alternatively run the
utility from the programs menu by clicking on “Start” > “Programs” > “Telkom 5100
ADSL Utility” > “ADSL Configuration”.
6) The utility will now open. Enter your supplied ISP(Internet Service Provider)
username and password in the location indicated by the two arrows in Figure 5.
The default Telkom guest account will now be replaced and thereby, enable you to
browse the whole Internet and not just the Telkom website.
11Quick Start Guide
Telkom ADSL 5100 utility (Figure 5)
9 The “Login Info” section of the utility form, houses the information
that enables you to access your router. If you have changed either
your router’s IP address and/or administrative username and
password, you will need to enter the new information here before
you click OK.
After you have entered your details, click on “OK”. The router will now be updated
with your ISP details. To complete this step just click “OK” when the utility has
finished and the utility will disappear by itself, once again returning you to the menu
screen.
9 The utility will open with all the fields preset to Telkom’s default
settings for when using a routed connection. Should you require
different settings and/or a bridged connection then select
“Manual Configuration” in the “Country” field to make all the
fields editable. Note, that this function is only for advanced
users and is not for a standard setup. Please consult the
manual for further information.
9 You may run the Telkom ADSL 5100 utility again, at any
later stage, by selecting it from your Programs list under
the windows start menu.
9 If the utility does not seem to respond, please refer to the
troubleshooting section.
12Telkom ADSL 5100
7) Please power down the router, wait a few seconds and power it up again in order
for the new settings to be loaded.
8) The moment the “ADSL” and “PPP” LEDs are steadily lit, you will be able to browse
the Internet.
9) The last button on the menu, “Read Manual (.PDF)”, will open the User manual
from the CD. It is recommended that you read this manual should you want to
make use of some of the advanced features on the Telkom ADSL 5100. The
manual is in Adobe Acrobat PDF format and requires Acrobat reader to open the
file.
If you do not have Acrobat reader installed on your PC. Click on the “Install Acrobat
Reader….” hyperlink to the immediate right of the manual button, select your
operating system and click install.
9 You have now completed the Telkom ADSL 5100 setup
and should now be able to browse the Internet. If you can
not browse the Internet, please refer to the
troubleshooting section at the back of this quick start
guide.
9 This guide provides assistance to setup the modem to connect to
the Internet. For other services such as e-mail, please contact
your ISP (Internet Service Provider) for details.
13Quick Start Guide Troubleshooting: Problem Description 1: ADSL LED (light) does not come on. Solution: 1. Check line connection at wall socket (C) and on router (D). (Refer to overview sketch – figure 3) 2. Make sure the micro filters are connected as illustrated in the overview sketch (figure 3) and not directly between the Telkom ADSL wall socket (C) and the Telkom ADSL 5100 router (D). 3. If your “ADSL” LED still keeps blinking after approximately 5 minutes, there may be a fault on your Telkom ADSL line, please report the fault to Telkom support on 0800 375 375. Problem Description 2: Nothing happens when I insert my CD. Solution: Your computer may not be set to auto run CDs you insert. To manually start the auto-run menu, click on “Start”> “Run”. The following screen will open, click “Browse”. Navigate to the CD drive containing the installation CD (Telkom ADSL 5100) and double click the file “Menu.exe”. This will start the menu from which you may proceed with the installation. Problem Description 3: When I click OK on the Telkom ADSL 5100 utility window (figure 5), it does not seem to respond. Solution: Please make sure that you have disabled all firewall software on your computer that may block traffic to the router. The utility is trying to communicate with the router on an IP address that may be filtered out by your firewall. The most well-known firewall software packages are: Norton Internet Security, TrendMicro’s PC-Cillin, Bit-Defender, McAfee, etc. Please also remember to re-enable the firewall software again after the router has been setup. 14
Telkom ADSL 5100

Problem Description 4:
I’ve completed all the steps of this quick guide but I still can’t browse the Internet.

Probable Causes:

1. Your Internet Explorer may still be setup to utilise a dialup connection, such as an
   analog or ISDN modem. Please change this setting to use the LAN.
2. You may have misspelled your ISP username and password. Open the utility again by
   using “Start” > “Programs” > “Telkom ADSL 5100 Utility v1.00k” and re-enter your
   details. Remember that the username and password is case-sensitive. Type them
   exactly as provided by your ISP.
3. Your ISP may have provided you with incorrect information.

Problem Description 5:
The router’s “PPP” LED (light) did not come on after I submitted my own ISP username
and password using the utility. (Only applicable for routed connections)

Solution:
1. You may have misspelled your ISP username and password. Open the utility again by
   using “Start” > “Programs” > “Telkom ADSL 5100 Utility v1.00k” and re-enter your
   details. Remember that the username and password is case-sensitive. Type them
   exactly as your ISP have printed them.
2. If you are sure that you have correctly typed your ISP details but is still unable to
   browse the Internet, please contact your ISP to confirm your username and password.

Product Support and Contact Information
Most problems with setting up the router can be solved by referring to the Troubleshooting
section in the User Manual on the enclosed CD. If you cannot resolve the problem using the
Troubleshooting above, please contact 0860 2C HELP (0860 22 43 57).

Windows 98, Windows NT, Windows 2000, Windows Me and Windows XP are registered Trademarks of Microsoft
Corporation.

                                                                                                    15
You can also read