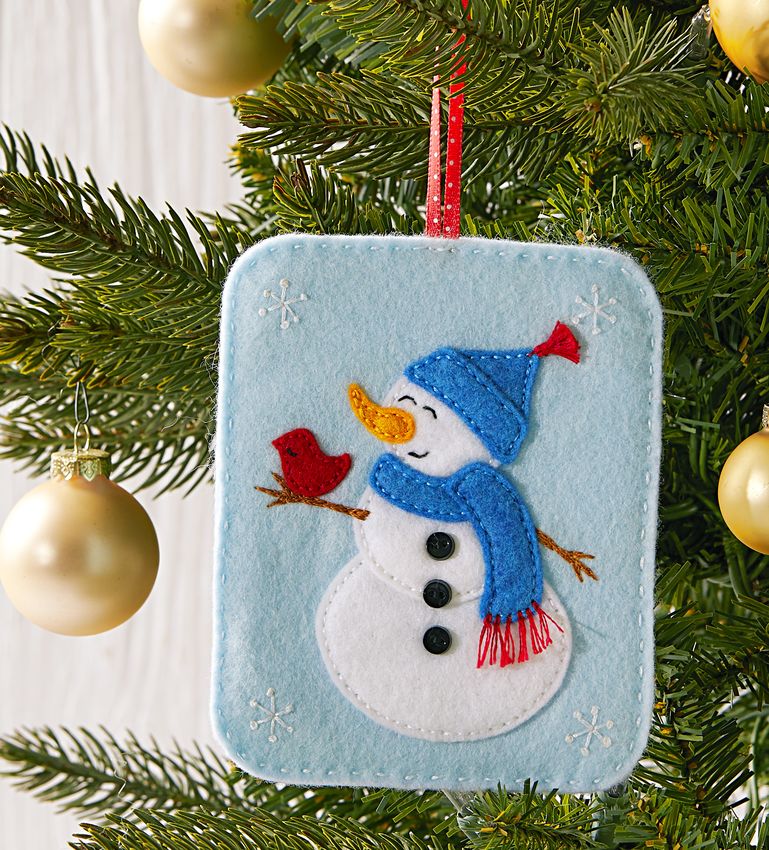
This ornament has a pocket to hold a gift card. After the gift card has been used, the bauble can decorate trees for years to come.
←
→
Page content transcription
If your browser does not render page correctly, please read the page content below
PROJECT BROUGHT TO YOU BY:

                          PROJECT: Sweet Snowman Ornament
             This ornament has a pocket to hold a gift card. After the gift card has
                  been used, the bauble can decorate trees for years to come.
                                    DESIGNER: Kathleen Berlew (flossandfleece.blogspot.com)

     FABRICS are from the WoolFelt collection by National Nonwovens (woolfelt.com).

                                                          AllPeopleQuilt.com
                              Pattern may be downloaded for personal use only. No electronic or printed reproduction permitted          1
                          without the prior written consent of Meredith Corporation. ©Meredith Corporation 2021. All rights reserved.
PROJECT BROUGHT TO YOU BY:
ORNAMENT
Finished size: 4×5" From gold felt, cut: appliqué, and pull it through loop to
n 1 of Pattern H make knot. Pull tight, then trim to
From red plaid, cut: 1 ⁄ 2" to make fringe. Repeat to make
MATERIALS n 16—21 ⁄ 2×41 ⁄ 2" rectangles
o 9×12" rectangle light blue wool
six fringes total.
felt (foundation, backing, gift card From red felt, cut:
pocket)
n 1 of Pattern I 5) To make tassel on hat, cut three
11 ⁄ 2"-long strands of red floss. Fold
o 4" square white wool felt (snowman)
APPLIQUÉ AND EMBROIDER strands in half to make a bundle,
o 3" square blue wool felt (scarf, hat) SNOWMAN then tie bundle in center with two
o 1" square gold wool felt (nose) Use two strands of embroidery floss 6"-long strands of red floss, leaving
o 1" square red wool felt (bird) in matching colors to stitch appliqués tails. Thread tails on needle and sew
and embroider unless otherwise stated. them to top of hat, securing tassel.
o Freezer paper Add two small straight stitches to
(Refer to “Embroidery Stitches,” page 7,
o 5×6" rectangle white tissue paper for stitch instructions.) anchor tassel in place.
o Embroidery floss: white, blue, gold,
red, light blue, brown, black
1) Referring to Appliqué Placement ASSEMBLE ORNAMENT
o 3—1⁄4"-diameter buttons: black
Diagram, position felt A–I pieces 1) Center light blue felt 23 ⁄4×33 ⁄4"
o 5×6" rectangle cardboard on a light blue felt ornament piece, rectangle on remaining light blue
o 9" length of 1⁄8"-wide ribbon: red making sure pieces overlap as ornament piece; pin. Using light
(hanger) marked on pattern pieces. Sew in blue floss and a backstitch, sew a
place in alphabetical order using scant 1 ⁄8" along side and bottom
matching floss and a backstitch. edges of rectangle to attach pocket
CUT FABRICS and make back panel (Diagram 2).
Cut pieces in the following order. 2) Trace Full-Size Embroidery Pattern
Patterns are on pages 4–5. onto white tissue paper 5×6" 2) Layer front and back panels, wrong
To make templates of patterns, see rectangle. sides together. Fold 9"-long red
“Make & Use Templates” on page 6. ribbon in half and slip cut ends into
To use freezer paper to cut appliqué 3) Pin traced tissue paper to Step 1 top edge of unit. Using white floss
shapes, complete the following steps. unit. Using brown floss, split-stitch and a running stitch, sew around
along lines for arms through felt and top and side edges. Insert cardboard
1) Lay freezer paper, shiny side down, tissue paper. Using black floss and 5×6" rectangle at bottom, then
over patterns. Use a pencil to trace a backstitch, embroider snowman’s continue using running stitches to
each pattern the number of times eyes and mouth and bird’s eye. close and complete ornament.
indicated in cutting instructions, Using white floss and straight
leaving 1 ⁄4" between tracings. Cut stitches, embroider snowflake
out freezer-paper shapes roughly 1 ⁄8" spokes and add French knots to
outside traced lines. end of each. Gently tear away
tissue paper. Sew on buttons using
2) Using a hot dry iron, press each black floss to make front panel.
freezer-paper shape, shiny side
down, onto designated wool felt; let 4) To make fringe on scarf, cut two
cool. Cut out wool felt shapes on 5"-long strands of red floss and fold
drawn lines. Peel off freezer paper. them together. Thread the four cut
ends through a needle. Starting
From light blue felt, cut: from front of Step 3 unit, insert
n 2 of Ornament Pattern needle at A, on stitch line of scarf
n 1—23 ⁄4×33 ⁄4" rectangle bottom (Diagram 1). Slowly pull
From white felt, cut: needle through to back, holding
n 1 each of pattern A–C folded loop against front so it
From blue felt, cut: doesn’t slip through. Bring needle
n 1 each of patterns D–G up at B, 1 ⁄8" from edge of scarf
AllPeopleQuilt.com
Pattern may be downloaded for personal use only. No electronic or printed reproduction permitted 2
without the prior written consent of Meredith Corporation. ©Meredith Corporation 2021. All rights reserved.PROJECT BROUGHT TO YOU BY:
F
G
H
C
1⁄4"
I
D
E
B
3⁄4"
A
3⁄ 8"
APPLIQUÉ PLACEMENT DIAGRAM
23⁄4"
1⁄ 8"
33⁄4"
A
B
DIAGRAM 1
DIAGRAM 2
AllPeopleQuilt.com
Pattern may be downloaded for personal use only. No electronic or printed reproduction permitted 3
without the prior written consent of Meredith Corporation. ©Meredith Corporation 2021. All rights reserved.PROJECT BROUGHT TO YOU BY:
GIFT GUIDE: ORNAMENT & GIFT CARD HOLDER
FULL-SIZE EMBROIDERY PATTERN
1 INCH
GIFT GUIDE: ORNAMENT & GIFT CARD HOLDER
ORNAMENT PATTERN
This box should
When printing a downloadable
measure 1 ".
PDF, set Page Scaling preference
to None to print patterns at 100%.
Do not use Shrink to Fit or Fit to
Printable Area.
AllPeopleQuilt.com
Pattern may be downloaded for personal use only. No electronic or printed reproduction permitted 4
without the prior written consent of Meredith Corporation. ©Meredith Corporation 2021. All rights reserved.PROJECT BROUGHT TO YOU BY:
1 INCH
PATTERN F
PATTERN G
ORNAMENT
& GIFT CARD
H HOLDER
PATTERN C
PATTERN D
I ORNAMENT
& GIFT CARD
HOLDER
PATTERN B
E
GIFT GUIDE:
ORNAMENT & GIFT CARD HOLDER
PATTERN A
This box should
When printing a downloadable
measure 1 ".
PDF, set Page Scaling preference
to None to print patterns at 100%.
1" Do not use Shrink to Fit or Fit to
Printable Area.
AllPeopleQuilt.com
Pattern may be downloaded for personal use only. No electronic or printed reproduction permitted 5
without the prior written consent of Meredith Corporation. ©Meredith Corporation 2021. All rights reserved.PROJECT BROUGHT TO YOU BY:
MAKE TEMPLATES USE TEMPLATES
A
A template is a pattern made from To mark on fabric, use a pencil, white
extra-sturdy material so you can trace dressmaker’s pencil, chalk, or a special
around it many times without wearing fabric marker that makes a thin,
away the edges. Acrylic templates for accurate line. Do not use a ballpoint or
many common shapes are available ink pen; it may bleed if washed. Test all
at quilt shops. Or you can make your marking tools on a fabric scrap before
own by duplicating printed patterns on using them.
DIAGRAM 1
template plastic. To make pieces for hand piecing or
To make permanent templates, appliqué, place a template facedown
purchase easy-to-cut template on the wrong side of the fabric and
plastic, available at quilt shops and trace. Then reposition the template at
crafts supply stores. Lay the plastic least 1 ⁄2" away from the previous tracing
over a printed pattern. Trace the (Diagram 1), trace again, and repeat.
pattern onto the plastic using a ruler The lines you trace on the fabric are
and a permanent marker to ensure sewing lines. Mark cutting lines 1 ⁄4" away B
straight lines, accurate corners, and from the sewing lines, or estimate the
permanency. distance by eye when cutting out the
For hand piecing and appliqué, make pieces with scissors. For hand piecing,
templates the exact size finished pieces add a 1 ⁄4" seam allowance; for hand DIAGRAM 2
will be (without seam allowances). For appliqué, add a 3⁄ 16" seam allowance.
piecing, this means tracing the patterns’ Because templates used to make
dashed lines. pieces for machine piecing have seam
For machine piecing, make templates allowances included, you can use
that include seam allowances by tracing common tracing lines for efficient
the patterns’ solid and dashed lines onto cutting. Place a template facedown on
the template plastic. the wrong side of the fabric and trace.
For easy reference, mark each Then reposition the template without
template with its letter designation, a space between it and the previous
grain line (if noted on the pattern), and tracing (Diagram 2); trace again and
block name. Cut out the traced shapes repeat. Using a rotary cutter and ruler,
on their outside lines. Verify each cut pieces out, cutting precisely on the
template’s shape and size by placing it drawn lines.
over its printed pattern. Templates must
be accurate; errors, however small, will
compound many times as you assemble
a quilt. To check templates’ accuracy,
make a test block before cutting the
fabric pieces for an entire quilt.
AllPeopleQuilt.com
Pattern may be downloaded for personal use only. No electronic or printed reproduction permitted 6
without the prior written consent of Meredith Corporation. ©Meredith Corporation 2021. All rights reserved.FG H F B
A C
B
A C
AGRAM
PROJECT BROUGHT TO YOU BY:
STAR STITCH DIAGRAM PINWHEEL STITCH DIAGRAM
STEM STITCH DIAGRAM CROSS-STITCH DIAGRAM
A
C E
C C
A B
BACKSTITCH F D C
A
Start from back of fabric, and pull
C D
B needle up at A (Backstitch Diagram). B B
A
Insert it back into fabric at B, and bring D
it up at C. Push it down again at D, with
AGRAM no gaps between stitches,
FISH BONE and DIAGRAM
STITCH continue SPLIT STITCH DIAGRAM
in same manner. BACKSTITCH DIAGRAM STRAIGHT STITCH DIAGRAM
FRENCH KNOT
Bring needle through at A, the point
A
where knot is desired (French Knot B
Diagram). Wrap floss around needle B C
D BF C
DB B A B C D
twice without twisting
B it. Insert tip of C B D F C
E
B FG
C G E A C A B
needle into fabricAat B, 1 ⁄ 16" away from A. A B E D C A
A C A
Gently push wraps down needle to meet A
FRENCH KNOT DIAGRAM WHIPSTITCH DIAGRAM RUNNING STITCH DIAGRAM
GRAM
fabric. Pull needle and trailing floss
WOVEN SPIDER WEB STITCH DIAGRAM COUCHING STITCH DIAGRAM
FRENCH KNOT DIAGRAM WHIPSTITCH DIAGRAM
through fabric slowly and smoothly. WRAPPED BACKSTITCH DIAGRAM INVISIBLE STITCH DIAGRAM
D
RUNNING STITCH A
Bring needle up from back of fabric at
A A E E A G
B A, and insert A C into fabric
it back atC
B
B; A G C
B
pull needle up againB A C B A C A C B
B at C, and insert it B B D
A
C B DC C B FC
back into fabric at D (RunningB Stitch A A B BC
C A
D
FG
B
A C E H F
Diagram). AContinue in same Amanner, B
C C
D B
D loading several stitches on needle at
A C B D
IAGRAM a time. BLANKET STITCH
WHIPSTITCH DIAGRAM
DIAGRAM LAZY DAISYSTITCH
RUNNING STITCHDIAGRAM
DIAGRAM FEATHER STITCH
STAR STITCH DIAGRAM
DIAGRAM
RAM CHAIN STITCH DIAGRAM SEED STITCH DIAGRAM
BLANKET STITCH DIAGRAM LAZY DAISY STITCH DIAGRAM
OUTLINE STITCH DIAGRAM STEM STITCH DIAGRAM
SPLIT STITCH
Pull needle up at A, make a short D A
straight stitch, and go back into fabric C E
C
C at B (Split Stitch Diagram). Push BE A B F D
OB A
needle up at C, piercing
B through center DG C
B B
B C
of first straight stitch;Athen
C make a B D
D F B B A
straight stitch, C C
A Band go back into fabric A
A C
C A
at D. Continue in same D manner. A C
DIAGRAM
DIAGRAM STEM
LAZY STITCH
DAISY
WHIPSTITCH DIAGRAM
STITCH DIAGRAM
DIAGRAM CROSS-STITCH
FEATHER
SPLIT STITCH
STITCH DIAGRAM
DIAGRAM
DIAGRAM SATIN
FISH BONESTITCH DIAGRAM
STITCH DIAGRAM
STEM STITCH DIAGRAM CROSS-STITCH DIAGRAM
STRAGHT STITCH
Pull needle up at A (Straight Stitch
Diagram). Push it back down at B, and C
bring it up at C. Push it down at D, and C C
A
continue in same Cmanner. AA C A B
D B B
D A B CB D C C
B D
A B B
D
C
A C A D D
AGRAM BACKSTITCH DIAGRAM
CROSS-STITCH DIAGRAM STRAIGHT STITCH
SATIN STITCH DIAGRAM
DIAGRAM FLY STITCH
WOVEN SPIDER WEBDIAGRAM
STITCH DIAGRAM
BACKSTITCH DIAGRAM STRAIGHT STITCH DIAGRAM
C A AllPeopleQuilt.com
A C
C Pattern mayBbe downloaded for personal use only. No electronic or printed reproduction
A permitted 7
B C prior written consent of Meredith Corporation. ©Meredith CorporationB2021. All rights reserved.
without the A A B KM O
C GI
FB
B C C B B
B CE B
C E D C CF JL C NP B CYou can also read