Segmented Circle - JANUARY 2021 - Brandywine Valley Quilters
←
→
Page content transcription
If your browser does not render page correctly, please read the page content below
QuiltMuseum.org/BlockOfTheMonth
JANUARY 2021
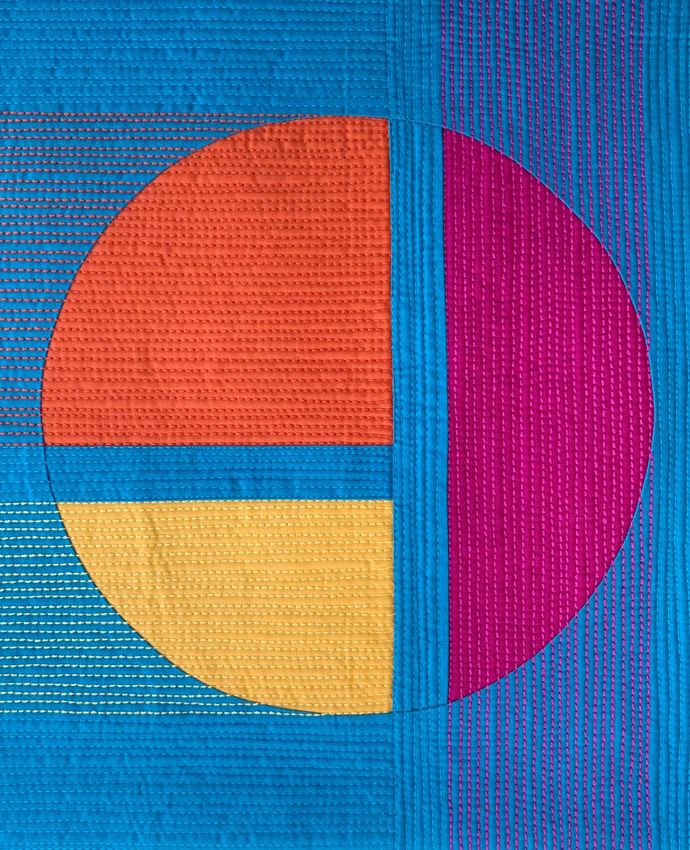
Segmented Circle
inspired by NQM Collection Artist
Quilt: Segmented Circle by Cassandra Ireland Beaver
JANUARY 2021

                                      Welcome
                                       Back!

Welcome to the Block of the Month Club! Round 3 will run January - December 2021.

Blocks are released as PDF patterns at Noon CST on the 1st of each month to both the FB
group page, and the website: QuiltMuseum.org/BlockOfTheMonth

Block size has increased this Round - they will be trimmed to 12.5” x 12.5” each month and
finish at 12” x 12”.

As the Museum celebrates its 30th anniversary in 2021, blocks created by guest designers will
be inspired by museum exhibits, programs & themes.

Finished Round 3 quilts that use all 12 blocks will be eligible for an exclusive custom label.
Using the suggested layout is not required to receive a label.

We’ll be using a Quilt-As-You-Go method for Round 3.

Quilt-As-You-Go (QAYG)

A process of layering the top, batting and backing, then quilting each block individually before
it is joined together into a finished quilt. It can relieve the stress of wrangling a large quilt
through the sewing machine when quilting. As each block is quilted along the way, once they
are joined together the quilt is already quilted and just needs binding!

There are many ways to accomplish QAYG, but we will be following the joining method from
Marianne at TheQuiltingEdge.com (Instagram @MariQuilts).

Fabric requirements will be for the suggested layout and QAYG joining method. Feel free to
use other methods in creating your quilt if desired. See website for details on layout and fabric.

                #NQMblockofthemonth                  Support the Museum!

                                                                                            Page 2
JANUARY 2021
Featured Artist: Cassandra Ireland Beaver
                           Cassandra is a pattern designer, quilting
Cassandra Ireland Beaver   educator, and blogger based in west-
                           central Ohio. She uses her training in art
                           and theatrical design to create work that
                           merges modern, traditional, and art quilting
                           aesthetics. Cassandra’s award-winning quilts
                           draw inspiration from nature, architecture,
                           and art. Her quilt "Infused Plaid", and three
                           of her modern mini quilts reside in the
                           collection of the National Quilt Museum.

                           Blog: http://thenotsodramaticlife.com

                           Instagram: @cassandra.beaver

                                                                Page 3
JANUARY 2021
Sample Block: Segmented Circle
Sample by Cassandra Ireland Beaver
Supplies Cutting
• Fat quarter of background fabric (blue) • From orange fabric cut one rectangle
• 6” Square Orange 5½”x 5¾”
• 6” Square Yellow • From yellow fabric cut one rectangle
• 5”x 10” Rectangle Pink 4”x 5¾”
• From pink fabric cut one rectangle
• One 15” square backing fabric 3¾”x 9¾”
• One 15” square batting • From Blue background fabric cut:
One 13” square
Thread to match each color in the quilt. One 1-¼”x 5¾” rectangle
Ideally for each non-background color you would One 1-¼”x 9¾” rectangle
use 28wt thread in the top and matching 50wt
thread in the bobbin. 50wt thread is used for
both the top and bobbin thread for the back-
ground areas. If you cannot obtain 28wt thread,
40wt or 50wt thread will work as well.
• Size 14 Topstitch needle (if using 28wt thread)
Page 4JANUARY 2021
Assembly: Piece the Top Block
1. Arrange the cut pieces, except for the 13” background square, as shown.
Page 5JANUARY 2021
Assembly: Piece the Top Block
2. Stitch the orange rectangle to the short background rectangle to the yellow rectangle.
Stitch the long background rectangle to the pink rectangle.
Page 6JANUARY 2021
Assembly: Piece the Top Block
3. Stitch the orange and yellow unit to the pink unit as shown.
Print and cut out templates on page 20.
Page 7JANUARY 2021
Assembly: Piece the Top Block
NOTE: Take your time folding, tracing, and cutting the inner and outer circles. The success of
your block depends on accurately cut pieces.
4. Fold the orange/yellow/pink unit in half horizontally. Press. Fold the unit vertically. Do not
unfold.
Place the convex Inner Template on the folded material with the straight edges of the tem-
plate aligned with the folded edges. Carefully trace the curved line with a fabric pen. Re-
move the template.
Pin the layers together away from the line to prevent shifting while cutting. Carefully cut
along the drawn line. Unfold the piece, keeping the creases to use as construction indica-
tors.
Page 8JANUARY 2021
Assembly: Piece the Top Block
5. Fold the 13" background square in half horizontally. Press. Fold in half vertically. Press. Do
not unfold. Place the concave Outer Template on the folded fabric with the indicated edges
on the folds. Trace the curved line with a fabric pen. Remove template. Pin the layers to-
gether away from the drawn line to prevent shifting while cutting. Carefully cut along the
drawn line. Unfold the piece, keeping the creases to use as construction indicators.
Page 9JANUARY 2021
Assembly: Piece the Top Block
6. Using a removable fabric pen, mark the crease lines on both the inner and outer circle A, B,
C, and D as shown.
Page 10JANUARY 2021
Assembly: Piece the Top Block
7. On both the inner and outer circles fold the pieces in half diagonally so point A meets point
B and point C meets point D. Press a crease in this line. Unfold. Fold each unit in half di-
agonally the other direction so point A meets point D and point B meets point C. Press a
crease in this line. Unfold.
NOTE: Handle the pieces carefully, especially the background piece, to avoid stretching the
cut circles.
Page 11JANUARY 2021
Assembly: Piece the Top Block
8. With the right sides of the fabrics together, match point A on the outer circle to point A on
the inner circle. Pin with the cut edges aligned. Do the same with points B, C, and D. Align
and pin the pressed diagonal creases. Add pins between the crease lines as needed to en-
sure the cut edges of the circles are aligned.
The outer corners of blue background fabric will be scrunched into the center as you pin
the pieces together.
Page 12JANUARY 2021
Assembly: Piece the Top Block
9. With the background fabric on top, use an accurate 1/4” seam to machine piece the circle.
Press the seam allowance toward the background fabric.
Page 13JANUARY 2021
Quilting
Layer the quilt backing, batting, and pieced quilt top. Baste.
Thread the sewing machine in orange thread using 28wt thread in the top and 50wt thread in
the bobbin. Use the Top Stitching needle to quilt.
NOTE: For the horizontal lines, I suggest quilting from the center of the quilt outward. Since
the quilting is a dominant design element, avoid back stitching to lock the quilting in. Instead,
use a lock stitch or bring the bobbin thread up to the top of the quilt, knot, and bury the
thread.
10. Mark and stitch a line at the top and bottom of the orange section of piecing. To mark
lines, you may use masking tape or a removable fabric pen.
Page 14JANUARY 2021
Quilting
11. Mark 1” increments from the bottom stitched line. At the top, you will have one space that
is approximately 1/2”. Stitch.
Page 15JANUARY 2021
Quilting
12. Stitch halfway between the 1” increments to create 1/2” spaces.
Page 16JANUARY 2021
Quilting
13. Stitch halfway between the previously quilted lines to create 1/4” spaces.
Page 17JANUARY 2021
Quilting
14. Stitch halfway between the previously quilted lines to create 1/8” spaces.
Page 18JANUARY 2021
Quilting
15. Repeat steps 10-14 to quilt the yellow and pink area of the quilt as shown. Use yellow
thread for the yellow area and pink thread for the pink area. Using blue 50wt thread in
both the top and bobbin, quilt the background using the same method to complete the
block.
16. Trim the block to 12½" x 12½” square.
Finished?
Fantastic!
Page 19JANUARY 2021
Fold
Outer
Template
Fold
Fold
1"
Inner
Template
1"
Fold
Page 20You can also read