USER GUIDE - OCTOBER 9, 2021 - OPENAIR
←
→
Page content transcription
If your browser does not render page correctly, please read the page content below
User Guide

October 9, 2021
Copyright © 2013, 2021, Oracle and/or its affiliates.

This software and related documentation are provided under a license agreement containing restrictions
on use and disclosure and are protected by intellectual property laws. Except as expressly permitted
in your license agreement or allowed by law, you may not use, copy, reproduce, translate, broadcast,
modify, license, transmit, distribute, exhibit, perform, publish, or display any part, in any form, or by any
means. Reverse engineering, disassembly, or decompilation of this software, unless required by law for
interoperability, is prohibited.

The information contained herein is subject to change without notice and is not warranted to be error-
free. If you find any errors, please report them to us in writing.

If this is software or related documentation that is delivered to the U.S. Government or anyone licensing it
on behalf of the U.S. Government, then the following notice is applicable:

U.S. GOVERNMENT END USERS: Oracle programs (including any operating system, integrated software,
any programs embedded, installed or activated on delivered hardware, and modifications of such
programs) and Oracle computer documentation or other Oracle data delivered to or accessed by
U.S. Government end users are "commercial computer software" or "commercial computer software
documentation" pursuant to the applicable Federal Acquisition Regulation and agency-specific
supplemental regulations. As such, the use, reproduction, duplication, release, display, disclosure,
modification, preparation of derivative works, and/or adaptation of i) Oracle programs (including any
operating system, integrated software, any programs embedded, installed or activated on delivered
hardware, and modifications of such programs), ii) Oracle computer documentation and/or iii) other
Oracle data, is subject to the rights and limitations specified in the license contained in the applicable
contract. The terms governing the U.S. Government's use of Oracle cloud services are defined by the
applicable contract for such services. No other rights are granted to the U.S. Government.

This software or hardware is developed for general use in a variety of information management
applications. It is not developed or intended for use in any inherently dangerous applications, including
applications that may create a risk of personal injury. If you use this software or hardware in dangerous
applications, then you shall be responsible to take all appropriate fail-safe, backup, redundancy, and other
measures to ensure its safe use. Oracle Corporation and its affiliates disclaim any liability for any damages
caused by use of this software or hardware in dangerous applications.

Oracle and Java are registered trademarks of Oracle and/or its affiliates. Other names may be trademarks
of their respective owners.

Intel and Intel Inside are trademarks or registered trademarks of Intel Corporation. All SPARC trademarks
are used under license and are trademarks or registered trademarks of SPARC International, Inc. AMD,
Epyc, and the AMD logo are trademarks or registered trademarks of Advanced Micro Devices. UNIX is a
registered trademark of The Open Group.

This software or hardware and documentation may provide access to or information about content,
products, and services from third parties. Oracle Corporation and its affiliates are not responsible for and
expressly disclaim all warranties of any kind with respect to third-party content, products, and services
unless otherwise set forth in an applicable agreement between you and Oracle. Oracle Corporation and
its affiliates will not be responsible for any loss, costs, or damages incurred due to your access to or use
of third-party content, products, or services, except as set forth in an applicable agreement between you
and Oracle.

If this document is in public or private pre-General Availability status:

This documentation is in pre-General Availability status and is intended for demonstration and preliminary
use only. It may not be specific to the hardware on which you are using the software. Oracle Corporation
and its affiliates are not responsible for and expressly disclaim all warranties of any kind with respect to
this documentation and will not be responsible for any loss, costs, or damages incurred due to the use of
this documentation.
If this document is in private pre-General Availability status:

The information contained in this document is for informational sharing purposes only and should be
considered in your capacity as a customer advisory board member or pursuant to your pre-General
Availability trial agreement only. It is not a commitment to deliver any material, code, or functionality, and
should not be relied upon in making purchasing decisions. The development, release, timing, and pricing
of any features or functionality described in this document may change and remains at the sole discretion
of Oracle.

This document in any form, software or printed matter, contains proprietary information that is the
exclusive property of Oracle. Your access to and use of this confidential material is subject to the terms
and conditions of your Oracle Master Agreement, Oracle License and Services Agreement, Oracle
PartnerNetwork Agreement, Oracle distribution agreement, or other license agreement which has
been executed by you and Oracle and with which you agree to comply. This document and information
contained herein may not be disclosed, copied, reproduced, or distributed to anyone outside Oracle
without prior written consent of Oracle. This document is not part of your license agreement nor can it be
incorporated into any contractual agreement with Oracle or its subsidiaries or affiliates.

Documentation Accessibility

For information about Oracle's commitment to accessibility, visit the Oracle Accessibility Program website
at http://www.oracle.com/pls/topic/lookup?ctx=acc&id=docacc

Access to Oracle Support

Oracle customers that have purchased support have access to electronic support through My Oracle
Support. For information, visit http://www.oracle.com/pls/topic/lookup?ctx=acc&id=info or visit http://
www.oracle.com/pls/topic/lookup?ctx=acc&id=trsif you are hearing impaired.

Sample Code

Oracle may provide sample code in SuiteAnswers, the Help Center, User Guides, or elsewhere through
help links. All such sample code is provided "as is” and “as available”, for use only with an authorized
NetSuite Service account, and is made available as a SuiteCloud Technology subject to the SuiteCloud
Terms of Service at www.netsuite.com/tos, where the term “Service” shall mean the OpenAir Service.

Oracle may modify or remove sample code at any time without notice.

No Excessive Use of the Service

As the Service is a multi-tenant service offering on shared databases, Customer may not use the Service
in excess of limits or thresholds that Oracle considers commercially reasonable for the Service. If Oracle
reasonably concludes that a Customer’s use is excessive and/or will cause immediate or ongoing
performance issues for one or more of Oracle’s other customers, Oracle may slow down or throttle
Customer’s excess use until such time that Customer’s use stays within reasonable limits. If Customer’s
particular usage pattern requires a higher limit or threshold, then the Customer should procure a
subscription to the Service that accommodates a higher limit and/or threshold that more effectively aligns
with the Customer’s actual usage pattern.
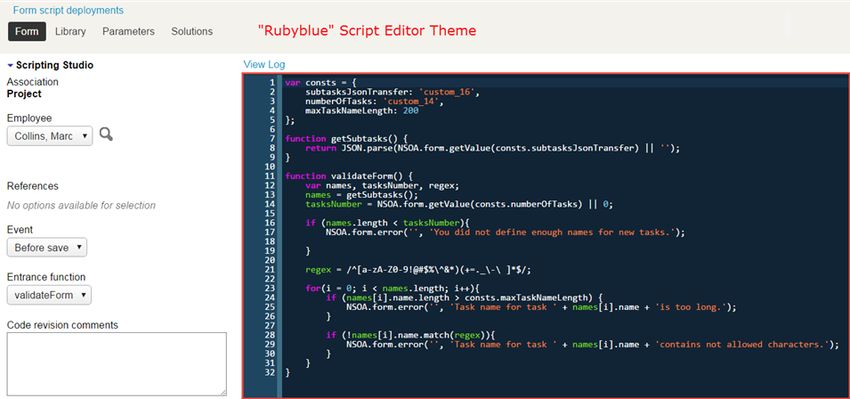
Table of Contents
OpenAir Overview ................................................................................................................... 1
Logging in to OpenAir ............................................................................................................. 2
Navigating OpenAir ................................................................................................................. 7
Navigation .......................................................................................................................... 7
User Center ........................................................................................................................ 8
View Button ........................................................................................................................ 9
Sidebar ............................................................................................................................ 10
Canvas ............................................................................................................................. 11
Working with Records, Forms and Lists ..................................................................................... 13
List View .......................................................................................................................... 13
Form ............................................................................................................................... 16
Grids ............................................................................................................................... 20
Working with Dashboards and Calendars .................................................................................. 23
Home / Dashboard ............................................................................................................ 23
Calendars ......................................................................................................................... 26
Working with Reports ............................................................................................................. 28
Reports ............................................................................................................................ 28
Report Management and Report Editor ................................................................................ 28
Creating a New Report ................................................................................................... 33
Editing Reports in the Report Editor ................................................................................. 35
Personal Settings ................................................................................................................... 38
General ............................................................................................................................ 38
Optional Features .............................................................................................................. 38
Time Settings .................................................................................................................... 39
Regional Settings ............................................................................................................... 39
Print Settings .................................................................................................................... 40
Page Layout ..................................................................................................................... 40
Dashboard Options ............................................................................................................ 40
Timesheet Options ............................................................................................................ 41
Expenses Options .............................................................................................................. 42
Invoices Options ................................................................................................................ 43
Projects Options ................................................................................................................ 43
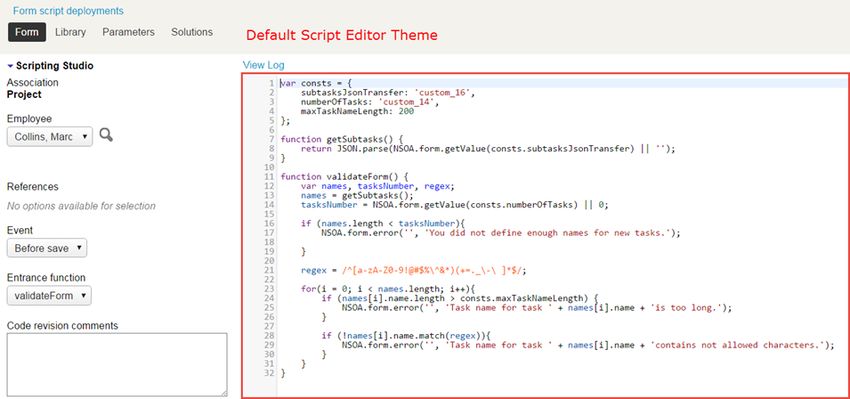
Scripting Studio Options ..................................................................................................... 43
Display Options ................................................................................................................. 47
Authorized Applications ...................................................................................................... 54
Authorizing Applications to Access OpenAir on Your Behalf .................................................. 54
References ........................................................................................................................... 58
Terminology ..................................................................................................................... 58
Icons ............................................................................................................................... 58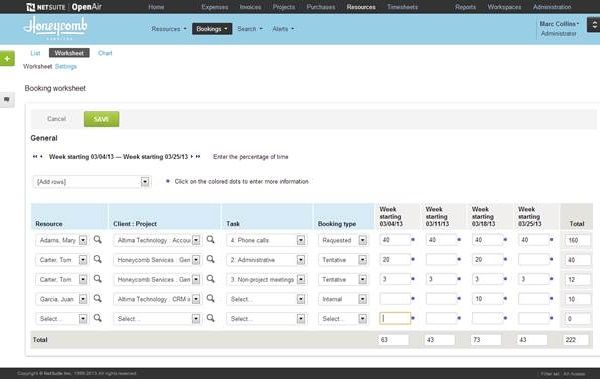
OpenAir Overview   1

OpenAir Overview
Welcome to OpenAir!

This guide will take you through the OpenAir product and how to use its interface and features.

User Guide
Logging in to OpenAir 2
Logging in to OpenAir
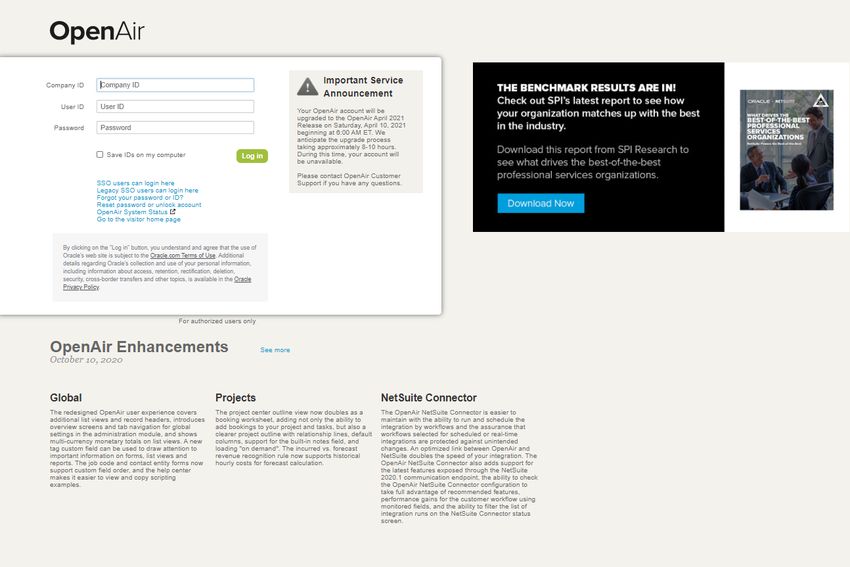
To access OpenAir, go to the OpenAir login page and enter your login details. Use the following web
address: https://auth.openair.com/login.
The method you use to log in to OpenAir depends on your account configuration. For more information,
see the following topics:
■ Logging in to OpenAir with your OpenAir login details
■ Logging in to OpenAir using Single Sign-On (SSO)
Note: Depending on the Single Sign-On solution used in your company, you may need to
enter your SSO details on your company SSO page first, then select the application you want to
access. In this case, refer to your internal documentation for instructions.
If you are logging in to OpenAir using your OpenAir login details, you may need to change your password
the first time you log in to OpenAir. See Changing your OpenAir Password.
Passwords are valid for a limited period. The validity period depends on your account configuration. You
will need to change your password periodically, before or when it expires. See Password Expiration.
Depending on your account configuration you may also need to set up security questions. If this feature
is enabled for your account, you can answer your security questions to reset your password and regain
access, in case you are locked out of OpenAir. See Setting Up Security Questions and Resetting your
OpenAir Password.
From time to time, we include important service announcements on the OpenAir login page. Please
review this panel regularly for information about planned service disruptions (during new release
upgrades, for example).
To check the availability of OpenAir at any time, click OpenAir System Status.
User Guide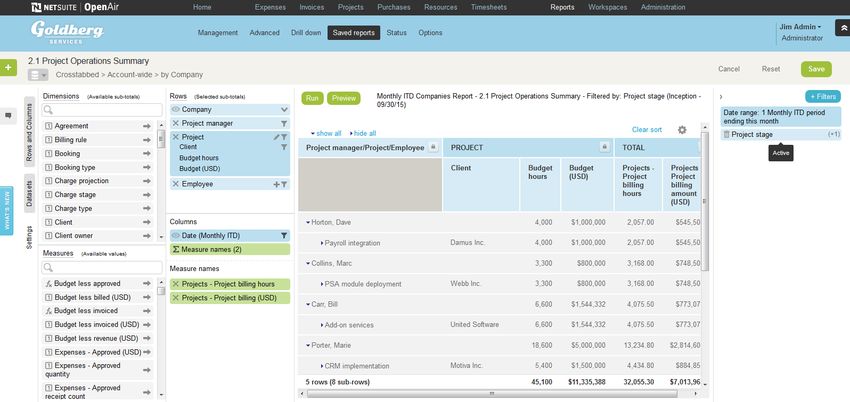
Logging in to OpenAir with your OpenAir login details      3

Logging in to OpenAir with your OpenAir login
details
You need the following information to log in to OpenAir:

■ Your Company ID — This is the unique identifier for your company’s OpenAir account.
■ Your User ID — This is your unique identifier as a user of your company’s OpenAir account.
■ Your Password — This is the combination of characters that you have created.

The combination of your Company ID , User ID and Password may be referred to as your OpenAir login
details or user credentials in the OpenAir documentation.

To log in to OpenAir using your login details:
  1. Go to the OpenAir login page — https://auth.openair.com/login.
  2. Enter your Company ID.
  3. Enter your User ID.
  4. Enter your Password.
  5. Click Log in.
      The OpenAir user interface appears.

In case you forget your login details, you can get a reminder of your user ID and the hint you set up for
your password.

To get a reminder of your login details:
  1. Click the link Forgot your password or ID?.
  2. Enter your email address associated with your OpenAir user account.
      An email is sent to your email address with a reminder of your user ID and the hint you set up for
      your password.

In case you are unable to log in to OpenAir, you can answer your security questions to reset your
password, or contact your account administrator. See Resetting your OpenAir Password.

Logging in to OpenAir using Single Sign-On (SSO)
Depending on your account configuration, you can log in to OpenAir using Single Sign-on (SSO).

To log in to OpenAir using SSO:
  1. Go to the OpenAir login page https://auth.openair.com/login.
  2. Click SSO users can login here.
  3. Enter your Company ID.
  4. Enter your User ID.
  5. Click Log in.
      Your company Single Sign-on page appears.

User Guide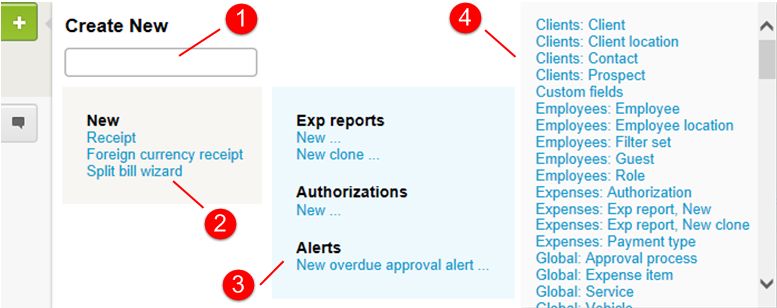
Changing your OpenAir Password      4

  6. Enter your Single Sign-on details. If your identity is verified successfully using SSO, you will be
     redirected to OpenAir.

Changing your OpenAir Password
You may need to change your OpenAir password the first time you log in to OpenAir or when your
password expires. You can also change your password at any time.

To change your password in OpenAir:

  1. Enter your Single Sign-on details. If your identity is verified successfully using SSO, you will be
     redirected to OpenAir.
  2. In OpenAir, go to the User Center and click Password.
  3. Enter your Current Password.
  4. Enter your new password in the Change Password field.
  5. Enter your new password again in the Confirm New Password field.
  6. Click Save.
      A message appears confirming that your password was changed

It is important to choose a password that cannot be compromised. Your password must meet minimum
requirements. The following minimum requirements apply to all OpenAir accounts by default. However, a
stricter password policy may be enforced for your account.

■ The password must be at least characters 8 in length.
■ The password must not be the same as your User ID.
■ The password must contain at least one alpha and one numeric character.
■ The password must contain at least three of these four character types: uppercase, lowercase,
  numeric, special characters (" !"#$%&'()*+,-./:;?@[\]^_`{|}~").
■ Your new password must not be the same as one of your last two previous passwords.

      Tip: Create a password that is easy to remember and hard to guess.

User Guide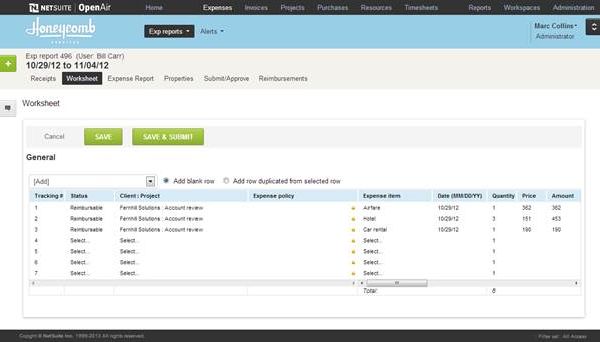
Password Expiration    5

Password Expiration
Passwords are valid for a limited period. Your password validity period depends on your account
configuration.

After your password expires, the password form appears automatically if you try to log in to OpenAir. You
must change your password before you can access OpenAir. You can change your password at any time
before it expires — see Changing your OpenAir Password.

You will receive a password expiration notification email 14 days before the password expires, and 3 days
before the password expires, unless you change your password before. The notification email includes
the date your password will expire and instructions for changing your OpenAir password.

Setting Up Security Questions
Depending on your account configuration, you may need to set up security questions when you log in
to OpenAir for the first time. You may also be prompted to set up security questions when you change
your password, if the Security Questions feature was enabled for you OpenAir account recently. Security
questions are used to verify your identity if you are unable to access OpenAir. After you set up security
questions in OpenAir, you can reset your password and regain access to OpenAir by answering a security
challenge.

You can select your three security questions from the dropdown list and write your answers in the field
next to each question.

To set up your security questions:

  1. Log in to OpenAir. If you have not already set up security questions and the feature is enabled for
     your OpenAir account, the Password form appears.
  2. Scroll down to the Security Questions section.
  3. For each question, select a question and enter your answers in the text field.
  4. Click Save.

You can change your security questions and answers at any time.

To change your security questions:

  1. In OpenAir, go to the User Center and click Password.
      The Password page appears.
  2. Scroll down to the Security Questions section.
  3. or each question, select a question and enter your answers in the text field.
  4. Click Save.

User Guide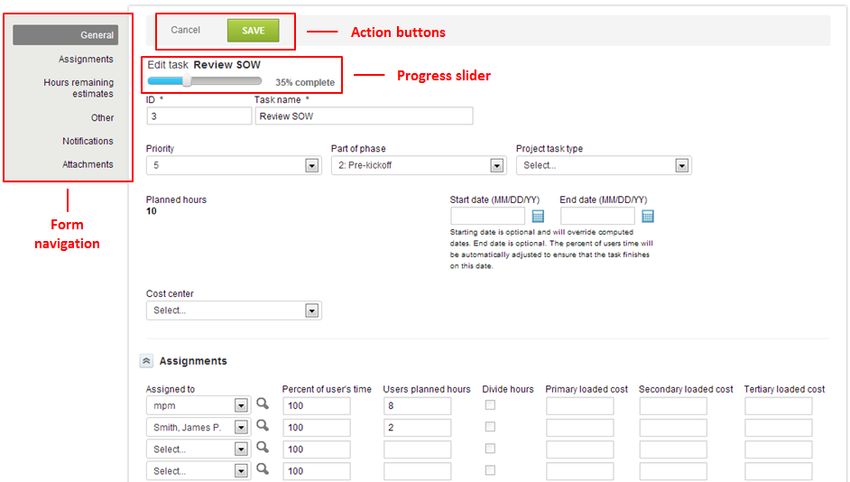
Resetting your OpenAir Password        6

      Note: When setting up or changing your security questions, consider the following rules:

      ■ You must answer all three questions.
      ■ Your answers should be unique for each question.

Resetting your OpenAir Password
Depending on your account configuration, you can reset your OpenAir password yourself in case you
forget your password or lock your OpenAir user account. You will need to answer the security questions
you set up in OpenAir to verify your identity and regain access to OpenAir, if this feature is enabled for
your OpenAir account.

To reset your password and unlock your access to OpenAir :
  1. In the OpenAir login page, click Reset password or unlock account.
  2. Enter your Company ID, User ID and E-mail address.
  3. Click Submit.
      If the details entered are valid, the security challenge form appears.
  4. Answer all three questions and click Submit. If you answer the questions correctly, you will receive
     an email with a temporary password.
  5. Log in to OpenAir using the temporary password.
      The password form appears. You will regain access to OpenAir after you change your password.
      See Changing your OpenAir Password.

User Guide
Navigating OpenAir 7
Navigating OpenAir
This section introduces you to the elements of the OpenAir user interface (UI). It includes topics for
common UI elements and tools.
The following features are always available regardless of the screen you are working in. They are context
sensitive and adapt accordingly.
1. Navigation — Three tier responsive menu gets you where you need to go. See also Form
Navigation and Pagination.
2. User Center — Draws together all user access and preference features into a common area.
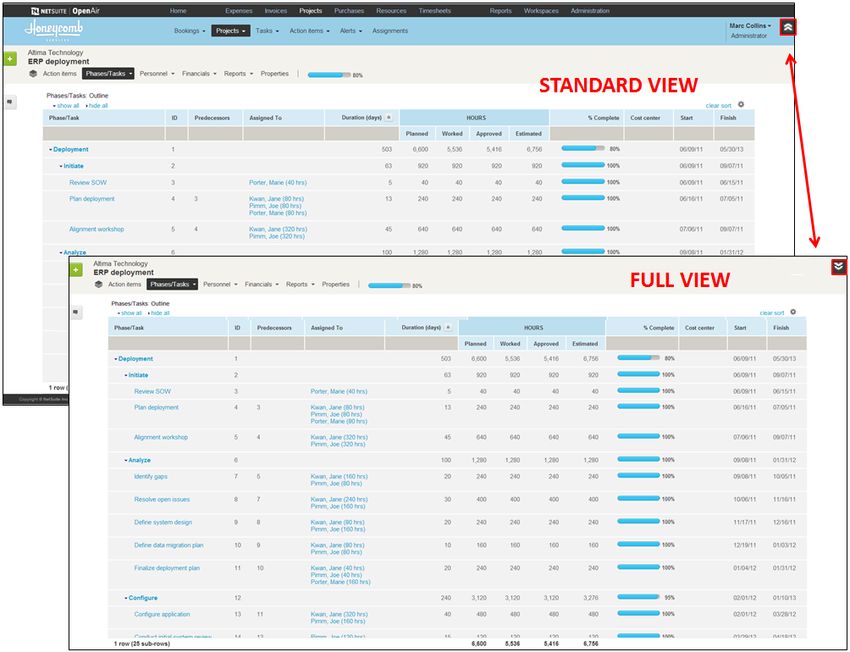
3. View Button — Allows you to swap quickly between the Standard and Full view. The Full view hides
the Navigation, User Center and the footer to maximize the screen area available to display the
content.
4. The Create Button draws together all the OpenAir content creation actions into a common area.
5. The Tips Button moves all the OpenAir tips into a more convenient location.
6. Canvas — Displays business data, organized into various visual forms for easy and convenient
use.The Canvas is the display area for the various screens i.e. Form, List View, Grids, Reports, etc.
Navigation
Navigation is divided into three main levels.
User GuideNavigation 8
1. Main navigation — The top menu bar allows users to navigate between the available modules.
Notice the use of spacing to logically group the modules.
2. In-Module navigation — The second menu bar allows users to navigate through the
functionality provided by the module.
3. Screen specific — The third level of navigation is specific to the selected screen and may contain
one or more level of tabs with supporting controls.
Navigation can be hidden by the View Button.
Continuation Menu
If there is not sufficient space to display the full menu bar then a continuation … drop down menu is
displayed.
Navigation Controls
See also:
■ Form Navigation — Allows you to quickly navigate around a large Form.
■ Pagination — Allows you to quickly navigate within a large List View.
User Center
The User Center draws together all OpenAir user features into a common area.
User GuideUser Center 9
The User Center displays the user name and role.
Point to the User Center to access the User Center menu.
■ Text size — Visual tool to set the text size used in the screens.
■ Change Filter set — If you have multiple filters sets available, you will have the option to change your
current filter set.
■ Personal settings — Displays the screen to configure personal settings and optional features. See the
chapter on Personal Settings for more information.
■ My profile — Displays your resource profile. You can only view or modify your own resource profile if
you have the relevant role permissions and if the feature is enabled on your account.
■ Password — Displays the screen to change password and provide password hint.
■ Help Center — Displays the OpenAir Help Center.
■ Support — Displays the support screen where users can access SuiteAnswers, access the User Forum
and view guides.
■ Log in as — Log in or proxy in as another user.
■ Log out — Log out and cancel your session.
Note: Some of the User Center menu options are only available if the feature is enabled for your
account and/or if your role permission enables you to access the feature.
The User Center can be hidden by the View Button.
View Button
The View button allows you to quickly swap between Standard and Full views.
User GuideView Button 10
The Full view hides the Navigation, User Center and the footer to maximize the screen area available to
display the content.
Sidebar
The Sidebar provides quick access to the most frequently used features.
The Sidebar typically contains:
■ Create Button
■ Tips Button
Create Button
The Create button draws together all the OpenAir content creation actions into a common area.
1. Search — Search is used to located a specific global create action. As you enter search text the
Global create list is filtered instantly.
2. Screen specific — List all create actions available for the current screen.
3. Module specific — List all create actions available for the current module.
4. Global create list — List all create actions from global settings.
User GuideSidebar 11 The Create button is context sensitive. Click the button to display the Create New menu. Tips Button The Tips button contains OpenAir tips in a convenient location. The Tips button contains information relevant to the screen or module you are in, and also contains special actions available to your role. Canvas The canvas displays business data organized into various visual forms for easy and convenient use. Depending on the context and purpose, information is organized into Lists, Charts, or Worksheets for a “Big Picture” perspective and convenient access to data. Data items, such as Projects, Timesheets or Expense Envelopes, each have their own navigation to give deeper and more precise control over the data configuration. This may be displayed as Forms, Lists, or Grids (Worksheets). The Home and Dashboard board screens combine useful information into clear and interactive portlets. These may include messages, reminders, overviews, and repositories of files or analytic data, presented as colorful graphs. Calendars provide support for the main modules, such as the Resource Management module by displaying various types of data in a useful color-coded form. User Guide
Canvas   12

The canvas can contain the following screen types:

■ List View
■ Form
■ Home / Dashboard
■ Calendars

User Guide
Working with Records, Forms and Lists          13

Working with Records, Forms and Lists

List View
The List View presents bulk data in a linear way, providing a variety of helpful tools for productive work.
Most List Views include a "Display/Toolbar Bar", which consist of various column configuration tabs,
filtering options and other useful tools.
List Options combine visual display settings, content configuration and data export options. Selected
rows, sorted and filtered columns are clearly highlighted in bright and positive colors.
Rows containing total values are always displayed on the screen, without the need to scroll or otherwise
locate them.
OpenAir includes a variety of useful illustrative ways to display various aspects and qualities of data, such
as the Progress Bar and Active Tick to indicate the project status at a glance.

   1. Screen-specific navigation
   2. Run bulk actions
   3. Row Header colors
   4. List Options
   5. “Active” tick
   6. Progress bar
   7. Pagination

      Note: The       icon is used for Run bulk actions and the Cog        icon is used for List options.

Features:

■ Screen specific navigation
■ Run bulk actions button
■ Row header colors

User Guide
List View 14 ■ List Options with new Density setting. ■ Active Tick ■ Progress Bar ■ Pagination List Options The List options button pulls together the previous List Menu and Rows per page features and has been moved to a more prominent position. Density List Views Select comfortable or compact from the List Options menu to control the density of the data displayed in list views. In compact mode the margins are trimmed and headings wrap to make more data visible. User Guide
List View   15

Timesheets

Timesheet grid density is set from User Center > Personal Settings > Display Options > Data Density >
Control the data density displayed in timesheet grid with selected mode.

Active Tick
The Active tick provides a clear positive indication of an active item.

Progress Bar
The Progress bar combines a quick visual indication of completed status together with the numerical
value.

Pagination
The Pagination control is provided in the List View to allow you to quickly move to the item you need
regardless of the size of the list.

From the control you can clearly see your position in the list and move through the pages. Hover your
mouse over the control and click to jump to a specific page.

User Guide
Form      16

Form
Forms present editable data clearly.

Forms have a 2 column layout, collapsible sections, and input fields to provide a positive and satisfying
user experience.

Form Navigation provides users with a quick and convenient way to navigate between form sections,
which is especially important for editing complex data items, such as Projects. The currently displayed
section is clearly highlighted and adjusts automatically when the form is scrolled.

Features:

■ Form Navigation — Allows you to quickly navigate large forms.
■ Form Signposting — Helps you keep your bearings when navigating complex forms.
■ Action buttons — Buttons are generally green throughout the application, and the green color
  indicates that they save data to the server. Blue buttons perform in-page functions which do not save
  data on the server. Cancel and Delete buttons are exceptions and are show as text.
■ Task Progress slider — Allows you to quickly view the current progress.

            Note: If enabled in your account, the slider also allows you to set the progress.

■ On-Screen Error Messages — New on-screen error reporting features help you to quickly located and
  correct input errors.
■ In-Form Notifications — Helps you to quickly find and resolve data entry issues.
■ In-Form Popups — Enjoy the full functionality of NetSuite OpenAir without the need for popup
  windows.

Form Navigation
Form navigation is a Form control that allows you to quickly navigate around large forms.

User Guide
Form 17
Note: Form Navigation does not display if the form only includes a General section.
Form navigation features:
■ Section list — The bar displays the list of sections the form is divided into.
Note: Clicking on a section will take you directly to the relevant part of the form.
■ Section indicator — The section you are currently viewing is highlighted in gray.
Note: As you scroll through a form the Section indicator changes instantly.
■ Section errors — If you attempt to save an incomplete form red text is used to indicate sections with
errors together with a count of the number of errors.
Note: One missing field will be reported as more than one error if it breaks more than one
rule. For example, not selecting a client can generate the ‘Required field' and ‘Please select a
client' errors.
Form Signposting
Form signposting uses info tips and color highlighting to help you to keep your bearings when navigating
complex forms.
User GuideForm 18
The orange box in the above screenshot shows an info tip. An info tip is displayed when you hover your
mouse over a control. This allows you to positively confirm the selection.
The blue boxes show the use of color to highlight the selections that have been made. This color coding
makes it easier for you to verify that the correct settings have been made.
Note: For this release, form signposting has only been applied to the ‘Modify the form
permissions’ screens.
On-Screen Error Messages
The Form Navigation control and on-screen error messages help to you quickly located and correct errors
messages.
User GuideForm 19
If problems are encountered, the form will automatically take you to the first error. The Form Navigation
control shows you the number of errors in each section. The on-screen error messages explain how to
correct the errors.
In-Form Notifications
In-Form notifications provide clear feedback on user actions without the need for popup windows. They
are particularly valuable for correcting data input errors. Errors are reported in a list with clickable links
and instructions. Click on the links to be taken directly to the source of the error.
Note: For this release, in-form notifications are only available for the timesheet grid.
In-Form Popups
In-Form popups have all the advantages of conventional popup windows, but appear as part of the form.
This allows you to block popup windows and still use all the OpenAir functionality.
User GuideForm 20 The new option is enabled from Personal Settings > Display Options. Grids Timesheet grid Timesheet grid features: User Guide
Grids     21

■ Pin — Select to fix the calendar display on the right. When pinned the left side can be scrolled without
  losing the calendar view on the right.
■ Week browse — Move quickly to the previous week or to the next week.
■ Delete row — Click the Delete button next to a row and confirm the deletion to remove the row from
  the grid.
■ Clone row — Click the Clone button next to a row and a complete copy of that row is created directly
  below it.
■ New row — To speed data entry a new row is kept at the bottom of the timesheet. As soon as you
  start to fill out the new row another new row is automatically created.

Resizing timesheet columns

When this feature is enabled, simply hover your mouse over the edge of a column header and drag the
column edge to the required size. The new column size will be remembered.

Multi-week timesheet view

Multi-week timesheet view is set from User Center > Personal Settings > Timesheet Options > Display all
weeks for timesheets containing multiple weeks.

User Guide
Grids   22

Classic grid

Retains all the previous functionality with a clean fresh look.

Dynamic grid

Retains all the previous functionality with a clean fresh look.

User Guide
Working with Dashboards and Calendars        23

Working with Dashboards and Calendars

Home / Dashboard
The content of the home page and dashboard is organized into portlets that can be collapsed, expanded,
resized, and moved. Portlets are screen width responsive.

This example shows three chart portlets. You can interact with the charts, e.g. hiding a series by clicking
on the legend or hovering over a point to display detailed information in a tooltip. You can also download
the chart as an image.

Portlet
The Home and Dashboard screens are organized as a set of portlets. Each portlet type is color coded and
can be moved and resized according to your needs. You will find all of the familiar OpenAir Dashboard
functionality encapsulated within these portlets.

User Guide
Home / Dashboard           24

Portlet features:

■ Portlets have a title that displays in the center when the portlet is collapsed and at the top when the
  portlet is expanded.

         Note: When collapsed the number of items in the portlet is displayed on the left.

■ Portlets can be moved by dragging the portlet title. To keep a pleasing appearance, portlets
  automatically align to a grid.

         Note: The Message Board portlet is always shown first and cannot be moved from the top
         left position on the Dashboard.

■ Portlets can be collapsed or expanded by clicking on the       /   Icons or by single clicking on the
  portlet title.
■ When expanded, portlets have action buttons displayed in the top right depending on the portlet type.
  An action hint is displayed if you hover your mouse over the button.

   If the content does not fit within the portlet area, then the content will either automatically resize or
   scrollbars will be displayed. Portlets with a   icon can be edited to display different information. For
   portlets which display information from a report, you can open the report from the portlet by clicking
   the icon. You can delete a portlet by clicking the       icon.

Chart
Colorful and interactive graphs create offer a productive and in-depth way to work with performance
metrics.

User Guide
Home / Dashboard 25 Chart features: ■ Dynamic — You can directly interact with the charts by simply clicking on them. For example, you can hide a series by clicking on the series in the legend. ■ Tooltip Labels — Point to a chart to display a tooltip with information on each point and series. The tooltip follows as the user moves the mouse over the graph, and great efforts have been taken to make it stick to the nearest point as well as making it easy to read a point that is below another point. ■ Export Chart — You can export the chart as an image by clicking on the icon. ■ Chart Preview — You can see a preview of the chart type when editing the Chart Portlet. ■ Chart Types — The following new chart types are available in OpenAir: Donut, Area Spline, Stack Area, and horizontal / vertical stacked-bar. Project Dashboard User Guide
Home / Dashboard        26

The Project Dashboard gives a visual analysis of a specific project and is useful for visually comparing
projects.

      Note: All items displayed on the Project Dashboard are filtered by the specific project. Only
      saved reports with the “Make this report available in project-specific situations” option selected are
      shown in the Reports portlet and available to create Charts.

Calendars
In the Calendar, information is presented in a modern, visual way, color-coded by type. A multi-level
filtering system allows users to create various data configurations depending on their needs. You can
always find your calendar by going to Home > Calendars. You can also add a My Calendar tab to other
modules’ in-module navigation (please see Customizing the Calendar below).

Calendar features:

■ Colors — Calendar items are color-coded for ease of identification.
■ Item Count — A count is displayed of items not visible in each calendar cell.
■ Clicking on a specific number of the day in the calendar opens a list of events for that day by type,
  along with a summary, details, and notes. Clicking an entry under Summary opens a window with
  more details about that entry.

Customizing the Calendar
The calendar and the information it displays can be customized by going to Administration > Global
Settings > Display > Interface: Display. The following options all affect the Calendar’s availability in various
modules:

■ Hide the ‘My Calendar’ tab — hides the My Calendar tab across the account. This setting is mutually
  exclusive with Show ‘My Calendar’ tab in all modules. If both are selected, the My Calendar tab will
  be hidden.
■ Maximum number of rows to display per day in ‘My Calendar’ monthly view — controls how
  many rows are displayed for each day in the monthly calendar view. The default (and minimum) is
  4 rows, and can be increased up to 10. The option to display all rows regardless of number is also
  available.

User Guide
Calendars 27 ■ Show ‘My Calendar’ tab in all modules. — shows the My Calendar tab to the in-module navigation in all modules. This setting is mutually exclusive with Show ‘My Calendar’ tab in all modules. If both are selected, the My Calendar tab will be hidden. The following options affect the information which appears on each calendar item in the calendar display and in the Summary or Detail fields in the list of events. ■ Show booking type for bookings as summary on the calendar — shows booking type information in the calendar. ■ Show custom fields for bookings as summary on the calendar — shows active booking custom fields in the calendar and summary. ■ Show custom fields for bookings as detail on the calendar — shows active booking custom fields in the calendar and detail. ■ Show custom fields for task assignments as summary on the calendar — shows active task custom fields in the calendar and summary. ■ Show custom fields for task assignments as detail on the calendar — shows active task custom fields in the calendar and detail. User Guide
Working with Reports   28

Working with Reports

Reports
Reports take their design from the List View.

Reporting controls can be found in the header.

Report Management and Report Editor
The Report Management and Report Editor features streamline the process for finding, editing,
and creating reports. For a quick overview of their functionality, please see the      OpenAir Report
Management and Editor Quick Reference.

To enable this feature, please have your Administrator contact OpenAir Support and request the Show
the ‘Enable Report Management and Editor Interface.’ Option in Employee demographics switch.
Administrators can then navigate to Administration > Global Settings > Employee/Users > [select a specific
user] > Reporting Options and check the Enable the report management and editor interface option
for each user or can use the Bulk Employee/User change wizard to enable the feature for multiple users
at one time.

User Guide
Report Management and Report Editor           29

Reporting Workflow in the Report Management and Editor
The report editor and management features introduce a more efficient workflow. Searching or filtering
reports in Report management brings up a list of rated results, as well as a preview of the report format,
all within the same screen. Clicking New (if selecting a template) or Edit (if selecting a saved report) in this
interface opens the Report editor, which lets you customize the report as you see fit.

User Guide
Report Management and Report Editor        30

      Warning: Advanced Reports are not currently supported in the Report Management or Report
      Editor interfaces.

Report Search and Ranking in the Report Management
Interface

The Report management interface includes a number of features to quickly locate reports which fit
your needs. Reports can be searched for by name and/or desired measures, attributes, dimensions, or
hierarchies. Report management is located under Reports > Management.

When the Report Management interface appears, you’re presented with the screen above. In the top left
corner is the Search and Filter area, where you can search for reports by name, and also by particular
measures, attributes, hierarchies, or dimensions.

Below the Search and Filter area is the Results area. Search results appear here, and include either
tabular or crosstabbed templates or saved reports. The order of dimensions in the results matches the
order of dimensions entered into the filter box.

Along the top of the Results area are tabs which organize the Results into various categories.

      Note: Depending on your level of access, some tabs may not be visible.

■ The All tab includes all results.
■ The All Saved tab includes all results which are saved reports and in the system
■ The My Saved tab includes only results which are your saved reports
■ The Shared tab includes results which are reports which others have shared with you or were shared
  by you with others

User Guide
Report Management and Report Editor 31
■ The Tabular tab includes any results which are tabular report templates
■ The Crosstabbed tab includes any results which are crosstabbed report templates
Note: When you search, you are searching through all available reports; however, the Results
area will only display a maximum of 100 search results.
Each result includes the saved report or report template name and buttons which, when clicked, allow the
user to perform available actions such as viewing, editing, or sharing the report.
In the search results, each report template or saved report result is given a rating between 0 and 10,
based on how often the template is used by all OpenAir users.
■ A 10 means that the report is used very often by all OpenAir users.
■ A 0 means that the report is rarely or never used by OpenAir users.
Note: Saved report ratings are taken from the report template which the saved report is based
on.
Clicking on a report name in the Results area opens a preview of the selected report result in the Report
information area and Configuration preview area. There is no need to navigate away from the search
results to see the preview.
User GuideReport Management and Report Editor 32 The Report Information area gives details about the selected report. ■ The Report rating appears in the top left corner, next to the Report name ■ Category — indicates whether the result is a Saved, Template, or Shared report ■ Type — indicates whether the result is a Tabular or Crosstabbed report ■ Template (Saved or Shared report results only) — the name of the template the saved report is based on ■ Owner — the owner of the report ■ Created — the date the report was created ■ Last saved — the date when the report was last saved ■ Last view — the date when the report was last viewed ■ Duration — the time it took to run this report the last time ■ Total views — total views by everyone who has view rights for these reports ■ Scheduled — indicates if the report is scheduled to be run at a specific time and the schedule is active ■ Folder — indicates which folders this report is located in ■ Shared with — indicates who this report has been shared with ■ Note / description — note or description of the saved report ■ Template specification (Templates only) — provides additional information about the selected template. □ Intro — briefly describes the template and its layout □ Dataset — indicates which tables provide data for the template □ Grouping — indicates the primary grouping, and describes other potential groupings □ Hierarchy — indicates which hierarchies are supported, if any User Guide
Report Management and Report Editor        33

Click New (if previewing a template) or Edit (if previewing a saved report) in the Report Information area
to open the Report Editor. You can also open the Report Editor by clicking the pencil icon     within the
search results themselves.

To Schedule a Report to Run at Periodic Intervals with Report Emails

  1. Navigate to Reports > Management, click the All, All Saved, or Saved tab, and click the Schedule
     icon   for the Saved report you would like to schedule.
  2. In the General section of the Schedule form, select Run the report at the following time, set the
     Day, Hour, and Minute when you would like the report to run, and select whether the report should
     be emailed as a PDF or CSV file.

             Note: Times are in U.S. Eastern Time.

  3. In the Email options section of the Schedule form, select who you want the emailed report sent to
     (“Me” is selected by default). You can also email it to All the employees who share the report, or
     add additional contacts by clicking > Create, selecting the Contacts in the Available column, clicking
     Add selected >, and clicking OK when finished.
  4. Enter an email address which will serve as the Sender.
  5. Enter a subject for the email. “Scheduled Report: [Report Name]” is used by default.

             Note: Metavalues such as %%date%% are not supported in Scheduled Report headings or
             bodies.

  6. Add any optional text which will appear in the email body.
  7. In the Other section of the Schedule form, select Email me additional information if the report
     returns no data if you would like to receive an email even if the report returns no data.
  8. Click Save and the report will be run and emailed (if addressees were selected) at the designated
     time.

Creating a New Report
Reports can be created in Report Management and Report Interface in three ways.

To create a new report (method 1):

  1. Go to Reports > Management.
  2. In the Report management search fields on the left, enter your desired criteria, and a template or
     saved report is suggested. Select the one which most closely matches your needs.
  3. Click New (for templates) or Edit (for saved reports) in the upper right corner of the preview
     window. You will be taken to the Report editor, and your criteria will be pre-populated in the layout
     preview in the center of the page.
  4. Drag-and-drop or click the appropriate dimensions and measures for your reports. Only
     Dimensions can be placed in the Rows box, and only Measures can be placed in Measure names
     box. The measure names container is present in the Columns box under the pre-defined Date
     dimension or only the Measure names box. As you place these elements, the preview window will
     automatically update to show you the new report layout configuration.
  5. Click on Funnel icons     to setup filters for dimensions.
  6. Click Preview to see an example of your report run with 1 record.

User Guide
Report Management and Report Editor 34
7. Click Run and the complete report is created using all of your selected records.
8. Click the + Filters button if you would like to narrow down or analyze specific data, for example for
specific employees or time periods. This section lets you set filters limiting the data which appears
in your report.
9. Enter the name of your report in the upper left corner of the Report editor, underneath your
company name and save it by clicking the Save button in the upper right corner of the Report
editor.
To create a new report (method 2):
1. Click the Create button on the upper left side of the screen. This can be done anywhere within
OpenAir. If you were already within the Report editor, select Report > New ... You can also select
Account-wide: Report from the Create new window in any other area of OpenAir. An empty report
(based on the “Crosstabbed > Account-wide > by Company” template) is opened in the Report
editor.
2. Drag-and-drop or click the appropriate dimensions and measures for your reports. Only
Dimensions can be placed in the Rows box, and only Measures can be placed in Measure names
box. The measure names container is present in the Columns box under the pre-defined Date
dimension or only the Measure names box. As you place these elements, the preview window will
automatically update to show you the new report layout configuration.
3. Click on Funnel icons to setup filters for dimensions.
4. Click Preview to see an example of your report run with 1 record.
5. Click Run and the complete report is created using all of your selected records.
6. Click the + Filters button if you would like to narrow down or analyze specific data, for example for
specific employees or time periods. This section lets you set filters limiting the data which appears
in your report.
7. Enter the name of your report in the upper left corner of the Report editor, underneath your
company name (default is “Untitled”) and save it by clicking the Save button in the upper right
corner of the Report editor.
To create a new report (method 3):
1. From the Report editor, click the Select dataset and data format button ( ) on the upper
left side of the screen, under the report name. A new report template (either empty or with the
selected dimension or measure) is created.
2. Drag-and-drop or click the appropriate dimensions and measures for your reports. Only
Dimensions can be placed in the Rows box, and only Measures can be placed in Measure names
box. The measure names container is present in the Columns box under the pre-defined Date
dimension or only the Measure names box. As you place these elements, the preview window will
automatically update to show you the new report layout configuration.
3. Click on Funnel icons to setup filters for dimensions.
4. Click Preview to see an example of your report run with 1 record.
5. Click Run and the complete report is created using all of your selected records.
6. Click the + Filters button if you would like to narrow down or analyze specific data, for example for
specific employees or time periods. This section lets you set filters limiting the data which appears
in your report.
7. Enter the name of your report in the upper left corner of the Report editor, underneath your
company name (default is “Untitled”) and save it by clicking the Save button in the upper right
corner of the Report editor.
User GuideReport Management and Report Editor 35 Editing Reports in the Report Editor The Report editor lets you create, edit, test, and run reports all on the same screen, without the need to switch between forms and previews or to refresh the page. At the top left is the Report name. Changing the report name from “Untitled” or any other name saves the report with the new name. The Select dataset and data format button is located under the report name. Clicking it opens a menu which lets you select a template. The current report template type is presented next to the Select dataset and date format icon. Next to the Tips button are three vertical tabs which can be clicked to show or hide various Report Editor elements. ■ Rows and Columns shows/hides the list of Rows, Columns, and Measure names currently in the report ■ Datasets shows/hides the list of Dimensions and Measures for crosstabbed report templates or Attributes for Tabular report templates which can be added to the report ■ Settings shows/hides the list of settings which can be modified for the report. Rows can be customized by drag-and-dropping dimensions (which are usually text and date fields available for filtering and grouping) into the Rows section. You can also click directly on a dimension User Guide
Report Management and Report Editor         36

or measure and it will be added to the end of the rows or columns list. Hovering over Dimensions,
Measures, or Rows opens a legend explaining what each icon in the interface means.

■ Dimensions can be suppressed by clicking the Suppress dimensions icon             .

■ The Total column for measures can also be suppressed by clicking the Suppress total column icon
    .

■ Clicking the    next to a selected dimension, measure, or attribute deletes it from the report layout.

A new picker type has been added to the reporting interface and can be used to select and reorder
columns. To enable it, activate the Use in-line multiple selection interface switch in Personal Settings >
Display Options.

To Add Fields to Rows and to Rearrange Row Order

  1. Click the Modify icon     .
  2. In the All tab, select attributes the which you would like to see in the report.
  3. In the Selected tab, the attributes you have chosen appear, and can be moved with drag-and-drop
     functionality to change their order within the report.
  4. Click OK in the bottom right of the picker window when you are finished.

Measures (numeric values which can be aggregated, including counts, totals, or custom calculations) can
be moved with drag-and-drop functionality into measure names.

You can type the names of dimensions and measures into their respective search fields to quickly find the
ones you need. Smart search functionality eliminates the need to know the full name.

User Guide
Report Management and Report Editor 37 In the center of the interface, an instantly-updated preview shows you how your report layout will look — again, there is no need to navigate away from the report editor and the updates do not require a page refresh. ■ Clicking Run will run the report from the Report Editor interface with all records. ■ Clicking Preview will run the report with only one record, which lets you see the report with actual data, but without the need to wait for all of your records to be processed. On the right side of the Report editor interface, you can add filters which limit the data which appears in the report. A picker window appears when you click on any existing filter, and lets you further customize each filter. Hovering over an existing filter shows a list of what is included within that filter. User Guide
Personal Settings   38

Personal Settings
Click Personal settings in the User Center to configure your personal settings and optional features.
Personal Settings override any corresponding settings set by your company.

      Note: The options which you see in your Personal Settings depend on your user role and your
      company’s settings. Some options may not be available to you.

General

Allow support log in
When enabled, OpenAir Support personnel can log into your account. This setting is usually used for
troubleshooting and support.

Optional Features

Show the list name in page footer
Displays the list name in the bottom right corner of the screen when in a list view.

Show currently active module name in the browser title bar
Displays the name of the active module in the browser bar or tab. When this option is cleared, only
“OpenAir” appears in the browser bar or tab.

User Guide
You can also read