DOCSIS 3.1 CABLE MODEM PLUS AC3200 WIFI ROUTER - MODEL MG8702 USER MANUAL
←
→
Page content transcription
If your browser does not render page correctly, please read the page content below
DOCSIS 3.1 cable modem plus
AC3200 WiFi router
Model MG8702

                 User Manual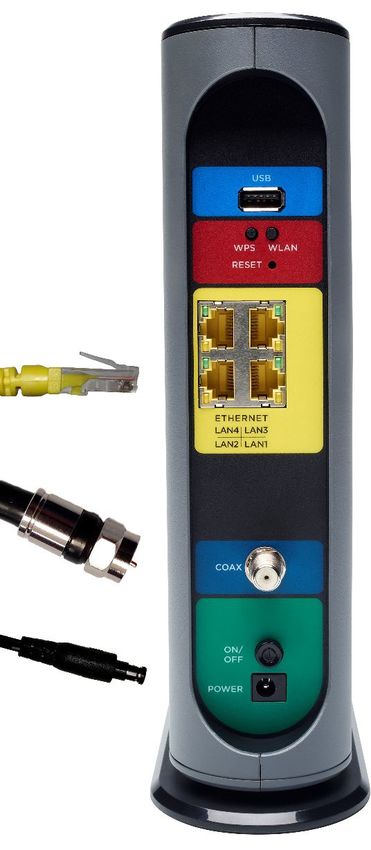
NOTICE

This document contains proprietary information protected by
copyright, and this Manual and all the accompanying hardware,
software, and documentation are copyrighted. No part of this
document may be photocopied or reproduced by mechanical,
electronic, or other means in any form.

The manufacturer does not warrant that the hardware will work
properly in all environments and applications, and makes no warranty
or representation, either expressed or implied, with respect to the
quality, performance, merchantability, or fitness for a particular purpose
of the software or documentation. The manufacturer reserves the right
to make changes to the hardware, software, and documentation
without obligation to notify any person or organization of the revision
or change.

All brand and product names are the trademarks of their respective
owners.

© Copyright 2020 MTRLC LLC
All rights reserved.
SAFETY

This equipment is designed with the utmost care for the safety of those
who install and use it. However, special attention must be paid to the
dangers of electric shock and static electricity when working with
electrical equipment. All guidelines of this and of the computer
manufacture must therefore be followed at all times to ensure the safe
use of the equipment.

CAUTION:
These precautions help protect you and your MG8702.

•   Do not put the MG8702 or its power adapter in water, since this is a
    shock hazard.
•   The MG8702 should normally be installed indoors. If you use it
    outdoors, protect it from moisture and be careful about
    temperature.
•   Your MG8702 should be operated in an environment that’s
    between 32 and 104° Fahrenheit (0 to 40° Centigrade).
•   Your MG8702 should not be in a confined space. There should be
    room for air flow around the top, front, and sides of the MG8702.
•   Make sure to use your MG8702’s power cube and a compatible
    electrical outlet.
•   The coaxial cable's ground shield is intended to be connected to
    the building's Earth ground. Attachment to Earth ground is
    typically provided through your cable service provider's
    installation.
•   MOTOROLA and MTRLC LLC assume no liability for damage
    caused by any improper use of the cable modem.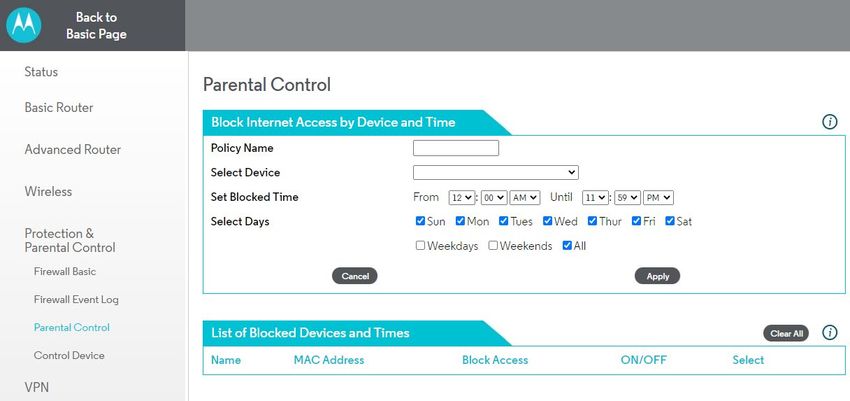
Table of Contents
Introduction                                                                                                                               6
Quick Start                                                                                                                                7
 CONNECTING A DEVICE VIA ETHERNET ................................................................................................. 23
 CONNECTING A SMARTPHONE, TABLET OR OTHER WIRELESS DEVICE VIA WIFI ............................24

Setting up a smart TV, streaming media
device, or other device                                                                                                                25
Accessing the Configuration Manager by
Using a Browser                                                                                                                        26
Configuring your MG8702 to support devices
and applications with special requirements 33
 FOR GAMES PLAYED ON GAME CONSOLES AND PCS, AND SECURITY CAMERAS ........................... 33
 TO CREATE A PORT FORWARDING RULE...............................................................................................36

Changing wireless settings                                                                                                            40
 TO CHANGE THE NETWORK NAME AND PASSWORD ...........................................................................41
 WIRELESS GUEST NETWORKS ............................................................................................................... 45

Changing firewall settings                                                                                                             48
Tuning wireless performance                                                                                                            50
 WIFI MULTIMEDIA (WMM) ..................................................................................................................... 55

Parental Control                                                                                                                        57
 SETTING UP TIMES WHEN INTERNET ACCESS IS ALLOWED AND NOT ALLOWED .............................58

VPN (Virtual Private Network)                                                                                                            61
Changing your MG8702’s Username and
Password, and Resetting to Factory Defaults
                                          68
 CHANGING YOUR MG8702’S USERNAME AND PASSWORD ..............................................................68
 RESETTING TO FACTORY DEFAULTS ..................................................................................................... 69

Configuring Alternate WiFi Security Settings
                                           70
 ALTERNATIVES TO WPA2-WPA, AND RADIUS ............................................................................... 70

Troubleshooting Tips                                                                                                                                     73
 WHAT IF I CAN’T MAKE AN INTERNET CONNECTION RIGHT AFTER INSTALLATION?....................... 73
 WHAT IF MY MG8702 HAS BEEN WORKING THEN STOPS WORKING? ............................................. 73
 WHAT IF I’M GETTING INTERNET SERVICE BUT MY SPEED IS DISAPPOINTING?................................ 74
 WHAT IF I'M TOLD THAT MY MG8702 ISN'T APPROVED BY MY CABLE SERVICE PROVIDER? ...... 74
 WHAT IF I AM CONNECTED WIRELESSLY BUT MY CONNECTION SEEMS SLOW OR KEEPS
 DROPPING? ................................................................................................................................................. 74
 WHAT IF I DON’T KNOW MY MG8702’S WIRELESS NETWORK NAMES/SSIDS OR SECURITY
 KEY/PASSWORD? ..................................................................................................................................... 75
 WHAT IF I THINK THAT WIRELESS DEVICES ARE INTERFERING WITH MY MG8702 WIRELESS
 ROUTER? ..................................................................................................................................................... 75

Support                                                                                                                                                 76
 WE LIKE TO HELP....................................................................................................................................... 76
 LIMITED WARRANTY ................................................................................................................................. 76

Compliance                                                                                                                                               77
Introduction
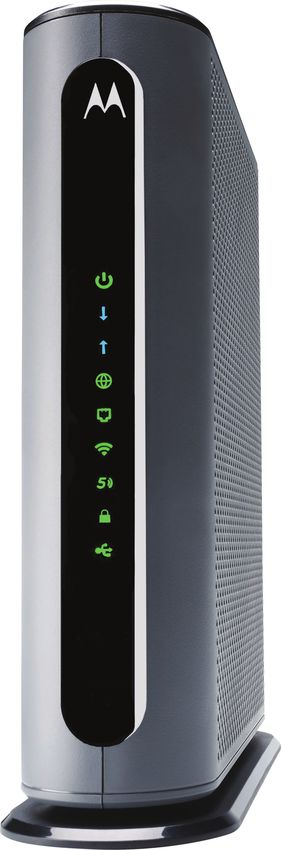
The Motorola Model MG8702 is a DOCSIS 3.1 cable modem with a built-
in AC3200 WiFi router that has 4 Gigabit Ethernet ports. This model
connects to standard cable company Internet service. Model MG8702
can provide shared Internet access to Ethernet-capable and WiFi
devices including computers, smartphones, tablets, Smart TVs, game
consoles, security cameras, and streaming media devices. The MG8702
is a dual-band WiFi router, and supports clients that operate on both
the 2.4 and 5 GHz bands.
Basic Installation instructions for Model MG8702 are in the Quick Start
that comes with Model MG8702 and that is duplicated in Chapter 2 of
this User Guide.
Model MG8702 has a Configuration Manager that provides a lot of
technical information about Model MG8702 and that tells you how to
do some useful things as summarized below. Please note that some
users will never need to use the Configuration Manager.
Chapter 3: Alternate Ways to Connect Your Coax Cable
Chapter 4: Connecting Devices to Your Cable Modem/Router
Chapter 5: Setting up a Smart TV, Streaming Media Device, or Other
Device
Chapter 6: Accessing the Configuration Manager by Using a Browser
Chapter 7: Configuring Your MG8702 to Support Devices and
Applications with Special Requirements, like Games Played on Game
Consoles and PCs, and Security Cameras
Chapter 8: Changing Wireless Settings
Chapter 9: Changing Firewall Settings
Chapter 10: Tuning Wireless Performance
Chapter 11: Parental Control
Chapter 12: VPN (Virtual Private Network)
Chapter 13: Troubleshooting Tips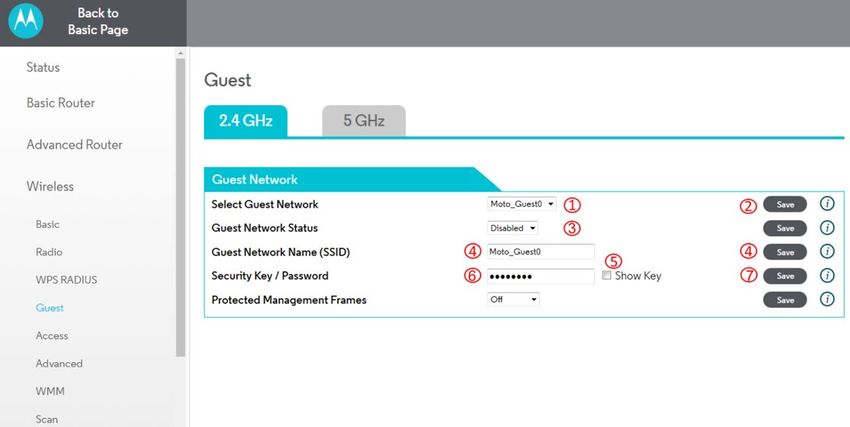
Quick Start
Packaged with your MG8702 modem/router

   Power Adapter           Coax Wrench

    Ethernet Cable         Velcro® Cable
                           Organizer

Para una Guía de Inicio Rápido en español, por favor
vaya a www.motorolanetwork.com/MG8702ir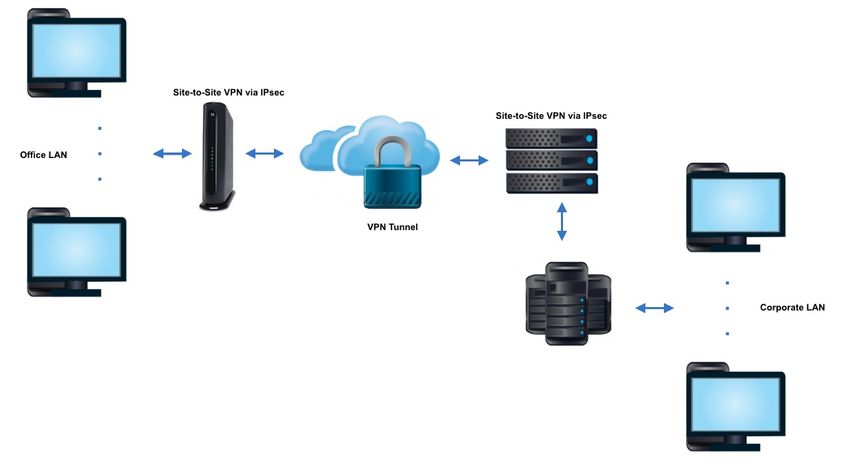
Let’s get started
1   Call your cable service provider to order cable Internet service if
    you don’t already have it. Mention that your MG8702 supports
    DOCSIS 3.1, the fastest cable modem service standard. Your
    MG8702 also supports the top speeds of any DOCSIS 3.0 services.

    If you already have cable Internet service, you probably don’t need
    to call your cable service provider. You should have your account
    number handy in case you need it during the activation process. You
    can generally find the account number on the landing page when
    you log in to your cable service provider account. You can also find
    it on a recent cable bill.

2 If possible, use your smartphone to take a photo of the label on
  the bottom of your cable modem. You’ll need the information on
  the label later. It will help to print the photo so you can scan a QR
  code on the label later.

3 Disconnect existing modems and routers, if any. Now connect
  your MG8702 as shown on the next page.

    Connecting to a coax cable
    See the connection photo on the next panel. Connect your
    MG8702 to a “live” coax cable. Sometimes a cable will already
    be available. Sometimes there’s a coax wall jack available, and
    you connect to the jack with a coax cable. Your MG8702 can
    also share a coax cable attached to a TV by using a coax
    splitter. Please note that a badly chosen splitter may reduce a
    cable modem's speed or prevent connection to the network: if
    you need to use a splitter, use a two-way splitter whose top
    frequency is 1,000 MHz or higher.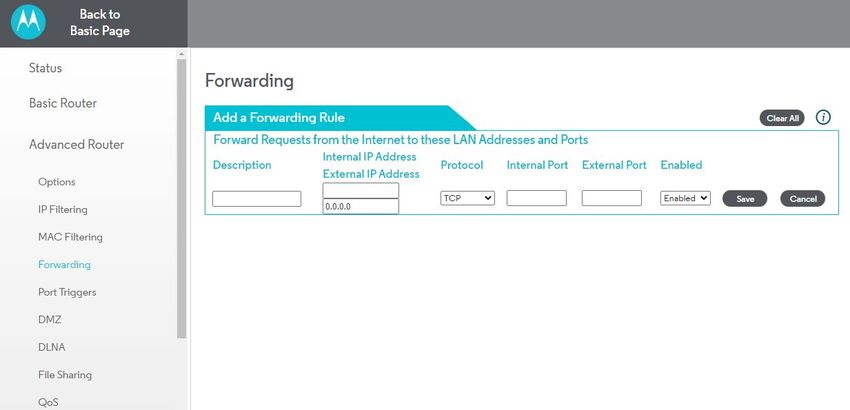
USB 3.0 Port

WPS button

WLAN button
WiFi on/off button

RESET
If pressed for ten
seconds all settings will
revert to factory
defaults.

ETHERNET (LAN 1-4)
You can connect a
computer, smart TV,
game station, or other
Ethernet-capable device
to any of these 4 LAN
ports.

COAX
Connect a “live” coax
cable (not included) to
the modem’s COAX
connector as discussed
above. Use the wrench
to tighten the nut finger-
tight: Do not
overtighten.

ON/OFF button

POWER
Connect the supplied
power adapter between
the power jack and an
electrical outlet.
Prepare to activate
Power up your cable modem/router. To do this, the On/Off button
needs to be On (Push the button in until it clicks). Wait for the online
connection light (      for 3.0, or   for 3.1) to stop flashing and remain
solidly lit. This may take up to 15 minutes.

Activate with your service provider

Some service providers allow you to activate by calling them. Others,
like Comcast Xfinity and Cox, prefer that you activate by opening the
Web browser of a computer. It’s best if the computer is plugged into
one of the MG8702’s Ethernet ports, but connecting with WiFi also
works as discussed below.
Once you've opened the browser, go to your service provider’s web
page. This should bring you directly to the service provider's activation
page. Follow the onscreen instructions.
If you don’t have a computer, you can use the Web browser of a WiFi
device such as a smartphone or tablet for activation. In that case, you’ll
need the unique WiFi Network Name (SSID) and WiFi Password printed
on the bottom of your MG8702. You’ll use these in setting up your
wireless device to wirelessly connect to the MG8702. Once you’ve
connected, you can open the browser of that wireless device.
For Comcast XFINITY Users Only:
If the activation page does not appear, please go to
xfinity.com/activate or call
1 (800) 934-6489 to activate your modem.

 Here is a list of phone numbers for some major cable
 service providers.
 (Note that this list is subject to change.)

   Comcast Xfinity                 1   (800) 934-6489
   Cox                             1   (877) 206-4210
   Bright House (Spectrum)         1   (855) 222-0102
   Sparklight                      1   (855) 310-0898
   (Cable One)
   Charter Spectrum                1   (855) 757-7328
   MediaCom                        1   (844) 987-3260
   RCN                             1   (800) 746-4726
   Altice Suddenlink               1   (877) 694-9474
   Time Warner (Spectrum)          1   (855) 707-7328
   WOW!                            1   (800) 343-2076
If you’re asked for information about the MG8702, refer to the photo
you took of the label on the bottom of the modem/router. A sample
label is shown below. The information highlighted in yellow below will
be unique on your product’s label. The unique QR code on the right
side of your label will help you with activation using our MotoManage
app.

When your MG8702 is activated either online or by phone, your service
provider will provision your MG8702 service. This usually takes less
than five minutes, but sometimes takes 30 minutes or longer.
Once the MG8702 is fully activated, try to browse the Web using a
device connected via Ethernet or WiFi to the MG8702. (See the section
Wireless Router below for information on connecting via WiFi). If
browsing works, Congratulations! Your MG8702 is working.
If your MG8702 is NOT working, see Troubleshooting Tips below.
MotoManage

We strongly suggest that you download our MotoManage App from
the Apple App Store or from Google Play to access basic and advanced
network control features. The app lets you manage your network
quickly and easily, and it makes it easy to keep your network’s original
wireless settings (recommended for most people unless the original
network name was 5 or less characters or the wireless password was 7
or less characters).

The app includes basic and advanced features, which are all available
free of charge for the first month. After that you will be able to decide
whether you’d like to just keep the free basic features, or whether you’d
like to also keep the advanced features for a small monthly fee.

1 Download the           MotoManage app on your smartphone or
  tablet.

2 Open the app and create an account.

3 Scan the QR code on the bottom of your MG8702 (or scan it from
  the photo you printed) to join your device’s WiFi network.

4 Now enjoy the app. You can easily elect to keep your original name
  and password, as we recommend.

         a. Or, maybe you want to change the WiFi Network Name and
            password. For instance, you might prefer a password that’s
            easier to remember, or you're replacing a router and want
            to use your existing WiFi Network Name (SSID) and/or
WiFi Password/Key instead of the unique ones that come
with the MG8702.
b. Plus you can easily monitor your Internet usage and WiFi
signal strength, get security alerts that help protect your
network, control Internet access by devices, or set up some
basic parental controls.
Note that your MG8702 must be online for the app to communicate
with it.Configuration Manager
The Configuration Manager is an alternative method to control WiFi
settings and other options if you have not downloaded the app. The
Configuration Manager also includes some additional device settings
for the advanced user as discussed below. Most users don’t need to use
the Configuration Manager if they use the Network Management App.
You might need to use the Configuration Manager if:
• You want to set up special Internet gaming settings.
• You want to get performance information about the MG8702 modem
and/or built-in router. This can be helpful in diagnosing DOCSIS
performance issues and optimizing wireless performance.
• You want to set up a Virtual Private Network (VPN).
• You want to change the wireless network name and password without
using the App. (See WiFi setup page.) Note that these WiFi settings
can be changed in the app without having to log in to the
Configuration Manager.
If you need to access the MG8702 Configuration Manager, open your
Web browser. Type https://192.168.0.1 in the address bar, and press
Enter. You will see security warnings. You can safely ignore these and
click through to access the Configuration Manager (see Note below). In
the login dialog box, type the following username and password in
lower case, then click OK.
Username: admin
Password:When you log in for the first time the first time Wireless Setup screen will appear. (If you have already connected using the MotoManage app, this screen may not appear). If this screen doesn’t appear, please see the Troubleshooting Tips below. (See below under WiFi Setup if you want to keep your current network name and password and if you haven’t used the app to do that.) NOTE: To reduce the risk of unauthorized access, your MG8702 is designed to accept access via secure http (https) only. To support secure access, your MG8702 includes a self-signed certificate. Unfortunately, web browsers flag self-signed certificates as insecure. This means that if you open the MG8702 Configuration Manager, your browser will display warnings that the site is insecure. The MG8702 Configuration Manager is secure, so you can safely ignore those warnings. For more detailed information about the MG8702 and its Configuration Manager, please see www.motorolanetwork.com/MG8702manual.
WiFi Setup using the Configuration Manager

Use this section only if you want to keep your current network name and
password and for some reason you can’t use the App.

We strongly suggest that you do this by using the MotoManage App
mentioned above. If that’s not possible, please continue below.
Please note that if your previous network name was 5 or less characters
or the wireless password was 7 or less characters, you cannot change
the Motorola password to match your previous network.

    If you need to do this WiFi setup by using your smartphone or
    other WiFi device, first connect your WiFi device to your new
    modem/router using the wireless network name (SSID) and
    password printed on the modem/router’s bottom label. (You don’t
    need an Internet connection to do this.)

If possible, connect a computer with Ethernet to any of your
modem/router’s Ethernet ports. You can also do this configuration
using WiFi by using your smartphone or another WiFi device that has a
Web browser.

1   Now write down the wireless network name and password for your
    original network. Most WiFi devices work on either the 2.4 GHz
    band, or both the 2.4 GHz and the 5 GHz band. You may have a
    wireless network name and password for just the 2.4 GHz band; or
    you may have a wireless network name and password for both the
    2.4 GHz and 5 GHz bands.

2 If you haven’t already logged into the Configuration Manager, follow
  the steps in the section above labeled Configuration Manager to do
  so.
3 After you click OK, the Wireless Initial Setup page should appear. Follow the instructions on this page to enter the network name and password for your original network, making sure to be accurate and to use the same upper and lower case characters you used for your original network. 4 Press Save. You will see a screen confirming your settings. If you need to, you can correct the settings and press Save again. If you encounter a problem, you can restore the factory modem/router network name and password by pressing the Reset button on the back of the modem/router for 10 seconds (a paperclip helps). Those names and passwords are printed on the bottom label of your MG8702 (and on the photo you took with your phone).
Wireless Router Performance

 Note that wireless performance depends on a number of factors. Please
 keep these things in mind:
• Where possible, put the MG8702 in a central place so that it’s not too
  far away from your other wireless devices. For example, in a two story
  house, an ideal location may be towards the middle of the first floor
  close to the ceiling.
• Avoid placing the MG8702 near metallic objects such as filing cabinets
  or appliances. Also avoid placing it on or near metallic shelves.
• Try to avoid interference from other wireless devices such as Bluetooth
  headsets and stereos, microwave ovens, wireless printers, and 2.4 GHz
  cordless phones and base stations. Don’t put the MG8702 close to
  these interfering devices.
• Sometimes it helps to change the MG8702 wireless channel frequency
  to reduce interference with neighbors’ wireless networks. This is
  discussed in the Troubleshooting section of this Quick Start.
• Wireless range can be limited by issues like weak wireless clients and
  challenging building configurations. Some devices that connect to the
  MG8702 may not have a powerful wireless signal, so those devices may
  slow down your network’s WiFi. If you need greater wireless range far
  away from your MG8702, you could add a Range Extender.
• If you have coaxial cable running near your router and a distant
  wireless access point, Smart TV, or other device, a Motorola MoCA
  Adapter is often a good way to connect the router to the device. MoCA
  can share the same cable used for cable TV or cable Internet and
  features speeds up to 2,500 Mbps. Please see
  www.motorolanetwork.com/MocaWifi
USB 3.0 Port

A USB 3.0 port is located on the back of the MG8702. You can choose
to use this port for File Sharing by the devices on your local network.
1   Log in to the Configuration Manager (see Configuration Manager
    section above) Navigate to Advanced > Advanced Router > File
    Sharing. If it isn’t already checked, click the Enable checkbox for
    Windows File Sharing (SAMBA), and click Save.

2 Plug your USB flash drive into the MG8702 USB port.

3 In Windows: Make sure you have Network Discovery and File
  Sharing enabled in Network Sharing on your computer.
    Open File Explorer (Windows Explorer) and type \\192.168.0.1 in the
    address bar. Press Enter. This will open your USB flash drive
    directory. Then you will have read/write access to its content.

    In MacOS: On the Finder menu, navigate to Go > Connect to
    Server. In the address bar type smb://192.168.0.1 and then press the
    Enter key.
    If prompted by an authentication dialog box, select Guest and click
    Connect.
    Then click OK. This will open your USB flash drive directory. Then
    you will have read/write access to its content.
Front Panel Lights
During power up, the lights will blink for about a minute.
LIGHT COLOR DESCRIPTION
ON: MG8702 power on
Green OFF: MG8702 power off
Power
Green Scanning for DS channel
Blinking:
Green ON: Connected on 1 channel
Green or
Blue Negotiating bonded
Downstream Blue
Blinking: channel(s)†
Blue ON: Bonded with 2 or more
channels
Green Ranging in progress
Blinking:
Green ON: Connected on 1 channel
Green or Blue Negotiating bonded
Blue Blinking: channel(s)†
Upstream Blue ON: Bonded with 2 or more
channels
OFF: Upstream not connected
Blinking: Trying to go online
Green or Green: Online with DOCSIS 3.0
Online Blue Blue: Online with DOCSIS 3.1
OFF: Offline
Blinking: Data is flowing
ON: WiFi is enabled
2.4 GHz Green
OFF: WiFi is not enabled
WLAN
Blinking: Data is flowing
ON: WiFi is enabled
Green
5 GHz OFF: WiFi is not enabled
WLAN
ON WPS is in discovery mode
Green OFF: Turns off after configuration
WPS is successful
ON: Light will remain solid
Green
when USB port is in useUSB
Blinking: Ethernet data is flowing
Rear Panel
Green or Green: Connected at 1 Gbps
Ethernet
Amber Amber: Connected at 10 or 100 Mbps
LAN port(s)
OFF: No connection
† If a blue light blinks continuously, this indicates partial service, which means that at
least one designated channel has not completed bonding. You should still get high
Internet speeds, but your service provider may want to know so they can adjust
their network.Connecting devices to your cable modem/router You can connect computers, smartphones, tablets, game consoles, security cameras, streaming media devices (like Roku, Chromecast & AppleTV), Smart TVs and other devices to your cable modem/router. You can connect these devices either with an Ethernet cable (a wired connection), or via WiFi (a wireless connection). An Ethernet connection is normally a faster, more reliable connection than a wireless connection. To make an Ethernet connection, you need a device with an Ethernet connector and a cable to connect between that device and your cable modem/router. In some cases, this may be impossible because of the location of the devices. In those cases, or if the device doesn’t have an Ethernet connector, you will need to create a wireless connection as described below. Connecting a device via Ethernet To make the connection at the Ethernet-capable device, simply plug in one end of the Ethernet cable to an Ethernet jack on the device. At the cable modem/router, plug the other end of the cable into any of the cable modem/router’s LAN jacks. You can connect up to four devices by using the four LAN jacks. If you need to connect devices via wired Ethernet over longer distances, for example several rooms away, note that you can use Cat 5e Ethernet cables for lengths up to 100 meters with no effect on performance.
Connecting a smartphone, tablet or other wireless
device via WiFi

Your MG8702 supports two WiFi bands, at 2.4GHz and 5GHz. By
default, your MG8702 is configured to support band steering. Band
steering uses a single network name (SSID) and password that apply to
both bands. This way, client devices can choose the band best suited
for their connections. It is possible to disable band steering if you want
to assign separate SSIDs and passwords for the two bands. (See
Chapter 8 if you want to change your wireless settings).

If you want to connect devices to a Guest Network, use the SSID and
Password for that network. (See Chapter 8 if you want to set up a Guest
Network).

Wireless devices vary, but they all have a Wireless Settings area. There
you should first select the wireless network you want, namely the
wireless SSID or Guest SSID of the MG8702. Now enter the password
for your wireless network. Make sure to Enable the Wireless on your
client devices. Normally that’s all you need to do.
Setting up a smart TV, streaming media
device, or other device
A typical Smart TV, Streaming Media Device or other device has an
Input or Setup section. Within that section there’s normally a Network
section. In that section you may need to specify that you have an
Ethernet connection if that’s how you connect to the MG8702. If you
want to connect wirelessly to the MG8702, you’ll need to select its
wireless SSID and then enter its wireless password.
Accessing the Configuration Manager by using
a browser
Model MG8702 has a Configuration Manager that provides a lot of
technical information and tells you how to do some useful things.
Please note that some users will never need to use the Configuration
Manager.

You can access the Configuration Manager from a computer or any
other device that has a browser and that is connected via Ethernet or
wirelessly to your cable modem/router. If you will be changing wireless
settings, it’s much better to use a device that connects via Ethernet
while you make these changes.

To access the Configuration Manager, do the following:

1.   Open your web browser.

2.   Type 192.168.0.1 into your browser’s address bar and press Enter.
3. You should see this page: Type admin in the Username field.

4. Type the unique password printed on your device’s bottom label
   in the Password field.
5.   Click the Login button.

6.   When you log in for the first time, the first time Wireless Setup
     screen will appear. (If you have already connected using the
     MotoManage app, this screen may not appear). If this screen
     doesn’t appear, please see the Troubleshooting Tips below. (See
     below under WiFi Setup if you want to keep your current
     network name and password and if you haven’t used the app to
     do that.)

 NOTE:
 To reduce the risk of unauthorized access, your MG8702 is
 designed to accept access via secure http (https) only. To
 support secure access, your MG8702 includes a self-signed
 certificate. Unfortunately, web browsers flag self-signed
 certificates as insecure.
 This means that if you open the MG8702 Configuration Manager,
 your browser will display warnings that the site is insecure. The
 MG8702 Configuration Manager is secure, so you can safely
 ignore those warnings.
After you have completed the first time wireless setup screen, you should see the Basic Status and Settings page shown below. The Basic Status and Settings page gives you information about your Internet connection, lets you view and modify your WiFi privacy settings, and shows you basic information about your cable modem’s addresses and software version. The logout link lets you end your session with the Configuration Manager. The Advanced button at the top of the page takes you to pages with more extensive information and options to configure your cable modem/router.
You can return to the Basic Status and Settings page from any
Advanced page by clicking the Motorola stylized M Logo in the upper
left-hand corner of the page.

Note the circled (i) ‘information’ icons to the right of the page. You can
click the icons for descriptions of entries:

The information icons appear on every page, including Advanced
pages.

The Advanced pages include more detailed status information, as well
as exhaustive configuration options for the WiFi, Router and Firewall
functions of your device. In addition, there is a Parental Control page,
and pages to set up Virtual Private Networks (VPNs).
Click the Advanced button. Note the Menus and Submenus on the left
of the page. The currently selected menu item is highlighted, and
submenu items corresponding to the selected menu item are indented
below. The currently selected submenu item is highlighted in blue.

In this screenshot, the menu item Status and submenu item Software
are selected.

The following sections in this guide will walk you through the features
that users most often want to configure.
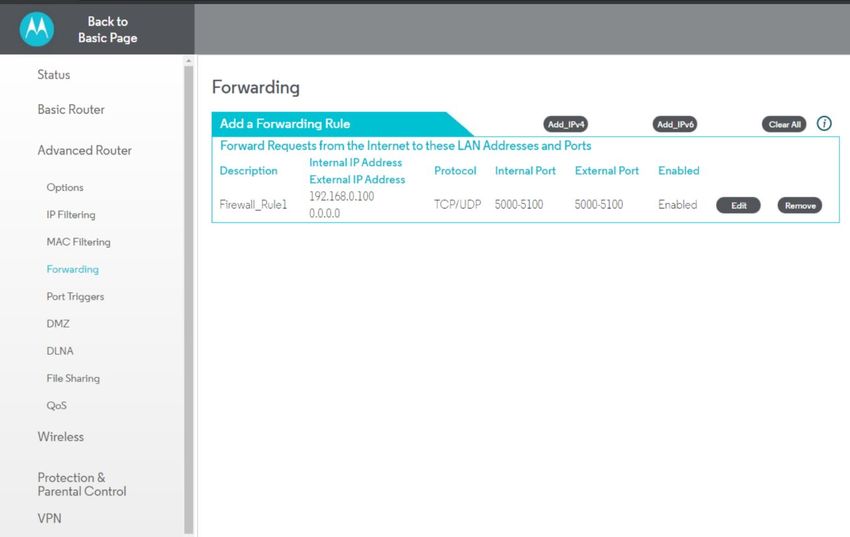
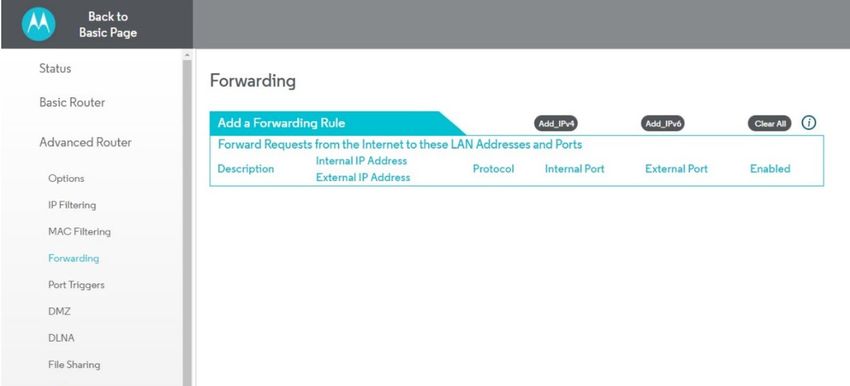
Configuring your MG8702 to support devices and applications with special requirements For games played on game consoles and PCs, and security cameras Devices including game consoles and security cameras often require special router settings to work correctly. This may also be true of games that you play on a PC or another device. For gaming, you probably want to use special settings if you’re playing another person or a computer over the Internet. You don’t need special settings for games that don’t involve connecting to another player or computer over the Internet. Typically, you will have to open ports on your router to support these devices. There may be other settings that you need to change. To open ports, first log into the Configuration Manager as described in chapter 4. In summary, you type 192.168.0.1 in the address bar of your browser, go to that address, enter the Username admin and your device’s unique password (printed on the bottom label), then click the Login button. This will bring you to the Basic Status and Settings page. Click the Advanced button in the upper right. This will bring you to the Status Software page. Hover over the Advanced Router menu item, and select the Forwarding submenu:
You can create forwarding rules for both IPv4 and IPv6 environments.
These rules determine how data flows from the address to specified
LAN addresses and ports. In this document we will describe how to
create a rule for an IPv4 network. The steps are similar for IPv6.

To create an IPv4 Forwarding Rule, first click the Add_IPv4 button. You
can now enter your port forwarding information.
Review your game or device documentation to find the port or ports
that need to be forwarded. Also, determine the IP Address that your
device is using. Your game or device documentation should show you
where to find this information.

You can create Port Forwarding Rules to support the requirements of
your game or device. Your game or device may need more than one
port to be forwarded. In some cases, the ports will be numbered
sequentially, in a range. These can be specified in a single Port
Forwarding rule. In other cases, the ports may be separated. In this
case, you will have to set up a separate forwarding rule for each port.
To create a Port Forwarding rule

1.   Under Internal IP Address, enter the address of the game station,
     PC or other device. In the case of a security camera, enter the
     address of the camera’s DVR.

2.   Under Internal Port, enter the starting port that your device or
     game needs.
     Example: 5000

3.   If your device uses a sequential range of port numbers, enter a
     dash after the starting port number you already entered, followed
     by the highest number in the range.
     Example: 5000-5100
     Otherwise, if there is only one number, just leave the single port
     number you entered in step 2.

4.   Unless instructed otherwise in your game or device
     documentation, leave the External entries blank. They will fill in
     automatically (the user has to enter the External ports as well, the
     GUI doesn’t accept empty entries).

5.   Select the protocol, TCP, UDP or Both, indicated in your
     documentation.

6.   Select Enable in the Enable/Disable pulldown.

7.   Click Save.

Repeat these steps as necessary to create rules for multiple ports or
port ranges.

The rule or rules you create will appear at the bottom of the page, as
shown below. Note that you can clear individual rules, or all rules.
For games and game consoles, you may also need to enable UPnP and to set the Firewall to OFF.
Select Options under Advanced Router in the left pane.

Then, click the UPnP Enable box, and click Save at the top of the Router
Selections box.
Select Firewall Basic under Protection & Parental Control in the left
pane.

Then, select Off in the IPv4 Firewall Protection pulldown, and click
Save.
Changing wireless settings
The MG8702 comes set up for wireless-N (2.4 GHz band) and wireless-
AC (5 GHz band) with WPA2 security, with unique wireless network
names (SSIDs) for each band, and a unique password. Both bands use
this password. There’s a good chance that you’ll want to use these
settings. In that case you will need to configure client wireless devices
(laptops, smartphones, etc.) with your MG8702’s wireless network
names and password to connect the devices to the Primary Network on
your MG8702. (You may want to enable a separate Guest Network or
Networks for visitors and others for whom you want to provide Internet
access without also providing access to your computers and other
devices connected to your network.)

You may want to change the wireless settings on the Primary Network.
The most common reason is that you’re replacing a cable
modem/router and you want to use the same wireless network names
and passwords that you’ve had. If you change the wireless settings on
your MG8702 to match your previous settings, you won’t have to
change the settings of wireless devices that worked with your previous
router. Unless there’s a good reason to change your wireless settings,
you should use the unique ones assigned at the factory.

To change the wireless settings, first log into the Configuration Manager
as described in chapter 6. In summary, you type 192.168.0.1 in the
address bar of your browser, go to that address, enter the Username
admin and your MG8702’s unique password, then click the Login
button.

This will bring you to the Basic Status and Settings page where you can
change your network name and password.
To change the Network Name and Password

In the Basic Status and Settings section, go to Wi-Fi Privacy Settings. In
band-steering mode (the default mode), for both bands:

   1 First click the Show Key box to display the characters for the
     Password.

   2 Select and delete the old Network Name, then type in the new
     Network Name.

   3 Next, select and delete the old Password, then type in the new
     Password.
4 Click the Save button. Network Name can be from 6 - 32 characters long. You can use the upper and lower case letters (a – z and A – Z), numbers (0 - 9) and special characters (e.g. $_/& etc.) except the single quote ‘ . Password can be from 8 - 63 characters long. You can use upper and lower case letters (a – z and A – Z), numbers (0 - 9) and special characters (e.g. $_/& etc.) except the single quote ‘ . Be sure to write down and save the new wireless network names and passwords in a place where you can easily find it. One approach is to write them on a small piece of paper and tape it on the bottom of your cable modem. Some people like to take a picture of the settings with their phone.
If band-steering is disabled (each band has its own SSID):

For the 5 GHz band:

  1 First click the Show Key box to display the characters for the
    Password.

  2 Select and delete the old Network Name, then type in the new
    Network Name.
3 Next, select and delete the old Password, then type in the new
Password.
4 Click the Save button.
For the 2.4 GHz band:
1 First click the Show Key box to display the characters for the
Password.
2 Select and delete the old Network Name, then type in the new
Network Name.
3 Next, select and delete the old Password, then type in the new
Password.
4 Click the Save button.
Network Name can be from 6 - 32 characters long. You can use the
upper and lower case letters (a – z and A – Z), numbers (0 - 9) and
special characters (e.g. $_/& etc.) except the single quote ‘ .
Password can be from 8 - 63 characters long. You can use upper and
lower case letters (a – z and A – Z), numbers (0 - 9) and special
characters (e.g. $_/& etc.) except the single quote ‘ .
Be sure to write down and save the new wireless network names and
passwords in a place where you can easily find it. One approach is to
write them on a small piece of paper and tape it on the bottom of your
cable modem. Some people like to take a picture of the settings with
their phone, in a place where they know where to find it.Wireless Guest Networks You can enable one or more Guest Networks to let friends use your Internet connection without giving them access to other devices on your network. To set up a Guest Network, first log into the Configuration Manager as described in chapter 4. In summary, you type 192.168.0.1 in the address bar of your browser, go to that address, enter the Username admin and your MG8702’s unique password, then click the Login button. This will bring you to the Basic Status and Settings page. Click the Advanced button in the upper right. This will bring you to the Status Software page. Hover over the Wireless menu item, and select the Guest submenu:
To configure and enable a Guest Network on the 2.4 GHz band, first
select the 2.4 GHz tab, and then:

        1 Select Enabled and click Save to enable the selected Guest
          Network.

The following steps are optional. Follow them if you want to change the
default Guest Network Name and Password:

        2 Select and delete the old Guest Network Name, then type
          in the new Guest Network Name and click Save.
        3 You can click the Show Key box to check your typing for
          Password.
        4 Select and delete the old Password, then type in the new
          Password.
        5 Click the Save button.
To configure and enable a Guest Network on the 5 GHz band, first select the 5 GHz tab, and then repeat the steps above. Network Name can be from 6 - 32 characters long. You can use the upper and lower case letters (a – z and A – Z), numbers (0 - 9) and special characters (e.g. $_/& etc.) except the single quote ‘ . Password can be from 8 - 63 characters long. You can use upper and lower case letters (a – z and A – Z), numbers (0 - 9) and special characters (e.g. $_/& etc.) except the single quote ‘ .
Changing firewall settings A Firewall helps protect your Model MG8702 and the devices attached to it from harm from outsiders connecting via the Internet. Model MG8702 comes with reasonable firewall settings. The firewall allows all normal traffic to pass, but protects against well-known attacks. Normally you just leave the firewall settings in place. If you want to change them, you go to the ProtectionFirewall section of the Configuration Manager. First log into the Configuration Manager as described in chapter 6. In summary, you type 192.168.0.1 in the address bar of your browser, go to that address, enter the Username admin and your MG8702’s unique password, then click the Login button. This will bring you to the Basic Status and Settings page. Click the Advanced button in the upper right. This will bring you to the Status Software page. Select the Protection & Parental Control menu item, and then select the Firewall submenu.
The firewall lets you set your protection level through IPv4 Firewall
Protection, for example. By default, with the Low setting, all services
are allowed. If you select Medium or High protection, the firewall will
block all services except those listed in the List of Allowed Services at
the bottom of the page. Select the desired protection level, and click
Save.

The higher protection levels will make it harder for attackers to
penetrate your network. You may find that if you select one of these
levels, that some Internet activities may fail. If that is the case, you may
need to use a lower level of protection during those activities.

Note that in order to play some games, you may need to turn
protection off.

When enabled, Port Scan Detection and IP Flood Detection will
generate reports in the Firewall Log if they detect attacks of their
respective types.
Tuning wireless performance
This chapter discusses steps to tune wireless performance. These steps
can optimize wireless performance in many cases.

First, note that placement of your MG8702 can be very important. Make
sure it is not too close to other wireless devices like Bluetooth
transmitters (e.g. for headsets), or a neighbor’s wireless router. For
example, in an apartment an MG8702 could be only feet away from a
neighbor’s device on the other side of a shared wall.

There are also optimizations you can make by using the MG8702’s
Configuration Manager.

Log into the Configuration Manager as described in chapter 4. In
summary, you type 192.168.0.1 in the address bar of your browser, go to
that address, enter the Username admin and your MG8702’s unique
password, then click the Login button.

This will bring you to the Basic Status and Settings page. When the
Basic Status and Settings page comes up, click the Advanced button at
the top right.

Remember that you can go back to the Basic Status and Settings page
at any time by clicking the Motorola ‘M’ logo at the upper left of the
page.

To optimize wireless performance, check channel usage of neighboring
devices. This is more likely to be an issue in the 2.4 GHz band than in
the 5 GHz band, but we will show you how to check both bands. You
can do this by looking at the wireless Scan Results table.
Select the Wireless Scan/Bridge page. Select the Wireless menu item to
bring the Wireless submenu options into view, then click the Scan
submenu option. This brings you to the Wireless Scan page:
Select the tab for the band you want to scan, 2.4 GHz or 5 GHz. Then
click the “Scan Wireless APs” button at the bottom of the page. This
will pop up the wireless Scan Results table:

Note that you may need to scroll down to see all neighboring networks.

For the 2.4 GHz band:

Look at the Channel column. This shows the channels that your
neighboring networks use. Available channels are 1 through 11. Many
installations use only channels 1, 6 or 11, because ideally wireless devices
should be separated by 5 channels.
If there are very few neighboring wireless devices in your location, you
should follow the rule of choosing a channel separated by 5 from all
other channels. For example, if there are two neighboring networks
using channels 6 and 11, you should choose channel 1.

If there are many neighboring networks, you may find that most use
channels 1, 6 and 11. In that case, you may find you achieve better
performance by choosing an unused channel between the most-used
channels, for example one of channels 3, 4, 8 or 9. You may need to
experiment to find the best channel. Note good candidate channels to
use for your network. Then, navigate to the Wireless Basic page.

For the 5 GHz band:

Look at the Channel column. This shows the channels that your
neighboring networks use. Available channels include 36 – 48 and 149 –
165. Some channels from 52 – 144 may also be available; however, these
channels may be allocated to uses including weather RADAR and other
government sanctioned applications.

As of this writing (2020) it is unusual for the 5 GHz band to be
crowded. If it is crowded in your location, choose a channel or channels
that are unused or little used by neighbors. Then, navigate to the
Wireless Basic page.

Select the Wireless menu item to bring the Wireless submenu options
into view, then click the Basic submenu option. This brings you to the
Wireless Basic page:
Select the tab for the band you want to change. Then select the desired
channel from the Channel pulldown, and click Save. Wait for a minute or
so for client devices to resynchronize to the new channel.

Check to see whether wireless performance has improved. If not, you
can try another channel selection.
WiFi Multimedia (WMM)
Another possible way to improve performance is to change WiFi
Multimedia (WMM) settings. From the Wireless menu, click the WMM
submenu:
WMM is designed to provide Quality of Service (QoS) support for
multi-media traffic on your network. The multi-media applications must
also support WMM. When they do, WMM facilitates smoother traffic
flow for these traffic types. WMM cannot be turned off.
If you find wireless traffic is not flowing well, you can turn on No-
Acknowledgement. No-Acknowledgement improves packet throughput
with the trade-off of higher error rates. In many cases this can result in
an overall improvement in performance.
Power Save Support is designed to support client devices with the
Power Save feature. The Power Save feature extends battery life by
reducing power consumption. However, sometimes this feature results
in suboptimal wireless performance. You can turn Power Save Support
Off and see if that improves performance in your network. Select the
tab for the band you are experiencing suboptimal performance with.
Then select Off and click Save.
Parental Control Parental Control lets you limit access to the Internet from particular devices on your network at particular times. For a device like a child’s computer or tablet, you can set times where Internet access is allowed and not allowed. To make Parental Control settings, go to the Protection & Parental Control section of the Configuration Manager. First log into the Configuration Manager as described in chapter 6. In summary, you type 192.168.0.1 in the address bar of your browser, go to that address, enter the Username admin and your MG8702’s unique password, then click the Login button. This will bring you to the Basic Status and Settings page. Click the Advanced button in the upper right. This will bring you to the Status Software page. Hover over the Protection & Parental Control menu item, and select the Parental Control submenu:
Setting up times when Internet access is allowed and not allowed You can allow Internet access for a particular device only during hours that you specify. Access will be allowed to all Internet sites. Internet access will not be allowed to any site outside of the hours that you specify. To do this, enter a Policy Name (e.g. Ann’s Laptop). Make sure the device you want to control is powered on and connected to the MG8702. Use the Select Device pulldown to select this device. The pulldown will show the MAC Addresses of devices connected to your MG8702. You may find the MAC Address of the device you want to control from the device itself. Follow instructions for the device and operating system to do this. You may also find the device’s MAC Address by looking at the client list on your MG8702. Click Basic Router DHCP and look at the MAC Addresses in the DHCP Client List: You may have to do a little sleuthing to find your device’s MAC Address, for example by turning the device off and on again to see which MAC Address is removed and then restored to the list.
Now set the start and end times of when you want to allow the device
to have Internet access. Here is an example of entries to allow Internet
access in an after-school period from 5:00 pm to 10:00 pm. Note that
we enter the blocked time starting at 10:00 pm overnight to the time
access is allowed at 5:00 pm the next day. We have named the sample
entry Ann’s Laptop:

Make sure to click the Apply button.

Since the blocked time period extends overnight and includes two
calendar days, the Parental Control feature generates two separate
segments of blocked time from 10:00 pm to 11:59 pm, and from 12:00
am to 5 pm.
VPN (Virtual Private Network) Virtual Private Networks (VPNs) provide protected connections across the Internet. Some companies and other organizations provide remote access to their internal networks via a VPN. Employees are typically provided with software that makes the VPN connection from a computer. When a computer provisioned for this type of VPN connection is connected behind the MG8702, the MG8702 must pass through the VPN traffic. The MG8702 is configured by default for VPN pass-through. (The IPsec and PPTP Pass-through settings on the Advanced Options page respectively enable IPsec and PPTP VPN pass- through. IPsec and PPTP are protocols used in different VPN implementations. The pass-through settings for both are enabled by default). The most common type of VPN connection that MG8702 users will encounter is the type of VPN described above, that simply needs to pass through the MG8702. The VPN pages support features that allow you to terminate VPN connections on the MG8702 itself. The MG8702 can terminate PPTP, L2TP and IPsec connections in specific scenarios. It can act as a VPN server to terminate PPTP and L2TP connections, for example from remote client computers. It can act as a VPN endpoint for IPsec connections, for example from a remote office to a central office (“site-to-site”). It cannot act as a VPN server to terminate IPsec connections from remote client computers.
To summarize, the MG8702 supports:

•   VPN Pass-through (for clients connected behind the device that
    need to access for example a corporate network)
• Termination of VPN clients via PPTP & L2TP (The MG8702 can be
configured as a VPN server in a small office or similar environment.
Clients located on the Internet can connect to the small office
network through VPN tunnels terminated at the MG8702.)
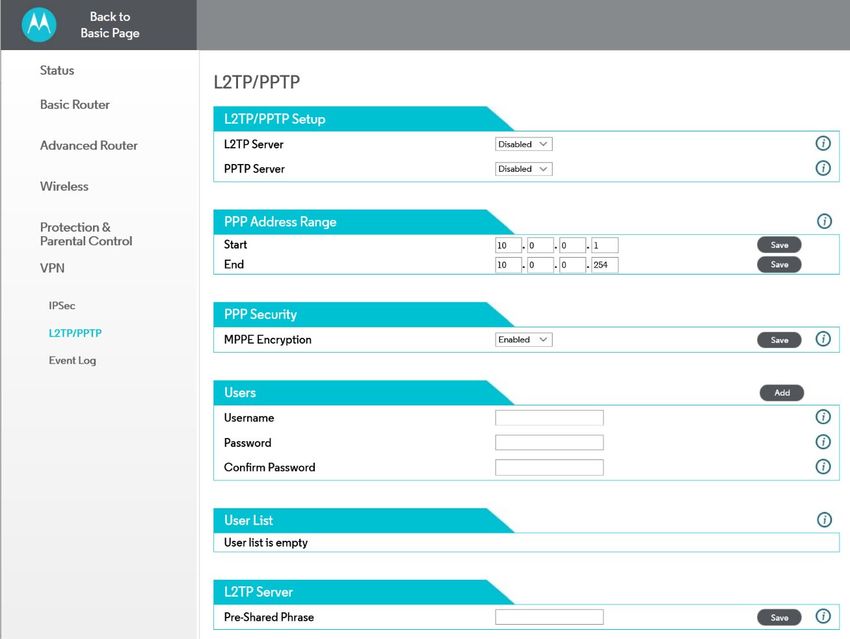
The L2TP/PPTP page allows you to configure server and security
settings. The L2TP (Layer 2 Tunneling Protocol) and PPTP (Point-to-
Point Tunneling Protocol) both allow PPP frames to be tunneled
through the network. PPTP is a Microsoft proprietary protocol,
(which is very similar to L2TP)
To configure an L2TP or PPTP tunnel, navigate to the L2TP/PPTP
page (VPNà L2TP/PPTP). Then, select to enable either an L2TP or a
PPTP tunnel, and enter the required information following the
descriptions in the Info Text (i) fields.Make sure to click Save as you complete each field.
•    Site-to-Site VPN via IPsec (the MG8702 can be configured to
     create a tunnel for all devices on the MG8702's LAN side to
     connect to a corporate network).

•    The MG8702 will NOT support termination of client VPN
     connections via IPsec.

    The IPSec page allows you to configure IPSec tunnel and endpoint
    settings. An IPSec tunnel is usually established in two phases. Each
    phase establishes a security association (SA), a contract indicating
    what security parameters the cable modem/router and the remote
    IPSec Router will use.

    The first phase establishes an Internet Key Exchange (IKE) SA
    between the cable modem/router and the remote IPSec Router.
    The second phase uses the IKE SA to securely establish an IPSec SA
    through which the cable modem/router and remote IPSec Router
    can send data between computers on the local network and remote
    network.
To configure an IPSec tunnel, navigate to the IPSec page (VPNàIPSec) and click the Create a New Tunnel button. Then, enter the required information, following the descriptions in the Info Text (i) fields. Make sure to click Save when you have completed the entries.
A couple of notes about VPN options. IPsec uses encryption and
provides the strongest security. PPTP is considered to be the least
secure VPN option. PPTP connections are not required to include
encryption or authentication. L2TP is based on PPTP, and adds
some level of compulsory authentication.

In the implementation of PPTP and L2TP on the MG8702, MPPE
encryption is optional. Both protocols require a login; L2TP requires
a passkey for authentication.

There are three pages under VPN in the MG8702 configuration
manager: IPsec, L2TP/PPTP and Event Log. Use the IPsec page to
set up an endpoint for a site to site IPsec connection. Use the
PPTP/L2TP page to set up a server for a set of remote clients that
connect via PPTP or L2TP. You may find the Event Log useful to
determine what has gone wrong if you have trouble setting up a
VPN.

For details on how to configure a VPN on the MG8702, follow the
help available through the information icons on the configuration
manager pages.

When the MG8702 is configured as a VPN endpoint, devices that
connect to the endpoint will need to know the IP Address of the
MG8702. You can find this address on the StatusàConnections page.
To provide the most stable VPN connections, the MG8702’s router
should be provisioned with a static IP Address. You will need to
order this from your cable service provider.

The VPN implementations on the MG8702 are best effort. They are
also Windows-centric. You will have to verify suitability for your own
environment.
Changing your MG8702’s Username and
Password, and Resetting to Factory Defaults
Changing your MG8702’s Username and Password

To change your MG8702’s Username and Password, first log into the
Configuration Manager as described in chapter 6. In summary, you type
192.168.0.1 in the address bar of your browser, go to that address, enter
the Username admin and your MG8702’s unique password, then click
the Login button.

This will bring you to the Basic Status and Settings page. Select
Advanced at the top of the screen, and then Status and Security.

You will need to enter the Current Username and Password, and then
the new Username and Password. Your new Password will have to be
entered twice. Both Username and Password can be from 8 - 63
characters long. You can use upper and lower case letters (a – z and A –
Z), numbers (0 - 9) and special characters (e.g. $_/& etc.) except the
single quote ‘.

Caution: Once you make this change, you will not be able to log into
the modem/router if you forget the new Username and Password . To
recover, you will have to reset the modem to factory defaults. When you
reset the device to factory defaults, you will lose all changes you have
made to the modem/router.

Resetting to Factory Defaults

There may be occasions when you need to reset your cable
modem/router to factory defaults, for example if you have changed the
Username and Password and lost the new values. Note that if you reset
your device to its factory defaults, you will lose any changes you have
made to settings in the device.

To reset to factory defaults:

1.   Make sure the cable modem/router is powered on.
2.   Find the reset button on the rear of the unit. It is marked RESET.
3.   Press and hold the Reset button for at least 10 seconds.
4.   The device will flash its LEDs and commence a reboot sequence.

Note that you will have to manually re-enter any required changes.
Configuring Alternate WiFi Security Settings
Alternatives to WPA2-PSK
Your Cable Modem/Router comes from the factory configured for
WPA2-PSK wireless security with AES encryption. Some older clients
may not support this security mode. (For details, see About Wireless
Security, below). To change the wireless security mode, first open the
page WPS_RADIUS.
To do this, first log into the Configuration Manager. In summary, you
type 192.168.0.1 in the address bar of your browser, go to that address,
enter the Username admin and your MG8702’s unique password, then
click the Login button.
This will bring you to the Basic Status and Settings page. Click the
Advanced button in the upper right. This will bring you to the Status
Software page. Select the Wireless menu item, and select the
WPS_RADIUS submenu:
To enable WPA-PSK, follow these steps:
1. Under 802.11n Mode Enable/Disable, select Disable from the
pulldown.
2. Find the WPA2-PSK Security Settings tab. If WPA2-PSK is not
enabled, select Enabled from the WPA2-PSK pulldown and then
click Save.
3. Find the WPA-PSK Security Settings tab. Select Enabled from the
WPA-PSK pulldown.
4. Click Save.
5. Under Encryption, select AES+TKIP.
6. Click Save.
7. The device will now operate in mixed WPA-PSK / WPA2-PSK
mode.About Wireless Security There are two versions of WPA: WPA and WPA2. When configured as part of a typical home or small office network, WPA and WPA2 require a Pre-Shared Key, or PSK. These modes are typically called WPA-PSK and WPA2-PSK, respectively, though sometimes they’re just called WPA and WPA2. You can enable either WPA-PSK or WPA2-PSK alone, or you can enable both WPA-PSK and WPA2-PSK together. By default, your Cable Modem/Router has WPA2-PSK with AES encryption enabled. You will only need to change the security mode if you have a device in your wireless network that only supports WEP or WPA-PSK with TKIP encryption. If you want an unsecured network, disable all security methods.
How to Tell if Your Clients Support WPA2
You can check to see if all other clients that you plan to put on the
network support WPA2. You can do this by checking the manual that
came with each device or by checking the configuration software for
the installed device. Look under Security or Encryption or Setup or
Advanced Features.

How to Configure Wireless Security for a RADIUS
Server
If you have a Radius Server, select the WPA/WPA2 options without
PSK. To enable WPA and WPA2 without PSK, follow these steps:

1.  Under 802.11n Mode Enable/Disable, select Disable from the
    pulldown.
2. Find the WPA-PSK Security Settings tab. If WPA-PSK is Enabled,
    select Disabled from the WPA-PSK pulldown and click Save. (Note
    that WPA-PSK is Disabled by default).
3. If WPA2-PSK is Enabled, select Disabled from the WPA2-PSK
    pulldown and click Save. (Note that WPA2-PSK is Enabled by
    default).
4. Select Enabled for WPA2. Do not click Save yet.
5. Enter the RADIUS Server Address and click Save.
6. Enter the RADIUS Port and click Save.
7. Enter the RADIUS Key and click Save.
8. If you want to enable WPA, select Enabled for WPA, and click Save.
9. If you want to enable WPA2, make sure Enabled is selected for
    WPA2, and click Save.
10. If you want to disable WPA2, select Disabled for WPA2, and click
    Save.
11. Under Encryption, if you have enabled WPA, or WPA and WPA2,
    select AES+TKIP. If you have enabled WPA2 only, select AES only.
12. Click Save.
You can also read