USER GUIDE RESIDENTIAL TV - OEC Fiber
←
→
Page content transcription
If your browser does not render page correctly, please read the page content below

RESIDENTIAL TV
USER GUIDE
      1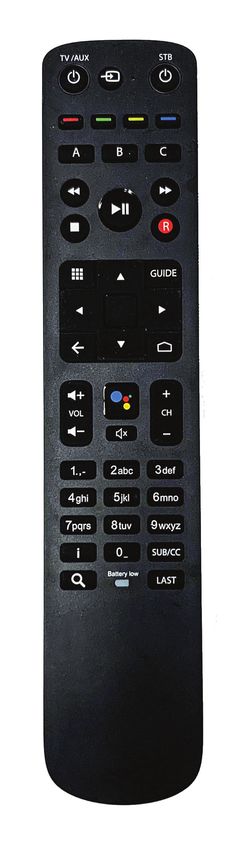
WELCOME TO

THANKS FOR TUNING IN

         2
This user guide contains information to help you get acquainted
with your OEC Fiber TV service. We’ll walk you through getting
started, then introduce you to some handy features and
customization options to enhance your viewing experience.

Never miss a single minute of your favorite programming!
Record multiple shows simultaneously and enjoy access
to recordings from any TV in your home. You can even start
watching a recording in one room and pick it up in another.

We also invite you to take advantage of watchTVeverywhere™.
If you have access to internet, you can login to watch your
favorite shows from a tablet, smartphone or computer
– anywhere in the world – thanks to the convenience of
watchTVeverywhere™! See page 20 for more information.

Lastly, keeping you connected is our top priority. We back all
of our services with 24/7 LOCAL technical support. Whether
you’ve forgotten your PIN, have a question or are experiencing
issues with your service, our highly skilled subscriber support
representatives can quickly analyze, diagnose and resolve your
issues over the phone. Simply by giving us a call at 405.217.6868.

        LET’S GET STARTED!

                                3
TABLE OF CONTENTS

GETTING STARTED
 • Initial Setup                      5
 • Watch On Other Devices             5

YOUR REMOTE
 • The Basics                         6
 • Battery Information                6
 • Remote Diagram                     7
 • Controlling Your Set Top Box       7
 • Learning Mode                      7
 • Factory Reset                      7

YOUR EXPERIENCE
 • Main Menu                          10
 • Setting Up User Profiles           11
 • Watch TV                           12
 • Live TV (On-Screen) Controls       13
 • Recordings                         14
 • Favorites                          16
 • Guide Filters                      17
 • Settings                           18
 • watchTVeverywhere™                 20
 • HD Content                         20
 • Technical Support                  21
 • Parental Controls                  21
 • Closed Captioning                  21

YOUR EQUIPMENT                        22

                                  4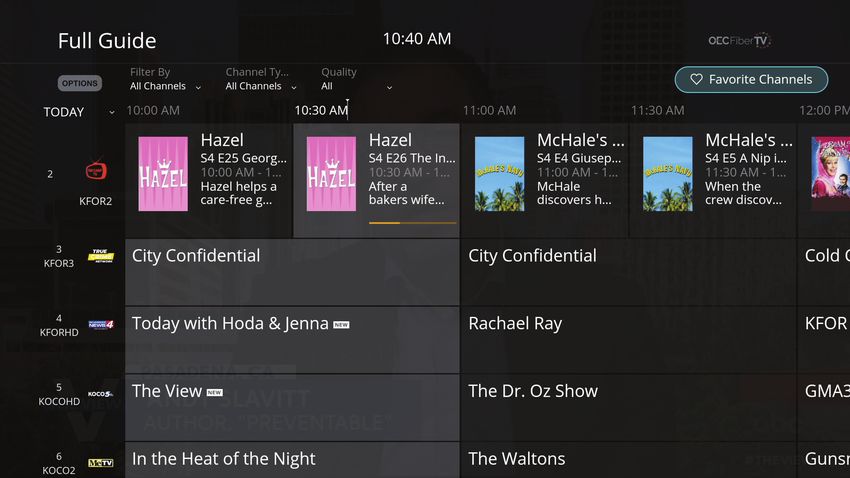
GETTING STARTED
                           INITIAL SETUP:

         First things first. When you first subscribed to OEC Fiber TV,
         you received an email to set your password and your email
          address is your username. We’ve given you a place below
                    to write that info down for safe keeping.
        Next, an OEC Fiber technician will trigger an email during the
      install process with prompts to set up your OEC Fiber TV account.
     You will use that information to log in to your OEC Fiber TV account.

                      My OEC Fiber TV username:

                       My OEC Fiber TV password:

              WATCH ON OTHER DEVICES:

 While OEC Fiber TV offers you the traditional cable feel in its viewing experience,
 it is an app-based product that can be downloaded on a number of other smart
   streaming devices. These include streaming boxes, sticks and web browsers.
       For a full list of approved devices, visit our website www.OECFiber.com.

If you choose to use a different device to enjoy OEC Fiber TV aside from the provided
    set top box, download the OEC Fiber TV app from the app store on your device.
Once you've downloaded and opened the OEC Fiber TV app, use your username and
        password to log in and begin enjoying OEC Fiber TV. It really is that easy.

                                         5
YOUR REMOTE

                       You know how magicians wave a wand,
                         say “Tah Dah”, and magic happens?
                                  Now it’s your turn.
                         It’s not magic, but it will feel like it.

       This remote will help you enjoy your OEC Fiber TV to its fullest.

             We’ve put together some information to help you fully
              understand and utilize your OEC Fiber TV remote

               There’s also really helpful graphic on the next page.

             The Basics:                                Battery Information:
When pressing a button, point the remote             Do not mix different types of battery
 control towards the front of the set top            or old and new batteries. Do not use
box (STB) to ensure correct operation. Do               rechargeable batteries with the
not cover the infra-red (IR) window at the                     remote control.
 front of the remote control and on the
             front of the STB.                      Remove the batteries from the remote
                                                    control if you are not going to use it for
 When a button on the remote control is           several weeks to avoid the risk of leakage.
 pressed, either the STB button will flash
or, if a TV brand has been entered, the TV/         Please respect your environment and
AUX button will flash, depending on which          any local regulations and dispose of old
      product is being controlled by the              batteries in a responsible manner.
                remote control.
                                                   Do not attempt to recharge the batteries.
  If a button is pressed for more than 30         Immediately remove any leaking batteries.
   seconds the remote control will stop           Take care when handling leaking batteries
    transmitting commands to preserve               as they may cause burns to the skin or
                 battery life.                          eyes, or other physical injuries.

                                              6
Your magic streaming device wand.
                               TV input
                          source select

       TV/AUX                                               Set top box
 power/standby                                              power/standby

            Red: Main Menu
       Green: DVR Manager
                                                            A: Back up 7 seconds
       Yellow: Last Channel
                                                            B: Settings
              Blue: Settings
                                                            C: Skip Fwd 30 seconds

                Set top box
               DVR buttons

Menu                                                        Channel Guide

                 Navigation
                   and OK
                                                                  Home
   Back
                                                            Voice control

                Volume up                                Channel up
                 and down                                and down
                                                                        Mute

            Channel select
             and text entry

                                                            Subtitles/closed
                Information
                                                            captions
   Search
                                                            Last channel recall

            Let’s move on and get you ready to experience OEC Fiber TV!

                                          7
YOUR REMOTE
                 CONTROLLING YOUR SET TOP BOX (STB):
The remote control has to be paired with a STB               except the STB button. You must press the STB
to control it. This can be done automatically or             button to stop pairing or to use another function.
manually. A remote control can only pair with one
STB at a time. For manual pairing, the STB must be           Auto-pairing can be triggered by the remote
in pairing mode, which is:                                   control in two cases:
   • For two minutes after the STB boots up                    • After the batteries have been inserted.
   • When the remote control pairing page of the               • After any button is pressed, and the STB button
   setup wizard is displayed during initial install.           flashes to confirm the button press.

If pairing is successful:                                    To auto-pair the remote control and the STB:

The TV/AUX button flashes once to confirm pairing            Ensure the STB is powered on and the STB button
and the remote control changes to Bluetooth                  on the remote control is not illuminated.
mode.                                                        Then follow manual pairing section below.

If pairing is unsuccessful:                                  To pair manually:

The TV/AUX button flashes to indicate an error.              Press MENU and OK simultaneously for at least
                                                             three seconds until the TV/AUX button flashes. The
During pairing, no remote control buttons will work          timeout for pairing is 60 seconds.

                                           LEARNING MODE:
The OEC Fiber TV remote control can learn a button         target button on the OEC Fiber TV remote control
function from another ‘source’ remote control.             is mute, press mute on the source remote control).
                                                           If the IR signal is received correctly, the STB button
1. Choose your ‘target button’ on the remote               will turn off and the remote control will return to
control. It must be one of the following buttons:          normal mode (note: this can overwrite a previously
TV-PWR / TV-INPUT / VOL+ / VOL- / MUTE.                    learned code).
This button will learn a function from the source
remote control.                                            5. If the IR signal is not received correctly, or is
                                                           received after 30 seconds, the OEC Fiber TV remote
2. Press 4 and 6 simultaneously for three seconds.         control will not store the code from the source
The STB button will flash twice and remain on.             remote control: it will give an error flash and return
                                                           to user mode.
3. Press your target button within 30 seconds:
                                                           6. If the back button is pressed on the remote
  • If valid, the STB button will give a                   control while it is waiting for an IR signal, the STB
  confirmation flash and remain on.                        button will give an error flash and return to user
                                                           mode. If the target button is pressed, any learned
  • If invalid, or you do not press within 30              code on it is cleared.
  seconds, the STB button will give an error
  flash and return to user mode.                           7. To clear the target button, press 4 and 6
                                                           simultaneously for three seconds. The STB button
4. Hold the OEC Fiber TV remote control a few              will flash twice and remain on. Then press the
inches from the source remote control with the IR           twice. The STB button will give a
windows facing each other, then press your target          confirmation flash.
button on the source remote control (e.g. if your

                                                       8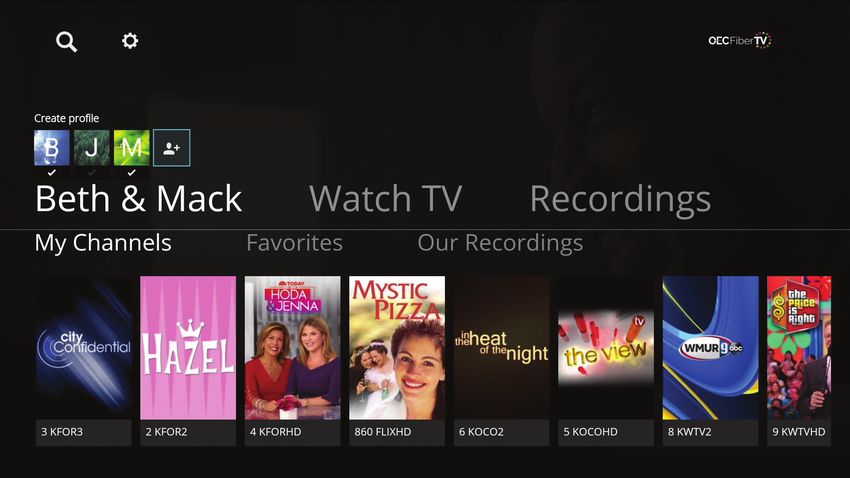
YOUR REMOTE

                              FACTORY RESET:
                1. Press and hold 1 and 6 simultaneously for at least three
                seconds until the STB button flashes twice then stays on.

 2. Enter the button sequence 9 8 1. After completing the sequence, the TV/AUX button
will flash twice. The TV settings are now deleted from the remote control and it will return
       to factory settings: Bluetooth mode, Samsung brand code (1150) and unpaired.

                     FOR MORE INFORMATION:
     Now that you’ve mastered the use of your remote control, take a peek at our user
    guide to learn how to use our remote control to enjoy your OEC Fiber TV to its fullest!

                                              9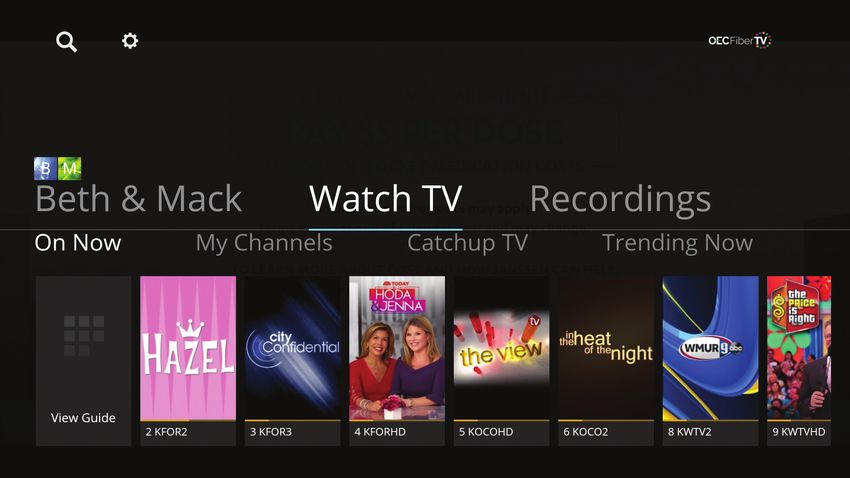
YOUR EXPERIENCE

                       MAIN MENU:

      After logging in to the app, the Main Menu, shown above,
       with the OEC Fiber TV logo at the top right, along with a
       magnifying glass icon (search) and a gear icon (settings)
      on the left will appear and you are ready to begin viewing.

 Here you will also be able to select/create a profile. Below that, you
 will have Menu options of Profile Name, Watch TV and Recordings.

  Profile Name: These are the names of the profiles created for the
unique watchers in your home. For more information on how to set up
profiles, see page 11. These profiles are a great way to customize your
  OEC Fiber TV experience with favorite channels (see page 16) and
         helpful parental control options (see pages 19 and 21).

 Watch TV: This is where you can find a list of the programs currently
 airing on live TV as well as the full TV guide and a selection of video
 on demand options. For more in-depth information on what all you
                 can find under Watch TV, see page 12.

    Recordings: This houses your DVR recordings. You can watch
previously recorded programming, cancel scheduled recordings, save
recordings so that they are not automatically deleted to clear storage
space or manually delete previously recorded programming. For more
  information and instructions to best utilize your DVR, see page 15.

                                   10
YOUR EXPERIENCE
SETTING UP USER PROFILES:
In order to get the most out of our OEC Fiber TV service and enjoy all the features
associated with the app across devices, you will want to create a profile.
Your profile allows you to select your favorite channels for easy access in
the Main Menu. You can create profiles for each family member in your home, up to 8.
1. On the Main Menu, press the Up Arrow button until you see the
person icon with the plus sign and the text “Create profile.”
2. Press the Select button on your remote control.
3. Give this profile a name. Typically, this will be the first
name of the person using the app, then press Continue.
5. Choose a profile picture. This is used to easily distinguish
your profile from others, then press Save.
7. Repeat this process for all profiles you would like to create.
When opening the app, choose which profile(s) you want to load.
Each profile is fully customizable with unique parental control settings to ensure
stress-free TV viewing for the whole family. For more information about setting up
these controls, see pages 19 and 21.
A useful feature is the ability to check multiple accounts. The system will keep
track of what you view together as users to make recommendations and improve
the viewing experience for all users.
11YOUR EXPERIENCE
WATCH TV:
Under Watch TV, you will see a sub-menu for On Now, My Channels, Catchup TV,
Trending Now and Free Previews. Learn a little about each of these features below.
On Now provides you a tile to view the streaming TV guide and shows what is currently
airing on the first sixteen channels listed in your channel lineup. To view the guide, press
the Down Arrow button or scroll down to highlight View Guide and press the Select
button. The half guide will display. To use the filters, press the Up Arrow button to go to
the top, and then use the Select button and directional buttons to make your selection.
To view the full guide, press the Right Arrow button. While in the full guide, you will be
able to set up favorites, use filters and jump to specific days in the guide.
The My Channels sub-menu shows a list of the sixteen most viewed channels associated
with the profile(s) currently being used. The currently airing program will be displayed on
the tile for each channel. Navigate to the tile for that program and press Select button to
tune to that channel.
Catchup TV will show a list of all programs that have previously aired but are able to
be viewed after the original airing. You can play a listed program from this screen by
navigating to the tile and pressing the Select button. You can also view a full list of
Catchup TV programs by highlighting the Catchup tile and pressing the Select button. In
this view, the Catchup TV programs that are available will be presented by channel. The
filters at the top can help you arrange the programs to your liking.
Trending Now shows the programs that are popular among all OEC Fiber TV subscribers
at the time you are viewing. Trending Now provides you with suggestions for programs
you may be interested in viewing.
Free Previews displays any premium channels currently offering a free
preview of their services. Programming in this section is available for a limited time.
When there are no active previews, it will appear blank.
12YOUR EXPERIENCE
LIVE TV (ON-SCREEN) CONTROLS:
A variety of controls will be available to you while watching. These controls can help
you better navigate available features and streamline your viewing experience.
To access these controls while watching, press the Select button.
The pictured-above options will appear on the screen.
• Press the Select button again to pause the current programming.
• Press the Up Arrow button to return to the main menu. The current
programming will continue to play in the background. If the Select
button is not pressed first, this will open the Last Viewed menu.
• Press the Right Arrow button to access the half guide. It will allow
you to scroll through the programming guide while your current
selection plays in the background. Press the Right Arrow button again
to reveal the full guide.
• Press the Left Arrow button for more information about the program
you are currently watching.
• Press the Down Arrow button to view settings. This will give you the
option to rewind 7 seconds, fast forward 30 seconds or toggle closed
captioning on or off.
13YOUR EXPERIENCE
RECORDINGS:
The Recordings menu option displays all recordings on the
account. This is not tailored to any one profile, but is a full list of
everyone’s recordings on the cloud-based DVR.
To record a live program:
1. Tune into the desired channel, and then press the Select button
to bring up the on-screen menu options, then press the Left Arrow
button on your remote.
2. Here you will see the information about the currently airing
program along with any upcoming airings of the same program.
3. Then you will be presented with options to Watch Live or Record.
You may also scroll tom see upcoming episodes of that program if
available.
4. Choose Record with the Select button on your remote, then you
will be presented with the option to Edit record settings. Here you
can choose to record only this episode or record the entire series.
• Only this episode: you will be presented with Channel & Time,
whether you would like to modify when to stop the recording and
how long to keep the recording.
• Record the entire series: you will be presented with the options of
First Run & Rerun or First Run Only, the channel number, the time,
when to stop the recording and whether to Keep Until Space
Needed or Keep Until I Erase.
14YOUR EXPERIENCE
RECORDINGS:
• Keep Until Space Needed: oldest recordings will be deleted when storage
limits have been reached.
• Keep Until I Erase: the recording will be saved from being deletred, even when
storage limits have been reached. Recordings with this chosen option will have to
be deleted manually to free up space.
5. You will now have the option of whether to Record or Don’t Record.
• Record: a message will appear in the top right stating “Recording” followed by
the name of the program.
• Don’t Record: you will be directed back to the previous info screen.
To view your recordings, navigate to the Main Menu and then use the Directional
Arrows to navigate to Recordings.
• Using the Directional Arrows, scroll to the the recorded content you wish to view
and press the Select button on your remote.
• To manage your recordings, navigate to Manage DVR in the Recordings menu
option and press the Select button on your remote. Here you can view existing
recordings as well as look at scheduled recordings. For existing recordings, you
have the option to Play, Save or Delete Recordings.
• Save Recordings: this will ensure it is not deleted when storage
limits have been reached.
• Delete Recordings: you will be asked to confirm if you want to delete it. Keep in
mind that recordings cannot be recovered after being deleted.
15YOUR EXPERIENCE
FAVORITES:
Once you have a profile set up (see page 11), Favorite Channels
can be configured. This is a great way to create a fast-access
process to getting to your most-watched channels.
1. Navigate to the Guide. This can be done from the Main Menu under Watch TV > On Now
> View Guide or if watching, press the Select button, then the Right Arrow button on your
remote.
2. You will be presented with a guide that takes up half the screen, to view the full guide,
press the Right Arrow button.
3. Once in the full guide, use the Up Arrow button on your remote to take you all the way
to the top (above the first channel in the list). Press the “0” button to return to the top of
the guide without scrolling. You will need to be at the top of the guide in order to have
access to the Favorite Channels button.
4. Use the Right Arrow button on your remote to highlight Favorite Channels and press
the Select button.
5. A list of all channels and their associated logos will appear.
6. Use the Down Arrow button to go through the list, pressing the Select button on your
remote for the channels you want to mark as Favorite.
• The heart icon will fill in to indicate it has been stored as a Favorite.
• To remove a Favorite, highlight a channel with a filled-in heart
and press the Select button. The heart will show as unfilled.
7. Once you are satisfied with the channels you’ve marked as a Favorite, press the Back
button to navigate to the full guide.
16YOUR EXPERIENCE
GUIDE FILTERS:
You can use filters to tailor the full TV guide to your
preference. This feature can be a great tool to help create a
more custom guide experience.
1. Use the Up Arrow button to take you all the way to the top (above
the first channel in the list). Press the “0” button to return to the top
of the guide without scrolling. You will need to be at the top of the
guide in order to have access to the Guide filters.
2. Use the Category option by using the Select button on your remote
to open the list of options. Go up or down to the option you wish to
use and press the Select button to filter the guide by All Channels, or
one of the listed channel genres.
3. If you use the Left Arrow button on your remote to navigate all the
way to the left, you will see that the word TODAY is highlighted.
4. When you press the Select button on your remote, a list of days
will appear. You can jump to days in the guide (7 days backward and
13 days forward).
5. When you find the day you want to view, press the Select button
on your remote.
17YOUR EXPERIENCE
SETTINGS:
In the settings section of the app, you can name the device you
are using, view all devices associated with your account, modify
recording options, set parental controls, and set other options. This is
also where you will go to sign out of the app if you choose to do so.
1. Navigate to the Main Menu.
2. Use the Directional Arrow buttons to navigate to the gear icon.
3. Press the Select button on your remote control. The Settings sidebar will show on the
right side of the screen.
The following options will be available to you:
Accounts Settings:
• Sign Out: sign out of the app.
Device Settings:
• Name: you can rename the device currently in use.
• On Screen Language: this is set to English (United States) by default and
cannot be changed.
• My Devices: you can view all devices that have signed into your account. You have the
option to sign out of individual devices or sign out of all other devices.
Stop recordings:
• You can set an account-wide rule to change when to stop recordings. You can
select a scheduled end time, 5 minutes after, 15 minutes after, etc.
18YOUR EXPERIENCE
SETTINGS:
PIN Controls (more parental control information on page 21):
• Content locks
• Here you can set a PIN and modify content ratings you wish to require entering the
PIN to view. You can set this for Unrated content, by MPAA movie ratings and by US
TV ratings.
• You also have access to Reset the PIN.
• Purchase locks
• Here you can set a PIN and modify whether you want to require a PIN to purchase
VOD (Video on Demand) programming.
• You can also Reset the PIN.
• Adult Lock
• Here you can set a PIN and modify whether you want to Hide Adult Content.
• You can also Reset the PIN.
Display:
• Closed Captions: You can turn this feature on or off. This will apply to
all programming on the app.
Audio:
• Descriptive Audio: You can toggle this setting on and off. When on, programs that
have a descriptive audio track will be enabled.
Last Watched:
You can toggle this setting on and off. When on, a list of last viewed channels will be
presented when you press the Up Arrow button while live video is playing with no other
overlays
are on the screen. It is a quick way to jump between channels without having to navigate
the guide.
System:
• Network Info: this shows the device’s IP address.
• System Information: this shows information about the app such as the In-Home Status,
Version number, etc.
• System Update: this button will search for any setting changes that have not
automatically reached the app.
• Restart System: this button will force close the app, and then open it again.
Android TV Settings: This option will take you out of the app to the Settings section
of the device.
19YOUR EXPERIENCE
watchTVeverywhere™:
Watching TV at home is no longer your only option.
Take OEC Fiber TV with you everywhere.
With watchTVeverywhere™, you have access to thousands of hours of programming
from participating networks on your smartphone, tablet or computer, all at no extra
cost. Watch your favorite show anywhere you have access to the internet.
1. Go to watchTVeverywhere.com.
2. Select OEC Fiber TV as your provider from
the dropdown list at the top of the screen.
3. Click Register.
4. Enter your OEC Fiber TV account number
and the last name on your account.
5. Complete the form and click Register.
6. Check your email for a message from watchTVeverywhere™
and click the validation link in the message.
7. You can now log in, see which networks are
available for your account and start watching.
HD CONTENT:
OEC Fiber TV offers free HD content to all subscribers. If we receive the channel
in HD, we broadcast it to you in HD at no additional charge. If you are watching a
channel that appears to be of lower quality picture, it is because the video content is
being received in SD quality from the channel broadcaster.
20YOUR EXPERIENCE
TECHNICAL SUPPORT:
If you experience issues with OEC Fiber TV, it may be your streaming device.
First, power off your unit and then power it back on. Then, log back into the app.
If you continue to experience issues with your connection, speeds and/or
wireless connectivity, please contact OEC Fiber technical support for
assistance any time, day or night, at 405.217.6868.
In some instances, your TV may display an error code if you have an issue. Be sure to note
the code (for example: net003) and provide that information when you call in.
Channels may change without notice. For a current channel lineup, please visit OECFiber.com/TV.
PARENTAL CONTROLS:
To restrict available content by ratings on OEC Fiber TV, activate Parental Controls
(this will be called PIN Controls) in the Settings menu as described below. PIN
Controls constrain full view access to content rated R, TVMA or NC17 unless a PIN
is entered. Full access to the content resumes after entering the correct PIN. It is
highly recommended to at least set up a PIN. This will need to be entered prior to
viewing any mature content rated R, TVMA or NC17.
The PIN Controls setting is either enabled or disabled and is accessed through the
Profile Settings in the Main Menu. At first access, the user will be asked to create
a 4-digit Personal Identification Number (PIN). This PIN will be used to restrict
access to the Parental Controls and mature content. You can also change or reset
your PIN from this menu.
NOTE: PIN Controls are predicated on the content being rated. On occasion, one may
encounter some programming not rated by the content provider. At this time, PIN
Controls are limited to live TV viewing.
CLOSED CAPTIONING:
Closed captioning provides a text overlay for all programming that provides this
service. To activate, click the Select button while watching live TV. This brings up the
media player controls on an overlay screen at the bottom. Navigate to the Audio/
Subtitle option on the Main Menu and press the Select button to toggle it on or off.
21YOUR EQUIPMENT
YOUR SET TOP BOX:
Whether you’ve bought a new TV, or just want to change the room you
experience OEC Fiber TV in, we wanted to make sure the steps for doing
so are clear, easy and just as reliable as your OEC Fiber.
Analog HDMI
A/V output output DC power
input
1. Connect your box to your TV
HDMI: Analog / AV:
This is recommended Connect the 3.5 mm
for best quality. jack to the A/V output
Connect an HDMI cable on your box and
to the HDMI output of connect the yellow
your box and to the RCA plug to the yellow
or
HDMI input of your TV. video port on your TV.
If your TV is not HDMI Connect the red and
ready, please follow the white RCA plugs to the
instructions for red and white audio
Analog / AV hook up. ports on your TV.
2. Connect your box to the power supply
Warning! Your box must only be used
with the supplied power adapter.
Insert the power adapter to the DC
power input, then plug the power
adapter into a power outlet.
22YOUR EQUIPMENT
Ethernet HDMI
port output
3. Connect your box to your internet 4. OPTIONAL: Connect
your box to an A/V amplifier
Your OEC Fiber TV set top box will
require an internet connection. Connect your A/V amplifier
There are a couple ways to do that. or home theatre system
The most common way is over using an HDMI cable. Then
Wi-Fi, which you will be prompted connect your A/V amplifier
to do later in the self-install process. or home theatre system
to your television using
The other method is to hardwire another HDMI cable.
your set top box with an ethernet
cable. Simply plug your ethernet
cable into the port shown above.
USB ports
Micro-SD
port
Micro-SD & USB Ports
NOTE: The micro-SD port is for OEC use only.
The USB ports are NOT to be used for powered
USB. Use only for external storage media such
as USB flash drive (external storage media must
be formatted as FAT32).
23405.217.6868 24 www.OECFiber.com
You can also read