User interface Version 7.18 - Creatio Academy
←
→
Page content transcription
If your browser does not render page correctly, please read the page content below

User interface Version 7.18

This documentation is provided under restrictions on use and are protected by intellectual property laws. Except as
expressly permitted in your license agreement or allowed by law, you may not use, copy, reproduce, translate,
broadcast, modify, license, transmit, distribute, exhibit, perform, publish or display any part, in any form, or by any
means. Reverse engineering, disassembly, or decompilation of this documentation, unless required by law for
interoperability, is prohibited.

The information contained herein is subject to change without notice and is not warranted to be error-free. If you
find any errors, please report them to us in writing.

© 2022 Creatio. All rights reserved.
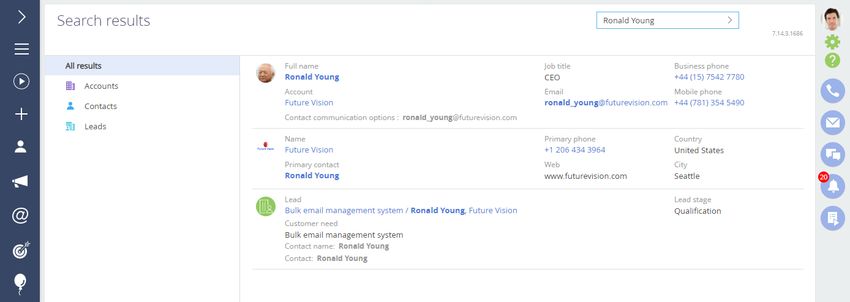
Table of Contents | 3

Table of Contents

Get started with Creatio interface                                5
  Side panel (1)                                                  5
  Communication panel (2)                                         7
  Command line (3)                                                7
  Folder and filter area (4)                                      8
  Working area (5)                                                8
Work with record lists                                            8
  Set up columns                                                  9
  Sort records in a list                                         13
  Set up list summaries                                          14
  List FAQ                                                       17
Work with record pages                                           18
  Record profile (1)                                             20
  Connected record block (2)                                     20
  Workflow bar (3)                                               20
  Action panel (4)                                               21
  Page tabs (5)                                                  22
  Toolbar (6)                                                    22
  Page dashboards (7)                                            22
Work with mini pages                                             23
Search records and run commands                                  24
  Search records                                                 24
  Go to sections                                                 26
  Add records                                                    26
  Run business processes                                         26
  Set up custom commands                                         26
Check timelines                                                  27
  Filter the timeline                                            29
  Search the timeline                                            29
Work with attachments                                            30
  Attach files to records                                        31
  Add external links as record attachments                       31
  Add a link to knowledge base articles                          31
  Download attachments                                           31
  Delete a file from the [Attachments] detail                    31
  Add notes to files                                             32

© 2022 Creatio. All rights reserved.
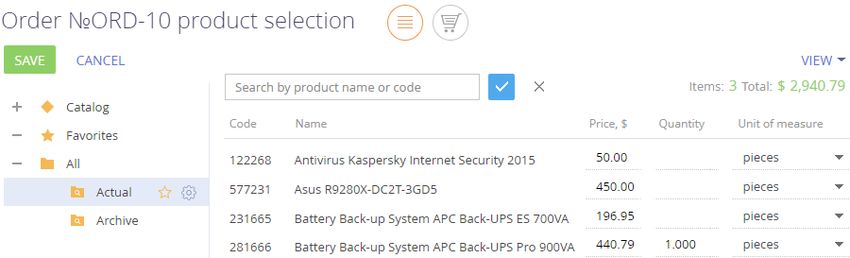
Table of Contents | 4

Work with currencies                                             32
 Select currency                                                 32
 Work with currency conversion                                   33
 Set up exchange rates                                           34
 Calculate exchange rates using a ratio                          35
 Currency conversion                                             35
 Calculate product price in an order                             36
 Manage currencies                                               36
 Currencies FAQ                                                  37
Keyboard shortcuts                                               38
 Section list                                                    38
 Mini page                                                       39
 Tags                                                            39
 Global search                                                   39
 The Activities section                                          39
 The Dashboards section                                          40
 The CTI panel tab in the communication panel                    40
 Content Designer                                                40

© 2022 Creatio. All rights reserved.
Get started with Creatio interface | 5

Get started with Creatio interface
PRODUCTS:         ALL CREATIO PRODUCTS

The Creatio interface (Fig. 1) consists of the side panel, notification panel, command line, folders and filtering
area, and the content of the page that is displayed at the moment.

Fig. 1 Creatio interface

Side panel (1)
The side panel (or the “section panel”) is located in the left part of the screen and is used to navigate through the
workplaces and sections. Also, the side panel contains buttons for quick access to the basic system operations.

The side panel buttons
      – the “Home” button contains a list of additional commands:

    [ Main menu ] – opens the home page. The home page contains the list of all sections of the application, the
    links to the system designer, and the user profile pages.

    [ Run process ] – opens the process start window.

    Note. Detailed descriptions of the business process automation are available in the Creatio business

© 2022 Creatio. All rights reserved.
Get started with Creatio interface | 6
process documentation.
[ Collapse section panel ]/[ Expand section panel ] – manage the status of the side panel.
[ Workplace ] – the list of available workplaces. When you change a workplace, the list of available sections in
the side panel will change too. You can edit the list of workplaces and sections.
[ User profile ] – opens the user profile page.
[ Exit ] – ends the current session. This command opens the login page.
– opens the process start window. If no process has been set up for this button, clicking it opens a window
containing the list of all business processes available in Creatio. If there is at least one process set up for this
button, clicking it opens a menu containing additional commands:
[ Run process ] – the list of main business processes available.
[ Another process ] – opens a window with the list of all business processes available in Creatio.
Note. You can set up the process start button in the [ Process library ]. Detailed descriptions of the
[ Process library ] can be found in the Creatio business process documentation.
– opens the “quick add” menu. Select the needed command from the menu to open a new record page in the
corresponding section.
Note. The menu structure can be set up using the [ Quick add menu setup ] lookup.
, – collapses/expands the side panel. The collapsed panel displays action buttons and the icons of the
current workplace sections. The expanded panel displays action buttons, section names, and the current
workplace name.
Selecting a workplace
Navigation between the user workplaces is done using the menu on the side panel. You can select the workspace
in the main menu of collapsed (Fig. 2) or expanded (Fig. 3) side panel.
Fig. 2 Selecting the workplace in the collapsed side panel
© 2022 Creatio. All rights reserved.Get started with Creatio interface | 7 Fig. 3 Selecting the workplace in the expanded side panel Communication panel (2) The communication panel is located on the right side of the screen and is used for working with email, making, and receiving calls. It is also used for quick access to system notifications for the current user and to the message feeds from other users. Command line (3) The command line is used to search for records, add new ones, as well as to perform other actions by entering text commands. © 2022 Creatio. All rights reserved.
Work with record lists | 8

Folder and filter area (4)
The area is used to extend the settings of data filters, as well as to work with the folders of the sections.

Working area (5)
Depending on the section and the selected view, the working area displays the following:

    The list of section records (for example, the contact list in the [ Contacts ] section)

    The record page
    The analytics tools of the current section

    Special pages. For example, the calendar in the [ Activities ] section.

A toolbar (Fig. 4) that enables you to open, copy, or delete a record is displayed when you select the record in a
list. You can launch a process for the selected record by clicking the [ Run process ] button.

    Note. The [ Run process ] button is enabled only if the start of the business process for a section record
    is configured.

Fig. 4 List record toolbar

Work with record lists
PRODUCTS:         ALL CREATIO PRODUCTS

The tile view shows each record as a set of tiles, each tile representing a field from the corresponding section. A
record in tile view usually occupies several rows. Tile view is best used when the list must show a lot of
information about each record, as well as images, such as contact profile photos and account logos.

When a record page opens the list is displayed in the additional vertical view. In this view, the list data is
displayed in a column. Each field of the record corresponds to a certain line in the vertical view. When you toggle

© 2022 Creatio. All rights reserved.
Work with record lists | 9
between records in the vertical view, the right side of the page displays the detailed information about the
selected record.
In Creatio you can edit records directly in the list without opening the corresponding pages. The editable list is
used for fast and frequently changing objects.
In this view, the emails and web addresses are displayed as links. Clicking a web address opens a window
containing the specified web page. Clicking an email address opens a window where you can create a new
message using the default mail client.
Some other values in the system are also displayed as links to allow quick switching between the records. For
example, the value in the [ Owner ] field of the [ Activities ] section is displayed as a link to enable switching from
the activities list to the activity's owner page.
Note. Data displayed in the list can be exported to Excel as an *.xlsx file for future processing.
Use data import in Creatio to add large numbers of records.
You can customize the appearance of a list, its field group, and the data sorting parameters. You can also bring
up the summary information for displayed records. To set up lists, use the [ View ] menu (Fig. 1).
Fig. 1 The list setup menu
Set up columns
Any list can be set up individually for each system user. You can add or remove columns from a list, edit column
position, width, and display style.
You can display columns of the current object as well as columns from connected objects. For example, in the list
of the [ Accounts ] section, you can display information about the account’s primary contact (such as the
primary contact’s position, phone, and email address).
Also, the list can display aggregate columns that show the summary information about the subordinate objects.
For example, for the “Account” object, you can calculate the number of activities by account; for the “Contact”
object, you can display the date of the last call by the customer, etc.
Note. Objects that contain fields with the current object specified are called “subordinate objects” or
“objects with the reverse connection.”
© 2022 Creatio. All rights reserved.Work with record lists | 10
The name of the connected column is generated in the format “Object.Column,” for example, “Primary
contact.Job title” or “Account.City.” The name of the aggregate column is generated in the format
“Function(Object (the way it is connected)).Column.” For example, to see the date of the last activity registered
for a contact, display the following column in the list: “Maximum(Activity(by column Contact)).End date.” The
column caption that is displayed in the list can be customized.
Select the [ Select fields to display ] command in the [ View ] menu to open the columns setup page.
To add a new column, click :
Clicking the button in an empty cell will add a column at that position. In the list mode, you can add columns
only if free cells are available in the column setup area. If no free cells are available in the column setup area, a
click on in the tile view will add a new row to the column.
near the border of any column. To do this, select the column and click at the right or left border to add a
new column on the right or left of the existing column (Fig. 2).
Fig. 2 Inserting a column between existing columns
To set up the display column properties, select it, and then click . Edit or hide column captions, specify
functions and filters for calculating aggregate columns, as well as select the caption display style.
Note. You can only set up the [ Hide caption ] column if you select in the tile view of the record list.
To hide a column, select it and click . If there are no columns in the row after the column has been removed
in the tile view, then the row will be hidden.
To adjust column width, drag its left or right border with your mouse (Fig. 3). If no free cells are available in the
row, the width of other columns will be modified to accommodate the new column size.
Fig. 3 Changing a column width
To move a column, select it, and then drag it to an empty cell with your mouse (Fig. 4).
Fig. 4 Moving a column
© 2022 Creatio. All rights reserved.Work with record lists | 11
To save column settings, click the [ Save ] button. The changes will be saved for the current user. If the column
settings must be saved for all users, select the [ Save for all users ] command from the [ Save ] button menu.
The [ Save for all users ] command is available if the current user has permission for the [ List setup for all users ]
system operation.
Note. To cancel custom column settings in all sections, click the [ Restore default settings ] button in the
user profile. Read more in the User management block of articles.
Add a regular list column
Described below is the procedure for adding current object columns to the list.
Example. Display the [ City ] and [ Department ] columns in the [ Contacts ] section.
To do this:
1. Open the [ Contacts ] section
2. In the [ View ] menu, select the [ Select fields to display ] command.
3. On the column setup page, click the button.
4. Select the column to be displayed, for example, “City.” Click the [ Select ] button (Fig. 5).
Fig. 5 Selecting a column
5. In the column settings area, select the added column and set up its width (Fig. 6).
Fig. 6 Widening a column
© 2022 Creatio. All rights reserved.Work with record lists | 12
6. Use the same procedure to add the [ Department ] column. Use the preview area to optimize the column
width (Fig. 7). Click [ Save ].
Fig. 7 Setting up columns in the [ Contacts ] section
Add an aggregated column
You can display aggregate columns of the connected objects. For example, you can get the summary information
about the “Account” object by the connected “Activity” object.
Example. Display several current contact’s activities connected to each account in the list of the
[ Accounts ] section.
1. Open the [ Accounts ] section.
2. In the [ View ] menu, select the [ Select fields to display ] command.
3. On the column setup page, click the button.
4. In the opened column selection window:
a. Click the [ + ] button next to the object name.
b. In the added field, select an object with the reverse connection, for example, “Activity (by the [ Account ]
column).”
c. In the [ Column ] field, specify the column of the connected object, for example, “Quantity.”
d. Click the [ Select ] button (Fig. 8).
Fig. 8 Selecting an aggregate column
© 2022 Creatio. All rights reserved.Work with record lists | 13
5. On the opened page, specify the display and filter parameters for the selected column (Fig. 9).
Fig. 9 The column setup page
6. Enter the caption for the column to be displayed, for example, “Number of activities.”
7. Specify the filter for data aggregating. For example, to display the number of activities, whose owner is the
current user, apply filtering by [ Owner ]: Current contact.
8. Click the [ Save ] button on the column setup page.
9. Save the column setup parameters.
As a result, the accounts list will display the number of activities of the current user for each account.
Sort records in a list
For convenience, the section records can be sorted by the values in the selected column in ascending or
descending order.
To sort records, select the [ Sort by ] command in the [ View ] menu. The columns displayed on the section page
are listed in the menu. The sorting order (ascending or descending) is indicated next to the name of the column
by which sorting is done. For example, all records of the [ Activities ] section can be sorted by the values in the
[ Due ] column in descending order (Fig. 10).
Fig. 10 Data sorting
© 2022 Creatio. All rights reserved.Work with record lists | 14
To sort records by column, select the [ Sort by ] command in the [ View ] menu. Then select the needed column.
Selecting the column repeatedly changes the sort order. To display the needed column in the menu, set up the
section list.
In the list view, you can quickly sort records by clicking the column caption (Fig. 11).
Fig. 11 Quick data sorting in the list view
Note. Creatio automatically saves sorting parameters for each user individually. To return to the default
sorting parameters, click [ Restore default settings ] in the user profile. In this case, all custom settings
including sorting will be discarded in all system sections.
Set up list summaries
Set up the summaries to display the summary information based on the data in the section columns. Select the
[ Set up summaries ] command in the [ View ] menu to manage summaries (Fig. 12).
Fig. 12 The [ Set up summaries ] option
© 2022 Creatio. All rights reserved.Work with record lists | 15
The configured summaries will be displayed in the top right part of the section area (Fig. 13).
Fig. 13 Summaries area in a section
Summaries are used to calculate:
the total number of records (available for all columns). For example, you can calculate the number of
registered customers in the [ Contacts ] section.
the minimum or maximum value in a column (available for numeric columns, date/time columns). For example,
in the [ Accounts ] section, you can find out the last date that a new company was added.
The sum or the average value in a column (for numeric columns only). For example, in the [ Activities ] section,
you can display the average activity duration.
If the section records are filtered (for example, a folder is selected, or one or more filters are applied), then
summaries will be calculated only for the filtered records. For example, if you want to calculate the number of
customers from New York, set the corresponding filter and display summaries (Fig. 14).
Fig. 14 Display of summaries for filtered records
© 2022 Creatio. All rights reserved.Work with record lists | 16
Calculate the number of records
To calculate the number of records:
1. Open the needed system section.
2. In the [ View ] menu, select the [ Set up summaries ] command.
3. Select the [ Display number of records ] checkbox on the opened page.
4. Click [ Save ].
5. As a result, the total number of system records will be displayed in the summary area.
Calculate the results by the column value
Described below is the procedure of setting up summaries by column values, using the average activity duration
value as an example. To set up:
1. Open the required section, for example, the [ Activities ] section.
2. In the [ View ] menu, select the [ Set up summaries ] command.
3. On the opened page, click the [ Add ] button.
4. In the list, select the numeric column the summaries should be displayed by, for example, “Duration
(minutes).” Click the [ Select ] button (Fig. 15).
Fig. 15 Selecting a column
© 2022 Creatio. All rights reserved.Work with record lists | 17
Note. To select a column of a subordinate object, click the button and select the needed subordinate
object from the list.
5. On the summary setup page, specify the display parameters for the summary information:
a. Select the function from the list for calculating data, for example, “Average.”
b. Enter the caption that will be displayed in the summary area, for example, “Average duration (minutes),”
and click the button.
c. Click the [ Save ] button to save the user settings (Fig. 16).
As a result, the average activity duration will be displayed in the summary area of the [ Activities ] section.
Fig. 16 Setting up summaries by column values of an object
To view summaries for specific records, apply a filter, or select a folder. For example, you can specify the
owner, activity category, and the required period.
Remove summaries
To remove summaries from the page, click the button next to the record in the summary area (Fig. 17).
Fig. 17 Canceling dashboards display
List FAQ
How many columns can I add to a section list?
Section lists can be displayed in either “list” or “tile” view.
The maximum number of columns displayed in the list view is 24. However, selecting a significant number of
columns may be uninformative since the visible area of the list depends on your monitor size. Also, the column
width depends on your monitor resolution. Column width may not be sufficient to display the information on
smaller monitors (768px, 1024px).
The number of columns displayed in the tile view is unlimited. However, selecting a significant number of
columns affects the overall performance of the system due to increased database loading times.
© 2022 Creatio. All rights reserved.Work with record pages | 18 We recommend selecting the optimal number of columns to display the most important data in the list. How do I quickly update the list without reloading the entire section page? If you make changes to the list (for example, if you modify filtering conditions or sort list entries) It may be necessary to quickly update the list without having to refresh the section page (by pressing the F5 button or using the "Reload" command). To update the list data, click on the name of the section (Fig. 18). Fig. 18 Updating the list data in the [ Activities ] section When I export data, a message that says "You have insufficient rights to operate” pops up You may have not configured access permission to the [ Export list records ] system operation. How to download detail values? Data from the detail can be exported with the [ Export to Excel ] command available from the actions menu of the detail (Fig. 19). Fig. 19 Exporting a detail list to Excel Work with record pages PRODUCTS: ALL CREATIO PRODUCTS All information about the record is available on its edit page. Information can be displayed as a field or detail. A field is an element displayed in the form of a certain value. The value can be specified in a textual, numeric, or logic format, in the format of date or time, and can also be selected from a list or a lookup. When selecting values from a list or a lookup, the system will offer a list of records starting with the entered value after entering a few characters. Similar fields can be grouped into field groups. You can minimize groups. © 2022 Creatio. All rights reserved.
Work with record pages | 19

A detail is an element about other objects connected to the selected record. Details are implemented are used
when the main record may be connected to more than one record object. For example, the information
connected to activity contact, addresses, documents, etc.

Visually, a detail is different from a group field due to the presence of the toolbar for managing data (update and
change records, sort, filter, configure details, etc)

The records in a detail can have their own edit pages.
Each record page consists of several blocks with structured details containing record data (Fig. 1). The page
contains:

    Record profile
    Connected information profile
    Page tabs
    Dashboard tile if it was added to the page by the user
    Toolbar

    Workflow bar and action panel (depending on the section)

Fig. 1 A record page

© 2022 Creatio. All rights reserved.
Work with record pages | 20 Record profile (1) The most important information about a record is displayed on the record page in the main sections of Creatio. Connected record block (2) Brief information about connected records, for example, client name, job title, and mobile phone number in the profile enables you to look through all the key data of the connected record on the page of the main record. A page can contain one or several profiles. If the connected record in the profile is not specified, you can select it from existing ones or create a new record. You can delete a record connection by clicking at the top right of the profile page. Workflow bar (3) In sections where records are maintained by a business process, a workflow bar is displayed. It enables you to see at what stage of the workflow a record is, and quickly move on to the next stage. This makes the case © 2022 Creatio. All rights reserved.
Work with record pages | 21
intuitive and simple and helps you to focus on moving forward.
The bar color changes depending on the stage. For example, the workflow bar is colored red if the opportunity is
moved to the [ Closed lost ] stage.
Note. Use the Case Designer to set up the workflow bar.
Action panel (4)
With the actions panel you can always see scheduled tasks and with just one click proceed to your activities,
work with email or the feed. You don't need to leave the main section because all the work with activity takes
place on the mini page.
For sections that use business processes or cases, you can also work with a list of tasks that are scheduled
automatically according to the process (case). You can, for example, approve a document (order, memo, etc.)
right from the action panel. You can work with the case, communicate with a client, or follow the opportunity
history and lead registration data at the same time.
Using the action panel, you can:
Schedule a task .
Send an email .
Create a case in the self-service portal .
Create a post in the record feed .
Message a contact through Facebook Messenger , WhatsApp , or Telegram chat.
Record call results .
The action panel displays the following:
Activities connected to a section object in a specific field. For example, in the lead action panel, only tasks that
contain the selected lead in the [ Lead ] field are shown.
Activities not in a final state.
Note. The activity is in its final state when the [ Final state ] checkbox is selected in the [ Activities states ]
lookup.
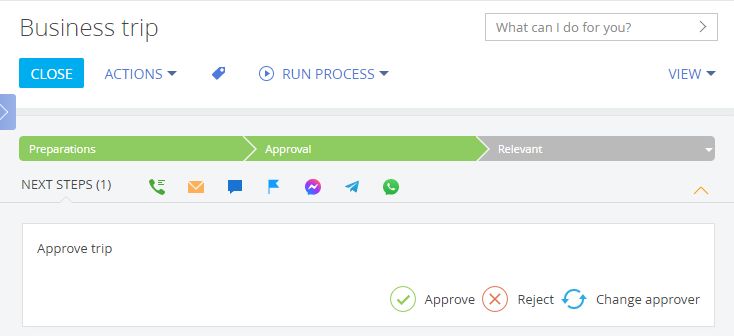
Approval in the “To set” status which is not canceled (Fig. 2).
Fig. 2 Approval on the action panel
© 2022 Creatio. All rights reserved.Work with record pages | 22
The action panel can contain other business process elements, such as user dialogs and other pages that the
process is supposed to open.
Page tabs (5)
Detailed information about the record is displayed on separate tabs. For example, the [ History ] tab contains the
history of activities, calls, and messages, and information about connected records. The [ Feed ] tab contains
user-published messages related to the record. These tabs contain fields, groups of fields, details, and
dashboards.
Toolbar (6)
The toolbar contains buttons to perform actions with the record.
You can save data, cancel changes, or close the page on the toolbar.
The Actions button enables you to set access rights and subscribe to updates for a selected record. With the
help of the action menu, you can also perform other tasks that depend on the section, for example, update a
contact with social network data, create an order based on opportunity, or send an invoice or order for
approval.
The Tags button enables you to set tags to make searching more convenient and to group records.
The Print button enables you to save information about a record in a separate file. Clicking the button opens a
list of print forms and reports available in this section. The list of data, displayed in the printed form, depends
on the section. After you select a report or a printed form, the information from the record page is stored in a
separate file in PDF format.
You can launch a process for the selected record by clicking the Run process button. The [ Run process ]
button is enabled only if the start of the business process for a section record is configured.
The View button opens the section wizard.
Page dashboards (7)
© 2022 Creatio. All rights reserved.Work with mini pages | 23 You can configure the displaying of dashboard tiles on any record page. A dashboard component displays the system data in various ways, for example, as a chart or a number. Adding of dashboard tiles on record pages is performed in the section wizard. Work with mini pages PRODUCTS: ALL CREATIO PRODUCTS Mini pages allow users to work with the essential data of a record without opening the record page. Use Creatio mini pages to add (Fig. 1), edit (Fig. 2), and view record data. The set of fields is different for each type of mini page and is configured separately. Mini pages and mini-page layout are configured in the Section wizard. You can add a mini-page to any Creatio section. Fig. 1 Adding a new record via mini page Hover the mouse pointer over a record hyperlink to display a mini page. Mini pages only contain fields filled in the record page. Fig. 2 Account mini page With mini pages, you can perform the basic actions available on the edit pages of the corresponding records, © 2022 Creatio. All rights reserved.
Search records and run commands | 24

such as view the phone number, send an email or go to the connected records. If a specific field is not available
on the mini page or if you need to populate the details, click        in the top right corner of the mini page to open the
main record page.
The user can click          in the top right corner of the mini page to edit the record.
You can exit the edit mode by clicking the          button or pressing the “Esc” key.

Search records and run commands
PRODUCTS:         ALL CREATIO PRODUCTS

Use Creatio command line (the field labeled “What can I do for you?”) to quickly access the frequently used
operations, such as opening a record page or running a business process.

The command line is similar to the search line of web search engines. For example, enter the name and click
 or press the [ Enter ] key, to find a contact record.

Execute other commands in the same way. For example, enter the command “Create Contact” to instantly open
a new contact page or “Run Process” to launch the corresponding business process. The command line can
recognize several variations of the same command. For example, both the “Create Contact“ and the “Add
Contact“ are valid commands.
If you enter a partial command, the system will offer you a list of several options. For example, if you enter
“Create A”, the system will offer the following options: “Create Account” and “Create Activity”.
You can search the system data by entering a search query in the command line. Creatio always searches in all
sections (including custom sections).
Localizable data in search results can be displayed in the language of the user. For example, if the [ Full name ]
field is localized, French users will see its value in French, and English users will see it in English.

    Note. On-site users need to perform preliminary registration of the global search. Learn more in the
    “Global search setup” article.

Search records
    Command line search utilizes the global search feature. The records are searched by their text and lookup
    fields as well as the following details: [ Addresses ], [ Communication options ] , and [ Banking details ]. For
    example, you can find an account by its alternative name, phone number, address, or account number.
    Files and links on the [ Attachments and notes ] tab of the record page can be found by their name or
    description.
    Search requests are processed taking into account common typos and morphology of different word forms
    in English (other languages are not currently supported). The query is not case-sensitive. You only need to
    enter the search text, for example, contact last name or the name of the knowledge database article. For a
    more accurate search, add more details to your search query, for example, “Ronald young director future
    vision".

© 2022 Creatio. All rights reserved.
Search records and run commands | 25
Note. To include certain section’s data in global search results, open the section wizard for the necessary
section and select the [ Indexing for full-text search ] checkbox. Learn more about indexing in the
“Configure section properties” article.
The search results are displayed as a list of records containing the text of the search query or a part of it. The
text that matches the search query is highlighted in bold for each found record (Fig. 1).
Fig. 1 A list of search results
The results are ranked by relevance both in the actual results list and with any configured filters. For example, if
the search is performed from the [ Contacts ] section the records of this section are displayed at the beginning
of the list, and records from other sections of the system will be displayed below. For example, if you set up a
filter by contact on the search result page, contacts with matching names will be displayed at the top of the list.
If a user does not have permissions for a specific object column, e.g., for viewing an invoice amount, such
column is not displayed on the page of global search results.
Example. Let's find a contact by its phone number.
1. Enter the phone number in any format in the command line. You can enter only part of the number, with or
without special delimiter characters.
2. Click or press the [ Enter ] key.
After processing the search query, a list of results will be displayed with the contact you were looking for at
the top of the list and other records that contain the entered phone number afterward.
Set up global search
Select the “Show localized data in the global search results” system setting (UseLocalizableGlobalSearchResult) to
display localizable data in the search results. If the setting is disabled, localized data will be displayed according
to the language selected for the system user specified in the “System operations user” system setting
(SystemUser).
© 2022 Creatio. All rights reserved.Search records and run commands | 26
Note. Data localization is enabled using development tools. Read more in the “Enabling multi-language
object schema” article.
The rules for displaying search results are determined using the [ Global search default entity weight ]
(GlobalSearchDefaultEntityWeight) and [ Global search default primary column weight ]
(GlobalSearchDefaultPrimaryColumnWeight) system settings.
Enable the [ Display search results with partial match ] system setting (UseInexactGlobalSearch) to display search
results accounting for morphology, typos, and fuzzy matches.
Set a value for the “Match threshold for displaying in search results (percent]” system setting
(GlobalSearchShouldMatchPercent) to manage the number of displayed search results with a partial match and
increase the chances of finding data for inaccurate search requests.
Go to sections
You can use the [ Go to section ] command of the command line to quickly display the contents of any folder in
any section. For example, while working with the [ Activities ] section, you can easily open the “Customers” folder
in the [ Accounts ] section. To do this, enter the command: “Go to section Accounts Customers”.
When you enter the command, the drop-down list will display commands for opening other folders in that
particular section.
Add records
To create records from the command line, use the [ Add ] command. When you enter it, the drop-down list will
display commands for creating records in various sections, such as “Add Activity”, “Add Contact”, etc.
The name of the new record can also be specified as part of the command. For example, enter “Add Contact
Jones” to create a contact whose last name is “Jones”. As a result, a contact page will be opened containing
“Jones” in the [ Full name ] field.
Run business processes
To start a business process, enter the [ Run process ] command and the process name in the command line. For
example, if there is a “New employee registration“ process set up in the system, enter the “Run process New
employee registration“.
Note. The list of processes available for selection in the command line is defined in the [ Process library ]
section. Managing your business processes is described in the “BPMN process administration” guide.
Set up custom commands
To create new commands for the command line, enter "create custom command." You can specify the command
text (for example, “My tasks”), select the keyword (for example, “Go to section”), and then stipulate additional
parameters depending on the selected keyword (for example, you can choose the [ Activities ] section and
dynamic folder “My tasks”).
© 2022 Creatio. All rights reserved.Check timelines | 27
Keywords represent types of operations that can be performed by the command line.
Search – for finding records.
Go to section – for navigating through sections and folders.
Add – for creating records in system sections.
Run process – for launching a business process.
Note. If any objects were configured in the system, for example, new sections were renamed or added,
then to make them appear in the command line, execute the "Generate metadata for command line
macros" action in the system settings page. This action is available by clicking the button in the right
upper corner of the advanced settings page.
Log out of Creatio and log back in to make the newly registered command available in the command line.
Check timelines
PRODUCTS: ALL CREATIO PRODUCTS
Use the timeline to get chronological insights into your customer history. The Timeline tab (Fig. 1) provides quick
access to information about tasks, communications, additional materials, and other linked objects in Creatio.
This tab is available by default in the following sections:
[ Contacts ]
[ Accounts ]
[ Leads ]
[ Opportunities ]
[ Cases ].
Fig. 1 Example of the [ Timeline ] tab
© 2022 Creatio. All rights reserved.Check timelines | 28
Note. You can add the [ Timeline ] tab to other Creatio sections using developer tools. Read more >>>
The timeline displays linked records in chronological order. The following types of records are displayed on the
timeline:
tasks
calls
emails
feed messages
files
links
contracts
documents
projects.
In some sections, the timeline displays additional types of records. The timeline content is determined by the
Creatio product and section specifics. For example, in bank products, the history of the customer's cases,
invoices, and cards is also displayed in the timeline.
Timeline controls:
– apply filter by date
– apply filter by record type
The records on the [ Timeline ] tab are displayed as a list. Click a record title or the button to open the
connected record.
Depending on the text volume, the list records may be displayed in a “collapsed” view mode. You can expand a
collapsed record by clicking the [ Show more ] button.
© 2022 Creatio. All rights reserved.Check timelines | 29
The timeline records are grouped by months. By default, newer records are displayed first. You can sort records
by date in ascending or descending order using the [ Date ] or the [ Date ] buttons.
Filter the timeline
The following quick filters are available in the timeline:
by date
by assignee
by linked object type
The number over the pipeline icon indicates the number of timeline record types currently selected. (Fig. 2).
Fig. 2 Applying filter by timeline record type
Search the timeline
Use the search string on the [ Timeline ] tab to find timeline records quickly. The search string looks up for feed
messages and email texts (Fig. 3).
Fig. 3 Search by the keyword
© 2022 Creatio. All rights reserved.Work with attachments | 30
Refreshing or closing the page will reset the timeline search.
Work with attachments
PRODUCTS: ALL CREATIO PRODUCTS
To work with additional information in Creatio, use the Attachments and notes tab. The tab contains the
[ Attachments ] and [ Notes ] details.
Use these details to store external files, links to web resources, and extended descriptions of the record. The tab
is available in all system sections. For example, in the [ Contacts ] section, you can add documents that represent
the history of your interactions with the contact; in the [ Activities ] section, add files that have been prepared
within a task.
The [ Attachments ] detail has the following views:
– the tile view. In this view, the files and links added to the detail are displayed as icons. The icon appearance
varies depending on the file extension.
Note. The icons for different file types can be set up in the [ File extension ] lookup. For the files whose
types are undefined in the lookup, a default icon is used.
– the list view. In this view, the files and links added to the detail are displayed as a list of records. Use this
view to delete a file or edit a link.
© 2022 Creatio. All rights reserved.Work with attachments | 31
Attach files to records
1. Open the needed record, for example, the activity page. Open the [ Attachments and notes ] tab.
2. On the [ Attachments ] detail, click the [ Add file ] button. You can also drag the file and drop it into the detail
(Fig. 1).
Fig. 1 Dragging a file into the [ Attachments ] detail
As a result, the selected file will be saved on the detail.
Add external links as record attachments
1. On the [ Attachments ] detail, in the menu, select the [ Add link ] option.
2. On the displayed page, enter the link address in the [ Name ] field and save the page.
As a result, the link will be added to the detail.
3. If you need to edit the link, in the list view, click on it and select the [ Change properties ] option from the
menu.
Add a link to knowledge base articles
1. On the [ Attachments ] detail, select the [ Add link to knowledge base ] option from the menu.
2. In the displayed window, select the needed knowledge base article and click the [ Select ] button.
As a result, the selected link to the knowledge base article will be added to the detail.
Download attachments
To download the file that has been added to the [ Attachments ] detail, click its title. Specify the location to save
the file to.
Delete a file from the [Attachments] detail
1. Open the list view by clicking the button.
© 2022 Creatio. All rights reserved.Work with currencies | 32
2. Select the file, and then select the [ Delete ] option from the menu.
Add notes to files
The [ Notes ] detail is used to store additional text information about the section record. On the detail, you can
edit and format the text of the notes using the built-in formatting tools. You can also add an image or an external
link to the detail.
If you switch to another tab of the page, the information on the [ Notes ] detail will be saved. To save the notes,
save the record.
Work with currencies
PRODUCTS: SALES CREATIO FINANCIAL SERVICES CREATIO
In Creatio, you can store monetary values in multiple currencies. The values that you enter will be automatically
converted to different currencies according to the exchange rates. These functions are available in products with
the [ Products ], [ Orders ], [ Invoices, ] and [ Contracts ] sections.
The currencies are used in special “currency fields”.
Select currency
In Creatio, you can enter monetary amounts in the special currency fields. For example, you can specify a
product price in a “currency” field.
Currency fields store both the monetary amount and the currency in which this amount is specified. Click a
currency field title to view the list of available currencies. The list contains currencies that are available in the
[ Currency ] lookup (Fig. 1).
Fig. 1 Selecting currency from the list in the currency field
Note. If the [ Currency ] lookup contains only one record, the list of currencies in the currency field will be
unavailable.
If you change the currency in a populated currency field, the amount will be automatically converted to the new
value according to currency exchange rates.
© 2022 Creatio. All rights reserved.Work with currencies | 33
Note. Read more about how Creatio converts currencies in a separate article.
Clicking the button in the currency field displays an additional edit window (Fig. 2).
Fig. 2 Additional currency field edit window
In this window you can:
View the equivalent of the specified monetary amount in the base currency in the [ Amount ] field. This is a
non-editable field.
Change the currency of the monetary amount (will be recalculated automatically).
Edit the exchange rate of a currency to the base currency, the amount will be recalculated automatically. The
new rate will be in effect only for the current record.
Note. Use the [ Base currency ] system setting to specify the “base currency”. All exchange rates will be
calculated according to the base currency.
View the value of the multiplicity ratio between the specified currency and the base currency when determining
the exchange rate.
Note. When you select the base currency, the [ Rate ] field is automatically filled in with the “1” value and
becomes grayed-out.
To save changes in the additional window, click the [ Apply ] button or anywhere outside of the currency field edit
window.
Work with currency conversion
You can work with various currencies in Creatio. The conversion is performed automatically, taking into account
the conversion currency exchange rate to the base currency and multiplicity ratio.
The base currency is the currency based on which the rate for all other currencies is set. Use the [ Base
currency ] system setting to select a base currency.
The conversion currency is any other currency to which the money is converted.
© 2022 Creatio. All rights reserved.Work with currencies | 34
The exchange rate determines the conversion currency amount in the base currency.
The multiplicity ratio indicates how many monetary units of the base currency correspond to the set
exchange rate.
The exchange rate and ratio of the currency are specified in the [ Currencies ] lookup (Fig. 3).
The exchange rate of the conversion currency is specified in terms of the base currency taking into account the
ratio. Currency rates are automatically re-calculated according to their base currency exchange rates and ratio.
For example, if the Yen is the base currency and the USD will have the 56537.3 exchange rate value for the 1000
ratio in the [ Currencies ] lookup, the exchange rate will be displayed in the additional window of the currency field
as 17.6874 USD for 1000 Yen.
Fig. 3 – Possible content of the [ Currencies ] lookup
Note. The [ Currencies ] lookup structure is described in a separate chapter. Use the “Base currency”
system setting to select a base currency.
Set up exchange rates
Set up the exchange rates for proper currency conversion towards the base currency. To do this:
1. Open the [ Currencies ] lookup.
2. Set the “1” value for the rate of the base currency.
3. Select the currency to set up the rate (for example, euro). Click .
4. On the opened currency settings page, set the ratio, for example, “1000”.
Note. For a more accurate calculation of prices during conversion, specify a high ratio for currencies,
for example, “1000”.
5. Specify the exchange rate between the current currency and the base currency in the [ Rate ] field,
considering the ratio. Save the changes.
Example. If the base currency is yen and the euro to yen ratio is 63.9655, specify the “63965.5” as the
exchange [ Rate ] and “1000” as the [ Ratio ].
© 2022 Creatio. All rights reserved.Work with currencies | 35
6. Repeat steps 3 through 7 for all currencies specified in the lookup.
Update all data in the lookup if the exchange rates are changed,
Calculate exchange rates using a ratio
The following formula is used for calculating exchange rates in Creatio:
[ Rate ]=[ Amount in conversion currency ]*[ Ratio ]/[ Amount in base currency ]
Example. 1000 Japanese yen is worth 0.84 US Dollars. Yen is selected as the base currency and the dollar
ratio is 100. The actual conversion is as follows:
[ Rate ]=19.40*100/1000=1.94
Thus, when the ratio is 100, the US dollar exchange rate to yen is 1.94
Currency conversion
When converting monetary amounts from the base currency into another currency, use the following formula:
[ Amount in conversion currency ]=[ Rate ]*[ Amount in base currency ]/[ Ratio ]
For example, 1,000 yen must be converted to US dollars. Yen is selected as the base currency, the USD / yen
exchange rate is 1.94 and the ratio is 100. The actual conversion is as follows:
[ Amount in conversion currency ]=1.94*1000/100=19.4
Thus, the amount of 1000 yen is equal to 19.40 USD.
When converting monetary amounts from one currency to another, calculations are made based on the base
currency. The following formula is used:
[ Amount in conversion currency(2) ]=[ Amount in conversion currency(1) ]*[ Ratio(1) ]*[ Rate(2)
For example, USD 100 must be converted to euro Yen is selected as the base currency. The dollar/yen exchange
rate is 1.94, with a ratio of 100, and the euro/yen exchange rate is 1.73, with a ratio of 100. The actual
conversion is as follows:
© 2022 Creatio. All rights reserved.Work with currencies | 36
[ Amount in euro ]=100*100*1.73/100*1.94=89.2
Thus, USD 100 is converted to EUR 89,20.
Calculate product price in an order
Let's see how the product price is calculated in order.
Example. The order currency is yen. Add a product with the price is specified in US dollars to the order.
The base system currency is the yen, the ratio of the US dollar is 100, the product price is USD 14.6.
Click on the [ Products ] detail to add products to the order. On the product selection page, all products are
priced in the currency used for the order (Fig. 4). In this case, “yen”.
Fig. 4 The ordered product selection page
For the products with the base price specified in foreign currency, the product price is automatically converted to
the base currency according to the current exchange rate specified as follows:
[ Product price ]*[ Ratio ]/[ Exchange rate ] – 14.6*100/1.5092=967.40
As a result, a new product will be added to the detail. The price of the product will be specified in yen. The [ Price ]
and [ Total ] fields are populated automatically and are not available for editing.
Manage currencies
This lookup contains a list of currencies used in mutual payments with customers, partners, suppliers, and the
like.
© 2022 Creatio. All rights reserved.Work with currencies | 37
Name [ Name ] – indicate the name of the currency, for example, “US Dollar” or “Euro”.
Code Specify a banking code that is used for a specific currency, for example, the US dollar
code is 840.
Short Shortened currency name, such as “USD” or “EUR”.
name
Symbol Currency symbol, such as “$” or “€”.
Ratio Specify the currency amount for which the exchange rate will be calculated (for example,
1, 10, 100).
Description Additional information about the currency.
Show Choose the appropriate option from the drop-down list. Choose [ on the left ] or [ on the
currency right ] options to display the sign before or after the amount.
sign
[Exchange rate] detail
Information about exchange rates is stored on the [ Exchange rate ] detail.
Start The starting date for the exchange rate. The start date of a new exchange rate is
considered the end date of the previous exchange rate.
Exchange The exchange rate between the base currency and the current currency. Enter a value
rate according to the currency ratio, specified in the currency card. The value for the base
currency must be set to “1”.
End The ending date for the exchange rate. Populated automatically, when the starting date of
the new exchange rate is set. This is a non-editable field.
Note. The base currency is used to calculate the financial performance indicators, for example, it can be
“US Dollar”. Use the “Base currency” system setting to select a certain base currency.
Currencies FAQ
How to calculate the price of the product in an opportunity, if the base
price list is listed in US dollars, and the base system currency is the Yen?
The price of a product in opportunity is always converted to the system base currency. When the product is
added to the opportunity the automatic conversion of the product price to the base currency is performed
according to the exchange rate specified in the [ Currencies ] lookup. The page of a product in the opportunity
© 2022 Creatio. All rights reserved.Keyboard shortcuts | 38
displays the product price for one unit and the total price of products specified in base currency and calculated
according to the exchange rate available at the date of the offer. These data will be displayed in the order created
based on an opportunity.
If the exchange rate has changed dramatically before order creation, remove the obsolete product data from the
opportunity after the agreement with the customer. When you re-add the product to the opportunity, its price
and total cost will be recalculated according to the current exchange rate.
How the currency conversion is performed in orders?
Currency conversion in order occurs when you select or change the order currency. When adding products to
the order, their prices will be automatically converted into the currency indicated on the order page at the current
exchange rate. In case of changing the currency of an already created order, the prices and the total amount
specified on the [ Products ] tab of the order page will be converted to the new currency. More information about
the price calculation of a product in an order is described in a separate article.
Can I use different currencies for orders and their invoices?
Yes, you can. For example, when selling products or services to foreign customers, you can keep information on
products in an opportunity and order in the base currency and still issue invoices in the corresponding foreign
currency at the exchange rate available on the date of invoice.
Keyboard shortcuts
PRODUCTS: ALL CREATIO PRODUCTS
This article lists keyboard shortcuts available in Creatio (a.k.a. “Hotkeys”). Using keyboard shortcuts improves
your efficiency by decreasing the time spent on frequent micro-operations, such as saving mini pages, navigating
lists, working with the campaign designer.
In the below table, you can find the most often used keyboard shortcuts.
Note. The table contains the shortcuts used for Windows OS. For Mac OS, use the “Command” key
instead of “Ctrl”
Section list
© 2022 Creatio. All rights reserved.Keyboard shortcuts | 39
Select multiple adjacent records. Shift + click the
Click the first record, press and hold the Shift key, and then click the last record
record.
Select multiple separate records. Ctrl + click the record
Move up and down the record list. One of the records in the list has to be ↑ and ↓
selected.
Open the selected record. Enter
Save the record after editing. Ctrl + Enter
Ctrl + S
Confirm the action in the dialog windows. Enter
Mini page
Move the cursor to the next field. Tab
Move the cursor to the previous field. Tab + Shift
Save the mini page. Shift + S
Ctrl + S
Close the mini page without saving. Esc
Tags
Navigate between tags. ↑ and ↓
To display the full list of tags, press ↓ in the tag selection string.
Select and apply tags. Enter
Global search
Search for currently entered value. Enter
The Activities section
© 2022 Creatio. All rights reserved.Keyboard shortcuts | 40
Navigate the tasks in chronological order. To do this, select the task and press the key. Tab
Move the selected task up and down the calendar. ↑ and ↓
Move the selected task to the previous or next day. ← and →
The Dashboards section
Close the opened dashboard tile. Esc
The CTI panel tab in the communication panel
Dial the number entered manually. Enter
Content Designer
Close a modal window, close a popup window, unfocus an input field, navigate to the parent Esc
element of an email template.
© 2022 Creatio. All rights reserved.You can also read